Adata GAMMIX S70 BLADE Manual do proprietário
- Tipo
- Manual do proprietário


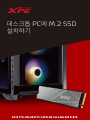
INSTALLING AN M.2 SSD ON A DESKTOP PC
Chinese traditional
Chinese simple
English
German
Japanese
Korean
Portuguese
Russian
Romanian
Spanish
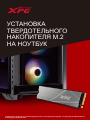
INSTALLING AN M.2 SSD ON A LAPTOP PC
Chinese traditional
Chinese simple
English
German
Japanese
Korean
Portuguese
Russian
Romanian
Spanish
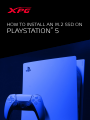
HOW TO INSTALL AN M.2 SSD ON PLAYSTATION® 5
English
INDEX
03
07
11
15
19
23
27
31
35
39
43
47
51
55
59
63
67
71
75
79
83

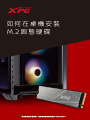
如何在桌機安裝
M.2 固態硬碟
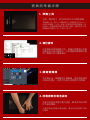
封面產品圖片僅示意,此說明書適用於所有XPG M.2 SSD。

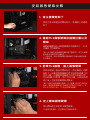
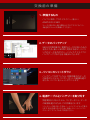
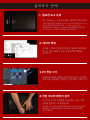
更換前準備步驟
1. 準備工具
*請準備一支一般大小的螺絲起子(牙頭直徑約3.5mm),
用來拆卸機殼;以及一支較小的拿來拆卸固態硬碟,由
於鎖M.2 固態硬碟的螺絲是比較小顆的,螺絲起子的牙
頭建議使用直徑1.85-1.98mm左右。
主機、螺絲起子、新的ADATA M.2固態硬碟。
2. 備份資料
在更換新的固態硬碟之前,建議先將電腦中的資
料備份到外接式硬碟中。
3. 請確實關機
完成備份後,請確實將主機關機,避免更換過程
中資料的遺失,或是對系統及各零組件的損害。
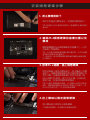
4. 關閉主機後方的電源鍵,並將電源
線拔除
*每一台主機的電源鍵位置不盡相同,請參照該主機的使
用者說明書。
此動作是避免微量的電流通過,會造成系統及零
件合資料損害。
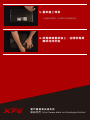
*建議另外準備一顆外接式硬碟,讓更換固態硬碟的過程
不會遺失任何重要資料。

*每一台主機的固態硬碟插槽位置不盡相同,也可以參閱
使用者手冊尋找該位置所在。
**一般來說,固定固態硬碟的螺絲會在主機出廠時裝載
在主機板上。
*請小心握住固態硬碟的側面,M.2插槽上的接口有防呆
設計,請依固態硬碟金手指與接口對應之方向插入,如
有干涉切勿強行插入,以免造成產品損壞。
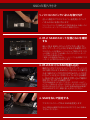
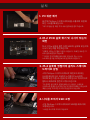
安裝固態硬碟步驟
使用正常牙頭直徑的螺絲起子,將機殼上的螺絲
取下。
2. 確認M.2固態硬碟的插槽位置以及
螺絲
確認新購買的M.2固態硬碟符合插槽大小,以及
主機板上有無螺絲。
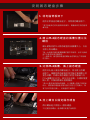
3. 對準M.2插槽、插上固態硬碟
使用牙頭較小直徑的螺絲起子,將主機板上的螺
絲取下,接著將固態硬碟的金手指對準插槽上的
金色凹槽,並確認固態硬碟上的金手指缺口與
PCIe插槽凹口對齊,表示方向正確,以傾斜角度
插入後,並推到底確認裝得穩妥。
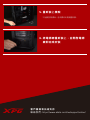
4. 拴上螺絲固態硬碟
*勿過度拴緊螺絲,造成螺牙或是產品毀損。
再以螺絲起子固定M.2固態硬碟。
1. 將主機機殼卸下

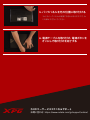
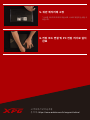
5. 重新裝上機殼
*勿過度拴緊螺絲,造成螺牙或是背蓋毀損。
6. 將電源線重新裝上,並開啟電源
鍵即完成安裝
客戶服務和技術支持
聯絡我們: https://www.adata.com/tw/support/online/

如何在台式電腦安裝
M.2固態硬盤
封面产品图片仅示意,此说明书适用于所有XPG M.2 SSD。

更換前準備步驟
1. 準備工具
*請準備一支一般大小的螺絲起子(牙頭直徑約3.5mm),
用來拆卸机箱;以及一支較小的拿來拆卸固態硬盤,由
于鎖M.2 固態硬盤的螺絲是比較小顆的,螺絲起子的牙
頭建議使用直徑1.85-1.98mm左右。
*建議另外准備一顆外接式硬盤,讓更換固態硬盤的過程
不會遺失任何重要數据。
電腦主机、螺絲起子、新的ADATA M.2固態硬盤。
2. 備份數據
在更換新的固態硬盤之前,建議先將電腦中的數
據備份到外接式硬盤中。
3. 請確認關機
完成備份后,請確認已將主機完全關閉,而非休
眠。避免更換過程中數據的遺失,或是對系統及
各零組件的損害。
4. 關閉主机后方的電源開關,并將電
源線拔除
*每一台主机的電源開關位置不盡相同,請參照該主机的
用戶說明書。
此動作是避免微量的電流通過,會造成系統及零
件和數據損害。

*每一台主机的固態硬碟插槽位置不盡相同,也可以參閱
用戶手冊尋找該位置所在。
**一般來說,固定固態硬盤的螺絲會在筆電出廠時裝載
在主板上。
*請小心握住固態硬盤的側面,M.2插槽上的接口有防呆
設計,請依固態硬盤金手指與接口對應之方向插入,如
有干涉切勿強行插入,以免造成產品損壞。
安裝固態硬盤步驟
使用正常牙頭直徑的螺絲起子,將側板上的螺絲
取下。
2. 確認M.2 固態硬盤的插槽位置以及
螺絲
確認新購買的M.2固態硬盤符合插槽大小,以及
主板上有無螺絲。
3. 對準M.2 插槽、插上固態硬盤
使用牙頭較小直徑的螺絲起子,將主板上的螺
絲取下,接著將固態硬盤的金手指對準插槽上的
金色凹槽,並確認固態硬盤上的金手指缺口與
PCIe插槽凹口對齊,表示方向正確,以傾斜角度
插入后,並推到底確認裝得穩妥。
4. 擰上螺絲以固定固態硬盤
*勿過度擰緊螺絲,造成螺牙或是產品毀損。
再以螺絲起子固定M.2固態硬盤。
1. 將机箱側板卸下

5. 重新裝上机箱側板
*勿過度擰緊螺絲,造成螺牙或是背蓋毀損。
6. 將電源線重新裝上,並開啟電源
鍵即完成安裝
客戶服務和技術支持
聯絡我們: https://www.adata.com/cn/support/online/

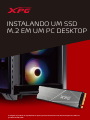
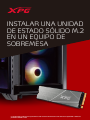
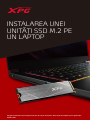
INSTALLING A M.2 SSD
ON A DESKTOP PC
The cover product image is for illustration purposes only. This manual is applicable to all XPG M.2 SSD products.2 pr

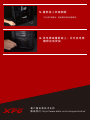
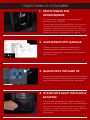
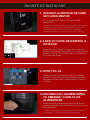
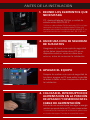
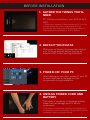
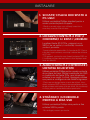
1. GATHER THE THINGS YOU'LL
NEED
*Please use a standard Phillips screwdriver (3.5mm) for
disassembling the case; and a smaller Phillips screwdriver
for installing the M.2 solid state drive as it uses screws
with a diameter of 1.85-1.98mm
PC, Phillips screwdrivers, and ADATA M.2
SSD
2. BACK UP YOUR DATA
Make sure to backup the important data on
your PC to an external device, such as an
external HDD, before starting installation.
3. POWER OFF YOUR PC
After backing up your data, power off your PC
to avoid data loss or damage to other
components during installation.
4. SWITCH OFF THE POWER
SWITCH AND UNPLUG POWER
CORD
*The location of the power switch may vary by PC,
please check your user manual.
This action is necessary to discharge residual
power that can damage your PC and its
components.
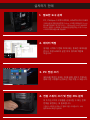
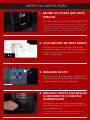
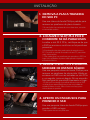
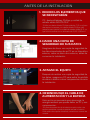
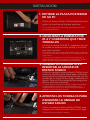
BEFORE INSTALLATION

*The location of slots may vary by PC. Please check your
PC's user manual for more information.
**Generally speaking, the screws that secure the SSD in
place will be installed on the motherboard when the PC is
shipped from the factory.
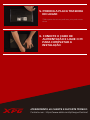
* The slot has a foolproof design. Please insert the SSD
in the direction corresponding to the pins on the solid
state drive and the slot. Do not insert it forcibly to avoid
damage to the product.
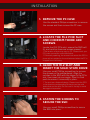
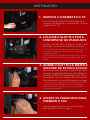
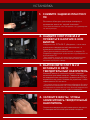
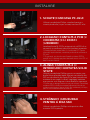
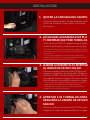
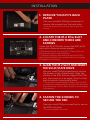
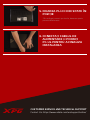
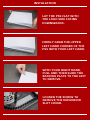
INSTALLATION
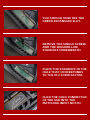
Use the standard Philips screwdriver to remove
the screws and then remove the PC case
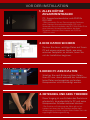
2. LOCATE THE M.2 PCIE SLOT
AND CONFIRM THERE ARE
SCREWS
Locate the M.2 PCIe slot, ensure the SSD will
fit, and confirm there are screws present.
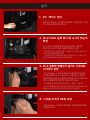
3. ALIGN THE M.2 SLOT AND
INSERT THE SOLID STATE DRIVE
Use your small Phillips screwdriver to remove
the screws on the motherboard. Align the
notches in the SSD with the ridges in the PCIe
slot, then insert at a an angle. Give it a final
push to ensure it is securely in place.
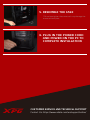
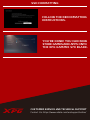
4. FASTEN THE SCREWS TO
SECURE THE SSD
Use your small Phillips screwdriver to secure
the SSD into place.
1. REMOVE THE PC CASE

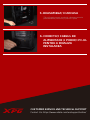
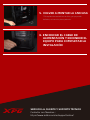
5. RESEMBLE THE CASE
*Do not overtighten the screws as it may damage the
screws ad back plate
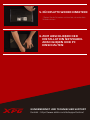
6. PLUG IN THE POWER CORD
AND POWER ON THE PC TO
COMPLETE INSTALLATION
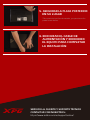
CUSTOMER SERVICE AND TECHNICAL SUPPORT
Contact Us: https://www.adata.com/en/support/online/

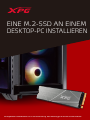
EINE M.2-SSD AN EINEM
DESKTOP-PC INSTALLIEREN
Das abgebildete Produktbild dient nur zur Veranschaulichung. Diese Anleitung gilt für alle XPG M.2 SSD-Produkte.

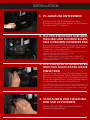
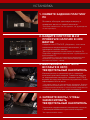
VOR DER INSTALLATION
1. ALLES NÖTIGE
ZUSAMMENTRAGEN
*Bitte verwenden Sie zur Demontage des Gehäuses
einen Standard-Kreuzschraubendreher (3,5 mm).
Verwenden Sie zur Installation des M.2-Solid-State-Drive
einen kleineren Kreuzschraubendreher, da dieser
Schrauben mit einem Durchmesser von 1,85 bis 1,98
mm nutzt
PC, Kreuzschraubendreher und ADATAs
M.2-SSD
2. IHRE DATEN SICHERN
Denken Sie daran, wichtige Daten auf Ihrem
PC auf einem externen Gerät, wie einer
externen Festplatte, zu sichern, bevor Sie
mit der Installation beginnen.
3. IHREN PC ABSCHALTEN
Schalten Sie nach Sicherung Ihrer Daten
Ihren PC aus, damit während der Installation
keine Daten verlorengehen und andere
Komponenten nicht beschädigt werden.
4.
NETZSCHALTER AUSSCHALTEN
UND NETZKABEL TRENNEN
*Die Position des Netzschalters kann je nach PC
variieren. Beachten Sie bitte Ihre Bedienungsanleitung.
Dieser Vorgang ist zum Entladen des Reststroms
erforderlich, da andernfalls Ihr PC und seine
Komponenten Schaden nehmen könnten.

*Die Position der Steckplatze kann je nach PC variieren.
Weitere Informationen finden Sie in der
Bedienungsanleitung Ihres PCs.
**Im Allgemeinen sind die Schrauben, die die SSD
sichern, am Motherboard installiert, wenn der PC ab
Werk geliefert wird.
*Der Steckplatz hat ein narrensicheres Design. Bitte setzen Sie
die SSD entsprechend den Kontakten an Solid-State-Drive und
Steckplatz ein. Setzen Sie sie nicht gewaltvoll ein. Andernfalls
könnte das Produkt beschädigt werden.
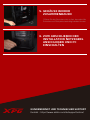
INSTALLATION
Entfernen Sie die Schrauben mit dem
Standard-Kreuzschraubendreher und entfernen
Sie dann das PC-Gehäuse
2.
M.2-PCIE-STECKPLATZ AUSFINDIG
MACHEN UND SICHERSTELLEN,
DASS SCHRAUBEN VORHANDEN SIND
Machen Sie den M.2-PCIe-Steckplatz ausfindig.
Stellen Sie sicher, dass die SSD passt und
Schrauben vorhanden sind.
3.
M.2-STECKPLATZ AUSRICHTEN
UND DAS SOLID-STATE-DRIVE
EINSETZEN
Entfernen Sie mit Ihrem kleinen Kreuzschraubendreher die
Schrauben am Motherboard. Richten Sie die Kerben in der
SSD an den Vorsprüngen im PCIe-Steckplatz aus. Setzen
Sie sie dann angewinkelt ein. Drücken Sie abschließend,
um sicherzustellen, dass sie richtig platziert ist.
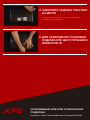
4. SCHRAUBEN ZUR FIXIERUNG
DER SSD FESTZIEHEN
Sichern Sie die SSD mit einem kleinen
Kreuzschraubendreher.
1. PC-GEHÄUSE ENTFERNEN

5. GEHÄUSE WIEDER
ZUSAMMENBAUEN
*Ziehen Sie die Schrauben nicht zu fest, da andernfalls
Schrauben und Rückplatte beschädigt werden könnten
6. ZUM ABSCHLIEßEN DER
INSTALLATION NETZKABEL
ANSCHLIEßEN UND PC
EINSCHALTEN
KUNDENDIENST UND TECHNISCHER SUPPORT
Kontakt : https://www.adata.com/de/support/online/

M.2 SSD
カバーの商品画像はイメージです。このマニュアルはXPGのすべてのM.2 SSD製品に適用されます。

1.
*
3.5mm M.2 SSD
SSD1.85 1.98mm
ADATA
M.2 SSD
2.
SSD
SSD
3.
4.
*
A página está carregando...
A página está carregando...
A página está carregando...
A página está carregando...
A página está carregando...
A página está carregando...
A página está carregando...
A página está carregando...
A página está carregando...
A página está carregando...
A página está carregando...
A página está carregando...
A página está carregando...
A página está carregando...
A página está carregando...
A página está carregando...
A página está carregando...
A página está carregando...
A página está carregando...
A página está carregando...
A página está carregando...
A página está carregando...
A página está carregando...
A página está carregando...
A página está carregando...
A página está carregando...
A página está carregando...
A página está carregando...
A página está carregando...
A página está carregando...
A página está carregando...
A página está carregando...
A página está carregando...
A página está carregando...
A página está carregando...
A página está carregando...
A página está carregando...
A página está carregando...
A página está carregando...
A página está carregando...
A página está carregando...
A página está carregando...
A página está carregando...
A página está carregando...
A página está carregando...
A página está carregando...
A página está carregando...
A página está carregando...
A página está carregando...
A página está carregando...
A página está carregando...
A página está carregando...
A página está carregando...
A página está carregando...
A página está carregando...
A página está carregando...
A página está carregando...
A página está carregando...
A página está carregando...
A página está carregando...
A página está carregando...
A página está carregando...
A página está carregando...
A página está carregando...
A página está carregando...
A página está carregando...
A página está carregando...
A página está carregando...
-
 1
1
-
 2
2
-
 3
3
-
 4
4
-
 5
5
-
 6
6
-
 7
7
-
 8
8
-
 9
9
-
 10
10
-
 11
11
-
 12
12
-
 13
13
-
 14
14
-
 15
15
-
 16
16
-
 17
17
-
 18
18
-
 19
19
-
 20
20
-
 21
21
-
 22
22
-
 23
23
-
 24
24
-
 25
25
-
 26
26
-
 27
27
-
 28
28
-
 29
29
-
 30
30
-
 31
31
-
 32
32
-
 33
33
-
 34
34
-
 35
35
-
 36
36
-
 37
37
-
 38
38
-
 39
39
-
 40
40
-
 41
41
-
 42
42
-
 43
43
-
 44
44
-
 45
45
-
 46
46
-
 47
47
-
 48
48
-
 49
49
-
 50
50
-
 51
51
-
 52
52
-
 53
53
-
 54
54
-
 55
55
-
 56
56
-
 57
57
-
 58
58
-
 59
59
-
 60
60
-
 61
61
-
 62
62
-
 63
63
-
 64
64
-
 65
65
-
 66
66
-
 67
67
-
 68
68
-
 69
69
-
 70
70
-
 71
71
-
 72
72
-
 73
73
-
 74
74
-
 75
75
-
 76
76
-
 77
77
-
 78
78
-
 79
79
-
 80
80
-
 81
81
-
 82
82
-
 83
83
-
 84
84
-
 85
85
-
 86
86
-
 87
87
-
 88
88


Adata GAMMIX S70 BLADE Manual do proprietário
- Tipo
- Manual do proprietário
em outras línguas
Artigos relacionados
-
Adata ATOM 30 KIT Manual do proprietário
-
Adata SU800 Guia de instalação
-
Adata 0323-HDD Guia de usuario
-
Adata AHV620S Guia de usuario
-
-
Adata HD330 Guia de usuario
-
-
Outros documentos
-
Kingston 07-16-2009 Manual do usuário
-
ASROCK B450M PRO4 Manual do usuário
-
Naim Uniti Core QSG Guia rápido
-
-
Kingston Technology SSDNOW Manual do usuário
-
ASROCK B450 Pro4 Guia de instalação
-
-
-
ASROCK 990FX Extreme9 Guia de instalação
-