Ascaso Molino/Grinder Manual do usuário
- Categoria
- Moedores de café
- Tipo
- Manual do usuário

Manual del usuario
Users manual
Mode d’emploi
Bedienungsanleitung
Instruçoes de uso
Manuale per l’uso
Gebruiksaanwijzing
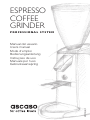
PROFESSIONAL SYSTEM
ESPRESSO
COFFEE
GRINDER
2015/4/1
molinos manual 2015.indd 1 09/12/2019 12:39:23

www.ascaso.com
molinos manual 2015.indd 2 09/12/2019 12:39:24

1
ascaso
Introducción
Gracias por haber adquirido un producto
ascaso
. Su máquina de café ha sido
diseñada y construida aplicando las últimas innovaciones tecnológicas, por lo
que el resultado es un producto de alta calidad, seguro y fiable
Introduction
Thank you very much for purchasing an
ascaso
product. This machine
makes the best espresso coffee and delicious cappuccinos.
Your coffee machine has been designed and built using the latest technological
computing and engineering innovations. It is therefore a high-quality,
safe and reliable product.
Introduction
Merci d’avoir acquis un produit
ascaso
. Avec lui vous pourrez obtenir le
meilleur des cafés expresso et de délicieux cappuccinos.
Votre machine à café a été conçue et fabriquée en appliquant les dernières
innovations technologiques, tant en matière d’informatique que d’ingénierie.
Le résultat est donc un produit de premier choix, sûr et fiable.
Einleitung
Wir beglückwünschen Sie zum Kauf dieses
ascaso
-Produkts. Mit diesem
Kaffeeautomaten.
genießen Sie besten Espresso und feinsten Cappuccino!
Dieser hochzuverlässige Kaffeeautomat wurde unter Anwendung der neuesten
technologischen Erkenntnisse in Informatik und Gerätebau entwikkelt
und erfüllt höchste Qualitäts- und, Sicherheitsstandards.
Introdução
Obrigado por ter adquirido um produto
ascaso
. Com ele poderá obter o melhor
café expresso e deliciosos cappuccinos.
A sua máquina de café foi idealizada e fabricada aplicando as mais recentes
inovações tecnológicas, tanto no âmbito informático como de engenharia,
pelo que o resultado é um produto de alta qualidade, seguro e fiável.
Introduzione
Grazie per avere acquistato un prodotto
ascaso
. Vi permetterà di preparare
un ottimo espresso e deliziosi cappuccini.
La vostra macchina da caffè è stata progettata e costruita con le ultime innova-
zioni tecnologiche, sia nell’ambito informatico che in quello ingegneristico:
il risultato è quindi un prodotto di alta qualità, sicuro e affidabile.
Inleiding
Wij danken u voor de aankoop van dit
ascaso
-product. Met dit koffiezetappara-
at kunt u de beste espresso en de lekkerste cappuccino’s zetten.
Uw koffiezetapparaat is ontworpen en ontwikkeld volgens de laatste technolo-
gische innovaties, zowel wat betreft informatica als techniek. Het resultaat is een
hoogwaardig, veilig en betrouwbaar product.
molinos manual 2015.indd 1 09/12/2019 12:39:24

2
ascaso
EC DIRECTIVE 2002/96/EC
Reciclaje de su aparato.
Las cafeteras pueden contener materiales reciclables.
Contacte con su distribuidor o con el centro de reciclaje de su localidad.
Disposal of your appliance
Old appliances may contain materials which can be reclaimed or recycled.
Please contact your distributor or your local waste collection centre .
Mise au rebut de votre ancien appareil
Les vieus appareils peuvent contenir des materieaux recyclables.
Communiquez avec votre distributeur oú le centre de recyclage de votre localité.
Verfügung von Ihren Geräten
Verfügung von Ihren Geräten Alten Geräten kann Materialien enthalten, die
zurückgewonnen werden können oder wiederverwertet werden kann.
Bitte kontaktieren Sie Ihren Verteiler unsere Ihre örtlicheVerschwendungen
Sammlung.
A disposição de seu eletrodoméstico velho.
Eletrodomésticos velhos podem conter materiais que podem ser exigido ou
pode ser reciclado. Por favor contate seu distribuidor ou el seu centro local de
coleção de desperdício.
La disposizione del suo elettrodomestico vecchi
Vecchi elettrodomestici possono contenere dei materiali che possono essere
rivendicato o può essere riciclato. Per favore di contattare il suo distributore o il
suo commerciante di centro di collezione di spreco
Recycling van uw koffiezetapparaat
Koffiezetapparaten kunnen herbruikbare materialen bevatten. Neem contact op
met uw leverancier of met het inzamelingspunt voor recycling in uw woonplaats.
molinos manual 2015.indd 2 09/12/2019 12:39:24

3
ascaso
ESPAÑOL
Indice
1. Características técnicas
2. Instalación / Puesta en marcha
3. Punto de molienda y su regulación
4. Limpieza
5. Mantenimiento
6. Seguridad
7. Declaración conformidad CE
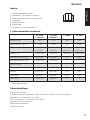
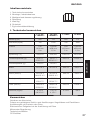
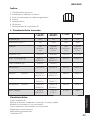
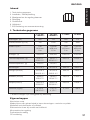
1 Características técnicas
*Otros bajo pedido
Características
Cuerpo en aluminio
Fresas de acero templado en dos versiones: fresa cónica y fresa plana
Modelos con dosificador o tobera
Timer electrónico en modelo con tobera
Regulación micrométrica
Molienda profesional
Certificación CE
I.1/I.1D/
I.1steel** I.2/I.2D
I.2steel** I.1 mini I.2 mini
Potencia (w) 250 175 250 175
Giros/minuto (r.p.m.) 700 1200 700 1200
Fresas Planas
ø54 mm
Cónicas
ø38 mm
Planas
ø54 mm
Cónicas
ø38 mm
Voltaje* (v) 230/120 230/120 230/120 230/120
Capacidad tolva (gr.) 500/250** 500/250** 250 250
Capacidad dosif. (gr.) 125(I.1D) 125(I.2D) -- --
Dimensiones
Alto 407/340** 407/340** 330 330
Ancho 162/120** 162/120** 130 130
Profundo 266/225** 266/225** 235 235
Peso (Kg.) 4,2/4,8** 3,5/4,2** 3,7 3
molinos manual 2015.indd 3 09/12/2019 12:39:24

4
ascaso
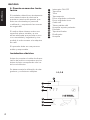
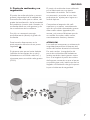
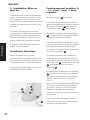
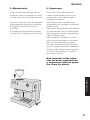
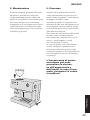
2. Puesta en marcha. Insta-
lación
El instalador deberá leer atentamente
este manual antes de efectuar la
puesta en marcha del aparato, que
debe ser efectuada por personal
cualificado, y respetando las normas
de seguridad.
El molino debe situarse sobre una
superficie plana, estable y a una
altura adecuada que permita su uso
con comodidad y seguridad y si es
posible lo más cercano a la máquina
de café.
El operador debe ser una persona
adulta y responsable.
Instalación eléctrica
Antes de conectar el cable de alimen-
tación del molino comprobar que los
datos de éste corresponden con los
de la red eléctrica.
Se desaconseja la utilización de alar-
gadores y conectores múltiples.
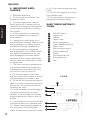
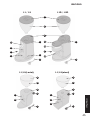
1
2
3
4
5
6
7
8
9
10
11
12
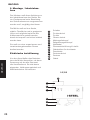
13
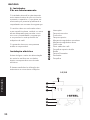
Interruptor ON-OFF
Tapa tolva
Tolva
Tapa superior
Pomo regulador molienda
Pomo regulador timer
Cable red
Tobera salida café
Horquilla soporte pulsador
Pulsador
Tapa dosificador
Dosificador
Horquilla
ESPAÑOL
I.1/I.2
2
5
8
1
10
13
3
molinos manual 2015.indd 4 09/12/2019 12:39:24

5
ascaso
ESPAÑOL
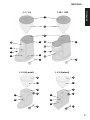
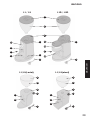
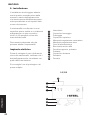
I.1 / I.2 I.1D / I.2D
I.1/I.2(steel)
1
2
22
3
33
4
44
5
55
88
10 10
13
5
6
7
77
7
8
9
1
10
13
12
11
I.1/I.2(i·mini)
molinos manual 2015.indd 5 09/12/2019 12:39:24

6
ascaso
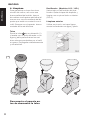
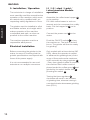
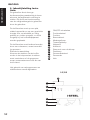
Funcionamiento modelos I.1
/ I.2 / steel / i·mini / i·steel
machine
Colocar la tolva 3 en su ubicación.
Llenarla de café en grano en la canti-
dad que estimemos gastar durante la
jornada. Poner la tapa 2.
Conectar el cable electrico 7 a la
red.
Accionar el interruptor de puesta en
marcha 1. En este momento se
encenderá el led que éste lleva incor-
porado. El molino ya está preparado
para moler.
Pulsar sobre pulsador 10 . Cada vez
que quiera café molido, solo tiene
que colocar el portafiltro de su máqui-
na bajo la salida de café 8, guiado
por la horquilla 9.
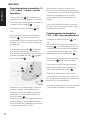
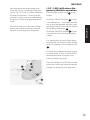
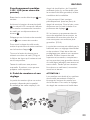
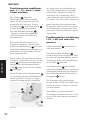
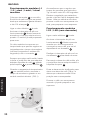
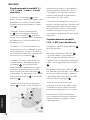
Modelos con temporizador (opción):
Permite regular anticipadamente
el tiempo de la molienda (mínimo 8
segundos y máximo 60 segundos)
con el mando 6.
Girando el pomo del temporizador en
sentido horario, aumenta el tiempo
de la molienda y girándolo en sentido
contrario disminuye. (FIG.1)
Aconsejamos que lo regule a un
tiempo de molienda que equivalga a
7 gr. de café: entre 20 y 25 segundos.
Revisar la regulación que variará
según tipo de café y desgaste de
fresas.
Una vez obtenida su dosis, prensar
el café con un prensa manual, para
preparar su espresso.
Funcionamiento modelos
I.1D / I.2D (con dosificador)
Conectar el cable eléctrico 7 a la
red.
Accionar el interruptor de puesta en
marcha 1 , en este momento se en-
cenderá el led que lleva incorporado
y empezará a moler café, que se irá
depositando en el dosificador 12 .
Desconectar el interruptor de puesta
en marcha 1 para dejar de moler.
Para servir la dosis de café molido,
poner el portafiltro de su máquina
sobre la horquilla de apoyo 13 .
Tirar de la palanca del dosificador
para obtener una dosis de café (7/ 8
gr.) y dejar que la palanca vuelva a su
posición sin acompañarla.
Prensar el café con un prensa manual
y ya puede preparar su espresso.
ESPAÑOL
molinos manual 2015.indd 6 09/12/2019 12:39:24

7
ascaso
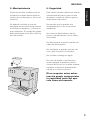
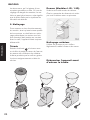
3. Punto de molienda y su
regulación
El punto de molienda (más o menos
grueso) dependerá de la calidad de
la mezcla de cafés que se utilice, del
grado de torrefacción, de la humedad
del ambiente (cuanto más húmedo, la
molienda debe ser más gruesa) y de
las condiciones de la cafetera.
Por ello, es necesario corregir
periódicamente (diario) el grado de
molienda.
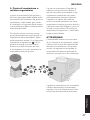
Para hacerlo disponemos en la
parte superior derecha de un pomo
regulador 5.
Si giramos este pomo hacia delante
(sentido de las agujas de un reloj)
obtendremos un molido más fino, y
viceversa para un molido más grueso.
(FIG.2)
El punto de molienda viene calibrado
por el fabricante con un ajuste
intermedio de molido. Por lo tanto
es necesario proceder a una fase
preliminar de ajuste para lograr un
molido óptimo.
Comprobar el aspecto del café
espresso y su sabor, considerando
que de un molido demasiado grueso
salen cafés claros (aguados) sin
aroma y sin crema. Mientras que de
un molido fino salen cafés cortos,
excesivamente fuertes y densos.
ATENCIÓN!
Los molinos incorporan un sistema de
seguridad para evitar el bloqueo del
motor del molino durante la molienda.
Por este motivo, la regulación del
punto de molienda está limitada en
ambos sentidos, tanto grueso como
fino. Si al regular el punto de molien-
da llega un momento en que el pomo
no puede girar más, indica que se ha
llegado a la limitación de giro impues-
ta por el sistema de seguridad.
ESPAÑOL
molinos manual 2015.indd 7 09/12/2019 12:39:24

8
ascaso
ESPAÑOL
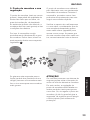
4. Limpieza
Para garantizar un buen funciona-
miento del molino, así como una
buena calidad del molido, hemos
de realizar una limpieza periódica (al
menos una vez a la semana) de las
partes que están en contacto con el
café. Siempre con el aparato desco-
nectado de la red eléctrica.
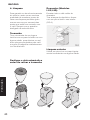
Tolva
Sacar la tolva 3 de su ubicación (*)
y lavarla con un paño húmedo o con
agua y jabón para eliminar los resi-
duos oleosos producidos por el café
en grano. Enjuagarla cuidadosamente
y secarla bien.
Desconecte el aparato an-
tes de desmontar la tolva
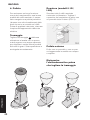
Dosificador (Modelos I.1D / I.2D )
Vaciar todo el café molido del dosi-
ficador. Quitar la tapa del depósito y
limpiar con un pincel todo su interior.
(FIG.3)
Limpieza exterior
Utilizar un pincel o un trapo ligera-
mente humedecido en agua y jabón.
(*)
molinos manual 2015.indd 8 09/12/2019 12:39:25

9
ascaso
ESPAÑOL
5. Mantenimiento
Antes de efectuar cualquer tipo de
operación se debe desconectar el
molino de su interruptor y de la red
eléctrica.
Se deberá controlar el nivel de
desgaste de las fresas para obtener
un molido homogéneo, y ofrecer un
buen espresso. El cambio de fresas
debe efectuarse entre 400 y 600 Kg
de café molido.
6. Seguridad
Este molino de café deberá ser usado
exclusivamente para lo que ha sido
diseñado: molido de café en grano y
dosificación del mismo.
No permitir que el aparato sea
manipulado por niños o personas
inexpertas.
No intervenir para trabajos de lim-
pieza o mantenimiento con la clavija
enchufada.
No desconectar el molino tirando del
cable de alimentación.
No manipular el aparato con las ma-
nos o pies mojados o húmedos.
No se debe sumergir en agua.
En caso de avería o mal funciona-
miento apagar el aparato y desen-
chufarlo de la red, no se debe intentar
repararlo o intervenir directamente.
Llamar a su servicio técnico.
El no respetar estas adver-
tencias puede comprometer
la seguridad tanto del apa-
rato como del usuario.
molinos manual 2015.indd 9 09/12/2019 12:39:25

10
ascaso
ESPAÑOL
7. Declaración de conformidad CE
ASCASO FACTORY declaramos que el producto que se refiere esta declaración,
es conforme a los requisitos de la Directiva de 14 de junio 1989 sobre la aproxi-
mación de las leyes de los Estados Miembros con relación a la maquinaria
(89/392/CEE). Sobre material eléctrico (73/23/CEE) y sobre compatibilidad
electromagnética (89/396/CEE).
GUARDE LAS INSTRUCCIONES
molinos manual 2015.indd 10 09/12/2019 12:39:25

11
ascaso
Index
1. Technical specifications
2. Important safeguards
3. Installation / Operation
4. Grinding point and regulation
5. Cleaning
6. Maintenance
7. EC Declaration of conformity
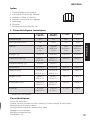
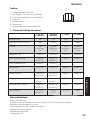
1. Technical specifications
* Other voltages upon request
Main features
Aluminium body
Hardened steel grinding discs in two versions: Either conical or flat discs
Models featuring either dispenser or coffee spout
Electronic timer on coffee spout model
Micrometrical regulation
Professional grinding
EC Certification
I.1/I.1D/
I.1steel** I.2/I.2D
I.2steel** I.1 mini I.2 mini
Power (w) 250 175 250 175
r.p.m. 700 1200 700 1200
Grinding Discs
(mm)
(in)
Flat
ø54 mm
2 in
Conical
ø38 mm
1,5 in
Flat
ø54 mm
2 in
Conical
ø38 mm
1,5 in
Voltage* (v) 230/120 230/120 230/120 230/120
Hopper Capacity (g/lb) 500/1.1
250/0.5**
500/1.1
250/0.5**
250/0.5 250/0.5
Dispenser Capacity (g/oz) 125/4.5 125/4.5 -- --
Dimensions 407/16.3 407/16.3 330/13 330/13
Height (mm/in) 407/16.3
340/13.4**
407/16.3
34013.4**
330/13 330/13
Width (mm/in) 162/6.5
120/4.7**
162/6.5
120/4.7**
130/5.2 130/5.2
Depth (mm/in) 266/10.6
225/8.9**
266/10.6
225/8.9**
235/9.2 235/9.2
Weight (Kg/lb) 4,2/9.2
4,8/10.6**
3,5/7.6
4,1/9**
3,7/8.2 3/6.6
molinos manual 2015.indd 11 09/12/2019 12:39:25

12
ascaso
2. IMPORTANT SAFE-
GUARDS
1-. Read all instructions
2-. Do not touch hot surfaces. Use
handles or knobs.
3-. To protect againts fire, electric
shock and injury to persons do not
immerse cord, plugs or (state specific
part or parts in question) in water or
other liquid.
4-. Close supervision is necessary
when any appliance is used by or
near children.
5-. Unplug from outlet when not in
use and before cleaning. Allow to cool
before putting on or taking off parts
and before cleaning the appliance.
6-. Do not operate any appliance
with a damaged cord or plug or after
the appliance malfunctions, or has
been damaged in any way. Return
appliance to the nearest authorized
service facility for examination, repair
or adjustment.
7-. The use of accesory attachments
not recommended by the appliance
manufacturer may result in fire, elec-
tric shock or injury to persons.
8-. Do not use outdoors (this item
may be omitted if the products is spe-
cifically designed for outdoor use).
9-. Do not let cord hang over edge of
table or counter or touch hot surfaces.
Dot not let cord contact hot surface,
including the stove.
10-. If the supplied cord is damaged,
it must be replaced by the manu-
facturer, its service agent or similarly
qualified persons in order to avoid a
hazard.
11-. Do not place on or near a hot gas
or electric burner or in a heated oven.
12-. Always attach plug to appliance
first, then plug cord into the wall
outlet. To disconnect, turn any control
to “off” then remove plug from wall
outlet.
13-. Do not use appliance for other
than intended use.
14-. Check hopper for presence of
foreing objects before using
SAVE THESE INSTRUCC-
TIONS.
ENGLISH
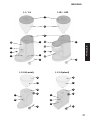
1
2
3
4
5
6
7
8
9
10
11
12
13
ON-OFF switch
Hopper lid
Hopper
Upper cover
Grinding regulator
Timer regulator (option)
Power cord
Ground coffee spout
Switch holder fork
Switch
Dose dispenser lid
Dose dispenser
Fork
I.1/I.2
2
5
8
1
10
13
3
molinos manual 2015.indd 12 09/12/2019 12:39:25

13
ascaso
ENGLISH
I.1 / I.2 I.1D / I.2D
I.1/I.2(mini)
1
2
22
3
33
4
44
5
55 88
1010
13
5
6
7
77
7
8
9
1
10
13
12
11
I.1/I.2(i·mini)
molinos manual 2015.indd 13 09/12/2019 12:39:25

14
ascaso
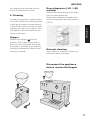
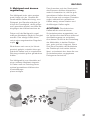
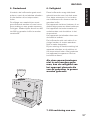
3. Installation / Operation
The technician in charge of installation
must carefully read this manual before
operation of the machine, which must
be carried out by qualified staff, yet
respecting safety regulations in force.
The grinder must be installed in a flat
and stable surface, at a height which
makes operation of the machine
comfortable and safe, as close as
possible to the coffee machine.
The machine operator must be a
responsible adult person.
Electrical installation
Before connecting the grinder to the
mains, be sure of checking that the
grinder specifications correspond with
those of the power supply.
It is not recommended to use cord
extensions nor multiple connectors.
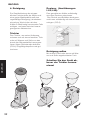
I.1 / I.2 / steel / i·mini /
i·steel machine Models
operation
Assemble the coffee bean hopper 3
on its position.
Fill it with coffee beans in such an
amount as to be consumed on a daily
basis. Put the hopper lid 2 on its
position.
Connect the power cord 7 to the
mains.
Push the ON-OFF switch 1 to turn
the machine on. The built-in led will
be on. The grinder will then be ready
for grinding.
Only models with a timer device (NO
USA), allows the operator to adjust
in advance the grinding time (a mini-
mum of 8 seconds and a maximum
of 60 seconds) by using regulator 6
. Every time ground coffee is required,
the machine filter holder must be
placed under the coffee spout 8and
guided by the switch holder fork 9,
pressing the switch 10 .
Turning the timer regulator 6
clockwise will result in an increase
of grinding time, whereas turning it
counterclockwise decreases grinding
time.(FIG.1)
ENGLISH
molinos manual 2015.indd 14 09/12/2019 12:39:25

15
ascaso
We recommend that grinding time
must be set for a production equiva-
lent to 7g / 0.25 oz of coffee: between
20 and 25 seconds. Check the ad-
justment, which may vary depending
on type of coffee and grinding discs
wear.
Once the dose is on the filter holder,
press the coffee by using a manual
tamper for brewing your espresso.
I.1D / I.2D (with dose dis-
penser) Models operation
Connect the power cord 7 to the
mains.
Push the ON-OFF switch 1 to turn
the machine on. The built-in led will
be on and the grinder will then start
grinding coffee, which will be stored
at the dose dispenser 12 .
Push the ON-OFF switch 1 to turn
the machine off and stop grinding
coffee.
For having the ground coffee dose
dispensed, the machine filter holder
must be placed on the support fork
13 .
Pull the dose dispenser lever to get
a coffee dose (7-8 g / 0.25-0.28 oz)
allowing the lever to return to its
former position by itself.
Once the dose is on the filter holder,
press the coffee by using a manual
tamper for brewing your espresso.
ENGLISH
molinos manual 2015.indd 15 09/12/2019 12:39:25

16
ascaso
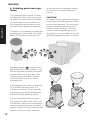
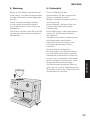
4. Grinding point and regu-
lation
The grinding point (coarser or finer)
will depend on the coffee blend qua-
lity used, its roasting point, humidity
(the more humid the conditions are
the coarser the grinding point must
be) and coffee machine conditions.
Therefore, it is necessary to adjust the
grinding point periodically (on a daily
basis). To do that we must use the
grinding regulator 5 located on the
upper right side of the machine. If we
turn the regulator forward (clockwise)
we will obtain a finer grinding, whe-
reas turning it backwards (counter-
clockwise) will result in a coarser
grinding point.
The grinding point is factory adjusted
for a medium grinding point. It is
therefore necessary to proceed with
a preliminary grinding adjustment to
achieve the best grinding quality.
It is recommended that you check
the espresso coffee result on the cup
and its taste, taking into consideration
that an excessively coarse regulation
results in lighter coffees (watered) with
neither aroma nor cream, whereas
an excessively fine regulation results
in short shots, strong and dense in
excess.
CAUTION!
Grinders include a protection system
to avoid the possibility that the motor
blocks when grinding. This protection
system makes the grinding point is
limited in both directions, fine and
coarse. If when regulating the grin-
ding point it is not possible to turn the
girnding regulator anymore, it means
ENGLISH
molinos manual 2015.indd 16 09/12/2019 12:39:26

17
ascaso
the ginding point reached the limit
due to the protection system.
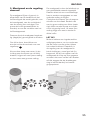
5. Cleaning
In order to guarantee a proper opera-
tion of the machine as well as ground
coffee good quality, all areas directly
in touch with coffee must be cleaned
regularly (at least once a week), with
the machine disconnected from the
mains in all cases.
Hopper
Remove the hopper 3 from its
position (FIG.3) and wash it with a
piece of cloth moistened with water
and soap to eliminate the inside oily
residues produced by coffee. Rinse
and dry it carefully.
Dose dispenser (I.1D / I.2D
models)
Remove the remaining ground coffee
from the dose dispenser.
Remove the dispenser lid and clean
all the internal parts by using a brush.
(FIG.3)
External cleaning
Use a brush or a piece of cloth mois-
tened with water and soap.
Disconnect the appliance
before remove the Hopper
ENGLISH
molinos manual 2015.indd 17 09/12/2019 12:39:26

18
ascaso
6. Maintenance
Before carrying out any kind of maintenance operation the grinder must be
switched off as well as disconnected from the mains.
Grinding discs wear must be regularly checked to produce homogeneously
ground coffee and obtain a perfect espresso.
Grinding discs must be replaced between 400-600 Kg (875-1,300 lb) of ground
coffee.
7. EC Declaration of conformity
ASCASO FACTORY declares that the product this declaration refers to complies
with the requirements of the Directive dated 14th June, 1989 on approximation of
legislations of the Member States with regards to Machines (89/392/EEC), Elec-
trical Material (73/23/EEC) and Electromagnetical Compatibility (89/396/EEC).
SAVE THESE INSTRUCTIONS
ENGLISH
molinos manual 2015.indd 18 09/12/2019 12:39:26
A página está carregando...
A página está carregando...
A página está carregando...
A página está carregando...
A página está carregando...
A página está carregando...
A página está carregando...
A página está carregando...
A página está carregando...
A página está carregando...
A página está carregando...
A página está carregando...
A página está carregando...
A página está carregando...
A página está carregando...
A página está carregando...
A página está carregando...
A página está carregando...
A página está carregando...
A página está carregando...
A página está carregando...
A página está carregando...
A página está carregando...
A página está carregando...
A página está carregando...
A página está carregando...
A página está carregando...
A página está carregando...
A página está carregando...
A página está carregando...
A página está carregando...
A página está carregando...
A página está carregando...
A página está carregando...
A página está carregando...
A página está carregando...
A página está carregando...
A página está carregando...
A página está carregando...
A página está carregando...
A página está carregando...
A página está carregando...
A página está carregando...
A página está carregando...
-
 1
1
-
 2
2
-
 3
3
-
 4
4
-
 5
5
-
 6
6
-
 7
7
-
 8
8
-
 9
9
-
 10
10
-
 11
11
-
 12
12
-
 13
13
-
 14
14
-
 15
15
-
 16
16
-
 17
17
-
 18
18
-
 19
19
-
 20
20
-
 21
21
-
 22
22
-
 23
23
-
 24
24
-
 25
25
-
 26
26
-
 27
27
-
 28
28
-
 29
29
-
 30
30
-
 31
31
-
 32
32
-
 33
33
-
 34
34
-
 35
35
-
 36
36
-
 37
37
-
 38
38
-
 39
39
-
 40
40
-
 41
41
-
 42
42
-
 43
43
-
 44
44
-
 45
45
-
 46
46
-
 47
47
-
 48
48
-
 49
49
-
 50
50
-
 51
51
-
 52
52
-
 53
53
-
 54
54
-
 55
55
-
 56
56
-
 57
57
-
 58
58
-
 59
59
-
 60
60
-
 61
61
-
 62
62
-
 63
63
-
 64
64


Ascaso Molino/Grinder Manual do usuário
- Categoria
- Moedores de café
- Tipo
- Manual do usuário
em outras línguas
- español: Ascaso Molino/Grinder Manual de usuario
- français: Ascaso Molino/Grinder Manuel utilisateur
- English: Ascaso Molino/Grinder User manual
- Nederlands: Ascaso Molino/Grinder Handleiding
- Deutsch: Ascaso Molino/Grinder Benutzerhandbuch