
REFERENCE MANUAL
OVATOR S-800, S-600 and S-400 LOUDSPEAKERS
ENGLISH, DEUTSCH, FRANÇAIS, ITALIANO, ESPAÑOL,
NEDERLANDS, 中文 , РУССКИЙ, 한국어

E1
OVATOR S-800, S-600 & S-400 – English
Introduction and Unpacking
The Ovator S-800, S-600 and S-400 are very high performance speakers that will
repay effort spent on installation. It is important that you read this manual before
fully unpacking and installing your Ovators. The manual begins with unpacking
instructions. Ovators are extremely heavy and to minimise the risk of damage
or personal injury you should follow these instructions carefully. Unpacking and
installing Ovators is a two-person task and should not be attempted alone.
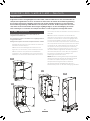
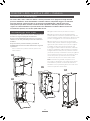
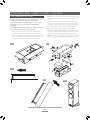
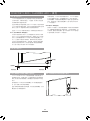
1 S-800 Unpacking
It is important that Ovators are unpacked as described in
the following paragraphs and illustrations.
They should be unpacked in the room in which they are to
be used and close to their likely installed positions.
Having removed this manual proceed to unpack each
Ovator following the steps below:
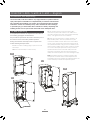
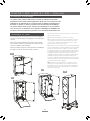
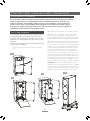
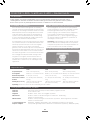
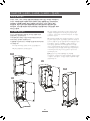
1.1 With the carton standing upright, open the two front
carton flaps.
1.2 Remove the inner flap to create a ramp.
1.3 The speaker has front and back castor trolleys
attached to its plinth that enable it to be rolled out of
the carton and down the ramp. The speaker is extremely
heavy – take great care. Do not work alone.
1.4 Work with a another person to roll the speaker to its
likely installed position. Push the speaker from a point
towards the middle or below. Remove the castor trolleys
one at a time. Unscrew both attachment screws then tilt
the speaker backwards, using your foot to stabilise it, and
remove the front trolley when it is clear. Lower the speaker
on to its front floor-spikes (fitted with covers) and tilt the
speaker forwards to remove the rear trolley. Even with
floor-spike covers fitted, take care when removing the
trolleys that the floor-spikes do not cause damage or injury.
Note: Keep all the packing, including the transit screws
and spacers. The transit screws must be replaced if the
loudspeakers are to be repacked and shipped. Tighten the
screws sufficiently to restrain the suspension system.
1.1
1.2
1.3
1.4

E2
OVATOR S-800, S-600 & S-400 – English
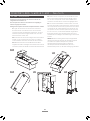
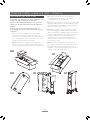
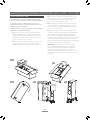
2 S-600 Unpacking
It is important that Ovators are unpacked as described in
the following paragraphs and illustrations.
They should be unpacked in the room in which they are to
be used and close to their likely installed positions.
Having removed this manual proceed to unpack each
Ovator following the steps below:
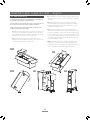
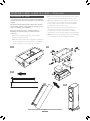
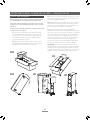
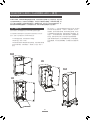
2.1 With the carton lying on its back, lift out the end-cap at
the base of the speaker. The speaker has front and back
castor trolleys attached to its plinth. A transit screw retains
each one. Do not remove them at this stage.
2.2 Using the foam insert located in the carton as a
wedge, push the speaker to the end of the carton so that
the trolley castors touch the cardboard.
2.3 Carefully lift the carton upright using the handles on its
sides. The Ovator is heavy – use an appropriate safe lifting
technique.
2.4 Wheel the speaker out of the carton on its trolleys,
remove remaining packaging, and wheel the speaker to
its likely installed position. Push the speaker from a point
towards the middle or below.
2.5 Remove the trolleys one at a time. Unscrew both
attachment screws then tilt the speaker backwards, using
your foot to stabilise it, and remove the front trolley when it
is clear. Lower the speaker on to its front floor-spikes and tilt
the speaker forwards to remove the rear trolley. Take care
when removing the trolleys that the Ovator floor-spikes do
not cause damage or injury.
Note: Keep all the packing, including the transit screws
and spacers. The transit screws must be replaced if the
loudspeakers are to be repacked and shipped. Tighten the
screws sufficiently to restrain the suspension system.
2.1
2.2
2.3 2.4 2.5

E3
OVATOR S-800, S-600 & S-400 – English
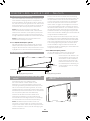
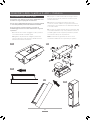
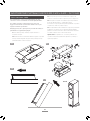
3 S-400 Unpacking
It is important that Ovators are unpacked as described in
the following paragraphs and illustrations.
They should be unpacked in the room in which they are to
be used and close to their likely installed positions.
Having removed this manual proceed to unpack each
Ovator following the steps below:
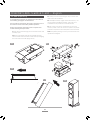
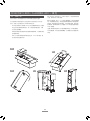
3.1 The carton should be lying on its back with the side and
end flaps open.
3.2 Remove the plastic side clips and handles from the
carton and lift off the outer sleeve and internal packaging.
The Ovator will now be left lying in its tray.
3.3 Gently push the Ovator along the tray so that its floor-
spikes touch the cardboard.
3.4 Carefully lift the tray upright. The Ovator is heavy – use
an appropriate safe lifting technique. Take care not to
over-balance the speaker so that it falls forwards.
3.5 The Ovator can now be manoeuvred out of its tray
and into position. Once the Ovator is in position, the plastic
protection caps fitted over its floor-spikes can be removed.
Note: Keep all the packing for use if your Ovators are to be
repacked and shipped.
3.1
3.2
3.3
3.4
3.5

E4
OVATOR S-800, S-600 & S-400 – English
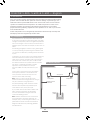
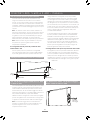
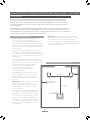
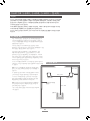
4.1 Positioning
The performance of any loudspeaker will be influenced
by the room and position in which it is located. Even small
changes of loudspeaker position can significantly influence
the sound. Changes of room contents, the introduction of
significant piece of furniture for example, can also have an
effect.
The following paragraphs constitute only a general guide
to Ovator positioning. Every listening room is different and
you may find an alternative positioning solution works best
in yours.
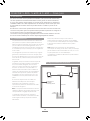
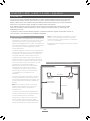
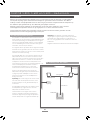
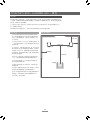
In general, try to choose a site for the speakers where they
are located between 2.0 metres and 4.0 metres apart,
clear of room corners, and where each one is between
0.25 metres and 1.0 metre away from a solid rear wall.
The distance between the speakers and the rear wall is
the aspect of positioning most likely to require
adjustment as the speakers run-in and you
become familiar with their performance in your
room.
If the Ovator is moved closer to the rear wall the
low frequency elements of music will become
more prominent. However this may be at the
expense of bass clarity and timing.
Note: There is no need to angle the Ovator
inwards towards the listening position but doing so
may be a useful fine-tuning adjustment.
The primary listening position should be central
between the loudspeakers approximately the
same distance away as they are apart.
Try to position each Ovator within a similar “near-
field” acoustic environment and with similar
acoustic characteristics along the side walls
towards the listening position.
Note: Different near-field acoustic environments
and characteristics would be created by, for
example, heavy curtains and glass windows, or a
plasterboard wall with and without bookshelves.
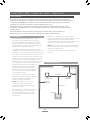
Diagram 4.2 illustrates the positioning guidelines
described above.
right
loudspeaker
left
loudspeaker
2.0m to 4.0m
listening
position
> 0.5m
0.25 to 1.0m
4.2 Room Layout
near-eld acoustic
environment
2.0m to 4.0m
4 Installation
Once your Ovators are fully unpacked they may be manoeuvred into their initial working
positions. Take care that the floor-spikes do not cause damage or personal injury. The
S-800 and S-600 incorporate BMR transit screws. These should not be removed until the
speakers are installed in their final positions. The S-400 incorporates no transit screws.
Positioning guidelines are provided in the following paragraphs but you should be
prepared to make positioning adjustments as the speakers “run-in” and as you become
more familiar with them.
Ovator loudspeakers are not magnetically shielded and should be kept well away from
CRT displays and other magnetically sensitive items.

E5
OVATOR S-800, S-600 & S-400 – English
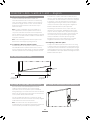
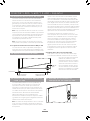
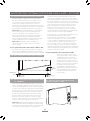
4.3 Using Floor-spikes
Ovators are fitted with floor-spikes to define the
mechanical interface with the structure of the listening
room. Floor-spikes should be adjusted to ensure that the
speakers are upright and do not rock. Use the minimum
length of floor-spike needed to hold the lock nut just
above the carpet.
Note: If Ovator loudspeakers are to be installed on a
non-carpeted floor, the floor-spikes should be used in
conjunction with Naim Floor Protectors and adjusted so
that the tapered part of the floor-spike extends just beyond
the lock nut. Your Naim retailer or distributor will be able to
supply Floor Protectors.
Note: Ovators are shipped fitted with floor spike covers.
Remove the covers simply by pulling them off.
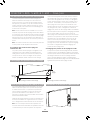
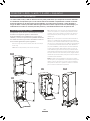
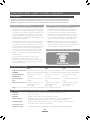
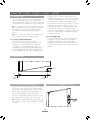
4.3.1 Adjusting S-800 and S-600 Floor-Spikes
All four floor-spikes are adjustable, however adjustment of
the S-800/600 rear floor-spikes is easier thanks to the top
access provided by its plinth design. To adjust an S-800/600
rear floor-spike first remove the locking set-screw with the
4.4 Adjusting Floor-spikes
4mm Allen key supplied. Then insert the Allen key from
above to turn the adjustment screw clockwise to lengthen
the floor-spike and anti-clockwise to shorten the floor-spike.
If necessary, to stop the floor-spike from turning when
re-tightening the locking set-screw, insert the supplied
tommy-bar in the floor-spike through-hole. Diagram 4.4
illustrates S-800/600 rear floor-spike adjustment.
Depending on the thickness of any carpet, and prior
adjustment of its rear spikes, S-800/600 front floor-spikes
may not need any adjustment. If adjustment is required
however, loosen the lock nut using a 13mm spanner and
turn the floor-spike as appropriate using the supplied
tommy-bar inserted in the floor-spike through-hole.
Re-tighten the lock-nut when adjustment is complete.
Diagram 4.4 illustrates front floor-spike adjustment.
4.3.2 Adjusting S-400 Floor-Spikes
To adjust an S-400 floor-spike first loosen its lock nut using
a 13mm spanner. Turn the floor-spike as appropriate using
the supplied tommy-bar inserted in the floor-spike through-
hole. Re-tighten the lock-nut when adjustment is complete.
The S-800/600 front floor-spike illustrated in Diagram 4.4 also
illustrates S-400 floor-spikes.
remove transit
screws
adjustment
screw
tommy-bar
through-hole
tommy-bar
through-hole
lock-nut
4.5 S-800 & S-600 BMR Transit Screws
The Ovator S-800 and S-600 BMR (balanced mode
radiator) modules are fitted with a twin leaf-spring
suspension system. The suspension system is restrained
during shipping by two transit screws that must be released
before use. The transit screws are located on the rear face
of the speaker directly behind the BMR.
Use the supplied 5mm Allen key to unscrew the transit
screws. Remove the screws and store them safely. Diagram
4.6 illustrates removal of the transit screws.
Note: The transit screws must be replaced if the
loudspeakers are to be repacked and shipped. Tighten the
screws sufficiently to restrain the suspension system.
4.6 S-800 & S-600 Transit Screw Removal

E6
OVATOR S-800, S-600 & S-400 – English
5 Connecting
Ovators incorporate a passive crossover but can be converted for use in active systems
using the appropriate Naim active crossover and multiple amplifiers. Contact your local
retailer or distributor for more information.
5.1 Cables and Connectors
If your Ovators are to be used with Naim amplification,
Naim loudspeaker cable will produce the best results and
is necessary with some amplifiers. Cable lengths to both
speakers should be equal and be between 3.5 metres
and 20 metres. If the position of a speaker in relation to
the amplifier results in spare cable do not coil the cable
but lay it out back and forth between the amplifier and
speaker.
The Ovator connection terminals are intended to accept
the custom-designed Ovator speaker connector. This
connector is designed to provide the best possible
performance. Other 4mm plugs can be used, however
the results will be unpredictable. Your retailer will be able
to make up speaker cables terminated on one end by the
Ovator connector and on the other end by a connector
appropriate to the driving amplifier.
It is important that loudspeaker cables are arranged and
dressed so that mechanical stress is minimised and that no
undue force is applied to the connectors either during or
after connection.
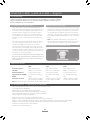
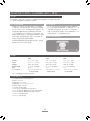
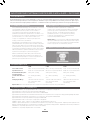
5.3 Ovator Connection Panel
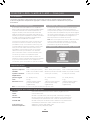
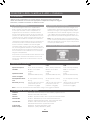
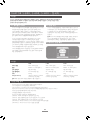
6 Specifications
S-800 S-600 S-400
Frequency response: 20Hz - 35kHz (in room) 28Hz - 35kHz (in room) 36Hz - 35kHz (in room)
Sensitivity: 89dB @ 1m for 2.83V input 88dB @ 1m for 2.83V input 88dB @ 1m for 2.83V input
Nominal impedance: 4 Ohms (min 3.9 Ohms) 4 Ohms (min 3.2 Ohms) 4 Ohms (min 3.8 Ohms)
Suggested power amplifier: 25 - 250W (8 Ohm rating) 25 - 150W (8 Ohm rating) 25 - 130W (8 Ohm rating)
Weight: 93.5kg 61kg 31kg
Dimensions H x W x D: 1393mm x 520mm x 542mm 1168mm x 401mm x 434mm 1060mm x 330mm x 345mm
(inc floor-spikes and grilles) (inc floor-spikes and grilles) (inc floor-spikes and grilles)
Note: The colour and grain characteristics of wood finishes may vary.
7 Conformance To Appropriate Standards
Naim Audio declares that Naim Audio products are in conformance with:
Low Voltage Directive 2006/95/EC
Electromagnetic Compatibility Directive 2004/108/EC
Restriction of Hazardous Substances (RoHS2) Directive 2011/65/EU
Waste of Electrical and Electronic Equipment Directive 2002/96/EC
Energy Using Product Directive 2005/32/EC
Naim Audio products comply with the following standards:
EN60065 - Audio, video and similar electronic apparatus - Safety requirements
EN55013 - Sound and television broadcast receivers and associated equipment - Radio disturbance characteristics
EN55020 - Sound and television broadcast receivers and associated equipment - Immunity characteristics
EN61000-3-2 - Mains harmonics current emissions
EN61000-3-3 - Mains flicker emissions
5.2 Connection Polarity
It is important that Ovators are connected with the correct
polarity. Ensure that the positive terminal on each speaker
(marked +) is connected to a positive output terminal on
the amplifier and the negative terminal on each speaker
(marked – ) is connected to a negative output terminal on
the amplifier. Diagram 5.3 illustrates the Ovator connection
panel.
Note: Naim speaker cable has a rib running down one
side to aid polarity identification. The positive side of Naim
speaker plugs have a small protrusion for identification.


BEDIENUNGSANLEITUNG
LAUTSPRECHER OVATOR S-800, S-600 und S-400
ENGLISH, DEUTSCH, FRANÇAIS, ITALIANO,
ESPAÑOL, NEDERLANDS, 中文 , РУССКИЙ, 한국어

D1
OVATOR S-800, S-600 & S-400 – Deutsch
Allgemeines
Aufgrund der hohen Leistungsfähigkeit der Ovator S-800, S-600 und S-400 lohnt es sich, beim Aufstellen der
Lautsprecher Sorgfalt walten zu lassen. Investieren Sie etwas Zeit in die Lektüre dieser Bedienungsanleitung,
bevor Sie die Lautsprecher vollständig auspacken und mit dem Aufstellen beginnen. Der erste Abschnitt
dieser Bedienungsanleitung enthält Hinweise zum Auspacken der Ovator. Da die Lautsprecher sehr schwer
sind, sollten Sie die nachstehenden Anweisungen sorgfältig befolgen, um eine Beschädigung des Geräts
oder Verletzungen zu vermeiden. Die Lautsprecher sollten zu zweit ausgepackt und aufgestellt werden.
1 S-800 – Auspacken
Gehen Sie beim Auspacken der Ovator S-800 wie im
Folgenden beschrieben vor.
Die Lautsprecher sollten in der Nähe ihres endgültigen Platzes
ausgepackt werden.
Befolgen Sie für jeden der beiden Lautsprecher diese Schritte:
1.1 Stellen Sie den Karton auf das Fußende und öffnen Sie
die beiden vorderen Klappen.
1.2 Nehmen Sie das keilförmige Kartonteil heraus und
legen Sie es vor den Karton, sodass eine Rampe entsteht.
1.3 Am Sockel des Lautsprechers sind zwei Rollkarren
angebracht, die es ermöglichen, den Lautsprecher über
die Rampe aus dem Karton hinauszurollen. Die Ovator ist
sehr schwer; Sie sollten sie deshalb zu zweit auspacken und
aufstellen.
1.4 Ziehen Sie den Lautsprecher auf den Rollen aus
dem Karton. Fassen Sie ihn an der unteren Hälfte seines
Gehäuses und rollen Sie ihn an seinen endgültigen Platz.
Nun müssen die Rollkarren entfernt werden. Lösen Sie
zunächst die beiden Transportschrauben. Stützen Sie dann
den Lautsprecher mit dem Fuß, kippen Sie ihn nach hinten
und ziehen Sie die vordere Rollkarre weg. Setzen Sie den
Lautsprecher auf den (mit Schutzkappen versehenen)
vorderen Spikes ab und kippen Sie ihn nun nach vorn, um
die hintere Rollkarre wegzuziehen. Bedenken Sie dabei,
dass die Bodenspikes der Ovator selbst mit aufgesetzten
Schutzkappen Oberflächen beschädigen oder
Verletzungen verursachen können.
Hinweis: Bewahren Sie das gesamte Verpackungsmaterial
(inklusive der Transportschrauben) für zukünftige Transporte
auf. Stellen Sie vor jedem Transport sicher, dass alle
Transportschrauben eingeschraubt sind. Ziehen Sie
die Transportschrauben des BMR-Moduls (des Hoch-/
Mitteltonchassis) so fest an, dass seine Aufhängung arretiert ist.
1.1
1.2
1.3
1.4

D2
OVATOR S-800, S-600 & S-400 – Deutsch
2 S-600 – Auspacken
Gehen Sie beim Auspacken der Ovator S-600 wie im
Folgenden beschrieben vor.
Die Lautsprecher sollten in der Nähe ihres endgültigen
Platzes ausgepackt werden.
Befolgen Sie für jeden der beiden Lautsprecher diese Schritte:
2.1 Legen Sie den Karton auf den Rücken und ziehen
Sie den Einschub am Fußende heraus. Am Sockel des
Lautsprechers sind zwei Rollkarren angebracht, die mit je
einer Transportschraube festgeschraubt sind. Lösen Sie
diese Schrauben vorerst nicht.
2.2 Verwenden Sie das im Karton liegende Schaumstoffteil
als Keil, um den Lautsprecher nach unten zu schieben,
sodass die Rollen der Karren den Kartonboden berühren.
2.3 Stellen Sie den Karton unter Zuhilfenahme der seitlich
angebrachten Griffe vorsichtig auf das Fußende. Die Ovator ist
sehr schwer; achten Sie deshalb auf eine sichere Hebetechnik.
2.4 Ziehen Sie den Lautsprecher auf den Rollen aus dem
Karton und entfernen Sie die Verpackungsteile. Fassen
Sie nun den Lautsprecher an der unteren Hälfte seines
Gehäuses und rollen Sie ihn an seinen endgültigen Platz.
2.5 Nun müssen die Rollkarren entfernt werden. Lösen Sie
zunächst die beiden Transportschrauben. Stützen Sie dann
den Lautsprecher mit dem Fuß, kippen Sie ihn nach hinten
und ziehen Sie die vordere Rollkarre weg. Setzen Sie den
Lautsprecher auf den vorderen Spikes ab und kippen Sie
ihn nun nach vorn, um die hintere Rollkarre wegzuziehen.
Bedenken Sie dabei, dass die Bodenspikes der Ovator
Oberflächen beschädigen oder Verletzungen verursachen
können.
Hinweis: Bewahren Sie das gesamte Verpackungsmaterial
(inklusive der Transportschrauben) für zukünftige Transporte
auf. Stellen Sie vor jedem Transport sicher, dass alle
Transportschrauben eingeschraubt sind. Ziehen Sie
die Transportschrauben des BMR-Moduls (des Hoch-/
Mitteltonchassis) so fest an, dass seine Aufhängung arretiert ist.
2.1
2.2
2.3 2.4 2.5

D3
OVATOR S-800, S-600 & S-400 – Deutsch
3 S-400 – Auspacken
Gehen Sie beim Auspacken der Ovator S-400 wie im
Folgenden beschrieben vor.
Die Lautsprecher sollten in der Nähe ihres endgültigen
Platzes ausgepackt werden.
Befolgen Sie für jeden der beiden Lautsprecher diese Schritte:
3.1 Legen Sie den Karton auf den Rücken und öffnen Sie
die vier Klappen.
3.2 Entfernen Sie seitlich angebrachten Plastiksicherungen
sowie die Plastikgriffe. Heben Sie den äußeren Karton und
die beiden Schaumstoffteile weg, sodass der Lautsprecher
nur noch in der Kartonschale liegt.
3.3 Schieben Sie den Lautsprecher vorsichtig nach unten,
sodass die Spikes den Kartonboden berühren.
3.4 Stellen Sie die Kartonschale vorsichtig auf das Fußende.
Die Ovator ist sehr schwer; achten Sie deshalb auf eine
sichere Hebetechnik sowie darauf, dass der Lautsprecher
nicht vorne überkippt.
3.5 Ziehen Sie den Lautsprecher aus dem Karton und schie-
ben Sie ihn an seinen endgültigen Platz. Entfernen Sie dann
die Schutzkappen von den Spikes.
Note: Bewahren Sie das gesamte Verpackungsmaterial für
zukünftige Transporte auf.
3.1
3.2
3.3
3.4
3.5

D4
OVATOR S-800, S-600 & S-400 – Deutsch
listening
position
2.0m to 4.0m
4 Aufstellen
Nachdem Sie die Lautsprecher ausgepackt haben, können Sie sie an der gewünschten Stelle platzieren.
Achten Sie beim Bewegen der Lautsprecher darauf, dass die Bodenspikes keine Verletzungen oder Schäden
verursachen. Die BMR-Module der S-800 und S-600 sind mit Transportschrauben gesichert; lösen Sie diese
Schrauben erst, wenn die Lautsprecher an ihrem endgültigen Platz stehen.
Nachstehend finden Sie Hinweise zur Positionierung der Lautsprecher. Unter Umständen müssen Sie die
Lautsprecher neu positionieren, wenn sie eingespielt sind und Sie sich mit ihrer Klangcharakteristik vertraut
gemacht haben.
Die Ovator-Modelle sind nicht magnetisch abgeschirmt und sollten daher nicht in der Nähe von
Röhrenfernsehern oder anderen magnetisch empfindlichen Geräten aufgestellt werden.
Überdies ist es von Vorteil, wenn die unmittelbare
Umgebung beider Lautsprecher jeweils ähnliche akustische
Eigenschaften aufweist; insbesondere die beiden
seitlichen Wände sollten im Bereich zwischen Hörplatz und
Lautsprechern möglichst gleich beschaffen sein.
Hinweis: Dicke Vorhänge wirken sich beispielsweise anders
auf die Akustik aus als freie Fensterflächen, Bücherregale
anders als eine glatte Wand.
Abbildung 4.2 veranschaulicht die oben gegebenen
Hinweise.
4.1 Positionieren
Die erzielte Klangqualität hängt immer von der
Raumakustik und der Platzierung der Lautsprecher
ab. Selbst geringfügige Veränderungen der Position
können einen Einfluss auf den Klang haben, wie auch
Veränderungen an der Einrichtung, zum Beispiel ein neu
hinzugekommenes größeres Möbelstück.
Im Folgenden erhalten Sie allgemeine Hinweise zum
Aufstellen der Ovator-Modelle. Jeder Raum besitzt jedoch
eine eigene Akustik, weshalb die optimale Positionierung in
Ihrem Raum von der hier empfohlenen abweichen kann.
Versuchen Sie, die Lautsprecher so zu positionieren, dass
sie zwischen 2,0 und 4,0 Meter voneinander und zwischen
0,25 und 1,0 Meter von der (nach Möglichkeit festen)
Rückwand entfernt stehen. Die Lautsprecher sollten nicht
in den Raumecken stehen. Der Abstand der beiden
Lautsprecher zueinander und ihr Abstand zur
Rückwand sind die beiden Parameter, die
am wahrscheinlichsten einer Neujustierung
bedürfen, wenn die Lautsprecher eingespielt
sind und Sie sich mit ihrer Klangcharakteristik
vertraut gemacht haben.
Wenn Sie die Ovator näher an die hintere
Wand stellen, wird die Wiedergabe der tiefen
Frequenzen verstärkt. Allerdings können
Klarheit und Timing darunter leiden.
Hinweis: Die Lautsprecher müssen nicht
eingewinkelt werden. Das Einwinkeln
kann jedoch bei der Feinabstimmung der
Positionierung helfen.
Der Hörplatz sollte von beiden Lautsprechern
gleich weit entfernt sein und sein Abstand
zur Lautsprecherbasis sollte etwa so groß
sein wie der Abstand zwischen den beiden
Lautsprechern.
Rechter
Lautsprecher
Linker
Lautsprecher
2,0 m bis 4,0 m
Hörplatz
> 0,5 m
0,25 bis 1,0 m
4.2 Raumaufteilung
Akustische
Umgebung
2,0 m bis 4,0 m

D5
OVATOR S-800, S-600 & S-400 – Deutsch
4.3 Bodenspikes justieren
Die Ovator-Modelle sind mit Bodenspikes ausgestattet, die
einen definierten Übergang zwischen Lautsprecher und
Boden gewährleisten. Die Bodenspikes sollten so justiert wer-
den, dass der Lautsprecher gerade steht und nicht wackelt.
Drehen Sie die Spikes so weit wie möglich ins Gewinde; die
Kontermutter sollte den Teppich jedoch nicht berühren.
Hinweis: Wenn Sie die Lautsprecher auf Parkett oder
einem ähnlichen Boden aufstellen wollen, sollten Sie Naim-
Parkettschoner verwenden und die Spikes so justieren, dass
ihre Spitze so wenig wie möglich aus der Kontermutter her-
ausragt. Parkettschoner erhalten Sie von Ihrem Naim-Händler.
Hinweis: Die Bodenspikes der Ovator-Modelle sind mit
abziehbaren Schutzkappen versehen.
4.3.1 S-800/600-Bodenspikes justieren
Alle vier Bodenspikes können verstellt werden; die beiden
hinteren Spikes lassen sich jedoch leichter justieren, da sie
aufgrund der Konstruktion des Lautsprechersockels von oben
zugänglich sind. Um einen der hinteren S-800/600-Spikes zu
justieren, entfernen Sie zuerst mithilfe des im Lieferumfang
enthaltenen 4-mm-Inbus-Schlüssels die Madenschraube, die
den Spike arretiert. Stecken Sie den Inbus-Schlüssels dann
von oben in den Spike und drehen Sie ihn im Uhrzeigersinn,
wenn Sie den Spike nach unten aus dem Sockel heraus-
drehen wollen, und gegen den Uhrzeigersinn, wenn Sie ihn
in den Sockel hineindrehen wollen. Schrauben Sie danach
die Madenschraube wieder ein. Um zu verhindern, dass sich
der Spike dabei verdreht, können Sie den im Lieferumfang
enthaltenen Drehstift in die Durchgangsbohrung des Spikes
stecken und ihn festhalten. Abbildung 4.4 veranschaulicht die
Justage der hinteren S-800/600-Spikes.
Wenn der Lautsprecher auf einem Teppich steht, kann sich
ein Justieren der vorderen S-800/600-Spikes erübrigen. Sollte
es erforderlich sein, lösen Sie zuerst die Kontermutter mithilfe
eines 13-mm-Maulschlüssels. Stecken Sie dann den Drehstift
in die Durchgangsbohrung des Spikes und drehen Sie ihn
auf die erforderliche Länge. Schrauben Sie danach die
Kontermutter wieder fest. Abbildung 4.4 veranschaulicht die
Justage der vorderen Spikes.
4.3.2 S-400-Bodenspikes justieren
Um die S-400-Spikes zu justieren, lösen Sie zuerst die
Kontermutter mithilfe eines 13-mm-Maulschlüssels.
Stecken Sie dann den Drehstift in die
Durchgangsbohrung des Spikes und
drehen Sie ihn auf die erforderliche
Länge. Schrauben Sie danach die
Kontermutter wieder fest. Die vorde-
ren S-800/600-Spikes in Abbildung 4.4
veranschaulichen auch die Justage
der S-400-Spikes.
4.4 Bodenspikes
Inbus-
Schraube
Durchgangsbohrung für Drehstift
Durchgangsbohrung für Drehstift
Kontermutter
4.5 Transportsicherung des S-800/600-BMR-
Moduls
Das BMR-Modul (das Hoch-/Mitteltonchassis)
der Ovator S-800 bzw. S-600 ist mithilfe von zwei
Blattfedern vom Lautsprechergehäuse entkoppelt. Die
Entkopplungsvorrichtung wird während des Transports mit-
hilfe von zwei Transportschrauben gesichert, die vor der
Inbetriebnahme des Lautsprechers entfernt werden müssen.
Die BMR-Transportschrauben befinden sich an der Rückseite
des Lautsprechers (direkt hinter dem BMR-Modul).
Entfernen Sie die beiden Schrauben mithilfe des im
Lieferumfang enthaltenen 5-mm-Inbus-Schlüssels und
bewahren Sie sie für zukünftige Transporte auf. Abbildung
4.6 veranschaulicht das Lösen der Transportsicherung.
Hinweis: Die BMR-Transportschrauben müssen zum
Verpacken und Transportieren der Lautsprecher wieder
eingeschraubt werden. Ziehen Sie die Transportschrauben
vor dem Verpacken so fest an, dass die Aufhängung des
BMR-Moduls arretiert ist.
4.6 S-800/600-BMR-Transportschrauben
entfernen
Transport-
schrauben
entfernen

D6
OVATOR S-800, S-600 & S-400 – Deutsch
5 Anschließen
Die Ovator-Lautsprecher sind mit Passivfrequenzweichen ausgestattet, können jedoch für den Betrieb mit
einer Naim-Aktivfrequenzweiche und mehreren Verstärkern umgerüstet werden. Weitere Informationen hierzu
erhalten Sie von Ihrem Händler oder der zuständigen Vertriebsgesellschaft.
5.1 Kabel und Anschlüsse
Zum Anschließen der Ovator an Naim-Verstärker
empfehlen wir Naim-Lautsprecherkabel (manche Naim-
Verstärker sollten konstruktionsbedingt nur mit Naim-
Lautsprecherkabeln betrieben werden). Beide Kabel sollten
gleich lang sein; die Mindestlänge beträgt 3,5 Meter,
die Höchstlänge 20 Meter. Wenn ein Lautsprecherkabel
aufgrund der Platzierung der Anlage zu lang ist, um
gerade verlegt zu werden, rollen Sie es nicht auf, sondern
legen Sie es ziehharmonikaartig zusammen.
Das Anschlussterminal der Ovator ist mit den speziell
entwickelten Ovator-Lautsprechersteckern kompatibel.
Diese bieten die bestmögliche Klangqualität, es können
jedoch auch andere 4-mm-Stecker verwendet werden. Ihr
Händler kann Lautsprecherkabel mit Ovator-Steckern an
einem Ende und für den Verstärker geeigneten Steckern
am anderen Ende konfektionieren.
Die Lautsprecherkabel sollten so verlegt werden, dass sie
möglichst wenig mechanisch belastet und die Stecker
keiner Zugkraft ausgesetzt werden.
5.3 Anschlussterminal
6 Technische Daten
S-800 S-600 S-400
Frequenzgang: 20 Hz bis 35 kHz (im Raum) 28 Hz bis 35 kHz (im Raum) 36 Hz bis 35 kHz (im Raum)
Wirkungsgrad: 89 dB (bei 2,83 V und 1 m) 88 dB (bei 2,83 V und 1 m) 88 dB (bei 2,83 V und 1 m)
Nennimpedanz: 4 Ohm (Minimum: 3,9 Ohm) 4 Ohm (Minimum: 3,2 Ohm) 4 Ohm (Minimum: 3,8 Ohm)
Verstärkerempfehlung: 25 bis 250 W (8 Ohm) 25 bis 150 W (8 Ohm) 25 bis 130 W (8 Ohm)
Gewicht: 93,5 kg 61 kg 31 kg
Abmessungen H x W x D: 1393 x 520 x 542 mm (H x B x T) 1168 x 401 x 434 mm (H x B x T) 1060 x 330 x 345 mm (H x B x T)
inkl. Spikes und Abdeckungen inkl. Spikes und Abdeckungen inkl. Spikes und Abdeckungen
Hinweis: Farbe und Maserung von Holzoberflächen können variieren.
7 Konformitätserklärung
Hersteller: Naim Audio Limited, Southampton Road, Salisbury, England, SP1 2LN
Produkt: Ovator S-600 und S-400
Sicherheit: EN 60065: Audio-, Video- und ähnliche elektronische Geräte
EMV Störaussendungen: EN 55013: Ton- und Fernseh-Rundfunkempfänger und verwandte Geräte der
Unterhaltungselektronik – Funkstöreigenschaften – Grenzwerte und Messverfahren
EMV Störfestigkeit: EN 55020: Ton- und Fernseh-Rundfunkempfänger und verwandte Geräte der
Unterhaltungselektronik – Störfestigkeitseigenschaften – Grenzwerte und Prüfverfahren
In Übereinstimmung 2006/95/EG (Sicherheit), 2004/108/EG (EMV),
mit EG-Richtlinien: 2002/95/EG (RoHS), 2002/96/EG (WEEE)
5.2 Anschlusspolung
Achten Sie darauf, dass Sie die Lautsprecher richtig
gepolt anschließen, d.h., dass jeweils der Pluspol des
Lautsprechers (durch + gekennzeichnet) an den Pluspol des
Lautsprecherausgangs am Verstärker und der Minuspol des
Lautsprechers (durch - gekennzeichnet) an den Minuspol
des Lautsprecherausgangs am Verstärker angeschlossen ist.
Abbildung 5.3 zeigt das Anschlussterminal der Ovator.
Hinweis: Naim-Lautsprecherkabel sind an einer Seite
mit einem Grat versehen, um die korrekte Polung zu
erleichtern. Der Pluspol von Naim-Lautsprechersteckern ist
durch eine Plastiklasche gekennzeichnet.


MANUEL DE RÉFÉRENCE
OVATOR S-800, S-600 & S-400
ENGLISH, DEUTSCH, FRANÇAIS, ITALIANO,
ESPAÑOL, NEDERLANDS, 中文 , РУССКИЙ, 한국어

F1
OVATOR S-800, S-600 & S-400 – Français
Introduction et déballage
Les Ovators S-800, S-600 et S-400 sont des enceintes acoustiques de très haute
performance qui récompenseront largement les efforts que vous consacrerez à leur
installation. Il est important de lire ce manuel avant de déballer complètement et
d’installer vos Ovators. Le manuel commence par des instructions de déballage.
Les Ovators sont très lourds et pour éviter de les endommager ou de vous blesser,
vous devez suivre ces instructions avec attention. Le déballage et l’installation des
enceintes Ovator nécessitent deux personnes et ne devraient pas être tentés seul.
1 Déballage du S-800
Il est important que les enceintes Ovator soient déballées
comme il est décrit dans les paragraphes et les illustrations
suivants.
Elles doivent être déballées dans la pièce dans laquelle
elles vont être utilisées et à proximité de l’endroit où elles
seront susceptibles d’être installées.
Après avoir retiré ce manuel, veuillez procéder au déballage
de chaque Ovator en suivant les étapes ci-dessous:
1.1 Mettez le carton en position verticale et ouvrez les deux
rabats avant de la boîte.
1.2 Retirez le rabat intérieur pour créer une rampe.
1.3 Des chariots à roulettes avant et arrière fixés sur le socle
de l’enceinte permettent de la faire rouler hors du carton
sur la rampe. L’enceinte est extrêmement lourde - Faîtes
attention. Ne la manoeuvrez pas seul.
1.4 Aidez-vous d’une autre personne pour faire rouler l’enceinte
jusqu’à l’emplacement où elle sera installée. Poussez l’enceinte
à partir d’un point situé vers son milieu ou en dessous. Retirez
les chariots à roulettes un à un. Dévissez les deux vis de fixation,
puis inclinez l’enceinte vers l’arrière, en utilisant votre pied pour
la stabiliser, et retirez le chariot avant quand l’enceinte est
dégagée. Abaissez l’enceinte sur ses pointes de découplage
avant (recouvertes de housses) et inclinez l’enceinte vers
l’avant pour retirer le chariot arrière. Veillez à ce que les pointes
de l’Ovator, même recouvertes de leurs housses de protection,
ne causent ni dommage ou blessure.
Note: Gardez tous les emballages, y compris les vis de
transport et les intercalaires. Les vis de transport doivent
être replacées si les enceintes doivent être remballées et
expédiées. Serrez les vis suffisamment pour restreindre le
système de suspension.
1.1
1.2
1.3
1.4

F2
OVATOR S-800, S-600 & S-400 – Français
2 Déballage du S-600
Il est important que les enceintes Ovator soient déballées
comme il est décrit dans les paragraphes et les illustrations
suivants.
Elles doivent être déballées dans la pièce dans laquelle
elles vont être utilisées et à proximité de l’endroit où elles
seront susceptibles d’être installées.
Après avoir retiré ce manuel, veuillez procéder au déballage
de chaque Ovator en suivant les étapes ci-dessous:
2.1 Couchez le carton sur le dos et tirez l’embout coulissant
à la base de l’enceinte. L’enceinte est munie de chariots à
roulettes avant et arrière fixés sur son socle. Une vis de
transport retient chacun d’eux. Ne les retirez pas à ce
stade.
2.2 En utilisant l’intercalaire en mousse placé dans
le carton comme une cale, poussez l’enceinte vers
l’extrémité de la boîte de sorte que les roulettes touchent
le carton.
2.3 Soulevez prudemment le carton en position verticale
en utilisant les poignées sur les côtés. L’Ovator est lourd –
Ayez recours à une technique de levage appropriée et
sans danger.
2.4 Faîtes rouler l’enceinte hors du carton, enlevez les
emballages restants et amenez l’enceinte sur ses roulettes
jusqu’à l’emplacement où elle sera susceptible d’être
installée. Poussez l’enceinte à partir d’un point situé vers
son milieu ou plus bas.
2.5 Retirez les chariots à roulettes, un à la fois. Dévissez les
deux vis de transport puis inclinez l’enceinte vers l’arrière, en
vous aidant de votre pied pour la stabiliser et retirez le chariot
avant quand l’enceinte est dégagée. Abaissez l’enceinte
sur ses pointes de découplage avant et inclinez l’enceinte
vers l’avant pour retirer le chariot arrière. Quand vous retirez
les chariots, veillez à ce que les pointes de découplage de
l’Ovator ne causent pas de dommage ou de blessure.
Note: Gardez tous les emballages, y compris les vis de
transport et les intercalaires. Les vis de transport doivent
être replacées si les enceintes doivent être remballées et
expédiées. Serrez les vis suffisamment pour restreindre le
système de suspension.
2.1
2.2
2.3 2.4 2.5

F3
OVATOR S-800, S-600 & S-400 – Français
3 Déballage du S-400
Il est important que les enceintes Ovator soient déballées
comme il est décrit dans les paragraphes et les illustrations
suivants.
Elles doivent être déballées dans la pièce dans laquelle
elles vont être utilisées et à proximité de l’endroit où elles
seront susceptibles d’être installées.
Après avoir retiré ce manuel, veuillez procéder au
déballage de chaque Ovator en suivant les étapes
ci-dessous:
3.1 Le carton doit être allongé sur le dos, les rabats
extérieurs et intérieurs ouverts.
3.2 Retirez les clips latéraux et les poignées en plastique du
carton, puis enlevez l’enveloppe externe et l’emballage
interne, en laissant l’Ovator allongé sur son plateau.
3.3 Poussez doucement l’Ovator le long du plateau jusqu’à
ce que ses pointes de découplage touchent le carton.
3.4 Relevez soigneusement le plateau. L’Ovator est lourd
– Ayez recours à une technique de levage appropriée
et sans danger. Faîtes attention à ne pas déséquilibrer
l’enceinte et la faire tomber en avant.
3.5 L’Ovator peut maintenant être manœuvré hors du
plateau et mis en position. Une fois que l’Ovator est
en position, les capuchons de protection en plastique
recouvrant ses pointes de découplage peuvent être retirés.
Note: Gardez tous les emballages pour pouvoir les réutiliser
si vos Ovators doivent être remballés et expédiés.
3.1
3.2
3.3
3.4
3.5
A página está carregando...
A página está carregando...
A página está carregando...
A página está carregando...
A página está carregando...
A página está carregando...
A página está carregando...
A página está carregando...
A página está carregando...
A página está carregando...
A página está carregando...
A página está carregando...
A página está carregando...
A página está carregando...
A página está carregando...
A página está carregando...
A página está carregando...
A página está carregando...
A página está carregando...
A página está carregando...
A página está carregando...
A página está carregando...
A página está carregando...
A página está carregando...
A página está carregando...
A página está carregando...
A página está carregando...
A página está carregando...
A página está carregando...
A página está carregando...
A página está carregando...
A página está carregando...
A página está carregando...
A página está carregando...
A página está carregando...
A página está carregando...
A página está carregando...
A página está carregando...
A página está carregando...
A página está carregando...
A página está carregando...
A página está carregando...
A página está carregando...
A página está carregando...
A página está carregando...
A página está carregando...
A página está carregando...
A página está carregando...
A página está carregando...
A página está carregando...
A página está carregando...
A página está carregando...
-
 1
1
-
 2
2
-
 3
3
-
 4
4
-
 5
5
-
 6
6
-
 7
7
-
 8
8
-
 9
9
-
 10
10
-
 11
11
-
 12
12
-
 13
13
-
 14
14
-
 15
15
-
 16
16
-
 17
17
-
 18
18
-
 19
19
-
 20
20
-
 21
21
-
 22
22
-
 23
23
-
 24
24
-
 25
25
-
 26
26
-
 27
27
-
 28
28
-
 29
29
-
 30
30
-
 31
31
-
 32
32
-
 33
33
-
 34
34
-
 35
35
-
 36
36
-
 37
37
-
 38
38
-
 39
39
-
 40
40
-
 41
41
-
 42
42
-
 43
43
-
 44
44
-
 45
45
-
 46
46
-
 47
47
-
 48
48
-
 49
49
-
 50
50
-
 51
51
-
 52
52
-
 53
53
-
 54
54
-
 55
55
-
 56
56
-
 57
57
-
 58
58
-
 59
59
-
 60
60
-
 61
61
-
 62
62
-
 63
63
-
 64
64
-
 65
65
-
 66
66
-
 67
67
-
 68
68
-
 69
69
-
 70
70
-
 71
71
-
 72
72


Naim OVATOR S-600 Manual do proprietário
- Tipo
- Manual do proprietário
- Este manual também é adequado para
em outras línguas
- español: Naim OVATOR S-600 El manual del propietario
- français: Naim OVATOR S-600 Le manuel du propriétaire
- italiano: Naim OVATOR S-600 Manuale del proprietario
- Nederlands: Naim OVATOR S-600 de handleiding
Outros documentos
-
Pioneer S-81C-QL Manual do proprietário
-
Pioneer CP-7EX Manual do proprietário
-
 BowersAndWilkins Bowers and Wilkins 800 Series Diamond Manual do proprietário
-
Pioneer CP-2EX Manual do proprietário
-
Pioneer S-81B-LR-W Manual do proprietário
-
 Magnat Audio Quantum 1005 Manual do proprietário
-
Magnat Audio Quantum Signature Manual do proprietário
-
Heco THE STATEMENT Manual do proprietário
-
 Bowers & Wilkins 804 Manual do usuário
-
Bowers & Wilkins 683 Manual do usuário


