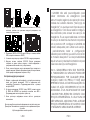
Grandstream GXV3350 Quick Installation Guide
- Tipo
- Quick Installation Guide

In all EU member states, operation of 5150
- 5350 MHz is restricted to indoor use only.
GXV3350
High-End Smart Video Phone for Android
TM
Quick Installation Guide
Grandstream Networks, Inc.
126 Brookline Ave, 3rd Floor
Boston, MA 02215. USA
Tel : +1 (617) 566 - 9300
Fax: +1 (617) 249 - 1987
www.grandstream.com
For Warranty and RMA information, please visit www.grandstream.com
HDMI, the HDMI Logo, and High-Denition
Multimedia Interface are trademarks or registered
trademarks of HDMI Licensing LLC in the United
States and other countries.
TM
*Android is a Registered Trademark of Google LLC.

Content
English............................................................................1
简体中文..........................................................................8
Español...........................................................................15
Français...........................................................................22
Deutsch...........................................................................29
Italiano...........................................................................36
Русскй...........................................................................43
Português..........................................................................50
Polski...........................................................................57

~ 1 ~ ~ 2 ~
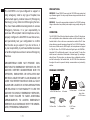
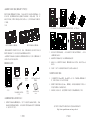
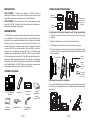
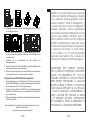
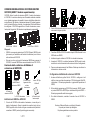
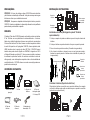
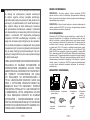
PACKAGE CONTENTS:
PRECAUTIONS:
WARNING: Please DO NOT power cycle the GXV3350 during system boot
up or rmware upgrade. You may corrupt rmware images and cause the unit
to malfunction.
WARNING: Use only the power adapter included in the GXV3350 package.
Using an alternative non-qualied power adapter may possibly damage the
unit.
1x GXV3350 Main Case 1x Handset
1x Phone Cord
1x Ethernet Cable
1x 12V Power
Adapter
1x Quick Instal-
lation Guide
1x GPL License
12V
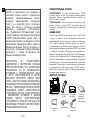
The GXV3350 is not pre-congured to support or
carry emergency calls to any type of hospital, law
enforcement agency, medical care unit (“Emergency
Service(s)”) or any other kind of Emergency Service.
You must make additional arrangements to access
Emergency Services. It is your responsibility to
purchase SIP-compliant Internet telephone service,
properly congure the GXV3350 to use that service,
and periodically test your conguration to conrm
that it works as you expect. If you do not do so, it
is your responsibility to purchase traditional wireless
or landline telephone services to access Emergency
Services.
GRANDSTREAM DOES NOT PROVIDE CON-
NECTIONS TO EMERGENCY SERVICES VIA THE
GXV3350. NEITHER GRANDSTREAM NOR ITS
OFFICERS, EMPLOYEES OR AFFILIATES MAY
BE HELD LIABLE FOR ANY CLAIM, DAMAGE, OR
LOSS. YOU HEREBY WAIVE ANY AND ALL SUCH
CLAIMS OR CAUSES OF ACTION ARISING FROM
OR RELATING TO YOUR INABILITY TO USE THE
GXV3350 TO CONTACT EMERGENCY SERVICES,
AND YOUR FAILURE TO MAKE ADDITIONAL
ARRANGEMENTS TO ACCESS EMERGENCY
SERVICES IN ACCORDANCE WITH THE IMMEDI-
ATELY PRECEDING PARAGRAPH.
EN
OVERVIEW:
The GXV3350 IP Video Phone for Android combines a 16-line IP video phone
with a multi-platform video collaboration solution and the functionality of an
Android tablet to oer an all-in-one communications solution.This IP video
phone delivers a powerful experience through its’ 5 inch 1280x720 capacitive
touch screen, tiltable camera, HDMI output, dual microphones and support
for 720p HD video. The GXV3350 adds dual Gigabit ports with PoE/PoE+,
integrated Wi-Fi and Bluetooth support. It also runs Android 7.0 and oers
instant access to hundreds of thousands of Android apps. By combining a
state-of-the-art IP video phone, an advanced video collaboration solution,
and the functionality of an Android tablet, the GXV3350 oers businesses
throughout the world a powerful desktop communication and productivity
solution..
1x Phone stand

~ 3 ~ ~ 4 ~
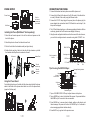
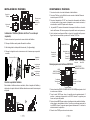
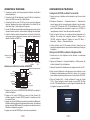
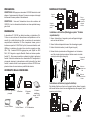
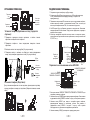
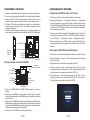
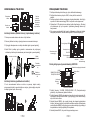
CONNECTING THE PHONE:
PHONE SETUP:
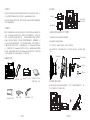
1. Attach the wall mount spacers to the slot for wall mount spacers on the
back of the phone.
2. Attach the phone to the wall via the wall mount hole.
3. Pull out the tab from the handset cradle (see gure below).
4. Rotate the tab and plug it back into the slot with the extension up to hold
the handset while the phone is mounted on the wall.
Installing the Phone (Wall Mount *Sold seperately):
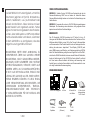
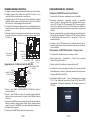
1. Connect the handset and main phone case with the phone cord.
2. Connect the LAN port of the phone to the RJ-45 socket of a hub/switch or
a router (LAN side of the router) using the Ethernet cable.
3. Connect the 12V DC output plug to the power jack on the phone; plug the
power adapter into an electrical outlet. If PoE switch is used in step 2, this
step could be skipped.
4. The LCD will display booting up or rmware upgrading information. Before
continuing, please wait for the main screen display to show up.
5. Using the web conguration interface or from the menu of the touch screen,
you can further congure network connection using static IP, DHCP... etc.
LAN Port
RJ9 Headset
Port
Power
Handset
Port
Slots for
wall mount
spacers and
phone stand.
PC Port
For installing the phone on the table with the phone stand, attach the phone
stand to the bottom of the phone where there is a slot for the phone stand,
(upper half, bottom part).
Using the Phone Stand:
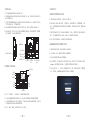
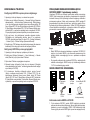
Tips for using the GXV3350 Keys:
Volume down
Volume UP
Home
MENU
BACK
1. Tap on VOLUME DOWN / UP keys to adjust volume on the phone.
2. Tap on HOME key to return to the default idle screen. Or press and hold on
the HOME key for 2 seconds to take a screenshot.
3. Press MENU key to access phone’s display settings, edit widgets and
thread manager. Or press and hold on the MENU key for 2 seconds to
enter managing application interface directly.
4. Press BACK key to go back to the previous menu.
Phone Stand
Wall mount
Wall Mount
USB Port
Kensington lock
HDMI OUT Port
Conference
Transfer
Send
Standard Keypad
Speaker
Headset
Mute
Message Waiting Indicator
Slot for expansion
Module
Handset Rest
Tab with
extension up
Tab with
extension
down

~ 5 ~ ~ 6 ~
Conguring the GXV3350 using Touch Screen:
1. Ensure your phone is properly powered up and connected to the Internet.
2. Tap on Settings → Status → Network status, to obtain the IP address of
your phone.
3. Type the phone’s IP address in your PC’s browser.
4. Enter username and password to login.(The default administrator username
is “admin” and the default random password can be found at the sticker on
the GXV3350).
5. In the web GUI → Account, select Account 1/2/3/.../16 page to congure
Account name, SIP Server, SIP User ID, Authenticate ID and Authenticate
Password to register the account on the GXV3350.
1. Make sure the phone is properly powered up and in idle screen.
2. Select Settings → Advanced → Account settings. Tap on one of the
Account to congure Account name, SIP Server, SIP User ID, SIP Auth ID,
SIP Auth Password to register account on the GXV3350. After successfully
registered, the dial screen will be shown.
3. Follow the Menu options to congure other settings on the phone. For
example, to congure static IP on the GXV3350, set up static IP address
via LCD Menu → Settings → Network → Ethernet Settings.
4. Please contact your ITSP (Internet Telephony Service Provider) for
additional settings that may be necessary to congure the phone.
PHONE CONFIGURATION:
Conguring the GXV3350 using Web Browser:
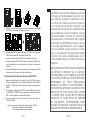
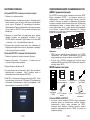
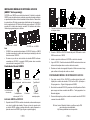
GBX20 PACKAGE CONTENTS:
1x GBX20
Extension Board
1x GBX20 Extension
Board Stand
1x Extension Board
Connector Plate
1x Screw
1x TypeA-MicroB
USB Cable
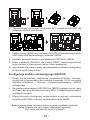
CONNECTING GBX20 EXTENSION MODULE TO
GXV3550 (GBX20 is sold seperatly):
The GXV3350 uses GBX20 as the extension module. The extension module
is an ideal solution for the busy enterprise environment looking to add the
ability to receive and dispatch calls eciently. Each GBX20 extension module
has 20 programmable buttons, Left and Right buttons, supporting 40 Multiple
Purpose Keys to be congured. GXV3350 supports up to 4 extension
modules, adding 160 fully programmable phone extensions to the phone.
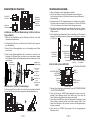
Installing the GBX20 to GXV3350:
1. On the back of the GBX20 and the GXV3350 there are slots for connector
plate. Attach the connector plate between the slots for the GBX20, Apply
the screw provided and securely tighten the connector plate to the
GBX20 (see gure in next page).
Notes:
• The GBX20 is an additional accessory for the GXV3350. Therefore, the
GBX20 (including extension module accessories for installation) is not
included in the GXV3350 package.
• In case two or more GBX20 extension modules are connected to the
GXV3350 , the second GBX20 needs to be powered on by a 12V/1A PSU.
GXV3350 with 1x GBX20
GXV3350 with 4x GBX20
1x 12V/1A Power Adapter
12V
1x Quick Installa-
tion Guide

~ 7 ~ ~ 8 ~
Conguring the GXV3350 Extension module:
1. Login the GXV3350 web GUI and congure multiple purpose keys for
extension board 1/2/3/4 under web GUI → Applications → Programmable
Keys → GBX20 Settings page.
2. On the GXV3350 extension board (i.e., GBX20), press LEFT or RIGHT
button to browse all the MPK → Programmable Keys’ status in dierent
pages.
3. For more conguration information, please refer to the GXV3350’s user
manual.
Refer to online documents and FAQ for more detailed information:
http://www.grandstream.com/our-products
This product is covered by one or more of the U.S. patents (and any
foreign patent counterparts thereto) identied at www.cmspatents.com.
2. Attach the other side of the connector plate to the GXV3350’s EXT slots
like shown in the gure below:
3. Connect the GBX20 to the GXV3350 via the USB port using the USB
cable provided with the GBX20.
4. Install the phone stands on the GXV3350 and the GBX20.
5. Power up the GXV3350. The GBX20 will show the booting up screen with
version information and connecting status.
6. After successfully booting up, the extension board will stay in idle. Press
Right and Left keys at the same time to check the version information and
status.
GXV3350不预设对医院,执法机构,医疗中心(急
救服务)以及各种紧急服务的紧急通话服务。用户必
须自行设定紧急通话功能。用户必须自行购买SIP兼
容的网络电话服务,正确的设定GXV3350使用该服
务,并定期测试您的配置以确保GXV3350如预期工
作,否则请购买传统无线或有线电话服务来拨打紧
急通话。
Grandstream Networks 公司的GXV3350不支持紧
急通话服务。Grandstream Networks公司、其管理
者和员工以及其相关机构对此所造成的任何索赔、
损失或者损害都不负有任何法律追究责任。在此,
您将无权对任何以及所有由于无法通过GXV3350拨
打紧急电话以及没有遵照前段文字描述而造成紧急
通话失败的事件提出诉讼。
ZH

~ 9 ~ ~ 10 ~
设备包装清单:
注意事项:
警告: 请不要在设备启动未完成的时候或设备的软件升级过程中断开电源。如
上所述的操作会导致话机本身的程序损坏,进而造成设备无法启动。
警告: 请使用设备包装中的电源。使用其他没有经过认证的替代电源适配器有
可能对设备造成损害。
GXV3350话机(1台)
电话手柄(1个)
手柄连线(1根)
网线 (1根)
电源适配器 (1个)
快速安装手册(1本)
/ GPL许可证 (1本)
12V
产品概览:
GXV3350视频电话代表着现代互联网时代个性化多媒体语音通信技术的
未来。它采用Android™操作系统,拥有16个独立的SIP帐号,是集多平台
视频 会议高级功能的通信解决方案。 IP视频电话GXV3350利用其5英寸
1208×720电容式触摸屏,可倾斜百万像素CMOS摄像头,HDMI输出,双
麦克风以及支持720P高清视频,为用户提供强大的体验。GXV3350增加了
具有PoE、PoE+的双千兆端口,内置Wi-Fi和蓝牙。它基于Android 7.0系统运
行,并提供对数十万个Android应用程序的即时访问。通过结合最先进的IP视
频电话、先进的视频协作解决方案以及Android平板电脑的功能,GXV3350
为全球企业提供了强大的桌面通信和生产力解决方案。
桌面支架 (1个)
安装电话:
1. 将墙体支架插入电话背面的支架插槽中;
2. 通过墙孔将电话固定在墙上;
3. 如下图所示,将话机手柄槽下方的扣机零件取出;
4. 将该零件倒转,然后重新插入原处。此时零件凸出处在外,当电话使 用墙
体支 。
安装电话 (墙体支架配件*分开出售):
墙体支架槽与
桌 面 支架槽
将桌面支架插入电话背面的支架插槽中。用户可以使用两排插槽中的一 排,
不同 的插槽用于不同的倾斜角度。
安装电话 (桌面支架):
桌面支架
墙体支架配件
墙体支架配件
话机手柄插槽
凸出处向上
凸出处向下

~ 11 ~ ~ 12 ~
电话的连接:
1. 用手柄连线连接电话手柄和电话主机;
2. 用网线连接电话的网络接口和外部网络接口(如:集线器或交换机上的
RJ-45网络接口);
3. 用12V电源适配器连接电话电源接口和交流电源插座。如果在第二步中使
用了PoE交换机,可忽略此步骤;
4. 电话屏幕将会显示设备启动或固件升级信息。请耐心等待至主画面显示;
5. 话机启动后,用户可以在主菜单或WEB浏览器进一步设置静态IP,DHCP
等其他 配置,从而获得网络连接。
网络连接端口
RJ9耳机连接
端口
12V电源
手柄连接
端口
PC端口
使用GXV3350按键:
音量减小
音量增大
主界面
菜单
返回
1. 按下“音量减小”“音量增大”按键调整话机音量 。
2. 点击主屏幕键返回默认待机界面,或长按主屏幕键2秒钟抓取屏幕截图。
3. 点击菜单键进入话机显示设置页面,可进行桌面编辑和进程管理,或长按
菜单键2秒钟直接进入进程管理界面 。
4. 按下“返回”按键,话机将回到上一级菜单。
USB端口
肯辛顿锁孔
HDMI输出
会议
转接
发送
标准键盘
免提
耳机
静音
信息指示灯
扩展模块的插槽
通过触摸屏配置GXV3350:
1. 请确保电话与电源,电话与网络已正确连接。
2. 点击设置→关于→网络状态查看电话IP地址。
3. 在电脑浏览器中输入话机的IP地址
4. 输入管理员用户名和密码登入管理界面(管理员用户名的缺省值为:
admin; 缺省密码为随机值,写于GXV3350机体的贴纸上)。
5. 打开web界面 → 帐号,选择帐号1/2/3.../16,配置帐号名称、SIP服务
器、用户ID、认证ID和认证密码等信息以注册帐号。
1. 请确保电话已正常启动,并且显示空闲状态。
2. 轉到設置→高級→帳戶設置,單擊帳戶,配置其帳戶名,SIP服務器,用戶
ID,身份驗證ID和身份驗證密碼以註冊帳戶。帳號註冊成功後,將顯示撥
號界面。
3. 根据菜单选项可以对电话进行其他设置。例如,在GXV3350上设置静态
IP,可以通过LCD界面→设置→网络→以太网设置进行配置。
4. 如有其它需要的设置,请联系您的服务提供商。
电话的配置:
通过WEB浏览器配置GXV3350:

~ 13 ~ ~ 14 ~
GBX20包装清单:
GBX20扩展板
(1个)
GBX20桌面支架
(1个)
连接板
(1个)
螺丝
(1个)
1根 TypeA-MicroB
USB线
连接GXV3350扩展板 (GBX20*分开出售):
GXV3350使用GBX20作为扩展板,为企业提供了有效处理大量频繁通话 的
解决方案。每个GBX20扩展板支持20个可编程按键、左键和右键,可配 置
40个多功能键。GXV3350支持最多4个扩展板,总共可配置和使用160个多
功 能键。
笔记:
安装GBX20扩展板至GXV3350:
1. 在GXV3350话机和GBX20背面,用户可以看到用于连接板的插槽。 将连
接板放置在GBX20的插槽上。使用提供的螺钉将连接板紧紧拧在GBX20
上(请参见下页图片)。
-GBX20是GXV3350额外的配件。因此,GBX20及其安装配件不包含在
GXV3350包装盒中。欲获取更多详细的GBX20使用信息
-如果GXV3350连接2个或超过2个的GBX20扩展模块,则第二个GBX20必须
使用12V/1A的电源进行供电。
GXV3350连接1个GBX20
GXV3350连接4个GBX20
电源适配器 12V/1A
(1个)
12V
快速安装手册
(1本)
配置GXV3350扩展板:
1. 登录到GXV3350 webGUI,在webGUI -> 应用-> 可编程键->GBX20设置
页,配置扩展板1/2/3/4的多功能键;
2. 在GXV3350的扩展板上(例如i.e., GXB20),按左键或右键查看不同页面上
的所有的MPK->可编程键的状态。
3. 欲获取更多详细信息,请参考GXV3350用户手册和GBX20用户手册。
请下载用户手册和常见问题解答以获得更详细的配置说明:
http://www.grandstream.com/our-products
2. 将连接板的另一侧连接到GXV3350的EXT插槽,如下图说示:
3. 使用包装中的USB连接线,一端接入GXV3350背面的USB接口,一端接
入GBX20背面接口;
4. 连接GXV3350桌面支架;连接GBX20桌面支架;
5. 连接好后,启动GXV3350话机。GBX20将显示启动界面,版本信息和连
接状态;
6. 同时按“左右”按键查看软件版本信息与扩展板连接状态.

~ 15 ~ ~ 16 ~
ES
El GXV3350 no viene pre congurado ni tiene
acceso a información de ningún tipo de servicio
de llamadas de emergencia, hospitales, servicios
policiales, unidades de cuidados médicos o
cualquier otro tipo de servicio de socorro. Usted
deberá hacer las coordinaciones necesarias
para poder acceder a estos servicios. Será su re-
sponsabilidad, el contratar el servicio de telefonía
por internet compatible con el protocolo SIP,
congurar apropiadamente el GXV3350 para
usar dicho servicio y periódicamente probar su
conguración para conrmar su funcionamiento
de acuerdo a sus expectativas. Si usted decide
no hacerlo, será su responsabilidad comprar
servicios de telefonía tradicional, ya sea por
línea ja o inalámbrica para poder acceder a
los servicios de emergencia.
GRANDSTREAM NO PROVEE CONEXIONES CON
NINGUN SERVICIO DE EMERGENCIA MEDIANTE EL
GXV3350. NI GRANDSTREAM NI SUS DIRECTORES,
EMPLEADOS O AFILIADOS, PUEDEN SER SUJETOS
REPONSABLES POR NINGUN RECLAMO, DAÑO
O PERDIDA. POR LO TANTO, USTED RENUNCIA A
SU DERECHO DE RECLAMO O DENUNCIA QUE
PUEDA SURGIR DEBIDO A LAS LIMITACIONES EN
EL USO DEL GXV3350 PARA CONTACTAR A LOS
SERVICIOS DE EMERGENCIA, ASI COMO A SU
NEGLIGENCIA DE REALIZAR LAS COORDINACIO-
NES NECESARIAS PARA ACCEDER A TODOS LOS
SERVICIOS DE EMERGENCIA, MENCIONADOS EN
EL PARRAFO PRECEDENTE.
CONTENIDO DEL PAQUETE:
PRECAUCIONES:
CUIDADO: Por favor NO apague el GXV3350 durante el arranque o durante
la actualización del rmware. La interrupción de la actualización del rmware
puede causar mal funcionamiento del equipo.
CUIDADO: Use solamente el adaptador de corriente incluido con el
GXV3350. Usar uno alternativo puede dañar el equipo.
1x GXV3350 Base
Principal
1x Auricular
1x Cable Telefónico
1x Cable Ethernet
1x Adaptador de
Alimentación 12V
1x Guia de Insta-
lación Rapida
/1x Licencia GPL
12V
INFORMACIÓN GENERAL:
El GXV3350 teléfono de video IP para Android combina un teléfono de video
IP de 16 líneas con una solución multiplataforma de video conferencias y la
funcionalidad de una tableta Android para ofrecer una solución de comunica-
ciones todo en uno.Este Vídeo Teléfono IP brinda una poderosa experiencia
de uso a través de su pantalla táctil capacitiva 1280x720 de 5 pulgadas,
su cámara inclinable, puerto de salida HDMI, micrófonos duales y soporte
para vídeo HD 720p. El GXV3350 posee puertos Gigabit duales con PoE/
PoE+ además de soporte para Wi-Fi y Bluetooth integrado. El dispositivo
opera bajo Android 7.0 ofreciendo acceso instantáneo a cientos de miles
de aplicaciones. Al combinar un vídeo teléfono IP de última generación,
una solución de colaboración de vídeo avanzada, y la funcionalidad de una
tableta Android, el GXV3350 ofrece a las compañías de todo el mundo una
poderosa solución para la comunicación y productividad empresarial.
1x Soporte de
Teléfono

~ 17 ~ ~ 18 ~
INSTALACIÓN DEL TELÉFONO:
1. Inserte la montura de pared en la ranura de atrás del teléfono.
2. Coloque el teléfono en la pared utilizando los oricios.
3. Halé la lengüeta de la horquilla del auricular. (Ver gura abajo).
4. Coloque la lengüeta en la misma ranura de tal manera que soporte el
auricular.
Instalando el Teléfono (Montura de Pared * se vende por
separado):
Ranuras para
soporte y
montura de
pared
Para instalar el teléfono sobre un escritorio, utilice el soporte del teléfono y
colóquelo en la parte inferior del teléfono donde se encuentra la ranura para
el soporte.
Uso del soporte del teléfono:
Soporte de
Teléfono
Montura de Pared
Montura de
Pared
CONECTANDO EL TELÉFONO:
1. Conecte el auricular a la unidad utilizando el cable telefónico
2. Conecte el Teléfono a un hub/Switch o router usando el cable de Ethernet a
través del puerto LAN RJ-45.
3. Conecte el adaptador de 12V DC en el conector de alimentación del teléfono
en la parte posterior, luego conecte el adaptador en una toma de corriente, si
esta usando un switch PoE puede omitir este paso.
4. La pantalla LCD mostrará información del arranque del teléfono o la actual-
ización del rmware. Por favor espere que la pantalla termine estos procesos.
5. Use la interfaz de conguración Web o el menú de la pantalla táctil, paracon-
gurar las funciones de redes, puede usar IP estática, DHCP, etc.
Puerto LAN
Puerto de manos
libres RJ9
Alimentación
Puerto
Auricular
Puerto PC
Consejos para usar las llaves GXV3350:
BAJAR VOLUMEN
SUBIR VOLUMEN
HOME
MENÚ
ATRÁS
1. Presione las teclas SUBIR VOLUMEN / BAJAR VOLUMEN para ajustar el nivel
de volumen en el teléfono.
2. Toque la tecla INICIO para volver a la pantalla inactiva predeterminada. O
presione y mantenga presionada la tecla INICIO durante 2 segundos para
tomar una captura de pantalla.
3. Presione la tecla MENÚ para acceder a la conguración de pantalla del teléfono,
editar widgets y administrador de hilos. O presione y mantenga presionada la
tecla MENÚ durante 2 segundos para ingresar directamente a la interfaz de
administración de la aplicación.
4. Pulse la tecla ATRÁS para volver al menú anterior.
Puerto USB
Kensington Lock
Salida HDMI Puerto
Conferencia
Transferencia
Enviar
Teclado Estándar
Altavoz
Receptor de Cabeza
Silenciar
INDICATOR DE
MENSAJE EN ESPERA
Ranura para
módulo de
extensión
Soporte de
Auricular
Lengüeta con
extensión
hacia abajo
Lengüeta con
extensión
hacia arriba

~ 19 ~ ~ 20 ~
Conguración del GXV3350 usando la pantalla táctil:
1. Asegúrese que su teléfono esté encendido y conectado a internet.
2. Toque Conguración → Acerca de → Estado de red, para obtener la
dirección IP de su teléfono.
3. Escriba la dirección IP del teléfono en el navegador de su PC
4. Introduzca el nombre de usuario y la contraseña para iniciar sesión. (El
nombre de usuario de administrador predeterminado es “admin” y la
contraseña aleatoria predeterminada puede ser encontrada en la etiqueta
del GXV3350).
5. En la GUI web → Cuenta, seleccione la página de la cuenta 1/2/3 /.../16 para
congurar Nombre de cuenta, Servidor SIP, ID de usuario SIP, Autenticar
ID y Autenticar contraseña para registrar la cuenta en el GXV3350.
1. Asegúrese que el teléfono este correctamente encendido y que la pantalla
del teléfono este inactiva.
2. Seleccione Conguración → Conguración avanzada → Conguración
de cuenta. Toque en una de las Cuentas para congurar Nombre de
cuenta,Servidor SIP, ID de usuario SIP, ID de autenticación SIP, contraseña
de autenticación SIP para registrar la cuenta en el GXV3350. Después de
registrarse con éxito, la pantalla de marcado se mostrará.
3. Siga las opciones de Menú para congurar otras conguraciones en el
teléfono. Por ejemplo, para congurar IP estática en el GXV3350, congure
la dirección IP estática a través de Menú LCD → Conguración → Red →
Conguración de Ethernet.
4. Por favor contacte a su PSI (Proveedor de Servicio de Internet) para los
ajustes adicionales que sean necesarios para congurar el teléfono.
CONFIGURACIÓN DEL TELÉFONO:
Congurando el GXV3350 utilizando un navegador Web:
Contenido del paquete del GBX20:
1x Tablero de
extensión GBX20
1x Soporte para el
tablero de extensión del
GBX20
1x Placa de
conexión del módulo
de extensión
1x tornillo
1x Cable USB
MicroB-TipoA
CONNECTING GBX20 EXTENSION MODULE TO
GXV3550 (GBX20 is sold seperatly):
El GXV350 utiliza el GBX20 como modulo extensión. El módulo de extensión
del GXV3350 es una solución ideal para el entorno empresarial que permite
monitorear el estado de las lineas, enviar y recibir llamadas de manera
eciente, cada módulo de extensión tiene 40 teclas programables multiusos,
20 en el lado izquierdo y 20 en el lado derecho. El GXV3350 Soporta hasta
4 módulos de extensión, añadiendo un total de 160 extensiones al teléfono
totalmente programables.
Instalación de modulo de extensión GBX20 en el GXV3350:
1. En la parte posterior del GXV3350 y del módulo de extensión hay unas
ranuras para la conexión a través de la placa de conexión, Instale la
placa de unión entre las ranuras para el GBX20, aplique los tornillos
proporcionados y ajuste con seguridad la placa de unión al GBX20 (ver
gura en la siguiente página).
Notas:
• El GBX20 es un accesorio adicional para el GXV3350. Por lo tanto, el
modulo de extensión GBX20 (incluyendo los accesorios para la insta-
lación del modulo) no se incluyen en el paquete del GXV3350.
• En caso de que dos o más módulos de extensión sean conectados al
GXV3350, el segundo GBX20 necesitará ser alimentado por un suministro
de poder 12V/1A.
GXV3350 con 1x GBX20
GXV3350 con 4x GBX20
1x Adaptador de Aliment-
ación 12V/1A
12V
1x Guia de Insta-
lación Rapida

~ 21 ~ ~ 22 ~
Conguración del módulo de extensión del GXV3350:
1. Ingrese a la interfaz gráca de usuario Web del GXV3350 y congure
las teclas multipropósito para el modulo de extensión 1/2/3/4 desde el
web GUI → Aplicaciones→Tecla programable→Pagina de confgiraciones
GBX20
2. En el tablero de extensión del GXV3350 (es decir, GBX20), pulse el bot-
ón IZQUIERDA o DERECHA para navegar por el estado de todas las
MPK→Tecla programable en las diferentes páginas;
3. Para mas información, por favor revisar el manual de usuario del
GXV3350 y GBX20.
Por favor, descargue el Manual del usuario y revisar la AYUDA
para obtener instrucciones más detalladas:
http://www.grandstream.com/our-products
2. Instale el otro lado de la placa de unión a las ranuras de extensión del
GXV3350 como mostrado en la gura siguiente:
3. Conecte el modulo de extensión GBX20 al GXV3350 a través del puerto
USB usando el cable USB suministrado con el GBX.
4. Instale el soporte del teléfono GBX20 y del módulo de extensión;
5. Encienda el teléfono GXV3350. El módulo de extensión del GBX20 mos-
trará la pantalla de inicio con información de la versión y el estado de la
conexión;
6. Presione las teclas de Derecha e Izquierda al mismo tiempo para vericar
la información de la versión y el estado del dispositivo.
FR
Le GXV3350 n’est pas préconguré pour prendre
en charge ou faire des appels d’urgence à tout
type d’hôpital, organisme d’application de la
loi, unité de soins médicaux (service d’urgence)
ou tout autre type de service d’urgence. Vous
devez prendre des dispositions supplémentaires
pour accéder aux services d’urgence. Il est de
votre responsabilité d’acheter un service télé-
phonique Internet compatible SIP, de congurer
correctement le GXV3350 pour utiliser ce service
et de tester périodiquement votre congura-
tion pour conrmer qu’elle fonctionne comme
prévu. Il est également de votre responsabilité
d’acheter des services téléphoniques sans l
ou xes traditionnels pour accéder aux services
d’urgence.
GRANDSTREAM NE FOURNIT PAS DE CONNEXIONS
AUX SERVICES D’URGENCE VIA LE GXV3350.
NI GRANDSTREAM NI SES BUREAUX, EMPLOYÉS
OU SOCIÉTÉS AFFILIÉES NE PEUVENT ÊTRE TENUS
RESPONSABLES DE TOUTE RÉCLAMATION,
DOMMAGE OU PERTE, ET VOUS RENONCEZ À
TOUTES LES RÉCLAMATIONS OU CAUSES D’ACTION
DÉCOULANT DE VOTRE INCAPACITÉ À UTILISER
LE GXV3350 POUR CONTACTER LES SERVICES
D’URGENCE, ET VOTRE DÉFAUT DE PRENDRE
DES DISPOSITIONS SUPPLÉMENTAIRES POUR
ACCÉDER AUX SERVICES D’URGENCE SELON LE
PARAGRAPHE PRÉCÉDANT IMMÉDIATEMENT.

~ 23 ~ ~ 24 ~
CONTENU DU PACK:
PRECAUTIONS:
AVERTISSEMENT: Veuillez ne pas éteindre le GXV3350 pendant le
démarrage du système ou la mise à jour du rmware. Cela risque de rompre
l’image du rmware et en conséquence rendre l’unité inutilisable.
AVERTISSEMENT: Utilisez seulement le boitier d’alimentation inclus dans
le pack du GXV3350. L’utilisation d’un boitier d’alimentation alternative non
qualié peut endommager l’équipement.
1x GXV3350 Boîtier
principal
1x Combiné
1x Cordon
téléphonique
1x Câble Ethernet
1x Adaptateur
secteur 12V
1x Guide
d’installation
rapide /
1x Licence GPL
12V
PRÉSENTATION:
Le GXV3350 est un vidéophone IP sous Android qui combine les avantages
d’un vidéophone IP à 16 lignes, d’une solution de vidéo conférence multi-
plateforme et d’une expérience utilisateur similaire à l’usage d’une tablette
Android pour orir une solution de communication uniée tout en un. Ce
vidéophone IP ore une expérience unique grâce à son écran tactile capacitif
5 pouces 1280x720, sa caméra inclinable, sa sortie HDMI, ses deux mi-
crophones et son support pour la vidéo HD 720p. Le GXV3350 dispose
également de deux ports Gigabit avec PoE/PoE+, Wi-Fi intégré et Bluetooth.
Il fonctionne également sous Android 7.0 et ore un accès instantané à des
centaines de milliers d’applications Android. En combinant un vidéophone
IP de pointe, une solution de collaboration vidéo avancée et la fonctionnalité
d’une tablette Android, le GXV3350 ore aux entreprises du monde entier
une puissante solution de communication et de productivité.
1x Support du
téléphone
INSTALATION DUTÉLÉPHONE:
1. Attachez le support de xation murale à la fente située à l’arrière du
téléphone.
2. Attachez le téléphone au mur via la fente de xation murale.
3. Tirez la languette du support du combiné (Voir gure ci-dessous).
4. Pivotez la languette et rebranchez-la dans la fente en gardant son appui
vers le haut pour tenir le combiné lorsque le téléphone est xé au mur (Voir
gure ci-dessous).
Installation du Téléphone (Support mural *Vendu séparément):
Fentes pour la
xation murale
et support du
téléphone
Pour installer le téléphone sur la table avec le support du téléphone, attachez
ce dernier à la fente placée à la base du téléphone (partie supérieure, partie
inférieure).
En utilisant le support du téléphone:
Support du
téléphone
Fixation Murale
Fixation
Murale
Appui du
Combiné
Languette
avec
appui vers le
haut
Languette
avec appui
vers le bas

~ 25 ~ ~ 26 ~
CONNECTER LE TÉLÉPHONE:
1. Connectez le combiné et la base principale du téléphone en utilisant le
cordon téléphonique.
2. Connectez le port LAN du téléphone à la prise RJ-45 d’un hub/switch ou
routeur (côté LAN du routeur) via le câble Ethernet.
3. Connectez la che de sortie 12V DC au port du courant du téléphone;
branchez l’adaptateur dans la prise d’alimentation. Si un Switch PoE est
utilisé dans l’étape 2, cette étape peut être ignorée.
4. L’écran LCD achera des informations de démarrage ou de mise à jour du
rmware. Avant de continuer, veuillez attendre l’achage l’écran principal.
5. A partir de l’interface web de conguration ou du menu de l’écran tactile,
vous pouvez toujours congurer la connexion réseau en utilisant soit une
adresse IP statique ou DHCP etc...
Port LAN
Prise Casque
RJ9
Alimentation
Port
Combiné
Port PC
Astuces pour utiliser les touches du GXV3350:
Volume Bas
Volume Haut
Accueil
MENU
RETOUR
1. Appuyez sur les touches VOLUME BAS/VOLUME HAUT pour ajuster le
volume du téléphone.
2. Appuyez sur la touche ACCUEIL pour revenir à l’écran d’accueil. Ou
maintenez appuyée la touche ACCUEIL pendant 2 secondes pour faire
une capture d’écran.
3. Appuyez sur la touche MENU pour accéder aux paramètres d’achage du
téléphone, éditer les widgets et le gestionnaire de processus. Ou maintenez
appuyée la touche MENU pendant 2 secondes pour accéder directement à
l’interface de l’application de gestion.
4. Appuyez sur la touche RETOUR pour revenir au menu précédent.
Port USB
Verrou Kensington
Port HDMI sortie
Conférence
Transfert
Envoyer
Clavier standard
Haut-parleur
Casque
Muet
Indicateur Message en Attente
Fente pour le module
d’extension
Congurer le GXV3350 en utilisant l’écran tactile:
1. Assurez-vous que votre téléphone est bien alimenté et correctement
connecté à Internet.
2. Appuyez sur Paramètres → À propos du téléphone → État du réseau, an
d’obtenir l’adresse IP de votre téléphone.
3. Saisissez l’adresse IP du téléphone dans le navigateur web de votre PC.
4. Entrez le nom d’utilisateur et mot de passe pour vous connecter. (Le nom
d’utilisateur de l’administrateur par défault est « admin » et le le mot de
passe aléatoire par défaut peut être trouvé sur l’autocollant du GXV3350).
5. Allez sur l’interface Web → Compte, sélectionnez la page du Compte
1/2/3/.../ 16 pour congurer le nom du compte, le serveur SIP, l’ID utilisa-
teur SIP, l’ID d’authentication et le mot de passe d’authentication an
d’enregistrer le compte sur le GXV3350.
1. Assurez-vous que le téléphone est bien alimenté et que l’écran de veille
est aché.
2. Sélectionnez Paramètres → Paramètres avancés → Paramètres du
compte. Appuyez sur l’un des comptes pour congurer le nom du compte,
le serveur SIP, l’ID utilisateur SIP, l’ID d’authentication SIP, le mot de
passe d’authentication pour enregistrer le compte sur le GXV3350. si
l’enregistrement est réussi, l’écran de numérotation sera aché.
3. Suivez les options du menu pour congurer d’autres paramètres sur le
téléphone. Par exemple, pour congurer l’adresse IP statique sur le
GXV3350, congurez l’adresse IP statique via l’écran LCD Menu →
Paramètres → Réseau → Paramètres Ethernet.
4. Veuillez contacter votre FAI (Fournisseur d’Accès à Internet) pour les
paramètres supplémentaires qui peuvent être nécessaires pour congurer
le téléphone.
CONFIGURATION DU TÉLÉPHONE:
Congurer le GXV3350 en utilisant le Navigateur Web:

~ 27 ~ ~ 28 ~
CONTENU DU PACK GBX20:
1x Carte
d’extension du
GBX20
1x Support de la
carte d’extension
du GBX20
1x Plaque de
connecteur de la
carte d’extension
1x Vis
1x Câble USB type A-
Micro B
CONNEXION DU MODULE D’EXTENSION GBX20 AU
GXV3550 (le GBX20 est vendu séparément):
TLe GXV3350 utilise GBX20 comme module d’extension. Le module
d’extension du GXV3350 est une solution idéale pour les entreprises à en-
vironnement chargé à la recherche de la possibilité de recevoir et répartir
les appels avec ecience. Chaque module d’extension possède 20 touches
programmables, touches de gauche et droite, supportant ainsi 40 Touches
Multi-fonctions à congurer. Le GXV3350 peut supporter jusqu’à 4 modules
d’extensions, ajoutant ainsi 160 touches d’extension totalement program-
mables au téléphone.
Installation du GBX20 sur GXV3350:
1. A l’arrière du GXV3350 et du module d’extension il y a des fentes de
connecteurs de la plaque. Fixez la plaque de connexion entre les fentes
du GBX20. Appliquez la vis fournie et serrez fermement la plaque de
connexion au GBX20 (voir la gure à la page suivante).
Remarques:
• Le module d’extension GBX20 est un accessoire supplémentaire pour le
GXV3350, il n’est donc pas inclus dans la boite du GXV3350 ( y compris
les accessoires d’installation du module d’extension).
• Si deux ou plusieurs modules d’extension GBX20 sont connectés au
GXV3350, le second GBX20 doit être alimenté par un PSU 12V / 1A.
GXV3350 avec 1x GBX20
GXV3350 avec 4x GBX20
1x Adaptateur secteur
12V/1A
12V
1x Guide d’installation
rapide
Conguration du module d’extension de GXV3350:
1. Accédez à l’inteface web du GXV3350 et congurez les touches multi-
fonctions pour les tableaux d’extensions 1/2/3/4 à partir de l’interface web
→ Applications → Touches programmables → Paramètres GBX20.
2. Sur le module d’extension du GXV3350, appuyez sur la touche Gauche
ou Droite pour pour parcourir l’état de MPK → Touches programmables
sur diérentes pages.
3. Pour plus d’informations, veuillez consulter le manuel d’utilisateur du
GXV3350 et GBX20.
Veuillez télécharger le manuel d’utilisation et la FAQ pour
plus de détails sur les instructions de conguration:
http://www.grandstream.com/our-products
2. Fixez l’autre côté de la plaque de connecteur aux logements EXT du
GXV3350, comme indiqué dans la gure ci-dessous:
3. Connectez le GBX20 au GXV3350 via le port USB à l’aide du câble USB
fourni avec le GBX20;
4. installez le support du téléphone sur le GXV3350 et la carte d’extension;
5. Alimentez le GXV3350. La carte d’extension du GXV3350 achera l’écran
du démarrage avec des informations sur la version et l’état de connexion;
6. Appuyez simultanément sur les touches droite et gauche pour vérier les
informations et l’état de la version.

~ 29 ~ ~ 30 ~
DE
Das GXV3350 ist nicht vorkonguriert, um Notfall-
rufnummern jeglicher Art (Unfall, Krankenhaus,
Juristisch, Medizinisch, usw.) automatisiert oder
manuell durchzuführen. Diese Services müssen
separat bestellt und organisiert werden. Ferner
liegt es im Verantwortungsbereich des Endverbr-
auchers, einen adäquaten und SIP-kompatiblen
Anschluss bereitzustellen und diesen, zusammen
mit dem GXV3350 so zu kongurieren, dass das
Endgerät wunschgemäß funktioniert.
GRANDSTREAM BIETET KEINE ANBINDUNG ZU
NOTRUFSERVICES ÜBER DAS GXV3350. WEDER
GRANDSTREAM, NOCH GRANDSTREAM NIEDER-
LASSUNGEN ODER MITARBEITER SIND HAFTBAR
FÜR BESCHÄDIGUNGEN, VERLUSTE, ODER ALLE
ANDEREN ARTEN AN SCHADENSANSPRÜCHEN,
DIE SICH AUS DER INSTALLATION, EINSATZ UND
NUTZUNG DES GXV3350 ALS TEIL EINES NOTRUF-
SYSTEMS ERGEBEN KÖNNTEN. ES LIEGT EINZIG
IN DER VERANTWORTUNG DES BENUTZERS, DIE
NOTWENDIGEN NOTRUFSERVICES, TELEKOM-
MUNIKATIONSANSCHLÜSSE UND TECHNISCH-
EN VORAUSSETZUNGEN FÜR DIE NUTZUNG DES
GXV3350 ZU SCHAFFEN.
PACKUNGSINHALT:
VORSICHTSMASSNAHMEN:
WARNUNG: Schalten Sie das GXV3350 beim Systemstart oder bei der
Firmware-Aktualisierung NICHT aus und wieder ein. Andernfalls können
Firmware-Bilder beschädigt werden und es könnten Funktionsstörungen am
Gerät auftreten.
WARNUNG: Verwenden Sie nur den im GXV3350 Paket eingeschlossenen
Netzadapter. Die Verwendung eines alternativen, nicht geeigneten Netza-
dapters kann vielleicht das Gerät beschädigen.
1x GXV3350 Hauptgerät 1x Hörer
1x Telefon
Spiralkabe
1x Netzwerkkabel
(Ethernet)
1x 12V
Netzteil
1x Kurz- Instal-
lationsanleitung
1x GPL Lizenz
12V
ÜBERSICHT:
Das IP Videotelefon GXV3350 kombiniert ein IP Telefon für bis zu 16
Leitungen und Multi-Media-Video-Kommunikation mit der Funktion und Flexi-
bilität eines Android Tablets, zu einer “All- In-One” Lösung für Kommunikation
und Zusammenarbeit. Das Produkt besticht durch eine leistungsstarke Aus-
stattung, die neben einem kapazitiven 5” Touch Display (1280x720) auch
einen HDMI Ausgang, zwei Mikrofone, und Videokommunikation in HD720p
bietet. Die Netzwerkanbindung erfolgt über zwei Gigabit Port´s mit Poe/PoE+,
oder über die WLAN Schnittstelle, die ebenso wie die Bluetooth Schnittstelle,
bereits im Gerät integriert ist. Das GXV3350 läuft unter Android 7 und bietet
auf Grund seiner oenen Architektur die Nutzung und Anwendung vieler
Android Apps zur optimalen Kommunikation und Zusammenarbeit in einer
sich stetig verändernden Businessumgebung.
1x Standfuß für
das Telefon

~ 31 ~ ~ 32 ~
EINRICHTEN DES TELEFONS:
1. Führen Sie die Wandhalterung auf der Rückseite des Telefons in die dafür
vorgesehenen Steckplätze ein.
2. Zur Montage des Telefons an der Wand nutzen Sie bitte die dafür vorgeseh-
enen Montagelöche
3. Ziehen Sie das Sicherungsplättchen aus der Hörerauage heraus (Siehe
untere Skizze)
4. Drehen Sie das Sicherungsplättchen und und stecken Sie es wieder in den
Steckplatz. Das Plättchen sollte nun weiter als zuvor herausstehen, sodass
die Hör-Sprecheinheit für die Wandmontage besser xiert werden kann. (Siehe
untere Skizze).
Installieren des Telefons (Wandmontage *nicht im Lieferum-
fang enthalten):
Eingebauter
Steckplatz für
die Wandhal-
terung und
den Standfuß
Zur Nutzung des Telefons am Tisch, führen Sie bitte den mitgelieferten Standfuß
in die auf der Rückseite des Telefons vorgesehene Montagesteckplätze ein.
Installation des Telefons (Tischmontage):
Standfuß für
das Telefon
Aufsatz zur
Wandmontage
Aufsatz zur
Wandmontage
TELEFON ANSCHLIESSEN:
1. Hörer und Gehäuse mit dem Telefonkabel anschließen.
2. LAN Port des Telefons an den RJ-45 Anschlussdose eines Netzknoten /
Switch oder eines Routers (LAN Seite des Routers) mittels des EthernetKa-
bels anschließen.
3. Verbinden Sie den 12V DC Ausgangsstecker mit der Strombuchse am Telefon.
Schließen Sie dann das Netzteil an eine Steckdose an. Wenn der PoE-Switch
in Schritt 2 verwendet wird, kann dieser Schritt übersprungen werden.
4. Das Display zeigt Informationen über den aktuellen Status oder ein Firmware-
Upgrade an. Bevor Sie fortfahren, warten Sie bitte, bis das Hauptmenu im
Display erscheint
5. Mit der Web-Kongurationsoberäche oder aus dem Menü des Touchscreens
können Sie die Netzwerkverbindung kongurieren, zum Beispiel mit statischer
IP, DHCP usw.
LAN Anschluß
RJ9 Anschlussbuchse
für Headsets
Steckernetzteil
Hörer
Anschlußt
PC Anschluß
Erste Schritte mit dem GXV3350:
LAUTSTÄRKE
VERRINGERN
LAUTSTÄRKE ERHÖHEN
HOME
MENÜ
ZURÜCK
1. Drücken Sie zur Regelung der Lautstärke die Tasten LAUTSTÄRKE ERHÖHEN
/ LAUTSTÄRKE VERRINGERN
2. Durch das Drücken der HOME Softtaste gelangen Sie immer zum vorein-
gestellten “Home”-Bildschirm zurück. Durch drücken und 2 Sek. halten der
Home Softtaste wird ein Bildschirmfoto (Scrennshot) erstellt.
3. Durch drücken der MENÜ Taste erfolgt der Zugang zu den Einstellungen, ferner
können Widget´s bearbeitet werden sowie Treads verwaltet werden. Oder
halten Sie die Menütaste 2 Sek, gedrückt um direkt in die Managementebene
der Apps zu wechseln.
4. Durch drücken der ZURÜCK Taste gelangen Sie zum vorangegangengen
Menüpunkt zurück.
USB Anschluß
KensingtonSchloss
HDMI Ausgang
Konferenz
Verbinden
Senden
Standard Tasten
Lautsprecher
Hör-Sprecheinheit
Stumm
MITTEILUNGWARTEANZEIGE
Anschlussstelle
für Erweiter-
ungsmodule
Auage für die
HörSprecheinheit
Position für das
Sicher-
ungsplättchen
bei
Wandmontage
Position für das
Sicher-
ungsplättchen bei
normaler
Nutzung

~ 33 ~ ~ 34 ~
Kongurieren des GXV3350 mit dem Touchscreen:
1. Stellen Sie sicher, das Telefon richtig eingeschaltet und mit dem Internet
ver bunden ist.
2. Wechseln auf Einstellungen → Über → Netzwerkstatus, um die IP Adresse
abzulesen.
3. Geben Sie die IP-Adresse des Telefons in Ihrem PC-Browser ein.
4. Geben Sie Benutzername und Passwort ein. Der voreingestellte Adminis-
trator-Benutzername lautet “admin”, das Zufallspasswort bendet sich auf
dem Produktaufkleber auf der Rückseite der GXV3350.
5. Über die Webschnittstelle → Konto, Konto auswählen 1/2/3/.../16 um
das Konto zu kongurieren und anschließend zu registrieren, z.B.
Kontonamen, Sip-Server, SIP-Benutzer-ID, Authentizierungs-ID und
Authentizierungs-Passwort
1. Achten Sie darauf, dass das Telefon ordnungsgemäß eingeschaltet und
die Ruhezustandsanzeige sichtbar ist
2. Wechseln zu Einstellungen→ Erweiterte Einstellungen → Kontoeinstellun-
gen. Wählen Sie das gewünschte Konto zur Konguration von Kontoname,
SIP-Server, SIP-Benutzer-ID, SIP Auth-ID, SIP Auth-Passwort, sowie zur
anschließenden Registration. Nach erfolgreicher Registration wird der
Wähl-Bildschirm.
3. Folgen Sie den Menüoptionen zur Konguration weiterer Einstellungen.
Z.B. um eine statische IP-Adresse zu kongurieren. Über das LCD Menü
→ Einstellungen → Netzwerk → Ethernet Einstellungen.
4. Bitte kontaktieren Sie Ihren Internettelefonie-Provider für zusätzliche Ein-
stellungen, die für die Kongurierung Ihres Telefons nötig sein könnten.
KONFIGURATION DES TELEFONS:
Kongurieren Sie das GXV3350 über einen Webbrowser:
GBX20-Erweiterungsmodul-Packungsinhalt:
1x GBX20
Erweiterungs-
Board
1x GBX20
Erweiterungs-
Board-Standfuß
1x Erweiterungs-Board
Anschlussplatte
1x Schraube
1x MicroB-USB
Typ 1 Kabel
Anschluss von Erweiterungsmodulen an das
GXV3350 (GBX20 *nicht im Lieferumfang enthalten)
Das Modul GBX20 wird beim GXV3350 zur Erweiterung genutzt. Das
GXV3350-Erweiterungsmodul ist eine ideale Lösung für das geschäftige
Enterprise-Umfeld, das nach einer Möglichkeit sucht, Anrufe ezient entge-
genzunehmen und weiterzuleiten. Jedes Erweiterungsmodul verfügt über 20
kongurierbare Tasten, Links- und Rechts-Tasten, die 40 Mehrzwecktasten
zur Konguration unterstützen. Das GXV3350 unterstützt bis zu 4 Erweiter-
ungsmodule, zusätzlich 160 frei programmierbare Nebenstellen am Telefon.
Anbindung des GBX20 an das GXV3350:
1. Auf der Rückseite des GXV3350 und des Erweiterungsboards gibt es
Steck pl- ätze für die Anschlussplatte. Befestigen Sie die Verbind-
ungsplatte mit den mitgelieferten Schrauben an der markierten An-
schlussstelle des GBX20. (Siehe nächste Skizze)
Bitte beachten:
• Das Erweiterungsmodul GBX20 ist ein optionales Zubehör für das
GXV3350 und nicht im Lieferumfang enthalten.
• Werden mehr als zwei GBX20 Erweiterungsmodule an ein GXV3350 an-
geschlossen, benötigt das zweite Erweiterungsmodul eine externe Strom-
versorgung über ein 12V/1A Netzteil
GXV3350 mit 1x GBX20
GXV3350 mit 4x GBX20
1x 12V/1A Netzteil
12V
1x Kurzanleitung

~ 35 ~ ~ 36 ~
Konguration des GXV3350-Erweiterungsmoduls:
1. Nach dem Einloggen in das Web-Menü des GXV3350, können über die
Rubrik GBX20 Einstellungen, die multiplen Anwendungen und Funktionen
der Er weiterungsmodule 1/2/3/4 konguriert werden;
2. Durch drücken der LINKS oder RECHTS Taste am Erweiterungsmodul
(GBX20) des GXV3350,können die unterschiedlichen Funktionsstatuse
eing- esehen werden;
3. Weitere Informationen entnehmen Sie bitte der Bedienungsanleitung des
GXV3350 und GBX20.
Das komplette Benutzer-Handbuch sowie weitere Informationen zur Kon-
guration nden Sie unter:
http://www.grandstream.com/our-products
2. Befestigen Sie die andere Seite der Verbindungsplatte mit dem GXV3350
wie nachfolgend skizziert:
3. Um das GBX20 Modul an das GXV3350 anzuschließen, stecken Sie bit-
te das im Lieferumfang enthaltene USB Kabel in die USB Buchse am
je- weiligen Gerät;
4. Installieren Sie den Telefonständer auf dem GXV3350 und
Erweiterungs-Board;
5. Schalten Sie das GXV3350 ein. Das GBX20 zeigt die Start-Bildschirm mit
Versionsinformationen und Anschlussstatus;
6. Drücken Sie gleichzeitig die linke und rechte Pfeiltaste, um Informationen
zum Systemstatus und zur Firmware Version zu erhalten.
IT
GXV3350 non è precongurato per supportare
o effettuare chiamate di emergenza a qualsiasi
tipo di ospedale, struttura giudiziaria, unità di
assistenza medica (“Servizi di emergenza”) o
a qualsiasi altro tipo di ervizio di emergenza. È
necessario effettuare accordi supplementari
per accedere ai Servizi di emergenza. È a Vostra
esclusiva responsabilità acquistare servizi di
telefonia internet conformi con SIP, congurare
GXV3350 correttamente per usare tale servizio
ed effettuare test periodici della congurazione
per assicurarsi che funzioni in modo idoneo.
Se non si effettua ciò, è Vostra responsabilità
acquistare servizi telefonici ssi o wireless tra-
dizionali per accedere ai Servizi di emergenza.
GRANDSTREAM NON FORNISCE COLLEGA-
MENTI AI SERVIZI DI EMERGENZA ATTRAVERSO
GXV3350. NÈ GRANSTREAM NÈ I SUOI RE-
SPONSABILI, DIPENDENTI O AFFILIATI POSSONO
ESSERE RITENUTI RESPONSABILI DI QUALSIASI
RECLAMO, DANNO O PERDITA, E DI QUALSIASI
AZIONE LEGALE DERIVANTE DA TALI RECLAMI
O CAUSE IN RELAZIONE ALL’IMPOSSIBILITÀ DI
USARE IL GXV3350 PER CHIAMATE AI SERVIZI
O DI STRINGERE ACCORDI SUPPLEMENTARI
PER ACCEDERE AI SERVIZI DI EMERGENZA IN
CONFORMITÀ AL PARAGRAFO PRECEDENTE.
A página está carregando...
A página está carregando...
A página está carregando...
A página está carregando...
A página está carregando...
A página está carregando...
A página está carregando...
A página está carregando...
A página está carregando...
A página está carregando...
A página está carregando...
A página está carregando...
A página está carregando...
A página está carregando...
-
 1
1
-
 2
2
-
 3
3
-
 4
4
-
 5
5
-
 6
6
-
 7
7
-
 8
8
-
 9
9
-
 10
10
-
 11
11
-
 12
12
-
 13
13
-
 14
14
-
 15
15
-
 16
16
-
 17
17
-
 18
18
-
 19
19
-
 20
20
-
 21
21
-
 22
22
-
 23
23
-
 24
24
-
 25
25
-
 26
26
-
 27
27
-
 28
28
-
 29
29
-
 30
30
-
 31
31
-
 32
32
-
 33
33
-
 34
34


Grandstream GXV3350 Quick Installation Guide
- Tipo
- Quick Installation Guide
em outras línguas
- español: Grandstream GXV3350
- français: Grandstream GXV3350
- italiano: Grandstream GXV3350
- polski: Grandstream GXV3350
Artigos relacionados
-
Grandstream GXV3370 IP Multimedia Phone for Android Guia de usuario
-
Grandstream GRP2650 Guia de instalação
-
Grandstream GBX20 Extension Module Quick Installation Guide
-
-
Grandstream GVC3212 Quick Installation Guide
-
Grandstream GHP62X/W Guia de instalação
-
Grandstream GVC3202 Quick Installation Guide
-
Grandstream GXV3350 Ficha de dados
-
Grandstream GHP620 Guia de instalação
-
Grandstream GRP2615 Quick Installation Guide