
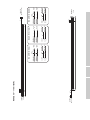
NUAGE I/O (16D) / NUAGE I/O (16A) / NUAGE I/O (8A8D) Operation Manual 1
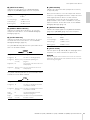
Nio
500
-
D
16
AUDIO INTERFACE
Nio
500
-
A
16
AUDIO INTERFACE
Nio
500
-
A8D8
AUDIO INTERFACE
Operation Manual
Benutzerhandbuch
Fonctions Détaillées
Manual de Operaciones
Manuale Operativo
Руководство пользователя
JA
ZH
RU
IT
ES
FR
DE
EN
NUAGE I/O
(
16
D
)
NUAGE I/O
(
16
A
)
NUAGE I/O
(
8
A
8
D
)
EnglishDeutschFrançaisEspañolItalianoРусский

2 NUAGE I/O (16D) / NUAGE I/O (16A) / NUAGE I/O (8A8D) Operation Manual
1. IMPORTANT NOTICE: DO NOT MODIFY THIS UNIT!
This product, when installed as indicated in the instructions
contained in this manual, meets FCC requirements. Modifica-
tions not expressly approved by Yamaha may void your
authority, granted by the FCC, to use the product.
2. IMPORTANT: When connecting this product to accessories
and/or another product use only high quality shielded cables.
Cable/s supplied with this product MUST be used. Follow all
installation instructions. Failure to follow instructions could void
your FCC authorization to use this product in the USA.
3. NOTE: This product has been tested and found to comply
with the requirements listed in FCC Regulations, Part 15 for
Class “B” digital devices. Compliance with these requirements
provides a reasonable level of assurance that your use of this
product in a residential environment will not result in harmful
interference with other electronic devices. This equipment gen-
erates/uses radio frequencies and, if not installed and used
according to the instructions found in the users manual, may
cause interference harmful to the operation of other electronic
devices. Compliance with FCC regulations does not guarantee
* This applies only to products distributed by YAMAHA CORPORATION OF AMERICA. (class B)
that interference will not occur in all installations. If this product
is found to be the source of interference, which can be deter-
mined by turning the unit “OFF” and “ON”, please try to elimi-
nate the problem by using one of the following measures:
Relocate either this product or the device that is being affected
by the interference.
Utilize power outlets that are on different branch (circuit
breaker or fuse) circuits or install AC line filter/s.
In the case of radio or TV interference, relocate/reorient the
antenna. If the antenna lead-in is 300 ohm ribbon lead, change
the lead-in to co-axial type cable.
If these corrective measures do not produce satisfactory
results, please contact the local retailer authorized to distribute
this type of product. If you can not locate the appropriate
retailer, please contact Yamaha Corporation of America, Elec-
tronic Service Division, 6600 Orangethorpe Ave, Buena Park,
CA90620
The above statements apply ONLY to those products distrib-
uted by Yamaha Corporation of America or its subsidiaries.
FCC INFORMATION (U.S.A.)
* This applies only to products distributed by YAMAHA CORPORATION OF AMERICA.
COMPLIANCE INFORMATION STATEMENT
(DECLARATION OF CONFORMITY PROCEDURE)
Responsible Party : Yamaha Corporation of America
Address : 6600 Orangethorpe Ave., Buena Park, Calif. 90620
Telephone : 714-522-9011
Type of Equipment : Audio Interface
Model Name : Nio500-D16/Nio500-A16/Nio500-A8D8
This device complies with Part 15 of the FCC Rules.
Operation is subject to the following two conditions:
1) this device may not cause harmful interference, and
2) this device must accept any interference received including interference that may cause undesired operation.
See user manual instructions if interference to radio reception is suspected.
(FCC DoC)
이 기기는 가정용(B급) 전자파적합기기로서 주로
가정에서 사용하는 것을 목적으로 하며, 모든
지역에서 사용할 수 있습니다.
(class b korea)
IMPORTANT NOTICE FOR THE UNITED KINGDOM
Connecting the Plug and Cord
WARNING: THIS APPARATUS MUST BE EARTHED IMPORTANT. The wires in this mains lead are coloured in accordance with the fol-
lowing code:
GREEN-AND-YELLOW : EARTH
BLUE : NEUTRAL
BROWN : LIVE
As the colours of the wires in the mains lead of this apparatus may not correspond with the coloured markings identifying the terminals
in your plug proceed as follows:
The wire which is coloured GREEN-and-YELLOW must be connected to the terminal in the plug which is marked by the letter E or by
the safety earth symbol or colored GREEN or GREEN-and-YELLOW.
The wire which is coloured BLUE must be connected to the terminal which is marked with the letter N or coloured BLACK.
The wire which is coloured BROWN must be connected to the terminal which is marked with the letter L or coloured RED.
(3 wires)

NUAGE I/O (16D) / NUAGE I/O (16A) / NUAGE I/O (8A8D) Operation Manual 3
The above warning is located on the top of the unit.
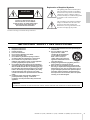
Explanation of Graphical Symbols
The lightning flash with arrowhead symbol
within an equilateral triangle is intended to
alert the user to the presence of uninsulated
“dangerous voltage” within the product’s
enclosure that may be of sufficient magnitude
to constitute a risk of electric shock to
persons.
The exclamation point within an equilateral
triangle is intended to alert the user to the
presence of important operating and
maintenance (servicing) instructions in the
literature accompanying the product.
IMPORTANT SAFETY INSTRUCTIONS
1 Read these instructions.
2 Keep these instructions.
3 Heed all warnings.
4 Follow all instructions.
5 Do not use this apparatus near water.
6 Clean only with dry cloth.
7 Do not block any ventilation openings. Install in
accordance with the manufacturer’s instructions.
8 Do not install near any heat sources such as
radiators, heat registers, stoves, or other apparatus
(including amplifiers) that produce heat.
9 Do not defeat the safety purpose of the polarized or
grounding-type plug. A polarized plug has two blades
with one wider than the other. A grounding type plug
has two blades and a third grounding prong. The wide
blade or the third prong are provided for your safety.
If the provided plug does not fit into your outlet,
consult an electrician for replacement of the obsolete
outlet.
10 Protect the power cord from being walked on or
pinched particularly at plugs, convenience
receptacles, and the point where they exit from the
apparatus.
11 Only use attachments/accessories specified by the
manufacturer.
12 Use only with the cart, stand,
tripod, bracket, or table
specified by the manufacturer,
or sold with the apparatus.
When a cart is used, use
caution when moving the cart/
apparatus combination to avoid
injury from tip-over.
13 Unplug this apparatus during lightning storms or
when unused for long periods of time.
14 Refer all servicing to qualified service personnel.
Servicing is required when the apparatus has been
damaged in any way, such as power-supply cord or
plug is damaged, liquid has been spilled or objects
have fallen into the apparatus, the apparatus has
been exposed to rain or moisture, does not operate
normally, or has been dropped.
(UL60065_03)
CAUTION: TO REDUCE THE RISK OF
ELECTRIC SHOCK, DO NOT REMOVE
COVER (OR BACK). NO USER-SERVICEABLE
PARTS INSIDE. REFER SERVICING TO
QUALIFIED SERVICE PERSONNEL.
CAUTION
RISK OF ELECTRIC SHOCK
DO NOT OPEN
WARNING
TO REDUCE THE RISK OF FIRE OR ELECTRIC SHOCK, DO NOT EXPOSE THIS APPARATUS TO RAIN OR MOISTURE.

4 NUAGE I/O (16D) / NUAGE I/O (16A) / NUAGE I/O (8A8D) Operation Manual
Contents
PRECAUTIONS .....................................................................................5
NOTICE .............................................................................................................. 6
Information.......................................................................................................... 6
Introduction ..........................................................................................7
A Message from the Development Team........................................................... 7
Included Accessories......................................................................................... 7
Items to Have Ready .......................................................................................... 7
Precautions for Rack Mounting .......................................................................... 8
Connection between the Device and a Computer ............................................. 8
How to Read the Manual .................................................................................... 8
About Dante..........................................................................................9
Overview............................................................................................................. 9
Connection with Dante Enabled Devices........................................................... 9
Setup ...................................................................................................10
Overall Process ................................................................................................ 10
Connection between the Device and a Computer ........................................... 10
Setting up the Power Supply ............................................................................ 11
Configuring the Audio Routing of the Dante Network ...................................... 11
Installing TOOLS for NUAGE............................................................................ 11
Configuring the Workgroup on NUAGE ........................................................... 11
Description of the Device ..................................................................12
Front Panel ....................................................................................................... 12
Rear Panel ........................................................................................................ 14
Description of the Software Programs.............................................17
NUAGE I/O Setup............................................................................................. 17
NUAGE Workgroup Manager........................................................................... 19
Troubleshooting.................................................................................21
Appendix.............................................................................................21
Firmware Updates ............................................................................................ 21
Specifications ....................................................................at the end of the book
Pin Assignment..................................................................at the end of the book
Dimensions........................................................................at the end of the book
Block Diagrams .................................................................at the end of the book
GNU GENERAL PUBLIC LICENSE ...................................at the end of the book

NUAGE I/O (16D) / NUAGE I/O (16A) / NUAGE I/O (8A8D) Operation Manual 5
PRECAUTIONS
PLEASE READ CAREFULLY BEFORE PROCEEDING
* Please keep this manual in a safe place for future reference.
WARNING
Always follow the basic precautions listed below to avoid the possibility of serious injury or even death from electrical
shock, short-circuiting, damages, fire or other hazards. These precautions include, but are not limited to, the following:
• Do not place the power cord near heat sources such as heaters or radiators, and
do not excessively bend or otherwise damage the cord, place heavy objects on
it, or place it in a position where anyone could walk on, trip over, or roll anything
over it.
• Only use the voltage specified as correct for the device. The required voltage is
printed on the name plate of the device.
• Use only the supplied power cord/plug.
If you intend to use the device in an area other than in the one you purchased,
the included power cord may not be compatible. Please check with your Yamaha
dealer.
• Check the electric plug periodically and remove any dirt or dust which may have
accumulated on it.
• Be sure to connect to an appropriate outlet with a protective grounding
connection. Improper grounding can result in electrical shock.
• This device contains no user-serviceable parts. Do not open the device or
attempt to disassemble the internal parts or modify them in any way. If it should
appear to be malfunctioning, discontinue use immediately and have it inspected
by qualified Yamaha service personnel.
• Do not expose the device to rain, use it near water or in damp or wet conditions,
or place on it any containers (such as vases, bottles or glasses) containing
liquids which might spill into any openings. If any liquid such as water seeps
into the device, turn off the power immediately and unplug the power cord from
the AC outlet. Then have the device inspected by qualified Yamaha service
personnel.
• Never insert or remove an electric plug with wet hands.
• Do not put burning items, such as candles, on the unit. A burning item may fall
over and cause a fire.
• When one of the following problems occur, immediately turn off the power
switch and disconnect the electric plug from the outlet. Then have the device
inspected by Yamaha service personnel.
- The power cord or plug becomes frayed or damaged.
- It emits unusual smells or smoke.
- Some object has been dropped into the instrument.
- There is a sudden loss of sound during use of the device.
CAUTION
Always follow the basic precautions listed below to avoid the possibility of physical injury to you or others, or damage
to the device or other property. These precautions include, but are not limited to, the following:
• When removing the electric plug from the device or an outlet, always hold the
plug itself and not the cord. Pulling by the cord can damage it.
• Remove the electric plug from the outlet when the device is not to be used for
extended periods of time, or during electrical storms.
• Do not place the device in an unstable position where it might accidentally fall
over.
• Do not block the vents. This device has ventilation holes at the sides to prevent
the internal temperature from becoming too high. In particular, do not place the
device on its side or upside down. Inadequate ventilation can result in
overheating, possibly causing damage to the device(s), or even fire.
• Do not place the device in a location where it may come into contact with
corrosive gases or salt air. Doing so may result in malfunction.
• Before moving the device, remove all connected cables.
• When setting up the device, make sure that the front-panel power switch can be
easily turned ON/OFF. If some trouble or malfunctions occurs, immediately turn
off the power switch and disconnect the plug from the outlet.
• If the device is mounted in an EIA standard rack, carefully read the section
“Precautions for Rack Mounting” on page 8. Inadequate ventilation can result in
overheating, possibly causing damage to the device(s), malfunction, or even
fire.
• Before connecting the device to other devices, turn off the power for all devices.
Before turning the power on or off for all devices, set all volume levels to
minimum.
• Remove the power plug from the AC outlet when cleaning the device.
Power supply/Power cord
Do not open
Water warning
Fire warning
If you notice any abnormality
Power supply/Power cord
Location
Connections
Maintenance
PA_en_1 1/2

6 NUAGE I/O (16D) / NUAGE I/O (16A) / NUAGE I/O (8A8D) Operation Manual
• Do not insert your fingers or hands in any gaps or openings on the device
(vents, etc.).
• Avoid inserting or dropping foreign objects (paper, plastic, metal, etc.) into any
gaps or openings on the device (vents, etc.) If this happens, turn off the power
immediately and unplug the power cord from the AC outlet. Then have the
device inspected by qualified Yamaha service personnel.
• Do not rest your weight on the device or place heavy objects on it, and avoid use
excessive force on the buttons, switches or connectors.
European Models
Inrush Current based on EN 55103-1:2009
2.0 A (on initial switch-on)
2.0 A (after a supply interruption of 5s)
Conforms to Environments: E1, E2, E3 and E4
NOTICE
To avoid the possibility of malfunction/ damage to the
product, damage to data, or damage to other property, follow
the notices below.
Handling and Maintenance
• Do not use the device in the vicinity of a TV, radio, stereo
equipment, mobile phone, or other electric devices.
Otherwise, the device, TV, or radio may generate noise.
• Do not expose the device to excessive dust or vibration, or
extreme cold or heat (such as in direct sunlight, near a
heater, or in a car during the day), in order to prevent the
possibility of panel disfiguration, unstable operation, or
damage to the internal components.
• Do not place vinyl, plastic or rubber objects on the device,
since this might discolor the panel.
• When cleaning the device, use a dry and soft cloth. Do not
use paint thinners, solvents, cleaning fluids, or chemical-
impregnated wiping cloths.
• Condensation can occur in the device due to rapid, drastic
changes in ambient temperature — when the device is
moved from one location to another, or air conditioning is
turned on or off, for example. Using the device while
condensation is present can cause damage. If there is
reason to believe that condensation might have occurred,
leave the device for several hours without turning on the
power until the condensation has completely dried out.
• Always turn the power off when the device is not in use.
Information
About copyrights
Copying of the commercially available musical data
including but not limited to MIDI data and/or audio data is
strictly prohibited except for your personal use.
About this manual
• The illustrations and LCD screens as shown in this manual
are for instructional purposes only, and may appear
somewhat different from those on your device.
• Windows is a registered trademark of Microsoft
®
Corporation in the United States and other countries.
• Apple, Mac and Macintosh are trademarks of Apple Inc.,
registered in the U.S. and other countries.
• The company names and product names in this manual
are the trademarks or registered trademarks of their
respective companies.
• To view PDF files, you will need to install Adobe Reader on
your computer. You can download the latest Adobe Reader
at the following website.
http://www.adobe.com
About this product
The input/output level (Max. before clip) specification can be
customized to +22dBu, +20dBu,+18dBu, +15dBu. (A fee will
be charged for this procedure.) For details, contact your
Yamaha dealer.
Yamaha cannot be held responsible for damage caused by improper use or
modifications to the device, or data that is lost or destroyed.
Handling caution
PA_en_1 2/2
The model number, serial number, power requirements, etc.,
may be found on or near the name plate, which is at the top of
the unit. You should note this serial number in the space
provided below and retain this manual as a permanent record
of your purchase to aid identification in the event of theft.
Model No.
Serial No.

Introduction
NUAGE I/O (16D) / NUAGE I/O (16A) / NUAGE I/O (8A8D) Operation Manual 7
Introduction
A Message from the
Development Team
Thank you for choosing a NUAGE series NUAGE I/O unit.
The NUAGE series is a professional music and sound
production system based around Steinberg Nuendo
digital audio workstation software.
Over the 20 years that have elapsed since Yamaha began
offering DM and O series digital consoles and other
equipment for post production and music production,
work schedules have become notably tighter with less
time available for individual projects. The NUAGE series
was created to respond to the deadline crunch with an
optimized working environment that provides
unprecedented efficiency as well as final quality.
The core of the system is Steinberg Nuendo, a DAW that
is acclaimed for its outstanding workflow efficiency and
sonic quality. The NUAGE MASTER (Ncs500-CT control
surface) and NUAGE FADER (Ncs500-FD control surface)
units were specifically developed to support and enhance
Nuendo operability. NUAGE MASTER provides a
comprehensive concentration of post production controls
in an efficient, easy-access layout. NUAGE FADER
integrates seamlessly with the Nuendo mixer window,
providing an intuitive hands-on extension to the software.
And then there’s the sound. NUAGE I/O audio interface
units have been designed to deliver the superior Nuendo
sound without compromise. Three models are currently
available: the Nio500-D16 with 16 channels of AES/EBU
input and output, the Nio500-A16 with 16 channels of
analog input and output, and the Nio500-A8D8 with a
combination of 8 channels of analog and 8 channels of
AES/EBU input and output. The NUAGE I/O units connect
to computers running Nuendo via the highly expandable
Dante digital audio protocol, allowing multiple NUAGE I/O
units to be flexibly incorporated in a wide variety of system
configurations. Monitoring latency is near zero for
comfortable, stress-free monitoring while recording, even
when multiple I/O units are used with cascaded monitor
buses. The development team was adamant that near-
zero latency would be essential to allow musicians and
artists to deliver their full creative and performance
potential.
Stability and dependability are essential in any
professional working environment. In addition to
minimizing latency, the DANTE ACCELERATOR (AIC128-
D audio interface card) used in conjunction with the
NUAGE I/O units offers stable, reliable communication
between I/O units and computer while allowing fast
recovery from any problems that do arise. You can
concentrate on the job at hand, secure in the knowledge
that you’ll be able to deliver great results on time.
Thanks to experience with the DM and O series, intensive
research, and invaluable feedback from our users, it is our
great pleasure to be able to deliver a new level of
production support in the NUAGE series. Our technology
is there to give you unrestricted creative freedom, and we
sincerely hope that the NUAGE series plays a role in your
growth and continued success.
The Yamaha NUAGE series development team.
Included Accessories
• Power cable
• Ferrite core
• Rubber stoppers (4)
• Operation Manual (this book)
NOTE
• Attach the ferrite core to prevent electromagnetic interference
when using the [CASCADE] connector. Fasten it to the
Ethernet cable near the [CASCADE OUT] connector.
• When using the unit on a slippery surface, attach the rubber
stoppers to the specified location on the bottom panel of this
device to prevent sliding.
Items to Have Ready
• Gigabit Ethernet Switch
A network switch that features various functions for
controlling and monitoring the network (such as QoS, the
ability to assign priority to data flows — e.g., clock
synchronization or audio transmission on certain data
circuits — and IGMP Snooping, the ability to filter
unnecessary multi-cast traffic) is recommended.
• Ethernet cable
A straight type (STP) of CAT5e or better is recommended.
•TOOLS for NUAGE
TOOLS for NUAGE is a software program which is
necessary when connecting the device to a computer.
When you install TOOLS for NUAGE, NUAGE Workgroup
Manager, NUAGE Extension, and NUAGE PT Bridge (Mac
only) will be installed. NUAGE Workgroup Manager is an
application that allows control over the devices and DAW
software applications as a Workgroup on NUAGE system.
NUAGE Extension is a program that allows you to link the
device with Nuendo (for versions which support the link
function). NUAGE PT Bridge is a program that allows you
to control Pro Tools (Mac only) using NUAGE FADER and
NUAGE MASTER (with the exception of certain functions).
TOOLS for NUAGE is available on the following website.
http://www.yamahaproaudio.com/downloads/

Introduction
8 NUAGE I/O (16D) / NUAGE I/O (16A) / NUAGE I/O (8A8D) Operation Manual
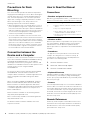
Precautions for Rack
Mounting
This unit is rated for operation at ambient temperatures
ranging from 0 to 40 degrees Celsius. When mounting the
unit with other device(s) in an EIA standard equipment
rack, internal temperatures can exceed the specified
upper limit, resulting in impaired performance or failure.
When rack mounting the unit, always observe the
following requirements to avoid heat buildup:
• When mounting the unit in a rack with devices such as
power amplifiers that generate a significant amount of
heat, leave more than 1U of space between NUAGE I/O
and other equipment. Also either leave the open spaces
uncovered or install appropriate ventilating panels to
minimize the possibility of heat buildup.
• To ensure sufficient airflow, leave the rear of the rack
open and position it at least 10 centimeters from walls or
other surfaces. If the rear of the rack can’t be left open,
install a commercially available fan or similar ventilating
option to secure sufficient airflow. If you’ve installed a
fan kit, there may be cases in which closing the rear of
the rack will produce a greater cooling effect. Refer to
the rack and/or fan unit manual for details.
Connection between the
Device and a Computer
The device can be connected to a computer in one of two
ways: with or without the DANTE ACCELERATOR. Using
the DANTE ACCELERATOR gives you the added
advantages of lower latency, using more channels, and
utilization of a redundant network. The descriptions in this
manual assume you are using the DANTE
ACCELERATOR.
To connect the device and a computer with the DANTE
ACCELERATOR, install the Dante Controller to the
computer. Dante Controller is a software application that
allows configuration and audio routing of the Dante
network.
When not using the DANTE ACCELERATOR, install the
Dante Controller and DVS (Dante Virtual Soundcard).
Dante Controller is a software application that allows
configuration and audio routing of the Dante network. DVS
is a software application that uses the computer as a
Dante-enabled device.
Dante Controller is available on the following website.
http://www.yamahaproaudio.com/
DVS is commercially available on the following website.
http://www.audinate.com/
For details on Dante Controller and DVS, refer to the
respective manuals.
How to Read the Manual
Conventions
• Brackets and quotation marks
Brackets ([ ]) and quotation marks (“ ”) around names and
phrases in this manual are used to indicate the following.
• Windows or Mac
When the procedures or explanations are specific to only
one of the platforms, Windows or Mac, this is properly
indicated in the manual. When the platforms do not
appear, procedures or explanations are for both Windows
and Mac.
• Procedures
“” appears on some procedures in the manual. For
example, the string “Devices” “Device Setup”
“Control Panel” indicates that you should perform the
procedures in the following order.
1. Click the “Devices” menu.
2. Select the “Device Setup” option.
3. Click the “Control Panel” button.
• Keyboard Shortcuts
[Windows modifier key]/[Mac modifier key]+[key] shows
the shortcut keys. For example, [Ctrl]/[command]+[Z]
means “press [Ctrl] under Windows or [command] under
Mac, then press [Z].”
• Screens
This manual predominantly uses screenshots of Windows.
However, Mac screenshots are used when instructions of
the function apply only to the Mac. Also, this manual uses
screenshots of Nuendo 6. If you are using another version
of Nuendo, the actual screenshots might not be the same.
For details, refer to the Nuendo manuals (PDF) opened
from the “Help” menu.
Nuendo References
For brevity, the descriptions of Nuendo functions in this
manual have been kept simple and basic. For details on
Nuendo functions, refer to the Nuendo manuals (PDF)
opened from the “Help” menu.
Mark Indication target
[ ] • Buttons, switches, indicators, terminals, etc. on the
device.
• Keys on a computer keyboard.
“ ” • Menus, buttons, tabs, areas, windows, etc. on a
computer window or software window.
• Excerpts of messages, function names, terms in
the manual, etc.

About Dante
NUAGE I/O (16D) / NUAGE I/O (16A) / NUAGE I/O (8A8D) Operation Manual 9
About Dante
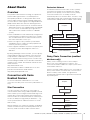
Overview
This product features Dante technology as a protocol to
transmit audio signals. Dante is a network protocol
developed by Audinate. It is designed to deliver multi-
channel audio signals at various sampling and bit rates,
as well as device control signals over a Giga-bit Ethernet
(GbE) network. Dante also offers the following benefits:
• It transmits up to 512 in/512 out, for a maximum total of
1024 audio channels over a GbE network. (The NUAGE
I/O series can be accommodate up to eight devices,
128 in/128 out with a 24-bit resolution on a NUAGE
system.)
• Dante-enabled devices will automatically configure their
network interfaces and find each other on the network.
You can label Dante devices and their audio channels
with names that make sense to you.
• Dante uses high accuracy network synchronization
standards to achieve sample-accurate playback with
extremely low latency and jitter.
• Dante supports redundant connections via primary and
secondary circuits to defend against unforeseen
difficulties.
By taking advantages of these benefits, you can skip any
complicated procedures to automate connections and
setups of Dante-enabled devices, remotely control I/O
racks or amplifiers from a mixing console, or make multi-
track recordings to a DAW, such as Nuendo, installed on a
computer in the network. Visit Audinate website for more
details on Dante.
http://www.audinate.com/
More information on Dante-enabled devices are also
posted on the Yamaha Pro Audio website:
http://www.yamahaproaudio.com/
Connection with Dante
Enabled Devices
To connect with Dante enabled devices, use a star
connection or a daisy chain connection (enabled devices
only).
Star Connection
In a star connection, each device is connected to a
central network switch. Using a GbE-compatible network
switch enables you to configure a wide-band, large-scale
network. We recommend a network switch that features
various functions to control and monitor the network (such
as Qos, the ability to assign priority to data flows — e.g.,
clock synchronization or audio transmission on certain
data circuits.)
With this topology, it is common to configure a redundant
network so that an unexpected network problem will not
affect any audio or otherwise stable communications.
Redundant Network
A redundant network consists of two circuits, a primary
circuit and a secondary circuit. Normally, the network
operates on the primary circuit. However, if the primary
connection is broken, the secondary circuit will
automatically take over communications. Therefore, using
a redundant network with a star topology would increase
communication stability relative to a daisy chain network.
Daisy Chain Connection (enabled
devices only)
A daisy chain is a wiring scheme in which multiple
devices are connected together in sequence. This
connection method is suitable for a simple system with a
small number of devices.
However, if a large number of devices are connected, the
latency value must be increased. Also, if a connection is
broken in a daisy chain network, the signal flow is
interrupted at that point and no signal will be transferred
beyond that point.
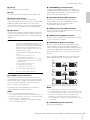
Computer
Ethernet port
Network switch Network switch
Dante-enabled device
Dante-enabled device
Dante-enabled device
PRIMARY
PRIMARY
PRIMARY
SECONDARY
SECONDARY
SECONDARY
Computer
Ethernet port
Network switch
Dante-enabled device
Dante-enabled device
PRIMARY
PRIMARY
PRIMARY
SECONDARY
SECONDARY
Dante-enabled device

Setup
10 NUAGE I/O (16D )/ NUAGE I/O (16A) / NUAGE I/O (8A8D) Operation Manual
Setup
Overall Process
This section explains how to set up the device for use with
the DANTE ACCELERATOR. Before setting up, make sure
that the following conditions are met.
• The DANTE ACCELERATOR installed to the computer
works properly.
• The Dante Controller has already been installed.
For details, refer to the DANTE ACCELERATOR manual.
1. Connect the device to a computer with a
Ethernet cable. “Connection between the
Device and a Computer” (page 10)
2. Connect the power cable then turn the
power on. “Setting up the Power Supply”
(page 11)
3. Configure the audio routing of the Dante
network with the Dante Controller.
“Configuring the Audio Routing of the Dante
Network” (page 11)
4. Install TOOLS for NUAGE. “Installing
TOOLS for NUAGE” (page 11)
5. Configure the Workgroup on NUAGE with
the NUAGE Workgroup Manager.
“Configuring the Workgroup on NUAGE”
(page 11)
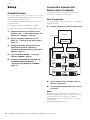
Connection between the
Device and a Computer
Connect the devices and computer by using a star
connection or a daisy chain connection.
Star Connection
This section explains the connections when configuring a
redundant network.
1. Connect the Ethernet cable as shown below.
2. Set the [UNIT ID rotary switch] on the rear
panel to a unique ID.
3. Turn on (down) the [Dip switch] No.1 on the
rear panel.
NOTE
Redundant network operation may not be available on the
DANTE ACCELERATOR depending on its firmware version. Make
sure that the firmware version currently on the DANTE
ACCELERATOR supports a redundant network by checking the
following website.
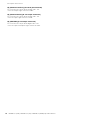
Computer
Ethernet port
Network switch Network switch
PRIMARY
PRIMARY
PRIMARY
SECONDARY
SECONDARY
SECONDARY
PRIMARY SECONDARY
CASCADE
OUT
CASCADE
OUT
CASCADE IN
CASCADE IN
DANTE
ACCELERATOR
ID#1
ID#2
ID#3

Setup
NUAGE I/O (16D )/ NUAGE I/O (16A) / NUAGE I/O (8A8D) Operation Manual 11
Daisy Chain Connection
1. Connect the Ethernet cable as shown below.
2. Set the [UNIT ID rotary switch] on the rear
panel to a unique ID.
3. Turn off (up) the [Dip switch] No.1 on the
rear panel.
Setting up the Power Supply
1. Insert one plug of the power cable into the
[AC IN] terminal on the device.
2. Insert the other plug of the power cable into
a proper AC wall outlet.
3. Turn on (|) the power.
WARNING
Only use the included power cable (or an equivalent
recommended by Yamaha). Using the wrong cable can result
in damage to the device or overheating.
CAUTION
Remove the plug of the power cable from the outlet when the
device is not be used for extended periods of time, or during
electrical storms.
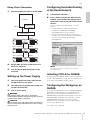
Configuring the Audio Routing
of the Dante Network
1. Launch Dante Controller.
2. In the “Routing” tab on the “Network View”
window, set the audio routing by placing a
check mark at the intersection of the desired
devices.
To use the link function with Nuendo, set up as
follows.
• Set the sample rate and pull-up/pull-down
parameters on NUAGE I/O and DANTE
ACCELERATOR to the same settings.
• Join the inputs and outputs in the matrix. For
example, set channels 1 through 16 on NUAGE I/
O to channels 1 through 16 on DANTE
ACCELERATOR.
NOTE
For details on the Dante Controller, refer to the Dante
Controller manual.
Installing TOOLS for NUAGE
To install TOOLS for NUAGE, double-click the installer file
you have downloaded from the website. For details, refer
to the TOOLS for NUAGE installation guide.
Configuring the Workgroup on
NUAGE
To configure the Workgroup, open the NUAGE Workgroup
Manager then register the devices and DAW software
applications to the Workgroup. For details, refer to the
NUAGE Workgroup Manager manual (PDF). To open the
NUAGE Workgroup Manager manual, double-click the
NUAGE Workgroup Manager icon on the task tray
(Windows) or menu bar (Mac) for opening the window,
then click the “Manual” icon.
The setup is now completed.
Computer
Ethernet port
Network switch
PRIMARY
SECONDARYCASCADE OUT
CASCADE IN
DANTE
ACCELERATOR
ID#1
ID#2
ID#3
PRIMARY
SECONDARYCASCADE OUT
CASCADE IN
PRIMARY
PRIMARY

Description of the Device
12 NUAGE I/O (16D) / NUAGE I/O (16A) / NUAGE I/O (8A8D) Operation Manual
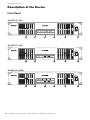
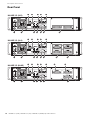
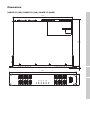
Description of the Device
Front Panel
NUAGE I/O (16D)
NUAGE I/O (16A)
NUAGE I/O (8A8D)

Description of the Device
NUAGE I/O (16D) / NUAGE I/O (16A) / NUAGE I/O (8A8D) Operation Manual 13
[INPUT level meter]
Indicates the input signal level of [ANALOG INPUT]
(page 16) or [AES/EBU] (page 16) on the rear panel.
[SAMPLE RATE indicator]
Indicates the sample rate of the device. To select the
sample rate of the device, use the NUAGE Workgroup
Manager (page 19).
[CLOCK indicator]
Indicates the word clock source of the device. To select
the word clock source of the device, use the NUAGE
Workgroup Manager (page 19).
The [SYSTEM indicator] indicates the system status of the
device on the Dante network.
The [SYNC indicator] indicates the synchronization status
of the device on the Dante network.
[SRC indicator]
Indicates the status of the SRC (sample rate converter),
on (lit) or off (unlit).
When you turn SRC on, even if the sample rate at which
the device is operating differs from the sample rate of the
audio signal input to the device, the SRC function
automatically converts the rate of the signal so that
playback will be correct. SRC is available on every two
adjacent channels. To turn SRC on/off, use the NUAGE
Workgroup Manager (page 19).
[OUTPUT level meter]
Indicates the output signal level of [ANALOG OUTPUT]
(page 16) or [AES/EBU] (page 16) on the rear panel.
[Power switch]
Turns the power on (I) and off ( ). The lamp lights when
the power is on, and is unlit when the power is off.
NOTICE
Rapidly turning the unit on and off in succession can cause it to
malfunction. After turning the unit off, wait for at least 6 seconds
before turning it on again.
Lamp Lighting level
Top (red) 0 dBFS
Second (orange) -3 dBFS or more
Third (orange) -14 dBFS or more
Bottom (green) -48 dBFS or more
Lamp Status Description
Left (green) Lit The device is working properly.
Left (green) Flashes (every
second)
The firmware updating is in
progress.
Right (red) Lit The memory on the device does not
work properly.
Right (red) Flashes (every
second)
The CPU on the device does not
work properly.
Lamp Status Description
Left (green) Lit The device is working as the slave
on the Dante network.
Left (green) Flashes (every
second)
The device is working as the master
on the Dante network.
Right
(orange)
Lit Synchronization with the Dante
network is in progress.
Right
(orange)
Flashes (every
second)
The device is not synchronized with
the Dante network.
Lamp Lighting level
Top (red) 0 dBFS
Second (orange) -3 dBFS or more
Third (orange) -14 dBFS or more
Bottom (green) -48 dBFS or more

Description of the Device
14 NUAGE I/O (16D) / NUAGE I/O (16A) / NUAGE I/O (8A8D) Operation Manual
Rear Panel
NUAGE I/O (16D)
NUAGE I/O (16A)
NUAGE I/O (8A8D)

Description of the Device
NUAGE I/O (16D) / NUAGE I/O (16A) / NUAGE I/O (8A8D) Operation Manual 15
[AC IN]
For connection to the power cable.
[Fan]
The electric fan for expelling heat and cooling the unit.
[UNIT ID rotary switch]
Sets the device ID on the Dante network. When
connecting multiple devices, set the ID on each device to
a different number. Note that you can only select the
device ID while the power is off. If you change this while
the power is on, the new device ID will not be applied.
[Dip switch]
Sets the device settings or initializes them. Note that you
can only select [Dip switch] while the power is off. If you
change this while the power is on, the settings will not be
applied.
[PRIMARY] (RJ-45 connector)
For connection to the Ethernet cable (CAT5e or better
recommended). This connector is for construction of the
Dante network, and is capable for input/output of sixteen
channels of audio. For details on how to connect the
devices, refer to “Setup” (page 10).
The lamp on this connector lights when the device is
communicating with the Dante network.
NOTE
• Use STP (shielded twisted pair) cable to prevent
electromagnetic interference. Make sure that the metal parts of
the plugs are electrically connected to the STP cable shield by
conductive tape or comparable means.
• Connect only Dante-compatible devices or GbE-compatible
devices (including a computer).
[SECONDARY] (RJ-45 connector)
The same as [PRIMARY]. However, the connection
configuration varies depending on the settings of [Dip
switch] (page 15). For details on how to connect the
devices, refer to “Setup” (page 10).
[SYSTEM LINK OUT] (BNC connector)
For connection to the BNC coaxial cable. When
connecting this connector to NUENDO SyncStation,
Nuendo and the devices maintain accurate
synchronization with each other.
[WORDCLOCK OUT] (BNC connector)
For connection to the BNC coaxial cable. This connector
outputs the word clock signal.
[WORDCLOCK IN] (BNC connector)
For connection to the BNC coaxial cable. This connector
receives the word clock signal.
[CASCADE OUT] (RJ-45 connector)
For connection to the Ethernet cable (CAT5e or better
recommended). This connector inputs and outputs
sixteen channels of audio for the direct monitoring. This is
useful when outputting the audio signal to another device
with near-zero latency. You can use this function with
Nuendo.
When connecting multiple devices, connect this to the
[CASCADE IN] terminals on other devices as shown.
Up to eight devices can be connected in this way.
NOTE
• Use a straight type (STP) cable of less than 3 meters.
• To use direct monitoring, complete “Setup” (page 10) then turn
on “Direct Monitoring” in the “Device Setup” menu on Nuendo.
• The device can input and output audio signals for direct
monitoring when the sample rate setting on the device is
96 kHz or lower. Direct monitoring is not supported for settings
of over 96 kHz.
[CASCADE IN] (RJ-45 connector)
Refer to [CASCADE OUT].
[Dip switch] Description
1 Selects whether [SECONDARY] (page 15) will
operate as a redundant network (page 9) or
daisy chain connection (page 9). [SECONDARY]
will operate as a redundant network when you
turn this on (down), and daisy chain connection
when you turn this off (up).
2 Initializes the device settings. Follow the steps
below.
1. Turn the power of the device off.
2. Turn [Dip switch 2] on (down).
3. Turn the power of the device on, then wait for
the [OUTPUT level meter] of the 16 channels to
flash at intervals.
4. Turn the power of the device off.
5. Turn [Dip switch 2] off (up).
6. Turn the power of the device on.
3 Not used. Turn it off (up) at any time.
4 Not used. Turn it off (up) at any time.
CASCADE OUT
CASCADE OUT
CASCADE IN
CASCADE IN
ID#1
ID#2
ID#3

Description of the Device
16 NUAGE I/O (16D) / NUAGE I/O (16A) / NUAGE I/O (8A8D) Operation Manual
[ANALOG OUTPUT] (D-sub 25-pin connector)
For connection to a 25-pin D-sub analog cable. This
connector outputs eight channels of audio.
[ANALOG INPUT] (D-sub 25-pin connector)
For connection to a 25-pin D-sub analog cable. This
connector inputs eight channels of audio.
[AES/EBU] (D-sub 25-pin connector)
For connection to a 25-pin D-sub digital cable. This
connector inputs and outputs eight channels of audio.

Description of the Software Programs
NUAGE I/O (16D) / NUAGE I/O (16A) / NUAGE I/O (8A8D) Operation Manual 17
Description of the
Software Programs
NUAGE I/O Setup
Overview
This software is for configuring the settings of the device
from Nuendo. To open this window, click the Nuendo
menu “Device” “NUAGE I/O Setup.”
NUAGE I/O Setup has the following two windows.
• Bass Management window
• ATT & Delay window
In the Bass Management window, you can separately
adjust the bass sound of the output signal from the device
in surround sound applications. In the ATT & Delay
window, you can adjust the level and delay of the output
signal from the device. To select the windows, click the
tabs on the upper side of the NUAGE I/O Setup window.
When you press the NUAGE Workgroup Manager button
on the upper right of the window, you can open the device
settings window opened from the NUAGE Workgroup
Manager. However, this is only available when launching
the NUAGE Workgroup Manager on the same computer.
NOTE
• To use these functions, complete “Setup” (page 10).
• To use the Bass Management function, create a surround
output bus (such as 5.1 channels) in the Nuendo menu
“Devices” “VST connection.” Also, assign the ports in one
NUAGE I/O to the ports of this output bus.
Controls and Functions
Bass Management Window
On/Off
Turns Bass Management on and off.
Presets
For selecting, storing, and deleting the preset.
The following presets are available in the default settings.
HPF1/2/3/4
Selects the type of high pass filter for each channel.
Preset
HPF
1/2/3/4
LPF1 LPF2
ATT
1/2
AMP
DVD LFE80Hz 80-12 80-24 80-24 0 +10
DVD LFE120Hz 80-12 120-42 80-24 0 +10
Movie LFE80Hz 80-12 80-24 80-24 -3 +10
Movie LFE120Hz 80-12 120-42 80-24 -3 +10
Bypass THRU THRU MUTE 0 0
Option Description
THRU The filter is not applied.
80-12 A Butterworth filter with a cutoff frequency of
80 Hz and -12 dB of attenuation.
80-12L A Linkwitz filter with a cutoff frequency of
80 Hz and -12 dB of attenuation.
80-24 A Butterworth filter with a cutoff frequency of
80 Hz and -24 dB of attenuation.
80-24L A Linkwitz filter with a cutoff frequency of
80 Hz and -24 dB of attenuation.

Description of the Software Programs
18 NUAGE I/O (16D) / NUAGE I/O (16A) / NUAGE I/O (8A8D) Operation Manual
LPF1
Selects the type of low pass filter for the LFE channel.
LPF2
Selects the type of low pass filter for the LFE channel
which is sent the signal from each channel.
ATT1/2
Sets the attenuator for each channel. The setting range is
from 0dB to -12dB.
AMP
Sets the amplifier for the LFE channel. The setting range is
from 0dB to +12dB.
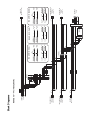
Block diagram
Indicates the position of each parameter in Bass
Management.
ATT & Delay Window
Presets
For selecting, storing, and deleting the preset.
Monitor
Selects the monitor for configuring the settings.
Mute on/off
Turns muting of the channel on and off.
Channel
Displays the channel.
Port
Displays the channel port.
ATT(dB)
Sets the attenuator/gain for speaker 1 and 2. The setting
range is from 0 dB to -12 dB, and the smallest unit is
0.1 dB.
DELAY(ms)
Sets the delay for the channel. The setting range is from 0
to 30 milliseconds, and the smallest unit is 0.02
milliseconds.
Option Description
THRU The filter is not applied.
80-24 A Butterworth filter with a cutoff frequency of
80 Hz and -24 dB of attenuation.
80-24L A Linkwitz filter with a cutoff frequency of
80 Hz and -24 dB of attenuation.
120-42 A Butterworth filter with a cutoff frequency of
120 Hz and -42 dB of attenuation.
Option Description
THRU The filter is not applied.
80-24 A Butterworth filter with a cutoff frequency of
80 Hz and -24 dB of attenuation.
80-24L A Linkwitz filter with a cutoff frequency of
80 Hz and -24 dB of attenuation.
MUTE The filter is muted.

Description of the Software Programs
NUAGE I/O (16D) / NUAGE I/O (16A) / NUAGE I/O (8A8D) Operation Manual 19
NUAGE Workgroup Manager
Overview
This is a software application that allows control over the
devices and DAW software applications as a Workgroup
on NUAGE system. To open this window, double-click the
NUAGE Workgroup Manager icon on the task tray
(Windows) or menu bar (Mac).
This section provides only the descriptions regarding the
device settings on the NUAGE Workgroup Manager. For
details on the NUAGE Workgroup Manager, refer to the
corresponding manual (PDF) which can be opened from
the “Manual” icon.
You can configure the following device settings in the
NUAGE Workgroup Manager. However, the setting menu
will differ depending on the particular devices being used.
• Adjusting the trim of the analog input and output
signals.
• Selecting the level of the analog input signal.
• Selecting the word clock source.
• Turning the SRC (sample rate converter) of the digital
input signal on and off.
• Turning the dual wire on and off.
To configure these settings, use the “Property Window”
opened by clicking “Property” on the Workgroup area in
the Main window.
Controls and Functions
NUAGE I/O (16D)

Description of the Software Programs
20 NUAGE I/O (16D) / NUAGE I/O (16A) / NUAGE I/O (8A8D) Operation Manual
NUAGE I/O (16A)
NUAGE I/O (8A/8D)
Name
Displays the name of the device or DAW software. To
change this name, click “Property” on the Workgroup area
in the Main window.
Version
Displays the version. You can confirm the firmware version
in case of devices, or the version of NUAGE Extension in
the case of Nuendo, or the version of NUAGE PT Bridge in
the case of Pro Tools.
Update
Update the device’s firmware. For details, refer to the
NUAGE Firmware Update Guide.
MAC Address
Displays the MAC Address.
Word Clock Source
Selects the word clock source.
Input and output
Displays the input and output.
Dual Wire
Turns the Dual Wire function on and off. You can turn on
and off the Dual Wire by eight channels.
This function is available when the sample rate is set to
88.2, 96, 176.4, and 192 kHz, and also the SRC is turned
off.
SRC
Turns the sample rate converter on and off. This function
is only available when the Dual Wire is turned off.
Level
Selects the input level.
Trim
Adjusts the trim.
A página está carregando ...
A página está carregando ...
A página está carregando ...
A página está carregando ...
A página está carregando ...
A página está carregando ...
A página está carregando ...
A página está carregando ...
A página está carregando ...
A página está carregando ...
A página está carregando ...
A página está carregando ...
A página está carregando ...
A página está carregando ...
A página está carregando ...
A página está carregando ...
-
 1
1
-
 2
2
-
 3
3
-
 4
4
-
 5
5
-
 6
6
-
 7
7
-
 8
8
-
 9
9
-
 10
10
-
 11
11
-
 12
12
-
 13
13
-
 14
14
-
 15
15
-
 16
16
-
 17
17
-
 18
18
-
 19
19
-
 20
20
-
 21
21
-
 22
22
-
 23
23
-
 24
24
-
 25
25
-
 26
26
-
 27
27
-
 28
28
-
 29
29
-
 30
30
-
 31
31
-
 32
32
-
 33
33
-
 34
34
-
 35
35
-
 36
36


em outros idiomas
- español: Yamaha A8D Manual de usuario
- français: Yamaha A8D Manuel utilisateur
- italiano: Yamaha A8D Manuale utente
- English: Yamaha A8D User manual
- русский: Yamaha A8D Руководство пользователя
- Nederlands: Yamaha A8D Handleiding
- Deutsch: Yamaha A8D Benutzerhandbuch
- dansk: Yamaha A8D Brugermanual
- čeština: Yamaha A8D Uživatelský manuál
- svenska: Yamaha A8D Användarmanual
- polski: Yamaha A8D Instrukcja obsługi
- Türkçe: Yamaha A8D Kullanım kılavuzu
- suomi: Yamaha A8D Ohjekirja
- română: Yamaha A8D Manual de utilizare
Artigos relacionados
-
Yamaha AIC128-D Manual do proprietário
-
Yamaha RMio64 Manual do proprietário
-
Yamaha V3 Guia de usuario
-
-
-
-
-
-
-
Yamaha V5 Manual do usuário