Perel LEDA3001WW-GP Manual do usuário
- Categoria
- Estroboscópios
- Tipo
- Manual do usuário

LEDA3001xx-xP
LEDA3002xx-xP
LEDA3003xx-xP
LEDA3005xx-xP
OUTDOOR FLOODLIGHT WITH PIR SENSOR
LED-SCHIJNWERPER VOOR BUITENSHUIS MET PIR-
SENSOR
PROJECTEUR LED POUR L'EXTÉRIEUR AVEC CAPTEUR PIR
PROYECTOR LED CON SENSOR PIR PARA EXTERIORES
LED-SCHEINWERFER MIT PIR-BEWEGUNGSMELDER FÜR
DEN AUßENBEREICH
PROJECTOR LED COM SENSOR DE MOVIMENTO PIR PARA
ESPAÇOS EXTERIORES
USER MANUAL 3
GEBRUIKERSHANDLEIDING 10
MODE D'EMPLOI 18
MANUAL DEL USUARIO 26
BEDIENUNGSANLEITUNG 33
MANUAL DO UTILIZADOR 41

LEDA3001xx-xP/3002xx-xP/3003xx-xP/3005xx-xP
V. 03 – 16/02/2016 2 ©Velleman nv

LEDA3001xx-xP/3002xx-xP/3003xx-xP/3005xx-xP
V. 03 – 16/02/2016 3 ©Velleman nv
USER MANUAL
1. Introduction
To all residents of the European Union
Important environmental information about this product
This symbol on the device or the package indicates that
disposal of the device after its lifecycle could harm the
environment. Do not dispose of the unit (or batteries) as
unsorted municipal waste; it should be taken to a
specialized company for recycling. This device should be
returned to your distributor or to a local recycling service. Respect
the local environmental rules.
If in doubt, contact your local waste disposal authorities.
Thank you for choosing Perel! Please read the manual thoroughly
before bringing this device into service. If the device was damaged in
transit, don't install or use it and contact your dealer.
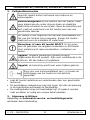
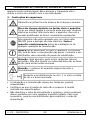
2. Safety Instructions
Keep this device away from children and unauthorized
users.
Risk of electroshock when opening the cover.
Touching live wires can cause life-threatening
electroshocks. Do not disassemble or open the housing
yourself. Have the device repaired by qualified personnel.
This luminaire does not have a built-in device to
disconnect it from the electric mains. Make sure to
electrically isolate the luminaire before installation or
maintenance activities are performed.
DO NOT disassemble or open the cover. There are no
user-serviceable parts inside the device. Refer to an
authorized dealer for service and/or spare parts.
Caution: possibly hazardous optical radiation emitted
from this product. Do not look at operating lamp. Eye
injury may result.
Caution: device heats up during use.

LEDA3001xx-xP/3002xx-xP/3003xx-xP/3005xx-xP
V. 03 – 16/02/2016 4 ©Velleman nv
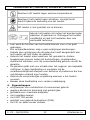
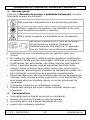
Respect a minimum distance of 1 m between the
device’s light output and any illuminated surface.
A qualified technician should install and service this device.
Make sure that the available voltage does not exceed the voltage
stated in the specifications of this manual.
Do not crimp the power cord and protect it against damage. Have
an authorised dealer replace it if necessary.
3. General Guidelines
Refer to the Velleman® Service and Quality Warranty on the last
pages of this manual.
Keep this device away from extreme temperatures.
Protect this device from shocks and abuse. Avoid brute
force when operating the device.
This device is not suitable for dimming.
Do not use the luminaire with a cracked or
broken protective glass. Disconnect immediately
from the mains and have it repaired by a
qualified technician.
Familiarise yourself with the functions of the device before actually
using it.
All modifications of the device are forbidden for safety reasons.
Damage caused by user modifications to the device is not covered
by the warranty.
Only use the device for its intended purpose. All other uses may
lead to short circuits, burns, electroshocks, lamp explosion, crash,
etc. Using the device in an unauthorised way will void the
warranty.
Damage caused by disregard of certain guidelines in this manual
is not covered by the warranty and the dealer will not accept
responsibility for any ensuing defects or problems.
Use the original packaging if the device is to be transported.
Keep this manual for future reference.

LEDA3001xx-xP/3002xx-xP/3003xx-xP/3005xx-xP
V. 03 – 16/02/2016 5 ©Velleman nv
4. Features
floodlight for commercial or residential use
die-cast aluminium housing with tempered glass
ribbed for maximum heat dissipation
with adjustable bracket
with 180° pyroelectric infrared (PIR) motion sensor
suited for outdoor use (IP44)
with 30 cm unterminated cable.
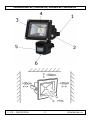
5. Overview
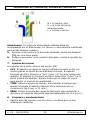
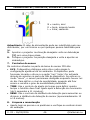
Refer to the illustrations on page 2 of this manual.
1
mounting bracket
6
daylight sensitivity control
(LUX)
time adjustment control
(TIME)
detection distance control
(SENS)
2
hinge
3
protective glass
4
LED
5
PIR motion sensor
6. Installation
6.1 Guidelines
The construction to which the device is attached should be able to
support 4 times the weight of the device for one hour without
deformation.
Never stand directly below the device when it is being mounted,
removed or serviced. Have a qualified technician check the device
once a year and once before you bring it into service.
Overhead mounting requires extensive experience: calculating
workload limits, determining the installation material to be used…
Have the material and the device itself checked regularly. Do not
attempt to install the device yourself if you lack these
qualifications as improper installation may result in serious
injuries.
This device is not suitable for dimming.
6.2 Distances
Keep at least 50 cm distance at the top and 30 cm on either side.
Respect a minimum distance of 1 m between the device’s light
output and any illuminated surface.

LEDA3001xx-xP/3002xx-xP/3003xx-xP/3005xx-xP
V. 03 – 16/02/2016 6 ©Velleman nv
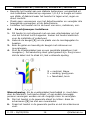
6.3 Choosing an appropriate location
You can adjust the detection area according to your needs: turn
the device to the left or right and aim it up or down. Note that the
detector is much more sensitive to objects moving across the
detection area than it is to objects coming straight at it. This is a
very important consideration when selecting the mounting
location.
The floodlight should be fixed to a stable outdoor wall made of a
non-flammable material approximately 1.8-2.0 m above the
ground, preferably in a location under eaves where the unit is
protected from the elements and shielded from direct sunlight.
Do not block the front of the detection window and make sure the
detection area holds no moving objects.
Do not install the device close to air conditioning vents,
radiators, etc.
6.4 Mounting the lamp
1. This luminaire does not have a built-in device to disconnect it
from the electric mains. Make sure to electrically isolate the
luminaire before installation or maintenance activities are
performed.
2. Use the mounting bracket [1] to determine the location of the
mounting holes.
3. Drill the holes and secure the bracket using screws and wall
plugs.
4. Connect the power cable to a suitable junction box (not incl.).
Make sure the connection is properly earthed. Make sure there is
no strain on the cable; leave sufficient slack.

LEDA3001xx-xP/3002xx-xP/3003xx-xP/3005xx-xP
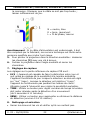
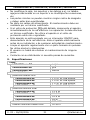
V. 03 – 16/02/2016 7 ©Velleman nv
N = neutral, blue
E = earth, yellow/green
L = line, brown
Warning: if the power cable is damaged, it must be replaced by the
manufacturer, his service agent, or a similar qualified person in order
to avoid any hazard.
5. To point the lamp in the desired direction: loosen the hinges [2]
using a spanner.
6. Tilt the lamp in the desired angle and tighten the hinges.
7. Sensor controls
The sensor controls on the bottom of the PIR sensor are:
LUX: The device can distinguish between day and night thanks to
the adjustable ambient light setting. The device can work in the
daytime when the “sun” (max.) position is selected with the
selector at the back of the device. When set to “moon”, the sensor
remains inactive during daylight. To set the sensitivity level, wait
until it gets darker and set the sensitivity you want.
TIME: Use the time adjustment control to set how long the
floodlight will stay on after the motion has been detected
(5 seconds to 11 minutes).
SENS: Use the detection distance control to increase or decrease
the sensor’s detecting distance (approximately 12 to 15 meters).
8. Cleaning and maintenance
All screws should be tight and free of corrosion.
The housing, the visible parts, the mounting supports and the
installation location (e.g. ceiling, suspension, trussing) should not
be deformed, modified or tampered with; e.g. do not drill extra

LEDA3001xx-xP/3002xx-xP/3003xx-xP/3005xx-xP
V. 03 – 16/02/2016 8 ©Velleman nv
holes in mounting supports, do not change the location of the
connections…
Mechanically moving parts must not show any signs of wear and
tear.
The electric power supply cables must not show any damage.
Have a qualified technician maintain the device.
If the protective glass [3] is damaged, disconnect the lamp
immediately from the mains. Have it repaired immediately by a
qualified technician. Do not use the lamp with a cracked or broken
protective glass.
This luminaire does not have a built-in device to disconnect it from
the electric mains. Make sure to electrically isolate the luminaire
before installation or maintenance activities are performed.
Wipe the device regularly with a moist, lint-free cloth. Do not use
alcohol or solvents.
There are no user-serviceable parts.
Contact your dealer for spare parts if necessary.
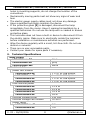
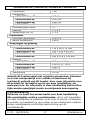
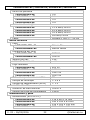
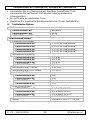
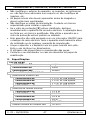
9. Technical Specifications
body colour
LEDA300xxx-BP
black
LEDA300xxx-GP
grey
LEDA300xxx-WP
white
electrical data
power LED module
LEDA3001xx-xP
1 x 10 W COB Epistar
LEDA3002xx-xP
1 x 20 W COB Epistar
LEDA3003xx-xP
1 x 30 W COB Epistar
LEDA3005xx-xP
1 x 50 W COB Epistar
total nominal power
LEDA3001xx-xP
12.5 W
LEDA3002xx-xP
22.5 W
LEDA3003xx-xP
32.5 W
LEDA3005xx-xP
54 W
nominal voltage driver
230 VAC
nominal voltage LED module
30-36 V
power factor
LEDA3001xx-xP
0.6
LEDA3002xx-xP
0.6

LEDA3001xx-xP/3002xx-xP/3003xx-xP/3005xx-xP
V. 03 – 16/02/2016 9 ©Velleman nv
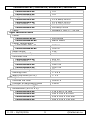
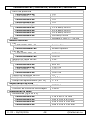
LEDA3003xx-xP
0.9
LEDA3005xx-xP
0.9
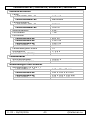
energy consumption
LEDA3001xx-xP
12.5 kWh/1000h
LEDA3002xx-xP
22.5 kWh/1000h
LEDA3003xx-xP
32.5 kWh/1000h
LEDA3005xx-xP
54 kWh/1000h
cable
HO5RN-F 3G1.0 – 30 cm
light technical data
colour
LEDA300xCW-xP
cold white
LEDA300xWW-xP
warm white
colour temperature
LEDA300xCW-xP
6500 K
LEDA300xWW-xP
3000 K
beam angle
120°
luminous intensity
- cd
luminous flux
LEDA3001xx-xP
600 lm
LEDA3002xx-xP
1200 lm
LEDA3003xx-xP
1800 lm
LEDA3005xx-xP
3000 lm
colour rendering index
70
starting time
< 0.5 s
warm-up time (60 %)
< 1 s
lifespan
nominal life time
30000 h
number of switching cycles
15000
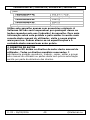
dimensions and weight
dimensions (W x H x D)
LEDA3001xx-xP
115 x 85 x 75 mm
LEDA3002xx-xP
180 x 140 x 93 mm
LEDA3003xx-xP
225 x 183 x 108 mm
LEDA3005xx-xP
285 x 235 x 138 mm

LEDA3001xx-xP/3002xx-xP/3003xx-xP/3005xx-xP
V. 03 – 16/02/2016 10 ©Velleman nv
weight
LEDA3001xx-xP
500 g +/- 20 g
LEDA3002xx-xP
1000 g +/- 50 g
LEDA3003xx-xP
1850 g
LEDA3005xx-xP
2600 g
cable length
30 cm
Use this device with original accessories only. Velleman nv
cannot be held responsible in the event of damage or injury
resulting from (incorrect) use of this device. For more info
concerning this product and the latest version of this manual,
please visit our website www.perel.eu. The information in this
manual is subject to change without prior notice.
© COPYRIGHT NOTICE
The copyright to this manual is owned by Velleman nv. All
worldwide rights reserved. No part of this manual may be copied,
reproduced, translated or reduced to any electronic medium or
otherwise without the prior written consent of the copyright holder.
GEBRUIKERSHANDLEIDING
1. Inleiding
Aan alle ingezetenen van de Europese Unie
Belangrijke milieu-informatie betreffende dit product
Dit symbool op het toestel of de verpakking geeft aan dat,
als het na zijn levenscyclus wordt weggeworpen, dit toestel
schade kan toebrengen aan het milieu. Gooi dit toestel (en
eventuele batterijen) niet bij het gewone huishoudelijke
afval; het moet bij een gespecialiseerd bedrijf
terechtkomen voor recyclage. U moet dit toestel naar uw verdeler of
naar een lokaal recyclagepunt brengen. Respecteer de plaatselijke
milieuwetgeving.
Hebt u vragen, contacteer dan de plaatselijke autoriteiten
betreffende de verwijdering.
Dank u voor uw aankoop! Lees deze handleiding grondig voor u het
toestel in gebruik neemt. Werd het toestel beschadigd tijdens het
transport, installeer of gebruik het dan niet en raadpleeg uw dealer.

LEDA3001xx-xP/3002xx-xP/3003xx-xP/3005xx-xP
V. 03 – 16/02/2016 11 ©Velleman nv
2. Veiligheidsinstructies
Houd dit toestel buiten het bereik van kinderen en
onbevoegden.
Elektrocutiegevaar bij het openen van het toestel. Raak
geen kabels aan die onder stroom staan om dodelijke
elektrische schokken te vermijden. Open de behuizing niet
zelf. Laat het onderhoud van het toestel over aan een
geschoolde vakman.
Dit toestel is niet uitgerust met een aan-uitschakelaar om
het van het lichtnet los te koppelen. Isoleer het toestel
elektrisch voor de installatie of onderhoud.
Demonteer of open dit toestel NOOIT. Er zijn geen
door de gebruiker vervangbare onderdelen in dit toestel.
Voor onderhoud of reserveonderdelen, contacteer uw
dealer.
Opgelet: mogelijk gevaarlijke optische straling
uitgezonden door dit product. Kijk nooit rechtstreeks in de
lichtbron. Dit kan leiden tot oogletsels.
Opgelet: de behuizing wordt zeer warm tijdens gebruik.
Zorg voor een minimumafstand van 1 m tussen de
lichtuitgang van het toestel en het belichte
oppervlak.
Laat dit toestel installeren en onderhouden door een geschoolde
technicus.
De beschikbare netspanning mag niet hoger zijn dan de spanning
in de specificaties achteraan de handleiding.
De voedingskabel mag niet beschadigd zijn of ingekort worden.
Laat uw dealer zo nodig een nieuwe kabel plaatsen.
3. Algemene richtlijnen
Raadpleeg de Velleman® service- en kwaliteitsgarantie
achteraan deze handleiding.

LEDA3001xx-xP/3002xx-xP/3003xx-xP/3005xx-xP
V. 03 – 16/02/2016 12 ©Velleman nv
Bescherm dit toestel tegen extreme temperaturen.
Bescherm het toestel tegen schokken. Vermijd brute
kracht tijdens de bediening van het toestel.
Dit toestel is niet geschikt om te dimmen.
Gebruik het toestel niet indien het beschermglas
gebarsten of gebroken is. Ontkoppel het toestel
onmiddellijk en laat het herstellen door een
geschoolde technicus.
Leer eerst de functies van het toestel kennen voor u het gaat
gebruiken.
Om veiligheidsredenen mag u geen wijzigingen aanbrengen.
Schade door wijzigingen die de gebruiker heeft aangebracht aan
het toestel valt niet onder de garantie.
Gebruik het toestel enkel waarvoor het gemaakt is. Andere
toepassingen kunnen leiden tot kortsluitingen, brandwonden,
elektrische schokken, enz. Bij onoordeelkundig gebruik vervalt de
garantie.
De garantie geldt niet voor schade door het negeren van bepaalde
richtlijnen in deze handleiding en uw dealer zal de
verantwoordelijkheid afwijzen voor defecten of problemen die hier
rechtstreeks verband mee houden.
Gebruik de oorspronkelijke verpakking wanneer u het toestel
vervoert.
Bewaar deze handleiding voor verdere raadpleging.
4. Eigenschappen
schijnwerper voor residentieel of commercieel gebruik
gegoten aluminium behuizing met gehard glas
geribbeld voor maximale dissipatie
met regelbare beugel
met 180° PIR-sensor
geschikt voor gebruik buitenshuis (IP44)
met 30 cm kabel zonder stekker.

LEDA3001xx-xP/3002xx-xP/3003xx-xP/3005xx-xP
V. 03 – 16/02/2016 13 ©Velleman nv
5. Omschrijving
Raadpleeg de afbeeldingen op pagina 2 van deze handleiding.
1
montagebeugel
6
instelknop daglichtgevoeligheid
(LUX)
instelknop schakeltijd (TIME)
instelknop detectieafstand (SENS)
2
scharnier
3
beschermglas
4
led
5
PIR-sensor
6. Installatie
6.1 Richtlijnen
De constructie waaraan het toestel wordt bevestigd, moet
gedurende 1 uur 4 keer het gewicht van dit toestel kunnen dragen
zonder te vervormen.
Sta nooit recht onder het toestel wanneer u het monteert,
verwijdert of herstelt. Laat het toestel controleren door een
geschoolde technicus voor u het in gebruik neemt en laat het 1 x
per jaar volledig nakijken.
Een degelijke praktijkervaring is vereist voor de plaatsing van dit
toestel: u moet de maximumbelasting van de draagconstructie
kunnen berekenen, weten welk constructiemateriaal u kunt
gebruiken, enz. Laat het materiaal en het toestel regelmatig
nakijken. Monteer het toestel niet zelf indien u er geen ervaring
mee heeft. Een slechte montage kan leiden tot verwondingen.
Dit toestel is niet geschikt om te dimmen.
6.2 Afstanden
Laat minstens 50 cm vrij aan de bovenkant en 30 cm aan
weerszijden.
Zorg voor een minimumafstand van 1 m tussen de lichtuitgang
van het toestel en het belichte oppervlak.
6.3 Een geschikte montageplaats kiezen
U kunt de detectiezone aanpassen aan uw behoeften: u kunt het
toestel naar links/rechts draaien en naar boven/beneden richten.
De detector is gevoeliger voor voorwerpen die de detectiezone
doorkruisen dan voor voorwerpen die recht op de detector afgaan.
Dit is een zeer belangrijk element bij de keuze van de
montageplaats.

LEDA3001xx-xP/3002xx-xP/3003xx-xP/3005xx-xP
V. 03 – 16/02/2016 14 ©Velleman nv
Bevestig het toestel aan een stabiele buitenmuur vervaardigd uit
niet-brandbaar materiaal op ongeveer 1,8-2,0 m hoogte en onder
een afdak of dakrand waar het beschut is tegen wind, regen en
direct zonlicht.
Plaats geen voorwerpen voor het detectievenster en verwijder alle
bewegende voorwerpen uit de detectiezone.
Installeer het toestel niet in de buurt van airco, radiatoren, enz.
6.4 De schijnwerper installeren
1. Dit toestel is niet uitgerust met een aan-uitschakelaar om het
van het lichtnet los te koppelen. Isoleer het toestel elektrisch
voor de installatie of onderhoud.
2. Gebruik de beugel [1] om de plaats van de montagegaten te
bepalen.
3. Boor de gaten en bevestig de beugel met schroeven en
muurpluggen.
4. Sluit de voedingskabel aan op een geschikte kabeldoos (niet
meegelev.). De aansluiting moet goed geaard zijn. Zorg ervoor
dat de kabel niet te strak zit; laat voldoende speling.
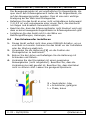
N = neutraal, blauw
E = aarding, geel/groen
L = fasedraad, bruin
Waarschuwing: Als de voedingskabel beschadigd is, moet deze
door de fabrikant, technische dienst, of een andere bevoegde
persoon vervangen worden om elk mogelijk risico te vermijden.
5. Om het toestel in de gewenste stand te richten: draai de
scharnieren [2] los met een moersleutel.
6. Draai het toestel in de gewenste positie en zet de scharnieren
vast.

LEDA3001xx-xP/3002xx-xP/3003xx-xP/3005xx-xP
V. 03 – 16/02/2016 15 ©Velleman nv
7. Instelknoppen
De instelknoppen aan de onderkant van de PIR-sensor zijn:
LUX: Het toestel kan het onderscheid maken tussen dag en nacht
dankzij de instelbare lichtgevoeligheid. Het toestel kan overdag
gebruik worden wanneer u de instelknop aan de achterkant van
het toestel op “sun” (max.) zet. Wanneer het toestel is ingesteld
op "moon", functioneert het toestel niet bij daglicht. Wacht tot het
donker wordt om de gewenste gevoeligheid in te stellen.
TIME: Gebruik deze instelknop om in te stellen hoelang het licht
blijft branden na het detecteren van een beweging (5 seconden
tot 11 minuten).
SENS: Gebruik deze instelknop om de detectieafstand van de
sensor te vergroten of te verkleinen (ongeveer 12 tot 15 meter).
8. Reiniging en onderhoud
Alle gebruikte schroeven moeten goed zijn aangespannen en
mogen geen sporen van roest vertonen.
De behuizing, de zichtbare delen, de montagebeugels en de
montageplaats (bvb. het plafond of het gebinte) mogen niet
vervormd zijn of aangepast worden (geen extra gaten in
montagebeugels, aansluitingen niet verplaatsen, enz.).
Mechanisch bewegende delen mogen geen sporen van slijtage
vertonen en mogen niet onregelmatig bewegen.
De voedingskabels mogen niet beschadigd zijn. Laat het toestel
onderhouden door een geschoolde technicus.
Indien het beschermglas [3] beschadigd is, ontkoppel het toestel
onmiddellijk. Laat het onmiddellijk herstellen door een geschoolde
technicus. Gebruik het toestel niet indien het beschermglas
gebarsten of gebroken is.
Dit toestel is niet uitgerust met een aan-uitschakelaar om het van
het lichtnet los te koppelen. Isoleer het toestel elektrisch voor de
installatie of onderhoud.
Maak het toestel geregeld schoon met een vochtige, niet
pluizende doek. Gebruik geen alcohol of solventen.
Er zijn geen door de gebruiker te vervangen onderdelen.
Bestel eventuele reserveonderdelen bij uw plaatselijke verdeler.

LEDA3001xx-xP/3002xx-xP/3003xx-xP/3005xx-xP
V. 03 – 16/02/2016 16 ©Velleman nv
9. Technische specificaties
kleur behuizing
LEDA300xxx-BP
zwart
LEDA300xxx-GP
grijs
LEDA300xxx-WP
wit
elektrische gegevens
vermogen ledmodule
LEDA3001xx-xP
1 x 10 W COB Epistar
LEDA3002xx-xP
1 x 20 W COB Epistar
LEDA3003xx-xP
1 x 30 W COB Epistar
LEDA3005xx-xP
1 x 50 W COB Epistar
totaal nominaal vermogen
LEDA3001xx-xP
12.5 W
LEDA3002xx-xP
22.5 W
LEDA3003xx-xP
32.5 W
LEDA3005xx-xP
54 W
nominale spanning driver
230 VAC
nominale spanning ledmodule
30-36 V
vermogensfactor
LEDA3001xx-xP
0.6
LEDA3002xx-xP
0.6
LEDA3003xx-xP
0.9
LEDA3005xx-xP
0.9
energieverbruik
LEDA3001xx-xP
12.5 kWh/1000h
LEDA3002xx-xP
22.5 kWh/1000h
LEDA3003xx-xP
32.5 kWh/1000h
LEDA3005xx-xP
54 kWh/1000h
kabel
HO5RN-F 3G1.0 – 30 cm
technische gegevens
kleur
LEDA300xCW-xP
koudwit
LEDA300xWW-xP
warmwit
kleurtemperatuur
LEDA300xCW-xP
6500 K
LEDA300xWW-xP
3000 K
stralingshoek
120°

LEDA3001xx-xP/3002xx-xP/3003xx-xP/3005xx-xP
V. 03 – 16/02/2016 17 ©Velleman nv
lichtsterkte
- cd
lichtstroom
LEDA3001xx-xP
600 lm
LEDA3002xx-xP
1200 lm
LEDA3003xx-xP
1800 lm
LEDA3005xx-xP
3000 lm
kleurweergave index
70
starttijd
< 0.5 s
opwarmtijd (60 %)
< 1 s
levensduur
nominale levensduur
30000 u
aantal schakelcycli
15000
afmetingen en gewicht
afmetingen (B x H x D)
LEDA3001xx-xP
115 x 85 x 75 mm
LEDA3002xx-xP
180 x 140 x 93 mm
LEDA3003xx-xP
225 x 183 x 108 mm
LEDA3005xx-xP
285 x 235 x 138 mm
gewicht
LEDA3001xx-xP
500 g +/- 20 g
LEDA3002xx-xP
1000 g +/- 50 g
LEDA3003xx-xP
1850 g
LEDA3005xx-xP
2600 g
kabellengte
30 cm
Gebruik dit toestel enkel met originele accessoires. Velleman
nv is niet aansprakelijk voor schade of kwetsuren bij
(verkeerd) gebruik van dit toestel. Voor meer informatie over
dit product en de laatste versie van deze handleiding, zie
www.perel.eu. De informatie in deze handleiding kan te allen
tijde worden gewijzigd zonder voorafgaande kennisgeving.
© AUTEURSRECHT
Velleman nv heeft het auteursrecht voor deze handleiding.
Alle wereldwijde rechten voorbehouden. Het is niet toegestaan
om deze handleiding of gedeelten ervan over te nemen, te kopiëren,
te vertalen, te bewerken en op te slaan op een elektronisch medium
zonder voorafgaande schriftelijke toestemming van de
rechthebbende.

LEDA3001xx-xP/3002xx-xP/3003xx-xP/3005xx-xP
V. 03 – 16/02/2016 18 ©Velleman nv
MODE D'EMPLOI
1. Introduction
Aux résidents de l'Union européenne
Informations environnementales importantes concernant ce
produit
Ce symbole sur l'appareil ou l'emballage indique que
l’élimination d’un appareil en fin de vie peut polluer
l'environnement. Ne pas jeter un appareil électrique ou
électronique (et des piles éventuelles) parmi les déchets
municipaux non sujets au tri sélectif ; une déchèterie
traitera l’appareil en question. Renvoyer cet appareil à votre
fournisseur ou à un service de recyclage local. Il convient de
respecter la réglementation locale relative à la protection de
l’environnement.
En cas de questions, contacter les autorités locales pour
élimination.
Nous vous remercions de votre achat ! Lire la présente notice
attentivement avant la mise en service de l’appareil. Si l’appareil a
été endommagé pendant le transport, ne pas l’installer et consulter
votre revendeur.
2. Consignes de sécurité
Garder l'appareil hors de la portée des enfants et des
personnes non autorisées.
Risque d’électrocution lors de l’ouverture du boîtier.
Toucher un câble sous tension peut causer des
électrochocs mortels. Ne jamais démonter ou ouvrir le
boîtier soi-même. Confier la réparation de l'appareil à du
personnel qualifié.
Cet appareil n'est pas équipé d'un interrupteur ON/OFF
pour le déconnecter du réseau électrique. Veiller à isoler
électriquement l'appareil avant l'installation ou
l'entretien.

LEDA3001xx-xP/3002xx-xP/3003xx-xP/3005xx-xP
V. 03 – 16/02/2016 19 ©Velleman nv
NE JAMAIS désassembler ou ouvrir le boîtier. L'appareil
ne contient aucune pièce réparable par l'utilisateur.
Commander des pièces de rechange éventuelles chez
votre revendeur.
Attention : possibilité de rayonnements optiques
dangereux émis par ce produit. Ne jamais regarder
directement dans le faisceau lumineux. Cela peut causer
des lésions oculaires.
Attention : l'appareil chauffe pendant l’usage.
Respecter une distance minimum de 1 m entre la
sortie lumière de l’appareil et la surface illuminée.
Confier l’installation et l’entretien à un technicien qualifié.
La tension réseau ne peut pas dépasser la tension mentionnée
dans les spécifications à la fin de cette notice.
Le câble d’alimentation ne peut pas être replissé ou endommagé.
Demander à votre revendeur de le remplacer si nécessaire.
3. Directives générales
Se référer à la garantie de service et de qualité Velleman® en
fin de notice.
Protéger cet appareil des températures extrêmes.
Protéger l’appareil des chocs. Traiter l'appareil avec
circonspection pendant l’opération.
Cet appareil ne convient pas à l'utilisation avec un
variateur.
Ne pas utiliser l'appareil si le verre de protection
est fissuré ou cassé. Déconnecter
immédiatement l'appareil du réseau électrique
et confier la réparation à un technicien qualifié.
Se familiariser avec le fonctionnement de l’appareil avant de
l’utiliser.

LEDA3001xx-xP/3002xx-xP/3003xx-xP/3005xx-xP
V. 03 – 16/02/2016 20 ©Velleman nv
Toute modification est interdite pour des raisons de sécurité. Les
dommages occasionnés par des modifications par le client ne
tombent pas sous la garantie.
N’utiliser l'appareil qu’à sa fonction prévue. Tout autre usage peut
causer des courts-circuits, des brûlures, des électrochocs,
explosion de lampe, chute, etc. Un usage impropre annule d'office
la garantie.
La garantie ne s’applique pas aux dommages survenus en
négligeant certaines directives de cette notice et votre revendeur
déclinera toute responsabilité pour les problèmes et les défauts
qui en résultent.
Transporter l’appareil dans son emballage originel.
Garder ce mode d'emploi pour toute référence ultérieure.
4. Caractéristiques
projecteur pour usage commercial ou résidentiel
boîtier en aluminium coulé avec verre trempé
cranté pour une dissipation thermique max.
avec support ajustable
avec capteur PIR 180°
convient à l'usage extérieur (IP44)
avec 30 cm de câble sans terminaison.
5. Description
Se référer aux illustrations en page 2 de ce mode d'emploi.
1
support de montage
6
réglage de la sensibilité à la
lumière du jour (LUX)
réglage du temps de
commutation (TIME)
réglage de la distance de
détection (SENS)
2
charnière
3
verre de protection
4
LED
5
capteur PIR
6. Installation
6.1 Directives
La construction portante de l’appareil doit être capable de
supporter 4 fois le poids de l’appareil pendant une heure, sans
qu’une déformation de la construction en résulte.
Éviter de vous positionner en dessous de l’appareil pour l’enlever
ou lors du montage ou du nettoyage. Un technicien qualifié doit
A página está carregando...
A página está carregando...
A página está carregando...
A página está carregando...
A página está carregando...
A página está carregando...
A página está carregando...
A página está carregando...
A página está carregando...
A página está carregando...
A página está carregando...
A página está carregando...
A página está carregando...
A página está carregando...
A página está carregando...
A página está carregando...
A página está carregando...
A página está carregando...
A página está carregando...
A página está carregando...
A página está carregando...
A página está carregando...
A página está carregando...
A página está carregando...
A página está carregando...
A página está carregando...
A página está carregando...
A página está carregando...
A página está carregando...
A página está carregando...
A página está carregando...
A página está carregando...
A página está carregando...
A página está carregando...
A página está carregando...
-
 1
1
-
 2
2
-
 3
3
-
 4
4
-
 5
5
-
 6
6
-
 7
7
-
 8
8
-
 9
9
-
 10
10
-
 11
11
-
 12
12
-
 13
13
-
 14
14
-
 15
15
-
 16
16
-
 17
17
-
 18
18
-
 19
19
-
 20
20
-
 21
21
-
 22
22
-
 23
23
-
 24
24
-
 25
25
-
 26
26
-
 27
27
-
 28
28
-
 29
29
-
 30
30
-
 31
31
-
 32
32
-
 33
33
-
 34
34
-
 35
35
-
 36
36
-
 37
37
-
 38
38
-
 39
39
-
 40
40
-
 41
41
-
 42
42
-
 43
43
-
 44
44
-
 45
45
-
 46
46
-
 47
47
-
 48
48
-
 49
49
-
 50
50
-
 51
51
-
 52
52
-
 53
53
-
 54
54
-
 55
55


Perel LEDA3001WW-GP Manual do usuário
- Categoria
- Estroboscópios
- Tipo
- Manual do usuário
em outras línguas
- español: Perel LEDA3001WW-GP Manual de usuario
- français: Perel LEDA3001WW-GP Manuel utilisateur
- Nederlands: Perel LEDA3001WW-GP Handleiding
- Deutsch: Perel LEDA3001WW-GP Benutzerhandbuch
Artigos relacionados
-
Perel EWL311 Manual do usuário
-
Perel LEDA5003NW-BM Manual do usuário
-
Perel LEDA250NW Manual do usuário
-
Perel LEDA3005CW-B Manual do usuário
-
Perel EWL313T Manual do usuário
-
Perel LEDA251NW Manual do usuário
-
-
Perel LEDA5001WW-W Manual do usuário
-
-
Perel LEDA7001NW-BP Manual do usuário
Outros documentos
-
Velleman PIR500 Manual do usuário
-
 CEMONJARDIN 91353050 Instruções de operação
-
Minelab Minelab F3Ci Countermine Detector Guia de usuario
-
Ferm FLM1002 Manual do proprietário
-
 REV Ritter 0075110703 Manual do proprietário
-
Brennenstuhl SV5405 Instruções de operação
-
 MicroBT Antminer A3 ASIC Miner Manual do usuário
-
-
Velleman CSOL06 Manual do usuário
-
Hager EE610 Manual do usuário


