Hayward 061000 Swimming Pool Cleaner Guia de usuario
- Tipo
- Guia de usuario

ISRC9994 - Rev D
- Parc Industriel de la Plaine de l’Ain - Allée des Chênes - 01150 Saint Vulbas - France

2
Toutes nos félicitations, vous venez d’acheter notre robot automatique à microprocesseur TigerShark. Ce
manuel contient des informations importantes pour l’utilisation et l’entretien de votre robot à lire attentive-
ment avant de l’utiliser. Ce document doit être remis au propriétaire de la piscine et doit être conservé par
celui-ci en lieu sûr.
.
Vous n’avez pas besoin d’installation ni d’accessoires complémentaires au robot. II vous suffit de le plonger
dans l’eau et de le démarrer. Le TigerShark est entièrement automatique.
Le nettoyage du filtre est très facile grâce à la nouvelle cartouche brevetée.
Le contrôle par microprocesseur ASCL (Adaptive Seek Control Logic) optimise les opérations de nettoyage
pour chaque dimension et chaque forme de piscine.
Le TigerShark est équipé d’un auto-diagnostic électronique et d’une protection contre les surcharges électriques.
Un système de conduite très simple dirige l’appareil, avec des paliers anti-corrosion pour une plus grande fiabilité.
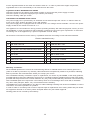
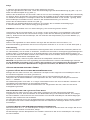
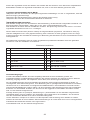
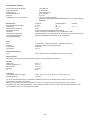
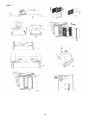
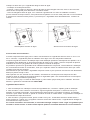
Prenez le temps de vous familiariser avec le TigerShark en consultant le dessin (Fig. 1) et les schémas (Fig 2).
Tout au long de ce manuel, nous ferons référence à ces dessins lorsque nous parlerons des différents com-
posants du TigerShark.
1. Sélectionner une prise 230 V
proche et protégée des courts-circuits. Prévoir un dispositif de protection
différentiel 30 mA, destiné à protéger les personnes contre les chocs électriques provoqués par une éven-
tuelle rupture de l’isolation électrique de l’équipement.
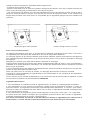
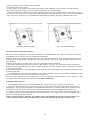
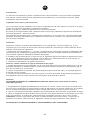
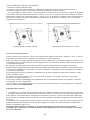
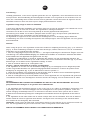
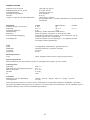
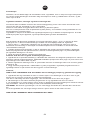
2. Installer le boîtier d’alimentation (1) de façon à ce que le TigerShark puisse atteindre toutes les parois de
la piscine ; Le boîtier d’alimentation doit se trouver au minimum à 3.5 mètres du bord de la piscine (fig. a).
La longueur standard du câble du TigerShark est de 18 mètres.
3. Brancher le câble flottant sur le boîtier d’alimentation.
.
4. Le TigerShark possède une poignée adaptable (3). La poignée doit être verrouillée en position diagonale
afin d’assurer des résultats de nettoyage optimaux. Inverser la position de la poignée après chaque utilisa-
tion (fig. b) pour un meilleur enroulement du fil.
5. Placer le TigerShark dans la piscine. II coulera doucement au fond du bassin en se vidant progressive-
ment de l’air qu’il contient.
6. Brancher le boîtier d’alimentation sur la prise et démarrer l’appareil. Le TigerShark programmera un auto-
diagnostic pendant plusieurs minutes avant de commencer le nettoyage de la piscine.
.
7. Le TigerShark s’éteindra automatiquement au bout d’un cycle de 4 heures environ. Si votre piscine est nettoyée
en moins de 4 heures, vous pouvez arrêter le robot en mettant le boîtier d’alimentation en position arrêt (off).
Si un deuxième nettoyage est nécessaire, attendre 30 secondes avant de le redémarrer.
8. Une fois la piscine nettoyée, éteindre le boîtier d’alimentation avant de sortir le TigerShark de l’eau.
9. Sortir le TigerShark de l’eau depuis le côté le moins profond de la piscine en tirant sur le câble jusqu’à ce
que le robot atteigne la surface. Ensuite, le remonter doucement en utilisant la poignée, PAS par le câble.
en tirant sur le câble, enroulez-le autour de vos deux mains et surtout pas autour de votre
bras. Pour préserver le TigerShark, le retirer de l’eau après chaque utilisation.
Il est recommandé de ne sortir l’appareil de l’eau qu’après environ 15 minutes.

3
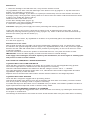
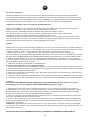
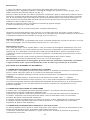
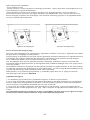
Vérifier la hauteur à laquelle le TigerShark atteint la ligne d’eau :
- S’assurer de la propreté du filtre.
- Mettre le robot dans l’eau et observer la hauteur de ligne d’eau atteinte. Pour cela, le laisser exécuter plu-
sieurs cycles de nettoyage pour déterminer une hauteur moyenne.
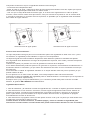
- Une fois la ligne d’eau atteinte, si le robot fait régulièrement un bruit de cliquetis excessif, prend de l’air à
travers le couvercle inférieur, remonte sur le bord du mur au lieu de repartir en arrière, ou s’il a tendance à
stagner dans la même zone de la piscine, il est probable que le TigerShark grimpe trop haut: installer le kit
réducteur.
...
La meilleure température d’eau pour un fonctionnement optimal du TigerShark se situe entre 10°C et 35°C.
Le TigerShark peut néanmoins être utilisé dans une eau de température différente.
Le nettoyage régulier de la cartouche filtrante après chaque utilisation optimise la performance de l’appareil.
Si le TigerShark grimpe difficilement le long des parois de la piscine, laver le filtre et reprendre le nettoyage
de la piscine.
Remplacer les brosses (12) usées afin d’assurer l’efficacité du nettoyage.
Si des produits chimiques en granulés sont utilisés quotidiennement dans la piscine, nous recommandons
l’utilisation d’un doseur flottant ou automatique, car il retient les sédiments de calcium quelquefois contenus
dans ce type de produits.
II est recommandé de ne pas utiliser le TigerShark tant que toutes les poudres chimiques ne sont pas dis-
soutes car elles pourraient boucher le filtre.
Dans une piscine avec un fort taux de calcaire, un nettoyage plus fréquent du filtre est conseillé.
Conserver le carton d’emballage du TigerShark pour son entreposage ou son transport (si des réparations
s’avéreraient nécessaires).
Le bloc moteur (13) et le boîtier d’alimentation (1) ne contiennent pas de pièces utiles à l’utilisateur. Si elles
sont ouvertes, la garantie est automatiquement .
1. Pour l’installation et l’utilisation normal du TigerShark QC, se référer au chapitre général d’utilisation.
2. Pour sélectionner le cycle normal ou économique, veuillez suivre les instructions suivantes : Lors de sa
mise sous tension, le programme économique est automatiquement sélectionné. Le voyant « quick Clean »
situé sur le boîtier de commande est alors allumé. Sur ce mode, le TigerShark s’éteindra automatiquement
au bout de 90 minutes environ.
3. Pour sélectionner le programme normal, veuillez appuyer sur le bouton « Full cycle ». Le voyant situé
au dessus du bouton s’allume et indique que le programme normal est lancé. Sur ce mode, le TigerShark
s’éteindra automatiquement au bout de 4 heures environ.
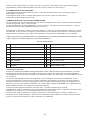
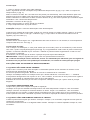
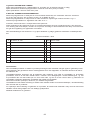
Hauteur de ligne d’eau incorrecteHauteur de ligne d’eau optimale

4
1. Pour l’installation et l’utilisation normal du TigerShark Plus, se référer au chapitre général d’utilisation.
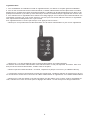
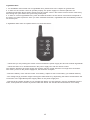
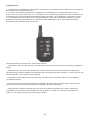
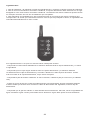
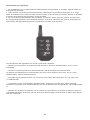
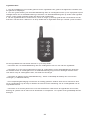
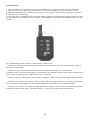
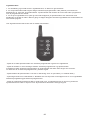
2. Pour un bon fonctionnement de la télécommande, le boîtier d’alimentation doit être placé dans un endroit
dégagé à une vingtaine de mètres de la télécommande. L’utilisation de la télécommande peut se faire à n’im-
porte quel moment du cycle sans qu’il soit interrompu. Eviter les rotations lorsque l’appareil est contre le mur.
3. Pour manœuvrer le TigerShark Plus, laissez votre doigt appuyé sur les boutons de la télécommande cor-
respondant à l’action que vous voulez effectuer. Une fois que vous aurez relâché le bouton, le TigerShark
Plus reprendra automatiquement son cycle normal.
Si le TigerShark Plus ne tourne pas lorsque vous appuyez sur le bouton :
- Vérifier que vous pointiez bien la télécommande vers le boîtier d’alimentation et pas vers le TigerShark.
- Vérifier qu’il n’y ai pas d’obstacle entre le boîtier d’alimentation et la télécommande
La distance entre le boîtier d’alimentation et la télécommande ne doit pas dépasser 20 mètres. Plus vous
êtes proche du boîtier d’alimentation, meilleur sera la réception.
- Vérifier la pile de la télécommande : si besoin, remplacer la pile par une neuve (1x CR2032 Lithium).
- La protection contre les surtensions est peut-être enclenchée. Veuillez la réactivé en appuyant sur le bou-
ton se situant au dessus de la connexion du câble d’alimentation du TigerShark, sur le boîtier d’alimentation.
- Vérifier que le vérin de rotation n’est pas encombré par des débris. Pour se faire, sortir le TigerShark de
l’eau, manœuvrer le vérin à la main pour le dégager des débris : le vérin doit pouvoir bouger facilement.

5
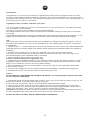
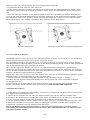
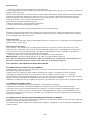
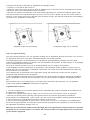
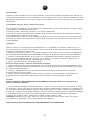
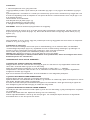
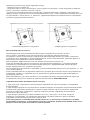
1- Nettoyer la cartouche du filtre après chaque utilisation :
Renverser le TigerShark sur le côté. Défaire les attaches du couvercle inférieur (6) (fig. c-d) et enlever l’en-
semble du couvercle inférieur (7) (fig. e)
Sortir la cartouche du filtre. Votre filtre est en 3 parties (ref. RCX70100), enlever chaque élément pour un
nettoyage minutieux en utilisant un tuyau d’arrosage avec un embout vaporisateur pour éliminer tous les
déchets. Maintenir les éléments du filtre comme décrit sur la fig. f afin de permettre aux déchets de tomber.
Laver l’intérieur du couvercle inférieur.
Replacer la cartouche du filtre (fig. g)
Installer le couvercle inférieur et ré enclencher les attaches.
2- Nettoyer fréquemment les parties mobiles.
débrancher le boîtier d’alimentation avant ce nettoyage.
Inspecter le refoulement de la pompe pour s’assurer qu’aucun déchet ou cheveu n’a obstrué la grille du ven-
turi. II peut être nettoyé en enlevant la grille (9) et en la tournant (fig. h) Nettoyer tous les déchets accumulés
entre les chenilles (10) et les roues (11).
Lorsqu’il est hors de l’eau, renverser le TigerShark sur le côté dans un endroit sec et ombragé à une tempé-
rature comprise entre 5 et 46°C (fig. i)
Avec le temps et les utilisations, le câble peut finir par se tordre (comme un fil téléphonique). Pour y remé-
dier, coincer la poignée dans la position diagonale opposée (fig. b). TigerShark tournera alors dans la pis-
cine dans la direction opposée et le câble se remettra de lui même. On peut également tirer régulièrement
sur le cordon au soleil pour résoudre le problème.
Et surtout penser à inverser la position de la poignée après chaque utilisation.
vérifier régulièrement que le câble ne présente pas de dommages externes
:
Nettoyer le filtre. II se peut qu’il soit bouché ou trop lourd à cause de déchets ou en raison d’une présence
trop importante d’algicide.
Les brosses sont peut-être usées. Inspecter les brosses et les remplacer si nécessaire.
Vérifier l’installation électrique et s’assurer que le voltage est correct : 230 V
50/60Hz
La température de l’eau doit être supérieure à 15°C, sinon les brosses en PVC peuvent se rigidifier et affec-
ter la capacité du TigerShark à grimper le long des parois.
En fonction du type de revêtement, remplacer les brosses en PVC par des brosses en mousse. S’assurer
que la poignée est en position diagonale.
Nettoyer le filtre, il se peut qu’il soit bouché et empêche l’aspiration.
Vérifier que les arrivées dans le couvercle inférieur ne sont pas bloquées et les nettoyer si nécessaire.
Vérifier le Venturi pour d’éventuels déchets ou dommages. Nettoyer ou remplacer si nécessaire.
Un insert qui se « clipse » sur le couvercle inférieur peut être ajouté, il est disponible en option auprès de
votre revendeur. Celle-ci permet une plus grande vitesse et donc une meilleure aspiration des déchets petits
ou lourds.
Le Venturi est peut-être bouché par des déchets. Vérifier et nettoyer si nécessaire en suivant les instructions
du chapitre entretien.
Les roulements des brosses ou les chenilles sont grippés. Vérifier s’il y a des saletés et les nettoyer si
nécessaire.
Remettre TigerShark dans l’eau et le redémarrer. Pour protéger les composants fragiles, le TigerShark ris-
que de s’arrêter automatiquement s’il est sorti de l’eau.
Vérifier la prise électrique et le système d’interrupteur contre les surtensions pour vous assurer que l’alimen-
tation est correcte.
Vérifier la puissance du boîtier d’alimentation (voir ci-dessous)
Vérifier le câble flottant par section

6
Le boîtier d’alimentation est protégé par un coupe circuit automatique qui interrompt le courant. Pour le
redémarrer, mettre en position “OFF” puis sur “ON”.
Le boîtier d’alimentation est équipé d’un circuit interne. La tension entre les bornes 1 et 2 de la prise d’ali-
mentation du robot doit être de 24 V ⎓.
Cet appareil n’est pas destiné à être utilisé par des personnes (notamment des enfants) dont les capacités
physiques, sensorielles ou intellectuelles sont réduites, ou par des personnes manquant d’expérience ou
de connaissances, à moins que celles-ci ne soient sous surveillance ou qu’elles aient reçu des instructions
quant à l’utilisation de l’appareil par une personne responsable de leur sécurité.
Tous les raccordements électriques doivent être effectués par un électricien professionnel agréé qualifié et
selon les normes en vigueur dans le pays d’installation.
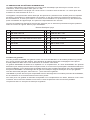
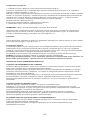
Norme électrique / pays
F NF EN C 15-100 GB BS7671:1992
D DIN VDE 0100-702 EW EVHS-HD 384-7-702
A ÖVE 8001-4-702 H MSZ 2364-702:1994 / MSZ 10-533 1/1990
E UNE 20460-7-702 1993, REBT ITC-BT-31 2002 M MSA HD 384-7-702.S2
IRL Wiring Rules + IS HD 384-7-702 PL PN-IEC 60364-7-702:1999
I CEI 64-8/7 CZ CSN 33 2000 7-702
LUX 384-7.702 S2 SK STN 33 2000-7-702
NL NEN 1010-7-702 SLO SIST HD 384-7-702.S2
P RSIUEE TR TS IEC 60364-7-702
Tous les produits HAYWARD sont garantis contre tous vices de fabrication ou de matière pendant une période
de 2 ans à compter de la date d’achat. Toute demande de garantie devra être accompagnée d’une preuve
d’achat justifiant sa date. Nous vous incitons donc à conserver votre facture.
La garantie HAYWARD est limitée à la réparation ou au remplacement, au choix d’HAYWARD, des produits
défectueux pour autant qu’ils aient subi un emploi normal, en accord avec les prescriptions mentionnées dans leur
manuel d’utilisation, que le produit n’ait été modifié d’aucune sorte et utilisé uniquement avec des composants et
des pièces HAYWARD. Les dommages dûs au gel et aux attaques d’agents chimiques ne sont pas garantis.
Tous les autres frais (transport, main-d’œuvre…) sont exclus de la garantie.
HAYWARD ne pourra être tenu pour responsable d’aucun dommage direct ou indirect provenant de l’installation,
du raccordement ou du fonctionnement incorrect d’un produit.
Pour faire jouer une garantie et demander la réparation ou le remplacement d’un article, adressez vous à votre
revendeur. Aucun retour de matériel à notre usine ne sera accepté sans notre accord écrit préalable.
Les pièces d’usure ne sont pas couvertes par la garantie.

7
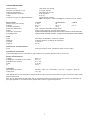
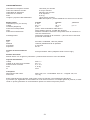
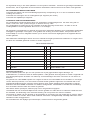
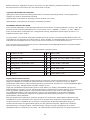
Vitesse au sol 18 mètres par minute
Taux de couverture au sol 5 m≤ par minute
Capacité d’aspiration 283 litres par minute
Consommation courante 0.78 ampères
Poids 9,74 kg
Longueur et type du câble Matériaux 16.76 mètres, flottant
ABS haut impact - pièces métalliques en acier inox non ferreux
POMPE COMMANDE CARTE
Vitesse (tour par minute) 2 700 55 -
Voltage 24 V ⎓ 22 V ⎓ 5 V ⎓
Courant (ampères) 2,62 0,63 -
Protection étanchéité joint « double redundant radial shaft »
Boîtier IP68, scellé, étanche, en ABS haut impact
Protection surtension Système automatique électronique de mise hors courant en cas de surtension
Auto-diagnostic système d’auto test de la mémoire - à usage des services après vente autorisés
Type amovible, ré-utilisable, cartouche plissée
Matériau cellulose plissée / mélange de polyester
Porosité 5 microns
Surface 64 cm2
Type microprocesseur ASCL (Adaptive Seek Control Logic)
Commande directe avec chenilles en polyuréthane et système directionnel en acier inox
Voltage 230 V
Voltage de la puissance à la sortie : 24 V ⎓
Puissance du courant 3,5 - 4A
Poids 3,76 kg
IP IP54
Dimensions du carton hauteur : 48,3 cm - Profondeur : 48,3 cm - Longueur : 48,3 cm
Poids total 15,9 kg
Ces spécifications sont données à titre indicatives, elles peuvent varier selon le type de piscine et les instal-
lations électriques.
Bien que le Tigershark ait été testé afin de fonctionner dans une large gamme de piscines, le fabricant ne
peut pas garantir un fonctionnement optimal dans tous les types de piscines.

8
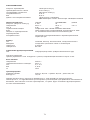
5 °C
46 °C
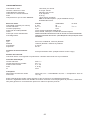
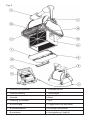
Fig. 1

9
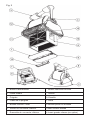
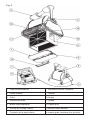
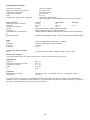
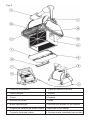
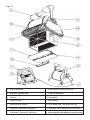
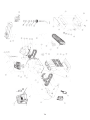
Fig. 2
1. Boîtier d’alimentation 8. Boîtier cartouche de filtre
2. Câble flottant 9. Venturi
3. Poignée 10. Chenille
4. Crans de la poignée 11. Roue
5. Bouton marche / arrêt 12. Brosse picots ou mousse
6. Verrou du couvercle inférieur 13. Bloc moteur scellée
7. Ensemble du couvercle inférieur 14. Insert grande vitesse (en option)

10
Congratulations, you have just purchased our TigerShark automatic cleaner equipped with its own micro-
processor. This handbook contains important information on the use and maintenance of your cleaner that
you should read carefully before use. This document should be given to the owner of the swimming pool and
must be kept by the owner in a safe place.
You do not need to install your cleaner or fit accessories to it. You just immerse it in the water and switch
it on. TigerShark is fully automatic.
The filter is very easy to clean thanks to its new patented cartridge.
The Adaptive Seek Control Logic (ASCL) microprocessor optimizes cleaning for each pool size and each
pool shape.
TigerShark is equipped with an electronic self-diagnostic system and with electrical surge protection. A very
simple steering system steers the appliance, with anti-corrosion bearings offering greater reliability.
Take some time to become acquainted with your TigerShark by looking at the drawings (Figures 1 and 2).
Throughout the handbook we refer to these drawings when we are talking about the various components
of TigerShark.
1. Choose a 230 V
socket (outlet) that is close and protected from short-circuits. Fit a 30 mA differential
protection device to protect people from electric shock caused by a possible break in the electrical
insulation.
2. Install the power supply box (1) so that your TigerShark can reach all of the walls/surfaces
of the pool. The power supply box should be at least 3.5 metres from the edge of the pool (Figure 1a).
The standard length of the TigerShark cable is 18 metres.
3. Plug the floating cable into the power supply box.
4. TigerShark has an adaptable handle (3). The handle should be locked in the diagonal position in order
to guarantee optimum cleaning results. Reverse the position of the handle after use every time it is used
(Figure 1b) to enable the cord to be wound up without twisting.
5. Place TigerShark in the pool. It will sink gently to the bottom of the pool as it gradually empties itself
of the air that it contains.
6. Plug the power supply box into the socket and switch on the appliance. TigerShark will programme
a self-diagnostic test for a few minutes before it starts cleaning the pool.
7. TigerShark switches off automatically after a 4-hour cycle. If your pool is clean in under 4 hours, you can
switch off the cleaner by switching off the power supply box.
If a second clean is necessary, wait for 30 seconds before switching back on again.
8. Once the pool is clean, switch off the power supply box before you take TigerShark out of the water.
9. Take TigerShark out of the water from the shallow end of the pool by pulling the cable until the cleaner
comes up to the surface. Then, lift it out gently by using the handle, NOT the cable.
while pulling the cable, wind it in around both of your hands and above all not around your arm.
To make TigerShark last, remove the water from it after use, every time it is used.

11
Check the height of the waterline on TigerShark:
- Ensure that the filter is clean.
- Put the cleaner in the water and observe the height of the waterline on the cleaner. For this purpose,
let it perform several cleaning cycles in order to determine an average height.
- Once the waterline is settled, if the cleaner regularly makes excessive rattling noises, takes air in through
the bottom cover, climbs up the edge of the wall instead of going back the other way, or if it tends to stagnate
in the same zone of the pool, it is probable that TigerShark is climbing too high: install the reducer kit.
The best water temperature for optimum operation of TigerShark lies in the range 10°C to 35°C. However,
TigerShark can be used in water at a different temperature.
Regular cleaning of the filter cartridge after use, every time the cleaner is used, optimizes performance of
the appliance. If TigerShark is struggling to climb up the walls of the pool, wash the filter and then resume
pool cleaning.
Replace the brushes (12) when they are worn to maintain effective cleaning.
If granulated chemical products are used on a daily basis in the pool, we recommend using a floating or
automatic metering feeder because such a feeder retains the calcium sediment that is sometimes contained
in that type of product.
It is recommended not to use TigerShark before all of the chemical powders are not dissolved because they
could clog the filter.
In a hard-water pool, more frequent cleaning of the filter is advised. Keep the TigerShark packaging for stor-
ing it or transporting it (in case any repairs are necessary).
The motor unit (13) and the power supply box (1) do not contain any parts that are of use to the user. If they
are opened the warranty automatically becomes .
1. For installation and normal use of TigerShark QC, please refer to the chapter on general use.
2. In order to select the normal cycle or the economy cycle, please follow the following instructions: on
switching on, the economy programme is automatically selected. The “Quick Clean” light, situated on the
control box, then comes on. In this mode, TigerShark will switch off automatically after 90 minutes.
3. In order to select the normal programme, please press the “Full Cycle” button. The light situated above
the button comes on and indicates that the normal programme is running. In this mode, TigerShark will
switch off automatically after 4 hours.
Incorrect waterline heightOptimum waterline height

12
1. For installation and normal use of TigerShark Plus, please refer to the chapter on general use.
2. In order for the remote control to operate properly, the power supply box must be placed in an
unobstructed location about twenty metres from the remote control. The remote control can be used at any
time during the cycle without the cycle being interrupted.
3. In order to control TigerShark Plus, press and hold the buttons of the remote control that correspond to
the action you wish to perform. Once you have released the button, TigerShark Plus automatically resumes
its normal cycle.
If TigerShark Plus does not operate when you press the button:
- Check that you are pointing the remote control towards the power supply box and not towards TigerShark.
- Check that there is no obstacle between the power supply box and the remote control
The distance between the power supply box and the remote control should be no longer than 20 metres.
The closer you are to the power supply box, the better the reception.
- Check the battery of the remote control: if necessary, replace it with a new battery (1x CR2032 Lithium).
- The voltage surge protection might have tripped. Reactivate it by depressing the button located above the
connection of the TigerShark power supply cable on the power supply box.
- Check that the rotation actuator is not clogged with debris. For this purpose, remove TigerShark from the
water, and operate the actuator by hand to clear the debris: the actuator should be able to move easily.

13
1- Clean the cartridge of the filter after use, every time the cleaner is used:
Lay TigerShark on its side. Undo the fastenings of the bottom cover (6) (Figures 1c-1d) and remove the
bottom cover assembly (7) (Figure 1e)
Remove the filter cartridge. If your filter is in 3 parts (ref. RCX70100), remove each element and clean it
thoroughly using a hose pipe with a spray head so to remove all of the waste. Hold the elements as shown
in Figure 1f to enable the waste to fall off.
Wash the inside of the bottom cover.
Put the filter cartridge back (Figure 1g)
Fit the bottom cover and re-engage the fastenings.
2- Clean the moving parts frequently.
unplug the power supply box before performing this cleaning operation.
Inspect the orifice of the pump to check that no waste or hair is obstructing the Venturi tube. It can be
cleaned by removing the tube (9) and by turning it (Figure 1h). Clean off all of the waste that has built up
between the tracks (10) and the wheels (11).
When it is out of the water, lay TigerShark on its side in a dry and shady place at a temperature between
5°C and 46°C (Figure 1i)
After a while and with use, the cable can become twisted (like a telephone cord). To remedy this, wedge
the handle in the opposite diagonal position (Figure 1b). TigerShark will then turn in the pool in the opposite
direction and the cable will untwist itself. It is also possible to pull regularly on the cord in the sun in order
to solve the problem.
Above all, remember to reverse the position of the handle after use, every time the cleaner is used.
check the cable regularly to make sure that it has no external damage.
Clean the filter. It might be clogged or too heavy due to waste or to too much algaecide being present.
The brushes might be worn. Examine them and change them if necessary.
Check the electrical installation and make sure that the voltage is correct: 230 V
50/60Hz
The water temperature should be greater than 15°C, otherwise the PVC brushes might stiffen and affect
TigerShark’s capacity to climb the walls.
Replace the PVC brushes with foam brushes. Ensure that the handle is in the diagonal position.
Clean the filter. It might be clogged and be preventing suction.
Check that the feeds in the bottom cover are not blocked, and clean them if necessary. Check the Venturi
tube for any waste or damage. Clean or replace if necessary.
An intake that clips onto the bottom cover is available from your dealer. This makes it possible to achieve a
higher speed and thus improved suction of small or heavy waste.
The Venturi tube might be clogged with waste. Check and clean if necessary, by following the instructions in
the chapter on maintenance.
The bearings of the brushes or the tracks are stuck. Check whether there is any dirt; clean them if necessary.

14
Put the TigerShark back in the water and switch it back on. In order to protect the fragile components,
TigerShark will cut out automatically if it is removed from the water.
Check the socket for the voltage surge switch system to ensure that the power supply is correct.
Check the power of the power supply box per section (see below).
Check the floating cable per section
The power supply box is protected by an automatic circuit that interrupts the current. To switch it back on,
move to the “OFF” position and then to the “ON” position.
The power supply box is equipped with an internal circuit. The voltage across terminals 1 and 2 of the power
supply socket for the cleaner must be 24 V ⎓.
This appliance is not intended for use by persons (including children) with reduced physical, sensory or men-
tal capabilities, or lack of experience and knowledge, unless they have been given supervision or instruction
concerning use of the appliance by a person responsible for their safety.
All electrical connections must be done by a qualified electrician according to local electrical standard.
Electric standard/country
F NF EN C 15-100 GB BS7671:1992
D DIN VDE 0100-702 EW EVHS-HD 384-7-702
A ÖVE 8001-4-702 H MSZ 2364-702:1994 / MSZ 10-533 1/1990
E UNE 20460-7-702 1993, REBT ITC-BT-31 2002 M MSA HD 384-7-702.S2
IRL Wiring Rules + IS HD 384-7-702 PL PN-IEC 60364-7-702:1999
I CEI 64-8/7 CZ CSN 33 2000 7-702
LUX 384-7.702 S2 SK STN 33 2000-7-702
NL NEN 1010-7-702 SLO SIST HD 384-7-702.S2
P RSIUEE TR TS IEC 60364-7-702
All HAYWARD products are covered for manufacturing defects or material defects for a warranty period of 2
years as of date of purchases. Any warranty claim should be accompanied by evidence of purchase, indicating
date of purchase. We would therefore advise you to keep your invoice.
The HAYWARD warranty is limited to repair or replacement, as chosen by HAYWARD, of the faulty products,
provided that they have been subjected to normal use, in compliance with the guidelines given in their user guides,
provided that the products have not been altered in any way, and provided that they have been used exclusively
with HAYWARD parts and components. The warranty does not cover damage due to frost and to chemicals.
Any other costs (transport, labour, etc.) are excluded from the warranty.
HAYWARD may not be held liable for any direct or indirect damage resulting from incorrect installation, incorrect
connection, or incorrect operation of a product.
In order to claim on a warranty and in order to request repair or replacement of an article, please ask your dealer.
No equipment returned to our factory will be accepted without our prior written approval.
Wearing parts are not covered by the warranty.

15
Speed on floor 18 metres per minute
Floor coverage rate 5 m≤ per minute
Suction capacity 283 litres per minute
Ordinary consumption 0.78 amps
Weight 9.74 kg
Length and type of cable 16.76 metres, floating
Materials High-impact ABS — metal parts: non-ferrous stainless steel
PUMP CONTROL CARD
Speed (revolutions per minute) 2700 55 -
Voltage 24 V ⎓ 22 V ⎓ 5 V ⎓
Current (amps) 2.62 0.63 -
Sealing protection double redundant radial shaft seal
Box IP68, sealed, waterproof, and made of high-impact ABS
Voltage surge protection automatic electronic system for interrupting current in the event of
voltage surge
Self-diagnostic system memory self-test system — for use by authorised after-sales ser-
vice
personnel
Type removable, reusable, pleated cartridge
Material pleated cellulose / polyester mixture
Porosity 5 microns
Area 64 cm2
Type Adaptive Seek Control Logic (ASCL) microprocessor
Direct control with polyurethane tracks and stainless steel steering system
Voltage 230 V
Outlet power voltage: 24 V ⎓
Power current 3,5 - 4A
Weight 3.76 kg
IP IP54
Dimensions of the cardboard box height: 48.3 cm - Depth: 48.3 cm - Length: 48.3 cm
Total weight 15.9 kg
These specifications may vary depending on the type of pool and on the electrical installations.
Although TigerShark has been tested to operate in a broad range of swimming pools, the manufacturer can-
not guarantee that operation will be optimum in all types of pool.

16
5°C
46°C
Fig. 1

17
Fig. 2
1. Power supply box 8. Filter cartridge box
2. Floating cable 9. Venturi tube
3. Handle 10. Track
4. Handle adjustment notches 11. Wheel
5. ON/OFF button 12. Spiky brush or foam brush
6. Bottom cover latch 13. Sealed motor unit
7. Bottom cover assembly 14. High-speed insert (not included)

18
Herzlichen Glückwunsch zum Erwerb des mikroprozessorgesteuerten Automatikreinigers TigerShark.
Das vorliegende Handbuch enthält wichtige Hinweise zur Verwendung und Pflege Ihres Reinigers. Lesen
Sie es deshalb vor der Inbetriebnahme des Geräts sorgfältig durch. Dieses Dokument ist dem Eigentümer
des Schwimmbeckens zu übergeben und von diesem an einem sicheren Ort aufzubewahren.
Weder eine Installation noch Zubehör zum Reiniger sind erforderlich. Sie geben das Gerät einfach ins
Wasser und schalten es ein. TigerShark wird vollautomatisch betrieben.
Dank der neuen, patentierten Kartusche lässt sich der Filter kinderleicht reinigen.
Die Steuerung über den ASCL - Mikroprozessor (Adaptive Seek Control Logic) optimiert den
Reinigungsvorgang für Schwimmbecken jeder Größe und jeder Form.
TigerShark ist mit einer elektronischen Auto-Diagnosefunktion und einem Überspannungsschutz verse-
hen. Das Lenksystem ist durch eine äußerst einfache Auslegung gekennzeichnet. Darüber hinaus tragen
korrosionsgeschützte Lager dazu bei, die Zuverlässigkeit zu erhöhen.
Nehmen Sie sich vor der Inbetriebnahme etwas Zeit, um sich mit dem Gerät vertraut zu machen. Studieren
Sie hierzu die Zeichnungen (Abb. 1) und Skizzen (Abb. 2). Dieses Handbuch nimmt immer wieder auf diese
Abbildungen Bezug, wenn von den verschiedenen TigerShark - Bestandteilen die Rede ist.
1. Wählen Sie eine 230 V
- Steckdose aus, die sich in guter Reichweite befindet und über eine
Kurzschlusssicherung verfügt. Differenzialschutzvorrichtung 30 mA zum Schutz vor elektrischem Schlag,
der ggf. durch die Beschädigung der elektrischen Isolierung der Ausrüstung verursacht werden kann.
2. Stellen Sie das Netzteil (1) so auf, dass TigerShark alle Beckenwände erreichen kann. Der Abstand
zwischen Netzteil und Beckenrand muss dabei mindestens 3,5 Meter betragen (Abb. a). Die Standardlänge
des TigerShark-Kabels beträgt 18 Meter.
3. Schließen Sie das Schwimmkabel an das Netzteil an.
4. TigerShark verfügt über einen adaptierbaren Griff (3). Für ein optimales Reinigungsergebnis muss dieser
in Schrägstellung arretiert werden. Verstellen Sie die Griffposition nach jedem Gebrauch (Abb. b), damit das
Kabel problemlos aufgerollt werden kann.
5. Geben Sie TigerShark ins Schwimmbecken. Das Gerät sinkt langsam zum Beckenboden, während die in
ihm enthaltene Luft entweicht.
6. Verbinden Sie das Netzteil mit der Steckdose und schalten Sie das Gerät ein. TigerShark führt zunächst
eine Diagnose durch, die einige Minuten dauert, und beginnt dann mit der Reinigung des Schwimmbeckens.
7. TigerShark schaltet sich nach einem Reinigungszyklus von vier Stunden automatisch ab. Sollte Ihr
Schwimmbecken in weniger als vier Stunden sauber sein, so können Sie den Reiniger abschalten, indem
Sie das Netzteil auf die Position AUS stellen (OFF). Falls eine zweite Reinigung erforderlich sein sollte,
warten Sie 30 Sekunden, bevor Sie das Gerät wieder einschalten.
8. Wenn die Reinigung des Schwimmbeckens abgeschlossen ist, schalten Sie das Gerät am Netzteil aus,
bevor Sie TigerShark aus dem Wasser nehmen.
9. Nehmen Sie TigerShark von der Seite mit der geringsten Tiefe aus dem Wasser. Ziehen Sie hierzu am
Kabel, bis der Reiniger die Wasseroberfläche erreicht. Ziehen Sie das Gerät nun vorsichtig am Griff nach
oben, NICHT am Kabel.
Wickeln Sie das Kabel, während Sie es nach oben ziehen, um beide Hände und keinesfalls
um den Arm. Sie verlängern die Lebensdauer des Geräts, indem Sie TigerShark nach jedem Gebrauch aus
dem Wasser nehmen.

19
Überprüfen Sie, wie weit TigerShark über den Wasserspiegel hinausragt:
- Vergewissern Sie sich, dass der Filter sauber ist.
- Geben Sie den Reiniger ins Wasser und achten Sie auf die Höhe des Wasserspiegels am Gerät. Lassen
Sie es hierzu mehrere Reinigungszyklen durchlaufen, damit Sie die durchschnittliche Höhe feststellen kön-
nen.
- Wenn der Reiniger, nachdem er den Wasserspiegel erreicht hat, regelmäßig ein heftiges Klickgeräusch
von sich gibt, über die Bodenabdeckung Luft aufnimmt, wiederholt an der Beckenwand hinauffährt, anstatt
zurückzufahren, oder immer wieder im selben Schwimmbeckenbereich verharrt, so ist es wahrscheinlich,
dass TigerShark zu hoch aufsteigt. Installieren Sie in diesem Fall das Reduzierset.
TigerShark funktioniert am besten bei einer Wassertemperatur zwischen 10 °C und 35 °C. Das Gerät kann
jedoch auch bei anderen Wassertemperaturen eingesetzt werden.
Die regelmäßige Reinigung der Filterkartusche nach jedem Gebrauch ist Voraussetzung für eine optimale
Reinigungsleistung. Falls TigerShark nur schwer an den Beckenwänden aufsteigt, muss der Filter gewaschen
und der Reinigungsvorgang erneut begonnen werden.
Wechseln Sie abgenutzte Bürsten (12) aus, um ein optimales Reinigungsergebnis zu gewährleisten.
Werden im Schwimmbecken täglich chemische Reinigungsmittel in Granulatform verwendet, so empfehlen
wir den Einsatz eines Dosierschwimmers oder eines automatischen Dosierers, der die in diesen Produkten
mitunter enthaltenen Kalziumsedimente zurückhält.
TigerShark sollte immer erst dann verwendet werden, wenn sich alle chemischen Reinigungsmittel komplett
aufgelöst haben, da sich andernfalls der Filter verstopfen kann.
In Schwimmbecken mit hohem Kalkgehalt empfiehlt es sich, den Filter häufiger zu reinigen.
Bewahren Sie den TigerShark-Verpackungskarton für die Lagerung oder einen eventuellen Transport
(im Reparaturfall) auf.
Der Motorblock (13) und das Netzteil (1) enthalten keinerlei Teile, die vom Benutzer gewartet werden
können. Das Öffnen dieser Elemente führt automatisch zum .
1. Informationen zur Installation und normalen Verwendung von TigerShark QC finden Sie im Abschnitt mit
den allgemeinen Gebrauchshinweisen.
2. Gehen Sie zur Auswahl des Voll- oder des Sparprogramms wie folgt vor: Beim Einschalten wird
automatisch das Sparprogramm gewählt. Die „Quick Clean“-Kontrollleuchte an der Steuerung schaltet sich
nun ein. In diesem Modus schaltet sich TigerShark nach 90 Minuten automatisch aus.
3. Um das Vollprogramm zu wählen, drücken Sie die Taste „Full cycle“. Die Kontrollleuchte über der Taste
schaltet sich daraufhin ein und zeigt an, dass das Vollprogramm anläuft. Ist dieser Modus gewählt, so
schaltet sich TigerShark nach vier Stunden automatisch aus.
Gerät ragt zu weit über den Wasserspiegel hinausOptimale Wasserhöhe

20
1. Informationen zur Installation und normalen Verwendung von TigerShark Plus finden Sie im Abschnitt mit
den allgemeinen Gebrauchshinweisen.
2. Um einen einwandfreien Betrieb der Fernbedienung zu gewährleisten, muss das Netzteil an einem
offenen Ort und in einer Entfernung von ca. 20 Metern zur Fernbedienung aufgestellt werden. Sie können die
Fernbedienung zu jedem Zeitpunkt des Reinigungszyklus benutzen, ohne dass dieser unterbrochen würde.
3. Um TigerShark Plus zu lenken, lassen Sie die jeweiligen Tasten der Fernbedienung gedrückt, bis der
gewünschte Vorgang abgeschlossen ist. Sobald die Taste losgelassen wurde, nimmt TigerShark Plus
automatisch den normalen Zyklus wieder auf.
Falls TigerShark Plus nicht auf den Tastendruck reagiert:
- Vergewissern Sie sich, dass Sie die Fernbedienung in Richtung Netzteil und nicht in Richtung TigerShark
halten.
- Überprüfen Sie, dass sich keine Hindernisse zwischen dem Netzteil und der Fernbedienung befinden.
Die Entfernung zwischen Netzteil und Fernbedienung darf maximal 20 Meter betragen. Je näher Sie sich am
Netzteil befinden, umso besser ist der Empfang.
- Überprüfen Sie die Batterie der Fernbedienung. Ersetzen Sie sie bei Bedarf mit einer neuen Batterie
(1x CR2032 Lithium).
- Eventuell wurde der Überspannungsschutz ausgelöst. Aktivieren Sie das Gerät wieder, indem Sie die
Taste über dem Anschluss des TigerShark-Stromkabels am Netzteil betätigen.
- Überprüfen Sie, dass der Drehzylinder nicht durch Fremdkörper behindert wird. Nehmen Sie hierzu
TigerShark aus dem Wasser und bewegen Sie den Zylinder von Hand, um eventuelle Fremdkörper zu
entfernen. Der Zylinder muss sich leicht bewegen lassen.
A página está carregando...
A página está carregando...
A página está carregando...
A página está carregando...
A página está carregando...
A página está carregando...
A página está carregando...
A página está carregando...
A página está carregando...
A página está carregando...
A página está carregando...
A página está carregando...
A página está carregando...
A página está carregando...
A página está carregando...
A página está carregando...
A página está carregando...
A página está carregando...
A página está carregando...
A página está carregando...
A página está carregando...
A página está carregando...
A página está carregando...
A página está carregando...
A página está carregando...
A página está carregando...
A página está carregando...
A página está carregando...
A página está carregando...
A página está carregando...
A página está carregando...
A página está carregando...
A página está carregando...
A página está carregando...
A página está carregando...
A página está carregando...
A página está carregando...
A página está carregando...
A página está carregando...
A página está carregando...
A página está carregando...
A página está carregando...
A página está carregando...
A página está carregando...
A página está carregando...
A página está carregando...
A página está carregando...
A página está carregando...
A página está carregando...
A página está carregando...
A página está carregando...
A página está carregando...
A página está carregando...
A página está carregando...
A página está carregando...
-
 1
1
-
 2
2
-
 3
3
-
 4
4
-
 5
5
-
 6
6
-
 7
7
-
 8
8
-
 9
9
-
 10
10
-
 11
11
-
 12
12
-
 13
13
-
 14
14
-
 15
15
-
 16
16
-
 17
17
-
 18
18
-
 19
19
-
 20
20
-
 21
21
-
 22
22
-
 23
23
-
 24
24
-
 25
25
-
 26
26
-
 27
27
-
 28
28
-
 29
29
-
 30
30
-
 31
31
-
 32
32
-
 33
33
-
 34
34
-
 35
35
-
 36
36
-
 37
37
-
 38
38
-
 39
39
-
 40
40
-
 41
41
-
 42
42
-
 43
43
-
 44
44
-
 45
45
-
 46
46
-
 47
47
-
 48
48
-
 49
49
-
 50
50
-
 51
51
-
 52
52
-
 53
53
-
 54
54
-
 55
55
-
 56
56
-
 57
57
-
 58
58
-
 59
59
-
 60
60
-
 61
61
-
 62
62
-
 63
63
-
 64
64
-
 65
65
-
 66
66
-
 67
67
-
 68
68
-
 69
69
-
 70
70
-
 71
71
-
 72
72
-
 73
73
-
 74
74
-
 75
75


Hayward 061000 Swimming Pool Cleaner Guia de usuario
- Tipo
- Guia de usuario
em outras línguas
- español: Hayward 061000 Swimming Pool Cleaner Guía del usuario
- français: Hayward 061000 Swimming Pool Cleaner Mode d'emploi
- italiano: Hayward 061000 Swimming Pool Cleaner Guida utente
- Nederlands: Hayward 061000 Swimming Pool Cleaner Gebruikershandleiding
- Deutsch: Hayward 061000 Swimming Pool Cleaner Benutzerhandbuch
- dansk: Hayward 061000 Swimming Pool Cleaner Brugervejledning
Outros documentos
-
 c NC71RCEU Instruções de operação
-
Maytronics Dolphin WAVE 100 Operating Instructions Manual
-
SWIM-ESSENTIALS Swim Essentials Baby Pool Yellow 60 cm Manual do usuário
-
 Bigfoot BIGFOOT Instruções de operação
-
-
Castorama Vortex RV 4560 Guia de usuario
-
-
-
Castorama Robot de nettoyage de fond électrique Zodiac Tornax GT 2120 Guia de usuario
-

