Dometic RC10.4S.70, RC10.4T.70, RC10.4S.90, RC10.4T.90, RC10.4P.100, RC10.4M.90, RCS10.5S, RCS10.5T, RCS10.5XS, RCS10.5XT, RCL10.4E, RCL10.4ES, RCL10.4ET, RCD10.5S, RCD10.5T, RCD10.5XS, RCD10.5XT Guia de instalação
- Categoria
- Geladeiras
- Tipo
- Guia de instalação

RC10.4S.70, RC10.4T.70, RC10.4S.90, RC10.4T.90, RC10.4P.100, RC10.4M.90,
RCS10.5S, RCS10.5T, RCS10.5XS, RCS10.5XT, RCL10.4E, RCL10.4ES, RCL10.4ET,
RCD10.5S, RCD10.5T, RCD10.5XS, RCD10.5XT
Compressor refrigerator
Installation Manual. . . . . . . . . . . . . . . . . . . . . 9
Kompressor-Kühlschrank
Montageanleitung. . . . . . . . . . . . . . . . . . . .25
Réfrigérateur à compresseur
Instructions de montage . . . . . . . . . . . . . . . 41
Nevera de compresor
Instrucciones de montaje . . . . . . . . . . . . . .57
Frigorífico com compressor
Instruções de montagem . . . . . . . . . . . . . . 73
Frigorifero a compressore
Indicazioni di montaggio . . . . . . . . . . . . . . 89
EN
DE
FR
ES
PT
IT
REFRIGERATION
10-SERIES

© 2023 Dometic Group. The visual appearance of the contents of this manual is
protected by copyright and design law. The underlying technical design and the
products contained herein may be protected by design, patent or be patent
pending. The trademarks mentioned in this manual belong to Dometic Sweden AB.
All rights are reserved.

RC(S)(L)(D)10-Series
3
NOTICE
NOTICE
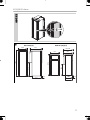
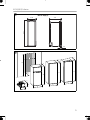
d 90°
RCL 10.4(S)(T)
420
1293
431 49,5
595
696
RCD 10.5(X)(S)(T)
523
1282
400 49,5
565
696
(X) 620
(X) 455
1

RC(S)(L)(D)10-Series
4
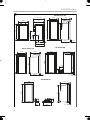
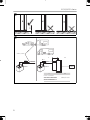
RCS 10.5(X)(S)(T) RC 10.4 (S)(T).90
810
420
975
435,5 49,5
485
RC 10.4 (S)(T).70
666
420
821
400,5 49,5
450
523
821
458
210
50118
400
(X) 455
555
(X) 610
821
49,6
485
420
185 396
169
901
RC 10.4 P.100
900
420
49,5
485
170
185
RC 10.4 M.90
2

RC(S)(L)(D)10-Series
5
RCL 10.4E(S)(T)
420
1293
44
595
3
D
H
W
C
A
B
C
A
B
C
A
B
C
A
B
4

RC(S)(L)(D)10-Series
6
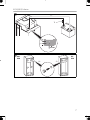
5 mm
5
10 A 10 A
12 Vg12 Vg
CI-BUS
t
Ø 2,5 mm²
,,,
,,,
t
Ø 0,75 mm²
<4 m = Ø 4 mm²
4 m – 6 m = Ø 6 mm²
>6 m = Ø 10 mm²
6

RC(S)(L)(D)10-Series
7
bk
rd
rd
bk
CI-bus
rd
1
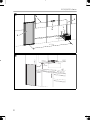
7
4x6x
RCL
RCD
RC
RCS
8

RC(S)(L)(D)10-Series
8
MODE
t1.5 m
tR30 mm
1
2
3
5
4
9
d 3.5 m
0

EN
RC(S)(L)(D)10-Series Explanation of symbols
9
Please read these instructions carefully and follow all instructions, guidelines, and warnings included in this product manual in order to ensure
that you install, use, and maintain the product properly at all times. These instructions MUST stay with this product.
By using the product, you hereby confirm that you have read all instructions, guidelines, and warnings carefully and that you understand and
agree to abide by the terms and conditions as set forth herein. You agree to use this product only for the intended purpose and application
and in accordance with the instructions, guidelines, and warnings as set forth in this product manual as well as in accordance with all appli-
cable laws and regulations. A failure to read and follow the instructions and warnings set forth herein may result in an injury to yourself and
others, damage to your product or damage to other property in the vicinity. This product manual, including the instructions, guidelines, and
warnings, and related documentation, may be subject to changes and updates. For up-to-date product information, please visit
dometic.com.
Contents
1 Explanation of symbols. . . . . . . . . . . . . . . . . . . . . . . . . . . . . . . . . . . . . . . . . . .9
2 Safety instructions . . . . . . . . . . . . . . . . . . . . . . . . . . . . . . . . . . . . . . . . . . . . . .10
3 Intended use . . . . . . . . . . . . . . . . . . . . . . . . . . . . . . . . . . . . . . . . . . . . . . . . . .12
4 Installing the refrigerator. . . . . . . . . . . . . . . . . . . . . . . . . . . . . . . . . . . . . . . . .13
5 Technical data . . . . . . . . . . . . . . . . . . . . . . . . . . . . . . . . . . . . . . . . . . . . . . . . .19
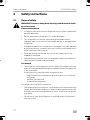
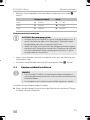
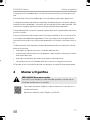
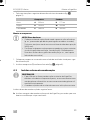
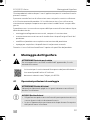
1 Explanation of symbols
!
!
A
I
WARNING!
Safety instruction: Indicates a hazardous situation that, if not avoided,
could result in death or serious injury.
CAUTION!
Safety instruction: Indicates a hazardous situation that, if not avoided,
could result in minor or moderate injury.
NOTICE!
Indicates a situation that, if not avoided, can result in property damage.
NOTE
Supplementary information for operating the product.

EN
Safety instructions RC(S)(L)(D)10-Series
10
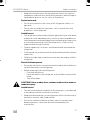
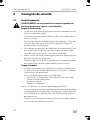
2 Safety instructions
2.1 General safety
!WARNING! Failure to obey these warnings could result in death
or serious injury.
Electrocution hazard
• Installation and removal of the refrigerator may only be carried out by
qualified personnel.
• Do not operate the refrigerator if it is visibly damaged.
• This refrigerator may only be repaired by qualified personnel.
Improper repairs can result in considerable danger or damage to the
refrigerator.
• If the power cable for this refrigerator is damaged, it must be replaced
by the manufacturer, customer service or a similarly qualified person in
order to prevent safety hazards.
• When positioning the refrigerator, ensure the supply cord is not
trapped or damaged.
• Plug the device to sockets that ensure proper connection especially
when the device needs to be grounded.
Fire hazard
• The refrigerant in the refrigerant circuit is highly flammable and in the
event of a leakage combustible gases could build up if the appliance
is in a small room.
In the event of any damage to the refrigerant circuit:
– Keep naked flames and potential ignition sources away from the
refrigerator.
– Ventilate the room well.
– Switch off the refrigerator.
For refrigerators with R600a refrigerant:
• The refrigeration circuit contains a small quantity of an environmentally
friendly but flammable refrigerant. It does not damage the ozone layer
and does not increase the greenhouse effect. Any leaking refrigerant
may ignite.
• Do not use or store the refrigerator in confined spaces with none or
minimal air flow.

EN
RC(S)(L)(D)10-Series Safety instructions
11
• Keep the installation recess for the refrigerator free of any electrical
components and luminaires which during normal or abnormal opera-
tion produce sparks or arcs (i.e. relays or fuse boxes).
Explosion hazard
• Do not spray aerosols in the vicinity of this refrigerator while it is in
operation.
• Do not store any explosive substances, such as aerosol cans with
propellants, in the refrigerator.
Health hazard
• This refrigerator can be used by children aged from 8 years and above
and persons with reduced physical, sensory or mental capabilities or
lack of experience and knowledge if they have been given supervision
or instruction concerning use of the refrigerator in a safe way and
understand the hazards involved.
• Children aged from 3 to 8 years are allowed to load and unload the
refrigerator.
• Cleaning and user maintenance shall not be made by children without
supervision.
• Children must be supervised to ensure that they do not play with the
refrigerator.
Risk of child entrapment
• Ensure that the shelves are mounted and secured so that children can-
not lock themselves in the refrigerator.
• Before disposing of your old refrigerator:
– Dismantle the drawers.
– Leave the shelves in the refrigerator so that children cannot climb
inside.
– Take off the doors.
!CAUTION! Failure to obey these cautions could result in minor or
moderate injury.
Health hazard
• To avoid a hazard due to instability of the refrigerator, it must be fixed
in accordance with the installation instructions.
• Keep ventilation openings, on the refrigerator and in its enclosure or in
the built-in structure, clear of obstruction.
• Do not use mechanical devices or other means to accelerate the
defrosting process, other than those recommended by the
manufacturer.

EN
Intended use RC(S)(L)(D)10-Series
12
• Do not open or damage the refrigerant circuit under any circum-
stances.
• Do not use electrical devices inside the refrigerator unless they are
recommended by the manufacturer for that purpose.
Risk of injury
• Do not use or store flammable materials in or near this refrigerator.
• Do not place articles on or against this refrigerator.
• Do not modify this refrigerator.
ANOTICE! Damage hazard
• Check that the voltage specification on the data plate is the same as
that of the power supply.
• Do not place the refrigerator near heat sources (heaters, direct sun-
light, gas ovens, etc.).
• Keep the condensate drain clean at all times.
• Do not use a high-pressure cleaner near the ventilation grille when
cleaning the vehicle.
• Attach the winter covers to the ventilation grille (accessories) when the
vehicle is cleaned from the outside or not used for a prolonged period
of time.
• The refrigerator may not be exposed to rain.
3 Intended use
The refrigerator is suitable for:
• Installation in caravans and motor homes
• Cooling, deep-freezing and storing food
The refrigerator is not suitable for:
• Storing medications
• Storing corrosive substances or substances that contain solvents
• Quick-freezing food
The refrigerator is intended for installation in a piece of cabinetry or an installation
niche.
This refrigerator is not intended to be used in household applications.
The frozen compartment is suitable for storing pre-frozen food, storing or making ice
cream and making ice cubes. It is not suitable for freezing previously unfrozen food.

EN
RC(S)(L)(D)10-Series Installing the refrigerator
13
This product is only suitable for the intended purpose and application in accordance
with these instructions.
This manual provides information that is necessary for proper installation and/or
operation of the product. Poor installation and/or improper operating or mainte-
nance will result in unsatisfactory performance and a possible failure.
The manufacturer accepts no liability for any injury or damage to the product
resulting from:
• Incorrect assembly or connection, including excess voltage
• Incorrect maintenance or use of spare parts other than original spare parts
provided by the manufacturer
• Alterations to the product without express permission from the manufacturer
• Use for purposes other than those described in this manual
Dometic reserves the right to change product appearance and product
specifications.
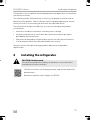
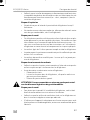
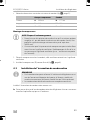
4 Installing the refrigerator
!CAUTION! Health hazard
To avoid a hazard due to instability of the device, it must be fixed in
accordance with the instructions.
Find the instructions for changing the door stop and the decorative
plate online at:
documents.dometic.com/?object_id=63258

EN
Installing the refrigerator RC(S)(L)(D)10-Series
14
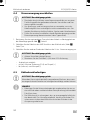
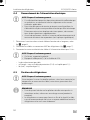
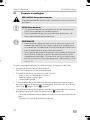
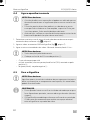
4.1 Preparing the installation
!
A
I
When installing the refrigerator, note the following:
• Ensure that the floor is solid and level.
Park the vehicle horizontally for this purpose.
• The refrigerator must be installed so that
– it is easily accessible for service work
– easy to uninstall and install
– can be easily removed from the vehicle
• The refrigerator must be installed in a recess so that it stands secure when the
vehicle is in motion. Note the dimensions in fig. 1, page 3 to fig. 3, page 5 for
this purpose.
• The refrigerator must be installed with a minimum distance of 5 mm from the floor
to ensure that the door can be opened properly (fig. 5, page 6).
– Make sure that no carpets interfere with the free movement of the door.
– Avoid placing the refrigerator directly on the floor.
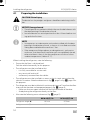
• Also note the following recess dimension (fig. 4, page 5):
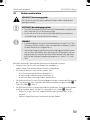
CAUTION! Risk of injury
The device has sharp edges and gloves should be used during installa-
tion.
NOTICE! Damage hazard
• The refrigerator may not be installed in the rear of mobile homes with
the door pointing in the direction of travel.
• Leave the device in a vertical position for at least 3 hours before start-
ing up for the first time.
NOTE
• In campervans an undercounter unit can be installed with the door
pointing in the direction of travel, as long as it is installed next to the
sliding door and behind the co-driver’s seat.
• If the compressor fridge replaces an absorption unit, you have to
make sure, that the external ventilation grills are completely closed,
otherwise there is the risk, that the compressor will not run at low
ambient temperature (~below 0 °C).
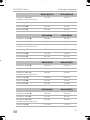
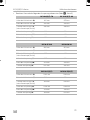
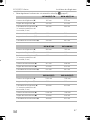
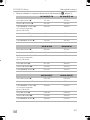
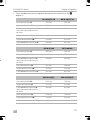
RC10.4(S)(T).70 RC10.4(S)(T).90
Refrigerator height (A) 821 mm 975 mm
Refrigerator width (B) 420 mm 420 mm

EN
RC(S)(L)(D)10-Series Installing the refrigerator
15
Refrigerator depth (C)
(excludes control knob 5 mm)
450 mm 485 mm
Recess height (H) 828 mm 982 mm
Recess width (W) 425 mm 425 mm
Recess depth (D) 452 mm 487 mm
RC10.4P.100 RC10.4M.90
Refrigerator height (A) 900 mm 901 mm
Refrigerator width (B) 420 mm 420 mm
Refrigerator depth (C)
(excludes control knob 5 mm)
655 mm 485 mm
Recess height (H) 907 mm 908 mm
Recess width (W) 425 mm 425 mm
Recess depth (D) 657 mm 487 mm
RCD10.5(S)(T) RCD10.5X(S)(T)
Refrigerator height (A) 1282 mm 1282 mm
Refrigerator width (B) 523 mm 523 mm
Refrigerator depth (C)
(excludes control knob 5 mm)
565 mm 620 mm
Recess height (H) 1290 mm 1290 mm
Recess width (W) 528 mm 528 mm
Recess depth (D) 568 mm 623 mm
RCL10.4(S)(T) RCL10.4E(S)(T)
Refrigerator height (A) 1293 mm 1293 mm
Refrigerator width (B) 420 mm 420 mm
Refrigerator depth (C)
(excludes control knob 5 mm)
595 mm 595 mm
Recess height (H) 1301 mm 1301 mm
RC10.4(S)(T).70 RC10.4(S)(T).90

EN
Installing the refrigerator RC(S)(L)(D)10-Series
16
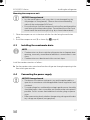
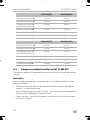
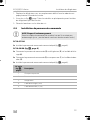
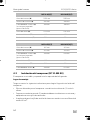
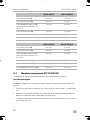
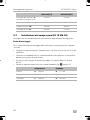
4.2 Installing the compressor unit (RC 10.4M.90)
The compressor unit is removable and can be mounted apart from the refrigerator.
Installation location
Observe the following instructions when selecting an installation location for the
compressor unit:
• Choose a location for the compressor unit at a maximum distance of 1.5 m from
the refrigerator.
• Prepare a closed duct. The duct must be at one end open and equipped with a
ventilation grille.
• Ensure that the ventilation grille has a free cross-section of at least 60 cm2.
• Note the following maximum dimensions of the duct (fig. 4, page 5):
Recess width (W) 425 mm 425 mm
Recess depth (D) 598 mm 598 mm
RCS10.5(S)(T) RCS10.5X(S)(T)
Refrigerator height (A) 821 mm 821 mm
Refrigerator width (B) 523 mm 523 mm
Refrigerator depth (C)
(excludes control knob 5 mm)
555 mm 610 mm
Recess height (H) 829 mm 829 mm
Recess width (W) 528 mm 528 mm
Recess depth (D) 558 mm 613 mm
Compressor unit Duct
Height A169 mm H177 mm
Width B185 mm W190 mm
Depth C396 mm D400 mm
RCL10.4(S)(T) RCL10.4E(S)(T)

EN
RC(S)(L)(D)10-Series Installing the refrigerator
17
Mounting the compressor unit
A
1. Place the compressor unit in the duct with the fan side facing the ventilation
grille.
2. Install the compressor unit (1) as shown (fig. 9, page 8).
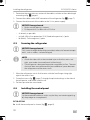
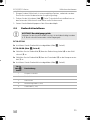
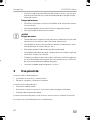
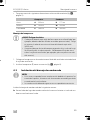
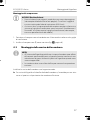
4.3 Installing the condensate drain
I
Install the condensate drain as follows:
➤Run the condensation water hose from the refrigerator through an opening in the
floor which goes outside.
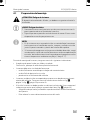
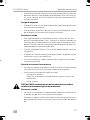
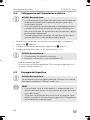
4.4 Connecting the power supply
A
NOTICE! Damage hazard
• Lay the suction pipe in such a way that it is not damaged (e.g. by
sharp edges or strong bends). Observe the minimum bending
radius of the suction pipe (≥R30 mm).
• Ensure that the air from the compressor unit can flow out through the
ventilation grille without obstruction. Do not block the air flow and
do not cover the ventilation grille (e.g. by a closed cabinet door).
NOTE
• Condensation can form inside the refrigerator due to frequent door
opening, incorrectly stored food or food that is stored when it is too
warm.
• Condensation must be drained with a constant slope.
NOTICE! Damage hazard
• The electrical installation and repairs may only be performed by a
specialist in accordance with the applicable national regulations and
standards.
• To avoid voltage loss and therefore a drop in performance, the cable
should be kept as short as possible and should not be interrupted if
possible. For this reason avoid additional switches, plugs or power
strips.
• Before connecting check whether the operating voltage and the bat-
tery voltage correspond (see type plate).

EN
Installing the refrigerator RC(S)(L)(D)10-Series
18
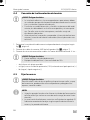
1. Determine the required cross section of the cable in relation to the cable length
according to fig. 6, page 6.
2. Connect the cables to the AMP connector of the refrigerator (fig. 7, page 7).
3. Connect the other ends of the cables to the 12 Vg power supply:
A
– As directly as possible
– rd (red): With a fuse protection (10 A) fitted to the positive (+) pole
– bk (black): To the negative (–) pole
4.5 Securing the refrigerator
A
I
1. Move the refrigerator into its final location with the front flange sitting tight
against the recess front.
2. Fasten the screws (fig. 8, page 7) through the plastic bushings in the sides of
the refrigerator, and further into the wall.
3. Put the caps onto the screw heads.
4.6 Installing the control panel
A
RC10.4P.100
➤Install the control panel as shown (fig. 0, page 8).
NOTICE! Damage hazard
• Make sure the polarity is correct.
• Fit the positive (+) cable with a 10 A fuse.
NOTICE! Damage hazard
Only screw through the bushings provided, otherwise foamed compo-
nents, such as cables, can be damaged.
NOTE
• Attach the side walls or the attached strips so that the screws are
tight, even under increased loads (while driving).
• The refrigerator is designed to provide a regulated air flow. The man-
ufacturer does not recommend to leave additional space between
the refrigerator and the recess walls.
NOTICE! Damage hazard
Lay the connection cables in such a way that they are not damaged (e.g.
by sharp edges or strong bends).

EN
RC(S)(L)(D)10-Series Technical data
19
RC10.4M.90 (fig. 9, page 8)
➤Connect the control panel (2) to the refrigerator (3) via the lightning cable (4).
➤Connect the control panel (2) to the compressor unit (1) via the data cable (5).
➤Install the control panel as shown (fig. 9, page 8).
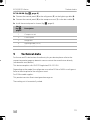
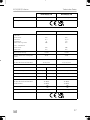
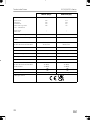
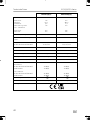
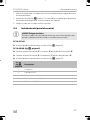
5 Technical data
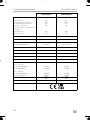
For the current EU declaration of conformity for your device please refer to the
respective product page on dometic.com or contact the manufacturer directly
(see dometic.com/dealer).
This device complies with UN ECE Regulation R10.05.2014.
Depending on the model, the refrigerator uses either R134a or R600a as refrigerant.
Refer to the data plate for the refrigerant used.
For R134a models applies:
This product contains fluorinated greenhouse gases.
The cooling unit is hermetically sealed.
No. in
fig. 9,
page 8
Description
1 Compressor unit
2 Control panel
3 Refrigerator
4 Lightning cable (3.5 m)
5 Data cable (3.5 m)

EN
Technical data RC(S)(L)(D)10-Series
20
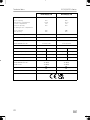
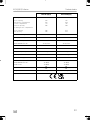
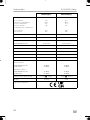
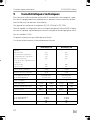
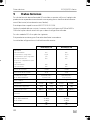
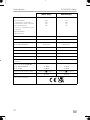
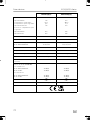
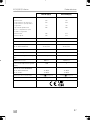
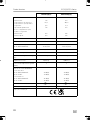
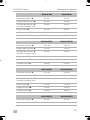
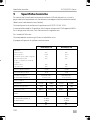
RC10.4(S)(T).70 RC10.4(S)(T).90
Capacity
Gross capacity:
Refrigerator compartment:
Frozen compartment:
Total net capacity:
Excluding frozen compartment
Gross capacity:
Net capacity:
62 l
54.5 l
7.5 l
62 l
69 l
64 l
86 l
75.5 l
7.5 l
83 l
90 l
85 l
Connection voltage: 12 Vg12 Vg
Average power input: 42 W 45 W
Energy consumption
PERFORMANCE mode:
0.45 kWh/24 h
37.5 Ah/24 h
0.45 kWh/24 h
37.5 Ah/24 h
Climate class: T T
Refrigerant: R134a R600a R134a R600a
Refrigerant quantity: 40 g 16 g 43 g 20 g
CO2 equivalent: 0.057 t 0.048 kg 0.061 t 0.060 kg
Global warming potential (GWP): 1430 3 1430 3
Noise emission (EN60704):
PERFORMANCE mode:
QUIET mode:
42 dB(A)
39 dB(A)
42 dB(A)
39 dB(A)
Dimensions H x W x D (in mm): see fig. 2, page 4 see fig. 2, page 4
Weight: 19.5kg 21.4kg
Inspection/certification:
A página está carregando ...
A página está carregando ...
A página está carregando ...
A página está carregando ...
A página está carregando ...
A página está carregando ...
A página está carregando ...
A página está carregando ...
A página está carregando ...
A página está carregando ...
A página está carregando ...
A página está carregando ...
A página está carregando ...
A página está carregando ...
A página está carregando ...
A página está carregando ...
A página está carregando ...
A página está carregando ...
A página está carregando ...
A página está carregando ...
A página está carregando ...
A página está carregando ...
A página está carregando ...
A página está carregando ...
A página está carregando ...
A página está carregando ...
A página está carregando ...
A página está carregando ...
A página está carregando ...
A página está carregando ...
A página está carregando ...
A página está carregando ...
A página está carregando ...
A página está carregando ...
A página está carregando ...
A página está carregando ...
A página está carregando ...
A página está carregando ...
A página está carregando ...
A página está carregando ...
A página está carregando ...
A página está carregando ...
A página está carregando ...
A página está carregando ...
A página está carregando ...
A página está carregando ...
A página está carregando ...
A página está carregando ...
A página está carregando ...
A página está carregando ...
A página está carregando ...
A página está carregando ...
A página está carregando ...
A página está carregando ...
A página está carregando ...
A página está carregando ...
A página está carregando ...
A página está carregando ...
A página está carregando ...
A página está carregando ...
A página está carregando ...
A página está carregando ...
A página está carregando ...
A página está carregando ...
A página está carregando ...
A página está carregando ...
A página está carregando ...
A página está carregando ...
A página está carregando ...
A página está carregando ...
A página está carregando ...
A página está carregando ...
A página está carregando ...
A página está carregando ...
A página está carregando ...
A página está carregando ...
A página está carregando ...
A página está carregando ...
A página está carregando ...
A página está carregando ...
A página está carregando ...
A página está carregando ...
A página está carregando ...
A página está carregando ...
A página está carregando ...
A página está carregando ...
A página está carregando ...
A página está carregando ...
-
 1
1
-
 2
2
-
 3
3
-
 4
4
-
 5
5
-
 6
6
-
 7
7
-
 8
8
-
 9
9
-
 10
10
-
 11
11
-
 12
12
-
 13
13
-
 14
14
-
 15
15
-
 16
16
-
 17
17
-
 18
18
-
 19
19
-
 20
20
-
 21
21
-
 22
22
-
 23
23
-
 24
24
-
 25
25
-
 26
26
-
 27
27
-
 28
28
-
 29
29
-
 30
30
-
 31
31
-
 32
32
-
 33
33
-
 34
34
-
 35
35
-
 36
36
-
 37
37
-
 38
38
-
 39
39
-
 40
40
-
 41
41
-
 42
42
-
 43
43
-
 44
44
-
 45
45
-
 46
46
-
 47
47
-
 48
48
-
 49
49
-
 50
50
-
 51
51
-
 52
52
-
 53
53
-
 54
54
-
 55
55
-
 56
56
-
 57
57
-
 58
58
-
 59
59
-
 60
60
-
 61
61
-
 62
62
-
 63
63
-
 64
64
-
 65
65
-
 66
66
-
 67
67
-
 68
68
-
 69
69
-
 70
70
-
 71
71
-
 72
72
-
 73
73
-
 74
74
-
 75
75
-
 76
76
-
 77
77
-
 78
78
-
 79
79
-
 80
80
-
 81
81
-
 82
82
-
 83
83
-
 84
84
-
 85
85
-
 86
86
-
 87
87
-
 88
88
-
 89
89
-
 90
90
-
 91
91
-
 92
92
-
 93
93
-
 94
94
-
 95
95
-
 96
96
-
 97
97
-
 98
98
-
 99
99
-
 100
100
-
 101
101
-
 102
102
-
 103
103
-
 104
104
-
 105
105
-
 106
106
-
 107
107
-
 108
108


Dometic RC10.4S.70, RC10.4T.70, RC10.4S.90, RC10.4T.90, RC10.4P.100, RC10.4M.90, RCS10.5S, RCS10.5T, RCS10.5XS, RCS10.5XT, RCL10.4E, RCL10.4ES, RCL10.4ET, RCD10.5S, RCD10.5T, RCD10.5XS, RCD10.5XT Guia de instalação
- Categoria
- Geladeiras
- Tipo
- Guia de instalação
em outros idiomas
- español: Dometic RC10.4S.70, RC10.4T.70, RC10.4S.90, RC10.4T.90, RC10.4P.100, RC10.4M.90, RCS10.5S, RCS10.5T, RCS10.5XS, RCS10.5XT, RCL10.4E, RCL10.4ES, RCL10.4ET, RCD10.5S, RCD10.5T, RCD10.5XS, RCD10.5XT Guía de instalación
- français: Dometic RC10.4S.70, RC10.4T.70, RC10.4S.90, RC10.4T.90, RC10.4P.100, RC10.4M.90, RCS10.5S, RCS10.5T, RCS10.5XS, RCS10.5XT, RCL10.4E, RCL10.4ES, RCL10.4ET, RCD10.5S, RCD10.5T, RCD10.5XS, RCD10.5XT Guide d'installation
- italiano: Dometic RC10.4S.70, RC10.4T.70, RC10.4S.90, RC10.4T.90, RC10.4P.100, RC10.4M.90, RCS10.5S, RCS10.5T, RCS10.5XS, RCS10.5XT, RCL10.4E, RCL10.4ES, RCL10.4ET, RCD10.5S, RCD10.5T, RCD10.5XS, RCD10.5XT Guida d'installazione
- Deutsch: Dometic RC10.4S.70, RC10.4T.70, RC10.4S.90, RC10.4T.90, RC10.4P.100, RC10.4M.90, RCS10.5S, RCS10.5T, RCS10.5XS, RCS10.5XT, RCL10.4E, RCL10.4ES, RCL10.4ET, RCD10.5S, RCD10.5T, RCD10.5XS, RCD10.5XT Installationsanleitung
Artigos relacionados
-
Dometic RC10.4.70, RC10.4.90, RC10.4P.100 RCS10.5, RCL10.4, RCD10.5 Guia de instalação
-
-
-
-
-
-
-
-
-