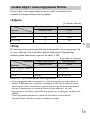
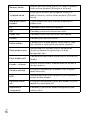
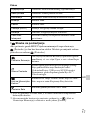
Sony Cyber-Shot DSC H100 Guia de usuario
- Categoria
- Filmadoras
- Tipo
- Guia de usuario

©2012 Sony Corporation Printed in China
4-439-008-21(1)
DSC-H100
Digital Still Camera / Instruction Manual GB
Appareil photo numérique / Mode d’emploi FR
Fotocamera digitale / Istruzioni per l’uso IT
Cámara fotografía digital / Manual de instrucciones ES
Câmara fotográfica digital / Manual de instruções PT
Digitale Fotokamera / Gebrauchsanleitung DE
Digitale camera / Gebruiksaanwijzing NL
Cyfrowy aparat fotograficzny / Instrukcja obsługi PL
Digitální fotoaparát / Návod k obsluze CZ
Digitális fényképezőgép / Használati útmutató HU
Digitálny fotoaparát / Návod na používanie SK
Digital stillbildskamera / Handledning SE
Digitaalikamera / Käyttöopas FI
Digitalt stillkamera / Bruksanvisning NO
Digitalt stillbilledkamera / Betjeningsvejledning DK
Digitalni fotoaparat / Priručnik za upotrebu HR
Aparat foto digital / Manual de instrucţiuni RO
Ψηφιακή φωτογραφική μηχανή / Εγχειρίδιο οδηγιών GR
DSC-H100
4-439-008-21(1)
DSC-H100

GB
2
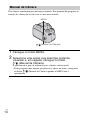
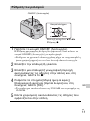
The number in parentheses indicates the number of pieces.
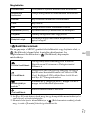
• Camera (1)
• LR6 (size AA) alkaline batteries (4)
• Dedicated USB cable (1) (Sony Corporation 1-837-783-)
• Shoulder strap (1)
• Lens cap (1)/Lens cap strap (1)
• Instruction Manual (this manual) (1)
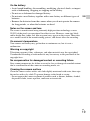
English
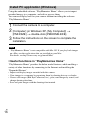
Learning more about the camera (“Cyber-shot
User Guide”)
“Cyber-shot User Guide” is an on-line manual. Refer to it for
in-depth instructions on the many functions of the camera.
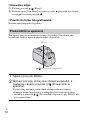
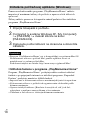
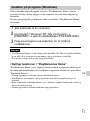
1 Access the Sony support page.
http://www.sony.net/SonyInfo/Support/
2 Select your country or region.
3 Search for the model name of your camera within the
support page.
• Check the model name on the bottom of your camera.
Checking the supplied items

GB
3
GB
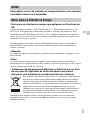
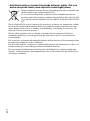
To reduce fire or shock hazard, do not expose the unit to rain or
moisture.
[ Notice for the customers in the countries applying EU Directives
The manufacturer of this product is Sony Corporation, 1-7-1 Konan Minato-ku Tokyo,
108-0075 Japan. The Authorized Representative for EMC and product safety is Sony
Deutschland GmbH, Hedelfinger Strasse 61, 70327 Stuttgart, Germany. For any service or
guarantee matters please refer to the addresses given in separate service or guarantee
documents.
This product has been tested and found compliant with the limits set out in the EMC
Directive for using connection cables shorter than 3 meters (9.8 feet).
[ Attention
The electromagnetic fields at the specific frequencies may influence the picture and sound
of this unit.
[ Notice
If static electricity or electromagnetism causes data transfer to discontinue midway (fail),
restart the application or disconnect and connect the communication cable (USB, etc.)
again.
[ Disposal of Old Electrical & Electronic Equipment (Applicable in
the European Union and other European countries with separate
collection systems)
This symbol on the product or on its packaging indicates that this product
shall not be treated as household waste. Instead it shall be handed over to
the applicable collection point for the recycling of electrical and electronic
equipment. By ensuring this product is disposed of correctly, you will help
prevent potential negative consequences for the environment and human
health, which could otherwise be caused by inappropriate waste handling
of this product. The recycling of materials will help to conserve natural
resources. For more detailed information about recycling of this product,
please contact your local Civic Office, your household waste disposal service or the shop
where you purchased the product.
WARNING
For Customers in Europe

GB
4
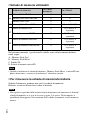
[ Disposal of waste batteries (applicable in the European Union
and other European countries with separate collection systems)
This symbol on the battery or on the packaging indicates that the battery
provided with this product shall not be treated as household waste.
On certain batteries this symbol might be used in combination with a
chemical symbol. The chemical symbols for mercury (Hg) or lead (Pb) are
added if the battery contains more than 0.0005% mercury or 0.004% lead.
By ensuring these batteries are disposed of correctly, you will help prevent
potentially negative consequences for the environment and human health which could
otherwise be caused by inappropriate waste handling of the battery. The recycling of the
materials will help to conserve natural resources.
In case of products that for safety, performance or data integrity reasons require a
permanent connection with an incorporated battery, this battery should be replaced by
qualified service staff only.
To ensure that the battery will be treated properly, hand over the product at end-of-life to
the applicable collection point for the recycling of electrical and electronic equipment.
For all other batteries, please view the section on how to remove the battery from the
product safely. Hand the battery over to the applicable collection point for the recycling of
waste batteries.
For more detailed information about recycling of this product or battery, please contact
your local Civic Office, your household waste disposal service or the shop where you
purchased the product.

GB
5
GB
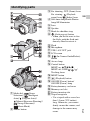
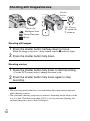
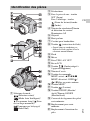
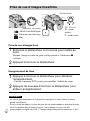
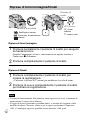
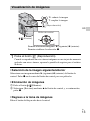
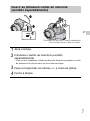
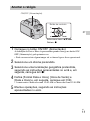
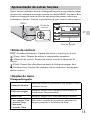
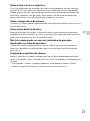
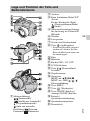
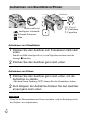
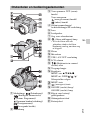
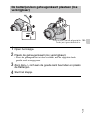
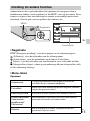
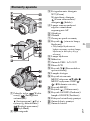
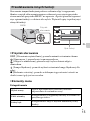
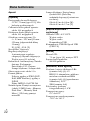
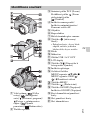
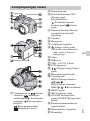
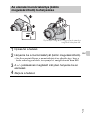
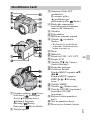
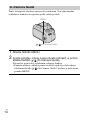
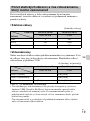
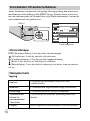
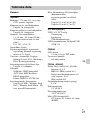
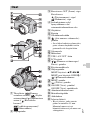
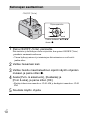
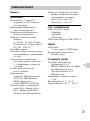
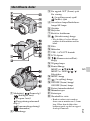
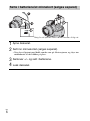
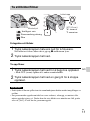
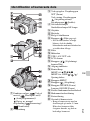
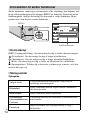
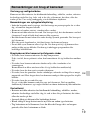
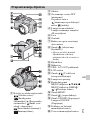
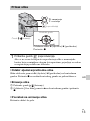
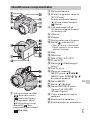
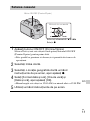
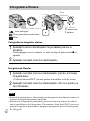
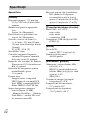
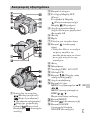
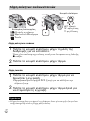
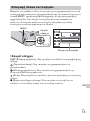
A Mode dial: (Scene
Selection)/ (Intelligent
Auto)/ (Program Auto)/
(Manual Exposure Shooting)/
(Sweep Panorama)/
(Movie Mode)
B Shutter button
C For shooting: W/T (Zoom) lever
For viewing: (Playback
zoom) lever/ (Index) lever
D Self-timer lamp/Smile Shutter
lamp/AF illuminator
E Lens
F Speaker
G Hook for shoulder strap
H (flash pop-up) button
• When you do not want to fire
the flash, push the flash unit
down by hand to retract it.
I Flash
J Microphone
K USB / A/V OUT jack
L LCD screen
M / (In-Camera Guide/Delete)
button
N Access lamp
O Control button
MENU on: v/V/b/B/z
MENU off: DISP/ / / /
Tracking focus
P MENU button
Q (Playback) button
R ON/OFF (Power) button/
ON/OFF (Power) lamp
S Battery/memory card cover
T Memory card slot
U Battery insertion slot
V Tripod receptacle
• Use a tripod with a screw less
than 5.5 mm (7/32 inches)
long. Otherwise, you cannot
firmly secure the camera, and
damage to the camera may
occur.
Identifying parts

GB
6
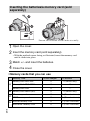
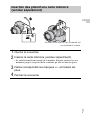
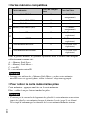
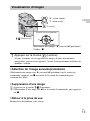
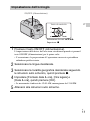
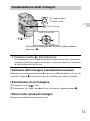
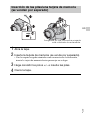
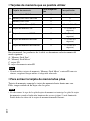
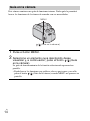
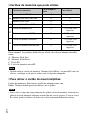
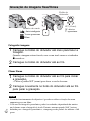
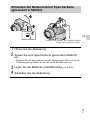
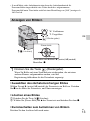
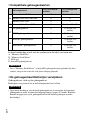
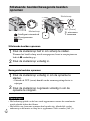
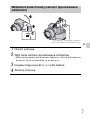
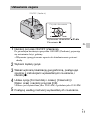
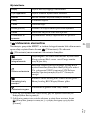
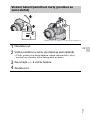
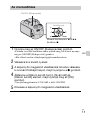
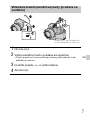
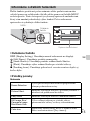
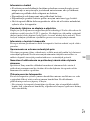
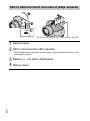
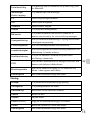
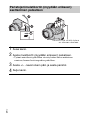
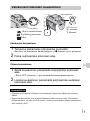
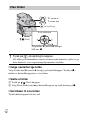
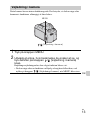
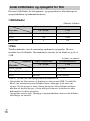
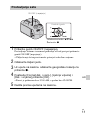
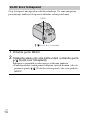
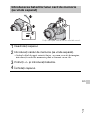
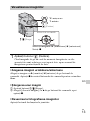
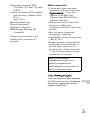
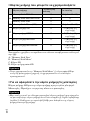
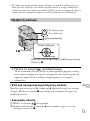
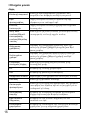
x
Memory cards that you can use
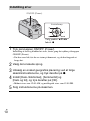
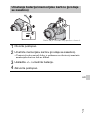
Inserting the batteries/a memory card (sold
separately)
1
Open the cover.
2
Insert the memory card (sold separately).
• With the notched corner facing as illustrated, insert the memory card
until it clicks into place.
3
Match +/– and insert the batteries.
4
Close the cover.
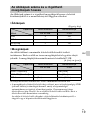
Memory Card For still images For movies
A
Memory Stick PRO Duo aa (Mark2 only)
Memory Stick PRO-HG Duo aa
Memory Stick Duo a —
B Memory Stick Micro (M2) aa (Mark2 only)
C
SD memory card aa (Class 4 or faster)
SDHC memory card aa (Class 4 or faster)
D
microSD memory card aa (Class 4 or faster)
microSDHC memory card aa (Class 4 or faster)
Ensure the notched corner faces correctly.

GB
7
GB
In this manual, the products in the table are collectively referred to as
followings:
A: “Memory Stick Duo” media
B: “Memory Stick Micro” media
C: SD card
D: microSD memory card
• When using “Memory Stick Micro” media or microSD memory cards with this
camera, make sure to use with the appropriate adaptor.
x
To remove the memory card/batteries
Memory card: Push the memory card in once.
Batteries: Be sure not to drop the batteries.
• Never open the battery/memory card cover or remove the batteries/memory card
when the access lamp (page 5) is lit. This may cause damage to data in the
memory card/internal memory.
x
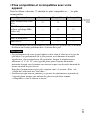
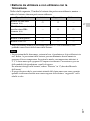
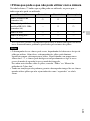
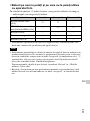
Batteries you can and cannot use with your camera
In the table below, a indicates the battery can be used, while — indicates the
one cannot be used.
* Operating performance cannot be ensured if voltage drops or other problems are
caused by the nature of the battery.
Note
Note
Battery type Supplied Supported Rechargeable
LR6 (size AA) alkaline
batteries
aa—
HR15/51: HR6 (size AA)
Nickel-Metal Hydride
batteries
— aa
Lithium batteries* — — —
Manganese batteries* — — —
Ni-Cd batteries* — — —

GB
8
• The performance of your camera differs depending on the manufacturer and the
type of battery you use. Also, battery-performance may decline dramatically under
low temperatures. Especially, at temperatures below 5 °C (41 °F), your camera
may get turned off unexpectedly as you turn it on or switch the playback mode to
the shooting mode.
For more details on batteries, see “Batteries” in “Cyber-shot User Guide”.
• Please note that we cannot guarantee full performance of your camera when using
the batteries not indicated as “supported” in the above table.
x
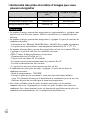
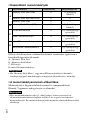
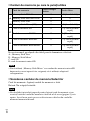
Battery life and number of images you can record/
view
• The number of images that can be recorded is an approximate number when
shooting with new batteries. The number may be less depending on the
circumstances.
• The number of images that can be recorded is when shooting under the following
conditions:
– Using Sony “Memory Stick PRO Duo” (Mark2) media (sold separately).
– New batteries are used at an ambient temperature of 25°C (77°F).
• The number of still images that can be recorded is based on the CIPA standard,
and is for shooting under the following conditions.
(CIPA: Camera & Imaging Products Association)
– [Panel Brightness] is set to [3].
– Shooting once every 30 seconds.
– The zoom is switched alternately between the W and T ends.
– The flash strobes once every two times.
– The power turns on and off once every ten times.
• The battery life for movies is when shooting under the following conditions:
– Recording mode: 720 FINE
– When continuous shooting ends because of set limits (page 17), press the shutter
button down again and continue shooting. Shooting functions such as the zoom
do not operate.
• The values shown for alkaline battery are based on commercial norms, and do not
apply to all alkaline batteries in all conditions. The values may vary, depending on
the battery manufacturer/type, environmental conditions, product setting, etc.
Notes
Battery life (min.) Number of Images
Shooting still images Approx. 175 Approx. 350
Viewing still images Approx. 400 Approx. 8000
Shooting movies Approx. 150 —
Notes

GB
9
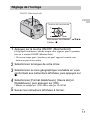
GB
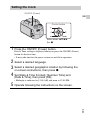
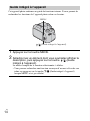
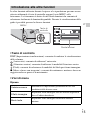
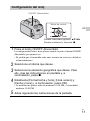
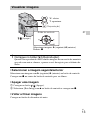
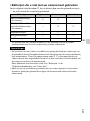
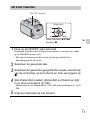
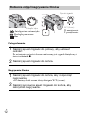
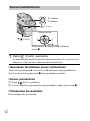
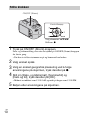
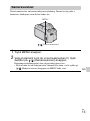
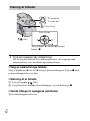
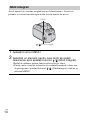
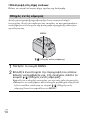
Setting the clock
1
Press the ON/OFF (Power) button.
Date & Time setting is displayed when you press the ON/OFF (Power)
button for the first time.
• It may take time for the power to turn on and allow operation.
2
Select a desired language.
3
Select a desired geographic location by following the
on-screen instructions, then press z.
4
Set [Date & Time Format], [Summer Time] and
[Date & Time], then press [OK].
• Midnight is indicated as 12:00 AM, and noon as 12:00 PM.
5
Operate following the instructions on the screen.
Select items: v/V/b/B
Set: z
Control button
ON/OFF (Power)

GB
10
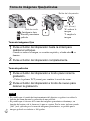
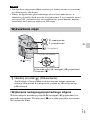
Shooting still images
Shooting movies
• The operating sound of the lens is recorded when the zoom function operates
while shooting a movie.
• The panoramic shooting range may be reduced, depending on the subject or the
way it is shot. Therefore even when [360°] is set for panoramic shooting, the
recorded image may be less than 360 degrees.
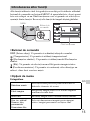
Shooting still images/movies
1
Press the shutter button halfway down to focus.
When the image is in focus, a beep sounds and the z indicator lights.
2
Press the shutter button fully down.
1
Press the shutter button fully down to start recording.
• Use the W/T (zoom) lever to change the zoom scale.
2
Press the shutter button fully down again to stop
recording.
Notes
Mode dial
Shutter
button
W/T (Zoom)
W: zoom out
T: zoom in
: Intelligent Auto
: Sweep Panorama
: Movie

GB
11
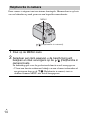
GB
x
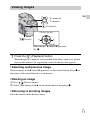
Selecting next/previous image
Select an image with B (next)/b (previous) on the control button. Press z in
the center of the control button to view movies.
x
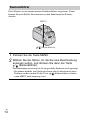
Deleting an image
1 Press / (Delete) button.
2 Select [This Image] with v on the control button, then press z.
x
Returning to shooting images
Press the shutter button halfway down.
Viewing images
1
Press the (Playback) button.
When images on a memory card recorded with other cameras are played
back on this camera, the registration screen for the data file appears.
/ (Delete)
Control button
(Playback)
W: zoom out
T: zoom in
Select images: B (next)/b (previous)
Set: z

GB
12
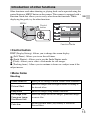
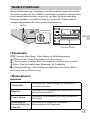
This camera contains an internal function guide. This allows you to search the
camera’s functions according to your needs.
In-Camera Guide
1
Press the MENU button.
2
Select an item whose description you want to view, then
press the / (In-Camera Guide) button.
The operation guide for the selected function is displayed.
• You can search for a function by key word(s) or icon, by pressing the
/ (In-Camera Guide) button when MENU is not displayed.
/ (In-Camera Guide)
MENU

GB
13
GB
Other functions used when shooting or playing back can be operated using the
control button or MENU button on the camera. This camera is equipped with a
Function Guide that allows you to easily select from the functions. While
displaying the guide, try the other functions.
x
Control button
DISP (Display Setting): Allows you to change the screen display.
(Self-Timer): Allows you to use the self-timer.
(Smile Shutter): Allows you to use the Smile Shutter mode.
(Flash): Allows you to select a flash mode for still images.
z (Tracking focus): Allows you to continue to focus on a subject even if the
subject moves.
x
Menu Items
Shooting
Introduction of other functions
Scene Selection Select pre-set settings to match various scene conditions.
Picture Effect
Shoot still images with an original texture according to
the desired effect.
Easy Mode Shoot still images using minimal functions.
Still Image Size/
Panorama Image
Size/Movie Size
Select the image size for still images, panoramic images
or movie files.
Color hue
Set the color hue when [Toy camera] is selected in
Picture Effect.
MENU
Control
button
Function Guide

GB
14
Extracted Color
Select the color to extract when [Partial Color] is
selected in Picture Effect.
Cont. Shooting
Settings
Select single-image mode or burst mode.
EV Adjust the exposure manually.
ISO Adjust the luminous sensitivity.
White Balance Adjust color tones of an image.
Focus Select the focus method.
Metering Mode
Select the metering mode that sets which part of the
subject to measure to determine the exposure.
Scene Recognition
Set to automatically detect shooting conditions in
Intelligent Auto mode.
Soft Skin Effect Set the Soft Skin Effect and the effect level.
Smile Detection
Sensitivity
Set the Smile Shutter function sensitivity for detecting
smiles.
Face Detection
Select to detect faces and adjust various settings
automatically.
DRO
Set DRO function to correct the brightness and contrast
and improve the image quality.
Anti Blink
Set to automatically shoot two images and select image
in which the eyes are not blinking.
In-Camera Guide Search the camera’s functions according to your needs.

GB
15
GB
Viewing
x
Setting items
If you press the MENU button while shooting or during playback,
(Settings) is provided as a final selection. You can change the default
settings on the (Settings) screen.
*1 [Eye-Fi] is displayed only when a compatible memory cards is inserted to the
camera.
*2 If a memory card is not inserted, (Internal Memory Tool) will be displayed
and only [Format] can be selected.
Slideshow Select a method of continuous playback.
View Mode Select the display format for images.
Retouch Retouch an image using various effects.
Delete Delete an image.
Protect Protect the images.
Print (DPOF) Add a print order mark to a still image.
Rotate Rotate a still image to the left or right.
In-Camera Guide Search the camera’s functions according to your needs.
Shooting Settings
AF Illuminator/Grid Line/Disp. Resolution/Digital
Zoom/Red Eye Reduction/Blink Alert/Write Date
Main Settings
Beep/Panel Brightness/Language Setting/Display color/
Initialize/Function Guide/Video Out/USB Connect
Setting/LUN Setting/Download Music/Empty Music/
Eye-Fi*
1
/Power Save
Memory Card
Tool
*
2
Format/Create REC.Folder/Change REC.Folder/Delete
REC.Folder/Copy/File Number
Clock Settings
Area Setting/Date & Time Setting

GB
16
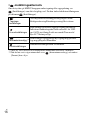
Using the embedded software “PlayMemories Home” allows you to import
recorded images to a computer, and edit or process them.
You can record/play back on your camera without installing the software
“PlayMemories Home”.
• “PlayMemories Home” is not compatible with Mac OS. If you play back images
on a Mac, use the applications that are installed on your Mac.
For details, see http://www.sony.co.jp/imsoft/Mac/
x
Useful functions in “PlayMemories Home”
“PlayMemories Home” provides the below useful features, while enabling a
variety of other functions by connecting to the Internet and installing the
“Expanded Feature”.
• Import and display images recorded with this camera.
• View images in a computer by organizing them by shooting date on a calendar.
• Correct still images (Red Eye Correction, etc.), print, send images by e-mail, and
change shooting date/time.
• Save and print images with the shooting date inserted.
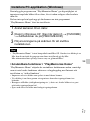
Install PC application (Windows)
1
Connect the camera to a computer.
2
[Computer] (in Windows XP, [My Computer]) t
[PMHOME] t double-click [PMHOME.EXE].
3
Follow the instructions on the screen to complete the
installation.
Note

GB
17
GB
The number of still images and recordable time may vary depending on the
shooting conditions and the memory card.
x
Still images
(Units: Images)
x
Movies
The table below shows the approximate maximum recording times. These are
the total times for all movie files. The maximum size of a movie file is up to
approximately 2 GB.
(h (hour), m (minute))
The number in ( ) is the minimum recordable time.
• The recordable time of movies varies because the camera is equipped with VBR
(Variable Bit Rate), which automatically adjusts image quality depending on the
shooting scene. When you record a fast-moving subject, the image is clearer but
the recordable time is shorter because more memory is required for recording.
The recordable time also varies depending on the shooting conditions, the subject
or the image size setting.
Number of still images and recordable time of
movies
Capacity
Size
Internal memory Memory card
Approx. 55 MB 2 GB
16M 8 265
VGA 350 11500
16:9(12M) 9 330
Capacity
Size
Internal memory Memory card
Approx. 55 MB 2 GB
1280 × 720 (Fine) — 25m (20m)
1280 × 720 (Standard) — 35m (30m)
VGA 2m (2m) 1h 5m (1h 5m)

GB
18
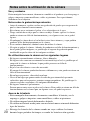
On use and care
Avoid rough handling, disassembling, modifying, physical shock, or impact such as
hammering, dropping or stepping on the product. Be particularly careful of the lens.
Notes on recording/playback
• Before you start recording, make a trial recording to make sure that the camera is
working correctly.
• The camera is neither dust-proof, nor splash-proof, nor water-proof.
• Avoid exposing the camera to water. If water enters inside the camera, a
malfunction may occur. In some cases, the camera cannot be repaired.
• Do not aim the camera at the sun or other bright light. It may cause the
malfunction of the camera.
• If moisture condensation occurs, remove it before using the camera.
• Do not shake or strike the camera. It may cause a malfunction and you may not be
able to record images. Furthermore, the recording media may become unusable or
image data may be damaged.
Do not use/store the camera in the following places
• In an extremely hot, cold or humid place
In places such as in a car parked in the sun, the camera body may become
deformed and this may cause a malfunction.
• Under direct sunlight or near a heater
The camera body may become discolored or deformed, and this may cause a
malfunction.
• In a location subject to rocking vibration
• Near a location that generates strong radio waves, emits radiation or is strongly
magnetic place. Otherwise, the camera may not properly record or play back
images.
• In sandy or dusty places
Be careful not to let sand or dust get into the camera. This may cause the camera to
malfunction, and in some cases this malfunction cannot be repaired.
Notes on using the camera

GB
19
GB
On the battery
• Avoid rough handling, disassembling, modifying, physical shock, or impact
such as hammering, dropping or stepping on the battery.
• Do not use a deformed or damaged battery.
• Do not mix a used battery together with a new battery or different types of
batteries.
• Remove the batteries from the camera when you do not operate the camera
for long periods, or when the batteries are dead.
Notes on the screen and lens
The screen is manufactured using extremely high-precision technology so over
99.99% of the pixels are operational for effective use. However, some tiny black
and/or bright dots (white, red, blue or green) may appear on the screen. These dots
are a normal result of the manufacturing process, and do not affect the recording.
On camera’s temperature
Your camera and battery may get hot due to continuous use, but it is not a
malfunction.
Warning on copyright
Television programs, films, videotapes, and other materials may be copyrighted.
Unauthorized recording of such materials may be contrary to the provisions of the
copyright laws.
No compensation for damaged content or recording failure
Sony cannot compensate for failure to record or loss or damage of recorded content
due to a malfunction of the camera or recording media, etc.
Cleaning the camera surface
Clean the camera surface with a soft cloth slightly moistened with water, then wipe
the surface with a dry cloth. To prevent damage to the finish or casing:
– Do not expose the camera to chemical products such as thinner, benzine, alcohol,
disposable cloths, insect repellent, sunscreen or insecticide.

GB
20
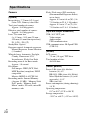
Camera
[System]
Image device: 7.75 mm (1/2.3 type)
color CCD, Primary color filter
Total pixel number of camera:
Approx. 16.4 Megapixels
Effective pixel number of camera:
Approx. 16.1 Megapixels
Lens: 21× zoom lens
f = 4.5 mm – 94.5 mm (25 mm –
525 mm (35 mm film equivalent))
F3.1 (W) – F5.8 (T)
SteadyShot: Optical
Exposure control: Automatic exposure,
Manual Exposure, Scene Selection
(11 modes)
White balance: Automatic, Daylight,
Cloudy, Fluorescent 1/2/3,
Incandescent, Flash, One Push
Recording interval for Burst mode:
Approx. 1.0 second
File format:
Still images: JPEG (DCF, Exif,
MPF Baseline) compliant, DPOF
compatible
Movies: MPEG-4 AVC/H.264
Recording media: Internal Memory
(Approx. 55 MB), “Memory Stick
Duo” media, “Memory Stick
Micro” media, SD cards, microSD
memory cards
Flash: Flash range (ISO sensitivity
(Recommended Exposure Index)
set to Auto):
Approx. 0.5 m to 6.8 m (W) (1 ft.
7 3/4 inches to 22 ft. 3 3/4 inches)
Approx. 0.5 m to 3.7 m (T) (1 ft.
7 3/4 inches to 12 ft. 1 3/4 inches)
[Input and Output connectors]
USB / A/V OUT jack:
Video output
Audio output
USB communication
USB communication: Hi-Speed USB
(USB 2.0)
[Screen]
LCD screen:
7.5 cm (3.0 type) TFT drive
Total number of dots:
460 800 dots
[Power, general]
Power: LR6 (size AA) alkaline
batteries (4), 6 V
HR15/51: HR6 (size AA) Nickel-
Metal Hydride batteries (4) (sold
separately), 4.8 V
ZR6 (size AA)
Power consumption (during shooting):
1.4 W
Operating temperature:
0°C to 40°C (32°F to 104°F)
Storage temperature:
–20°C to +60°C (–4°F to +140°F)
Specifications
A página está carregando ...
A página está carregando ...
A página está carregando ...
A página está carregando ...
A página está carregando ...
A página está carregando ...
A página está carregando ...
A página está carregando ...
A página está carregando ...
A página está carregando ...
A página está carregando ...
A página está carregando ...
A página está carregando ...
A página está carregando ...
A página está carregando ...
A página está carregando ...
A página está carregando ...
A página está carregando ...
A página está carregando ...
A página está carregando ...
A página está carregando ...
A página está carregando ...
A página está carregando ...
A página está carregando ...
A página está carregando ...
A página está carregando ...
A página está carregando ...
A página está carregando ...
A página está carregando ...
A página está carregando ...
A página está carregando ...
A página está carregando ...
A página está carregando ...
A página está carregando ...
A página está carregando ...
A página está carregando ...
A página está carregando ...
A página está carregando ...
A página está carregando ...
A página está carregando ...
A página está carregando ...
A página está carregando ...
A página está carregando ...
A página está carregando ...
A página está carregando ...
A página está carregando ...
A página está carregando ...
A página está carregando ...
A página está carregando ...
A página está carregando ...
A página está carregando ...
A página está carregando ...
A página está carregando ...
A página está carregando ...
A página está carregando ...
A página está carregando ...
A página está carregando ...
A página está carregando ...
A página está carregando ...
A página está carregando ...
A página está carregando ...
A página está carregando ...
A página está carregando ...
A página está carregando ...
A página está carregando ...
A página está carregando ...
A página está carregando ...
A página está carregando ...
A página está carregando ...
A página está carregando ...
A página está carregando ...
A página está carregando ...
A página está carregando ...
A página está carregando ...
A página está carregando ...
A página está carregando ...
A página está carregando ...
A página está carregando ...
A página está carregando ...
A página está carregando ...
A página está carregando ...
A página está carregando ...
A página está carregando ...
A página está carregando ...
A página está carregando ...
A página está carregando ...
A página está carregando ...
A página está carregando ...
A página está carregando ...
A página está carregando ...
A página está carregando ...
A página está carregando ...
A página está carregando ...
A página está carregando ...
A página está carregando ...
A página está carregando ...
A página está carregando ...
A página está carregando ...
A página está carregando ...
A página está carregando ...
A página está carregando ...
A página está carregando ...
A página está carregando ...
A página está carregando ...
A página está carregando ...
A página está carregando ...
A página está carregando ...
A página está carregando ...
A página está carregando ...
A página está carregando ...
A página está carregando ...
A página está carregando ...
A página está carregando ...
A página está carregando ...
A página está carregando ...
A página está carregando ...
A página está carregando ...
A página está carregando ...
A página está carregando ...
A página está carregando ...
A página está carregando ...
A página está carregando ...
A página está carregando ...
A página está carregando ...
A página está carregando ...
A página está carregando ...
A página está carregando ...
A página está carregando ...
A página está carregando ...
A página está carregando ...
A página está carregando ...
A página está carregando ...
A página está carregando ...
A página está carregando ...
A página está carregando ...
A página está carregando ...
A página está carregando ...
A página está carregando ...
A página está carregando ...
A página está carregando ...
A página está carregando ...
A página está carregando ...
A página está carregando ...
A página está carregando ...
A página está carregando ...
A página está carregando ...
A página está carregando ...
A página está carregando ...
A página está carregando ...
A página está carregando ...
A página está carregando ...
A página está carregando ...
A página está carregando ...
A página está carregando ...
A página está carregando ...
A página está carregando ...
A página está carregando ...
A página está carregando ...
A página está carregando ...
A página está carregando ...
A página está carregando ...
A página está carregando ...
A página está carregando ...
A página está carregando ...
A página está carregando ...
A página está carregando ...
A página está carregando ...
A página está carregando ...
A página está carregando ...
A página está carregando ...
A página está carregando ...
A página está carregando ...
A página está carregando ...
A página está carregando ...
A página está carregando ...
A página está carregando ...
A página está carregando ...
A página está carregando ...
A página está carregando ...
A página está carregando ...
A página está carregando ...
A página está carregando ...
A página está carregando ...
A página está carregando ...
A página está carregando ...
A página está carregando ...
A página está carregando ...
A página está carregando ...
A página está carregando ...
A página está carregando ...
A página está carregando ...
A página está carregando ...
A página está carregando ...
A página está carregando ...
A página está carregando ...
A página está carregando ...
A página está carregando ...
A página está carregando ...
A página está carregando ...
A página está carregando ...
A página está carregando ...
A página está carregando ...
A página está carregando ...
A página está carregando ...
A página está carregando ...
A página está carregando ...
A página está carregando ...
A página está carregando ...
A página está carregando ...
A página está carregando ...
A página está carregando ...
A página está carregando ...
A página está carregando ...
A página está carregando ...
A página está carregando ...
A página está carregando ...
A página está carregando ...
A página está carregando ...
A página está carregando ...
A página está carregando ...
A página está carregando ...
A página está carregando ...
A página está carregando ...
A página está carregando ...
A página está carregando ...
A página está carregando ...
A página está carregando ...
A página está carregando ...
A página está carregando ...
A página está carregando ...
A página está carregando ...
A página está carregando ...
A página está carregando ...
A página está carregando ...
A página está carregando ...
A página está carregando ...
A página está carregando ...
A página está carregando ...
A página está carregando ...
A página está carregando ...
A página está carregando ...
A página está carregando ...
A página está carregando ...
A página está carregando ...
A página está carregando ...
A página está carregando ...
A página está carregando ...
A página está carregando ...
A página está carregando ...
A página está carregando ...
A página está carregando ...
A página está carregando ...
A página está carregando ...
A página está carregando ...
A página está carregando ...
A página está carregando ...
A página está carregando ...
A página está carregando ...
A página está carregando ...
A página está carregando ...
A página está carregando ...
A página está carregando ...
A página está carregando ...
A página está carregando ...
A página está carregando ...
A página está carregando ...
A página está carregando ...
A página está carregando ...
A página está carregando ...
A página está carregando ...
A página está carregando ...
A página está carregando ...
A página está carregando ...
A página está carregando ...
A página está carregando ...
A página está carregando ...
A página está carregando ...
A página está carregando ...
A página está carregando ...
A página está carregando ...
A página está carregando ...
A página está carregando ...
A página está carregando ...
A página está carregando ...
A página está carregando ...
A página está carregando ...
A página está carregando ...
A página está carregando ...
A página está carregando ...
A página está carregando ...
A página está carregando ...
A página está carregando ...
A página está carregando ...
A página está carregando ...
A página está carregando ...
A página está carregando ...
A página está carregando ...
A página está carregando ...
A página está carregando ...
A página está carregando ...
A página está carregando ...
A página está carregando ...
A página está carregando ...
A página está carregando ...
A página está carregando ...
A página está carregando ...
A página está carregando ...
A página está carregando ...
A página está carregando ...
A página está carregando ...
A página está carregando ...
A página está carregando ...
A página está carregando ...
A página está carregando ...
A página está carregando ...
A página está carregando ...
A página está carregando ...
A página está carregando ...
A página está carregando ...
A página está carregando ...
A página está carregando ...
A página está carregando ...
A página está carregando ...
A página está carregando ...
A página está carregando ...
A página está carregando ...
A página está carregando ...
A página está carregando ...
A página está carregando ...
A página está carregando ...
A página está carregando ...
A página está carregando ...
A página está carregando ...
A página está carregando ...
A página está carregando ...
A página está carregando ...
A página está carregando ...
A página está carregando ...
A página está carregando ...
A página está carregando ...
A página está carregando ...
A página está carregando ...
A página está carregando ...
A página está carregando ...
A página está carregando ...
A página está carregando ...
A página está carregando ...
A página está carregando ...
A página está carregando ...
A página está carregando ...
A página está carregando ...
A página está carregando ...
A página está carregando ...
A página está carregando ...
A página está carregando ...
A página está carregando ...
A página está carregando ...
A página está carregando ...
A página está carregando ...
A página está carregando ...
A página está carregando ...
A página está carregando ...
A página está carregando ...
A página está carregando ...
A página está carregando ...
A página está carregando ...
A página está carregando ...
A página está carregando ...
A página está carregando ...
A página está carregando ...
A página está carregando ...
A página está carregando ...
A página está carregando ...
A página está carregando ...
A página está carregando ...
A página está carregando ...
A página está carregando ...
A página está carregando ...
A página está carregando ...
A página está carregando ...
A página está carregando ...
A página está carregando ...
A página está carregando ...
-
 1
1
-
 2
2
-
 3
3
-
 4
4
-
 5
5
-
 6
6
-
 7
7
-
 8
8
-
 9
9
-
 10
10
-
 11
11
-
 12
12
-
 13
13
-
 14
14
-
 15
15
-
 16
16
-
 17
17
-
 18
18
-
 19
19
-
 20
20
-
 21
21
-
 22
22
-
 23
23
-
 24
24
-
 25
25
-
 26
26
-
 27
27
-
 28
28
-
 29
29
-
 30
30
-
 31
31
-
 32
32
-
 33
33
-
 34
34
-
 35
35
-
 36
36
-
 37
37
-
 38
38
-
 39
39
-
 40
40
-
 41
41
-
 42
42
-
 43
43
-
 44
44
-
 45
45
-
 46
46
-
 47
47
-
 48
48
-
 49
49
-
 50
50
-
 51
51
-
 52
52
-
 53
53
-
 54
54
-
 55
55
-
 56
56
-
 57
57
-
 58
58
-
 59
59
-
 60
60
-
 61
61
-
 62
62
-
 63
63
-
 64
64
-
 65
65
-
 66
66
-
 67
67
-
 68
68
-
 69
69
-
 70
70
-
 71
71
-
 72
72
-
 73
73
-
 74
74
-
 75
75
-
 76
76
-
 77
77
-
 78
78
-
 79
79
-
 80
80
-
 81
81
-
 82
82
-
 83
83
-
 84
84
-
 85
85
-
 86
86
-
 87
87
-
 88
88
-
 89
89
-
 90
90
-
 91
91
-
 92
92
-
 93
93
-
 94
94
-
 95
95
-
 96
96
-
 97
97
-
 98
98
-
 99
99
-
 100
100
-
 101
101
-
 102
102
-
 103
103
-
 104
104
-
 105
105
-
 106
106
-
 107
107
-
 108
108
-
 109
109
-
 110
110
-
 111
111
-
 112
112
-
 113
113
-
 114
114
-
 115
115
-
 116
116
-
 117
117
-
 118
118
-
 119
119
-
 120
120
-
 121
121
-
 122
122
-
 123
123
-
 124
124
-
 125
125
-
 126
126
-
 127
127
-
 128
128
-
 129
129
-
 130
130
-
 131
131
-
 132
132
-
 133
133
-
 134
134
-
 135
135
-
 136
136
-
 137
137
-
 138
138
-
 139
139
-
 140
140
-
 141
141
-
 142
142
-
 143
143
-
 144
144
-
 145
145
-
 146
146
-
 147
147
-
 148
148
-
 149
149
-
 150
150
-
 151
151
-
 152
152
-
 153
153
-
 154
154
-
 155
155
-
 156
156
-
 157
157
-
 158
158
-
 159
159
-
 160
160
-
 161
161
-
 162
162
-
 163
163
-
 164
164
-
 165
165
-
 166
166
-
 167
167
-
 168
168
-
 169
169
-
 170
170
-
 171
171
-
 172
172
-
 173
173
-
 174
174
-
 175
175
-
 176
176
-
 177
177
-
 178
178
-
 179
179
-
 180
180
-
 181
181
-
 182
182
-
 183
183
-
 184
184
-
 185
185
-
 186
186
-
 187
187
-
 188
188
-
 189
189
-
 190
190
-
 191
191
-
 192
192
-
 193
193
-
 194
194
-
 195
195
-
 196
196
-
 197
197
-
 198
198
-
 199
199
-
 200
200
-
 201
201
-
 202
202
-
 203
203
-
 204
204
-
 205
205
-
 206
206
-
 207
207
-
 208
208
-
 209
209
-
 210
210
-
 211
211
-
 212
212
-
 213
213
-
 214
214
-
 215
215
-
 216
216
-
 217
217
-
 218
218
-
 219
219
-
 220
220
-
 221
221
-
 222
222
-
 223
223
-
 224
224
-
 225
225
-
 226
226
-
 227
227
-
 228
228
-
 229
229
-
 230
230
-
 231
231
-
 232
232
-
 233
233
-
 234
234
-
 235
235
-
 236
236
-
 237
237
-
 238
238
-
 239
239
-
 240
240
-
 241
241
-
 242
242
-
 243
243
-
 244
244
-
 245
245
-
 246
246
-
 247
247
-
 248
248
-
 249
249
-
 250
250
-
 251
251
-
 252
252
-
 253
253
-
 254
254
-
 255
255
-
 256
256
-
 257
257
-
 258
258
-
 259
259
-
 260
260
-
 261
261
-
 262
262
-
 263
263
-
 264
264
-
 265
265
-
 266
266
-
 267
267
-
 268
268
-
 269
269
-
 270
270
-
 271
271
-
 272
272
-
 273
273
-
 274
274
-
 275
275
-
 276
276
-
 277
277
-
 278
278
-
 279
279
-
 280
280
-
 281
281
-
 282
282
-
 283
283
-
 284
284
-
 285
285
-
 286
286
-
 287
287
-
 288
288
-
 289
289
-
 290
290
-
 291
291
-
 292
292
-
 293
293
-
 294
294
-
 295
295
-
 296
296
-
 297
297
-
 298
298
-
 299
299
-
 300
300
-
 301
301
-
 302
302
-
 303
303
-
 304
304
-
 305
305
-
 306
306
-
 307
307
-
 308
308
-
 309
309
-
 310
310
-
 311
311
-
 312
312
-
 313
313
-
 314
314
-
 315
315
-
 316
316
-
 317
317
-
 318
318
-
 319
319
-
 320
320
-
 321
321
-
 322
322
-
 323
323
-
 324
324
-
 325
325
-
 326
326
-
 327
327
-
 328
328
-
 329
329
-
 330
330
-
 331
331
-
 332
332
-
 333
333
-
 334
334
-
 335
335
-
 336
336
-
 337
337
-
 338
338
-
 339
339
-
 340
340
-
 341
341
-
 342
342
-
 343
343
-
 344
344
-
 345
345
-
 346
346
-
 347
347
-
 348
348
-
 349
349
-
 350
350
-
 351
351
-
 352
352
-
 353
353
-
 354
354
-
 355
355
-
 356
356
-
 357
357
-
 358
358
-
 359
359
-
 360
360
-
 361
361
-
 362
362
-
 363
363
-
 364
364
-
 365
365
-
 366
366
-
 367
367
-
 368
368
-
 369
369
-
 370
370
-
 371
371
-
 372
372
-
 373
373
-
 374
374
-
 375
375
-
 376
376
-
 377
377
-
 378
378
-
 379
379
-
 380
380
-
 381
381
-
 382
382
-
 383
383
-
 384
384
-
 385
385
-
 386
386
-
 387
387
-
 388
388
-
 389
389
-
 390
390
-
 391
391
-
 392
392
-
 393
393
-
 394
394
-
 395
395
-
 396
396
-
 397
397
-
 398
398
-
 399
399
-
 400
400
-
 401
401
-
 402
402
-
 403
403


Sony Cyber-Shot DSC H100 Guia de usuario
- Categoria
- Filmadoras
- Tipo
- Guia de usuario