Hikoki CS51EA Manual do usuário
- Categoria
- Motosserras sem fio
- Tipo
- Manual do usuário

Chain Saw
Motosierra
Motoserra
CS 51EA
Handling instructions
Instrucciones de manejo
Instruções de uso
Read through carefully and understand these instructions before use.
Leer cuidadosamente y comprender estas instrucciones antes del uso.
Antes de usar, leia com cuidado para assimilar estas instruções.

2
12
14
13
0.5 – 1 mm
17
15
16
3
12
4
69
ON
18
25-50
1
2
1
2
10
8
11
5
7
4
123
456
789
10 11 12

3
19
20
STOP
18
20
21
22
23
24
27
25
26
23
22
26
24
27
28
25
29
33
28
29
30
31
32
21
13 14 15
16 17 18
19 20 21
22 23 24

4
32
31
33
34
30
35
T
H
L
0.6 mm
39
36
35
37
38
34
39
43
40
41 42
25 26 27
28 29 30
31 32 33
34 35 36

5
40
42 41
43
44
45 46 47 48
49
53
52
51
50
54
5454
55 56
56 57
48 47
49
50
51 52 53 54 55
60 60
62 63
60
44
58
59
45 46
41
45
41
61
37 38 39
40 41 42
43 44 45
46 47

6
English
MEANINGS OF SYMBOLS
NOTE: Some units do not carry them.
Symbols
WARNING
The following show symbols used for the machine. Be sure that you understand their meaning before use.
It is important that you read, fully understand and
observe the following safety precautions and
warnings. Careless or improper use of the unit may
cause serious or fatal injury.
Emergency stop
Read, understand and follow all warnings and
instructions in this manual and on the unit. Fuel and oil mixture
Always wear eye, head and ear protectors when using
this unit. Chain oil fi ll
Warning, kickback danger. Be careful of possible
sudden and accidental upward and/or backward
motion of the guide bar.
Carburetor adjustment - Idle speed
One-handed usage not permitted. While cutting, hold
saw fi rmly with both hands with thumb fi rmly locked
around front handle.
Carburetor adjustment - Low speed mixture
Chain brake Carburetor adjustment - High speed mixture
Choke Oil pump adjustment
On/Start Priming pump
Off /Stop Decompression valve
Contents
WHAT IS WHAT? .............................................................................. 7
WARNINGS AND SAFETY INSTRUCTIONS .................................. 8
SPECIFICATIONS ............................................................................ 9
ASSEMBLY PROCEDURES ........................................................... 10
OPERATING PROCEDURES ......................................................... 10
MAI NT ENA NCE .............................................................................. 12
Parts breakdown

7
English
WHAT IS WHAT?
1. Throttle lever: Device activated by the operatorʼs fi nger, for
controlling the engine speed.
2. Throttle lever lockout: Device that prevents the accidental
operation of the throttle lever until manually released.
3. Stop switch: Device for allowing the engine to be started or
stopped.
4. Oil tank cap: For closing the oil tank.
5. Recoil starter: Pull handle to start the engine.
6. Front handle: Support handle located at or towards the front of
the engine housing.
7. Fuel tank cap: For closing the fuel tank.
8. Choke lever: Device for enriching the fuel/air mixture in the
carburetor, to aid starting.
9. Priming pump; Device for supplying extra fuel, to aid starting.
10. Decompression valve: Device for reducing the compression
pressure to aid starting.
11. Guide bar: The part that supports and guides the saw chain.
12. Saw chain: Chain, serving as a cutting tool.
13. Chain brake (Front hand guard): Device for stopping or locking
the chain.
14. Spiked bumper: Device for acting as a pivot when in contact with
a tree or log.
15. Chain catcher: Device for restraining the saw chain.
16. Guide bar cover: Device for covering the guide bar and saw
chain when the unit is not being used.
17. Combi box spanner: The tool for removing or installing a spark
plug and tensioning the saw chain.
18. Handling instructions: Included with unit. Read before operation
and keep for future reference to learn proper, safe techniques.
15
16 16
17
17 18
13
12
11
14
8
2
9 15
10
6
5
1
37
4

8
English
WARNINGS AND SAFETY INSTRUCTIONS
Operator safety
○ Always wear a safety face shield or goggles.
○ Gloves should be used when sharpening chain.
○ Always wear safety protective equipment such as jacket,
trousers, gloves, helmet, boots with steel toe-caps and non-slip
soles, and eye, ear and leg protection equipment whenever you
use a chain saw. For working in trees the safety boots must be
suitable for climbing techniques. Do not wear loose clothing,
jewelry, short pants, sandals or go barefoot.
Secure hair so it is above shoulder length.
○ Do not operate this tool when you are tired, ill or under the
infl uence of alcohol, drugs or medication.
○ Never let a child or inexperienced person operate the machine.
○ Wear hearing protection. Pay attention to your surroundings.
Be aware of any bystanders who may be signaling a problem.
Remove safety equipment immediately upon shutting off engine.
○ Wear head protection.
○ Never start or run the engine inside a closed room or building.
Breathing exhaust fumes can kill.
○ For respiratory protection, wear a protection mask while emitting
the chain oil mist and dust from sawdust.
○ Keep handles free of oil and fuel.
○ Keep hands away from cutting equipment.
○ Do not grab or hold the unit by the cutting equipment.
○ When the unit turned off , make sure the cutting attachment has
stopped before the unit is set down.
○ When operation is prolonged, take a break from time to time
so that you may avoid possible Hand-Arm Vibration Syndrome
(HAVS) which is caused by vibration.
○ The operator must obey the local regulations of cutting area.
WARNING
○ Antivibration systems do not guarantee that you will not sustain
Hand-Arm Vibration Syndrome or carpal tunnel syndrome.
Therefore, continual end regular users should monitor closely
the condition of their hands and fi ngers. If any of the above
symptoms appear, seek medical advice immediately.
○ Long or continuous exposure to high noise levels may cause
permanent hearing impairment. Always wear approved hearing
protection when operating a unit/machine.
○ If you are using any medical electric/electronic devices such
as a pacemaker, consult your physician as well as the device
manufacturer prior to operating any power equipment.
Unit/machine safety
○ Inspect the entire unit/machine before each use. Replace
damaged parts. Check for fuel leaks and make sure all fasteners
are in place and securely tightened.
○ Replace parts that are cracked, chipped or damaged in any way
before using the unit/machine.
○ Make sure the side case is properly attached.
○ Keep others away when making carburetor adjustments.
○ Use only accessories as recommended for this unit/machine by
the manufacturer.
○ Never let the chain strike any obstacle. If the chain makes
contact, the machine should be stopped and checked carefully.
○ Make sure the automatic oiler is working. Keep the oil tank fi lled
with clean oil. Never let chain run dry on the bar.
○ All chain saw service, other than the items listed in the
operatorʼs/ ownerʼs manual, should be performed by competent
chain-saw service personnel. (For example, if improper tools are
used to remove the fl ywheel or if an improper tool is used to hold
the fl ywheel in order to remove the clutch, structural damage
to the fl ywheel could occur and could subsequently cause the
fl ywheel to burst.)
WARNING
○ Never modify the unit/machine in any way. Do not use your unit/
machine for any job except that for which it is intended.
○ Never use chain saw without any safety equipment or that has
faulty safety equipment. It could result in serious personal injury.
○ Using guide bar/chain other than recommended by the
manufacturer which are not approved, could result in a high risk
of personal accidents or injury.
Fuel safety
○ Mix and pour fuel outdoors and where there are no sparks or
fl ames.
○ Use a container approved for fuel.
○ Do not smoke or allow smoking near fuel or the unit/machine or
while using the unit/machine.
○ Wipe up all fuel spills before starting engine.
○ Move at least 3 m away from fueling site before starting engine.
○ Stop engine and let it cool for a few minutes before removing fuel
tank cap.
○ Empty the fuel tank before storing the unit/machine. It is
recommended that the fuel be emptied after each use. If fuel is
left in the tank, store so fuel will not leak.
○ Store unit/machine and fuel in area where fuel vapors cannot
reach sparks or open fl ames from water heaters, electric motors
or switches, furnaces, etc.
WARNING
Fuel is easy to ignite or get explosion or inhale fumes, so that pay
special attention when handling or fi lling fuel.
Cutting safety
○ Do not cut any material other than wood or wooden objects.
○ For respiratory protection, wear an aerosol protection mask
when cutting the wood after insecticide has been applied.
○ Keep others including children, animals, bystanders and helpers
outside the hazard zone. Stop the engine immediately if you are
approached.
○ Hold the unit/machine fi rmly with the right hand on the rear
handle and the left hand on the front handle.
○ Keep fi rm footing and balance. Do not over-reach.
○ Keep all parts of your body away from the muffl er and cutting
attachment when the engine is running.
○ Keep Bar/Chain below waist level.
○ Before felling a tree, the operator must be accustomed to the
sawing techniques of the chain saw.
○ Be sure to pre-plan a safe exit from a failing tree.
○ While cutting, hold the unit/machine fi rmly with both hands with
thumb fi rmly locked around front handle, and stand with feet well
balanced and your body balanced.
○ Stand to the side of the saw when cutting - never directly behind
it.
○ Always keep the spiked bumper face to a tree, because the
chain may suddenly be drawn into a tree, if so equipped.
○ When completing a cut, be ready to hold up the units as it breaks
into clear, so it will not follow through and cut your legs, feet or
body, or contact an obstruction.
○ Be alert against kickback (when saw kicks up and back at
operator). Never cut with the nose of the bar.
○ When relocating to a new work area, be sure to shut off the
machine and ensure that all cutting attachments are stopped.
○ Never place the machine on the ground when running.
○ Always ensure that the engine is shut off and any cutting
attachments have completely stopped before clearing debris or
removing grass from the cutting attachment.
○ Always carry a fi rst-aid kit when operating any power equipment.
○ Never start or run the engine inside a closed room or building
and/or near the infl ammable liquid. Breathing exhaust fumes
can kill.
Maintenance safety
○ Maintain the unit/machine according to recommended
procedures.
○ Disconnect the spark plug before performing maintenance
except for carburetor adjustments.
○ Keep others away when making carburetor adjustments.
○ Use only genuine HiKOKI replacement parts as recommended
by the manufacturer.
CAUTION
Do not disassemble the recoil starter. You may get a possibility
of personal injury with recoil spring.
WARNING
Improper maintenance could result in serious engine damage or
in serious personal injury.

9
English
Transport and storage
○ Carry the unit/machine by hand with the engine stopped and the
muffl er away from your body.
○ Allow the engine to cool, empty the fuel tank, and secure the
unit/machine before storing or transporting in a vehicle.
○ Empty the fuel tank before storing the unit/machine. It is
recommended that the fuel be emptied after each use. If fuel is
left in the tank, store so fuel will not leak.
○ Store unit/machine out of the reach of children.
○ Clean and maintain the unit carefully and store it in a dry place.
○ Make sure stop switch is off when transporting or storing.
○ When transporting or storage, cover chain with guide bar cover.
If situations occur which are not covered in this manual, take care and
use common sense. Contact HiKOKI dealer if you need assistance.
Pay special attention to statements preceded by the following words:
WARNING
Indicates a strong possibility of severe personal injury or loss of
life, if instructions are not followed.
CAUTION
Indicates a possibility of personal injury or equipment damage, if
instructions are not followed.
NOTE
Helpful information for correct function and use.
WARNING
KICKBACK DANGER (Fig. 1)
One of the most severe dangers when working with a chain saw is
the possibility of kickback. Kickback may occur when the upper tip
of the guide bar touches an object, or when the wood closes in and
pinches the saw chain in the cut. Tip contact in some cases may
cause a lightning fast reverse reaction, kicking the guide bar up and
back toward you. Pinching the saw chain along the top of the guide
bar may also push the guide bar rapidly back towards you. Either of
these reactions may cause you to lose control of the saw which could
result in serious personal injury. Even though your saw has safety
built into its design, you should not rely on these safety features
exclusively. Know where your bar tip is at all times. Kickback does
occur if you allow the kickback zone (1) of the bar to touch an object.
Do not use that area. Kickback from pinching is caused by a cut
closing and pinching the upper side of the guide bar. Study your cut
and make sure it will open as you cut through. Maintain control when
the engine is running by always keeping a fi rm grip on the saw with
your right hand on the rear handle, your left hand on the front handle
and your thumbs and fi ngers encircling the handles. Always hold the
saw with both hands during operation and cut at high engine speed.
Follow manufacturer's sharpening and maintenance instructions
for the saw chain. The lack of this maintenance may increase the
possibility of kickback.
SPECIFICATIONS
○ Code “CS” of model name means “Chain saw”
Model CS51EA (40S) CS51EA (45S)
CS51EA (50S)
Type of equipment Chain saw, portable
Engine Size (cm3)50.1
Spark Plug NGK BPMR-7A
Fuel Tank Capacity (cm3)530
Chain Oil Tank Capacity (cm3)270
Dry Weight (kg)
(Without guide bar and chain) 5.1
Chain pitch (mm) 8.26
Chain gauge (mm) 1.27
Sound pressure level LpA (dB (A)) by ISO 22868
Equivalent
Uncertainty
104
1
Sound power level LwA (dB (A)) by ISO 22868
Measured
Uncertainty
Sound power level LwA (dB (A)) by 2000/14/EC
Measured
Guaranteed
113
2
114
117
Vibration level (m/s2) by ISO 22867
Front handle
Rear handle
Uncertainty
3.3
2.7
0.8
3.3
2.7
0.8
3.3
2.7
0.8
Guide bar length (mm) 400 450 500
Type of chain 95VPX
(Oregon)
20BPX
(Oregon)
Max. engine power
by ISO 7293 (kW) 2.5
Max. engine speed (/min) 13500
Idle engine speed (/min) 3000
Specifi c fuel consumption at maximum engine
power (g/kWh) 439
Max. chain speed (m/sec) 26.0
Sprocket (number of teeth) 7
NOTE: Equivalent noise level/vibration levels are calculated as the time-weighted energy total for noise/vibration levels under various
working conditions with the following time distribution: 1/3 idle, 1/3 full, 1/3 racing speed.
*All data subject to change without notice.

10
English
ASSEMBLY PROCEDURES
WARNING
Never try to start engine without side case, bar and chain
securely fastened.
1. Pull the front hand guard (2) toward the front handle to check that
the chain brake is disengaged. (Fig. 2)
2. Remove guide bar clamp nuts (3). Remove the side case (4).
(Fig. 3)
3. Install the guide bar (5) onto the bolts (6), then push it toward the
sprocket (7) as far as it will go.
4. Confi rm the direction of saw chain (12) is correct as in the fi gure,
and align the chain on the sprocket. (Fig. 5)
5. Guide the chain drive links into the bar groove all around the bar.
6. Install the side case (4) onto the bolts (6).
Make sure that the boss of chain tension adjust bolt (8) fi ts into
the hole (9) of the bar. (Fig. 4)
The brake lever (11) of the side case must fi t the groove (10) on
the side of the front hand guard.
Then tighten the guide bar clamp nuts (3) by hand that allows the
guide bar end to move up and down easily.
(
Fig. 3
)
7. Raise the bar end, and tighten the chain (12) by turning the
tension adjustment bolt (13) clockwise. To check proper tension,
lightly lift up the center of chain and there should be about 0.5
– 1.0 mm clearance (14) between bar and edge of drive link.
(Fig. 6, 7)
CAUTION
PROPER TENSION IS EXTREMELY IMPORTANT
8. Raise the bar end and securely tighten the guide bar clamp nuts
with the combi box spanner. (Fig. 7)
9. A new chain will stretch so adjust the chain after a few cuts and
watch chain tension carefully for the fi rst half hour of cutting.
NOTE
Check the chain tension frequently for optimum performance
and durability.
CAUTION
○ When the chain is excessively tightened, the bar and chain will
be damaged rapidly. Conversely, when the chain is excessively
loosened, it may get out of the groove in the bar.
○ Always wear gloves when touching the chain.
WARNING
During operation, hold chain saw fi rmly with both hands. A single
hand operation may cause serious injury.
OPERATING PROCEDURES
Fuel (Fig. 8)
WARNING
○ The chain saw is equipped with a two-stroke engine. Always
run the engine on fuel, which is mixed with oil. Provide good
ventilation, when fueling or handling fuel.
○ Fuel contains highly fl ammable and it is possible to get the
serious personal injury when inhaling or spilling on your body.
Always pay attention when handling fuel. Always have good
ventilation when handling fuel inside building.
Fuel
○ Always use branded 89 octane unleaded gasoline.
○ Use genuine two-cycle oil or use a mix between 25:1 to 50:1,
please consult the oil bottle for the ratio or HiKOKI dealer.
○ If genuine oil is not available, use an anti-oxidant added quality
oil expressly labeled for air-cooled 2-cycle engine use (JASO
FC GRADE OIL or ISO EGC GRADE). Do not use BIA or TCW
(2-stroke water-cooling type) mixed oil.
○ Never use multi-grade oil (10 W/30) or waste oil.
○ Always mix fuel and oil in a separate clean container.
Always start by fi lling half the amount of gasoline, which is to be
used.
Then add the whole amount of oil. Mix (shake) the fuel mixture. Add
the remaining amount of gasoline.
Mix (shake) the fuel-mix thoroughly before fi lling the fuel tank.
Fueling
WARNING (Fig. 9)
○ Always shut off the engine before refueling.
○ Slowly open the fuel tank (15), when fi lling up with fuel, so that
possible overpressure disappears.
○ Tighten the fuel cap carefully, after fueling.
○ Always move the unit at least 3 m from the fueling area before
starting.
○ Always wash any spilled fuel from clothing immediately with
soap.
○ Be sure to check any fuel leaking after refueling.
Before fueling, clean the tank cap area carefully, to ensure that no
dirt falls into the tank. Make sure that the fuel is well mixed by shaking
the container, before fueling.
Chain oil (Fig. 9)
Fill up with chain oil (16). Always use good quality chain oil. When the
engine is running, the chain oil is automatically discharged.
NOTE
When pouring fuel (15) or chain oil (16) into the tank, place the
unit with cap side up. (Fig. 9)
ADJUSTMENT OF CHAIN OIL SUPPLY
The chain oil quantity discharged through the lubrication system
is adjusted to the maximum in the factory. Adjust the quantity in
accordance with the operating condition.
Turn the adjusting screw (17) counterclockwise to increase the
quantity and turn it clockwise to decrease the quantity. (Fig. 10)
Chain brake operation (Fig. 2, 11)
Chain brake is designed to activate in an emergency such as kick-
back action.
Application of brake is made by moving the front hand guard towards
the bar. During the chain brake operation, even if the throttle lever
is pulled, the engine speed does not increase and the chain does
not turn. To release the brake, pull the front hand guard toward the
front handle.
If the engine keeps rotating at high speed with the brake engaged,
the clutch will overheat causing trouble.
When the brake engages during operation, immediately release the
throttle lever to slow down the engine.
How to confi rm the activation of the chain brake
1) Turn off the engine.
2) Holding the chain saw horizontally, release your hand from the
front handle, hit the tip of the guide bar to a stump or a piece
of wood, and confi rm brake operation. Operating level varies by
bar size.
In case the brake is not eff ective, ask our dealer for inspection and
repairs.
Starting (Fig. 11 – 16)
CAUTION
Before starting, make sure chain brake is engaged and that the
bar/chain does not touch anything. (Fig. 11)
1. Set ignition switch (18) to ON position. (Fig. 12)
*Push priming pump (20) several times so that fuel fl ows through
bulb into carburetor. (Fig. 13)
2. Pull the choke lever (19) to choked position (Fig. 13).
This will automatically lock to the half-throttle .
3. Push the decompression valve (21).
The valve (21) will automatically return to the original position
once the engine has started (Fig. 14).
4. Pull recoil starter briskly, taking care to keep the handle in your
grasp and not allowing it to snap back. (Fig. 15)
5. When you hear fi rst ignition, return the choke lever (19) all the
way in. (Fig. 13)
6. Push the decompression valve.

11
English
7. Pull recoil starter briskly again in the aforementioned manner.
(Fig. 15)
NOTE
If engine does not start, repeat procedures from 2 to 7.
8. As soon as engine start, pull throttle lever (23) full once with
throttle lever lockout (22) and release immediately. (Fig. 16)
Then half-throttle is disengaged.
Pull the front hand guard (2) toward the front handle to disengage
the chain brake.
Allow the engine about 2-3 minutes to warm up before subjecting
it to any load.
Do not run the engine at high speed without the load to avoid
shortening the life of the engine.
WARNING
Do not carry the machine with the engine running.
Stopping (Fig. 17)
Decrease engine speed, and push ignition switch (18) to stop
position.
WARNING
○ Do not overreach or cut above shoulder height.
○ Use extra caution when felling, and do not use the saw in a nose-
high position or above shoulder height.
CHAIN CATCHER
The chain catcher is located on the power head just below the chain
to further prevent the possibility of a broken chain striking the chain
saw user.
WARNING
Do not stand in-line with chain when cutting.
BASIC TECHNIQUES FOR MAKING FELLING, LIMBING AND
BUCKING CUTS
The intention of the following information is to provide you with the
general introduction to wood cutting techniques.
WARNING
○ This information does not cover all specifi c situations, which
may depend on diff erences in terrain, vegetation, kind of wood,
form and size of trees, etc. Consult your servicing dealer,
forestry agent or local forestry schools for advice on specifi c
woodcutting problems in your area. This will make your work
more effi cient and safer.
○ Avoid cutting in adverse weather conditions, such as dense fog,
heavy rain, bitter cold, high winds, etc.
Adverse weather is often tiring to work in and creates potentially
dangerous conditions such as slippery ground.
High winds may force the tree to fall in an unexpected direction
causing property damage or personal injury.
CAUTION
Never use a chain saw to pry or for any purpose for which it is not
intended.
WARNING
○ Avoid stumbling on obstacles such as stumps, roots, rocks,
branches and fallen trees. Watch out for holes and ditches. Be
extremely cautious when working on slopes or uneven ground.
Shut off the engine when moving from one work place to another.
Always cut at wide open throttle. A slow moving chain can easily
catch and force the saw to jerk.
○ Never use the saw with only one hand.
You cannot control the saw properly and you may lose control
and injure yourself severely.
Keep the saw body close to your body to improve control and
reduce strain.
When cutting with the bottom part of the chain the reactive force
will pull the saw away from you towards the wood you are cutting.
The saw will control the feeding speed and sawdust will be
directed towards you. (Fig. 18)
○ When cutting with the upper part of the chain the reactive force
will push the saw towards you and away from the wood you are
cutting. (Fig. 19)
○ There is a risk of kickback if the saw is pushed far enough so that
you begin to cut with the nose of the bar.
The safest cutting method is to cut with the bottom part of the
chain. Sawing with the upper part makes it much more diffi cult to
control the saw and increases the risk of kickback.
○ In case the chain locked, immediately release the throttle lever.
If the throttle lever keeps rotating at high speed with the chain
locked, the clutch will overheat causing trouble.
NOTE
Always keep the spiked bumper face to a tree, because the
chain may suddenly be drawn into a tree.
FELLING
Felling is more than cutting down a tree. You must also bring it down
as near to an intended place as possible without damaging the tree
or anything else.
Before felling a tree, carefully consider all conditions which may
eff ect the intended direction, such as:
Angle of the tree. Shape of the crown. Snow load on the crown.
Wind conditions. Obstacles within tree range (e.g., other trees,
power lines, roads, buildings, etc.).
WARNING
○ Always observe the general conditions of the tree. Look for
decay and rot in the trunk which will make it more likely to snap
and start to fall before you expect it.
○ Look for dry branches, which may break and hit you when you
are working.
Always keep animals and people at least twice the tree length
away while felling. Clear away shrubs and branches from around
the tree.
Prepare a path of retreat away from the felling direction.
BASIC RULES FOR FELLING TREES
Normally the felling consists of two main cutting operations, notching
and making the felling cut. Start making the upper notch cut on the
side of the tree facing the feeling direction. Look through the kerf as
you saw the lower cut so you do not saw too deep into the trunk. The
notch should be deep enough to create a hinge of suffi cient width
and strength. The notch opening should be wide enough to direct
the fall of the tree as long as possible. Saw the felling cut from the
other side of the tree between one and two inches (3–5 cm) above
the edge of the notch. (Fig. 20)
24. Felling direction
25. 45° minimum notch opening
26. Hinge
27. Felling cut
Never saw completely through the trunk. Always leave a hinge.
The hinge guides the tree. If the trunk is completely cut through, you
lose control over the felling direction.
Insert a wedge or a felling lever in the cut well before the tree
becomes unstable and starts to move. This will prevent the guide
bar from binding in the felling cut if you have misjudged the falling
direction. Make sure no people have come into the range of the
falling tree before you push it over.
FELLING CUT, TRUNK DIAMETER MORE THAN TWICE GUIDE
BAR LENGTH
Cut a large, wide notch. Then cut a recess into the center of the
notch. Always leave a hinge on both sides of the center cut. (Fig. 21)
Complete the felling cut by sawing around the trunk as in the Fig. 22.
WARNING
These methods are extremely dangerous because they involve
the use of the nose of guide bar and can result in kickback.
Only properly trained professionals should attempt these
techniques.
LIMBING
Limbing is removing the branches from a feller tree.
WARNING
A majority of kickback accidents occur during Iimbing.
Do not use the nose of the guide bar. Be extremely cautious and
avoid contacting the log, other limbs or objects with the nose
of the guide bar. Be extremely cautious of limbs under tension.
They can spring back towards you and cause loss of control
resulting in injury. (Fig. 23)
Stand on the left side of the trunk. Maintain a secure footing and
rest the saw on the trunk. Hold the saw close to you so that you are
in full control of it. Keep well away from the chain. Move only when
the trunk is between you and the chain. Watch out for spring back of
limbs under tension.

12
English
LIMBING THICK BRANCHES
When limbing thick branches, the guide bar may get pinched easily.
Branches under tension often snap up, so cut troublesome branches
in small steps. Apply the same principles as for cross cutting. Think
ahead and be aware of the possible consequences of all your
actions.
CROSS CUTTING/BUCKING
Before starting to cut through the log, try to imagine what is going to
happen. Look out for stresses in the log and cut through it in such a
manner that the guide bar will not get pinched.
CROSS CUTTING LOGS, PRESSURE ON TOP
Take a fi rm stance. Begin with an upper cut. Do not cut too deeply,
about 1/3 of the log diameter is enough. Finish with a bottom cut.
The saw cuts should meet. (Fig. 24)
28. Relieving cut
29. Cross cut
30. Pressure on top
31. Pressure side
32. Tension side
33. Relative depth of saw cuts
THICK LOG, LARGER THAN GUIDE BAR LENGTH
Begin by cutting on the opposite side of the log. Pull the saw towards
you, followed by previous procedure. (Fig. 25)
If the log is lying on the ground make a boring cut to avoid cutting into
the ground. Finish with a bottom cut. (Fig. 26)
WARNING
KICKBACK DANGER
Do not attempt a boring cut if you are not properly trained. A
boring cut involves the use of the nose of the guide bar and can
result in kickback.
CROSS CUTTING LOGS, PRESSURE ON BOTTOM
Take a fi rm stance. Begin with a bottom cut. The depth of the cut
should be about 1/3 of the log diameter.
Finish with an upper cut. The saw cuts should meet. (Fig. 27)
34. Relieving cut
35. Cross cut
36. Pressure on bottom
37. Tension side
38. Pressure side
39. Relative depth of saw cuts
THICK LOG, LARGER THAN GUIDE BAR LENGTH
Begin by cutting on the opposite side of the log. Pull the saw towards
you, followed by previous procedure. Make a boring cut if the log is
close to the ground. Finish with a top cut. (Fig. 28)
WARNING
KICKBACK DANGER
Do not attempt a boring cut if you are not properly trained. A
boring cut involves the use of the nose of the guide bar and can
result in kickback. (Fig. 29)
IF THE SAW GETS STUCK
Stop the engine. Raise the log or change its position, using a thick
branch or pole as a lever. Do not try to pull the saw free. If you do,
you can deform the handle or be injured by the saw chain if the saw
is suddenly released.
MAINTENANCE
MAINTENANCE, REPLACEMENT OR REPAIR OF THE EMISSION
CONTROL DEVICES AND SYSTEM MAY BE PERFORMED BY ANY
NON-ROAD ENGINE REPAIR ESTABLISHMENT OR INDIVIDUAL.
Carburetor adjustment (Fig. 30)
In the carburetor, fuel is mixed with air. When the engine is test run at
the factory, the carburetor is adjusted. A further adjustment may be
required, according to climate and altitude. The carburetor has one
adjustment possibility:
T = Idle speed adjustment screw.
Idle speed adjustment (T)
Check that the air fi lter is clean. When the idle speed is correct, the
cutting attachment will not rotate. If adjustment is required, close
(clockwise) the T-screw, with the engine running, until the cutting
attachment starts to rotate. Open (counter-clockwise) the screw
until the cutting attachment stops. You have reached the correct idle
speed when the engine runs smoothly in all positions well below the
rpm when the cutting attachment starts to rotate.
If the cutting attachment still rotates after idle speed adjustment,
contact HiKOKI dealer.
WARNING
When the engine is idling the cutting attachment must under no
circumstances rotate.
NOTE
Do not touch the High speed adjustment (H) and the Low speed
adjustment (L).
Those are only for HiKOKI dealer.
If you rotate them, It will cause a serious damage to the machine.
Air fi lter (Fig. 31)
The air fi lter (40) must be cleaned from dust and dirt in order to avoid:
○ Carburetor malfunctions.
○ Starting problems.
○ Engine power reduction.
○ Unnecessary wear on the engine parts.
○ Abnormal fuel consumption.
Clean the air fi lter daily or more often if working in exceptionally
dusty areas.
Remove the air fi lter cover (41) and the fi lter (40).
Rinse them in warm soap suds. Check that the fi lter is dry before
reassembly. An air fi lter that has been used for some time cannot be
cleaned completely. Therefore, it must regularly be replaced with a
new one. A damaged fi lter must always be replaced.
Spark plug (Fig. 32)
The spark plug condition is infl uenced by:
○ An incorrect carburetor setting.
○ Wrong fuel mixture (too much oil in the gasoline)
○ A dirty air fi lter.
○ Hard running conditions (such as cold weather).
These factors cause deposits on the spark plug electrodes, which
may result in malfunction and starting diffi culties. If the engine is
low on power, diffi cult to start or runs poorly at idling speed, always
check the spark plug fi rst. If the spark plug is dirty, clean it and check
the electrode gap. Readjust if necessary. The correct gap is 0.6 mm.
The spark plug should be replaced after about 100 operation hours
or earlier if the electrodes are badly eroded.
NOTE
In some areas, local law requires using a resistor spark plug
to suppress ignition signals. If this machine was originally
equipped with resistor spark plug, use same type of spark plug
for replacement.
Oiler port (Fig. 33)
Clean the chain oiler port (42) whenever possible.
Guide bar (Fig. 34)
Before using the machine, clean the groove and oiler port (43) in the
bar with the special gauge off ered as an optional accessory.
Side case (Fig. 35)
Always keep the side case and drive area clean of saw dust and
debris. Periodically apply oil or grease to this area to protect from
corrosion as some trees contain high levels of acid.
Fuel fi lter (Fig. 36)
Remove the fuel fi lter from the fuel tank and thoroughly wash it in
solvent. After that, push the fi lter into the tank completely.
NOTE
If the fi lter is hard due to dust and dirt, replace it.
Chain oil fi lter (Fig. 37)
Remove the oil fi lter and thoroughly wash it in solvent.
Cleaning the cylinder fi ns (Fig. 38)
When wood chips are caught between cylinder fi ns (44), the engine
may overheat, resulting in lower output. To avoid this, always keep
cylinder fi ns and fan case clean.

13
English
Icing protection system (Fig. 39, 40)
This system is to protect carburetor from icing when the unit is
operated in winter time.
1. When you need icing system work, remove air fi lter cover (41).
Pull out the shutter (45) from inside the air fi lter cover and
reinstall it in winter time position by turning half-way. (Fig. 39)
This will allow heated air to fl ow from cylinder side to carburetor
cabin through the opening (46).
NOTE
When winter time has been over and carburetor will not suff er from
icing, make sure that the shutter is reinstalled in ordinary position
(Fig. 40).
For long-term storage
Drain all fuel from the fuel tank. Start and let engine run until it stops.
Repair any damage which has resulted from use. Clean the unit with
a clean rag, or the use of high pressure air hose. Put a few drops of
two-cycle engine oil into the cylinder through the spark plug hole,
and spin the engine over several times to distribute oil.
Cover the unit and store it in a dry area.
CHAIN SHARPENING
Parts of a cutter (Fig. 41, 42)
WARNING
○ Gloves should be used when sharpening chain.
○ Be sure to round off the front edge to reduce the chance of
kickback or tie-strap breakage.
47. Top plate
48. Cutting corner
49. Side plate
50. Gullet
51. Heel
52. Chassis
53. Rivet hole
54. Toe
55. Depth gauge
56. Correct angle on top plate (degree of angle depends on chain
type)
57. Slightly protruding “hook” or point (curve on non-chisel chain)
58. Top of depth gauge at correct height below top plate
59. Front of depth gauge rounded off
LOWERING DEPTH GAUGES WITH A FILE
1) If you sharpen your cutters with a fi le holder, check and lower the
depth.
2) Check depth gauges every third sharpening.
3) Place depth gauge tool on cutter. If depth gauge projects, fi le
it level with the top of the tool. Always fi le from the inside of the
chain toward an outside cutter. (Fig. 43)
4) Round off front corner to maintain original shape of depth gauge
after using depth gauge tool. Always follow the recommended
depth gauge setting found in the maintenance or operator
manual for your saw. (Fig. 44)
GENERAL INSTRUCTIONS FOR FILING CUTTERS
File (60) cutter on one side of the chain from the inside out. File on
forward stroke only. (Fig. 45)
5) Keep all cutters the same length. (Fig. 46)
6) File enough to remove any damage to cutting edges (side plate
(62) and top plate (63)) of cutter. (Fig. 47)
NOTE
Do not fi le or alter the tops of bumper drive links (61). (Fig. 46).
SHARPENING ANGLES FOR SHARPENING SAW CHAIN
1. Part Number 95VPX/20BPX
2. Pitch 0.325”
3. Depth Gauge Setting 0.025"
85° 4. Side Plate Filing Angle 85°
5. Top Plate Angle 30°
100° 6. File Guide Angle 100°
Maintenance schedule
Below you will fi nd some general maintenance instructions. For
further information please contact HiKOKI dealer.
Daily maintenance
○ Clean the exterior of the unit.
○ Clean the chain oil fi lter port.
○ Clean the groove and oil fi lter port in the guide bar.
○ Clean the side case of saw dust.
○ Check that the saw chain is sharp.
○ Check that the bar nuts are suffi ciently tightened.
○ Make sure that the chain transport guard is undamaged and that
it can be securely fi tted.
○ Check that nuts and screws are suffi ciently tightened.
Especially inspect the bolt of muffl er and ensure that they are
properly tightened before starting engine. Should any of the
bolts be loose, retighten them immediately. Failure to do so
could result in serious hazard.
○ Check the tip of the guide bar. Please exchange it for the new
one when it is worn out.
○ Check the band of chain brake. Please exchange it for the new
one when it is worn out.
○ Clean the air fi lter.
Weekly maintenance
○ Check the recoil starter, especially cord.
○ Clean the exterior of the spark plug.
○ Remove the spark plug and check the electrode gap. Adjust it to
0.6 mm or change the spark plug.
○ Clean the cooling fi ns on the cylinder and check that the air
intake at the recoil starter is not clogged.
Monthly maintenance
○ Rinse the fuel tank with gasoline, and clean fuel fi lter.
○ Clean chain oil fi lter.
○ Clean the exterior of the carburetor and the space around it.
○ Clean the fan and the space around it.
NOTE
When ordering the parts to your nearest dealer, please use the
item numbers showing on the parts breakdown section in this
instruction.
BAR NO. LENGTH-
TYPE CHAIN NO.
MODEL NO.
OREGON
160MLBK041
180MLBK041
200PXBK041
16”
18”
20”
95VPX-66
95VPX-72
20BPX-78

14
Español
SIGNIFICADO DE LOS SÍMBOLOS
NOTA: Algunos aparatos no están provistos de ellos.
Símbolos
ADVERTENCIA
A continuación se muestran los símbolos usados para la máquina. Asegúrese de comprender su signifi cado antes del uso.
Es importante que usted lea, entienda totalmente y
observe las siguientes precauciones y advertencias de
seguridad. El uso descuidado o incorrecto del aparato
podrá causarle lesiones serias o fatales.
Parada de emergencia
Lea, comprenda y siga todas las advertencias y demás
instrucciones de este manual y las que hay en el
aparato. Mezcla de combustible y aceite
Utilice siempre las protecciones para los ojos, cabeza y
oídos cuando trabaje con este aparato. Relleno de aceite de la cadena
Advertencia sobre el peligro de contragolpe. Deberá
prestarse atención a los posibles movimientos
repentinos y accidentales de la barra de guía hacia
adelante o hacia atrás.
Ajuste del carburador - Velocidad sin carga
No se permite el uso con una sola mano. Durante
el corte, debe sostenerse fi rmemente la sierra con
ambas manos con el dedo pulgar fi rmemente trabado
alrededor del asidero frontal.
Ajuste del carburador - Mezcla de baja velocidad
Freno de cadena Ajuste del carburador - Mezcla de alta velocidad
Estrangulador Ajuste de la bomba de aceite
Activación/Inicio Bomba de impulsión
Desactivación/Parada Válvula de descompresión
Contenido
¿QUÉ ES QUÉ? .............................................................................. 15
ADVERTENCIAS E INSTRUCCIONES DE SEGURIDAD ............. 16
ESPECIFICACIONES ..................................................................... 18
PROCEDIMIENTOS DE MONTAJE ............................................... 18
PROCEDIMIENTOS DE OPERACIÓN ........................................... 19
MAN TE NIM IEN TO .......................................................................... 21
Desglose de las piezas

15
Español
¿QUÉ ES QUÉ?
1. Mango del acelerador: Dispositivo activado por el dedo del
operador para controlar la velocidad del motor.
2. Tope del mango del acelerador : Dispositivo que evita la
operación accidental del mango del acelerador hasta que se
suelta manualmente.
3. Llave de parada: Dispositivo que permite arrancar y detener el
motor.
4. Tapa del depósito de aceite: Para cerrar el depósito de aceite.
5. Arrancador de retroceso: Tire del asidero para arrancar el
motor.
6. Asidero frontal: Asidero de soporte ubicado en o hacia la parte
frontal de la caja del motor.
7. Tapa del depósito de combustible: Para cerrar el depósito de
combustible.
8. Palanca del estárter: Dispositivo para enriquecer la mezcla de
combustible/aire, para ayudar al arranque.
9. Bomba de cebado; dispositivo destinado a suministrar
combustible adicional para facilitar el arranque.
10. Válvula de descompresión: dispositivo para reducir la presión
de compresión y facilitar el arranque.
11. Barra de guía: Parte que soporta y guía la cadena de sierra.
12. Cadena de sierra: Cadena que sirve como herramienta de corte.
13. Freno de la cadena (Protector frontal de la mano): Dispositivo
para detener o bloquear la cadena.
14. Apoyo dentado: Dispositivo que actúa como pivote cuando se
entra en contacto con un árbol o un tronco.
15. Retén de la cadena: Dispositivo para retener la cadena de
sierra.
16. Cubierta de la barra de guía: Dispositivo para cubrir la barra
de guía y la cadena de sierra cuando no se esté utilizando el
aparato.
17. Llave combinada de cubo: Herramienta para extraer o instalar la
bujía y tensar la cadena de sierra.
18. Instrucciones de manejo: Incluidas con el aparato. Lea las
instrucciones para aprender a utilizar apropiadamente y con
seguridad el aparato, y guárdelas para futuras referencias.
15
16 16
17
17 18
13
12
11
14
8
2
9 15
10
6
5
1
37
4

16
Español
ADVERTENCIAS E INSTRUCCIONES DE
SEGURIDAD
Seguridad del usuario
○ Utilice siempre las protecciones tales como una pantalla o gafas
de seguridad.
○ Utilice guantes protectores cuando afi le la cadena.
○ Utilice equipos protectores de seguridad tales como chaqueta,
pantalones, guantes, casco, botas con puntera de acero y
suelas de no-tropiezo, así como equipamiento de protección
para ojos, oídos y piernas siempre que utilice una motosierra.
Para trabajar en árboles, las botas de seguridad deben ser
convenientes para técnicas de escalamiento. No utilice prendas
sueltas, joyas, pantalones cortos o sandalias, y nunca trabaje
descalzo.
Arregle la cabellera de tal forma que no pueda alcanzar el
hombro.
○ No opere este aparato cuando esté cansado, enfermo o bajo la
infl uencia del alcohol, drogas o medicamentos.
○ No deje que niños o personas inexpertas operen este aparato.
○ Utilice protección de oídos. Preste atención a su entorno.
Observe a los asistentes que pudiesen estar señalizando un
problema.
Quite el equipo de seguridad inmediatamente después de parar
el motor.
○ Utilice casco protector.
○ Nunca ponga en marcha este aparato dentro de un local cerrado
o edifi cio.
La inhalación de los humos de escape puede ser fatal.
○ Como protección respiratoria, coloque una máscara protectora
contra el vapor de aceite y el serrín emitidos por la cadena.
○ Mantenga los asideros libres de aceite y combustible.
○ Mantenga las manos alejadas del mecanismo de corte.
○ No agarre este aparato por el mecanismo de corte.
○ Cuando apague el aparato, asegúrese de que el mecanismo de
corte se haya detenido antes de apoyarlo sobre el suelo.
○ Durante la operación prolongada, se recomienda descansar de
vez en cuando para evitar el posible Síndrome por Vibración en
Manos y Brazos (HAVS), causado por las vibraciones.
○ El operador deberá respetar los reglamentos locales del área de
tala.
ADVERTENCIA
○ Los sistemas antivibratorios no garantizan de que no sufra del
Síndrome por Vibraciones en Manos y Brazos o síndrome de
túnel carpal.
Por lo tanto, los usuarios continuos o regulares deberán
controlar frecuentemente las condiciones de sus manos y
dedos. Si aparece cualquiera de los síntomas citados, deberá
solicitarse inmediatamente la indicación médica.
○ La exposición larga o continua a niveles altos de ruido puede
causar deterioro de vista de permanente. Siempre utilice
protección de oídos aprobada al operar un aparato que genere
ruidos.
○ Si utiliza algún dispositivo médico eléctrico o electrónico tal
como marcapasos, consulte a su médico así como al fabricante
del dispositivo antes de operar cualquier equipo motorizado.
Seguridad del aparato
○ Inspeccione siempre el aparato antes de utilizarlo. Reemplace
las piezas dañadas. Compruebe que no haya fugas de
combustible y asegúrese de que todas las piezas estén bien
apretadas en su sitio.
○ Reemplace las piezas agrietadas, rotas o deterioradas antes de
poner en marcha el aparato.
○ Asegúrese de que la caja lateral esté correctamente instalada.
○ No permita que se acerquen otras personas mientras esté
ajustando el carburador.
○ Utilice únicamente los accesorios para este aparato que hayan
sido recomendados por el fabricante.
○ Jamás deberá golpearse la cadena contra algún obstáculo.
En el caso de que la cadena haga contacto, se debe detener
inmediatamente el aparato y revisarlo cuidadosamente.
○ Asegúrese de que el lubricador automático esté funcionando.
Mantenga el depósito de aceite con aceite limpio. Jamás deberá
permitirse que la cadena gire en seco sobre la barra.
○ Todos los trabajos con la sierra de cadena, aparte de los
elementos indicados en el manual de instrucciones del usuario/
del propietario, deben efectuarse por personal califi cado para
el servicio de sierra de cadena. (Por ejemplo, si se emplean
herramientas incorrectas para quitar el volante o si se utiliza una
herramienta incorrecta para sujetar el volante con el propósito
de quitar el embrague, podría ocasionar la avería estructural del
volante y causar posteriormente el estallido del volante.)
ADVERTENCIA
○ Nunca intente modifi car de ninguna manera el aparato. No
utilice este aparato para cualquier tarea excepto para la cual se
haya destinado.
○ No utilice nunca una sierra de cadena sin ningún equipo de
seguridad o una cuyo equipo de seguridad esté defectuoso.
Heridas graves podrían producirse como consecuencia.
○ Si se utiliza una barra de guía o una cadena diferente de la que
fue recomendada por el fabricante y que no está aprobada, el
operador podría correr un alto riesgo de accidente o de heridas.
Seguridad con el combustible
○ Mezcle y llene el combustible al aire libre, en lugares donde no
se produzcan chispas ni fuegos.
○ Utilice un recipiente adecuado al combustible.
○ No fume ni deje fumar a otras personas en las cercanías del
combustible o del aparato mientras este está en marcha.
○ Limpie los residuos de combustible antes de poner en marcha el
motor.
○ Antes de poner en marcha el motor, apártese como mínimo 3
metros del lugar en el que se ha llenado el combustible.
○ Detenga el motor y deje que se enfríe durante unos minutos
antes de quitar la tapa del depósito de combustible.
○ Vacíe el depósito antes de almacenar el aparato. Se recomienda
vaciar el depósito después de cada uso del aparato. Si deja
combustible en el depósito, asegúrese de que no puedan
producirse fugas.
○ Almacene el aparato y el combustible en un lugar donde los
vapores del combustible no puedan llegar a chispas o llamas
de calentadores de agua, motores eléctricos, interruptores,
hornos, etc.
ADVERTENCIA
El combustible puede encenderse o explotar fácilmente o
inhalar humos y, por lo tanto, preste especial atención cuando
maneje o llene combustible.
Seguridad durante el corte
○ No corte ningún material que no sea madera u objetos de
madera.
○ Para la protección de las vías respiratorias, utilice máscara
de protección contra el aerosol durante el corte de madera
después de la aplicación de insecticidas.
○ Mantenga a otras personas, niños, animales y ayudantes fuera
de la zona peligrosa. Detenga inmediatamente el motor cuando
se acercara alguna persona.
○ Agarre el aparato fi rmemente con la mano derecha en el asidero
trasero y con la mano izquierda en el asidero frontal.
○ Mantenga estable el cuerpo, con los pies bien apoyados sobre
el suelo. No estire demasiado el cuerpo.
○ Mantenga su cuerpo apartado del silenciador de escape y del
mecanismo de corte mientras esté en marcha el motor.
○ Mantenga la barra/cadena debajo del nivel de la cintura.
○ Antes de talar el árbol, el operador deberá familiarizarse con la
técnica del corte con la sierra de cadena.
○ Antes de la tala, deberá planifi carse el refugio seguro contra la
caída del árbol.
○ Durante la tala, agarre fi rmemente la unidad/el aparato con
ambas manos sujetando fi rmemente el asidero frontal con el
pulgar y parado con los pies bien apoyados y con el cuerpo
equilibrado.
○ Quede al costado de la sierra, pero nunca directamente detrás
de la misma.
○ Mantenga siempre apoyado el apoyo dentado contra el árbol,
porque la sierra puede ser arrastrada bruscamente hacia el
árbol.

17
Español
○ Cuando fi nalice un corte, esté preparado para sujetar el aparato
cuando quede libre, a fi n de que no se corte las piernas, los pies,
o el cuerpo, y para que el aparato no entre en contacto con una
obstrucción.
○ Preste atención al contragolpe de la sierra (cuando la sierra
retroceda hacia el operador). Nunca corte con el extremo de la
barra.
○ Cuando se reubique en una nueva área de trabajo, asegúrese
de detener el aparato y de que el mecanismo de corte haya
parado.
○ Jamás coloque el aparato sobre el suelo cuando esté en
marcha.
○ Asegúrese siempre de que el motor esté apagado y de que
el mecanismo de corte esté completamente parado antes de
eliminar escombros o quitar pasto del mecanismo de corte.
○ Lleve siempre un botiquín de primeros auxilios consigo cuando
opere cualquier equipo motorizado.
○ Jamás arranque o haga funcionar el motor dentro de un
recinto cerrado o edifi cio y/o cerca de líquidos infl amables. La
inhalación de los humos de escape puede ser fatal.
Seguridad durante el mantenimiento
○ Realice el mantenimiento del aparato según las
recomendaciones.
○ Antes de iniciar el mantenimiento, desconecte la bujía, excepto
si hay que ajustar el carburador.
○ No permita que se acerquen otras personas mientras esté
ajustando el carburador.
○ Utilice únicamente repuestos y accesorios originales de HiKOKI
recomendados por el fabricante.
PRECAUCIÓN
No desmonte el dispositivo de arranque de retroceso. Uno
podría herirse a causa del resorte de retroceso.
ADVERTENCIA
El mantenimiento incorrecto podría conducir a una avería seria
del motor o a heridas graves.
Transporte y almacenamiento
○ Transporte el aparato con el motor y el silenciador apartados del
cuerpo.
○ Antes de almacenar o transportar el aparato en un vehículo,
espere a que se haya enfriado el motor, vacíe el depósito de
combustible y sujete bien el aparato.
○ Vacíe el depósito de combustible antes de almacenar el aparato.
Se recomienda vaciar el depósito de combustible después
de cada uso del aparato. Si deja combustible en el depósito,
asegúrese de que no puedan producirse fugas.
○ Almacene el aparato fuera del alcance de niños.
○ Limpie y lleve a cabo el mantenimiento del aparato
cuidadosamente, y guárdelo en un lugar seco.
○ Asegúrese de que esté desconectada la llave de parada del
motor al transportar o almacenar el aparato.
○ Cuando transporte o almacene el aparato, cubra la cadena con
una cubierta de cadena barra directriz.
Si ocurren situaciones que no se han previsto en este manual, utilice
el sentido común. Póngase en contacto con un distribuidor HiKOKI
si necesita ayuda. Dedique especial atención a los apartados
precedidos por las palabras siguientes:
ADVERTENCIA
Indica gran peligro de daños personales graves e incluso la
muerte, si no se siguen las instrucciones.
PRECAUCIÓN
Indica posibilidad de daños personales o materiales, si no se
siguen las instrucciones.
NOTA
Indica información útil para el uso y funcionamiento correcto del
aparato.
ADVERTENCIA
PELIGRO DE CONTRAGOLPE (Fig. 1)
Uno de los peligros más severos durante el trabajo con la sierra de
cadena, es la posibilidad del contragolpe. El contragolpe puede
ocurrir cuando la punta superior de la barra de guía hace contacto
con un objeto o cuando se cierre el árbol y quede aprisionada
la cadena de la sierra durante el corte. En algunos casos, el
contacto de la punta puede causar una reacción inversa repentina,
sacudiendo la barra de guía hacia atrás contra el operador. Al
quedar aprisionada la cadena de la sierra en la parte superior de
la barra de guía, puede también empujar rápidamente la barra de
guía hacia atrás contra el operador. Cualquiera de estas reacciones
podrá hacer perder el control de la sierra, pudiendo causar serias
heridas personales. Aunque la sierra haya sido construida con
seguridad dentro de las especifi caciones de diseño, no se debe
confi ar exclusivamente en estas características de seguridad. Sepa
en todo momento dónde está la punta de la barra. El contragolpe
ocurre cuando se permite que la zona del contragolpe (1) de la
barra haga contacto con un objeto. No se debe utilizar esa zona.
El contragolpe por aprisionamiento ocurre debido al cierre del corte
y al atascamiento del lado superior de la barra de guía. Estudie la
posición del corte para que el corte se abra a medida que se vaya
cortando. Se debe mantener el control durante la marcha del motor,
sujetando fi rmemente la empuñadura del asidero trasero de la sierra
con la mano derecha y el asidero frontal con la mano izquierda,
rodeando los asideros con los dedos y pulgares. Sostenga siempre
la sierra con ambas manos durante la operación y corte con el motor
bajo el régimen de alta velocidad.
Sig las instrucciones del fabricante para el afi lado y mantenimiento
de la motosierra. Un mantenimiento defectuoso puede aumentar la
posibilidad de retroceso.

18
Español
ESPECIFICACIONES
○ Código “CS” de nombre del modelo signifi ca “Motosierra”
Modelo CS51EA (40S) CS51EA (45S)
CS51EA (50S)
Tipo de equipo Motosierra, portátil
Tamaño del motor (cm3)50,1
Bujía NGK BPMR-7A
Capacidad del depósito de combustible (cm3)530
Capacidad del depósito de aceite para cadena (cm3)270
Peso en seco (kg)
(Sin la barra de guía ni la cadena) 5,1
Paso de la cadena (mm) 8,26
Calibre de cadena (mm) 1,27
Nivel de presión de sonido LpA (dB (A))por ISO 22868
Equivalente
Incertidumbre
104
1
Nivel de potencia acústica LwA (dB (A)) por ISO 22868
Medida
Incertidumbre
Nivel de potencia acústica LwA (dB (A)) por 2000/14/CE
Medida
Garantizada
113
2
114
117
Nivel de vibración (m/s2) por ISO 22867
Asidero frontal
Asidero trasero
Incertidumbre
3,3
2,7
0,8
3,3
2,7
0,8
3,3
2,7
0,8
Longitud de la barra de guía (mm) 400 450 500
Tipo de cadena 95VPX
(Oregon)
20BPX
(Oregon)
Potencia máxima del motor
por ISO 7293 (kW) 2,5
Velocidad máxima del motor (/min) 13 500
Velocidad de ralentí del motor (/min) 3 000
Consumo de combustible específi co a máximo
rendimiento del motor (g/kWh) 439
Velocidad máxima de la cadena (m/seg) 26,0
Rueda dentada (número de dientes) 7
NOTA: Los niveles de ruido/vibración equivalentes se calculan como la energía ponderada en tempo en varias condiciones de trabajo con la
distribución de tiempo siguiente: 1/3 de ralentí, 1/3 de velocidad total, 1/3 de velocidad de embalamiento.
* Todos los datos están sujetos a cambios sin previo aviso.
PROCEDIMIENTOS DE MONTAJE
ADVERTENCIA
Jamás intente arrancar el motor sin la caja lateral, la barra y la
cadena fi rmemente instaladas.
1. Tire del dispositivo de seguridad delantero (2) hacia el asa
delantera para comprobar que el freno esté desactivado.
(Fig. 2)
2. Quite las tuercas de fi jación (3) de la barra directriz. Quite la caja
lateral (4). (Fig. 3)
3. Instale la barra directriz (5) en los pernos (6) y, a continuación,
empújela hacia la rueda dentada (7) lo más lejos posible.
4. Compruebe que la dirección de la cadena (12) sea correcta
como se indica en la fi gura y alinee la cadena sobre la rueda
dentada. (Fig. 5)
5. Guíe los eslabones impulsores en la ranura de la barra en todo
el contorno de la barra.
6. Instale la caja lateral (4) en los pernos (6).
Asegúrese de que la cabecilla del tornillo de ajuste (8) de
tensión de cadena esté fi ja en el agujero (9) de la barra. (Fig. 4)
La palanca de freno (11) de la cubierta lateral debe ajustarse a la
ranura (10) en la parte lateral del protector salva-manos.
Luego, apriete las tuercas de fi jación de la barra directriz (3)
manualmente permitiendo que el extremo de la barra guía se
mueva de arriba a hacia abajo fácilmente. (Fig. 3)
7. Levante el extremo de la barra y apriete la cadena (12) girando
el perno de ajuste de tensión (13) en el sentido horario. Para
comprobar la tensión correcta, levante ligeramente el centro
de la cadena, debiendo existir un juego de alrededor de 0,5
a 1,0 mm entre la barra y el borde del eslabón impulsor (14).
(Fig. 6, 7).
PRECAUCIÓN
¡LA CORRECTA TENSIÓN ES SUMAMENTE IMPORTANTE!
8. Levante el extremo de la barra y apriete fi rmemente las tuercas
de fi jación de la barra guía con la llave combinada. (Fig. 7)
9. Debido a que la cadena nueva se va estirando, se debe ajustar la
cadena después de unos cortes, observando cuidadosamente
la tensión de la cadena durante los primeros 30 minutos del
corte.
NOTA
Verifi que frecuentemente la tensión de la cadena para lograr el
óptimo rendimiento y durabilidad.
PRECAUCIÓN
○ Cuando la cadena estuviera excesivamente tensa, podrán
dañarse rápidamente la barra y la cadena. En cambio, cuando la
cadena estuviera excesivamente fl oja, la cadena podrá salirse
de la ranura de la barra.
○ Utilice siempre guantes para la manipulación de la cadena.

19
Español
ADVERTENCIA
Durante la operación, agarre fi rmemente la sierra con ambas
manos. La operación con una sola mano podrá causar heridas
serias.
PROCEDIMIENTOS DE OPERACIÓN
Combustible (Fig. 8)
ADVERTENCIA
○ La sierra de cadena está equipada con un motor de dos
tiempos. El motor debe funcionar siempre con combustible, que
se mezcla con aceite. Asegúrese siempre de hay una buena
ventilación en los lugares de manejo o llenado de combustible.
○ El combustible contiene sustancias altamente infl amables,
existiendo la posibilidad de graves lesiones por inhalación o
por derrame sobre su cuerpo. Preste siempre atención cuando
maneje el combustible. Asegure siempre una buena ventilación
cuando maneje el combustible dentro de un edifi cio.
Combustible
○ Utilice siempre gasolina sin plomo de marca de 89 octanos.
○ Utilice aceite de dos tiempos genuino o utilice una mezcla de
25:1 a 50:1, refi riéndose a la relación en la botella o consultando
un distribuidor HiKOKI.
○ Si no hay aceite genuino disponible, utilice un aceite con
antioxidante de calidad que esté etiquetado expresamente para
motores de dos tiempos enfriados por aire (ACEITE GRADO
JASO FC o GRADO ISO EGC). No utilice aceite mezclado BIA o
TCW (tipo de 2 tiempos refrigerado por agua).
○ No utilice nunca aceites multigrado (10 W/30) ni residuales.
○ Mezcle siempre el combustible y el aceite en un recipiente
especial para ello que esté limpio.
Empiece llenando el recipiente hasta la mitad con gasolina.
Luego, agregue todo el aceite. Sacuda la mezcla de combustible.
Agregue el resto de la gasolina.
Antes de llenar el depósito de combustible, agite la mezcla
cuidadosamente.
Llenado de combustible
ADVERTENCIA (Fig. 9)
○ Apague siempre el motor antes de llenar el combustible.
○ Para llenar el combustible del depósito, abra lentamente la
tapa del depósito de combustible (15) para que escape la
sobrepresión que pueda contener.
○ Después de llenar, cierre y apriete bien la tapa.
○ Antes de arrancar el aparato, debe alejarse por lo menos 3 m del
área de llenado de combustible.
○ Lave siempre inmediatamente con jabón cualquier combustible
vertido sobre la ropa.
○ Asegúrese de verifi car si existe alguna fuga de combustible
después del llenado.
Antes de llenar el combustible, limpie cuidadosamente el área de
la tapa del depósito para asegurar que no entre suciedad en el
depósito. Asegúrese de que el combustible esté bien mezclado
agitando bien el recipiente antes de llenar el combustible en el
depósito.
Aceite para cadena (Fig. 9)
Llene el aceite para cadena (16). Utilice siempre el aceite para
cadena de buena calidad. El aceite para cadena se descarga
automáticamente durante el funcionamiento del motor.
NOTA
Al llenar el combustible (15) o el aceite para cadena (16) en el
depósito, coloque el aparato con la tapa hacia arriba. (Fig. 9)
AJUSTE DE LA ALIMENTACIÓN DEL ACEITE PARA LA CADENA
La cantidad de aceite para la cadena que se descarga a través
del sistema de lubricación es ajustada al máximo en la fábrica.
La cantidad deberá ajustarse de acuerdo con las condiciones de
operación.
Gire el tornillo (17) de ajuste para aumentar a la izquierda la cantidad
y lo gira a la derecha para disminuir la cantidad. (Fig. 10)
Operación del freno de la cadena (Fig. 2, 11)
El freno de la cadena está diseñado para actuar en caso de
emergencia, como en el movimiento de contragolpe.
La aplicación del freno se realiza desplazando el dispositivo de
seguridad delantero hacia la barra. Durante la operación del freno
de la cadena, la velocidad del motor no aumenta, aun cuando se
pulsa el gatillo del acelerador, y la cadena no gira. Para liberar el
freno, se debe tirar del dispositivo de seguridad delantero hacia el
asa delantera.
Si el motor sigue girando a alta velocidad con el freno aplicado, el
embrague se recalentará.
Cuando el freno funcione durante la operación de la motosierra,
suelte inmediatamente la palanca del acelerador para reducir la
velocidad del motor.
Método de verifi cación de la activación del freno
1) Apague el motor.
2) Sostenga horizontalmente la motosierra, suelte la mano del
asa delantera, golpee el extremo de la barra de guía contra
un tocón o algo similar, y compruebe que el freno funcione
correctamente. La altura de operación depende del tamaño de
la barra.
Si el freno no funciona bien, solicite una inspección y reparación a
su distribuidor.
Arranque (Fig. 11
-
16)
PRECAUCIÓN
Antes del arranque, asegúrese de que el freno de la cadena esté
enganchado y que la barra/cadena no esté rozando con algún
objeto. (Fig. 11)
1. Ajuste la llave de ignición (18) a la posición ON (encendido).
(Fig. 12)
*Empujar varias veces la bomba cebadora (20) de manera que
el combustible fl uya a través del bulbo hacia el carburador.
(Fig. 13)
2. Tire de la palanca del estrangulador (19) hasta la posición de
estrangulamiento (Fig. 13).
Esto bloqueará el estrangulador automáticamente en la
posición de aceleración media.
3. Presione la válvula de descompresión (21).
La válvula (21) volverá automáticamente a la posición original
cuando arranque el motor (Fig. 14).
4. Tire enérgicamente del arrancador de retroceso, tomando la
precaución de mantener el asidero bien sujeto para evitar que
salte de la mano. (Fig. 15)
5. Cuando escuche la primera ignición, devuelva la palanca del
estrangulador (19) a su posición original. (Fig. 13)
6. Presione la válvula de descompresión.
7. Tire de nuevo el arrancador de retroceso con fuerza de la misma
manera antes mencionada. (Fig. 15)
NOTA
Si el motor no se pone en marcha, repita los pasos de 2 al 7.
8. Después de arrancar el motor, tire por completo una vez de
la palanca del acelerador (23) con bloqueo de la palanca del
acelerador (22) y suéltela de inmediato. (Fig. 16) Luego, la
aceleración media estará desenganchada. Tire del dispositivo
de seguridad delantero (2) hacia el asa delantera para
desactivar el freno.
Espere a que el motor se caliente durante aproximadamente 2-3
minutos antes de someterlo a cualquier carga.
No haga funcionar el motor a altas velocidades sin carga para
evitar reducir la vida útil de éste.
ADVERTENCIA
No transporte el aparato con el motor en funcionamiento.
Detención (Fig. 17)
Reduzca la velocidad del motor y coloque la llave de ignición (18) en
la posición de parada.

20
Español
ADVERTENCIA
○ No extienda excesivamente la mano ni corte sobre la altura de
los hombros.
○ Preste especial atención durante la tala y no utilice la sierra con
la posición de nariz alta o sobre la altura de los hombros.
RETÉN DE LA CADENA
El retén de la cadena se ubica sobre el cabezal de fuerza motriz
precisamente debajo de la cadena para impedir la eventualidad que
una cadena rota pueda golpear al usuario.
ADVERTENCIA
No se coloque de pie alineado a la sierra al cortar.
TÉCNICAS BÁSICAS PARA LA TALA, PODA Y TROCEO
El propósito de la siguiente información es dar las explicaciones
generales sobre las técnicas del corte de la madera.
ADVERTENCIA
○ Esta información no cubre todas las situaciones específi cas, que
pueden diferir dependiendo del terreno, vegetación, clase de
madera, forma y tamaño de los árboles, etc. Consulte el agente
de servicios, agente de forestación o escuelas de forestación
local para obtener los consejos sobre los problemas específi cos
del corte de madera dentro de su zona. Esto permitirá que el
trabajo sea más efi caz y seguro.
○ Evite cortar bajo condiciones adversas del tiempo, como en
días con niebla densa, lluvia torrencial, frío intense o vientos
fuertes, etc.
El tiempo adverso suele ser cansador para el trabajo y
crea condiciones potencialmente peligrosas como el suelo
resbaloso.
Los vientos fuertes pueden forzar la caída del árbol a una
dirección imprevista, causando daños en las propiedades o
lesiones personales.
PRECAUCIÓN
Nunca utilice la sierra de cadena como una palanca o para
cualquier propósito que no haya sido previsto.
ADVERTENCIA
○ Evite cualquier tropiezo con obstáculos como troncos, raíces,
rocas, ramas y árboles talados. Observe las cavidades y zanjas.
Preste extrema atención cuando trabaje en pendientes o suelo
desnivelado.
Apague el motor cuando se desplace de un lugar de trabajo a
otro.
Corte siempre con el acelerador ampliamente abierto. El
movimiento lento de la cadena puede ser fácilmente atrapado
y producir tirones.
○ Nunca utilice la sierra con una mano solamente.
De esa forma, será difícil controlar correctamente la sierra y
sufrirá heridas serias al perder el control.
Mantenga el cuerpo de la sierra cerca de su cuerpo para mejorar
el control y reducir el esfuerzo.
Cuando corte con la parte inferior de la cadena, la fuerza
reactiva tratará de arrastrar la sierra fuera de sus manos en
dirección de la madera que esté cortando.
La sierra controlará la velocidad de avance y el serrín será
lanzado hacia usted. (Fig. 18)
○ Cuando corte con la parte superior de la cadena, la fuerza
reactiva empujará la sierra hacia usted tratando de alejarse de
la madera que esté cortando. (Fig. 19)
○ Existe el riesgo del contragolpe cuando se empuja la sierra lo
sufi cientemente lejos al iniciar el corte con la nariz de la barra.
El método de corte más seguro es cortar con la parte inferior
de la sierra. El corte con la parte superior ofrece mayores
difi cultades para controlar la sierra e incrementa el riesgo del
contragolpe.
○ Si se bloquea la cadena, suelte inmediatamente la palanca
liberadora. Si la palanca liberadora sigue girando a gran
velocidad con la cadena bloqueada, el embrague se recalentará
causando un problema.
NOTA
Mantenga siempre apoyado el apoyo dentado contra el árbol,
porque la sierra puede ser arrastrada bruscamente hacia el
árbol.
TALA
La tala es más que el simple corte de un árbol. Debe tumbar el árbol
hacia la dirección más próxima a la deseada sin dañar el árbol o
cualquier otra cosa.
Antes de la tala del árbol, se debe considerar todas las condiciones
que puedan desviar la dirección deseada, tales como:
Inclinación del árbol. Forma de la copa. Peso de la nieve de la copa.
Condiciones del viento. Obstáculos dentro del alcance del árbol (por
ejemplo, otros árboles, líneas de transmisión, caminos, edifi cios, etc.).
ADVERTENCIA
○ Observe siempre las condiciones generales del árbol. Observe
las partes descompuestas y podridas del tronco que pudieran
quebrarse, iniciando la caída antes de lo previsto.
○ Mire las ramas secas que puedan romperse y causar golpes
durante el trabajo.
Durante la tala, mantenga siempre los animales y las personas
a una distancia de por lo menos el doble de la longitud del árbol.
Despeje los arbustos y ramas de los alrededores del árbol.
Prepare el camino para refugiarse de la dirección de tala.
REGLAS BÁSICAS PARA LA TALA DE ÁRBOLES
Normalmente, la tala consta de dos principales operaciones de
corte: la estalladura y el corte de tala. Comience con el corte de la
entalladura sobre el lado del árbol que esté en la dirección de tala.
Observe a través del entalle al efectuar el corte inferior de manera
que no sea excesivamente profundo en el tronco. La entalladura
deberá ser lo sufi cientemente profunda para crear una articulación
de sufi ciente ancho y resistencia. La abertura de la entalladura
deberá ser lo sufi cientemente ancha para orientar lo máximo posible
la caída del árbol. Realice el corte de tala desde el otro lado del árbol
entre 3 – 5 cm sobre el borde de la entalladura. (Fig. 20)
24. Dirección de tala
25. Apertura de entalle mínima de 45°
26. Articulación
27. Corte de tala
Nunca corte completamente a través del tronco. Deje siempre una
articulación.
La articulación orienta la caída del árbol. Al cortarse totalmente el
tronco, se pierde el control de la orientación de la caída.
Inserte una cuña o palanca en el corte antes que el árbol se terne
inestable y comience a moverse. De esta manera, se evitará
que la barra de guía quede aprisionada en el corte cuando se
haya equivocado la dirección de tala. Asegúrese de que nadie
permanezca dentro del alcance del árbol talado antes de ser
empujado.
TALA DE TRONCOS CON DIÁMETRO MAYOR QUE EL DOBLE
DE LA LONGITUD DE LA BARRA DE GUÍA
Corte una entalladura grande y amplia. Luego, efectúe el corte
desde el centro de la entalladura. Deje siempre una articulación en
ambos lados del corte del centro. (Fig. 21)
Complete el corte de tala cortando alrededor del tronco como se
indica en la Fig. 22.
ADVERTENCIA
Estos métodos son extremadamente peligrosos debido a que
involucran el uso de la nariz de la barra de guía y pueden causar
el contragolpe.
Solamente profesionales debidamente entrenados deben
intentar estas técnicas.
PODA
La poda es la eliminación de las ramas de un árbol talado.
ADVERTENCIA
La mayoría de los accidentes de contragolpes ocurren durante
la poda.
No se debe utilizar la nariz de la barra de guía. Tenga mucho
cuidado y evite el contacto de la nariz de la barra de guía con
el rollo, otras ramas u objetos. Preste la máxima atención a las
ramas que estén bajo tensión. Ellas pueden saltar contra usted
y causar la pérdida del control, resultando en lesiones. (Fig. 23)
A página está carregando...
A página está carregando...
A página está carregando...
A página está carregando...
A página está carregando...
A página está carregando...
A página está carregando...
A página está carregando...
A página está carregando...
A página está carregando...
A página está carregando...
A página está carregando...
A página está carregando...
A página está carregando...
A página está carregando...
A página está carregando...
-
 1
1
-
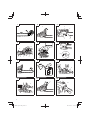 2
2
-
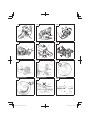 3
3
-
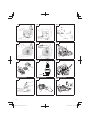 4
4
-
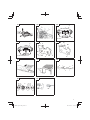 5
5
-
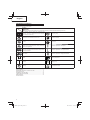 6
6
-
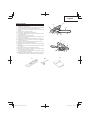 7
7
-
 8
8
-
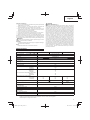 9
9
-
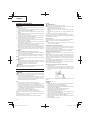 10
10
-
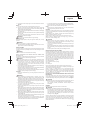 11
11
-
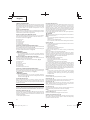 12
12
-
 13
13
-
 14
14
-
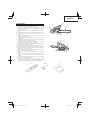 15
15
-
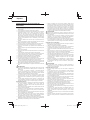 16
16
-
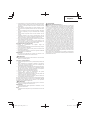 17
17
-
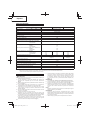 18
18
-
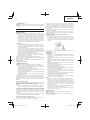 19
19
-
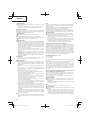 20
20
-
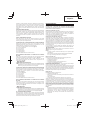 21
21
-
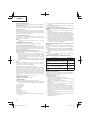 22
22
-
 23
23
-
 24
24
-
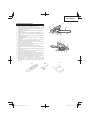 25
25
-
 26
26
-
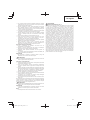 27
27
-
 28
28
-
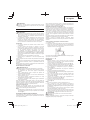 29
29
-
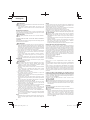 30
30
-
 31
31
-
 32
32
-
 33
33
-
 34
34
-
 35
35
-
 36
36


Hikoki CS51EA Manual do usuário
- Categoria
- Motosserras sem fio
- Tipo
- Manual do usuário
em outras línguas
- español: Hikoki CS51EA Manual de usuario
- English: Hikoki CS51EA User manual
Artigos relacionados
Outros documentos
-
Hitachi CS 40EA Handling Instructions Manual
-
Maruyama MCV381 Manual do proprietário
-
Shindaiwa 490/EMC_490/INTL Manual do usuário
-
Hitachi CS33EDP Handling Instructions Manual
-
-
 Poulan Pro PR4016 Manual do usuário
-
Batavia BT-NXS006 Compact Cordless Chainsaw Manual do usuário
-
-
BLACK+DECKER BECS2040 Manual do usuário
-
 JBM 60029 Guia de usuario

