BOMANN cb750 Manual do proprietário
- Categoria
- Umidificadores
- Tipo
- Manual do proprietário
Este manual também é adequado para

Bedienungsanleitung/Garantie
Gebruiksaanwijzing/Garantie • Mode d’emploi/Garantie
Instrucciones de servicio/Garantía • Manual de instruções/Garantia
Istruzioni per l’uso/Garanzia • Bruksanvisning/Garanti
Instruction Manual/Guarantee • Instrukcja obsługi/Gwarancja
Návod k použití/Záruka • A használati utasítás/Garancia
Руководство по эксплуатации/Гарантия
Dampfbügelautomat
Stoomstrijkijzer • Fer à repasser à vapeur
Autómata de vapor • Autómata de vapor
Ferro da stiro a vapore • Dampstrykejern
Automatic Steam Iron • Automatyczne żelazko parowe
Napařovací žehlička • Gőzölős vasaló
Паровой утюг
DB 2898
5....-05-DB 2898 1 01.10.2004, 9:26:23 Uhr

2
Inhalt
Inhoud • Sommaire • Indice • Índice • Indice • Innhold
Contents • Spis treści • Obsah • Tartalom • Содержание
D
Übersicht Bedienelemente . . . . . . . . . . . . . . . . . . . . . . . . . . Seite 3
Bedienungsanleitung . . . . . . . . . . . . . . . . . . . . . . . . . . . . . . . Seite 4
Garantie . . . . . . . . . . . . . . . . . . . . . . . . . . . . . . . . . . . . . . . . . Seite 7
NL
Overzicht bedieningselementen . . . . . . . . . . . . . . . . . . . . . . Pagina 3
Gebruiksaanwijzing . . . . . . . . . . . . . . . . . . . . . . . . . . . . . . . . Pagina 9
Garantie . . . . . . . . . . . . . . . . . . . . . . . . . . . . . . . . . . . . . . . . . Pagina 12
F
Aperçu des éléments de commande . . . . . . . . . . . . . . . . . . Page 3
Mode d’emploi . . . . . . . . . . . . . . . . . . . . . . . . . . . . . . . . . . . . Page 13
Garantie . . . . . . . . . . . . . . . . . . . . . . . . . . . . . . . . . . . . . . . . . Page 16
E
Vista de conjunto Elementos de mando . . . . . . . . . . . . . . . . Página 3
Instrucciones de servicio . . . . . . . . . . . . . . . . . . . . . . . . . . . . Página 18
Garantia . . . . . . . . . . . . . . . . . . . . . . . . . . . . . . . . . . . . . . . . . Página 21
P
Vista geral dos elemntos de comando . . . . . . . . . . . . . . . . . Página 3
Manual de instruções . . . . . . . . . . . . . . . . . . . . . . . . . . . . . . Página 23
Garantía . . . . . . . . . . . . . . . . . . . . . . . . . . . . . . . . . . . . . . . . . Página 26
I Descrizione dei singoli pezzi . . . . . . . . . . . . . . . . . . . . . . . . Pagina 3
Istruzioni per l’uso . . . . . . . . . . . . . . . . . . . . . . . . . . . . . . . . . Pagina 28
Garanzia . . . . . . . . . . . . . . . . . . . . . . . . . . . . . . . . . . . . . . . . . Pagina 31
N
Oversikt over betjeningselementer . . . . . . . . . . . . . . . . . . . . Side 3
Bruksanvisning . . . . . . . . . . . . . . . . . . . . . . . . . . . . . . . . . . . . Side 33
Garanti . . . . . . . . . . . . . . . . . . . . . . . . . . . . . . . . . . . . . . . . . . Side 36
GB
Control element overview . . . . . . . . . . . . . . . . . . . . . . . . . . . Page 3
Instruction Manual . . . . . . . . . . . . . . . . . . . . . . . . . . . . . . . . . Page 37
Guarantee . . . . . . . . . . . . . . . . . . . . . . . . . . . . . . . . . . . . . . . Page 40
PL
Przegląd elemetów obsługi . . . . . . . . . . . . . . . . . . . . . . . Strona 3
Instrukcja obsługi . . . . . . . . . . . . . . . . . . . . . . . . . . . . . . Strona 41
Gwarancja . . . . . . . . . . . . . . . . . . . . . . . . . . . . . . . . . . . . Strona 44
CZ
Přehled obsluhovací prvky . . . . . . . . . . . . . . . . . . . . . . . . Strana 3
Návod k použití . . . . . . . . . . . . . . . . . . . . . . . . . . . . . . . . Strana 46
Záruka . . . . . . . . . . . . . . . . . . . . . . . . . . . . . . . . . . . . . . Strana 49
H
A hasznalt elemek megtekintése . . . . . . . . . . . . . . . . . . . Oldal 3
A hasznalati utasítás . . . . . . . . . . . . . . . . . . . . . . . . . . . . Oldal 50
Garancia . . . . . . . . . . . . . . . . . . . . . . . . . . . . . . . . . . . . . Oldal 53
RUS
Обзор управляющих элементов . . . . . . . . . . . . . . . . . . . . стр. 3
Руководство по эксплуатации . . . . . . . . . . . . . . . . . . . . . . стр. 55
Гарантия . . . . . . . . . . . . . . . . . . . . . . . . . . . . . . . . . . . . . . . . . стр. 58
5....-05-DB 2898 2 01.10.2004, 9:26:25 Uhr

3
Übersicht der Bedienelemente
Overzicht van de bedieningselementen • Liste des différents éléments de commande
Indicación de los elementos de manejo • Descrição dos elementos
Elementi di comando • Oversikt over betjeningselementene
Overview of the Components • Przegld elementów obsugi
Přehled ovládacích prvků • A kezelő elemek áttekintéseé
Обзор деталей прибора
5....-05-DB 2898 3 01.10.2004, 9:26:27 Uhr
A página está carregando...

D
5
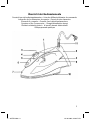
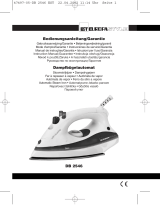
Übersicht der Bedienelemente
1 Stufenloser Temperaturregler 7 Sprühdüse
2 Kontrollleuchte 8 Transparenter Wassertank
3 Dampfstoßknopf 9 Standfuß
4 Dampfmengenregler 10 Edelstahl-Bügelsohle
5 Sprühknopf 11 Flexible Netzkabeleinführung
6 Einfüllöffnung Wassertank
Inbetriebnahme des Gerätes
• Reinigen Sie die Bügelsohle mit einem leicht feuchten Tuch.
• Befüllen Sie den Wassertank an der Einfüllöffnung (6). Nehmen Sie einen
Füllbehälter zu Hilfe. Verwenden Sie möglichst destilliertes Wasser oder klares
Leitungswasser bis zum Härtegrad 2. Bei härterem Wasser verwenden Sie nur
destilliertes Wasser.
• Batteriewasser, Wasser aus dem Wäschetrockner und Wasser mit Zusätzen
(wie Stärke, Parfüm, Weichspüler oder andere Chemikalien) dürfen nicht in
den Wassertank eingefüllt werden. Das Gerät könnte dadurch beschädigt
werden, da sich Rückstände in der Dampfkammer bilden könnten. Diese
Rückstände können beim Ausfallen durch die Dampfaustrittsöffnungen das
Bügelgut verunreinigen.
Benutzung des Gerätes
Hinweis: Bügeln Sie mit diesem Gerät nur Kleidungsstücke.
• Entfernen Sie eventuell vorhandene Schutzfolien und Aufkleber von der Edel-
stahl-Bügelsohle, bevor Sie das Gerät benutzen.
• Wickeln Sie das Kabel bitte komplett ab.
Bügeln ohne Dampf (Dampfmengenregler auf O)
1. Stellen Sie das Gerät auf seinen Standfuß.
2. Stellen Sie den Dampfmengenregler (4) auf O.
3. Elektrischer Anschluss:
Vergewissern Sie sich, dass Gerätespannung (siehe Typenschild) und Netz-
spannung übereinstimmen.
4. Stellen Sie den Temperaturregler immer auf „0“, bevor Sie das Gerät an der
Steckdose anschließen bzw. vom Netz trennen.
5. Sortieren Sie die Wäschestücke nach Bügeltemperaturen. Beginnen Sie mit
der niedrigsten Temperatur. Diese stellen Sie am Temperaturregler (1) ein:
• Synthetik, Seide niedrige Temperatur
• • Wolle, mittlere Temperatur
• • • Baumwolle, Leinen hohe Temperatur
MAX höchste Temperatur
5....-05-DB 2898 5 01.10.2004, 9:26:28 Uhr
A página está carregando...
A página está carregando...

D
8
Nach der Garantie
Nach Ablauf der Garantiezeit können Reparaturen kostenpfl ichtig vom entspre-
chenden Fachhandel oder Reparaturservice ausgeführt werden.
5....-05-DB 2898 8 01.10.2004, 9:26:30 Uhr

NL
9
Algemene veiligheidsinstructies
• Lees vóór de ingebruikname van dit apparaat de handleiding uiterst zorgvul-
dig door en bewaar deze goed, samen met het garantiebewijs, de kassabon
en zo mogelijk de doos met de binnenverpakking.
• Gebruik het apparaat uitsluitend privé en uitsluitend voor de voorgeschreven
toepassing. Dit apparaat is niet geschikt voor commercieel gebruik (tenzij het
bedoeld is voor beperkt gebruik in de buitenlucht). Bescherm het tegen hitte,
directe zonnestralen, vocht (i geen geval in vloeistoffen dompelen) en scherpe
kanten. Gebruik het apparaat niet met vochtige handen. Bij vochtig of nat
geworden apparaat onmiddellijk de stroomtoevoer onderbreken. Niet in het
water grijpen.
• Schakel het apparaat uit en onderbreek altijd de stroomtoevoer (trek aan de
steker, nooit aan de kabel) wanneer u het apparaat niet gebruikt, hulpstukken
aanbrengt, reinigt of wanneer storingen optreden.
• Laat het ingeschakelde apparaat niet zonder toezicht werken. Schakel het
apparaat altijd uit of trek de steker uit de contactdoos (trek aan de steker, niet
aan de kabel) voordat u de werkplek verlaat.
• Bescherm kinderen tegen gevaren en zorg ervoor dat kabels nooit los omlaag
hangen en dat het apparaat buiten het bereik van kinderen blijft.
• Controleer regelmatig of het apparaat beschadigingen vertoont. Een bescha-
digd apparaat mag niet in gebruik worden genomen.
• Repareer het apparaat nooit zelf, maar breng het naar een geautoriseerde
vakman. Voorkom gevaren en laat een defecte kabel altijd alleen door de
fabrikant, onze technische dienst of een eender gekwalifi ceerde persoon
vervangen door een soortgelijke kabel.
• Gebruik alleen originele reserveonderdelen.
• Neem de onderstaande “Speciale veiligheidsinstructies“ in acht.
Speciale veiligheidsinstructies
• VOORZICHTIG! De strijkzool (10) wordt snel heet en heeft lange tijd nodig om
af te koelen. De strijkzool niet aanraken!
• Zet de strijkautomaat a.u.b. verticaal op de standvoet (9) wanneer u hem niet
gebruikt.
• Trekt u de stekker uit de contactdoos voordat u water in de tank (8) vult. Vult
u de tank nooit verder dan de MAX-markering (ca. 300ml).
Nummering van de bedieningselementen
1 Variabele temperatuurregelaar 7 Sproeier
2 Controlelampje 8 Transparante watertank
3 Stoomstoot-knop 9 Standvoet
4 Stoomregelaars 10 Edelstalen strijkzool
5 Sproeiknop 11 Flexibele netkabeldoorvoer
6 Vulopening watertank
5....-05-DB 2898 9 01.10.2004, 9:26:30 Uhr

NL
10
Inbedrijfstelling van het strijkijzer
• U reinigt de strijkzool met een vochtige doek.
• Vul de watertank via de vulopening (6). Gebruik een vulbeker voor het vullen.
Gebruik zo mogelijk gedestilleerd water of zuiver leidingwater tot hardheids-
graad 2. Bij harder water dient u alleen gedestilleerd water te gebruiken.
• Accuwater, water uit de wasdroger en water met additieven (zoals stijfsel, par-
fum, wasverzachter of andere chemicaliën) mogen niet inde watertank worden
gevuld. Het apparaat zou daardoor kunnen worden beschadigd omdat zich
in de stoomkamer resten kunnen vormen. Deze resten kunnen het te strijken
wasgoed verontreinigen wanneer deze resten uit de stoomuitlaatopening
vallen.
Bediening van het apparaat
AANWIJZING: Stnjkt u met dit apparaat uitsluitend kledingstukken.
• Verwijder eventueel voorhanden beschermfolies en stickers van de edelstalen
strijkzool voordat u het apparaat gebruikt.
• Wikkel de kabel a.u.b. compleet af.
Strijken zonder stoom (stoomregelaar op O)
1. Plaats het apparaat op de steunvoet.
2. Zet de regelaar voor de stoomhoeveelheid (4) op O.
3. Elektrische aansluiting
Controleer of de apparaatspanning (zie typeplaat) correspondeert met de
netspanning.
4. Zet de temperatuurregelaar altijd op „0“ voordat u het apparaat op de con-
tactdoos aansluit of de stroomtoevoer naar het apparaat onderbreekt.
5. Sorteer het strijkgoed naar strijktemperaturen. Begin met de laagste tempera-
tuur. Deze stelt u in aan de temperatuurregelaar (1):
• synthetisch weefsel, zijde lage temperatuur
• • wol matige temperatuur
• • • katoen, linnen hoge temperatuur
MAX hoogste temperatuur
6. Sluit het apparaat alleen aan op een volgens de voorschriften geïnstalleerd
geaard stopcontact, 230V/50Hz.
7. Het controlelampje (2) brandt. Zodra dit lampje dooft, is de gewenste tempe-
ratuur bereikt. Nu kunt u beginnen te strijken.
8. Trek na gebruik altijd de netstekker uit de contactdoos.
5....-05-DB 2898 10 01.10.2004, 9:26:31 Uhr

NL
11
Strijken met stoom ( )
Hiervoor is een hoge temperatuur vereist (katoen, linnen).
U regelt de stoomhoeveelheid door middel van de stoomregelaar (4).
O geen stoom
kleine stoomhoeveelheid
gemiddelde stoomhoeveelheid
MAX grote stoomhoeveelheid
Met de stoomstoottunctie (3) kunt u extra stoom toevoegen.
Let op: de stoom is heet. Gevaar voor verbranding!
Let bij het strijken met lage temperaturen op dat u de stoomhoeveelheid vermin-
dert of zonder stoom strijkt. Bij een te lage temperatuur is het normaal dat water
uit de strijkzool druppelt. Het apparaat is echter uitgerust met een „Antidruppel-
functie“, daardoor wordt de stoomfunctie bij een te laag ingestelde temperatuur
uitgeschakeld.
Bijvullen van de watertank
• Trek altijd de netstekker uit de contactdoos voordat u water bijvult.
• Zet de regelaar voor de stoomhoeveelheid (4) op de stand “0” (geen stoom).
Open het deksel van de invulopening (6) en vul voorzichtig het water in. Vul de
watertank alleen tot de MAX-markering.
Sproeifunctie (
)
Om het strijkgoed plaatselijk in te vochten, drukt u op de sproeiknop (5).
Vertical steam
Met deze functie is stoom in verticale richting mogelijk.
Opmerking: om een overtollige uitstoot van water uit de strijkzool te voorkomen,
dient u de stoomstoottoets niet langer dan 5 seconden ingedrukt te houden.
Zelfreiniging (Self-Clean)
1. Vul de watertank tot de helft met water.
2. Verwarm het apparaat tot de maximum temperatuur. Na het doven van de
controlelamp onderbreekt u de stroomtoevoer naar het apparaat.
3. Houd het apparaat nu horizontaal boven een spoelbak. Houd de stoomrege-
laar op de stand „SELF CLEAN“. Schud het apparaat nu licht heen en weer
totdat de tank leeg is. De stoomregelaar springt automatisch terug naar zijn
uitgangspositie O.
4. Zet het apparaat weer op de voet en verwarm het opnieuw. Om de zool te
reinigen, strijkt u nu over een schone katoenen doek.
5....-05-DB 2898 11 01.10.2004, 9:26:31 Uhr
A página está carregando...
A página está carregando...
A página está carregando...
A página está carregando...
A página está carregando...
A página está carregando...
A página está carregando...

E
19
Descripción de los elementos de mando
1 Regulador continuo de temperatura 7 Surtidor del rociador
2 Lámpara indicadora 8 Depósito de agua transparente
3 Botón „chorro a vapor“ 9 Pie
4 Regulador de volumen de vapor 10 Suela de plancha en acero fi no
5 Rociador 11 Flexible entrada de cables de la red
6 Orifi cio de relleno del depósito
de agua
Primera puesta en marcha
• Limpie la base de la plancha con un trapo ligeramente húmedo.
• Llene el depósito de agua a través de la abertura de llenado (2). Ayúdese con
un recipiente de llenado. Si es posible, utilice agua destilada o agua clara de
grifo hasta el grado hidrotimétrico 2. En caso de que su agua tenga grados
superiores, utilice solamente agua destilada.
• Agua de batería, agua de la secadora de ropa y agua con aditivos (como
almidón, perfume, suavizantes u otros químicos) no se debe llenar en el
depósito de agua. El aparato se podría estropear, ya que se podrían originar
residuos en el depósito de vapor. Estos residuos, al escapar de las aberturas
de salida de vapor, podrían ensuciar la ropa preparada para planchar.
Manipulación del aparato
ATENCION: Planche con este aparato sólo ropa.
• Aparte las hojas antiabrasión que pueda haber y etiquetas adhesivas de la
suela de plancha de acero fi no, antes de utilizar el aparato.
• Por favor desenrolle el cable por completo.
Planchar sin vapor (regulador de la cantidad de vapor en posición O)
1. Coloque el aparato encima de su base.
2. Ajuste el regulador de la cantidad de vapor (4) a la posición O.
3. Conexión eléctrica:
Asegúrese que la tensión del aparato (véa la indicación de tipo) sea la misma
que la tensión de red.
4. Siempre ajuste el regulador de temperatura a la posición ”0”, antes de conec-
tar el aparato a la caja de enchufe, es decir retirarlo de la red.
5. Seleccione la ropa por temperaturas de planchar. Empiece con la temperatu-
ra más baja. Regule la temperatura con el regulador de temperatura (1):
• Sintética, seda temperatura baja
• • Lana temperatura media
• • • Algodón, lino temperatura alta
MAX temperatura máxima
5....-05-DB 2898 19 01.10.2004, 9:26:35 Uhr
A página está carregando...
A página está carregando...

E
22
de atención al cliente! ¡Rotos de vidrio o roturas en las piezas de plástico deben
pagarse siempre por el cliente !
Defectos en los accesorios de uso o en las piezas de desgaste (p.ej. escobillas
de carbón del motor, varillas amasadoras, correas de transmisión, mando a dis-
tancia de repuesto, cepillos de dientes de repuesto, hojas de sierra etc.), como
también la limpieza, mantenimiento o el recambio de piezas de desgaste no reca-
en en la garantía e irán al cargo del cliente!
En caso de intervención ajena se expira la garantía.
Después de la garantía
Después de haber expirado la garantía se pueden realizar las reparaciones por
el concesionario o por el servicio de reparaciones. Los gastos irán al cargo del
cliente.
5....-05-DB 2898 22 01.10.2004, 9:26:37 Uhr

P
23
Instruções gerais de segurança
• Antes de pôr este aparelho a funcionar, leia muito atentamente as instruções
de emprego e guarde-as muito bem, juntamente com o talão de garantia, o
talão de compra e, tanto quanto possível, a embalagem com os elementos
interiores.
• Utilize o aparelho exclusivamente para fi ns privados e para a fi nalidade para a
qual o mesmo foi concebido. Este aparelho não se destina a fi ns comerciais.
Não o utilize ao ar livre (a não ser que o mesmo possa ser usado ao ar livre
sob determinadas condições). Mantenha-o protegido do calor, de irradiação
solar directa, da humidade (não o imergir de forma alguma em quaisquer
líquidos) e de arestas aguçadas. Não utilize o aparelho com as mãos molha-
das. No caso de o aparelho fi car húmido ou molhado, retire imediatamente a
fi cha da tomada. Não tocar na água.
• Sempre que não utilizar o aparelho, ou desejar montar acessórios, ou queira
limpá-lo, ou ainda em caso de avarias, deverá desligá-lo e retirar a fi cha da
tomada (puxe pela fi cha e não pelo fi o).
• O aparelho não deverá funcionar sem vigilância. No caso de ter de se ausen-
tar do local onde o aparelho estiver a funcionar, desligue-o sempre ou retire a
fi cha da tomada (puxe pela fi cha e não pelo fi o).
• Para proteger as crianças dos perigos relacionados com aparelhos eléctricos,
nunca deixe os fi os pendurados e atente em que as crianças não possam
chegar a tais aparelhos.
• Verifi que regularmente se o aparelho ou o fi o têm alguns danos. Nunca ponha
a funcionar um aparelho com quaisquer danos.
• Não tente reparar o aparelho, dirija-se a um técnico da especialidade,
devidamente autorizado. Para evitar quaisquer perigos, é favor substituir um
fi o danifi cado por um fi o da mesma qualidade. Tal deverá ser efectuado pelo
fabricante, pelos nossos serviços de assistência ou por outra pessoa com as
mesmas qualifi cações.
• Utilize apenas acessórios de origem.
• É favor observar as seguintes „Instruções especiais de segurança...“.
Instruções de segurança especiais
• CUIDADO! A base do ferro (10) aquece muito rapidamente e leva muito
tempo a arrefecer. É favor não tocar nela.
• Quando a não utilizar coloque por favor a máquina automática de engomar
verticalmente no dispositivo de pé (9).
• Antes de se encher o depósito da água (8), retirar a fi cha da tomada. A
água que se deita no depósito não deverá ultrapassar a marcação MAX (ca.
300ml).
5....-05-DB 2898 23 01.10.2004, 9:26:37 Uhr

P
24
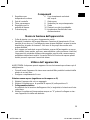
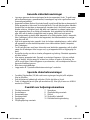
Numeração dos elementos
1 Regulador da temperatura 6 Orifício para introdução
sem escalonamento da água no depósito
2 Lâmpada de controlo 7 Pulverizador
3 Botão de super-vapor 8 Deposito transparente
4 Regulador da quantidade do vapor 9 Descanso
5 Botão pulverizador 10 Base de engomar em aço fi no
11 Metida fl exivel do cabo de rede
Primeira utilização do ferro
• A base do ferro deverá ser limpa com um pano húmido.
• Encha o tanque de água pela abertura de enchimento (6). Utilise como ajuda
um recipiente para o enchimento. Se possivel empregue só água destilada ou
água limpa da torneira até um grau de dureza de 2. No caso da água ser mais
dura utilize só água destilada.
• Não se deve encher o tanque com água de baterias, água do secador de
roupa ou água com produtos adicionais (produtos para gomar, para amaciar
a roupa, perfumes ou outros produtos quimicos). Desta forma o aparelho po-
deria se estragar uma vez que na câmara de vapor seria possivel formarem-
se residuos. Estes residuos, no caso de eles cairem pela abertura de saida de
vapor poderiam sujar a roupa a engomar.
Utilização do ferro de engomar
NOTA: Engomar apenas roupa.
• Antes de utilizar a máquina retire a folha prateada de protecção bem como
o rótulo gomado que eventualmente se encontrem na base de aço fi no da
máquina de engomar.
• Por favor desdobre o cabo completamente.
Engomar sem vapor (regulador do volume de vapor na pos. O)
1. Colocar o ferro na vertical.
2. Coloque o regulador da quantidade do vapor (4) em O.
3. Ligação à electricidade:
Verifi car se a tensão do ferro (ver a placa de características) corresponde à
tensão da corrente.
4. Coloque o regulador de temperatura sempre a ”0”, antes de ligar o aparelho à
tomada de corrente ou de o separar da rede.
5....-05-DB 2898 24 01.10.2004, 9:26:37 Uhr

P
25
5. Seleccionar as peças de vestuário de acordo com as temperaturas para
engomar. Comece com as temperaturas mais baixas. Estas serão selecciona-
das no regulador de temperaturas (1) da forma seguinte:
• Tecidos sintécticos, seda temperatura baixa
• • Lã temperatura média
• • • Algodão, linho temperatura alta
MAX temperatura máxima
6. Ligar o aparelho apenas a uma tomada de 230 V, 50 Hz, com protecção de
contacto, instalada devidamente.
7. A lâmpada de controle (2) acender-se-á. Logo que esta se apagar, terá sido
atingida a temperatura que se seleccionou. Poderá agora começar-se a
engomar.
8. Retirar a fi cha da tomada, logo que se acabe de utilizar o ferro.
Engomar a vapor (
)
Para tal, é necessária uma temperatura alta (algodões, linhos).
A quantidade do vapor será seleccionada através do regulador do vapor (4).
O falta o vapor
pequena quantidade de vapor
quantidade média de vapor
MAX grande quantidade de vapor
Para vapor extra, utilizar a função de super-vapor (3).
Atenção: o vapor é muito quente. Perigo de queimaduras!
Quando engomar a temperaturas baixas, reduza a quantidade do vapor ou en-
gome sem vapor. No caso de uma temperatura muito baixa é normal que venha
a sair água da base da máquina. Porém o aparelho está equipado com uma
”Função contra gotas” e assim a função de fazer vapor será desligada logo que a
temperatura escolhida seja demasiado baixa.
Reenchimento do tanque de água
• Retire sempre a fi cha antes de voltar a meter água.
• Por favor ponha o regulador da quantidade de vapor (4) em posição ”O”
(sem vapor). Abra a tampa do orifi cio de enchimento (6) e ponha àgua com
cuidado. Encha o tanque de água só até à marcação MAX.
Função de spray (
)
Para humedecer uma determinada parte da roupa que esteja a ser engomada,
pressionar o botão pulverizador (5).
5....-05-DB 2898 25 01.10.2004, 9:26:38 Uhr

P
26
Steam na vertical
Através desta função, o vapor extra será produzido com o ferro em posição
vertical.
Indicação: Para evitar uma saida excessiva de água da base da máquina de
engomar, não carregue no botão de choque por vapor durante mais tempo do
que 5 segundos sem parar.
Autolimpeza (Self-Clean)
1. Encher o depósito da água até ao meio.
2. Colocar a temperatura no máximo. Depois de a lâmpada de controle se
apagar, tirar a fi cha da tomada.
3. Ponha então o aparelho horizontalmente sobre um lava-louças. Conserve o
regulador de quantidade de vapor na posição ”SELF CLEAN”. Balance então
o aparelho de um lado para o outro, até o depósito fi car vazio. O regulador de
quantidade de vapor salta automáticamente para trás para a posição O.
4. Colocar o ferro na vertical e voltar a aquecê-lo. Para limpar a base, engomar
um pano de algodão limpo.
Limpeza e arrecadamento
• Antes de se limpar o ferro, retirar sempre a fi cha da tomada!.
• Limpar a parte exterior com um pano seco.
• Limpar a base com um pano húmido
• Depois de acabar de utilizar o aparelho, coloque sempre o regulador da qu-
antidade do vapor na posição „O“ e deite fora a água que ainda se encontrar
no depósito, para evitar que haja um derramamento.
Este aparelho foi controlado nos termos das actuais directivas da CEE aplicáveis,
tais como inocuidade electromagnética e directiva sobre baixa tensão, e fabrica-
do de acordo com as mais novas prescrições da segurança técnica.
Reserva-se o direito de alterações!
Garantia
O aparelho vendido pela nossa empresa tem uma garantia de 24 meses a partir
da data da compra (talão).
Durante o período de garantia, procederemos à remoção grátis - por reparação,
ou, segundo a nossa decisão, por substituição - das defi ciências do aparelho
ou dos acessórios*) que provenham de erros de material ou de fabricação. A
prestação de serviços relacionados com a garantia não prolongarão a mesma,
nem iniciarão um novo prazo de garantia!
5....-05-DB 2898 26 01.10.2004, 9:26:38 Uhr

P
27
O talão de compra consistirá prova desta garantia. Sem o mesmo, não será
possível proceder-se a qualquer troca ou reparação grátis.
Em caso de garantia, entregue o aparelho completo, juntamente com o talão de
compra, na loja onde o mesmo foi comprado.
*) No caso de danos em quaisquer acessórios, não será efectuada automática-
mente uma substituição completa do aparelho. Contacte neste caso a nossa
hotline! Danos causados por quebras de peças de vidro ou de plástico terão de
ser pagos pelo cliente!
Não estão incluídos na garantia quaisquer defeitos de acessórios ou de peças
que se desgastem (como, por exemplo, carvões do motor, varinhas, correias do
motor, telecomandos, escovas de dentes, folhas de serra, etc.), nem a limpeza, a
manutenção ou a substituição de peças que se desgastem, devendo tais despe-
sas ser reembolsadas!
A garantia terminará sempre que tenha havido intervenção alheia nos aparelhos.
Após a garantia
Após a expiração do prazo de garantia, poderão ser efectuados arranjos por pes-
soal especializado, ou pelos nossos serviços de reparações, contra reembolso.
5....-05-DB 2898 27 01.10.2004, 9:26:39 Uhr
A página está carregando...
A página está carregando...

I
30
5. Selezionate i capi di abbigliamento e la biancheria da stirare a seconda della
temperatura. Iniziate con la temperatura più bassa. Impostatela con il termo-
stato (1):
• Capi sintetici, seta temperatura bassa
• • Lana temperatura media
• • • Cotone, lino temperatura alta
MAX temperatura massima
6. Collegare l’apparecchio solo ad una presa con contatto di terra regolarmente
installata, 230 V/50 Hz.
7. La spia luminosa (2) lampeggia. Non appena si spegne, la temperatura
d’esercizio è raggiunta. Ora potete cominciare a stirare.
8. Togliete sempre la spina dopo l’uso.
Stirare con vapore (
)
Per questo è necessaria una temperatura molto elevata (cotone, lino).
Il regola-vapore (4) regola la quantità di vapore.
O Nessun vapore
Quantità di vapore minore
Quantità di vapore media
MAX Quantità di vapore maggiore
Si può avere ulteriore vapore usando la funzione getto vapore (3).
Attenzione: il vapore scotta. Pericolo di ustione!
Per stirare a basse temperature ridurre la quantità di vapore o stirare senza
vapore. Se la temperatura è troppo bassa, è normale che dalla piastra fuoriesca
acqua. Comunque l’apparecchio è dotato di una ”funzione antigoccia”, quindi se
la temperatura selezionata è troppo bassa, la funzione vapore si disattiva.
Ricaricare il serbatoio dell’acqua
• Staccare sempre la spina prima di aggiungere acqua.
• Mettere il regolatore della quantità di vapore (4) sulla posizione ”O” (no
vapore). Sollevare il coperchio dell’apertura di riempimento (6) e con cautela
versare acqua. Riempire il serbatoio solo fi no alla tacca MAX.
Funzione spray (
)
Per inumidire una zona di tessuto da stirare premere il tasto spray (5).
Vapore verticale facilita il getto in posizione verticale.
Nota: per evitare la fuoriuscita di acqua in eccesso dalla piastra, non azionare il
tasto di getto vapore oltre 5 secondi ininterrottamente.
5....-05-DB 2898 30 01.10.2004, 9:26:40 Uhr
A página está carregando...

I
32
*) Danni agli accessori non giustifi cano automaticamente lo scambio gratuito
dell’apparecchio completo. Si prega di mettersi in contatto con la nostra centrale
telefonica. Danni alle parti di vetro oppure fratture ai pezzi di materia plastica
sono obbligatoriamente a spese del cliente.
La riparazione di pezzi d’uso ovvero soggetti a logoramento (cursori, ganci im-
pastatori, cinghie di trasmissione, telecomandi di ricambio, spazzolini di ricambio,
lame di seghe ecc.) come anche operazioni di pulizia e manutenzione o la sostitu-
zione di pezzi soggetti a logoramento non rientrano nella garanzia e quindi sono
a pagamento!
La garanzia si annulla nel caso di intervento da parte di terzi.
Dopo la garanzia
Al termine della garanzia le riparazioni possono essere eseguite dietro pagamento
dal corrispettivo negozio specializzato o servizio riparazioni.
5....-05-DB 2898 32 01.10.2004, 9:26:41 Uhr
A página está carregando...
A página está carregando...
A página está carregando...
A página está carregando...
A página está carregando...

GB
38
First Use of the Machine
• Clean the ironing base with a slightly damp cloth.
• Fill the water reservoir at the refi ll opening (6), using a fi lling container. Prefe-
rably use distilled water or clear tap water (maximum water hardness level 2).
If water is harder, used distilled water only.
• Do not fi ll battery water, water from the clothes dryer and water containing
additives (such as starch, perfume, softener or other chemicals) into the water
reservoir. This could damage the iron due to residues forming in the steam
chamber. These residues may cause impurities to the fabric when dropping
out of the holes in the soleplate.
Using the Machine
NOTE: Only clothes should to be ironed with this machine.
• Remove any protective fi lms and adhesive labels from the stainless steel
soleplate before using the appliance.
• Completely unwind the line cord.
Ironing without steam (steam jet regulator on O)
1. Place the iron on its stand.
2. Turn the steam regulator (4) to O.
3. Electrical connection
Make sure that the iron voltage (see name plate) and the line voltage match.
4. Always set the temperature control to „0“ before connecting the appliance to
a power point, or before disconnecting it.
5. Sort out the garments according to their ironing temperatures. Start with the
lower temperatures. It is set with the thermostat (1):
• Synthetics, silk low temperature
• • Wool medium temperature
• • • Cotton, linen high temperature
MAX maximum temperature
6. Only connect the machine to a properly installed safety socket, 230 V/50 Hz.
7. The control lamp (2) lights up. As soon as it shuts off, the set temperature is
reached. Now you can start to iron.
8. Always pull the plug out of the socket after using the iron.
5....-05-DB 2898 38 01.10.2004, 9:26:44 Uhr

GB
39
Steam Ironing ( )
For this a high temperature is needed (cotton, linen).
The quantity of steam can be regulated using the steam quantity regulator (4).
O no steam
Small steam volume
Medium steam volume
MAX Large steam volume
Extra steam can be added with the steam jet function (3).
Caution: the steam is hot. Danger of scalding!
When ironing at low temperatures, make sure that you reduce the quantity of
steam or iron without steam. If the temperature is too low water may leak from
the soleplate. The appliance features an „anti-leakage function“ which deactiva-
tes the steam mode if the temperature chosen is insuffi cient for steam operation.
Refi lling the water tank
• Always disconnect the mains plug before refi lling water.
• Set the steam control (4) to “O” (no steam). Open the lid of the refi ll inlet (6)
and carefully pour in the water. Do not exceed the maximum line as marked
on the water reservoir.
Spray Function (
)
In order to moisten a section to be ironed press the spray button (5).
Vertical Steam
This can be used to produce a jet of steam in a vertical direction.
Note: To avoid excess water leaking from the soleplate do not operate the steam
burst for more than 5 seconds without interruption.
Self-Cleaning (Self-Clean)
1. Half fi ll the water tank with water.
2. Heat the machine up to its maximum temperature. After the control lamp goes
off remove the machine from the mains supply.
3. Now hold the iron horizontally over a sink. Hold the steam control in the
„SELF CLEAN“ position. Now rock the device backwards and forwards until
the tank is empty. The steam control automatically returns to position O.
4. Place the machine back on its stand and heat it up again. To clean the base
now iron over a clean cotton cloth.
5....-05-DB 2898 39 01.10.2004, 9:26:44 Uhr
A página está carregando...
A página está carregando...
A página está carregando...

PL
43
5. Proszę posegregować elementy odzieży według temperatury prasowania.
Proszę rozpocząć od najniższej temperatury. Można ją ustawić przy pomo-
cy regulatora temperatury (1):
• syntetyk, jedwab niska temperatura
• • wełna średnia temperatura
• • • bawełna, len wysoka temperatura
MAX najwyższa temperatura
6. Urządzenie wolno podłączyć tylko i wyłącznie do przepisowo zamontowa-
nego gniazdka wtykowego ze stykiem ochrennym z prądem 230V, 50Hz.
7. Zaświeci się lampka kontrolna (2). Gdy lampka zgaśnie oznacza to, że
wymagana temperatura została osiągnięta. Mogą Państwo rozpocząć
prasowanie.
8. Proszę zawsze po zakończeniu prasowania wyciągać wtyczkę z sieci.
Prasowanie z użyciem pary (
)
W tym celu niezbędna jest wysoka temperatura (bawełna, len).
Ilość pary można uregulować za pomocą regulatora pary (4).
O brak pary
mała ilości pary
średnia ilości pary
MAX duża ilości pary
Dodatkową porcję pary otrzymacie Państwo dzięki funkcji wyrzutu pary (3).
Uwaga: para jest gorąca. Niebezpieczeństwo poparzenia!
W przypadku prasowania przy ustawieniu niskiej temperatury proszę pamiętać
o tym, żeby zredukować ilość pary lub prasować bez pary. Przy za niskiej tem-
peraturze normalnym zjawiskiem jest wydobywanie się wody z płyty żelazka.
Jednak urządzenie wyposażone jest w funkcję “przeciwkapania”, przez co
funkcja nawilżania przy za niskiej temperaturze zostaje wyłączona.
Uzupełnianie zbiornika na wodę
• Przed uzupełnieniem wody proszę zawsze wyciągać wtyczkę z sieci.
• Regulator ilości pary (4) proszę ustawić w pozycji “0” (bez pary). Proszę
otworzyć pokrywkę otworu do nalewania (6) i ostrożnie nalać wody. Proszę
napełnić zbiornik na wodę tylko do znaku MAX.
Funkcja rozpylacza (
)
W celu zroszenia miejsca do prasowania proszę nacisnąć przycisk rozpylacza (5).
5....-05-DB 2898 43 01.10.2004, 9:26:46 Uhr
A página está carregando...
A página está carregando...
A página está carregando...
A página está carregando...
A página está carregando...
A página está carregando...
A página está carregando...
A página está carregando...
A página está carregando...
A página está carregando...
A página está carregando...
A página está carregando...
A página está carregando...
A página está carregando...
A página está carregando...
A página está carregando...
A página está carregando...
A página está carregando...
A página está carregando...
-
 1
1
-
 2
2
-
 3
3
-
 4
4
-
 5
5
-
 6
6
-
 7
7
-
 8
8
-
 9
9
-
 10
10
-
 11
11
-
 12
12
-
 13
13
-
 14
14
-
 15
15
-
 16
16
-
 17
17
-
 18
18
-
 19
19
-
 20
20
-
 21
21
-
 22
22
-
 23
23
-
 24
24
-
 25
25
-
 26
26
-
 27
27
-
 28
28
-
 29
29
-
 30
30
-
 31
31
-
 32
32
-
 33
33
-
 34
34
-
 35
35
-
 36
36
-
 37
37
-
 38
38
-
 39
39
-
 40
40
-
 41
41
-
 42
42
-
 43
43
-
 44
44
-
 45
45
-
 46
46
-
 47
47
-
 48
48
-
 49
49
-
 50
50
-
 51
51
-
 52
52
-
 53
53
-
 54
54
-
 55
55
-
 56
56
-
 57
57
-
 58
58
-
 59
59
-
 60
60
-
 61
61
-
 62
62


BOMANN cb750 Manual do proprietário
- Categoria
- Umidificadores
- Tipo
- Manual do proprietário
- Este manual também é adequado para
em outras línguas
- español: BOMANN cb750 El manual del propietario
- français: BOMANN cb750 Le manuel du propriétaire
- italiano: BOMANN cb750 Manuale del proprietario
- English: BOMANN cb750 Owner's manual
- русский: BOMANN cb750 Инструкция по применению
- Nederlands: BOMANN cb750 de handleiding
- Deutsch: BOMANN cb750 Bedienungsanleitung
- čeština: BOMANN cb750 Návod k obsluze
- polski: BOMANN cb750 Instrukcja obsługi
Outros documentos
-
Clatronic db 2897 Manual do proprietário
-
-
-
-
-
-
-
-
-
 EUROPASTYLE DB 2546 Manual do proprietário
