
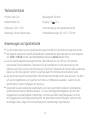
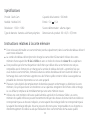
70mai Dash Cam Lite 2 User Manual

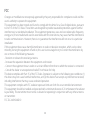
Contents
English ....................................................................................................................................................1
Español ................................................................................................................................................ 10
Deutsch ............................................................................................................................................... 18
Français ............................................................................................................................................... 26
Русский ............................................................................................................................................... 34
Português ........................................................................................................................................... 43
Polski .................................................................................................................................................... 51
Čeština ................................................................................................................................................. 59
Română ............................................................................................................................................... 67
.................................................................................................................................................. 75
ภาษาไทย ................................................................................................................................................ 89

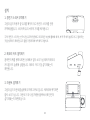
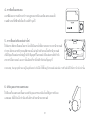
01
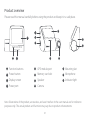
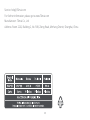
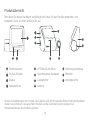
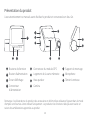
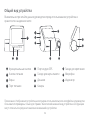
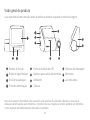
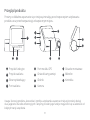
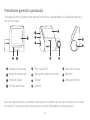
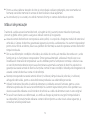
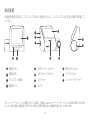
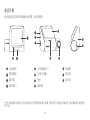
Product overview
Note: Illustrations of the product, accessories, and user interface in the user manual are for reference
purposes only. The actual product and functions may vary due to product enhancements.
Please read this manual carefully before using the product and keep it in a safe place.
1
2
3
4
5
6
8
7
9
10
11
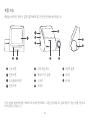
Function buttons
Power button
Display screen
Power port
GPS module port
Memory card slot
Speaker
Camera
12
3
4
6
5
7
9
8
10
11
Mounting slot
Microphone
Indicator light

02
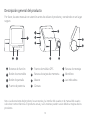
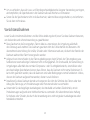
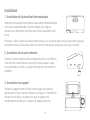
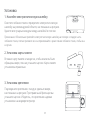
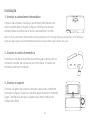
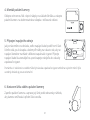
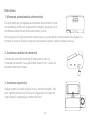
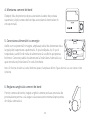
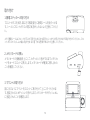
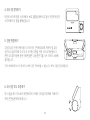
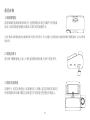
Installation
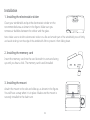
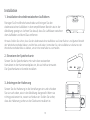
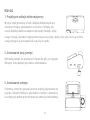
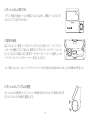
1. Installing the electrostatic sticker
Clean your windshield and put the electrostatic sticker on the
recommended area as shown in the figure. Make sure you
remove air bubbles between the sticker and the glass.
2. Installing the memory card
Insert the memory card into the card slot with its contacts facing
up until you hear a click. The memory card is well-installed.
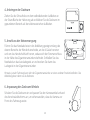
3. Installing the mount
Attach the mount to the slot and slide up, as shown in the figure.
You will hear a snap when it is in place. Make sure the mount is
securely installed to the dash cam.
0LFUR6'
Note: Make sure to stick the electrostatic sticker on a flat and smooth part of the windshield, press it firmly,
and avoid sticking it on the edge of the windshield's film to prevent it from falling down.

03
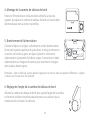
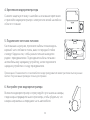
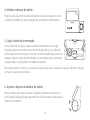
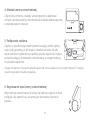
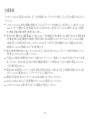
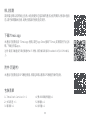
4. Mounting the dash cam
Peel off the protective film from the adhesive sticker on the base of
the mount, and paste the dash cam onto the electrostatic sticker in
the dotted area.
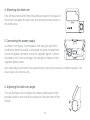
5. Connecting the power supply
As shown in the figure, run the power cord along the top of the
windshield, down the A-pillar, and around the glove compartment,
so that the power connector is near the cigarette lighter. Connect
the power cord to the car charger, then plug the charger into the
cigarette lighter socket.
6. Adjusting the dash cam angle
Turn on the dash cam and adjust the camera angle based on the
preview screen to ensure that the camera is facing the front of the
vehicle.
Note: Depending on the vehicle, the cigarette lighter socket may be located in a different position. The
above figure is for reference only.

04
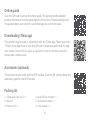
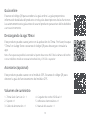
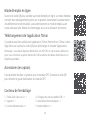
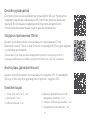
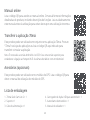
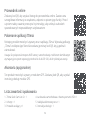
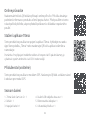
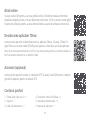
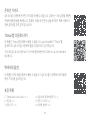
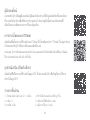
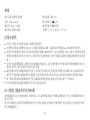
Downloading 70mai app
This product may be used in conjunction with the 70mai app. Please search for
"70mai" in the App Store or scan the QR code to download and install the app.
Note: Android 4.4 & iOS 9.0 or above is required to connect to the dash cam’s Wi-Fi
hotspot with a mobile phone.
Accessories (optional)
This product may be used with the GPS module. Scan the QR code to obtain the
operation guide for the GPS module.
Online guide
Scan the QR code to access the online guide. The guide provides detailed
product information including descriptions of functions. Please carefully read
this guide before use in order to avoid damage due to incorrect use.
Packing list
1. 70mai Dash Cam Lite 2 × 1
2. Mount × 1
3. Power cord × 1
4. Dual USB car charger × 1
5. Electrostatic sticker × 1
6. User manual × 1

05
Memory card instructions
●A memory card (sold separately) must be installed in the dash cam before use.
●The dash cam supports standard MicroSD cards. Please use memory cards with the capacity of 16 GB ~
128 GB and a speed rating of Class 10 or higher.
●The default file partition format of the memory card may be inconsistent with the format supported
by the dash cam. When inserting the memory card for the first time, please format it in the dash cam
before use. Formatting the memory card will delete all files on the card. Please back up important data
to another device beforehand.
●The memory card may become damaged or deteriorate after repeated cycles of overwriting, and this
may affect its ability to save video and image files. If this occurs, immediately replace it with a new
memory card.
●Please use a high-quality memory card purchased from a reputable vendor. Inferior memory cards may
have issues such as actual reading/writing speeds that do not match the stated speeds, and an actual
storage capacity that does not match the stated storage capacity. We shall not be held liable for lost or
damaged videos caused by the use of a low-quality memory card.
●In order to avoid reading and writing speeds decreasing after prolonged use, it is recommended to
format the memory card in the dash cam every two weeks.
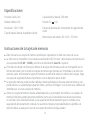
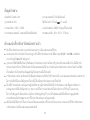
Product: Dash Cam
Model: Midrive D10
Resolution: 1920 × 1080
Battery type: Lithium polymer battery
Specifications
Battery capacity: 500 mAh
Input: 5V 1.5A
Power supply: Car cigarette lighter
Item dimensions: 83 × 60.5 × 37.9 mm

06
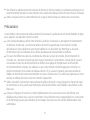
●Do not insert or remove a memory card while the dash cam is turned on.
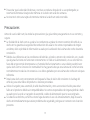
Precautions
Before using this dash cam, please read all the precautions and the online guide to ensure correct and
safe use.
●This dash cam is intended to assist drivers with the purpose of recording the environment outside the
vehicle. The dash cam does not guarantee the user's driving safety. We shall not be held liable for any
accident, damage, or loss of information caused by operating the dash cam while driving.
●Due to differences in vehicle conditions, driving style, driving environment, etc., some functions may
not work properly. A power failure, usage in environments outside the normal operating temperature
or humidity range, a collision, or a damaged memory card may cause the dash cam to function
abnormally. There is no guarantee that this dash cam will function normally under all circumstances.
Videos recorded by this dash cam are for reference only.
●Please install this dash cam correctly, and do not block the driver's line of sight, nor block the vehicle's
airbag, in order to avoid product failure or personal injury.
●Please use the included car charger, power cord, and other accessories in order to avoid product failure
due to non-conformance. We shall not be held liable for any loss or damage caused by the use of a
non-genuine car charger or power cord.
●If the battery becomes deformed, swollen, or starts leaking during use or storage, stop using the dash
cam immediately in order to avoid safety issues, and contact after-sales service.
●Please keep this dash cam away from any strong magnetic fields, as they may cause damage to the
dash cam.
●Do not use this dash cam in environments with temperatures over 60°C or below -10°C.
●Please only use this dash cam within the scope permitted by law.

07
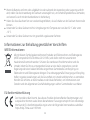
WEEE information
EU declaration of conformity
All products bearing this symbol are waste electrical and electronic equipment (WEEE
as in directive 2012/19/EU) which should not be mixed with unsorted household waste.
Instead, you should protect human health and the environment by handing over your waste
equipment to a designated collection point for the recycling of waste electrical and electronic
equipment, appointed by the government or local authorities. Correct disposal and recycling
will help prevent potential negative consequences to the environment and human health.
Please contact the installer or local authorities for more information about the location as well
as terms and conditions of such collection points.
The manufacturer hereby, declares that this equipment is in compliance with the applicable
Directives and European Norms, and amendments. The full text of the EU declaration of
conformity is available at the following internet address: https://help.70mai.asia/1193.html
Regulatory compliance information
Caution
●Disposal of a battery into fire or a hot oven, or mechanically crushing or cutting of a battery, that can
result in an explosion.
●Leaving a battery in an extremely high temperature surrounding environment that can result in an
explosion or the leakage of flammable liquid or gas.
●A battery subjected to extremely low air pressure that may result in an explosion or the leakage of
flammable liquid or gas.
●This device is equipped with a built-in battery that cannot be removed or replaced. Do not disassemble
or modify the battery by yourself.
●Replacement of a battery with an incorrect type can defeat a safeguard (for example, in the case of
some lithium battery types).

08
FCC
Changes or modifications not expressly approved by the party responsible for compliance could void the
user's authority to operate the equipment.
This equipment has been tested and found to comply with the limits for a Class B digital device, pursuant
to Part 15 of the FCC Rules. These limits are designed to provide reasonable protection against harmful
interference in a residential installation. This equipment generates, uses and can radiate radio frequency
energy and, if not installed and used in accordance with the instructions, may cause harmful interference
to radio communications. However, there is no guarantee that interference will not occur in a particular
installation.
If this equipment does cause harmful interference to radio or television reception, which can be deter-
mined by turning the equipment off and on, the user is encouraged to try to correct the interference by
one or more of the following measures:
- Reorient or relocate the receiving antenna.
- Increase the separation between the equipment and receiver.
- Connect the equipment into an outlet on a circuit different from that to which the receiver is connected.
- Consult the dealer or an experienced radio/TV technician for help.
This device complies with Part 15 of the FCC Rules. Operation is subject to the following two conditions: (1)
this device may not cause harmful interference, and (2) this device must accept any interference received,
including interference that may cause undesired operation.
This equipment complies with FCC radiation exposure limits set forth for an uncontrolled environment.
This equipment should be installed and operated with a minimum distance of 20 cm between the radiator
& your body. This transmitter must not be co-located or operating in conjunction with any other antenna
or transmitter.
FCC ID: 2AOK9-MiD10

09
Service: [email protected]
For further information, please go to www.70mai.com
Manufacturer: 70mai Co., Ltd.
Address: Room 2220, Building 2, No. 588, Zixing Road, Minhang District, Shanghai, China

10
Descripción general del producto
Nota: Las ilustraciones del producto, los accesorios y la interfaz del usuario en el manual del usuario
solo sirven como referencia. El producto actual y sus funciones pueden variar debido a mejoras de los
productos.
Por favor, lea este manual con atención antes de utilizar el producto y consérvelo en un lugar
seguro.
1
2
3
4
5
6
8
7
9
10
11
Botones de función
Botón de encendido
Botón de pantalla
Puerto de potencia
Puerto de módulo GPS
Ranura de tarjeta de memoria
Altavoz
Cámara
12
3
4
6
5
7
9
8
10
11
Ranura de montaje
Micrófono
Luz indicadora

11
Instalación
1. Colocar el adhesivo electrostático
Limpie el parabrisas y coloque el adhesivo electrostático en
la zona recomendada tal y como se muestra en la imagen .
Asegúrese de eliminar las burbujas de aire que hay entre el
adhesivo y el cristal.
2. Instale la tarjeta de memoria
Inserte la tarjeta de memoria en la ranura para la tarjeta con los
contactos hacia arriba hasta que escuche un clic. La tarjeta de
memoria está colocada correctamente.
3. Colocación del soporte
Coloque el soporte en la ranura y deslícelo hacia arriba tal y
como se muestra en la ilustración. Escuchará un chasquido
cuando esté bien colocado. Asegúrese de que el soporte está
colocado de forma segura en la dash cam.
0LFUR6'
Nota: Asegúrese de colocar la pegatina electrostática en una parte llana y lisa del parabrisas, presiónela
con firmeza y evite pegarla en el extremo del film del parabrisas para evitar que se caiga.

12
4. Montaje de la dash cam
Despegue la película protectora del adhesivo en la base del soporte
y pegue la dash cam en la pegatina electrostática de la zona con
puntos.
5. Conectar la fuente de alimentación
Como se muestra en la figura, pase el cable de alimentación a lo
largo de la parte superior del parabrisas, por debajo del pilar A y
alrededor de la guantera, de modo que el conector de alimentación
esté cerca del encendedor de cigarrillos del coche. Conecte el cable
de alimentación al cargador para coche y, a continuación, enchufe el
cargador a la toma del encendedor de cigarrillos.
6. Ajustar el ángulo de la cámara de coche
Encienda la dash cam y ajuste el ángulo de la cámara basándose en la
pantalla de vista previa para asegurarse de que la cámara está situada
hacia la parte delantera del vehículo.
Nota: Dependiendo del vehículo, la toma del encendedor de cigarrillos del coche puede estar situada en
una posición diferente. La imagen superior solo sirve como referencia.

13
Descargando la app 70mai
Este producto puede usarse junto con la aplicación de 70mai. Por favor, busque
“70mai” en la App Store o escanee el código QR para descargar e instalar la
app.
Nota: Para que sea posible la conexión al punto de acceso Wi-Fi de la cámara del coche
con un teléfono móvil es necesario Android 4.4 y iOS 9.0 o superior.
Accesorios (opcional)
Este producto puede usarse con el módulo GPS. Escanee el código QR para
obtener la guía de funcionamiento del módulo GPS.
Guía online
Escanee el código QR para acceder a la guía online. La guía proporciona
información detallada del producto e incluye las descripciones de las funciones.
Lea atentamente esta guía antes de usar el producto para evitar daños debidos
a un uso incorrecto.
Volumen de suministro
1. 70mai Dash Cam Lite 2 × 1
2. Soporte × 1
3. Cable de alimentación × 1
4. Cargador de coche USB Dual × 1
5. Adhesivos electrostáticos × 1
6. Manual del usuario × 1

14
Instrucciones de la tarjeta de memoria
●Debe colocarse una tarjeta de memoria (vendida por separado) en la dash cam antes de su uso.
●La dash cam es compatible con las tarjetas estándar MicroSD. Por favor, utilice tarjetas de memoria con
una capacidad de 16 GB ~ 128 GB y un índice de velocidad de clase 10 o superior.
●El formato de división de fichero por defecto de la tarjeta de memoria puede ser incompatible con el
formato de la dash cam. Al insertar la tarjeta de memoria por primera vez, formatéela en la dash cam
antes de usarla. Al formatear la tarjeta de memoria se eliminarán todos los archivos de la tarjeta. Haga
una copia de seguridad de datos importantes en otro dispositivo antes de ello.
●La tarjeta de memoria puede resultar dañada o deteriorada después de varias sobreescrituras y esto
puede afectar a su capacidad para guardar vídeos y archivos de imagen. Si se da este caso, cámbiela de
inmediato por una nueva tarjeta de memoria.
●Utilice una tarjeta de memoria de alta calidad adquirida a un proveedor de confianza. Las tarjetas de
memoria inferiores pueden presentar problemas como que la velocidad actual de lectura/escritura
no coincida con la velocidad indicada y una capacidad de almacenamiento que no coincida con la
capacidad de almacenamiento indicada. No asumimos ninguna responsabilidad por la pérdida o el
daño de vídeos causada por el uso de una tarjeta de memoria de baja calidad.
Producto: Dash Cam
Modelo: Midrive D10
Resolución: 1920 × 1080
Tipo de batería: Batería de polímero de litio
Especificaciones
Capacidad de la batería: 500 mAh
Entrada: 5V 1,5A
Fuente de alimentación: Encendedor de cigarrillos del
coche
Dimensiones del artículo: 83 × 60,5 × 37,9 mm

15
●Para evitar que la velocidad de lectura y escritura se reduzca después de su uso prolongado, se
recomienda formatear la tarjeta de memoria en la dash cam cada dos semanas.
●No inserte ni retire una tarjeta de memoria mientras la dash cam esté encendida.
Precauciones
Antes de usar la dash cam, lea todas las precauciones y la guía online para garantizar un uso correcto y
seguro.
●La finalidad de la dash cam es ayudar a los conductores a grabar el entorno exterior del vehículo. La
dash cam no garantiza la seguridad de conducción del usuario. No somos responsables de ningún
accidente, daño o pérdida de información causada por la utilización de la cámara de coche durante la
conducción.
●Debido a las diferencias en las condiciones del vehículo, el estilo o entorno de conducción, etc., puede
que algunas funciones no funcionen correctamente. Un fallo en la alimentación, un uso en entornos
fuera del rango normal de temperatura o humedad de funcionamiento o una colisión pueden hacer
que la dash cam no funcione con normalidad. No hay garantía de que esta cámara de coche funcione
normalmente en todas las circunstancias. Los vídeos grabados por esta cámara de coche son solo para
referencia.
●Instale esta dash cam correctamente sin bloquear la línea de visión del conductor ni el airbag del
vehículo, para evitar fallos del producto o lesiones personales.
●Utilice el cargador para automóvil, el cable de alimentación y otros accesorios incluidos para evitar
fallos en el producto debido a incompatibilidades. No somos responsables de ninguna pérdida o daño
causado por el uso de un cargador de automóvil o cable de alimentación que no sean originales.
●Si la batería se deforma, se hincha o tiene fugas durante el uso o el almacenamiento, deje de usar la
dash cam inmediatamente para evitar problemas de seguridad y póngase en contacto con el servicio
posventa.

16
Información sobre RAEE
Declaración de conformidad de la UE
Todos los productos que llevan este símbolo son residuos de aparatos eléctricos y
electrónicos (RAEE según la directiva 2012/19/UE) que no deben mezclarse con residuos
domésticos sin clasificar. En su lugar, debe proteger la salud humana y el medio ambiente
entregando sus equipos de desecho a un punto de recogida para el reciclaje de residuos
de equipos eléctricos y electrónicos, designado por el gobierno o las autoridades locales.
La eliminación y el reciclado correctos ayudarán a evitar posibles consecuencias negativas
para el medio ambiente y la salud humana. Póngase en contacto con el instalador o con las
autoridades locales para obtener más información sobre la ubicación y las condiciones de
dichos puntos de recogida.
El fabricante, por la presente, declara que el equipo cumple con las Directivas y Normas
Europeas aplicables y las enmiendas. Encontrará el texto completo de la declaración de
conformidad de la UE en esta dirección de Internet: https://help.70mai.asia/1193.html
Información sobre el cumplimiento de la normativa
¡Precaución!
●Tirar la batería al fuego o a un horno caliente, así como aplastarla o cortarla mecánicamente, puede
provocar una explosión.
●Mantenga esta cámara de coche alejada de cualquier campo magnético potente, ya que pueden dañar
la cámara.
●No use esta dash cam en entornos con temperaturas superiores a los 60°C o inferiores a los -10°C.
●Utilice esta dash cam exclusivamente dentro del ámbito permitido por la ley.

17
Asistencia: [email protected]
Para obtener más información, visite www.70mai.com
Fabricante: 70mai Co., Ltd.
Dirección: Sala 2220, Edificio 2, Nr. 588, Zixing Road, Distrito Minhang, Shanghai, China
●Dejar la batería en un entorno de temperaturas extremadamente altas puede generar una explosión o
la fuga de líquidos o gases inflamables.
●Una batería sometida a presiones de aire extremadamente bajas puede generar una explosión o la
fuga líquidos o gases inflamables.
●Este dispositivo cuenta con una batería integrada que no se puede extraer ni reemplazar. No desmonte
ni modifique la batería por su cuenta.
●La sustitución de una pila por otra de un tipo incorrecto puede anular una medida de seguridad (por
ejemplo, en el caso de algunos tipos de pilas de litio).

18
Produktübersicht
Hinweis: Die Abbildungen des Produkts, des Zubehörs und der Benutzeroberfläche im Benutzerhandbuch
dienen nur als Referenz. Das tatsächliche Produkt und die Funktionen können aufgrund von
Weiterentwicklungen des Produkts variieren.
Bitte lesen Sie dieses Handbuch sorgfältig durch, bevor Sie das Produkt verwenden, und
bewahren Sie es an einem sicheren Ort auf.
1
2
3
4
5
6
8
7
9
10
11
Funktionstasten
Ein/Aus-Schalter
Display
Netzanschluss
GPS-Modul-Anschluss
Speicherkarten-Steckplatz
Lautsprecher
Kamera
12
3
4
6
5
7
9
8
10
11
Halterungsvertiefung
Mikrofon
Anzeigeleuchte
A página está carregando...
A página está carregando...
A página está carregando...
A página está carregando...
A página está carregando...
A página está carregando...
A página está carregando...
A página está carregando...
A página está carregando...
A página está carregando...
A página está carregando...
A página está carregando...
A página está carregando...
A página está carregando...
A página está carregando...
A página está carregando...
A página está carregando...
A página está carregando...
A página está carregando...
A página está carregando...
A página está carregando...
A página está carregando...
A página está carregando...
A página está carregando...
A página está carregando...
A página está carregando...
A página está carregando...
A página está carregando...
A página está carregando...
A página está carregando...
A página está carregando...
A página está carregando...
A página está carregando...
A página está carregando...
A página está carregando...
A página está carregando...
A página está carregando...
A página está carregando...
A página está carregando...
A página está carregando...
A página está carregando...
A página está carregando...
A página está carregando...
A página está carregando...
A página está carregando...
A página está carregando...
A página está carregando...
A página está carregando...
A página está carregando...
A página está carregando...
A página está carregando...
A página está carregando...
A página está carregando...
A página está carregando...
A página está carregando...
A página está carregando...
A página está carregando...
A página está carregando...
A página está carregando...
A página está carregando...
A página está carregando...
A página está carregando...
A página está carregando...
A página está carregando...
A página está carregando...
A página está carregando...
A página está carregando...
A página está carregando...
A página está carregando...
A página está carregando...
A página está carregando...
A página está carregando...
A página está carregando...
A página está carregando...
A página está carregando...
A página está carregando...
A página está carregando...
A página está carregando...
A página está carregando...
A página está carregando...
A página está carregando...
A página está carregando...
A página está carregando...
A página está carregando...
A página está carregando...
A página está carregando...
-
 1
1
-
 2
2
-
 3
3
-
 4
4
-
 5
5
-
 6
6
-
 7
7
-
 8
8
-
 9
9
-
 10
10
-
 11
11
-
 12
12
-
 13
13
-
 14
14
-
 15
15
-
 16
16
-
 17
17
-
 18
18
-
 19
19
-
 20
20
-
 21
21
-
 22
22
-
 23
23
-
 24
24
-
 25
25
-
 26
26
-
 27
27
-
 28
28
-
 29
29
-
 30
30
-
 31
31
-
 32
32
-
 33
33
-
 34
34
-
 35
35
-
 36
36
-
 37
37
-
 38
38
-
 39
39
-
 40
40
-
 41
41
-
 42
42
-
 43
43
-
 44
44
-
 45
45
-
 46
46
-
 47
47
-
 48
48
-
 49
49
-
 50
50
-
 51
51
-
 52
52
-
 53
53
-
 54
54
-
 55
55
-
 56
56
-
 57
57
-
 58
58
-
 59
59
-
 60
60
-
 61
61
-
 62
62
-
 63
63
-
 64
64
-
 65
65
-
 66
66
-
 67
67
-
 68
68
-
 69
69
-
 70
70
-
 71
71
-
 72
72
-
 73
73
-
 74
74
-
 75
75
-
 76
76
-
 77
77
-
 78
78
-
 79
79
-
 80
80
-
 81
81
-
 82
82
-
 83
83
-
 84
84
-
 85
85
-
 86
86
-
 87
87
-
 88
88
-
 89
89
-
 90
90
-
 91
91
-
 92
92
-
 93
93
-
 94
94
-
 95
95
-
 96
96
-
 97
97
-
 98
98
-
 99
99
-
 100
100
-
 101
101
-
 102
102
-
 103
103
-
 104
104
-
 105
105
-
 106
106


