Model: JE-300B
Contact us:
1-888-502-2236(US)
USER MANUAL
Jackery Explorer 300 Plus
Version: JAK-UM-V1.0

CONTENTS
US English 01-10
FR Français 11-20
31-40
ES Español 21-30
Português (Brasil)
PT-BR

Congratulations on your new Jackery Explorer 300 Plus. Please read this manual carefully before using
the product, particularly the relevant precautions to ensure proper use. Keep this manual in an
accessible place for frequent reference.
In compliance with laws and regulations, the right of final interpretation of this document and all related
documents of this product resides with the Company.
Please kindly notice that no further notifications will be given in case of any update, revision or
termination.
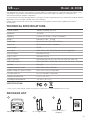
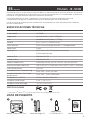
TECHNICAL SPECIFICATIONS
01
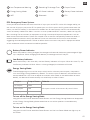
CERTIFICATIONS
Product Name
Model No.
Capacity
Weight
Dimensions
Cycle Life
Total Output
AC Output
USB-A Output
USB-C (OUT)
USB-C (IN/OUT)
USB Total Output
Car Port
Charge mode AC Input
Bypass mode AC Input/Output
DC Input(USB-C)
Charge Temperature
Discharge Temperature
Jackery Explorer 300 Plus
JE-300B
Lithium-ion 22.5Ah / 12.8V DC(288Wh)
Around 8.27 Ibs / 3.75 kg
9.1 x 6.1 x 6.6 in / 23 x 15.5 x 16.7 cm
3000 cycles to 80%+ capacity
300W
120V~60Hz, 2.5A, 300W Rated, 600W Surge peak
15W Max 5V⎓3A
15W Max 5V⎓3A
100W Max 5V⎓3A, 9V⎓3A, 12V⎓3A, 15V⎓3A, 20V⎓5A
USB-C(IN/OUT) : 100W Max, USB-C(OUT)+USB-A : 24W Max
12V⎓10A
100V-120V~60Hz, 10A Max
100V-120V~60Hz, 300W Max
12-27V⎓5A Max, 100W Max
0~45°C (32~113℉)
-10~45°C (14~113℉)
US Model: JE-300B
English
USB Type-C and USB-C are registered trademarks of USB Implementers Forum.
® ®
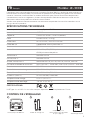
PACKAGE LIST
3
AC Charge Cable
2 4
1
Jackery Explorer 300 Plus DC7909 to USB-C
Adaptor
5
User Manual
Model: JE-300B
Contact us:
1-888-502-2236(US)
USER MANUAL
Jackery Explorer 300 Plus
5
Version: JAK-UM-V1.0

5
02
8
79
5
4
12
6
3
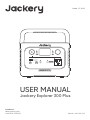
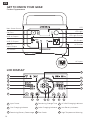
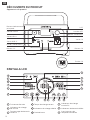
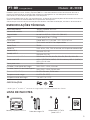
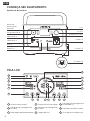
GET TO KNOW YOUR GEAR
Product Appearance
LED Light
LCD
LED Light Button
AC Button
AC Output
AC Input
AC 100V-120V 10A Max
USB-C
Input/Output
USB-C Output
USB-A Output
DC Button
Car Port
12
14
13
15
16
17
18
11
10
9
8
7
6
5
4
1
2
3
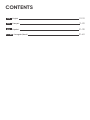
LCD DISPLAY
Input Power Remaining Charge Time
Solar Charging Indicator
AC Wall Charging Indicator
Car Charging Indicator Low Battery Indicator
Remaining Battery Percentage Error Code High Temperature Warning
US
Main Power Button

03
1513
1110
EPS18
12
WIFI
16 Bluetooth
17
14
Low Temperature Warning Remaining Discharge Time Output Power
AC Power Indicator Battery Power Indicator
US
Battery Power Indicator
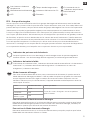
When the product is being charged, the orange circle around the battery percentage will light
up in sequence. When charging other devices, the orange circle will stay on.
Low Battery Indicator
When the battery is less than 20%, the Low Battery Indicator will stay on. When less than 5%, the
Low Battery Indicator will flash. When it is being charged, the Indicator will be o.
EPS: Emergency Power System.
Once you have connected the mains and the AC input port of the EPS via the AC charger cable, you
can use the AC output port of the EPS to power your unit (at this point the AC power comes from the
mains, not the EPS battery). In the event of a sudden loss of mains power, the EPS can automatically
switch to battery mode within 20ms. Since this is a non-professional UPS function, it does not support
0ms switching. Do not connect to equipment with high uninterruptible power requirements such as
data servers and workstations. Please test several times to confirm compatibility before use and it is
recommended to connect to only one device. Do not use more than one unit at a time to avoid
triggering the overload protection. Failure to follow these instructions may result in equipment failure
or loss of data for which we cannot be held responsible.
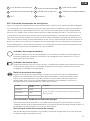
Output Output Power Defaults
AC Output
All outputs turned o automatically after 12 hours
≤25W
≤2W
≤2W
USB Output
Car Output
Energy Saving Mode
To avoid forgetting to turn o the output which results in battery consumption, the product
turns the Energy Saving Mode on by default. This occurs when no device is connected or the
connected device is less than or equal to a certain value. (Refer to the table below for more
details), the device will automatically turn o all outputs after 12 hours.
To turn o the Energy Saving Mode
Long press the AC Button and Main Power Button until the Energy Saving Mode icon disappears.
In Non-Energy Saving Mode, please remember to turn o the products to avoid battery
consumption.
To turn on the Energy Saving Mode
Long press the AC Button and Main Power Button until the Low Power Mode icon lights up on
the screen.
Energy Saving Mode

04
High-temperature warning
If it appears on the screen, do not worry, the battery will restore automatically after cooling.
Low-temperature Warning
If it is displayed on the screen, do not worry. It will automatically restore after the ambient
temperature is restored.
US
BASIC OPERATIONS
LCD Screen On/O
Output On/O
Main power on/off: Press the "Main Power Button" and the working indicator lights up and the LCD
display is illuminated. When this product does not have any operation for 2 minutes, the product will
enter the hibernation state and the display will turn off automatically. If you need to turn off the main
power, please press and hold the "Main Power Button" until the working indicator turns off. The default
standby time of this product is 2 hours. If the other power output switch is not turned on, or the product
does not have any charging input, the product will automatically shut down after 2 hours. The
automatic shutdown time can be set on the Jackery App.
AC Output On/Off: Ensure that the main power supply is turned on. Press the AC Button, the AC
Output operation indicator lights up. Then you can connect the equipment that needs AC charging.
Press the AC Button again to turn off the AC Output.
USB/Car Port Output On/Off: Ensure that the main power supply is turned on. Press the DC Button, the
DC Output operation indicator lights up. Then USB/Car Port Output Ports can be connected to
external load devices. Press the DC Button again to turn off the USB/ Car Port Output.
Fault code
In order to respond to the feedback quickly, we set up common fault codes F0-FE in the
system: If the F8 code appears, please remove the load or unplug the charging plug, the
product can restore by itself, if not, please contact after-sales service; If the F9 code appears,
please remove the load and the product can recover by itself, if not, please contact
after-sales service. In case of any other code appears, please contact our after-sales service.
To turn on, press the Main Power Button or when there’s a charging input, the screen display will
light up automatically. To turn off, press the Main Power Button again and the screen display will
turn off. Or, if there is no operation in 2 minutes, the product will enter a sleep state and the screen
display will automatically turn off.
To get the screen always-on (under charging or discharging state), follow these steps: After the
display screen lights up, double-click the Main Power Button and the mode of Always-On Display will
be on.
To turn off Always-On Display, follow these steps: Press the Main Power Button and the screen will
be turned off in 2 minutes.
Tip: During Always-On mode, the screen automatically turns off after 2 hours without charging or
discharging.
AC Input Reset Button: When the Reset Button pops up, you need to remove AC charge cable and
press the Reset Button to reset.

05
US
The operations are as follows: Press the LED Light Button, the LED will be turned on. The light will always
turn on in Low Light mode and the output power on the screen is 1W. Press again to enter the SOS
mode and the output power on the screen is 1W. Then, press again to turn o the LED Light. In any of
these modes, the light can be turned o by a long press.
LED Light On/O
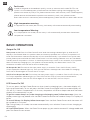
CHARGING YOUR JACKERY EXPLORER 300 PLUS
Green energy first: We advocate to use the green energy first. This product supports two modes of
charging at the same time: solar charging and AC wall charging.
When AC wall charging and solar charging are turned on at the same time, the product will give priority
to solar charging and both methods will be used to charge the battery at the maximum permissible
power.
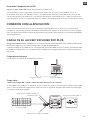
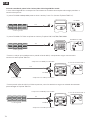
Charging from the wall
Please use the AC cable included in the package.
Explorer 300 Plus
AC Charger
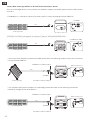
Solar energy charging
Jackery SolarSaga 100 or 60 Solar Panel Connection Guide
The Solar Generator 300 Plus is different from other Jackery Solar Genrator. For the first time, it adopts
USB-C input as the solar charging input. You can refer to the following connection scheme to charge
your Explorer 300 Plus.
There are three modes of LED Light: Light mode, and SOS mode.
This product supports the connection of Jackery App for intelligent control and operation. Users can
download the Jackery App through App Store or Google Play. Please refer to the User Manual for
Jackery App for detailed connection instructions.
APP CONNECTION
5
USB-C input port
Explorer 300 Plus
DC7909 male
DC7909 to DC8020 Adaptor
DC7909 to USB-C Adaptor
SolarSaga 100

06
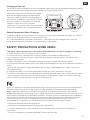
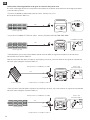
Jackery New SolarSaga 40 Mini or 80 Solar Panel Connection Guide
The new SolarSaga 40 Mini is compatible with different models of portable power stations and contains
two ports:
* DC8020 port is suitable for Jackery Pro series and Plus series (excluding Explorer 300 Plus ).
*DC8020-DC7909 port applies to Jackery Explorer 160/240/300/500/1000.
3m
DC8020
3m
DC8020-DC7909
US
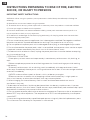
* Users who have already purchased the 80W solar panel, the following scheme shows how to connect
it to the Explorer 300 Plus.
* For the 40W solar panel included in the package, please also refer to the following connection
method to charge the Explorer 300 Plus
Explorer 300 Plus
SolarSaga 80
USB-C input port
DC8020 to DC7909 Adaptor
DC7909 to USB-C Adaptor
DC8020
3m
5
Explorer 300 Plus
SolarSaga 40
USB-C input port
DC8020 to DC7909 Adaptor
DC7909 to USB-C Adaptor
DC8020
3m
5
SolarSaga 40
SolarSaga 40

07
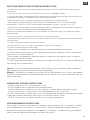
Explorer 300 Plus
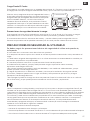
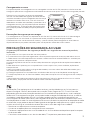
Charging in the Car
This product can be charged with a 12V car charger. Please start the vehicle before charging to prevent
draining the car battery and prevent your vehicle from being unable to start.
5
1 3 5
24 6
R
A/C
AUTO
Vehicle
1) Vehicle charging is only applicable in 12V vehicles, not in 24V ones. Please do not charge this product
in 24V vehicle to avoid personal injury and property loss.
2) It is recommended to use Jackery accessories - solar panels for solar charging. We will not be
responsible for the losses caused by using other brands’ solar panels.
Safety Precautions When Charging
SAFETY PRECAUTIONS WHEN USING
The basic safety precautions should be followed when using this product, including:
a. Please read all instructions before using this product.
b. Close supervision is required when using this product near children to reduce the risk.
c. Risk of electric shock may occur if using accessories recommended or sold by non-professional
product manufacturers.
d. When the product is not in use, please unplug the power plug from the product's socket.
e. Do not dismantle the product, which may lead to unpredictable risks such as fire, explosion or electric
shock.
f. Do not use the product through damaged cords or plugs, or damaged output cables, which may
cause electric shock.
g. Charge the product in a well ventilated area and do not restrict ventilation in any way.
h. Please put the product in a ventilated and dry place to avoid rain and water to cause electric shock.
i. Do not expose the product to fire or high temperature (under direct sunlight or in vehicle under high
heat), which may cause accidents such as fire and explosion.
NOTE: This equipment has been tested and found to comply with the limits for a Class B digital device,
pursuant to part 15 of the FCC Rules. These limits are designed to provide reasonable protection
against harmful interference in a residential installation. This equipment generates, uses and can
radiate radio frequency energy and, if not installed and used in accordance with the instructions, may
cause harmful interference to radio communications. However, there is no guarantee that interference
will not occur in a particular installation. If this equipment does cause harmful interference to radio or
television reception, which can be determined by turning the equipment o and on, the user is
encouraged to try to correct the interference by one or more of the following measures:
--Reorient or relocate the receiving antenna.
--Increase the separation between the equipment and receiver.
--Connect the equipment into an outlet on a circuit dierent from that to which the receiver is
connected.
--Consult the dealer or an experienced radio/TV technician for help.
Meanwhile, please ensure that the car charger
and the car cigarette lighter provide a good
connection, and ensure that the car charger is
fully inserted. In addition, if the vehicle is running
on bumpy roads, it is forbidden to use the car
charger in case it burns due to a poor
connection. The Company will not be responsible
for any loss caused by non-standard operation.
US

08
US
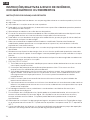
IMPORTANT SAFETY INSTRUCTIONS
INSTRUCTIONS PERTAINING TO RISK OF FIRE, ELECTRIC
SHOCK, OR INJURY TO PERSONS
WARNING–When using this product, basic precautions should always be followed, including the
following:
a) Read all the instructions before using the product.
b) To reduce the risk of injury, close supervision is necessary when the product is used near children.
c) Do not put fingers or hands into the product.
d) Use of an attachment not recommended or sold by power pack manufacturer may result in a
risk of fire, electric shock, or injury to persons.
e) To reduce risk of damage to the electric plug and cord, pull the plug rather than the cord when
disconnecting the power pack.
f) Do not use a battery pack or appliance that is damaged or modified. Damaged or modified
batteries may exhibit unpredictable behavior resulting in fire, explosion or risk of injury.
g) Do not operate the power pack with a damaged cord or plug, or a damaged output cable.
h) Do not disassemble the power pack, take it to a qualified service person when service or repair
is required. Incorrect reassembly may result in a risk of fire or electric shock.
i) To reduce the risk of electric shock, unplug the power pack form the outlet before attempting
any instructed servicing.
j) PERSONAL PRECAUTIONS
1)Have plenty of fresh water and soap nearby in case battery acid contacts skin,clothing, or
eyes.
2)Wear complete eye protection and clothing protection. Avoid touching eyes while working
near battery.
3)If battery acid contacts skin or clothing, wash immediately with soap and water. If acid
enters eye, immediately flood eye with running cold water for at least 10 minutes and get medical
attention immediately.
4)NEVER smoke or allow a spark or flame in vicinity of battery or engine.
5)Be extra cautious to reduce risk of dropping a metal tool onto battery. It might spark or
short-circuit battery or other electrical part that may cause explosion.
k) When charging the internal battery, work in a well ventilated area and do not restrict
ventilation in any way.
l) Under abusive conditions, liquid may be ejected from the battery; avoid contact. If contact
accidentally occurs, flush with water. If liquid contacts eyes, additionally seek medical help. Liquid
ejected from the battery may cause irritation or burns.
m) Do not expose a power pack to fire or excessive temperature. Exposure to fire or temperature
above 130°C may cause explosion. The temperature of 130°C can be replaced by the tempera-
ture of 265°F.
n) Have servicing performed by a qualified repair person using only identical replacement parts.
This will ensure that the safety of the product is maintained.

09
US
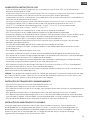
SAVE THESE INSTRUCTIONS OPERATING INSTRUCTIONS
• Use and store the unit only in a clean and dry environment. DO NOT use and store in dusty and wet
environment.
• Check the unit prior to every use. DO NOT use the unit if it is damaged, broken.
• If rust, peculiar odors, overheating or other abnormal circumstances are observed, stop using the unit
immediately and contact the dealer or our customer service center.
• Make sure that the unit is properly secured when transporting it in a motor vehicle.
• Only charge the Explorer 300 Plus within a ambient temperature 0-45°C (32-113°F),discharge
temperature is -10-45°C (14~113°F) and Storage temperature is 6 months: -10~25°C (14~77°F).
• Switch the unit off immediately if it has accidentally fallen, was dropped or was exposed to vibrations.
• DO NOT use the unit if the power cord is damaged or broken.
• Keep the unit away from children. DO NOT let children use the power supply unit. Keep this product
away from pets.
• DO NOT use the unit in an area or environment with high temperature.
• Should fluid from inside of the unit come in contact with your skin or clothing, wash the affected areas
with tap water.
• In a storm, unplug the power cord from the socket.
• DO NOT place the unit on its side or upside down while in use or storage.
• DO NOT use accessories for other usage.
• Make sure that the device you are connecting is switched off before you connect it.
• DO NOT expose a power pack to fire or excessive temperature. Exposure to fire or temperature
above 130°C may cause explosion.
• Solar charge times depend on weather conditions, place your solar panel where it will get as
much direct sunlight as possible.
• DO NOT place the power pack on the floor, or at a height less than 457 mm (18 inches) above the
floor, during use in a repair facility.
WarningDo not remove the battery pack without permission,If you need to repair the battery
pack, contact your local manufacturer as soon as possible
DANGER: This device is for indoor use only (e.g. RV/tent/o-grid cabin, etc.). Do not use outdoors
under any circumstances (e.g. where exposed to rain or snow or use it in wet environments by the
sea or waterways).
• DO NOT move the unit if it is recharging or in use.
• DO NOT dispose the unit together with household waste.
• DO NOT place the unit close to or in a fire or expose it to heat. Keep out of direct sunlight.
• DO NOT store the unit in a bathroom or in an area exposed to rain or moisture.
• DO NOT disassemble the power pack, take it to a qualified service person when service or repair
is required. Incorrect reassembly may result in a risk of fire or electric shock.
• DO NOT store the unit in an area or environment with high temperature.
MOVING AND STORAGE INSTRUCTIONS
When using it for the first time, please fully charge the device before use. If this product is stored
for a long period of time (3 months - 6 months) with the power depleted, its performance will
deteriorate and may even become unchargeable. If this device is stored for a long time, please
check the power regularly and charge it to about 60% to 80%.
USER MAINTENANCE INSTRUCTIONS

Warranty Period
Exchange
Exclusions
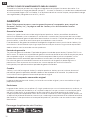
WARRANTY
Note: We only provide our warranty for the buyer who purchased on Amazon
(Jackery Inc.), Jackery website or local authorized dealers.
Jackery Inc. warrants to the original consumer purchaser that the Jackery product will be free from
defects in workmanship and material under normal consumer use during the applicable warranty
period identified in the 'Warranty Period' section below, subject to the exclusions set forth below.
This warranty statement sets forth Jackery's total and exclusive warranty obligation. We will not
assume, nor authorize any person to assume for us, any other liability in connection with the sale of
our products.
3 Years Standard Warranty: The standard warranty period for Jackery Explorer 300 Plus is 36
months. In each case, the warranty period is measured starting on the date of purchase by the
original consumer purchaser. The sales receipt from the first consumer purchase, or other reasonable
documentary proof, is required in order to establish the start date of the warranty period.
2 Years Extended Warranty: To activate the Warranty Extension, you must register your product
online or contact our customer service team at hello@jackery.com to extend the standard warranty
runtime.
Jackery will replace (at Jackery's expense) any Jackery product that fails to operate during the
applicable warranty period due to defect in workmanship or material. A replacement product
assumes the remaining warranty of the original product.
Jackery's warranty does not apply to:
Misused, abused, modified, damaged by accident, or used for anything other than normal consumer
use as authorized in Jackery's current product literature.
Attempted repair by anyone other than an authorized facility.
Any product purchased through an online auction house.
Jackery's warranty does not apply to the battery cell unless the battery cell is fully charged by you
within seven days after you purchase the product and at least once every 6 months thereafter.
Limited Warranty
The warranty on Jackery's product is limited to the original consumer purchaser and is not
transferable to any subsequent owner.
Limited to Original Consumer Buyer
10
US
Download the Jackery Mobile App

Nom du produit
Numéro de modèle
Capacité
Poids
Dimensions
Durée de vie
Sortie totale
Sortie CA
Sortie USB-A
(Sortie) USB-C
(Entrée /Sortie) USB-C
Puissance totale de la sortie USB
Port de voiture
Entrée CA en mode charge
Entrée/Sortie CA en mode dérivation
Entrée CC (USB-C)
Température de charge
Température de décharge
Jackery Explorer 300 Plus
JE-300B
Lithium-ion 22.5Ah / 12.8V DC(288Wh)
Environ 8.27 lb / 3.75 kg
9.1 x 6.1 x 6.6 in / 23 x 15.5 x 16.7 cm
Capacité de 3000 cycles à 80 %+
300W
120V~60Hz, 2.5A, 300W puissance nominale,
600W puissance de pointe
15W Max 5V⎓3A
15W Max 5V⎓3A
100W Max 5V⎓3A, 9V⎓3A, 12V⎓3A, 15V⎓3A, 20V⎓5A
USB-C(IN/OUT) : 100W Max, USB-C(OUT)+USB-A : 24W Max
12V⎓10A
100V-120V~60Hz, 10A Max
100V-120V~60Hz, 300W Max
12-27V⎓5A Max, 100W Max
0~45 °C (32~113 ℉)
-10~45 °C (14~113 ℉)
11
SPÉCIFICATIONS TECHNIQUES
CONTENU DE L'EMBALLAGE
3
24
1
FR Modèle: JE-300B
Français
CERTIFICATIONS:
USB Type-C® et USB-C® sont des marques déposées de USB Implementers Forum.
Jackery Explorer 300 Plus Câble de charge CA
adaptateur pour
transformer le port DC7909
en port USB-C
Guide de
démarrage rapide
Félicitations pour votre nouvelle acquisition, le Jackery Explorer 300 Plus. Veuillez lire attentivement ce
manuel avant d'utiliser le produit, en particulier les précautions à prendre pour garantir une utilisation
correcte. Conservez ce manuel dans un endroit accessible pour pouvoir le consulter fréquemment.
Conformément aux lois et règlements, le droit d'interprétation finale de ce document et de tous les
documents relatifs à ce produit est réservé à notre Société.
Veuillez noter qu'aucune autre notification ne sera communiquée dans le cas où le manuel est mis à
jour, est révisé ou prend fin.
5
Model: JE-300B
Contact us:
1-888-502-2236(US)
USER MANUAL
Jackery Explorer 300 Plus
5
Version: JAK-UM-V1.0

5
8
79
5
4
1 2
6
3
LCD
Sortie
CA
Entrée CA
Entrée /Sortie USB-C
Sortie USB-C
Sortie USB-A
Bouton CC
12
14
13
15
16
17
18
11
10
9
8
7
6
5
4
1
2
3
FR
Bouton CA
Bouton Lumière LED
Lumière LED
PANTALLA LCD
DÉCOUVERTE DU PRODUIT
Apparence du produit
Abri de voiture
Puissance d'entrée Temps de charge restant Indicateur de charge
murale CA
Indicateur de charge
de voiture Indicateur de charge solaire Indicateur de batterie faible
Pourcentage de batterie
restante Code d'erreur Avertissement de
température élevée
Bouton d’alimentation
principale
12
AC 100V-120V 10A Max

1513
11
10
EPS
18
12
WIFI
16 Bluetooth
17
14
FR
Avertissement de basse
température Temps de décharge restant Puissance de sortie
Indicateur d'alimentation CA Indicateur de puissance
de la batterie
Indicateur de puissance de la batterie
Lorsque le produit est en cours de charge, le cercle orange autour du pourcentage de la
batterie s'allume . Lors de la recharge d'autres appareils, le cercle orange restera allumé.
Indicateur de batterie faible
Si la batterie est inférieure à 20 %, l'indicateur de batterie faible restera allumé. Si la batterie est
inférieure à 5 %, l'indicateur de batterie faible clignotera. Si la batterie est en cours de
chargement, l'indicateur sera éteint.
Mode économie de batterie
EPSGroupe électrogène
Une fois que vous avez branché l’entrée CA du groupe électrogène à l’alimentation avec le câble de
recharge CA, vous pouvez utiliser la prise de sortie CA pour alimenter votre unité. À ce stade, l’électricité
provient de la prise secteur, non pas de la batterie du groupe électrogène. Dans le cas d’une panne de
l’alimentation principale, le groupe électrogène passe automatiquement en mode batterie en 20 ms.
Puisqu’il ne s’agit pas d’une alimentation sans interruption (ASI) professionnelle, le temps de commuta-
tion ne peut pas être de 0 ms. Ne la branchez pas à un équipement qui nécessite une grande puissance
de l’onduleur, tel que les serveurs de données ou les stations de travail (workstations). Veuillez effectuer
plusieurs tests pour confirmer sa compatibilité avant toute utilisation. Il est recommandé de la brancher
à un seul appareil uniquement. N’utilisez pas plus d’une unité à la fois pour éviter de déclencher la
sécurité anti-surcharge. Le non-respect de ces consignes pourrait entraîner une panne de l’équipement
ou une perte des données, pour lesquelles nous ne pouvons être tenus pour responsables.
Sortie Puissance de sortie Valeurs par défaut
Sortie CA
Toutes les sorties s’éteignent automatiquement
après 12 heures.
≤25W
≤2W
≤2W
Sortie USB
Sortie
allume-cigare
Mode économie d’énergie
Pour éviter d’oublier d’éteindre la sortie, ce qui consomme de la batterie, le produit active le
Mode d’économie d’énergie par défaut. Cela se produit lorsqu’aucun appareil n’est connecté
ou que l’appareil connecté est égal ou inférieur à une certaine valeur. (Reportez-vous au
tableau ci-dessous pour plus d’informations.) L’appareil éteindra automatiquement toutes les
sorties après 12 heures.
Pour désactiver le Mode économie d’énergie
Maintenez enfoncé le bouton AC et le bouton d’alimentation principale jusqu’à ce que l’icône
Mode économie d’énergie disparaisse. Dans le mode sans économie d’énergie, n’oubliez pas
d’éteindre les produits pour éviter de consommer la batterie.
Pour activer le Mode économie d’énergie
Maintenez enfoncé le bouton AC et le bouton d’alimentation principale jusqu’à ce que l’icône
Mode faible consommation s’allume sur l’écran.
13

FR
Avertissement de basse température
Il peut être normal que cette icône apparaisse à l’écran. Une fois la batterie refroidie, elle
retrouve sa température normale.
Avertissement de basse température
Il peut être normal que cette icône apparaisse à l’écran. Une fois la température ambiante
rétablie, l’icône disparaît.
Codes d’erreur
Afin de répondre rapidement aux demandes, nous avons mis en place des codes allant de F0
à FE dans le système : Si le code F8 apparaît, arrêtez la recharge ou débranchez la prise. Le
produit se rétablira par lui-même. Si ce n’est pas le cas, contactez le service après-vente. Si le
code F9 apparaît, arrêtez la recharge et le produit se rétablira par lui-même. Si ce n’est pas le
cas, contactez le service après-vente. Dans le cas où un autre code apparaît, contactez notre
service après-vente.
OPÉRATIONS DE BASE
Mise en marche/arrêt de la sortie
Marche/arrêt de l'écran LCD
Mise en marche/arrêt de l’alimentation Appuyez sur le bouton d’alimentation principale. Le témoin de
fonctionnement et l’écran LCD s’allument. Lorsque le produit ne fonctionne pas pendant 2 minutes,
celui-ci entrera en veille et l’écran s’éteindra automatiquement. Si vous devez mettre en arrêt
l’alimentation principale, maintenez enfoncé le bouton d’alimentation principale jusqu’à ce que le
témoin de fonctionnement s’éteigne. Le temps de veille par défaut est de 2 heures. Si l’autre interrupt-
eur de sortie n’est pas activé et que le produit ne reçoit aucune charge, celui-ci s’é eindra automa-
tiquement après 2 heures. Le temps d’arrêt automatiquement peut être défini sur l’application Jackery.
Mise en marche/arrêt des sorties AC : Assurez-vous que l’alimentation principale est mise en route.
Appuyez sur le bouton AC. Le voyant lumineux indiquant le fonctionnement de la sortie CC (AC)
s’éclaire. Vous pouvez ensuite brancher l’équipement qui doit être rechargé par CA. Appuyez de
nouveau sur le bouton AC pour éteindre la sortie AC.
Mise en marche/arrêt des sorties USB/allume-cigare : Assurez-vous que l’alimentation principale est
mise en route. Appuyez sur le bouton DC. Le voyant lumineux indiquant le fonctionnement de la sortie
CC (DC) s’éclaire. Les ports de sortie USB/allume-cigare peuvent être branchés pour recharger les
appareils externes. Appuyez de nouveau sur le bouton DC pour éteindre la sortie USB/allume-cigare.
Pour l’allumer, appuyez sur le bouton d’alimentation principale. Si l’appareil reçoit de l’énergie, l’écran
s’éclairera automatiquement. Pour l’éteindre, appuyez de nouveau sur le bouton d’alimentation
principale. Si au bout de 2 minutes l’appareil n’est pas utilisé, celui-ci se mettra en mode veille et l’écran
s’éteindra automa-tiquement.
Pour garder l’écran allumé (en état de recharge ou de décharge), suivez les étapes suivantes :
Une fois que l’écran est allumé, appuyez deux fois sur le bouton d’alimentation principale pour activer le
mode Affichage permanent (Always-On Display).
Pour éteindre le mode Affichage permanent (Always-On Display), suivez les étapes suivantes :
Appuyez sur le bouton d’alimentation principale et l’écran s’éteindra au bout de 2 minutes.
Conseil : en mode Affichage permanent (Always-On Display), l’écran s’éteint au bout de 2 heures si
l’appareil n’a pas été chargé ou déchargé.
Bouton de réinitialisation de l’entrée CA : Lorsqu’une surintensité se produit et que la protection se
déclenche, le bouton de réinitialisation sort. Vous devez retirer le câble de la prise CA et appuyer sur ce
bouton pour réinitialiser le produit.
14

Les instructions sont les suivantes : Appuyez sur le bouton de lumière LED, la LED sera allumée. La
lumière s’allume toujours en mode faible luminosité et la puissance de sortie sur l’écran est de 1W.
Appuyez à nouveau pour entrer en mode SOS et la puissance de sortie sur l’écran est de 1W. Puis,
appuyez à nouveau pour éteindre la lumière LED. Dans n’importe quel de ces modes, la lumière peut
être éteinte par une longue pression.
Marche/arrêt de l'éclairage LED
Il existe trois modes d'éclairage LED : le mode forte luminosité et le mode SOS.
FR
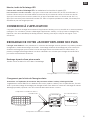
Port d’entrée USB-C
Explorer 300 Plus
CC7909 mâle
Adaptateurs CC7909 vers CC8020
Adaptateurs CC7909 vers USB-C
SolarSaga 100
Ce produit prend en charge la connexion à l’application Jackery pour un contrôle et un fonctionnement
intelligent. Les utilisateurs peuvent télécharger l’application Jackery sur l’App Store ou Google Play.
Reportez-vous au mode d’emploi de l’application Jackery pour de plus amples consignes sur la
connexion.
CONNEXION À L’APPLICATION
RECHARGE DE VOTRE JACKERY EXPLORER 300 PLUS
L'énergie verte d'abord : nous préconisons l'utilisation de l'énergie verte en premier. Ce produit prend en
charge deux modes de recharge simultanés : la recharge solaire et la recharge par prise murale CA.
Quand la recharge par prise murale CA et la recharge solaire sont effectuées en même temps, le
produit privilégie la recharge solaire. Les deux méthodes sont utilisées pour charger la batterie à la
puissance maximalement autorisée.
Explorer 300 Plus
Recharge à partir d'une prise murale
Veuillez utiliser le câble CA inclus dans l'emballage.
Chargeur CA
Instructions sur l’opération de connexion des panneaux solaires Jackery SolarSaga 60/100
Le générateur solaire 300 Plus est différent des autres produits Jackery. Pour la première fois, l’entrée
USB-C prend en charge la recharge par énergie solaire. Pour découvrir comment recharger la station
d’énergie portable, reportez-vous aux schémas de branchement suivants.
Chargement par le biais de l’énergie solaire
15

FR
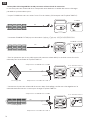
* L'interface DC8020-DC7909, qui est destinée à: Jackery Explorer 160/240/300/500/1000.
Port d’entrée USB-C
Port d’entrée USB-C
3m
CC8020
3m
CC8020-CC7909
Jackery New SolarSaga 40 Mini ou 80 panneaux solaires Guide de connexion
Le nouveau panneau solaire 40 W est compatible avec différents modèles de stations d’énergie
portables et présente deux ports :
* Le port DC8020 convient aux séries Pro et Plus de Jackery (à l’exception de l’Explorer 300 Plus).
* Pour les personnes qui se sont déjà procuré le panneau solaire 80 W, le schéma suivant illustre la
méthode pour le raccorder à l’Explorer 300 Plus.
* Concernant le panneau solaire 40 W contenu dans l’emballage, veuillez consulter également la
méthode de branchement suivante pour charger l’Explorer 300 Plus.
Explorer 300 Plus
Adaptateurs CC8020 vers CC7909
Adaptateurs CC7909 vers USB-CSolarSaga 80
CC8020
3m
5
Explorer 300 Plus
Adaptateurs CC8020 vers CC7909
Adaptateurs CC7909 vers USB-C
SolarSaga 40 CC8020
3m
5
16

Explorer 300 Plus
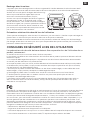
Recharge dans la voiture
Ce produit peut être rechargé avec un allume-cigare de12V. Veuillez démarrer le véhicule avant de le
recharger pour éviter de vider la batterie de la voiture et d'empêcher votre véhicule de redémarrer.
vehícule
Veuillez vous assurer que le chargeur de l’allume-cig-
are et la prise de l’allume-cigare de la voiture
fournissent une bonne connexion. De plus,
assurez-vous que le chargeur de l’allume-cigare est
complètement inséré. Si le véhicule roule sur des
routes cahoteuses, il est interdit d'utiliser le chargeur
de l’allume-cigare, car il pourrait prendre feu à cause
d'une mauvaise connexion. Notre Société ne sera
pas tenue pour responsable de toute perte causée
par un fonctionnement non conforme.
FR
a. Veuillez lire toutes les instructions avant d'utiliser ce produit.
b. Une étroite surveillance est nécessaire lors de l'utilisation de ce produit à proximité d'enfants afin de
réduire les risques.
c. Un risque de décharge électrique peut se produire en cas d'utilisation d'accessoires recommandés
ou vendus par des fabricants non professionnels.
d. Lorsque le produit n'est pas utilisé, veuillez débrancher la fiche d'alimentation de la prise du produit.
e. Ne démontez pas le produit, ce qui pourrait entraîner des risques imprévisibles tels qu'un incendie,
une explosion ou une décharge électrique.
f. N'utilisez pas le produit à travers des cordons ou des fiches endommagés, ou des câbles de sortie
endommagés, ce qui pourrait provoquer une décharge électrique.
g. Rechargez le produit dans un endroit bien ventilé et ne limitez en aucun cas la ventilation.
h. Veuillez placer le produit dans un endroit ventilé et sec pour éviter que la pluie et l'eau ne
provoquent des décharges électriques.
i. N'exposez pas le produit au feu ou à une température élevée (sous la lumière directe du soleil ou
dans un véhicule soumis à une forte chaleur), ce qui pourrait provoquer des accidents tels qu'un
incendie ou une explosion.
CONSIGNES DE SÉCURITÉ LORS DE L'UTILISATION
Les précautions de sécurité de base doivent être respectées lors de l'utilisation de ce
produit, notamment :
REMARQUE: Cet équipement a été testé et jugé conforme aux limites d'un appareil numérique de classe
B, conformément à la partie 15 des règles FCC. Ces limites sont conçues pour fournir une protection
raisonnable contre les interférences nuisibles dans une installation résidentielle. Cet équipement génère,
utilise et peut émettre de l'énergie de fréquence radio et, s'il n'est pas installé et utilisé conformément
aux instructions, peut causer des interférences nuisibles aux communications radio. Cependant, il n'y a
aucune garantie que des interférences ne se produiront pas dans une installation particulière. Si cet
équipement provoque des interférences nuisibles à la réception de la radio ou de la télévision, ce qui
peut être déterminé en éteignant et en allumant l'équipement, l'utilisateur est encouragé à essayer de
corriger les interférences par une ou plusieurs des mesures suivantes:
--Réorienter ou déplacer l'antenne de réception.
--Augmenter la distance entre l'équipement et le récepteur.
--Connecter l'équipement à une prise sur un circuit diérent de celui auquel le récepteur est connecté.
--Consulter le revendeur ou un technicien radio/TV expérimenté pour obtenir de l'aide.
1) Vous pouvez recharger les véhicules de 12 V seulement, pas ceux de 24 V. Veuillez ne pas recharger ce
produit dans un véhicule 24V pour éviter les blessures et les pertes matérielles.
2) Il est recommandé d’utiliser les accessoires et les panneaux solaires de Jackery lors de la recharge
par énergie solaire. Nous ne serons pas tenus pour responsables des pertes causées par l'utilisation de
panneaux solaires d'autres marques.
Précautions relatives à la sécurité lors de l'utilisation
13 5
24 6
R
A/C
AUTO
5
17

FR
18
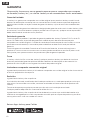
ATTENTION : Lors de l’utilisation de ce produit, les précautions de base suivantes doivent toujours être
suivies:
a) Lire toutes les consignes avant d’utiliser le produit.
b) Afin de réduire le risque de blessures, une surveillance étroite est nécessaire, lorsque le produit est
utilisé à proximité d’enfants.
c) Ne pas mettre les doigts ou les mains dans le produit.
d) L'utilisation d'un accessoire non recommandé ou vendu par le fabricant du bloc d'alimentation peut
entraîner un risque d'incendie, de choc électrique ou de blessure.
e) Pour éviter d’endommager la prise électrique et le cordon, tirer sur la prise au lieu du cordon,lorsque
la station électrique doit être débranchée.
f) Ne pas utiliser une station électrique ou un appareil endommagé ou altéré. Les batteries endom
magées ou modifiées peuvent présenter un comportement imprévisible entraînant un incendie,
une explosion ou un risque de blessure.
g) Ne pas faire fonctionner la station électrique, si la prise ou le cordon est endommagé, ou si le câble
de sortie est abîmé.
h) Ne pas démonter le bloc d’alimentation. S’il doit être réparé, faire appel à un technicien qualifié.
Un remontage incorrect peut entraîner un risque d'incendie ou de choc électrique.
i) Pour réduire les risques d’électrisation, débrancher la station électrique de la prise, avant d'effectuer
toute réparation.
j) PRÉCAUTIONS PERSONNELLES
1) Gardez une bonne quantité d’eau claire et de savon à proximité, au cas où l’acide de la batterie
entrerait en contact avec la peau, les vêtements ou les yeux.
2) Portez une protection complète des yeux et des vêtements de protection. Évitez de vous toucher
les yeux lorsque vous travaillez près de la batterie.
INSTRUCTIONS CONCERNANT LES RISQUES D'INCENDIE,
DE CHOC ÉLECTRIQUE OU DE BLESSURE AUX PERSONNES
CONSIGNES DE SÉCURITÉ IMPORTANTES
3) Si l'acide de la batterie entre en contact avec la peau ou les vêtements, lavez immédiatement
avec de l'eau et du savon. Si de l’acide entre dans les yeux, rincez-les immédiatement et abondam
ment avec de l’eau froide pendant 10 minutes au moins et demandez une aide médicale le plus vite
possible.
4) Ne fumez ou ne provoquez JAMAIS d’étincelles ou de flammes à proximité de la batterie ou de
l’appareil.
5) Limitez au maximum le risque de faire tomber un outil métallique sur la batterie. Cela pourrait
créer une étincelle ou un court-circuit dans la batterie, ou tout autre composant électrique qui
entraînerait une explosion.
k) Chargez la batterie interne dans un espace bien aéré. N’empêchez la bonne aération d’aucune façon.
l) En cas d’utilisation abusive, du liquide peut être projeté de la batterie. Éviter tout contact. En cas
de contact accidentel, rincez à l'eau. Si le liquide entre en contact avec les yeux, consultez
également un médecin. Le liquide éjecté de la batterie peut provoquer une irritation ou des brûlures.
m) Ne pas exposer la station électrique près d’un feu ou à des températures extrêmes. L'exposition
au feu ou à une température supérieure à 130 °C (265 °F) peut provoquer une explosion.
n) Faire réparer le produit par un technicien qualifié qui utilisera uniquement des pièces de
remplacement identiques. Cela garantira que la sécurité du produit est maintenue.
A página está carregando...
A página está carregando...
A página está carregando...
A página está carregando...
A página está carregando...
A página está carregando...
A página está carregando...
A página está carregando...
A página está carregando...
A página está carregando...
A página está carregando...
A página está carregando...
A página está carregando...
A página está carregando...
A página está carregando...
A página está carregando...
A página está carregando...
A página está carregando...
A página está carregando...
A página está carregando...
A página está carregando...
A página está carregando...
A página está carregando...
A página está carregando...
-
 1
1
-
 2
2
-
 3
3
-
 4
4
-
 5
5
-
 6
6
-
 7
7
-
 8
8
-
 9
9
-
 10
10
-
 11
11
-
 12
12
-
 13
13
-
 14
14
-
 15
15
-
 16
16
-
 17
17
-
 18
18
-
 19
19
-
 20
20
-
 21
21
-
 22
22
-
 23
23
-
 24
24
-
 25
25
-
 26
26
-
 27
27
-
 28
28
-
 29
29
-
 30
30
-
 31
31
-
 32
32
-
 33
33
-
 34
34
-
 35
35
-
 36
36
-
 37
37
-
 38
38
-
 39
39
-
 40
40
-
 41
41
-
 42
42
-
 43
43
-
 44
44


em outras línguas
- español: Jackery JE-300B Manual de usuario
- français: Jackery JE-300B Manuel utilisateur
- English: Jackery JE-300B User manual