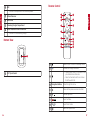
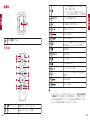
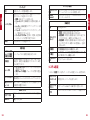
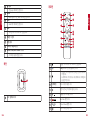
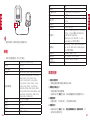
Nebula D23501F1 Cosmos Laser 4K Projector Manual do usuário
- Categoria
- Projetores de dados
- Tipo
- Manual do usuário

User Manual
Nebula Cosmos Laser /
Nebula Cosmos Laser 4K

English
01
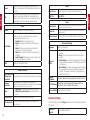
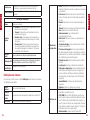
Important Safety Instructions
Read all instructions before you use this device. Do not make any
changes or create settings that are not described in this manual. If
physical injury, loss of data, or damage is caused by failure to follow
instructions, the warranty does not apply.
Setup
• Do not place heavy or sharp objects on this device.
• To avoid electric shock, do not disassemble the device.
• Only use attachments or accessories specified by the manufacturer.
• Keep away from any heat sources.
• Place in a dry and well-ventilated area.
• Do not place this device on soft surfaces such as tablecloths or
carpets. The device could catch fire.
• Do not look straight at the projector lens during operation. The
intense light beam may damage your eyes.
• To prevent overheating, do not block or clog the ventilation openings.
• To reduce the risk of fire and/or electric shock, do not expose the
device to rain or moisture. Objects filled with liquids, such as vases,
should not be placed on this device.
• Turn off and remove the cable if this product emits smoke or any
strange odor.
• Unplug from the power source when not in use for a long period of
time.
• Always handle the device with care. Avoid touching the lens.
• Do not allow children to handle the device without supervision.
• Avoid extreme vibrations. It may damage the internal components.
• The power cord shall connect to socket-outlet with a grounding/
earthing connection.
• The power supply should be installed near the equipment; for
pluggable equipment, the socket-outlet must be easily accessible.
• Only use the power cord provided by the manufacturer. An
unauthorized power cord may cause danger and violate the
authorization of the projector as well as the guarantee.
• The plug of the power cord is considered as the disconnect device.
Once unplugged, the projector is disconnected from the power
source.
• Do not use the device in an environment where the temperature is
too high or too low. Never expose the device to strong sunshine or
wet environments.
English 01
Deutsch 29
Español 59
Français 89
Italiano 119
Nederlands 149
Português 179
日本語209
233
繁体中文 257
279

English
English
02 03
• Before you make or change any connections, ensure that all devices
are disconnected from the power outlet.
• Never touch the mains cable of the mains connection with wet
hands.
• The suitable temperature range for projector D2341 or D2350 and
its accessories is 32°F-95°F / 0°C-35°C.
• The suitable temperature range for 4K Streaming Dongle D0480 and
its accessories is 32°F-104°F / 0°C-40°C.
• The suitable temperature for remote C008 is 113°F / 45°C
maximum.
• It is recommended to operate the device in an environment with a
temperature that ranges from 41°F-77°F / 5°C-25°C.
• When operating, place the device in an environment that has a
normal room temperature and good ventilation.
• Possibly hazardous optical radiation emitted from this product may
be harmful to the eyes. Do not stare at the operating beam.
Battery
• The remote control contains batteries which can be swallowed. Keep
the remote control out of the reach of children.
• Keep away from heat, direct sunlight, or fire to avoid risk of explosion.
Never dispose of by burning.
• Remove the batteries when the remote control has not been used for
a long period of time.
• Replace the batteries only with the same or equivalent type.
• Batteries contain chemical substances, and they should be disposed
of properly.
CAUTION: RISK OF EXPLOSION IF BATTERY IS REPLACED BY AN
INCORRECT TYPE. DISPOSE OF USED BATTERIES ACCORDING TO THE
INSTRUCTIONS.
Hearing Safety
• To avoid hearing damage, do not listen for extended periods at high
volume. Set the volume at a safe level.
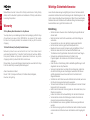
Cleaning
• Use a soft, lint-free cloth. Never use liquid, gaseous, or easily
flammable cleansers to clean.
• Do not use any liquid cleaning agents to clean the lens to avoid
damaging the coating film on the lens.
• Wipe the surfaces gently. Be careful that you do not scratch the
surface.
• Use lens cleaning paper to clean the lens of the projector.
Repairs
• Do not make any repairs to this device yourself. Only have your
projector repaired by an authorized service center.
• Improper maintenance can result in injuries to persons or damage
to this device.
• Refer servicing to qualified service personnel.
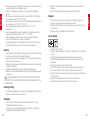
Laser Safety
• RG1 IEC 62471-5:2015
• Complies with IEC 60825-1:2014 Class 1 and IEC 62471-5:2015 Risk
Group 1.
• Potential hazards may exist during lamp or product servicing.
• Service shall be performed only by authorized, trained servicing
personnel.
• Do not open the enclosure of the product.
• When the enclosure of the product is damaged, discontinue use.
• Do not open the enclosure of laser module inside the product.
• When the enclosure of laser module inside the product is damaged,
discontinue use.
• Laser inside, be aware of the risk of skin or corneal burns.
• The lable is located at the bottom of the enclosure.

English
English
04 05
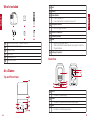
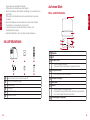
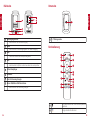
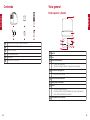
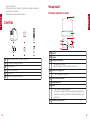
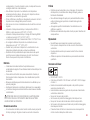
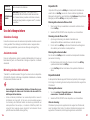
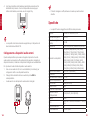
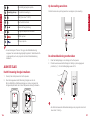
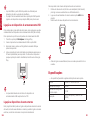
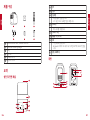
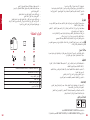
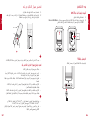
What’s Included
1 2 3
4 5 6
QSG
1
Nebula Cosmos Laser / Cosmos Laser 4K
2
Nebula 4K Streaming Dongle
3
Remote Control
4
Power Cord
5
AAA Batteries
x 2
6
Quick Start Guide
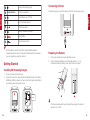
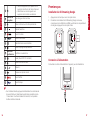
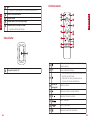
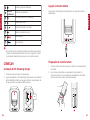
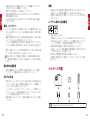
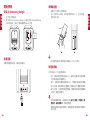
At a Glance
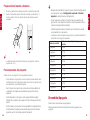
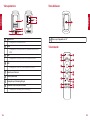
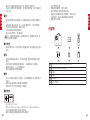
Top and Front Panel
7
8
3
4
2
6
5
1
1Lens
2
Handle
3
Power Button
• Press to power on.
• Press and hold for 3 seconds to power off.
4Navigation Buttons
• Move through the menu.
5Confirm a Selection
6
Volume Up/Down
7Back
• Return to a previous menu.
• When in Bluetooth Speaker Mode, press again to switch to
Projector Mode.
8Settings (Projector)
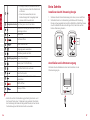
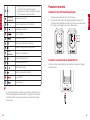
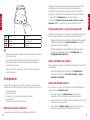
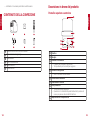
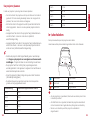
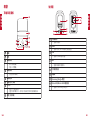
Rear View
1 4
5
6
2 3
78
1AC IN
• Connect to power supply.
2HDMI
• Connect to a playback device with HDMI output.
3USB
• Connect to a USB storage device.

English
English
06 07
4AUX
• Connect to headphones or an external speaker.
5Infrared Receiver
6Back Cover
7Streaming Dongle Compartment
8Micro-USB/Micro-HDMI Connectors
• Connect to the Streaming Dongle.
Bottom View
1
11/4" Tripod Socket
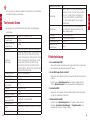
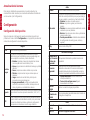
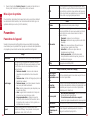
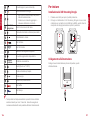
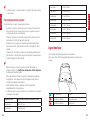
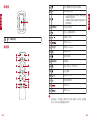
Remote Control
19
10
11
12
13
14
15
16
17
2
3
4
5
6
7
8
1Power on/off or switch to Standby Mode.
2Activate the Google Assistant.
3
• Open an app, move it, or remove it from
your home screen favorites.
• Select a channel to add to or remove
from the watch list.
4Navigation Buttons Move through the menu.
5Return to the previous screen or action.
6Volume up/down.
7Open YouTube.
8Open Prime Video.
9Select an input source.

English
English
08 09
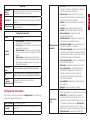
10 Access the settings page.
11 Confirm Button Confirm a selection.
12 Guide (Open Live TV EPG)
13 Go to the home screen.
14 Channel up/down.
15 Mute or resume the sound.
16 Open Netflix.
17 Open Disney+ Video.
T
• On the remote, press and hold the Home and Back buttons
simultaneously for about 10 seconds. After Bluetooth connected,
you can operate by using the remote.
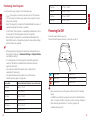
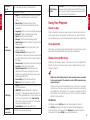
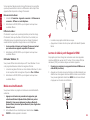
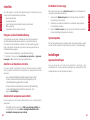
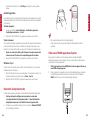
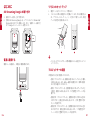
Getting Started
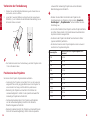
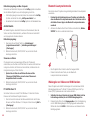
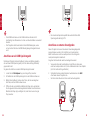
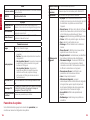
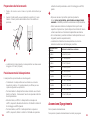
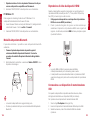
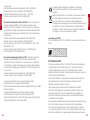
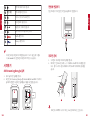
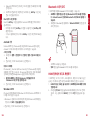
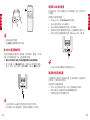
Installing 4K Streaming Dongle
1. Press up to open the back cover.
2. Correctly connect the included 4K Streaming Dongle to the Micro-
USB/Micro-HDMI connectors, then close the dongle compartment
by pressing down on the back cover.
open
Connecting to Power
Connect the power cord to the device, and then to the power supply.
open
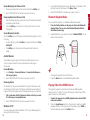
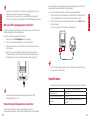
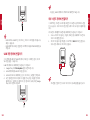
Preparing the Remote
1. Press and slide down to open the battery cover.
2. Insert 2 new AAA batteries, matching the polarity (+ / -) as
indicated. Close the battery cover until it clicks into place.
12
+
+
T
• The distance between the remote and the projector should not
exceed 10 m / 33 ft.

English
English
10 11
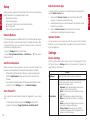
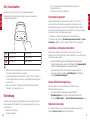
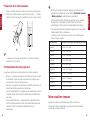
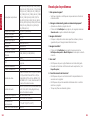
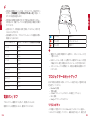
Positioning Your Projector
You can position your projector in the following ways.
• Front: The projector is placed on the table in front of the screen.
This is the most common way to position the projector for quick
setup and portability.
• Rear: The projector is placed on the table behind the screen. A
special rear projector screen is required.
• Front Ceiling: The projector is suspended upside-down in front
of the screen. The ceiling/wall mount kit is required.
• Rear Ceiling: The projector is suspended upside-down from
behind the screen. A special rear projector screen and ceiling/
wall mount kit are required.
T
• After powering on the projector, press the Settings button on
the projector, then go to Advanced Settings > Projector Mode
and select a setting.
• It is unnecessary to tilt the projector toward the projection
surface. This device is featured with autofocus and auto-
keystone correction.
• You may also install the projector onto a tripod (sold
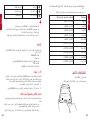
separately) if necessary.
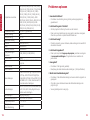
• The distance between the projector lens and the screen
determines the projection image size.
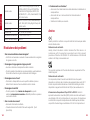
Screen Size Distance Between Projector Lens and Screen
60 inches 1.68 m / 5.51 ft
70 inches 1.97 m / 6.46 ft
80 inches 2.25 m / 7.38 ft
90 inches 2.53 m / 8.30 ft
100 inches 2.81 m / 9.22 ft
110 inches 3.10 m / 10.17 ft
120 inches 3.37 m / 11.06 ft
130 inches 3.65 m / 11.98 ft
140 inches 3.93 m / 12.89 ft
150 inches 4.22 m / 13.85 ft
Powering On/Off
Press the power button to power on.
Press and hold the power button for 3 seconds to power off.
Steady Blue Powered On
Steady Red Standby Mode
Steady Red Powered Off
T
• When powered on, press the power button to switch to Standby
Mode.
• In HDMI Source Mode, the projector will switch to Standby Mode
after 10 minutes of button inactivity or when no signal is detected.
• When Standby Mode lasts for 1 hour, the projector will
automatically power off.

English
English
12 13
Setup
When using the projector for the first time, follow the on-screen display
(OSD) instructions to complete the basic setup.
• Bluetooth connection
• Select your language
• Set up your TV with your Android phone (Optional)
• Wi-Fi connection
• Sign in with your Google account
Remote Buttons
For the best experience, add Nebula to the TV list and set up the remote
buttons. Follow the on-screen instructions to complete the setup. After
a successful setup, you can control the volume, power, and input of
your device by using the remote.
1. Press the Settings button on the remote.
2. Select Set Up Remote Buttons > Add Device > TV, then select
Nebula as the TV.
AutoFocus Keystone
When you power on the projector or move it to another location, the
projector will automatically focus and perform keystone correction.
• After setting up the remote controls, you can also press and
hold the Input Source button on the remote to activate this
feature.
• You can also manually adjust the focus and perform keystone
correction in the Settings menu. (See Device Settings)
Auto Screen Fit
This projector can automatically adjust the alignment to your screen
size.
• To activate this function, press the Settings button on the
projector, then select Image Correction > Auto Screen Fit.
Nebula Connect App
To easily control the projector, we recommend you to download the
devoted Nebula Connect app.
1. Download the Nebula Connect app from the App Store (iOS
devices) or Google Play (Android devices).
2. Enable Bluetooth on your phone and select this projector as the
device to be connected.
3. Open the Nebula Connect app and follow the on-screen
instructions to complete the connection setup.
System Update
To fully enhance your experience with this product with the latest
features, you are recommended to update the system from time to
time. (See Settings)
Settings
Device Settings
Go through the setup process when you turn on the projector for the
first time. Press the Settings button on the projector to access the
settings menu of this device.
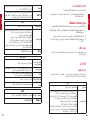
Picture
Brightness
Adjust brightness based on your environment.
Picture Mode
The projector is preset with several predefined picture
modes so that you can choose one to suit your
environment and input source.
• Standard: Keeps natural looking colors with a
balance of warm and cool tones.
• Vivid: Provides more picture details and color
sharpness.
• Soft: Provides warm colors with lower light.
• Movie: Provides the best colors for watching
movies.
• Game: Increases the brightness and response
time level for playing video games.
• Picture Custom: Manually set the contrast,
saturation, sharpness, color temperature, and
gamma, or reset the values.

English
English
14 15
Aspect
Adjust the width and the height proportion of the
display. You can select from these options: Auto, 16:9,
16:10, 4:3.
HDR
Turn High-Dynamic Range on or off. HDR enables the
projector to automatically detect the brightness and
darkest points of the input source and optimize settings
to reproduce contents under high dynamic range.
Audio
Volume
Adjust the volume of the built-in speaker.
Audio Mode
The projector is preset with several predefined sound
modes so that you can choose one to suit your
environment and input source.
• Standard: Keeps the original sound.
• Music: Enhances the treble for listening to the
music.
• Movie: Creates a surround-sound listening
experience for watching movies.
• News: Make voices more clear and dynamic for
listening.
• Audio Custom: Manually set audio settings such
as bass, midrange, and treble.
Dolby
Adjust the Dolby DRC Mode.
Image Correction
One-Click Focus
and Keystone
Correction Automatically focus and perform keystone correction.
Keystone
Correction
Automatically or manually perform keystone
correction. Manual keystone correction is only available
when auto keystone correction is off.
Focus
• Autofocus: Activate or deactivate Autofocus.
• Manual Focus Correction: Manually adjust the
focus.
Screen Zoom Zoom in or out of the projection image.
Auto Screen Fit Activate to automatically adjust the image size to
your surface.
HDMI
Input Access Select Android TV or HDMI as the input source.
HDMI 2.0 Auto/Off/On
About
Projector Info Check the current system firmware version and the
projector firmware version.
Contact Us Check our regional hotlines to contact our customer
service team.
Nebula Connect Scan the QR code to install the Nebula Connect app.
Advanced Settings
Language Select your language.
Projector
Mode
• Front: The device is located in front of the projection
surface.
• Rear: The device is located behind the projection
surface.
• Front Ceiling: The device is hanging from the ceiling
in an upside-down position. The image is rotated by
180 degrees.
• Rear Ceiling: The device is hanging from the ceiling
in an upside-down position behind the projection
surface. The image is rotated by 180 degrees and
horizontal mirrored.
Eyesight
Protection Activate or deactivate the eyesight protection function.
ToF Calibration If the picture is still unclear after cleaning the lens,
calibrate the Time-of-Flight (ToF) sensor.
Back to Default Restore settings to default.
System Settings
On the remote, press the Settings button to access the setting menus of
the system.
Network &
Internet See available networks.

English
English
16 17
Accounts &
Sign-In Sign in to make the most of the Android TV.
Apps See all apps installed.
Device
Preferences
• About: Check the product information, upgrade
firmware, reset the system, or rename the
device.
• Date & Time: Set date and time. Select
time zone, time format, and automatic time
calibration.
• Language: Select an on-screen display language.
• Keyboard: Check and manage keyboards.
• Sound: Select the sound formats.
• Storage: View the internal storage usage.
• Home Screen: Set the channels and apps on the
home screen.
• Google Assistant: Sign in to get better voice
control of your TV.
• Chromecast Built-in: Choose to show
notifications on all Android devices connected to
your Wi-Fi and let them control media casting to
this device.
• Screen Saver: Change the screen saver settings.
• Location: Check the location status.
• Usage & Diagnostics: Automatically send
diagnostic information to Google, like crash
reports and usage data from your device, apps,
and Chromecast built-in.
• Accessibility: Set the caption settings.
• Reboot: Reboot the system or cancel.
TV Settings
• Display: Adjust screen resolution, display mode,
and screen position.
• HDMI CEC: Enable HDMI CEC to allow this
projector to communicate back and forth with
your TV through HDMI ports. This projector and
your TV can control each other. One Key Play
allows this projector to use the TV as the active
source when playback starts.
• Audio Output: Adjust Dolby DRC mode.
Remotes &
Accessories Search for accessories for pairing.
Set Up Remote
Buttons
Add Device: Add a TV, AV receiver, or a soundbar to
experience remote button controls. With the remote
control, you can control volume, power, and input on
TVs, AV receivers, and soundbars.
Using Your Projector
Select an App
Once connected to a wireless network, you can access online services,
enjoy movies, music, and pictures, and browse online. Apart from the
pre-installed apps, you can also download more apps from Google Play.
Voice Assistant
After setup, press the Google Assistant button on the remote, you can
speak to the Google Assistant and request your commands.
Wireless Screen Mirroring
Wirelessly cast movies, games, and music from your compatible iOS,
MacOS, Android, or Windows device right to Nebula Cosmos Laser /
Cosmos Laser 4K.
T
•Make sure that Nebula projector and your device are connected
to the same network. The network can be a WiFi network or your
phone's hotspot.
• Certain content may be unavailable to be cast due to copyright
restrictions. In this case, you can stream the content via the same
app installed on the projector. For example, copyrighted content
from Netflix cannot be mirrored or cast. You need to download
Netflix from Google Play.
iOS Devices
iOS devices support AirPlay while your Nebula projector does not
have AirPlay preloaded. You need to install the Nebula Manager app
from Google Play, and then install the AirScreen app from the Nebula
Manager app to enable AirPlay on your Nebula projector.

English
English
18 19
Screen Mirroring From iPhone or iPad:
1. Swipe up to display the control console and tap the AirPlay icon.
2. Select “D2341/D2350” as the device you want to cast to.
Streaming Video From iPhone or iPad:
1. Open the streaming apps you want to cast on the Nebula projector
and select a video to play.
2. Click the AirPlay icon or cast icon in the top right corner to cast to
the projector.
Screen Mirroring From Mac:
Click the AirPlay icon on the Mac and select the Nebula projector to start
mirroring.
• To stop mirroring, click the AirPlay icon again and then select Turn
AirPlay Off.
• The AirPlay icon in the menu bar is blue when the function is
active.
Android Devices
Your Nebula projector supports Chromecast, which means you can
mirror or stream videos from your Android devices that support
Chromecast.
Screen Mirroring:
1. Go to Settings > Connected Devices > Connection Preferences >
Cast on your phone.
2. Select “D2341/D2350” as the device you want to cast to.
Streaming Videos:
Chromecast can only open applications that support Chromecast, such
as YouTube and Prime Video. To find more information about apps that
support Chromecast, please install the Google Home app on your phone.
1. Play a video and click the Chromecast button at the top to search
for a Chromecast-compatible device.
2. Select “D2341/D2350” as the device you want to cast to.
Windows 10 PC
You can stream videos from a Windows 10 PC to your Nebula projector
by using the Chrome browser.
1. Launch the Chrome browser on your Windows 10 computer, at the
top right corner of the browser. Click More > Cast.
2. Select “D2341/D2350” as the device you want to cast to.
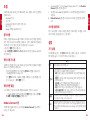
Bluetooth Speaker Mode
You can use this projector as a standalone Bluetooth speaker.
1. Press the Settings button on the projector, then select Bluetooth
Speaker Mode. You can also enter Bluetooth Speaker Mode in
the Nebula Connect app.
2. Enable Bluetooth on your phone and select "Nebula-XXXXXX" as the
device to be connected.
< Settings Bluetooth
Nebula-xxxxxx
Bluetooth
Connected
DEVICE
T
• The projector light will be shut off shortly.
• Press the Back button to exit Bluetooth Speaker Mode.
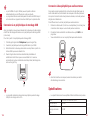
Playing Video from HDMI Devices
This projector supports connections with vairous HDMI playback
devices such as TV sticks, TV boxes, DVD players, set-top boxes (STB),
game consoles, or othre devices.
1. Connect this projector to an HDMI playback device with an HDMI
cable (not included).
2. Press the Input Source button on the remote to select your HDMI
playback device as the input source. Alternatively, select HDMI on
the home menu and press the Confirm button.

English
English
20 21
open
open
T
• The HDMI port and USB port cannot be used for video or audio
streaming simultaneously.
• The projector will automatically start the HDMI playback when
connected to an HDMI playback device for the first time.
Connecting to USB Storage Device
With this projector, you can enjoy music, video, and pictures that are
stored on a USB storage device (not inlcuded).
To play from a USB storage device:
1. Download the File Explorer app from Google Play.
2. Insert the USB storage device into the USB port.
3. Select music, videos, or photos from the USB drive that you want
to play.
4. Open the pre-installed multimedia player app and select the desired
files to play. If no multimedia player app is available, download one
from Google Play.
open
open
T
• The maximum memory capacity of the supported USB storage
device is 4 TB.
Connecting to External Sound Devices
This projector can also be connected to external sound output devices,
including headphones and speakers; when connected to external
speakers, the built-in speaker system is disabled.
To play sound through external sound devices:
1. Use a 3.5mm audio cable or an adapter (not included) to connect
your headphones or external speaker.
2. Connect the other end of the audio cable to the AUX port on this
projector.
• You will hear audio from your external sound devices.
T
• Before connecting headphones, turn down the volume to avoid
hurting your ears.

English
English
22 23
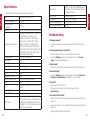
Specifications
• Specifications are subject to change without notice.
Input 100-240V~ 50/60 Hz, 2.5A
Power Consumption < 200 W
Standby Power
Consumption < 0.5 W
Resolution 1920x1080 (D2341); 3840x2160 (D2350)
Compatible Resolutions
480i (60Hz), 480p (60HZ), 576i (50Hz),
576p (50Hz), 720p (30Hz), 720p
(50Hz), 720p (60Hz), 1080p (24Hz),
1080p (30Hz), 1080p (50Hz), 1080p
(60Hz), 1080i (50Hz), 1080i (60Hz),
4K2K (23.976Hz), 4K2K (25Hz), 4K2K
(30Hz), 4K2K (50Hz), 4K2K (60Hz), 4096
(23.976Hz), 4096 (25Hz), 4096 (30Hz),
4096 (50Hz), 4096 (60Hz)
Contrast Ratio 1500000:1 (Dynamic)
Aspect Ratio 16:9
Screen Size 60"-150"
Throw Ratio 1.27:1
Light Source Laser (ALPD 3.0)
Focus Auto
Keystone Correction Auto
Speaker Output Power 20 W (D2341); 30 W (D2350)
Noise 28 dB
Wi-Fi MIMO Wi-Fi 2.4GHz/5.0GHz 802.11 a/b/
g/n/ac
Bluetooth Version 5.0
Bluetooth Range 25 m / 82 ft
Video Format
H.265 10-bit 4K*2K@75fps, VP9 4K*2K
@75fps, AVS2-P2 up to 4K*2K@75fps,
H.264 AVC 4K*2K@30fps, MPEG1/2/4
ASP, WMV/VC-1, AVS+, RealVideo8/9/10
and other video formats
Audio Format
MPEG1/2/4, MVC, MP3, WMA/WMA-pro,
FLAC, OGG (AC3, Dolby Digital Plus) and
other audio formats
Photo Format HD JPEG, BMP, PNG
USB Format FAT, FAT32, NTFS, EXFAT
Operating Temperature 0°C-35°C / 32°F-95°F
Remote Control Batteries AAA x 2
Troubleshooting
1. No image appears?
• Check the connection and make sure to select the correct input
source.
2. Is the image too large or too small?
• Move the projector closer to or further from the screen.
• Press the Settings button on the projector, then select Screen
Zoom and adjust the image size.
3. Blurry image?
• Place on a stable, flat surface and wait until the autofocus works.
4. Reversed image?
• Press the Settings button on the projector, then select Advanced
Settings > Projector Mode and switch to a correct state.
5. No sound?
• Make sure that mute isn't on.
• Please refer to the audio file formats supported. (See
Specifications)
6. The remote doesn't work?
• Make sure that the remote has been successfully paired with the
projector.
• Make sure there are not any obstacles between the remote and the
projector.
• Change batteries if they are depleted.

English
English
24 25
Notice
This product complies with the radio interference requirements of the
European Community.
Declaration of Conformity
Hereby, Anker Innovations Limited. declares that this device is in
compliance with the essential requirements and other relevant
provisions of Directive 2014/53/EU. For the Declaration of Conformity,
visit the Web site https://uk.seenebula.com.
This product complies with the radio interference requirements of the
United Kingdom.
Declaration of Conformity
Hereby, Anker Innovations Limited declares that this device is in
compliance with Radio Equipment Regulation 2017. The full text of
the UK declaration of conformity is available at the following internet
address: https://uk.seenebula.com.
RF exposure information for D2341 or D2350: The Maximum
Permissible Exposure (MPE) level has been calculated based on a
distance of d=20 cm between the device and the human body. To
maintain compliance with RF exposure requirement, use product that
maintain a 20cm distance between the device and human body.
Bluetooth Operating Frequency Range: 2402~2480 MHz;
Bluetooth Maximum Output Power: 6.99 dBm(EIRP);
2.4G Operating Frequency Range: 2402~2477 MHz;
2.4G Maximum Output Power: 5.84 dBm(EIRP).
RF exposure information for D0480: The Maximum Permissible
Exposure (MPE) level has been calculated based on a distance of d=20
cm between the device and the human body. To maintain compliance
with RF exposure requirement, use product that maintain a 20cm
distance between the device and human body.
Bluetooth Operating Frequency Range: 2402~2480 MHz;
Bluetooth Max Output Power: 8.96dBm(EIRP).
Wi-Fi Max Output Power: 19.67 dBm (EIRP for2.4G); 19.62 dBm (EIRP
for 5G);
Wi-Fi Operating Frequency Range: 2412~2472 MHz (2.4G); 5150~5250
MHz, 5725~5850 MHz (5G).
RF exposure information for C008: The Maximum Permissible
Exposure (MPE) level has been calculated based on a distance of d=20
cm between the device and the human body. To maintain compliance
with RF exposure requirement, use product that maintain a 20cm
distance between the device and human body.
Bluetooth Operating Frequency Range: 2402~2480 MHz;
Bluetooth Max Output Power: 8.2 dBm(EIRP).
The following importer is the responsible party (contract for EU
matters)
Anker Innovations Deutschland GmbH I Georg-Muche-Strasse 3, 80807
Munich, Germany
The following importer is the responsible party (contract for UK
matters):
Anker Technology (UK) Ltd I Suite B, Fairgate House, 205 Kings Road,
Tyseley, Birmingham, B11 2AA, United Kingdom
Your product is designed and manufactured with high quality
materials and components, which can be recycled and reused.
This symbol means the product must not be discarded as
household waste, and should be delivered to an appropriate
collection facility for recycling. Proper disposal and recycling
helps protect natural resources, human health and the
environment. For more information on disposal and recycling of
this product, contact your local municipality, disposal service,
or the shop where you bought this product.
Warning information for D0480
5150~5350 MHz (for IC: 5150~5250 MHz) can be used indoor only.

English
English
26 27
FCC Statement
This device complies with Part 15 of the FCC Rules. Operation is
subject to the following two conditions: (1) this device may not cause
harmful interference, and (2) this device must accept any interference
received, including interference that may cause undesired operation.
Warning: Changes or modifications not expressly approved by the party
responsible for compliance could void the user's authority to operate
the equipment.
Note: This equipment has been tested and found to comply with the
limits for a Class B digital device, pursuant to Part 15 of the FCC Rules.
These limits are designed to provide reasonable protection against
harmful interference in a residential installation.
This equipment generates uses and can radiate radio frequency energy
and, if not installed and used in accordance with the instructions, may
cause harmful interference to radio communications. However, there is
no guarantee that interference will not occur in a particular installation.
If this equipment does cause harmful interference to radio or television
reception, which can be determined by turning the equipment off and
on, the user is encouraged to try to correct the interference by one or
more of the following measures: (1) Reorient or relocate the receiving
antenna. (2) Increase the separation between the equipment and
receiver. (3) Connect the equipment into an outlet on a circuit different
from that to which the receiver is connected. (4) Consult the dealer or
an experienced radio/TV technician for help.
FCC Radio Frequency Exposure Statement
The device has been evaluated to meet general RF exposure
requirements. The device can be used in fixed/mobile exposure
condition. The min separation distance is 20cm.
Notice: Shielded cables
All connections to other computing devices must be made using
shielded cables to maintain compliance with FCC regulations.
The following importer is the responsible party.
Company Name: Fantasia Trading LLC
Address: 5350 Ontario Mills Pkwy, Suite 100, Ontario, CA 91764
Telephone: 1-800-988-7973
IC Statement:
This device complies with Industry Canada licence-exempt RSS
standard(s). Operation is subject to the following two conditions:
1. this device may not cause interference, and
2. this device must accept any interference, including interference
that may cause undesired operation of the device."
Le présent appareil est conforme aux CNR d'Industrie Canada
applicables aux appareils radio exempts de licence. L'exploitation est
autorisée aux deux conditions suivantes:
1. l'appareil nedoit pas produire de brouillage, et
2. l'utilisateur de l'appareil doit accepter tout brouillage radioélectrique
subi, même si le brouillage est susceptible d'en compromettre le
fonctionnement."
This Class B digital apparatus complies with Canadian ICES-003.
Cet appareil numérique de la classe B est conforme à la norme NMB-
003 du Canada.
IC RF Statement:
When using the product, maintain a distance of 20cm from the body to
ensure compliance with RF exposure requirements.
Lors de l'utilisation du produit, maintenez une distance de 20 cm du
corps afin de vous conformer aux exigences en matière d'exposition
RF.
5150~5250 MHz can be used indoors only.
5150~5250 MHz peut être utilisé à l'intérieur uniquement.
Trademarks
HDMI, and HDMI logo and High-Definition Multimedia Interface are
trademarks or registered trademarks of HDMI licensing LLC in the
United States and other countries.
The Bluetooth® word mark and logos are registered trademarks
owned by the Bluetooth SIG, Inc. and any use of such marks by Anker
Innovations Limited is under license. Other trademarks and trade
names are those of their respective owners.

29
Deutsch
English
28
Manufactured under license from Dolby Laboratories. Dolby, Dolby
Audio, and the double-D symbol are trademarks of Dolby Laboratories
Licensing Corporation.
Warranty
30-Day Money-Back Guarantee for Any Reason
You may return your undamaged product and packaging within 30 days
of purchase to receive a FULL REFUND for any reason. If the reason
for return isn’t quality-related, the customer must pay for the return
shipping.
12-Month Warranty for Quality-Related Issues
Nebula’s products are warrantied to be free from material and
workmanship defects for 12 months from the date of purchase. Within
this period, Nebula will provide a replacement and cover any return
shipping costs for products that fail in normal use.
Please Note: Any provided shipping labels must be used within 20 days
from the date they’re issued by Nebula Support.
Anker Innovations Limited
Room 1318-19, Hollywood Plaza, 610 Nathan Road, Mongkok,
Kowloon, Hong Kong
Wichtige Sicherheitshinweise
Lesen Sie alle Anweisungen sorgfältig durch, bevor Sie dieses Gerät
verwenden. Nehmen Sie keine Änderungen oder Einstellungen vor, die
nicht in diesem Handbuch beschrieben sind. Wenn Personenschäden,
Datenverluste oder Schäden auf eine Missachtung der Anweisungen
zurückzuführen sind, greift die Garantie nicht.
Einrichtung
• Stellen Sie keine schweren oder scharfkantigen Gegenstände auf
dieses Gerät.
• Nehmen Sie das Gerät nicht auseinander,um Stromschläge zu
vermeiden.
• Verwenden Sie nur das vom Hersteller zugelassene Zubehör.
• Halten Sie das Gerät von jeglichen Wärmequellen fern.
• Bewahren Sie es an einem trockenen und gut belüfteten Ort auf.
• Stellen Sie dieses Gerät nicht auf weiche Oberflächen wie
Tischdecken oder Teppichböden. Das Gerät könnte Feuer fangen.
• Schauen Sie während des Betriebs nicht direkt in das
Projektorobjektiv. Der intensive Lichtstrahl kann Ihre Augen
schädigen.
• Zum Schutz vor Überhitzung dürfen die Belüftungsöffnungen nicht
abgedeckt oder verstopft werden.
• Verringern Sie das Brand- und/oder Stromschlagrisiko, indem Sie
das Gerät nicht Regen oder Feuchtigkeit aussetzen. Mit Wasser
gefüllte Gegenstände wie Vasen dürfen nicht auf dem Gerät
abgestellt werden.
• Schalten Sie das Produkt aus und entfernen Sie das Kabel, wenn von
ihm Rauch oder eigenartige Gerüche ausgehen.
• Trennen Sie den Stecker von der Stromquelle, wenn Sie das Produkt
längere Zeit nicht verwenden.
• Gehen Sie mit dem Gerät stets sorgsam um. Vermeiden Sie es, das
Objektiv zu berühren.
• Lassen Sie Kinder nicht unbeaufsichtigt mit dem Gerät hantieren.
• Vermeiden Sie extreme Erschütterungen. Hierdurch können die
internen Komponenten beschädigt werden.
• Das Netzkabel muss an eine geerdete Steckdose angeschlossen
werden.
• Die Stromversorgung sollte in der Nähe des Geräts installiert werden
und bei Geräten mit Stecker muss die Steckdose leicht zugänglich
sein.

30 31
Deutsch
Deutsch
• Verwenden Sie ausschließlich das vom Hersteller mitgelieferte
Netzkabel. Die Verwendung eines nicht zugelassenen Netzkabels
birgt Risiken und verletzt die Garantiebedingungen.
• Der Stecker des Netzkabels ist die Trennvorrichtung des Geräts.
Sobald der Projektor ausgesteckt wurde, ist er von der Stromquelle
getrennt.
• Verwenden Sie das Gerät nicht in einer Umgebung, in der die
Temperatur zu hoch oder zu niedrig ist. Setzen Sie das Gerät
niemals zu starker Sonneneinstrahlung oder einer zu feuchten
Umgebung aus.
• Vor dem Herstellen oder Ändern von Verbindungen stellen Sie bitte
sicher, dass alle Geräte vom Stromnetz getrennt sind.
• Fassen Sie das Netzkabel am Stromanschluss niemals mit nassen
Händen an.
• Der geeignete Temperaturbereich für den Projektor D2341 oder
D2350 und seiner Zubehörteile liegt zwischen 0°C und 35°C.
• Der geeignete Temperaturbereich für den 4K Streaming Dongle
D0480 und seiner Zubehörteile liegt zwischen 0°C und 40°C.
• Die geeignete Temperatur für die Fernbedienung C008 beträgt
maximal 45°C.
• Es wird empfohlen, das Gerät in einer Umgebung mit einer
Temperatur von 5°C bis 25°C zu betreiben.
• Stellen Sie das Gerät während des Betriebs in einer Umgebung mit
normaler Raumtemperatur und angemessener Belüftung auf.
• Möglicherweise geht von diesem Produkt eine gefährliche optische
Strahlung für die Augen aus. Blicken Sie nicht direkt in den
Lichtstrahl.
Akku
• Die Fernbedienung enthält Batterien, die verschluckt werden könnten.
Bewahren Sie die Fernbedienung außerhalb der Reichweite von
Kindern auf.
• Halten Sie die Batterien von Hitze, direkter Sonneneinstrahlung oder
Feuer fern, um eine Explosionsgefahr zu vermeiden. Entsorgen Sie
die Batterien niemals durch Verbrennen.
• Entfernen Sie die Batterien, wenn die Fernbedienung über einen
längeren Zeitraum nicht verwendet wurde.
• Ersetzen Sie die Batterien nur durch den gleichen oder einen
gleichwertigen Typ.
• Batterien enthalten chemische Substanzen und sollten
ordnungsgemäß entsorgt werden.
VORSICHT: BEI AUSTAUSCH DER BATTERIE DURCH EINEN
UNGEEIGNETEN BATTERIETYP BESTEHT EXPLOSIONSGEFAHR.
GEBRAUCHTE AKKUS ENTSPRECHEND DEN ANWEISUNGEN
ENTSORGEN.
Schutz des Gehörs
• Zur Vermeidung von Gehörschäden nicht über längere Zeiträume
bei hoher Lautstärke verwenden. Stellen Sie die Lautstärke auf einen
sicheren Pegel ein.
Reinigung
• Verwenden Sie ein weiches, fusselfreies Tuch. Verwenden
Sie für die Reinigung keine flüssigen, gasförmigen oder leicht
entflammbaren Reinigungsmittel.
• Verwenden Sie keine flüssigen Reinigungsmittel zum Reinigen
des Objektivs. Andernfalls könnte die Beschichtung des Objektivs
beschädigt werden.
• Wischen Sie die Oberflächen vorsichtig ab. Achten Sie darauf, die
Oberfläche nicht zu verkratzen.
• Verwenden Sie Objektivreinigungspapier, um die Linse des
Projektors zu reinigen.
Reparaturen
• Nehmen Sie keine Reparaturen an diesem Gerät vor. Lassen Sie den
Projektor nur von einem autorisierten Servicecenter reparieren.
• Unsachgemäße Wartung kann zu Verletzungen und zu Schäden an
diesem Gerät führen.
• Überlassen Sie alle Wartungsarbeiten qualifiziertem Servicepersonal.
Lasersicherheit
• RG1 IEC62471-5:2015
• Entspricht IEC60825-1:2014 Klasse1 und IEC62471-5:2015
Risikogruppe1.
• Während der Lampen- oder Produktwartung können potenzielle
Gefahren auftreten.
• Die Wartung darf nur von autorisiertem und geschultem

32 33
Deutsch
Deutsch
Servicepersonal durchgeführt werden.
• Öffnen Sie nicht das Gehäuse des Produkts.
• Wenn das Gehäuse des Produkts beschädigt ist, verwenden Sie es
nicht mehr.
• Öffnen Sie nicht das Gehäuse des Lasermoduls im Inneren des
Produkts.
• Wenn das Gehäuse des Lasermoduls im Inneren des Produkts
beschädigt ist, verwenden Sie es nicht mehr.
• Laser im Inneren; es besteht die Gefahr von Haut- oder
Hornhautverbrennungen.
• Das Etikett befindet sich an der Unterseite des Gehäuses.
IM LIEFERUMFANG
1 2 3
4 5 6
QSG
1
Nebula Cosmos Laser / Cosmos Laser 4K
2
Nebula 4K Streaming Dongle
3
Fernbedienung
4
Stromkabel
5
AAA-Batterien
x 2
6
KURZANLEITUNG
Auf einen Blick
Ober- und Vorderseite
7
8
3
4
2
6
5
1
1Objektiv
2
Griff
3
Ein-/Aus-Taste
• Zum Einschalten drücken.
• Zum Ausschalten 3Sekunden lang gedrückt halten.
4Navigationstasten
• Zum Navigieren durch das Menü.
5Auswahl bestätigen
6
Laut/Leise
7Zurück
• Zurück zu einem vorherigen Menü.
• Im Bluetooth-Lautsprechermodus die Taste erneut drücken,
um in den Projektormodus zu wechseln.
8Einstellungen (Projektor)

34 35
Deutsch
Deutsch
Rückseite
1 4
5
6
2 3
78
1Netzeingangsbuchse
• Anschluss für die Stromversorgung.
2HDMI
• Anschluss für ein Wiedergabegerät mit HDMI-Ausgang.
3USB
• Zum Anschluss eines USB-Speichergeräts.
4AUX
• Anschluss für Kopfhörer oder einen externen Lautsprecher.
5Infrarot-Empfänger
6Rückseite
7Fach für Streaming-Dongle
8Micro-USB/Micro-HDMI Anschlüsse
• Anschluss für den Streaming-Dongle.
Unterseite
1
11/4" Stativgewinde
Fernbedienung
19
10
11
12
13
14
15
16
17
2
3
4
5
6
7
8
1Ein-/Ausschalten oder in den Standby-Modus
wechseln.
2Google Assistant aktivieren.

36 37
Deutsch
Deutsch
3
• Eine App öffnen, verschieben oder aus
Ihren Favoriten auf dem Startbildschirm
entfernen.
• Einen Kanal auswählen, der zur
Beobachtungsliste hinzugefügt oder
daraus entfernt werden soll.
4Navigationstasten Zum Navigieren durch das Menü.
5Zurück zum vorherigen Bildschirm oder zur
vorherigen Aktion.
6Laut/Leise
7YouTube öffnen.
8Prime Video öffnen.
9Eingangsquelle auswählen.
10 Einstellungsseite aufrufen.
11 Bestätigungstaste Auswahl bestätigen.
12 Guide (Live TV EPG öffnen)
13 Zum Startbildschirm wechseln.
14 Kanal hoch/runter.
15 Sound stummschalten oder wieder
einschalten.
16 Netflix öffnen.
17 Disney+ öffnen.
T
• Halten Sie auf der Fernbedienung gleichzeitig die Home- und
die Zurück-Taste etwa 10Sekunden lang gedrückt. Nachdem
die Verbindung mit Bluetooth hergestellt wurde, können Sie die
Fernbedienung zum Betrieb des Geräts verwenden.
Erste Schritte
Installieren des 4K Streaming Dongle
1. Schieben Sie die hintere Abdeckung nach oben, um sie zu öffnen.
2. Schließen Sie den im Lieferumfang enthaltenen 4K Streaming
Dongle ordnungsgemäß an die Micro-USB/Micro-HDMI Anschlüsse
an und schließen Sie dann das Dongle-Fach, indem Sie auf die
hintere Abdeckung drücken.
open
Anschließen an die Stromversorgung
Schließen Sie das Netzkabel an das Gerät und dann an die
Stromversorgung an.
open
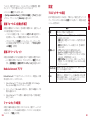
A página está carregando...
A página está carregando...
A página está carregando...
A página está carregando...
A página está carregando...
A página está carregando...
A página está carregando...
A página está carregando...
A página está carregando...
A página está carregando...
A página está carregando...
A página está carregando...
A página está carregando...
A página está carregando...
A página está carregando...
A página está carregando...
A página está carregando...
A página está carregando...
A página está carregando...
A página está carregando...
A página está carregando...
A página está carregando...
A página está carregando...
A página está carregando...
A página está carregando...
A página está carregando...
A página está carregando...
A página está carregando...
A página está carregando...
A página está carregando...
A página está carregando...
A página está carregando...
A página está carregando...
A página está carregando...
A página está carregando...
A página está carregando...
A página está carregando...
A página está carregando...
A página está carregando...
A página está carregando...
A página está carregando...
A página está carregando...
A página está carregando...
A página está carregando...
A página está carregando...
A página está carregando...
A página está carregando...
A página está carregando...
A página está carregando...
A página está carregando...
A página está carregando...
A página está carregando...
A página está carregando...
A página está carregando...
A página está carregando...
A página está carregando...
A página está carregando...
A página está carregando...
A página está carregando...
A página está carregando...
A página está carregando...
A página está carregando...
A página está carregando...
A página está carregando...
A página está carregando...
A página está carregando...
A página está carregando...
A página está carregando...
A página está carregando...
A página está carregando...
A página está carregando...
A página está carregando...
A página está carregando...
A página está carregando...
A página está carregando...
A página está carregando...
A página está carregando...
A página está carregando...
A página está carregando...
A página está carregando...
A página está carregando...
A página está carregando...
A página está carregando...
A página está carregando...
A página está carregando...
A página está carregando...
A página está carregando...
A página está carregando...
A página está carregando...
A página está carregando...
A página está carregando...
A página está carregando...
A página está carregando...
A página está carregando...
A página está carregando...
A página está carregando...
A página está carregando...
A página está carregando...
A página está carregando...
A página está carregando...
A página está carregando...
A página está carregando...
A página está carregando...
A página está carregando...
A página está carregando...
A página está carregando...
A página está carregando...
A página está carregando...
A página está carregando...
A página está carregando...
A página está carregando...
A página está carregando...
A página está carregando...
A página está carregando...
A página está carregando...
A página está carregando...
A página está carregando...
A página está carregando...
A página está carregando...
A página está carregando...
A página está carregando...
A página está carregando...
A página está carregando...
A página está carregando...
A página está carregando...
A página está carregando...
A página está carregando...
A página está carregando...
A página está carregando...
A página está carregando...
A página está carregando...
A página está carregando...
-
 1
1
-
 2
2
-
 3
3
-
 4
4
-
 5
5
-
 6
6
-
 7
7
-
 8
8
-
 9
9
-
 10
10
-
 11
11
-
 12
12
-
 13
13
-
 14
14
-
 15
15
-
 16
16
-
 17
17
-
 18
18
-
 19
19
-
 20
20
-
 21
21
-
 22
22
-
 23
23
-
 24
24
-
 25
25
-
 26
26
-
 27
27
-
 28
28
-
 29
29
-
 30
30
-
 31
31
-
 32
32
-
 33
33
-
 34
34
-
 35
35
-
 36
36
-
 37
37
-
 38
38
-
 39
39
-
 40
40
-
 41
41
-
 42
42
-
 43
43
-
 44
44
-
 45
45
-
 46
46
-
 47
47
-
 48
48
-
 49
49
-
 50
50
-
 51
51
-
 52
52
-
 53
53
-
 54
54
-
 55
55
-
 56
56
-
 57
57
-
 58
58
-
 59
59
-
 60
60
-
 61
61
-
 62
62
-
 63
63
-
 64
64
-
 65
65
-
 66
66
-
 67
67
-
 68
68
-
 69
69
-
 70
70
-
 71
71
-
 72
72
-
 73
73
-
 74
74
-
 75
75
-
 76
76
-
 77
77
-
 78
78
-
 79
79
-
 80
80
-
 81
81
-
 82
82
-
 83
83
-
 84
84
-
 85
85
-
 86
86
-
 87
87
-
 88
88
-
 89
89
-
 90
90
-
 91
91
-
 92
92
-
 93
93
-
 94
94
-
 95
95
-
 96
96
-
 97
97
-
 98
98
-
 99
99
-
 100
100
-
 101
101
-
 102
102
-
 103
103
-
 104
104
-
 105
105
-
 106
106
-
 107
107
-
 108
108
-
 109
109
-
 110
110
-
 111
111
-
 112
112
-
 113
113
-
 114
114
-
 115
115
-
 116
116
-
 117
117
-
 118
118
-
 119
119
-
 120
120
-
 121
121
-
 122
122
-
 123
123
-
 124
124
-
 125
125
-
 126
126
-
 127
127
-
 128
128
-
 129
129
-
 130
130
-
 131
131
-
 132
132
-
 133
133
-
 134
134
-
 135
135
-
 136
136
-
 137
137
-
 138
138
-
 139
139
-
 140
140
-
 141
141
-
 142
142
-
 143
143
-
 144
144
-
 145
145
-
 146
146
-
 147
147
-
 148
148
-
 149
149
-
 150
150
-
 151
151
-
 152
152


Nebula D23501F1 Cosmos Laser 4K Projector Manual do usuário
- Categoria
- Projetores de dados
- Tipo
- Manual do usuário
em outras línguas
- español: Nebula D23501F1 Cosmos Laser 4K Projector Manual de usuario
- français: Nebula D23501F1 Cosmos Laser 4K Projector Manuel utilisateur
- italiano: Nebula D23501F1 Cosmos Laser 4K Projector Manuale utente
- English: Nebula D23501F1 Cosmos Laser 4K Projector User manual
- Nederlands: Nebula D23501F1 Cosmos Laser 4K Projector Handleiding
- Deutsch: Nebula D23501F1 Cosmos Laser 4K Projector Benutzerhandbuch
- 日本語: Nebula D23501F1 Cosmos Laser 4K Projector ユーザーマニュアル