
1
What are Add-On Effects?
Add-On Effects are software packages that install additional high-quality effects programs on
digital consoles.
Studio Manager REV-X Window
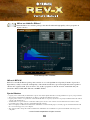
What is REV-X?
REV-X is an Add-On Effects package that consists of a reverb algorithm developed by Yamaha. It provides a
high-density, richly reverberant sound quality, with smooth attenuation, spread and depth that work together to
enhance the original sound. You can choose one of three programs to suit the acoustic sound field and your
intentions: REV-X Hall, REV-X Room, and REV-X Plate.
Special Notices
• Copying of the commercially available music sequence data and/or digital audio files is strictly prohibited except for your personal use.
• The software and this Owner’s Manual are exclusive copyrights of Yamaha Corporation.
• Copying of the software or reproduction of this manual in whole or in part by any means is expressly forbidden without the written
consent of the manufacturer.
• Yamaha makes no representations or warranties with regard to the use of the software and documentation and cannot be held
responsible for the results of the use of this manual and the software.
• The screen displays as illustrated in this Owner’s Manual are for instructional purposes, and may appear somewhat different from
the screens which appear on your computer.
• The company names and product names in this Owner’s Manual are the trademarks or registered trademarks of their respective
companies.
© 2003 Yamaha Corporation. All rights reserved.

2
Installing REV-X
See the Add-On Effects Installation Guide for more information on installing REV-X.
Using REV-X
As with other effects, you can recall and edit the REV-X programs on the console or Studio Manager. The basic
operation is as follows:
1
Select one of the internal effects processors.
2
Patch the signal to and from the currently selected effects processor.
3
Locate the Effects Library page.
4
Select REV-X Hall, REV-X Room or REV-X Plate.
5
Recall the selected effect.
6
Locate the Effects Edit page.
7
Set the parameters. (See the “Part Names and Functions” section for more information on REV-X
parameters.)
The procedure for recalling and editing REV-X varies depending on the console you are using.
Refer to the Owner’s Manual that came with your console for more information.
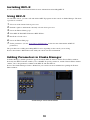
Editing Parameters in Studio Manager
In Studio Manager, editable parameters appear in both the REV-X window and the Generic Editor window.
Basically, the REV-X window enables you to edit REV-X specific parameters, and the Generic Editor window
enables you to edit parameters common to the REV-X and other Effects.
Refer to the Studio Manager Owner’s Manual for your console for more information regarding the Generic
Editor window.
Studio Manager Generic Editor Window

3
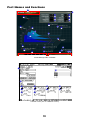
Part Names and Functions
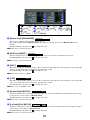
Studio Manager REV-X Window
Console screen (This is a DM2000 screen.)
1
2
3
4
5
6
7
8
9
)
!
@
3
4
5
6
7
8
#
$
%
º ¡
^
&
*(
$
$
9
)
!
@
º
3 4 ) !
7 6 5 @
8 9
1
¡

4
In the following section:
Functions marked with are available in Studio Manager.
Functions marked with are available on the console.
EFFECT NAME
The effects name appears here.
[OPEN/CLOSE]
Click here to open or close the parameter window.
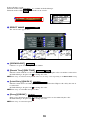
[Reverb Time]/[REV TIME]
Duration of time until the reverberation attenuates and stops. Higher values extend the reverberation.
In Studio Manager, drag the icon to change the value.
n
The range is from 0.3s through 30.0s. However, the range varies depending on the
Room Size
setting.
[Initial Delay]/[INI.DLY]
Duration of time between sound input and the start of reverberation. Higher values delay the start of
reverberation.
In Studio Manager, drag the icon to change the value.
n
The range is from 0.0ms through 125.0ms.
[Decay]/[DECAY]
Shape of reverberation envelope. Reverberation characteristics are determined by the value.
In Studio Manager, drag the icon to change the value.
n
The range is from 0 through 53.
Studio Manager
Console
1
1
1
Studio Manager Console
3 4 ) !
7 6 5 @
8 9
2
3
4
5
6
7
8
9
)
!
@
2
Studio Manager
3
Studio Manager Console
4
Studio Manager Console
5
Studio Manager Console

5
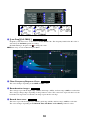
[Room Size]/[ROOMSIZE]
Size of space. Higher values simulate larger spaces.
This value is linked with the
Reverb Time
value. When you change this value, the
Reverb Time
value
changes.
In Studio Manager, drag the icon to change the value.
n
The range is from 0 through 28.
[Diffusion]/[DIFF.]
Density and spread of reverberation. Higher values increase the density and enhance the spread.
In Studio Manager, drag the icon to change the value.
n
The range is from 0 through 10.
[HPF]
This filter cuts the low frequency range of the reverberation. The range below the frequency specified by this
value is cut. This filter does not affect the original source sound.
In Studio Manager, drag the icon to change the value.
n
The range is Thru to 8.00kHz.
[LPF]
This filter cuts the high frequency range of the reverberation. The range above the frequency specified by this
value is cut. This filter does not affect the original source sound.
In Studio Manager, drag the icon to change the value.
n
The range is 1.00kHz to Thru.
[Hi Ratio]/[HI.RATIO]
Length of reverberation in the high frequency range. The reverberation duration of the high frequency range
is expressed as a ratio relative to
Reverb Time
.
In Studio Manager, drag the icon to change the value.
n
The range is from 0.1 through 1.0.
[Lo Ratio]/[LO.RATIO]
Length of reverberation in the low frequency range. The reverberation duration of the low frequency range is
expressed as a ratio relative to
Reverb Time
.
In Studio Manager, drag the icon to change the value.
n
The range is from 0.1 through 1.4.
3 4 ) !
7 6 5 @
8 9
2
3
4
5
6
7
8
9
)
!
@
6
Studio Manager Console
7
Studio Manager Console
8
Studio Manager Console
9
Studio Manager Console
)
Studio Manager Console
!
Studio Manager Console

6
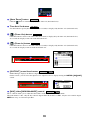
[Low Freq]/[LO.FREQ.]
Frequency value that serves as the basis for the Lo Ratio value. The frequency band below this value is
affected by the Lo Ratio parameter setting.
In Studio Manager, drag the icon to change the value.
n The range is from 22.0Hz through 18.0kHz.
Filter Frequency Response Curve
The curve changes depending on the HPF and LPF values.
Reverberation images
These images represent the high-range (10kHz), mid-range (1kHz), and low-range (100Hz) reverberation.
These images change shape depending on the parameter values. The vertical axis represents the level; the
horizontal axis represents reverb time; the shape represents the envelope.
Reverb time curve
This curve represents the high-range (10kHz), mid-range (1kHz), and low-range (100Hz) reverb time.
The curve changes depending on the Reverb Time, Hi Ratio, and Lo Ratio parameter values.
3 4 ) !
7 6 5 @
8 9
2
3
4
5
6
7
8
9
)
!
@
@
Studio Manager Console
7
8
#
$
%
$
$
)
!
@
#
Studio Manager
$
Studio Manager
%
Studio Manager

7
[Auto Zoom] button
Click the button to automatically adjust the time axis (horizontal axis).
Time Axis Set button
Use this button to specify the time duration (in seconds) as displayed by the time axis (horizontal axis).
[] (Zoom Out) button
Click this button to increase the time value (in seconds) as displayed by the time axis (horizontal axis).
As a result, the display zooms out on the horizontal axis.
[] (Zoom In) button
Click this button to decrease the time value (in seconds) as displayed by the time axis (horizontal axis).
As a result, the display zooms in on the horizontal axis.
[OUTPUT] meter/Level meter
Studio Manager displays the Effects output level.
On the console, you can select the input level or output level to be displayed using the METER: [IN][OUT]
switch.
[MIX] slider/[MIX BALANCE] control
These controls enable you to adjust the mix balance of the dry and wet (effect) sounds.
When the balance is 0%, only the dry sound is output. When the balance is 100%, only the wet sound is output.
n The range is from 0 through 100%.
^
&
* (
^
Studio Manager
&
Studio Manager
*
Studio Manager
(
Studio Manager
6
º
º
º
Studio Manager Console
¡
* (
¡
¡
Studio Manager
Console

8
U.R.G., Pro Audio & Digital Musical Instrument Division, Yamaha Corporation
© 2003 Yamaha Corporation
312IP-01A0
-
 1
1
-
 2
2
-
 3
3
-
 4
4
-
 5
5
-
 6
6
-
 7
7
-
 8
8


Yamaha Rev-X Manual do proprietário
- Tipo
- Manual do proprietário
- Este manual também é adequado para
em outros idiomas
- español: Yamaha Rev-X El manual del propietario
- français: Yamaha Rev-X Le manuel du propriétaire
- italiano: Yamaha Rev-X Manuale del proprietario
- English: Yamaha Rev-X Owner's manual
- русский: Yamaha Rev-X Инструкция по применению
- Nederlands: Yamaha Rev-X de handleiding
- Deutsch: Yamaha Rev-X Bedienungsanleitung
- dansk: Yamaha Rev-X Brugervejledning
- čeština: Yamaha Rev-X Návod k obsluze
- svenska: Yamaha Rev-X Bruksanvisning
- polski: Yamaha Rev-X Instrukcja obsługi
- Türkçe: Yamaha Rev-X El kitabı
- suomi: Yamaha Rev-X Omistajan opas
- română: Yamaha Rev-X Manualul proprietarului
Artigos relacionados
-
Yamaha SPX2000 Manual do proprietário
-
Yamaha LSP Manual do usuário
-
Yamaha V96i Manual do usuário
-
Yamaha R96 Manual do proprietário
-
-
-
Yamaha DM2000 Manual do usuário
-
-
-