
—
ABB DRIVES FOR HVAC
ACH580 HVAC control program
Quick start-up guide
EN
English . . . . . . . 3
DE
Deutsch . . . . . 13
ES
Español . . . . . . 23
FI
Suomi . . . . . . . 33
FR
Français . . . . . 43
IT
Italiano . . . . . . 53
NL
Nederlands . . . 63
PT
Português . . . . 73
RU
Русский . . . . . 83
SV
Svenska . . . . . . 93
3AXD50000047658 Rev B MUL
EFFECTIVE: 2019-09-19


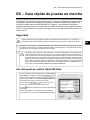
EN – Quick start-up guide
This guide describes how to start-up the drive using the First start assistant on the
Hand-Off-Auto control panel. For complete information on start-up including Normal ID run,
see ACH580 firmware manual (3AXD50000027537 [English]). Normal ID run is required
during the drive start-up, when the load torque is higher than 20% or the machinery is not
able to withstand the nominal torque transient during the ID run.
Safety
Obey the safety instructions in the drive hardware manual. If you ignore them, injury or death, or
damage to the equipment can occur.
Make sure that the installation work is complete. Make sure that cover of the drive and the cable box, if
included, are on place. In cabinet drives, make sure that the cabinet doors are closed.
Check that the starting of the motor does not cause any danger. De-couple the driven machine
if there is a risk of damage in case of an incorrect direction of rotation. Before you activate the
automatic fault reset or automatic restart functions of the drive control program, make sure that
no dangerous situations can occur. These functions reset the drive automatically and continue
operation after a fault or supply break. If these functions are activated, the installation must be
clearly marked as defined in IEC/EN 61800-5-1, subclause 6.5.3, for example, "THIS MACHINE
STARTS AUTOMATICALLY".
Using the Hand-Off-Auto control panel
EN – Quick start-up guide 3
R0-
R4
EN
DA
DE
ES
FI
FR
IT
NL
PL
PT
RU
SV
TR
ZH
EN – Quick start-up guide
This guide describes how to start-up the drive using the First start assistant on the
Hand-Off-Auto control panel. For complete information on start-up, see ACH580
firmware manual (3AXD50000027537 [English]).
Note: Automatic selection of supply voltage is not supported in ACH580-31. You must
select the supply voltage manually using parameter 95.01. See steps for
Commissioning with parameters on page 9.
Start-up with the First start assistant on an Hand-Off-Auto
control panel
Safety
Do not start-up the drive unless you are a qualified electrician.
Read and obey the instructions in chapter Safety instructions at the beginning of the
Hardware manual of the drive. Ignoring the instructions can cause physical injury or death, or
damage to the equipment
Check the installation. See chapter Installation checklist in the Hardware manual of the
drive.
Make sure there is no active start on (DI1 in factory settings, that is, HVAC default).
The drive will start up automatically at power-up if the external run command is on
and the drive is in the external control mode.
Check that the starting of the motor does not cause any danger.
De-couple the driven machine if
• there is a risk of damage in case of an incorrect direction of rotation, or
•a Normal ID run is required during the drive start-up, when the load torque is higher
than 20% or the machinery is not able to withstand the nominal torque transient during
the ID run.
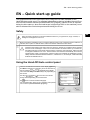
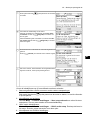
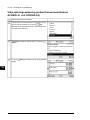
Hints on using the assistant control panel
The two commands at the bottom of the display
(Options and Menu in the figure on the right),
show the functions of the two softkeys and
located below the display. The commands
assigned to the softkeys vary depending on the
context.
Use keys , , and to move the cursor
and/or change values depending on the active
view.
Key shows a context-sensitive help page.
For more information, see ACX-AP-x assistant
control panels user’s manual (3AUA0000085685
[English]).
?
ACH580 QSG.book Page 3 Friday, September 1, 2017 7:53 PM
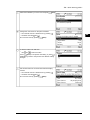
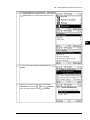
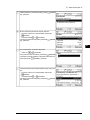
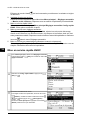
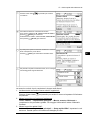
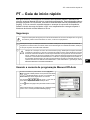
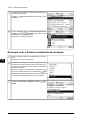
The two commands at the bottom of the display (Options
and Menu in the figure on the right), show the functions of
the two softkeys and located below the display.
The commands assigned to the softkeys vary depending on
the context.
Use keys , , and to move the cursor and/or
change values depending on the active view.
Key shows a context-sensitive help page.
For more information, see ACS-AP-x assistant control panels
user’s manual (3AUA0000085685 [Englisch]).
EN – Quick start-up guide 3
EN
DE
ES
FI
FR
IT
NL
PT
RU
SV

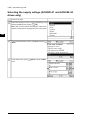
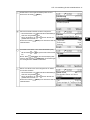
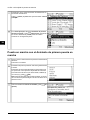
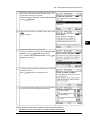
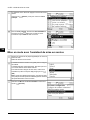
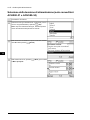
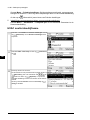
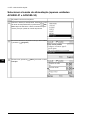
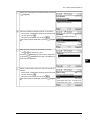
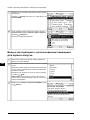
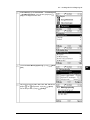
Selecting the supply voltage (ACH580-31 and ACH580-34
drives only)
Power up the drive.
Select the language you want to use by highlighting it (if not
already highlighted) and pressing (OK).
Note: After you have selected the language, it takes a few
minutes to download the language file to the control panel.
In the First start assistant screen, select Exit and press
(Next).
In the Home screen, press (Menu) to enter the Main
menu.
4 EN – Quick start-up guide
EN
DE
ES
FI
FR
IT
NL
PT
RU
SV

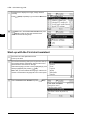
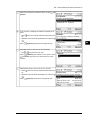
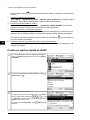
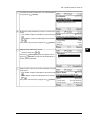
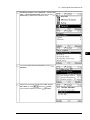
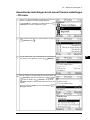
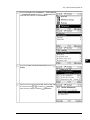
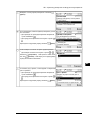
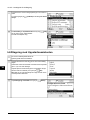
In the Main menu, go to Parameters → Complete list →
95 HW configuration, pressing (Select) repeatedly to
select parameter 95.01.
In parameter 95.01 Supply voltage, press (Edit).
Select supply voltage as 380...415 V or 440...480 V, using
and keys. Press (Save).
To cancel the selection, press (Cancel).
EN – Quick start-up guide 5
EN
DE
ES
FI
FR
IT
NL
PT
RU
SV

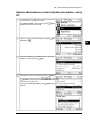
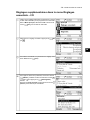
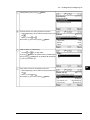
Parameter 95.01 displays the supply voltage selected
manually.
Press (Back) repeatedly to go back to the Main menu.
In the Main menu, select First start assistant and press
(Select) to enter the First start assistant menu.
Continue with the following steps.
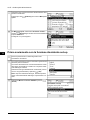
Start-up with the First start assistant
Have the motor name plate data at hand.
Power up the drive.
The First start assistant guides you through the first start-up.
The assistant begins automatically. Wait until the control
panel enters the view shown on the right
Select the language you want to use by highlighting it (if not
already highlighted) and pressing (OK).
Note: After you have selected the language, it takes a few
minutes to download the language file to the control panel.
Select Commission the ACH580 and press (Next).
6 EN – Quick start-up guide
EN
DE
ES
FI
FR
IT
NL
PT
RU
SV

Select the localization you want to use and press (Next).
Change the units shown on the panel if needed.
•
Go to the edit view of a selected row by pressing .
•
Scroll the view with and .
Go to the next view by pressing (Next).
To select a value in an edit view:
•
Use and to select the value.
Press (Save) to accept the new setting, or press
(Cancel) to go back to the previous view without making
changes.
Set the date and time as well as date and time display
formats.
•
Go to the edit view of a selected row by pressing .
•
Scroll the view with and .
Go to the next view by pressing (Next).
EN – Quick start-up guide 7
EN
DE
ES
FI
FR
IT
NL
PT
RU
SV

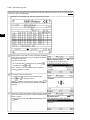
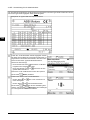
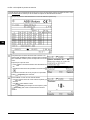
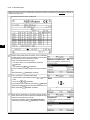
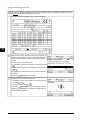
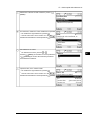
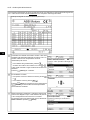
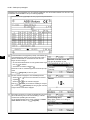
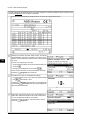
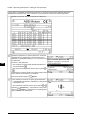
Refer to the motor nameplate for the following nominal value settings of the motor. Enter the values exactly
as shown on the motor nameplate.
Example of a nameplate of an induction (asynchronous) motor:
Check that the motor data is correct. Values are predefined
on the basis of the drive size but you should verify that they
correspond to the motor.
Start with the motor type.
•
Go to the edit view of a selected row by pressing
•
Scroll the view with and .
Motor nominal cos Φ and nominal torque are optional.
Press (Next) to continue.
To change a value in an edit view:
•
Use and to move the cursor left and right.
•
Use and to change the value.
Press (Save) to accept the new setting, or press
(Cancel) to go back to the previous view without making
changes.
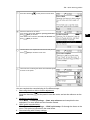
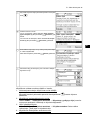
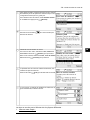
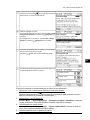
This step is optional, and requires rotating the motor. Do not
do this if it could cause any risk, or if the mechanical set-up
does not allow it.
To do the direction test, select Spin the motor and press
(Next).
8 EN – Quick start-up guide
EN
DE
ES
FI
FR
IT
NL
PT
RU
SV

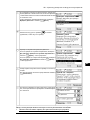
Press the Hand key
Hand
on the panel to start the drive.
Check the direction of the motor.
If it is forward, select Yes, motor is spinning forward and
press (Next) to continue.
If the direction is not forward, select No, fix direction and
press (Next) to continue.
The first start is now complete and the drive is ready for use.
Press (Done) to enter the Home view.
The Home view monitoring the values of the selected signals
is shown on the panel.
You can complete the commissioning in five different ways:
1. Start using the drive with no further adjustment:
Press the Hand key
Hand
on the panel to start the motor, and set the reference on the
panel.
2. Assistant commissioning:
Go to Menu → Primary settings → Start, stop reference and complete the two
assistants. For more details see the firmware manual.
3. HVAC quick commissioning:
Go to Menu → Primary settings → HVAC quick setup. Go through the items on the
menu. This option is instructed in the rows below.
4. Commissioning with Primary settings:
EN – Quick start-up guide 9
EN
DE
ES
FI
FR
IT
NL
PT
RU
SV

Go to Menu → Primary settings. Set the start/stop and reference, motor data, ramps
and limits. You can continue with further adjustment. See in the firmware manual or
press the information on Primary settings menu items.
5. Commissioning with parameters (advanced users only):
Go to Menu → Parameters → Complete list. See chapter Parameters in the firmware
manual.
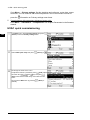
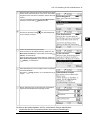
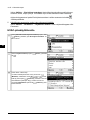
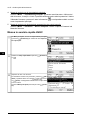
HVAC quick commissioning
In the Main menu, select Primary settings and press
(Select) to enter the Primary settings menu.
Select HVAC quick setup and press (Select) (or ).
Go through the items on the menu.
To adjust the value of a parameter, press (Edit), adjust
the value using , , and keys and press
(Save). Note that the actual wiring must match the new
value.
Go back to the Main menu by pressing (Back) re-
peatedly.
10 EN – Quick start-up guide
EN
DE
ES
FI
FR
IT
NL
PT
RU
SV

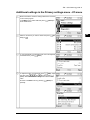
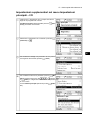
Additional settings in the Primary settings menu - I/O menu
Make sure that the actual I/O wiring matches the I/O used
in the control program.
In the Main menu, select a I/O and press (Select) to
enter the I/O menu.
Select a connection you want to check and press (Se-
lect) (or ).
To view the details of a parameter that cannot be adjusted
via the I/O menu, press (View).
To adjust the value of a parameter, press (Edit), adjust
the value using , , and keys and press
(Save). Note that the actual wiring must match the new
value.
Go back to the Main menu by pressing (Back) re-
peatedly.
EN – Quick start-up guide 11
EN
DE
ES
FI
FR
IT
NL
PT
RU
SV

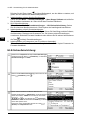
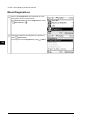
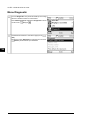
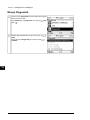
Diagnostics menu
Use the Diagnostics menu to make sure that the setup is
functioning correctly.
In the Main menu, select Diagnostics and press (Se-
lect) (or ).
Select the diagnostics item you want to view and press
(Select).
Return to the Diagnostics menu by pressing (Back).
12 EN – Quick start-up guide
EN
DE
ES
FI
FR
IT
NL
PT
RU
SV

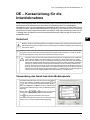
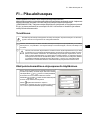
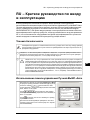
DE – Kurzanleitung für die
Inbetriebnahme
Diese Anleitung beschreibt die Inbetriebnahme des Frequenzumrichters ACH580 mit dem
Inbetriebnahme-Assistenten des Hand-Aus-Auto-Bedienpanels. Die vollständigen
Informationen über die Inbetriebnahme einschließlich dem normalen ID-Lauf finden Sie im
ACH580 firmware manual (3AXD50000027537 [Englisch]). Der normale ID-Lauf ist bei der
Inbetriebnahme des Frequenzumrichters erforderlich, wenn das Lastmoment mehr als 20
% beträgt oder die Maschine dem Nennmomenttransienten während des ID-Laufs nicht
standhalten kann
Sicherheit
Befolgen Sie die Sicherheitsvorschriften im Hardware-Handbuch des ACH580 Frequenzumrichters.
Die Nichtbeachtung der Vorschriften kann zu Verletzungen und tödlichen Unfällen oder Schäden an
den Geräten führen .
Stellen Sie sicher, dass die Installationsarbeiten abgeschlossen sind. Stellen Sie sicher, dass die Abde-
ckung des Frequenzumrichters und des Kabelanschlusskastens, falls vorhanden, montiert ist. Stellen
Sie bei Schrankgeräten sicher, dass die Schranktüren geschlossen sind.
Prüfen Sie, dass der Start des Motors gefahrlos erfolgen kann. Entkoppeln Sie die Arbeitsma-
schine, falls die Gefahr einer Beschädigung durch Drehen in der falschen Richtung besteht.
Bevor Sie die Funktionen für eine automatische Störungsquittierung oder einen automatischen
Neustart des Antriebsregelungsprogramms aktivieren, stellen Sie sicher, dass keine gefährlichen
Situationen auftreten können. Diese Funktionen bewirken eine automatische Quittierung der
Störung des Frequenzumrichters und eine sofortige Wiederaufnahme des Betriebs nach einer
Störung oder einer kurzen Unterbrechung der Spannungsversorgung. Wenn diese Funktionen
aktiviert sind, muss die Anlage gemäß IEC/EN 61800-5-1, Unterabschnitt 6.5.3, deutlich gekenn-
zeichnet werden zum Beispiel "DIESE MASCHINE STARTET AUTOMATISCH".
Verwendung des Hand-Aus-Auto-Bedienpanels
DE – Kurzanleitung für die Inbetriebnahme 19
R0-
R4
EN
DA
DE
ES
FI
FR
IT
NL
PL
PT
RU
SV
TR
ZH
DE – Kurzanleitung für die
Inbetriebnahme
Diese Anleitung beschreibt die Erstinbetriebnahme des Frequenzumrichters mit dem
Inbetriebnahme-Assistenten des HLK-Bedienpanels. Die vollständigen Informationen
für die Inbetriebnahme enthält das Firmware-Handbuch ACH580 HLK-Regelungs-
programm (3AXD50000027591 [deutsch]).
Erstinbetriebnahme mit dem Assistenten des HLK-
Bedienpanels
Sicherheit
Stellen Sie sicher, dass die Installationsarbeiten abgeschlossen sind. Stellen Sie sicher,
dass die Abdeckungen des Frequenzumrichters und des Kabelanschlusskastens, falls vor-
handen, montiert sind.
Prüfen Sie, dass durch den Start des Motors keine Gefährdungen entstehen. Kop-
peln Sie die angetriebene Maschine ab, wenn durch eine falsche Drehrichtung
eine Gefährdung entsteht.
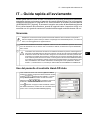
Hinweise zur Verwendung des Komfort-Bedienpanels
Die zwei Befehlsanzeigen am unteren Rand des
Displays (in dem Bild rechts Optionen und
Menü), zeigen die Funktionen der zwei Funktions-
tasten und an, die sich unter dem Dis-
play befinden. Die den Funktionstasten
zugeordneten Befehlsanzeigen sind vom Betrieb-
szustand abhängig.
Mit den Tasten , , und können Sie, je
nach aktiver Ansicht, den Cursor bewegen
und/oder Werte ändern.
Taste zeigt eine kontextsensitive Hilfe-Seite
an.
1 – Erste Inbetriebnahme mit dem Assistenten, Grundeinstellungen:
Sprache, Motor-Nenndaten, Datum und Uhrzeit
Zur Einstellung müssen die Daten vom Motorty-
penschild verfügbar sein.
Den Frequenzumrichter einschalten.
?
Die beiden Befehlsanzeigen am unteren Rand des Displays
zeigen die Funktionen der beiden Funktionstasten und
an, die sich unterhalb des Displays befinden (in dem
Bild rechts Optionen und Menü). Die den Funktionstasten
zugeordneten Befehlsanzeigen sind vom Betriebszustand
abhängig.
Mit den Tasten , , und können Sie, je nach aktiver
Ansicht, den Cursor bewegen und/oder Werte ändern.
Taste zeigt eine kontextsensitive Hilfe-Seite an.
Für weitere Informationen siehe ACS-AP-x assistant control
panels user’s manual (3AUA0000085685 [English]).
DE – Kurzanleitung für die Inbetriebnahme 13
EN
DE
ES
FI
FR
IT
NL
PT
RU
SV

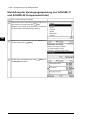
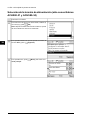
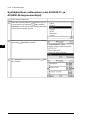
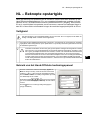
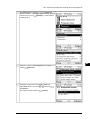
Einstellung der Versorgungsspannung (nur ACH580-31
und ACH580-34 Frequenzumrichter)
Den Frequenzumrichter einschalten.
Wählen Sie die zu benutzende Sprache aus (falls nicht be-
reits markiert) und drücken Sie dann (OK).
Hinweis: Nach Auswahl der Sprache dauert es einige Zeit,
bis die Umstellung des Bedienpanels erfolgt ist.
Wählen Sie im Inbetriebnahme-Assistenten Beenden und
drücken Sie die Taste (Weiter).
Drücken Sie in der Startansicht die Taste (Menü), um
das Hauptmenü zu öffnen.
14 DE – Kurzanleitung für die Inbetriebnahme
EN
DE
ES
FI
FR
IT
NL
PT
RU
SV

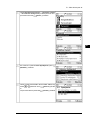
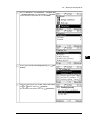
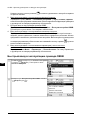
Wählen Sie im Hauptmenü die Option Parameter →
Komplette Liste → 95 Hardware-Konfiguration, drücken
Sie wiederholt die Taste (Auswählen), um 95.01 aus-
zuwählen.
Wählen Sie Parameter 95.01 Einspeisespannung aus und
drücken Sie dann die Taste (Bearbeiten).
Wählen Sie die Einspeisespannung 380…415 V oder
440…480 V mit den Tasten und . Drücken Sie die
Taste (Speichern).
Um die Auswahl zurückzusetzen, drücken Sie die Taste
(Abbrechen).
DE – Kurzanleitung für die Inbetriebnahme 15
EN
DE
ES
FI
FR
IT
NL
PT
RU
SV

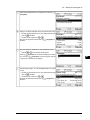
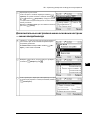
Parameter 95.01 zeigt nun die manuell eingestellte Einspei-
sespannung an.
Durch das wiederholte Drücken der Taste (Zurück)
kehren Sie in das Hauptmenü zurück.
Wählen Sie im Hauptmenü die Option Inbetriebnahme-
Assistent und drücken Sie die Taste (Auswählen), um
das Menü Inbetriebnahme-Assistent zu öffnen.
Führen Sie die folgenden Schritte aus.
Erstinbetriebnahme mit dem Inbetriebnahme-Assistenten
Zur Einstellung müssen die Daten vom Motortypenschild
verfügbar sein.
Den Frequenzumrichter einschalten.
Der Inbetriebnahme-Assistent führt Sie durch die erste Inbe-
triebnahme.
Der Assistent startet automatisch. Warten Sie, bis das Bedi-
enpanel die erste Ansicht, wie rechts dargestellt, anzeigt.
Wählen Sie die zu benutzende Sprache aus (falls nicht be-
reits markiert) und drücken Sie dann (OK).
Hinweis: Nach Auswahl der Sprache dauert es einige Minu-
ten, bis die Sprachdatei in das Bedienpanel geladen ist.
Wählen Sie Inbetriebnahme des ACH580 und drücken Sie
dann Taste (Weiter).
16 DE – Kurzanleitung für die Inbetriebnahme
EN
DE
ES
FI
FR
IT
NL
PT
RU
SV

Wählen Sie Ihr bevorzugtes Einheitensystem aus und
drücken Sie die Taste (Weiter).
Sie können einzeilne Einheit auf Wunsch anpassen.
•
Durch das Drücken von wechseln Sie zur Bearbeitungs-
sicht einer ausgewählten Zeile.
•
Durch das Drücken von und können Sie die aus-
gwählte Zeile wechseln.
Gehen Sie mit Taste (Weiter) zum nächsten Schritt der
Inbetriebnahme.
Auswählen eines Werts in der Ansicht Bearbeiten (Edit):
•
Mit den Tasten und den gewünschten Wert auswäh-
len.
Mit der Taste (Speichern) die neue Einstellung über-
nehmen, oder mit Taste (Abbrechen) ohne Änderungen
zur vorhergehenden Ansicht zurückkehren.
Datum und Uhrzeit sowie das Anzeigeformat von Datum
und Uhrzeit einstellen.
•
Durch das Drücken von wechseln Sie zur Bearbeitungs-
sicht einer ausgewählten Zeile.
•
Durch das Drücken von und können Sie die aus-
gwählte Zeile wechseln.
Gehen Sie mit Taste (Weiter) zum nächsten Schritt der
Inbetriebnahme.
DE – Kurzanleitung für die Inbetriebnahme 17
EN
DE
ES
FI
FR
IT
NL
PT
RU
SV

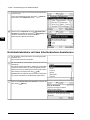
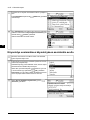
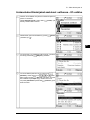
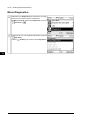
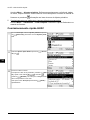
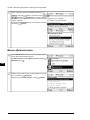
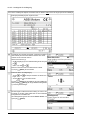
Für die folgenden Einstellungen der Motordaten die Nenndaten vom Motor-Typenschild verwenden. Die auf
dem Motor-Typenschild angegeben Werte genau eingeben.
Beispiel für ein Typenschild eines Asynchronmotors:
Prüfen Sie, ob die Motordaten korrekt eingegeben wurden.
Die Werte sind auf Basis der Frequenzumrichtergröße vor-
eingestellt und Sie müssen sicherstellen, dass sie mit den
Daten auf dem Motor-Typenschild übereinstimmen.
Starten mit dem Motortyp.
•
Durch Drücken der Taste wechseln Sie zur Bearbei-
tungssicht einer ausgewählten Zeile.
•
Durch das Drücken von und können Sie die aus-
gwählte Zeile wechseln.
Motornenn-cos Φ und Motornennmoment sind optional.
Mit der Taste (Weiter) fortfahren.
Ändern eines Werts in der Ansicht Bearbeiten:
•
Mit den Tasten und den Cursor nach links und
rechts bewegen.
•
Mit den Tasten und den Einstellwert ändern.
Mit der Taste (Speichern) die neue Einstellung über-
nehmen, oder mit Taste (Abbrechen) ohne Änderungen
zur vorhergehenden Ansicht zurückkehren.
18 DE – Kurzanleitung für die Inbetriebnahme
EN
DE
ES
FI
FR
IT
NL
PT
RU
SV

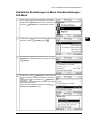
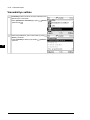
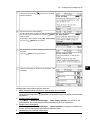
Dieser Schritt ist optional und erfordert, dass der Motor dreht.
Diesen Schritt nicht durchführen, wenn davon eine Gefahr
ausgehen könnte oder der mechanische Aufbau dies nicht
zulässt.
Für einen Drehrichtungstest die Zeile Den Motor drehen
markieren und die Taste (Weiter) drücken.
Drücken Sie die Taste Hand
Hand
auf dem Bedienpanel,
um den Antrieb zu starten.
Prüfen Sie die Drehrichtung des Motors.
Dreht der Motor in die richtige Richtung, wählen Sie, Ja,
Motor dreht vorwärts aus und drücken Sie die Taste
(Weiter), um fortzufahren.
Dreht der Motor nicht in die richtige Richtung, wählen Sie,
Nein, Drehrichtung ändern aus und drücken Sie die Taste
(Weiter), um fortzufahren.
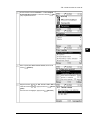
Die Erstinbetriebname ist nun komplett und der Frequenzum-
richter betriebsbereit.
Die Taste (Fertig) drücken, um zur Startansicht zu ge-
langen.
Mit der Startansicht können die Werte der ausgewählten
Signale auf dem Bedienpanel angezeigt werden.
Sie können die Inbetriebnahme auf fünf verschiedene Weisen abschließen:
1. Verwenden Sie den Frequenzumrichter ohne weitere Einstellungen.
DE – Kurzanleitung für die Inbetriebnahme 19
EN
DE
ES
FI
FR
IT
NL
PT
RU
SV

Drücken Sie die Taste Hand
Hand
auf dem Bedienpanel, um den Motor zu starten, und
geben Sie den Sollwert auf dem Bedienpanel ein.
2. Inbetriebnahme mit dem Komfort-Bedienpanel:
Öffnen Sie das Menü → Grundeinstellungen → Start, Stopp, Sollwert und schließen
Sie die beiden Assistenten ab. Siehe hierzu das Firmware-Handbuch.
3. HLK-Schnelleinrichtung:
Öffnen Sie das Menü → Grundeinstellungen → HLK-Schnelleinrichtung. Gehen
Sie die einzelnen Menüpunkte durch. Diese Option wird nachfolgend beschrieben.
4. Inbetriebnahme mit den Grundeinstellungen:
Öffnen Sie das Menü → Grundeinstellungen. Geben Sie Start/Stopp und den Sollwert,
die Motordaten, Rampen und Grenzwerte ein. Sie können weitere Einstellungen
vornehmen. Siehe das Firmware-Handbuch oder drücken Sie für weitere Informationen
die Taste im Menü Grundeinstellungen.
5. Inbetriebnahme mit Parametern (nur für erfahrene Anwender):
Öffnen Sie das Menü → Parameter → Komplette Liste. Siehe Kapitel Parameter im
Firmware-Handbuch.
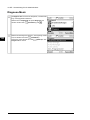
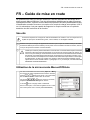
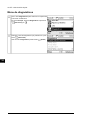
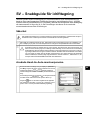
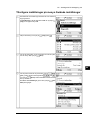
HLK-Schnelleinrichtung:
Wählen Sie im Hauptmenü die Option Grundeinstellungen
und drücken Sie die Taste (Auswählen), um das Menü
Grundeinstellungen zu öffnen.
Wählen Sie HLK-Schnelleinrichtung und drücken Sie die
Taste (Auswählen) (oder ).
Gehen Sie die einzelnen Punkte des Menüs durch.
Drücken Sie die Taste (Bearbeiten), um einen Parame-
terwert einzustellen. Stellen Sie den Wert mit den Tasten
, , und ein und drücken Sie (Speichern).
Beachten Sie, dass die tatsächliche Verdrahtung zu diesem
neuen Wert passen muss.
Kehren Sie durch wiederholtes Drücken der Taste
(Zurück) zum Hauptmenü zurück.
20 DE – Kurzanleitung für die Inbetriebnahme
EN
DE
ES
FI
FR
IT
NL
PT
RU
SV
A página está carregando...
A página está carregando...
A página está carregando...
A página está carregando...
A página está carregando...
A página está carregando...
A página está carregando...
A página está carregando...
A página está carregando...
A página está carregando...
A página está carregando...
A página está carregando...
A página está carregando...
A página está carregando...
A página está carregando...
A página está carregando...
A página está carregando...
A página está carregando...
A página está carregando...
A página está carregando...
A página está carregando...
A página está carregando...
A página está carregando...
A página está carregando...
A página está carregando...
A página está carregando...
A página está carregando...
A página está carregando...
A página está carregando...
A página está carregando...
A página está carregando...
A página está carregando...
A página está carregando...
A página está carregando...
A página está carregando...
A página está carregando...
A página está carregando...
A página está carregando...
A página está carregando...
A página está carregando...
A página está carregando...
A página está carregando...
A página está carregando...
A página está carregando...
A página está carregando...
A página está carregando...
A página está carregando...
A página está carregando...
A página está carregando...
A página está carregando...
A página está carregando...
A página está carregando...
A página está carregando...
A página está carregando...
A página está carregando...
A página está carregando...
A página está carregando...
A página está carregando...
A página está carregando...
A página está carregando...
A página está carregando...
A página está carregando...
A página está carregando...
A página está carregando...
A página está carregando...
A página está carregando...
A página está carregando...
A página está carregando...
A página está carregando...
A página está carregando...
A página está carregando...
A página está carregando...
A página está carregando...
A página está carregando...
A página está carregando...
A página está carregando...
A página está carregando...
A página está carregando...
A página está carregando...
A página está carregando...
A página está carregando...
A página está carregando...
A página está carregando...
A página está carregando...
-
 1
1
-
 2
2
-
 3
3
-
 4
4
-
 5
5
-
 6
6
-
 7
7
-
 8
8
-
 9
9
-
 10
10
-
 11
11
-
 12
12
-
 13
13
-
 14
14
-
 15
15
-
 16
16
-
 17
17
-
 18
18
-
 19
19
-
 20
20
-
 21
21
-
 22
22
-
 23
23
-
 24
24
-
 25
25
-
 26
26
-
 27
27
-
 28
28
-
 29
29
-
 30
30
-
 31
31
-
 32
32
-
 33
33
-
 34
34
-
 35
35
-
 36
36
-
 37
37
-
 38
38
-
 39
39
-
 40
40
-
 41
41
-
 42
42
-
 43
43
-
 44
44
-
 45
45
-
 46
46
-
 47
47
-
 48
48
-
 49
49
-
 50
50
-
 51
51
-
 52
52
-
 53
53
-
 54
54
-
 55
55
-
 56
56
-
 57
57
-
 58
58
-
 59
59
-
 60
60
-
 61
61
-
 62
62
-
 63
63
-
 64
64
-
 65
65
-
 66
66
-
 67
67
-
 68
68
-
 69
69
-
 70
70
-
 71
71
-
 72
72
-
 73
73
-
 74
74
-
 75
75
-
 76
76
-
 77
77
-
 78
78
-
 79
79
-
 80
80
-
 81
81
-
 82
82
-
 83
83
-
 84
84
-
 85
85
-
 86
86
-
 87
87
-
 88
88
-
 89
89
-
 90
90
-
 91
91
-
 92
92
-
 93
93
-
 94
94
-
 95
95
-
 96
96
-
 97
97
-
 98
98
-
 99
99
-
 100
100
-
 101
101
-
 102
102
-
 103
103
-
 104
104


ABB ACH580-31 Quick Start Up Manual
- Tipo
- Quick Start Up Manual
- Este manual também é adequado para
em outras línguas
- español: ABB ACH580-31
- français: ABB ACH580-31
- italiano: ABB ACH580-31
- English: ABB ACH580-31
- русский: ABB ACH580-31
- Nederlands: ABB ACH580-31
- Deutsch: ABB ACH580-31
- svenska: ABB ACH580-31
- suomi: ABB ACH580-31
Artigos relacionados
-
ABB ACS580 Series Guia rápido
-
ABB ACH580-01-03A0-4 Quick Installation And Start-Up Manual
-
-
-
-
ABB ACS880 Series Quick Start Up Manual
-
-
-