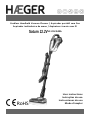
HAEGER Saturn 22.2V Manual do usuário
- Categoria
- Aspirador de pó
- Tipo
- Manual do usuário

Cordless Handheld Vacuum Cleaner / Aspirador portátil sem fios
Aspirador inalámbrico de mano / Aspirateur à main sans fil
User instructions
Instruções de uso
Instrucciones de uso
Mode d’emploi
VC-22V.040A
RoHS

15
16
17

GB
Instructions for use 1
Dear customer
Thank you for having chosen a HÆGER product.
The HÆGER products have been produced to think about the welfare of the
consumer privileging the most raised standards of quality, functionality and
assign. We are sure you will be happy with this appliance.
We assume that the user is familiar with the common procedures of handling
household appliances.
Before using the appliance for the first time please read carefully and
thoroughly through these operating instructions and the safety advice,
completely familiarising yourself with the appliance. Retain these instructions
for future reference and pass them on to whoever might acquire the
appliance at a future date.
General Safety Instructions
When using this or any other electrical appliance, always follow these
basic safety precautions:
READ ALL INSTRUCTIONS BEFORE USE.
• This appliance can be used by children aged from 8 years
and above and persons with reduced physical, sensory or
mental capabilities or lack of experience and knowledge
if they have been given supervision or instruction
concerning use of the appliance in a safe way and
understand the hazards involved.
• Children shall not play with the appliance.
• Cleaning and user maintenance shall not be made by
children unless they are older 8 years and supervised.

English
2 Instructions for use
• Keep the appliance and its cord out of reach of children
less than 8 years.
• Prior to cleaning, the battery must be removed from the vacuum
cleaner.
• The device must not be used after falling or when showing visible
damage, or if it is leaking.
• If the power adaptor cable of this device should become damaged,
it must be replaced by the manufacturer, the manufacturer's
customer service department or a similarly qualified specialist, in
order to avoid any hazards.
• This appliance has been designed exclusively for domestic use. It
must only be used in accordance with these instructions. The
manufacturer will not be held any responsibility for any damage
caused by improper use or incorrect operation.
• This vacuum cleaner is intended only for use on dry surfaces. The
vacuum cleaner is not intended for use on foam, water, inflammable
or explosive materials or other liquids.
• Do not use the vacuum cleaner for sucking up sharp objects or
pieces of glass. Never suck up burning matches, glowing ashes or
cigarette ends.
• Do not use the vacuum cleaner for sucking up products containing
chemicals, dust, plaster, cement, or similar particles.
• ATTENTION: Do not use the vacuum cleaner to suck up building
waste (cement, brick dust, rubble, etc.). These types of particles
quickly clog up the pores in the dust filter causing the appliance to
overheat.
• Always make sure that the vacuum cleaner is not placed near
radiators, ovens or other heating equipment or heated surfaces.
Heat can deform and discolour the plastic parts of unit.

English
Instructions for use 3
• Always make sure that the ventilation slots are kept free from
obstruction. Obstructed air circulation can lead to overheating and
damage to the vacuum cleaner.
• Always remove the plug from the power socket when the appliance
is not in charging.
• Never use spirits or other solvents to clean the appliance.
• Never leave the appliance unattended when it is switched on. Keep
the appliance out of the reach of children or the infirm.
• Do not switch the appliance on if it appears to be faulty in any way.
• The battery must be removed from the appliance before it is
scrapped.
• The battery is to be disposed of safely.
• The appliance must be disconnected from the supply when
removing the battery.
• Only the adapter provided by the manufacturer can be used
• If your vacuum cleaner is defective, please send it to the
appropriate service center or have it repaired at an electrical
equipment repair workshop. Under no circumstances open the
vacuum cleaner yourself. Work on your vacuum cleaner carried out
by non-authorized service centers could endanger your health.
• Any rights under the guarantee are lost if these operating
instructions are not followed. The guarantee does not cover wear
parts or damage resulting from improper use (incorrect operation,
water, dropping etc.), work on the vacuum cleaner carried out by
third parties, or technical modifications to the vacuum cleaner.
• Before you switch on the vacuum cleaner make sure that the
mains voltage is the same as that shown in the technical details.

English
4 Instructions for use
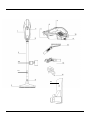
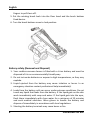
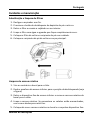
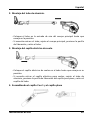
Overview of the components
1. Main unit
2. Aluminum tube
3. Electrical floor brush
4. ON/OFF button
5. Dust bin release knob
6. Removeable dust bin
7. Battery indicator display
8. Aluminum tube release knob
9. Floor brush release knob
10. Charge port
11. Battery pack
12. Flat brush
13. 2 in 1 brush
14. Power adapter
15. Wall support
16. Accessory holder
17. Main unit rest holder
Before using for the first time
1. Take the vacuum cleaner out of the packaging.
2. Remove the packaging and check that the dust bin and safety filter are
correctly fitted.
3. Clean it with a soft, damp cloth and dry thoroughly. Do not immerse the
vacuum cleaner in water or any other liquid.
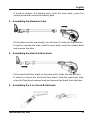
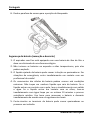
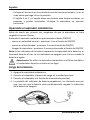
Assembling the cordless vacuum cleaner
1. Assembling the battery pack
- Fit the battery pack onto the main body base until it clicks into the
position.

English
Instructions for use 5
- If need to remove the battery pack, hold the main body, press the
release knob and remove the battery pack.
2. Assembling the aluminum tube
- Fit the tube onto the main body’s air inlet until it clicks into the position.
- If need to remove the tube, hold the main body, press the release knob
and remove the tube.
3. Assembling the electrical floor brush
- Fit the electrical floor brush on the tube until it clicks into the position.
- If need to remove the electrical floor brush, hold the aluminum tube,
press the floor brush release knob and remove the brush from the tube.
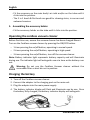
4. Assembling the 2 in 1 brush & flat brush

English
6 Instructions for use
- Fit the accessory on the main body’s air inlet and/or on the tube until it
clicks into the position.
- The 2 in 1 brush & flat brush are good for cleaning stairs, in corners and
awkward crevices.
5. Assembling the accessory holder
- Fit the accessory holder on the tube until it clicks into the position.
Operating the cordless vacuum cleaner
Before first time use, ensure the vacuum cleaner has been charged 4hours.
Turn on the Cordless vacuum cleaner by pressing the ON/OFF button.
– 1 time pressing the on/off button, operating in normal speed.
– 2 times pressing the on/off button, operating in high speed.
– 3 times pressing the on/off button, turn off the vacuum cleaner.
Note: Battery indicator light represents battery capacity and will illuminate
during use. The indicator light will extinguish one at a time as the battery runs
out.
Warning: Do not use the Cordless Vacuum cleaner without the
removable filter or dust bin not in position.
Charging the battery
1. Turn off the Cordless vacuum cleaner.
2. Connect the adapter to the charging port on the main unit.
3. Plug the adapter into the main power supply.
4. The battery indicator display will flash and illuminate one by one. Once
the battery fully charged, the battery indicator display will extinguish.

English
Instructions for use 7
Warning: Do not use any mains power adaptor other than that
supplied, as using an alternative will increase the risk of injury
and/or damage to main product.
Care and Maintenance
Filter replacement and cleaning
1. Turn off the Cordless vacuum cleaner.
2. Press the dust bin release knob, remove the dust bin.
3. Take out the filter and empty the dirt inside.
4. Clean the filter in water, wait for it to dry completely.
5. Put the filter back into the dust bin carefully.
6. Put the dust bin back into the main body.
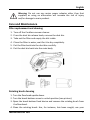
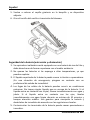
Rotating brush cleaning
1. Turn the floorhead upside down.
2. Turn the brush bottom screw to unlock position (see picture).
3. Open the brush bottom fixed device and remove the rotating brush from
the floorhead.
4. Clean the rotating brush. Has, for instance, hair been caught, use your

English
8 Instructions for use
fingers to pull them off.
5. Put the rotating brush back into the floor head and the brush bottom
fixed device.
6. Turn the brush bottom screw to lock position.
Battery safety (Removal and Disposal)
1. Your cordless vacuum cleaner is fitted with a Li-ion battery and must be
disposed of it in an environmentally friendly way.
2. Do not incinerate batteries or expose to high temperatures, as they may
explode.
3. Liquid ejected from the battery may cause irritation or burns. In an
emergency situation contact professional help immediately!
4. Leaks from the battery cells can occur under extreme conditions. Do not
touch any liquid that leaks from the battery. If the liquid gets on the skin
wash immediately with soap and water. If the liquid gets into the eyes,
flush them immediately with clean water for a minimum of 10 minutes
and seek medical attention. Wear gloves to handle the battery and
dispose of immediately in accordance with local regulations.
5. Shorting the battery terminals may cause burns or fire.

English
Instructions for use 9
6. When the battery pack is not in use, keep it away from paper clips, coins,
keys, nails, screws or other small metal objects that could make a
connection from one terminal to another.
7. Discharge the battery by running the appliance to stop the engine at idle.
8. Remove the battery from the appliance.
9. Dispose of the battery safely in accordance with local regulations.
Technical Specifications
Features
Model VC-22V.040A
Rated Power (W)
110W
Rated Voltage
22.2V DC
Battery type
Lithium-ion battery
Battery capacity
2200mAh
Dust bin capacity (ml)
500ml
Power Adapter input
100-240V~ 50/60Hz 0.5A
Power Adapter output
26V 500mA
Charge time
4.5 h
Noise (dB)
Low 70dB - High 72dB
Vacuum Power (Kpa)
ECO 4.5Kpa – Max 7.5Kpa
Operating time
Max speed: 25min – ECO speed: 40min
Conformity CE
This product has been tested and produced according to all relevant current
CE guidelines, such as:
- electromagnetic compatibility Directive 2014/30/EU,
- Low voltage Directive (LVD) Directive 2014/35/EU,
- RoHS Directive (EU) 2015/863,
and has been constructed in accordance with the latest safety regulations.
The CE mark attests this product with all relevant directives.

English
10 Instructions for use
Disposal – Environment policy
This appliance is marked according to the European directive 2012/19/EU on Waste
Electrical and Electronic Equipment (WEEE).
By ensuring this product is disposed of correctly, you will help prevent potential
negative consequences for the environment and human health, which could
otherwise be caused by inappropriate waste handling of this product.
This symbol on the product, or on the documents accompanying the
product, indicates that this appliance may not be treated as household
waste. Instead it shall be handed over to the applicable collection point for
the recycling of electrical and electronic equipment.
Disposal must be carried out in accordance with local environmental regulations for
waste disposal. For more detailed information about treatment, recovery and
recycling of this product, please contact your local city office, your household waste
disposal service or the shop where you purchased the product.
The battery used with this device must not be treated as household waste. The
device and the battery must be disposed of properly.
Guarantee
This unit is covered by a 24 months (*) warranty, from the purchase date, and covers
the repair free of charges of the damaged due to the manufacturer fault or defected
components. The distributor reserves the right to change the unit for an equivalent
model.
The warranty does not cover any damaged caused by incorrect use, lightning,
incorrect installation, external factors or any intentional damaged. The warranty does
not cover damage thus attributable to falls, blows, spill, exposure to extreme
environmental conditions or deterioration caused by normal use of plastic parts or
keyboards, as well as using batteries other than those specified in this manual.
For the repairing, during the warranty period, the unit shall be sent to the distributor
or reseller, or to the address indicated by them, and must be jointed the warranty
certificated and the respective original invoice or selling ticket, where the buying date
is expressed indicated.
The consumer is protected by the guarantee provided by Directive 1999/44/CE of
European Parliament and Council of 25 May.
(*) Only for European Union countries

PT
Manual de Instruções 11
Estimado Cliente
Obrigado por ter escolhido um produto HÆGER.
Os produtos HÆGER foram concebidos a pensar no bem-estar do consumidor,
privilegiando os mais elevados padrões de qualidade, funcionalidade e
designe. Estamos certos da sua satisfação pela aquisição deste produto.
Partimos do princípio de que o utilizador possui conhecimentos gerais sobre
o manuseamento com eletrodomésticos.
Antes da primeira utilização, leia cuidadosa e totalmente estas instruções de
utilização e de segurança e familiarize-se com as funções do aparelho. Guarde
estas instruções e, se necessário, entregue-as a terceiros.
Instruções Gerais de Segurança
Ao usar este ou qualquer outro eletrodoméstico, siga sempre estas
precauções básicas de segurança:
LEIA TODAS AS INSTRUÇÕES ANTES DO USO.
• Este aparelho pode ser utilizado por crianças com idade a
partir de 8 anos e por pessoas com capacidades físicas,
sensoriais ou mentais ou falta de experiência e
conhecimento, se tiverem recebido supervisão ou
instruções relativas à utilização do aparelho de forma
segura e entender os riscos envolvidos.
• As crianças não devem brincar com o aparelho.
• Qualquer limpeza e ou manutenção não deve ser feito
por crianças a não ser que tenham idade superior a 8
anos e sejam supervisionados.

Português
12 Manual de Instruções
• Mantenha o aparelho e o cabo de alimentação fora do
alcance de crianças com menos de 8 anos.
• Antes da limpeza, a bateria deve ser removida do aspirador.
• O dispositivo não deve ser usado depois de cair ou quando
apresentar danos visíveis ou se estiver vazando.
• Se o cabo do adaptador de energia deste dispositivo for danificado,
deve o mesmo ser substituído pelo fabricante, pelo departamento
de atendimento ao cliente do fabricante ou por um especialista
qualificado, a fim de evitar qualquer risco.
• Este aparelho foi concebido exclusivamente para uso doméstico.
Apenas deve ser utilizado de acordo com estas instruções. O
fabricante não se responsabiliza por danos causados por utilização
inadequada ou funcionamento incorreto.
• Este aspirador foi concebido apenas para superfícies secas. O
aparelho não é indicado para espuma, água, materiais inflamáveis
ou explosivos ou outros líquidos.
• Não utilize o aparelho para a aspiração de objetos pontiagudos ou
estilhaços de vidro. Nunca aspire fósforos a arder, cinza
incandescente ou pontas de cigarro acesas.
• Não utilize o aspirador para a aspiração de produtos químicos,
poeira de pedra, gesso, cimento ou outras partículas semelhantes.
• ATENÇÃO: Não utilize o aspirador para limpar entulhos de obra
(cimento, pó de tijolos, escombros, etc.). Este tipo de partículas
entope o filtro do motor e faz com que o aparelho aqueça
excessivamente.
• Certifique-se que o aspirador não se encontre nas imediações de
radiadores, fornos ou outros aparelhos ou superfícies aquecidas. O
calor pode deformar e descolorir as partes plásticas da unidade.
• Certifique-se que os orifícios de ventilação estão desobstruídos. Um
bloqueio na circulação do ar pode levar a um sobreaquecimento e à
danificação do aparelho.

Português
Manual de Instruções 13
• Retire sempre a ficha da tomada quando o aparelho não estiver a
carregar.
• Nunca utilize álcool ou outros solventes para limpar o aparelho.
• Nunca deixe o aparelho sem vigilância quando estiver ligado.
Mantenha o aparelho fora do alcance de crianças ou pessoas
enfermas.
• Não ligue o aparelho se parecer estar com algum.
• A bateria deve ser removida do aparelho antes de ser descartada.
• A bateria deve ser descartada com segurança.
• O aparelho deve ser desligado da alimentação ao remover a bateria.
• Somente o adaptador fornecido pelo fabricante pode ser usado.
• Envie os aparelhos danificados ao respetivo serviço de assistência
técnica ou, então, mande-os reparar apenas numa oficina
devidamente qualificada. Em circunstâncias nenhumas, deverá
abrir, por si mesmo, o aparelho. As manipulações, que não tenham
sido levadas a cabo por serviços de assistência técnica autorizados,
podem constituir um risco para a sua saúde.
• O direito à garantia cessa em caso da não observância destas
instruções de utilização bem como em caso de danos que resultem
dum manejamento inadequado (operação incorreta, danos
provocados por penetração de água ou por quedas, etc.),
manipulações efetuadas por terceiros, modificações técnicas no
aparelho ou peças de desgaste.
• Antes de ligar o aspirador, certifique-se de que a tensão da rede
corresponde à tensão indicada na placa de características técnicas
do aparelho.

Português
14 Manual de Instruções
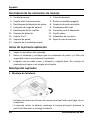
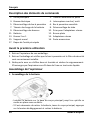
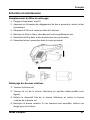
Descrição dos elementos
1. Unidade principal
2. Tubo de alumínio
3. Escova elétrica para aspira o chão
4. Botão de energia ON/OFF
5. Botão para libertar o recipiente
6. Depósito de pó removível
7. Indicador de carga da bateria
8. Desbloqueio do tubo
9. Botão de libertação da escova de piso
10. Porta de carga
11. Bateria
12. Escova lisa
13. Escova 2 em 1
14. Adaptador de energia
15. Suporte de parede
16. Suporte de acessórios
17. Apoio da unidade principal
Antes da primeira utilização
1. Retire o aparelho da embalagem.
2. Remova a embalagem e verifique se o depósito para pó e o filtro de
segurança estão instalados corretamente.
3. Limpe-o com um pano macio e húmido e enxugue completamente. Não
mergulhe o aspirador em água ou qualquer outro líquido.
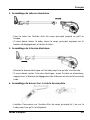
Montagem do aspirador
1. Montando a bateria
- Coloque a bateria na base do corpo principal até encaixar na posição.
- Se precisar remover a bateria, segure o corpo principal, pressione o
botão de liberação e remova a bateria.

Português
Manual de Instruções 15
2. Montagem do tubo de alumínio
- Encaixe o tubo na entrada de ar do corpo principal até ouvir um clique
na posição.
- Se precisar remover o tubo, segure o corpo principal, pressione o botão
de liberação e remova o tubo.
3. Montagem da escova de piso elétrica
- Coloque a escova de piso elétrica no tubo até encaixar na posição.
- Se precisar remover a escova de piso elétrica, segure o tubo de alumínio,
pressione o botão de liberação da escova de piso e remova a escova do
tubo.
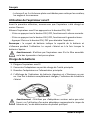
4. Montagem da escova 2 em 1 e escova plana
- Encaixe o acessório na entrada de ar do corpo principal e / ou no tubo
até encaixar na posição.

Português
16 Manual de Instruções
- A escova 2 em 1 e a escova plana são boas para a limpeza de escadas,
em cantos e fendas desajeitadas.
Operar o aspirador sem fio
Antes da primeira utilização, certifique-se de que o aspirador de pó foi
carregado cerca de 4 horas.
Ligue o aspirador sem fio pressionando o botão ON / OFF.
- Operar a velocidade normal – pressione 1 vez o botão ligar/desligar.
- Operar a velocidade alta – pressione 2 vezes o botão ligar/desligar.
- Desligar o aspirador – pressione 3 vezes o botão ligar/desligar.
Nota: A luz indicadora da bateria representa a capacidade da bateria e
acenderá durante o uso. O indicador luminoso apaga-se um de cada vez
quando a bateria se esgota.
Aviso: Não use o aspirador sem fio se o filtro removível ou o depósito
de pó não estiverem no seu lugar.
Carga da bateria
1. Desligue o aspirador sem fio.
2. Ligue o adaptador à tomada de carregamento na unidade principal.
3. Ligue o adaptador na tomada de energia principal.
4. O visor do indicador da bateria piscará e iluminará um por um. Quando a
bateria estiver totalmente carregada, o visor do indicador da bateria se
apaga.
Aviso: Não use nenhum adaptador de energia elétrica diferente do
fornecido, pois o uso de uma alternativa aumentará o risco de
ferimentos e / ou danos ao produto principal.

Português
Manual de Instruções 17
Cuidados e manutenção
Substituição e limpeza de filtros
1. Desligue o aspirador sem fio.
2. Pressione o botão de desbloqueio do depósito de pó e retire-o.
3. Retire o filtro e esvazie a sujidade no seu interior.
4. Limpe o filtro com água e aguarde que fique completamente seco.
5. Coloque o filtro de volta no recipiente de pó com cuidado.
6. Coloque o recipiente de pó de volta no corpo principal.
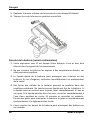
Limpeza de escova rotativa
1. Vire ao contrário o bocal para o chão.
2. Rode o parafuso da escova inferior para a posição de desbloqueada (veja
a figura).
3. Retire o dispositivo fixo da escova inferior e remova a escova rotativa do
bocal para o chão.
4. Limpe a escova rotativa. Se porventura os cabelos estão emaranhados,
use os seus dedos para retirá-los.
5. Coloque de novo a escova rotativa no bocal e o respetivo dispositivo fixo.

Português
18 Manual de Instruções
6. Rode o parafuso da escova para a posição de bloqueada.
Segurança da bateria (remoção e descarte)
1. O aspirador sem fios está equipado com uma bateria de iões de lítio e
deve ser eliminado de uma forma ecológica.
2. Não incinere as baterias ou exponha a altas temperaturas, pois elas
podem explodir.
3. O líquido ejetado da bateria pode causar irritação ou queimaduras. Em
situações de emergência, entre imediatamente em contato com um
profissional de saúde!
4. Os vazamentos das células da bateria podem ocorrer sob condições
extremas. Não toque em nenhum líquido que saia da bateria. Se o
líquido entrar em contato com a pele, lave-a imediatamente com sabão
e água. Se o líquido entrar em contato com os olhos, lave-os
imediatamente com água limpa por no mínimo 10 minutos e procure
assistência médica. Use luvas para manusear a bateria e descarte
imediatamente de acordo com os regulamentos locais.
5. Curto-circuitar os terminais da bateria pode causar queimaduras ou
provocar um incêndio.
A página está carregando...
A página está carregando...
A página está carregando...
A página está carregando...
A página está carregando...
A página está carregando...
A página está carregando...
A página está carregando...
A página está carregando...
A página está carregando...
A página está carregando...
A página está carregando...
A página está carregando...
A página está carregando...
A página está carregando...
A página está carregando...
A página está carregando...
A página está carregando...
A página está carregando...
A página está carregando...
A página está carregando...
A página está carregando...
A página está carregando...
A página está carregando...
-
 1
1
-
 2
2
-
 3
3
-
 4
4
-
 5
5
-
 6
6
-
 7
7
-
 8
8
-
 9
9
-
 10
10
-
 11
11
-
 12
12
-
 13
13
-
 14
14
-
 15
15
-
 16
16
-
 17
17
-
 18
18
-
 19
19
-
 20
20
-
 21
21
-
 22
22
-
 23
23
-
 24
24
-
 25
25
-
 26
26
-
 27
27
-
 28
28
-
 29
29
-
 30
30
-
 31
31
-
 32
32
-
 33
33
-
 34
34
-
 35
35
-
 36
36
-
 37
37
-
 38
38
-
 39
39
-
 40
40
-
 41
41
-
 42
42
-
 43
43
-
 44
44


HAEGER Saturn 22.2V Manual do usuário
- Categoria
- Aspirador de pó
- Tipo
- Manual do usuário
em outras línguas
- español: HAEGER Saturn 22.2V Manual de usuario
- français: HAEGER Saturn 22.2V Manuel utilisateur
- English: HAEGER Saturn 22.2V User manual
Artigos relacionados
Outros documentos
-
Miele HS19 Cordless Stick Vacuum Cleaner Manual do usuário
-
Miele Triflex HX1 Robijnrood Manual do proprietário
-
-
UFESA AE4622 Manual do proprietário
-
Silvercrest SHAZ 22.2 A1 Operating Instructions Manual
-
Black & Decker BHFEV36B2D Manual do usuário
-
AEG CX7-45ANI Manual do usuário