
ENGLISH
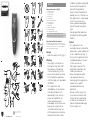
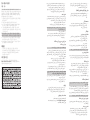
General description (Fig.1)
1 Cutting element
2 Vacuum system
3 Length settings
4 Zoom wheel
5 On/o button
6 Battery status indicator
7 Cleaning sponge
8 Cleaning brush
9 Small plug
10 Supply unit (adapter)
11 Precision trimmer
12 Beard and stubble comb
Note: The accessories supplied may vary for
dierent products. The box shows the accessories
that have been supplied with your appliance.
Important safety information
Read this important information carefully before
you use the appliance and its accessories and save
it for future reference. The accessories supplied
may vary for dierent products.
Danger
- Keep the supply unit dry (Fig. 2).
Warning
- The supply unit contains a
transformer. Do not cut o
the supply unit to replace
it with another plug, as this
causes a hazardous situation.
- Only charge the appliance
with the supply unit provided
(HQ8505).
- This appliance is not
intended for use by persons
(including children) with
reduced physical, sensory
or mental capabilities, or
lack of experience and
knowledge, unless they have
been given supervision or
instruction concerning use
of the appliance by a person
responsible for their safety.
- Children should be supervised
to ensure that they do not
play with the appliance.
- Always check the appliance
before you use it. Do not use
the appliance if it is damaged,
as this may cause injury.
Always replace a damaged
part with one of the original
type.
- Do not open the appliance
to replace the rechargeable
battery.
Caution
- This appliance is not
washable. Never immerse the
appliance in water and do not
rinse it under the tap (Fig. 2).
- Only use this appliance for its
intended purpose as shown
in the user manual.
- For hygienic reasons, the
appliance should only be
used by one person.
- Never use compressed air,
scouring pads, abrasive
cleaning agents or aggressive
liquids such as petrol
or acetone to clean the
appliance.
- Do not use the supply unit
in or near wall sockets that
contain or have contained
an electric air freshener to
prevent irreparable damage
to the supply unit.
4222.002.8666.3www.philips.com
>75% recycled paper
>75% papier recyclé
3.0
1
2
3
4
5
6
9
8
7
11
10
12
1
432
1098
75
3.0
10
0.5
6
1311 12
161514
21 2220
1917 18
BT7206, BT7205,
BT7204, BT7202,
BT7201

Electromagnetic elds (EMF)
- This Philips appliance complies with all
applicable standards and regulations regarding
exposure to electromagnetic elds.
General
- The appliance is suitable for mains voltages
ranging from 100 to 240 volts.
- The supply unit transforms 100-240 volts to a
safe low voltage of less than 24 volts.
Display
Battery status indications
- When the battery is almost empty, the battery
charge indicator ashes orange (Fig. 3).
- When the appliance is charging, the battery
charge indicator ashes white (Fig. 4).
- When the battery is fully charged, the battery
charge indicator lights up white continuously
(Fig. 5).
Note: The lights switch o automatically after
30 minutes.
Hair length indications
The selected hair length setting will show above
the zoom wheel when you select the desired
length setting with the zoom wheel (Fig. 6).
Charging
Charging takes approx. 1 hour. Charge the
appliance before you use it for the rst time and
when the display indicates that the battery is
almost empty.
1 Make sure the appliance is switched o.
2 Put the adapter in the wall socket and put the
small plug in the appliance (Fig. 7).
3 After charging, remove the adapter from the
wall socket and pull the small plug out of the
appliance.
When the appliance is fully charged, it has a
cordless operating time of up to 60 minutes.
Using the appliance
Note: This appliance can be used without cord or
directly from the power outlet.
You can use this appliance for a stubble and
a short beard. This appliance has an integrated
vacuum system that catches cut beard hair for
a less mess trimming experience.
The vacuum system is activated automatically as
soon as you switch on the appliance.
Note: Switch o and clean the appliance after
each use.
Switching the appliance on and o
Press the on/o button once to switch the
appliance on or o (Fig. 8).
Trimming without comb
- You can use the appliance without beard and
stubble comb to trim hair close to the skin or
to contour the neckline and sideburns. To trim
hair close to the skin, place the at side of the
trimming head against your skin and make
strokes in the desired direction (Fig. 9).
- You can use the precision trimmer to create
ne lines and contours around your facial style,
close to the skin (Fig. 10). Simply pull the cutting
element straight o (Fig. 11) and insert the
precision trimmer (Fig. 12).
- For contouring hold the trimming head
perpendicular to the skin and move the
trimming head upwards or downwards with
gentle pressure (Fig. 13).
Trimming with comb
You can use the beard and stubble comb attached
to the cutting element to groom your beard and
moustache in your preferred style. You can choose
from 20 length settings ranging from 0.5mm to
10mm in steps of 0.5mm.
1 Attach the comb onto the appliance (Fig. 14).
2 Turn the zoom wheel to select the desired
length setting (Fig. 6).
Note: When you trim for the rst time, start at
the highest length setting to familiarise yourself
with the appliance.
3 Switch on the appliance.
4 To trim most eectively, move the appliance
against the hair growth direction. Make sure that
the surface of the comb always stays in contact
with the skin (Fig. 15).
Cleaning and maintenance
Cleaning the appliance
Note: Only the cutting element and the comb can
be cleaned with water.
We advise you to empty the hair-collection
chamber after each trimming session. When you
trim long, dense beards, it may also be necessary
to empty the hair-collection chamber during the
trimming session in order to maintain optimal
suction performance.
1 Switch o the appliance and disconnect it from
the power outlet.
2
Wipe the housing of the appliance with a dry
cloth.
3 Remove the comb (Fig. 16) and clean it with the
cleaning brush and/or rinse it under the tap
(Fig. 17).
4 Remove the cutting element and clean it under
the tap (Fig. 18). Shake o excess water and
leave to dry completely.
Caution: Never dry the cutting element with a towel
or tissue, as this may damage the trimming teeth.
5 Shake and/or brush out the hairs that have
collected in the hair chamber (Fig. 19, Fig. 20).
6 After cleaning, reattach the cutting element
(Fig. 21) and comb (Fig. 14) to the appliance.
Recycling
- This symbol means that this product shall not
be disposed of with normal household waste
(2012/19/EU).
- This symbol means that this product contains
a built-in rechargeable battery which shall not
be disposed of with normal household waste
(2006/66/EC). We strongly advise you to take
your product to an ocial collection point or
a Philips service centre to have a professional
remove the rechargeable battery.
- Follow your country’s rules for the separate
collection of electrical and electronic products
and rechargeable batteries. Correct disposal
helps prevent negative consequences for the
environment and human health.
Warranty and support
If you need information or support, please
visit www.philips.com/support or read the
international warranty leaet.
PORTUGUÊS DO BRASIL
Descrição geral (Fig. 1)
1 Lâmina de corte
2 Sistema a vácuo
3 Ajustes de comprimento
4 Controle giratório
5 Botão liga/desliga
6 Indicador de status da bateria
7 Esponja de limpeza
8 Escova de limpeza
9 Plugue pequeno
10 Fonte de alimentação (adaptador)
11 Aparador de precisão
12 Pente para barba e barba por fazer
Nota: Os acessórios fornecidos podem variar para
produtos diferentes. A caixa mostra os acessórios
que foram fornecidos com seu aparelho.
Informações importantes de
segurança
Leia atentamente estas informações importantes
antes de usar o aparelho e seus acessórios.
Guarde-as para futuras consultas. Os acessórios
fornecidos podem variar para produtos diferentes.
Perigo
- Mantenha a fonte de
alimentação seca (g. 2).
Aviso
- A fonte de alimentação
contém um transformador.
Não desligue a fonte de
alimentação para trocá-
la por outro conector, pois
isso causará uma situação
perigosa.
- Carregue o aparelho somente
com a fonte de alimentação
fornecida (HQ8505).
- Este aparelho não deve ser
usado por pessoas (inclusive
crianças) com capacidades
físicas, mentais ou sensoriais
reduzidas ou com pouca
experiência e conhecimento,
a menos que sejam
supervisionadas ou instruídas
sobre o uso do aparelho por
uma pessoa responsável por
sua segurança.
- Crianças devem ser
supervisionadas para que não
brinquem com o aparelho.
- Sempre verique o aparelho
antes de usá-lo. Não use
o aparelho se ele estiver
danicado, pois isso pode
causar ferimentos. Sempre
substitua uma peça danicada
por outra do tipo original.
- Não abra o aparelho para
trocar a bateria recarregável.
Atenção
- Este aparelho não é
lavável. Nunca mergulhe-o
na água nem lave-o em água
corrente (g. 2).
- Só use este aparelho para
o propósito ao qual ele se
destina, conforme mostrado
no manual do usuário.

繁體中文
一般說明 (圖 1)
1 修剪組件
2 吸力裝置
3 長度設定
4 縮放滾輪
5 開關按鈕
6 電池狀態指示燈
7 清潔海綿
8 清潔刷
9 小插頭
10電源供應裝置(電源轉換器)
11精準修整刀
12鬍鬚與鬍渣梳具
注意:提供的配件可能隨產品而異。包裝盒會顯示您
產品隨附的配件。
重要安全資訊
使用本產品與其配件前,請先仔細閱讀此重要資訊,
並保留說明以供日後參考。提供的配件可能隨產品而
異。
危險
- 電源供應裝置請保持乾燥(圖2)。
警示
- 電源供應裝置內含一個變壓器。請勿切斷電源供應
裝置而以其他的插頭取代,否則會造成危險。
- 請務必使用隨附的電源供應裝置(HQ8505)進行充電。
- 本產品不適合供下列人士(包括孩童)使用:身體
官能或心智能力退化者,或是經驗與使用知識缺乏
者。他們需要有負責其安全的人員在旁監督,或指
示產品的使用方法,方可使用。
- 孩童使用本產品須有人監督,以免孩童將本產品當
成玩具。
- 使用前請務必檢查本產品。若產品受損請勿使用,
以免受傷。零件如有受損,請務必以原型號更換之。
- 請勿拆開本產品更換充電式電池。
警告
- 本產品不可水洗。請勿將本產品浸泡在水中,或者
在水龍頭下沖洗(圖2)。
- 本產品儘限用於本使用手冊所述之相關用途。
- 為保衛生起見,請勿多人共用本產品。
- 絕對不可使用壓縮空氣、鋼絲絨、磨蝕性的清潔劑
或侵蝕性的液體(例如汽油或丙酮)清潔本產品。
- 請勿在插入或已插入電子空氣清淨機的牆壁插座內
或附近使用電源供應裝置,以免電源供應裝置發生
無法修復的損壞。
電磁波 (EMF)
- 本Philips產品符合所有電磁場暴露的相關適用標準
和法規。
一般
- 本產品適用於100到240伏特的插座電壓。
- 電源供應裝置可以將100-240伏特的電壓轉換為低
於24伏特的安全低電壓。
3 Ligue o aparelho.
4 Para aparar de maneira mais eciente, mova o
aparelho na direção contrária à do crescimento
dos pelos. A superfície do pente deve car
sempre em contato com a pele (g. 15).
Limpeza e manutenção
Limpeza do aparelho
Nota: Somente a lâmina de corte e o pente podem
ser lavados com água.
É recomendável que a câmara de coleta de pelos
seja esvaziada após cada sessão de aparagem.
Ao aparar barbas longas e espessas, pode ser
necessário também esvaziar a câmara de coleta de
pelos durante a sessão de aparagem para manter
o desempenho de sucção ideal.
1 Desligue o aparelho e desconecte-o da tomada
elétrica.
2 Limpe o corpo do aparelho com um pano seco.
3 Retire o pente (g. 16), limpe-o com a escova de
limpeza e/ou lave-o em água corrente (g. 17).
4 Retire a lâmina de corte e limpe-a em água
corrente (g. 18). Sacuda para tirar o excesso de
água e deixe secar completamente.
Cuidado: Para não danicar os dentes de
aparagem, nunca seque a lâmina de corte com
uma toalha ou um tecido.
5 Sacuda e/ou escove para tirar os pelos que foram
coletados na câmara de pelos (g. 19, g. 20).
6 Após a limpeza, recoloque a lâmina (g. 21) de
corte e o pente (g. 14) no aparelho.
Reciclagem (Fig. 22)
ADVERTÊNCIA: Cuidados com a utilização e
descarte de pilhas e baterias.
Não descarte as pilhas e baterias juntamente ao
lixo doméstico.
O descarte inadequado de pilhas e baterias pode
representar riscos ao meio ambiente e à saúde
humana.
Para contribuir com a qualidade ambiental e com
sua saúde, a Philips receberá pilhas e baterias
comercializadas ou fornecidas com seus produtos
após seu m de vida, que serão encaminhadas à
destinação ambientalmente correta. A Philips dispõe
de pontos de coleta em Assistências Técnicas.
Garantia e suporte
Caso você precise obter informações ou suporte,
visite o site www.philips.com/support ou leia o
folheto de garantia mundial à parte.
Carregamento
O carregamento leva cerca de 1 hora. Carregue o
aparelho antes de utilizá-lo pela primeira vez e
quando o visor indicar que a bateria está quase
vazia.
1 Verique se o aparelho está desligado.
2 Insira o adaptador na tomada elétrica e o
conector pequeno no aparelho (g. 7).
3 Após o carregamento, remova o adaptador
da tomada elétrica e desconecte o conector
pequeno do aparelho.
Quando o aparelho está totalmente carregado,
o tempo de funcionamento sem conectá-lo à
tomada é de até 60 minutos.
Utilização do aparelho
Nota: Este aparelho pode ser usado sem o ou
diretamente conectado à tomada elétrica.
Este aparelho pode ser usado em barbas por
fazer e em barbas curtas. Este aparelho possui um
sistema a vácuo integrado que captura os pelos
cortados para proporcionar uma aparagem com
menos sujeira.
O sistema a vácuo é ativado automaticamente
assim que você liga o aparelho.
Nota: Desligue e limpe o aparelho sempre que
terminar de usá-lo.
Como ligar e desligar o aparelho
Pressione o botão Liga/desliga uma vez para ligar
ou desligar (g. 8) o aparelho.
Aparagem sem o pente
- Você pode usar o aparelho sem o pente para
barba e barba por fazer para cortar os pelos
rentes à pele ou para contornar a linha do
pescoço e as costeletas. Para cortar os pelos
rentes à pele, coloque o lado liso da cabeça
aparadora em contato com a pele e faça
movimentos na direção (g. 9) desejada.
- É possível usar o aparador de precisão para
criar linhas nas e contornos ao redor do seu
estilo facial, rentes à pele (g. 10). Basta puxar a
lâmina de corte diretamente para fora (g. 11) e
inserir oaparador (g. 12) de precisão.
- Para contornar, mantenha a cabeça aparadora
na posição perpendicular à pele e mova-a para
cima ou para baixo fazendo uma leve pressão
(g. 13).
Aparagem com o pente
Você pode usar o pente para barba e barba por fazer
encaixado na lâmina de corte para raspar a barba e
o bigode no estilo que preferir. É possível selecionar
entre 20 ajustes de comprimento que variam de
0,5 mm a 10 mm em intervalos de 0,5 mm.
1 Encaixe o pente no aparelho (g. 14).
2 Mova o controle giratório para selecionar o
ajuste (g. 6) de comprimento desejado.
Nota: Ao aparar pela primeira vez, use o ajuste
máximo de comprimento para se familiarizar
com o aparelho.
- Por questões de higiene, o
aparelho só deve ser utilizado
por uma pessoa.
- Nunca use ar comprimido,
palhas de aço, agentes de
limpeza abrasivos ou líquidos
agressivos como gasolina
ou acetona para limpar o
aparelho.
- Não use a fonte de alimentação
em tomadas que contêm ou
continham um puricador de
ar elétrico, nem perto delas,
para evitar danos irreparáveis à
fonte de alimentação.
Campos eletromagnéticos
- Este aparelho Philips está em conformidade
com todos os padrões e regulamentos
aplicáveis relacionados à exposição a campos
eletromagnéticos.
Informações gerais
- Este aparelho é adequado para voltagens de
100 a 240 volts.
- A fonte de alimentação transforma a tensão de
100-240 volts em uma tensão segura, inferior
a 24 volts.
Visor
Indicações de status da bateria
- Quando a bateria estiver quase descarregada,
o indicador de carga da bateria piscará na cor
laranja (g. 3).
- Quando o aparelho estiver sendo carregado,
o indicador de carga da bateria piscará na cor
branca (g. 4).
- Quando a bateria estiver totalmente carregada,
o indicador de carga da bateria cará aceso
continuamente (g. 5) na cor branca.
Nota: As luzes são apagadas automaticamente
após 30 minutos.
Indicações de comprimento dos pelos
O ajuste de comprimento dos pelos selecionado
aparecerá acima do controle giratório quando o
ajuste de comprimento desejado for selecionado
com o controle (g. 6) giratório.

충전
충전 시간은 약 1시간 정도 소요됩니다. 처음
사용하기 전이나 디스플레이에 배터리가 거의
방전되었다는 표시가 나타나면 제품을 충전하십시오.
1 제품의 전원이 꺼져 있는지 확인합니다.
2 어댑터를 벽면 콘센트에 꽂은 다음 소형 플러그를
제품 (그림 7)에 꽂으십시오.
3 충전 후에는 벽면 소켓에서 어댑터를 뽑고,
소형 플러그를 제품에서 분리하십시오.
배터리를 완전히 충전하면 최대 60분간 무선으로
사용할 수 있습니다.
제품 사용
참고: 이 제품은 코드 없이 사용하거나 전원 콘센트에
직접 연결하여 사용할 수 있습니다.
이 제품은 그루터기 및 짧은 수염에 사용할 수
있습니다. 이 제품에는 잘린 수염을 빨아들이는 진공
청소 시스템이 내장되어 있어 더욱 깔끔하게 트리밍을
할 수 있습니다.
제품을 켜면 진공 청소 시스템이 자동으로
작동합니다.
참고: 매 사용 후 제품의 전원을 끄고 제품을
청소하십시오.
제품 전원 켜기/끄기
제품의 전원을 켜거나 끄려면 (그림 8) 전원 버튼을 한
번 누르십시오.
빗을 사용하지 않는 트리밍
- 체모를 짧게 깎거나 목선 및 구레나룻 주변의
윤곽을 정리하려면 수염 및 그루터기 빗 없이
제품을 사용할 수 있습니다. 피부에 밀착하여
체모를 트리밍하려면 트리머 헤드의 평평한 면을
피부에 대고 원하는 방향 (그림 9)으로 여러 번
사용하십시오.
- 프리시젼 트리머를 사용하여 피부 (그림 10)에
가깝게 얼굴 스타일을 따라 섬세한 라인 및 윤곽을
만들 수 있습니다. 커팅 부품을 당겨 빼낸 (그림 11)
후 프리시젼 트리머 (그림 12)를 끼우면 됩니다.
- 윤곽을 정리하려면 트리머 헤드를 피부에 수직으로
두고 가볍게 누른 (그림 13) 상태로 위 또는 아래로
트리머 헤드를 움직이십시오.
빗으로 트리밍
커팅 부품에 부착된 수염 및 그루터기 빗을 사용하여
수염 및 콧수염을 원하는 스타일로 다듬을 수
있습니다. 0.5mm 간격으로 0.5mm ~ 10mm 사이의
길이 설정 20단계 중 선택할 수 있습니다.
1 빗을 제품 (그림 14)에 부착하십시오.
2 줌 휠을 돌려 원하는 길이 설정 (그림 6)
을 선택하십시오.
참고: 처음으로 다듬는 경우 가장 긴 설정으로
시작하여 제품에 익숙해지십시오.
3 제품의 전원을 켜십시오.
4 가장 효과적인 방법으로 수염을 다듬으려면 체모가
자라는 반대 방향으로 제품을 움직이십시오. 빗의
표면을 항상 피부 (그림 15)와 밀착되게 하십시오.
경고
- 전원 공급 장치에는 변압기가 내장되어 있습니다.
위험할 수 있으므로, 다른 플러그로 교체하기 위해
전원 공급 장치를 잘라내지 마십시오.
- 본 제품은 반드시 제품과 함께 제공된 전원 공급
장치(HQ8505)를 사용하여 충전하십시오.
- 신체적인 감각 및 인지능력이 떨어지거나 경험과
지식이 풍부하지 않은 성인 및 어린이는 혼자
제품을 사용하지 말고 제품 사용과 관련하여
안전에 책임질 수 있도록 지시사항을 충분히
숙지한 사람의 도움을 받으십시오.
- 어린이가 제품을 가지고 놀지 못하도록 지도해
주십시오.
- 사용하기 전에 제품을 항상 확인하십시오. 제품이
손상되었을 경우 부상을 초래할 수 있으므로
사용하지 마십시오. 손상된 부품은 반드시
정품으로 교체하여 사용하십시오.
- 제품을 열어 충전식 배터리를 교체하지 마십시오.
주의
- 이 제품은 물세척할 수 없습니다. 제품을 절대로
물에 담그거나 헹구지 마십시오 (그림 2).
- 사용 설명서에 나온 본래 용도로만 제품을
사용하십시오.
- 위생상 좋지 않으므로 이 제품을 타인과 함께
사용하지 마십시오.
- 제품을 세척할 때 압축 공기, 수세미, 연마성
세제나 휘발유, 아세톤과 같은 강력 세제를
사용하지 마십시오.
- 전원 공급 장치가 영구적으로 손상되는 것을
방지하려면 전기 공기 청정제가 사용된 적이
있거나 사용되고 있는 벽면 콘센트를 통해 또는 그
근처에서 전원 공급 장치를 사용하지 마십시오.
EMF(전자기장)
- 이 Philips 제품은 EMF(전자기장) 노출과 관련된
모든 기준 및 규정을 준수합니다.
일반
- 이 제품은 100 ~ 240V 범위의 전원에 적합합니다.
- 전원 공급 장치는 100-240V의 전압을 24V
미만의 안전한 저전압으로 변환해 줍니다.
디스플레이
배터리 상태 표시
- 배터리가 거의 방전되면 배터리 충전 표시등이
주황색 (그림 3)으로 깜박입니다.
- 제품이 충전 중일 때는 배터리 충전 상태 표시등이
흰색 (그림 4)으로 깜박입니다.
- 배터리가 완전히 충전되면 배터리 충전 표시등이
흰색으로 켜진 상태로 유지 (그림 5)됩니다.
참고: 30분이 지나면 표시등이 자동으로 꺼집니다.
모발 길이 표시
줌 휠 (그림 6)로 원하는 길이 설정을 선택하면 줌 휠
위에 선택된 모발 길이 설정이 표시됩니다.
清潔與維護
清潔產品
注意:只有修剪組件和梳具可以用水清洗。
建議您每次使用完畢後清空鬍渣收集室。修剪濃密的
長鬍鬚時,修剪期間可能也必須清空鬍渣收集室,以維
持最佳吸力。
1 關閉產品電源,並將產品插頭從插座拔下。
2 用乾布擦拭產品外殼。
3 取下梳具(圖16),用清潔刷清理和/或在水龍頭
(圖17)下沖洗。
4 取出修剪組件,在水龍頭(圖18)下清洗。甩乾多餘
的水份之後,讓產品完全乾燥。
注意事項: 切勿使用毛巾或紙巾擦乾修剪組件,否則
可能損壞修剪組件的刀齒。
5 搖晃並/或以清潔刷清除鬍渣收集室內的毛髮(圖19,
圖20).。
6 清洗後,將修剪組件(圖21)和梳具(圖14)重新裝回
產品。
回收
- 本產品使用壽命結束時請勿與一般家庭廢棄物一併
丟棄。請將該產品放置於政府指定的回收站,此舉
能為環保盡一份心力。
保固與支援
如需資訊或支援,請造訪:www.philips.com/support,
或另行參閱全球保證書。
한국의
구성품 명칭(그림 1)
1 커팅 부품
2 진공 청소 시스템
3 길이 설정
4 줌 휠
5 전원 버튼
6 배터리 상태 표시등
7 세척 스펀지
8 청소용 브러시
9 전원 플러그
10 전원 공급 장치(어댑터)
11 프리시젼 트리머
12 수염 및 짧은 수염용 빗
참고: 제공되는 액세서리는 제품에 따라 다를 수
있습니다. 보관함에 제품과 함께 제공된 액세서리가
있습니다.
중요 안전 정보
본 제품과 해당 액세서리를 사용하기 전에 이 중요
정보를 주의 깊게 읽고 나중에 참조할 수 있도록 잘
보관하십시오. 제공되는 액세서리는 제품에 따라 다를
수 있습니다.
주의
- 전원 공급 장치를 건조한 상태로 보관하십시오
(그림 2).
顯示幕
電池狀態指示燈
- 電池電力即將用盡時,電池充電指示燈會閃爍橘光
(圖3)。
- 裝置充電時,電池充電指示燈會閃爍白光(圖4)。
- 電池充飽電後,電池充電指示燈會持續(圖5)亮白
光。
注意:30分鐘後,指示燈會自動關閉。
髮長指示燈
使用縮放滾輪(圖6)選擇想要的長度時,縮放滾輪上方
會顯示所選的長度設定。
充電
充電時間約需1小時。 請在初次使用之前、螢幕指顯
示電池電量即將用盡時,為產品充電。
1 確定關閉本產品的電源。
2 將電源轉換器插入牆壁的插座,並將小插頭插入產
品
(圖7)中。
3 充電完畢請將電源轉換器拔離電源插座,並將小插
頭從產品上拔除。
本產品充飽電後,可以無線使用長達60分鐘。
使用本產品
注意:本產品可以無線方式使用或直接插在電源插座
上使用。
本產品可用於刮鬍渣及短鬚。本產品內建吸力裝置,
可吸取剪下的毛髮,修剪過後不留下髒亂。
開啟產品時,吸力裝置便會自動啟動。
注意:每次使用完畢後,請關閉電源並清潔產品。
開啟及關閉本產品
若要開啟或關閉(圖8)本產品電源,請按一下開關按
鈕。
不使用梳具修剪
- 您可以不裝鬍鬚與鬍渣梳具,只用產品修剪貼近皮
膚的毛髮或修整頸線和鬢角。若要修剪貼近皮膚的
毛髮,請將修整刀頭的平面靠在皮膚上,並往想要
的方向(圖9)推移。
- 您可以使用精準修整刀修出細線條,並貼近皮膚
(圖10)照著臉型修剪出造型。將修剪組件直接抽出
(圖11),並插入精準修整刀(圖12)。
- 若要貼面修整,請將修整刀頭與皮膚呈垂直,
然後稍微下壓(圖13)並向前或向後移動修剪刀頭。
使用梳具修剪
您可以用裝在修剪組件上的鬍鬚與鬍渣梳具,將鬢角與
鬍髭修整成您想要的造型。有20個長度設定
(從0.5mm到10mm,每個相差0.5mm)可供選擇。
1 將梳具裝到產品(圖14)上。
2 轉動縮放滾輪以選擇您想要的長度(圖6)。
注意:首次進行修剪時,請先從最高設定開始,
以熟練本產品的使用。
3 開啟產品。
4 若要以最有效的方式進行修剪,請逆著毛髮生長的
方向移動產品。請確認梳具表面與皮皮 (皮 15)完全地
接觸。

-
)EMF
- Philips
- 240100
- 240100
24
-
)3(
- )4
- )5
30
)6
1
1
)7 2
3
60
)8
-
)9
-
)10(
)12)11
-
)13
20
0.5100.5
)14 1
)6 2
3
4
)15
1
2
)16 3
)17
)18 4
5
.)2019(
)14)21 6
-
www.philips.com/support
청소 및 유지관리
제품 청소
참고: 커팅 유닛과 빗만 물로 세척할 수 있습니다.
트리밍이 끝난 후에는 매번 수염 받이를 비워 줄 것을
권장합니다. 길고 많은 수염을 다듬을 때에는 흡입
성능이 최적의 상태로 유지되도록 트리밍 도중 수염
받이를 비워야 할 수도 있습니다.
1 제품의 전원을 끄고 전원 콘센트와 연결된 코드를
뽑으십시오.
2 제품 케이스를 마른 천으로 닦으십시오.
3 빗 (그림 16)을 제거하고 청소용 브러시로 청소
및 /또는 수돗물 (그림 17)에 헹구십시오.
4 커팅 부품을 빼내 흐르는 수돗물 (그림 18)로
깨끗이 씻으십시오. 물기를 털어 내고 완전히 자연
건조하십시오.
주의: 절대로 수건이나 휴지로 커팅 부품의 물기를
닦아 내지 마십시오. 트리머 날이 손상될 수 있습니다.
5 수염 받이에 모인 수염은 흔들기 및/또는 빗질을
통해 제거하십시오 (그림 19. 그림 20).
6 청소 후에는 커팅 부품 (그림 21) 및 빗 (그림 14)
을 제품에 다시 부착하십시오.
재활용
- 수명이 다 된 제품은 일반 가정용 쓰레기와
함께 버리지 말고 지정된 재활용품 수거 장소에
버리십시오. 이를 준수함으로써 환경 보호에
동참할 수 있습니다.
보증 및 지원
보다 자세한 정보나 지원이 필요한 경우에는
www.philips.com/support 페이지를 방문하시거나
제품 보증서를 참조하십시오.

)1
1
2
3
4
5
6
7
8
9
10
11
12
- .)2
-
- .)HQ8505
-
-
-
-
-
.)2
-
-
-
-
)1
1
2
3
4
5
6
7
8
9
10
11
12
- .)2
-
- HQ8505
-
-
-
-
-
.)2
-
-
-
-
)10
)11
.)12
-
.)13
20
0.5100.5
.)14 1
.)6 2
3
4
.)15
1
2
)16 3
.)17
.)18 4
5
.)2019
)21 6
.)14(
-
www.philips.com/support
)EMF
- Philips
- 100
240
- 100-240
24
-
.)3
-
.)4
-
.)5
30
.)6
1
2
.)7(
3
60
.)8
-
.)9
-
 1
1
-
 2
2
-
 3
3
-
 4
4
-
 5
5
-
 6
6


Philips BT7201 Manual do usuário
- Categoria
- Aparadores de cabelo
- Tipo
- Manual do usuário
Artigos relacionados
-
Philips BT7204 Manual do usuário
-
-
Philips BT7210 Manual do usuário
-
-
-
Philips MG7710/13 Manual do usuário
-
Philips BT1216/15 Manual do usuário
-
Philips MG5730/13 Manual do usuário
-
-
Philips BRL140/00 Manual do usuário