Thule Apex XT Swing 4 Manual do usuário
- Categoria
- Acessórios para bicicletas
- Tipo
- Manual do usuário

Instructions
506-7348-02
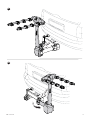
Thule Apex Swing XT
(4 Bike Carrier)
9027XT

2 506-7348-02
X
Instructions Safety
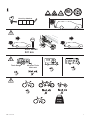
EN Apex XT(4 Bike Carrier) 9027XT
ES Apex XT (Portabicicletas Para 4 Bicicletas)
9027XT
FR Apex XT (4 portevélos) 9027XT
PT Apex XT (4 Bicicletário) 9027XT
x2 x1
x1
x1 x1
x1 x1
x1
x2
x8
x4
x1
x1
X
X < 1.5" (3.8 cm)X > 1.5" (3.8 cm)
_

3506-7348-02
Your Key-Number
80
mph
Max
150lbs,
68kg
STOP
200 miles
321 km
Thule Range All other Thule
hitch rack

4 506-7348-02
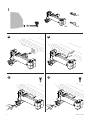
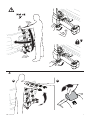
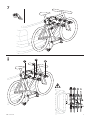
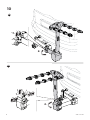
1
x1
x1x1
A
C D
B
Click

5506-7348-02
2
A
B
C
D
x1
x2
x1
x1
Click

6 506-7348-02
F G
D
E

7506-7348-02
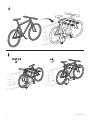
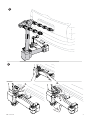
3
AB
8 506-7348-02
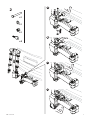
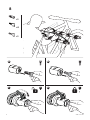
4

9506-7348-02
A
B
C
5
x8
Click
Click

10 506-7348-02
6
A
B
C
D
x4
Click

11506-7348-02
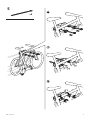
7
x1
1
2
3
4

12 506-7348-02
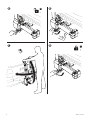
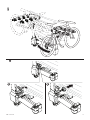
8
A B
C D
x1
x2
x1

13506-7348-02
B
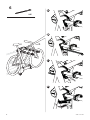
9
A

14 506-7348-02
E
DC
15506-7348-02
F
Click
G
Click

16 506-7348-02
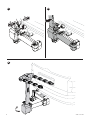
B
2.
10
A
2.
1.
1.

17506-7348-02
D
C
Click
Click
2.
1.

18 506-7348-02
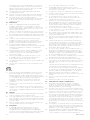
Thule One-Key System
450200 (x2)
450400 (x4)
450600 (x6)
450800 (x8)

19506-7348-02
EN
A.0 General
A.1 Thule assumes no liability for injury to persons, damage to
movable or immovable property, loss of profit, or any other
loss or damage caused by the improper mounting or use of the
carrier, including but not limited to mounting or use in conflict
with the assembly instructions, mounting instructions or any
other instructions given, in writing or verbally, by Thule or a Thule
dealer.
A.2 The carrier and its parts must not be modified in any way.
A.3 Consult your Thule dealer if you have any questions about the
operation, use and limits of the carrier. Read all of the instructions
and warranty information carefully before mounting and using
the carrier.
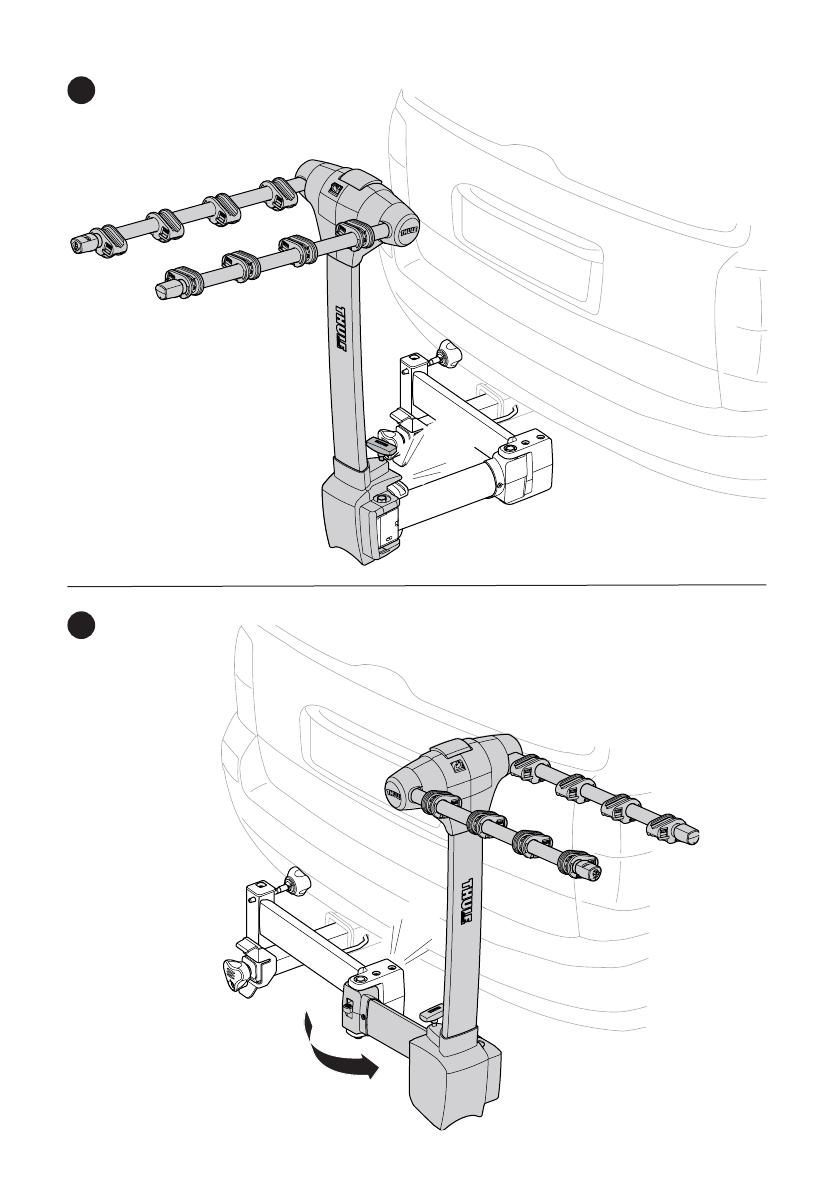
B.0 Fitting
B.1 Check the assembly instructions to make sure that all the
necessary parts of the carrier are present.
B.2 Read and follow the assembly instructions and the
recommendation list carefully, if the list is included. Then fit the
unit in the correct sequence by following points 1, 2, 3 and so on.
B.3 Do not attempt to fit the carrier in any other way than the way
shown in the mounting instructions.
C.0 Loading
C.1 The maximum load for the carrier, as specified in the assembly
instructions, must not be exceeded. In addition, the maximum
load recommended for the vehicle itself always takes priority
over the load specified in the assembly instructions. It is always
the lower recommended maximum load that applies and that
must not be exceeded.
C.2 The maximum load for the carrier, as specified in the assembly
instructions, applies to vehicles in motion as well as parked
vehicles.
C.3 The load must be carefully secured. Elastic bungees must not be
used.
C.4 Check and do not exceed the maximum weight per bike
specified in the mounting instructions.
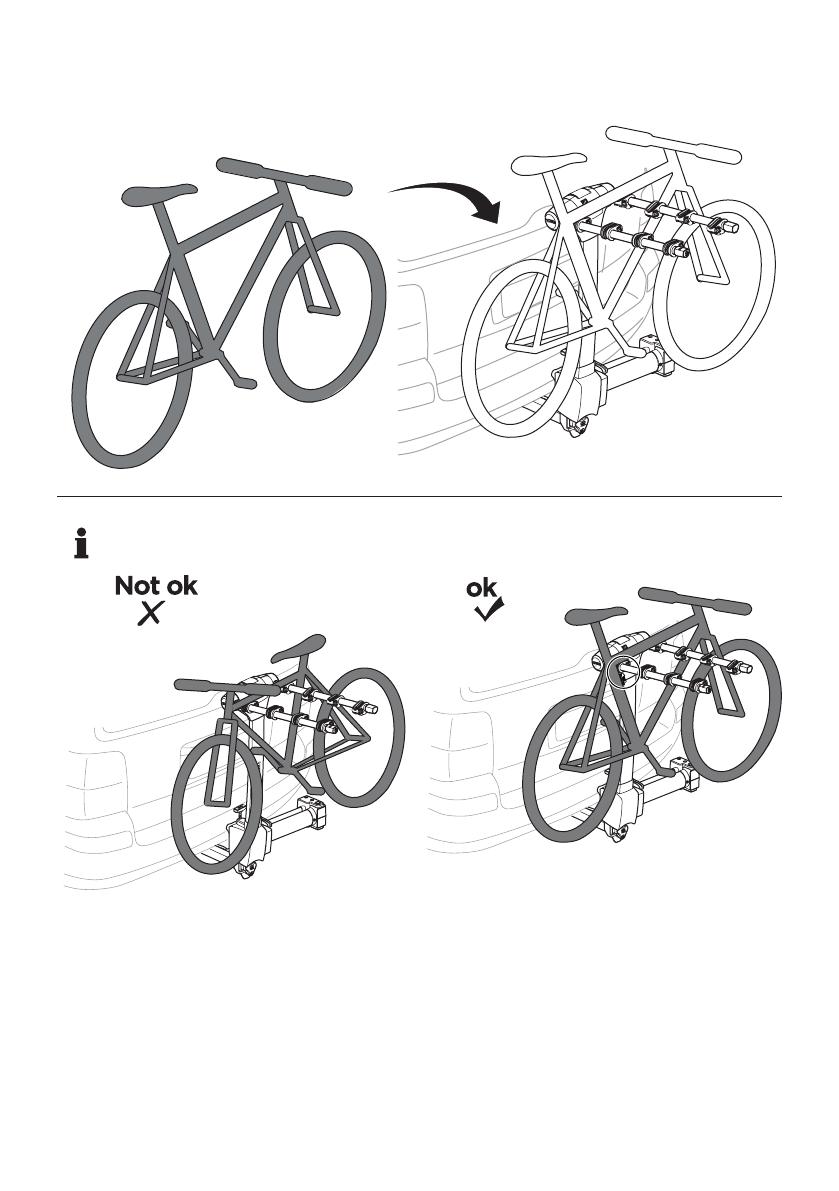
C.5 When loading bikes on the carrier, always position the largest
and heaviest bikes closest to the car, followed by the smaller and
lighter bikes.
C.6 The carrier is constructed to carry only standard bike frames.
Tandem bikes must not be transported on the carrier. Always
check and do not exceed the maximum bike frame size
(diameter) specified in the mounting instructions.
C.7 In the case of bikes with carbon frames or forks, always consult
the bike manufacturer or dealer to check if you are allowed to
use the carrier.
C.8 We recommend that you use the Thule Bike Frame Adapter 982
for rear-mounted carriers, such as the tow bar-mounted carriers
and rear door-mounted carriers.
C.9 Thule assumes no liability for any damage to carbon frames or
forks incurred during mounting and/or use of the carrier.
C.10 All easily removable parts of the bikes must be removed before
transportation, including but not limited to child seats, baskets,
locks (if not permanently mounted) and air pumps. These
parts can become detached during transportation because
of increased air resistance and vibration and can constitute a
danger to other road users.
C.11 If the vehicle is equipped with an automatic boot or tailgate
opening function, this function must be disabled and the luggage
compartment must be opened manually when the rear-mounted
carrier is fitted, to avoid damage to the vehicle and/or the carrier.
C.12 If necessary, the load must be fitted with the appropriate lights
and warning signs in accordance with local laws.
C.13 In the case of vehicles first type-approved after 1 October 1998,
the rear-mounted carrier and/or the load must not cover the
vehicle’s third brake light. The vehicle’s third brake light must be
visible from:
• 10 degrees to the left and to the right of the longitudinal axis
of the vehicle
• 10 degrees above and 5 degrees below the horizontal axis
If these figures are not complied with, an optional replacement
brake light must be fitted. National laws must be taken into
account while using the carrier.
C.14 Keep the mounting and safety instructions and (if applicable) the
EC-type approval in the vehicle where the carrier is mounted.
C.15 Not intended for tandems or recumbents.
C.16 Do not install on a trailer or other towed vehicle.
D.0 Driving characteristics and regulations
D.1 This product is not approved for and must not be used during
off-road driving. Adapt your speed to the prevailing road
conditions and the load being carried. Check the load fastenings
regularly.
D.2 The vehicle driver is solely responsible for ensuring that the
carrier is in perfect condition and that the carrier and load are
securely fastened (even if fitted by a third person).
D.3 Every time the carrier is used, check that the carrier is securely
fitted after driving a short distance (50km) and then at regular
intervals. If you notice any unusual noise, movement of the load
and/or carrier, different behaviour of the vehicle or other unusual
conditions, stop and check that the carrier and load are secured
correctly, and in accordance with the mounting instructions.
D.4 The vehicle’s total length and/or height may increase when
a carrier is mounted. The bikes themselves may increase the
vehicle’s total width and height. Take special care when reversing
and/or entering garages or ferries etc.
D.5 Replace any damaged or worn parts of the carrier immediately.
During transportation, all levers, bolts and/or nuts must be
tightened in accordance with the mounting instructions.
D.6 Carriers fitted with a lock must always be in the locked position.
The keys must be removed and kept inside the vehicle during
transport.
D.7 Be aware that the vehicle’s driving characteristics and braking
behaviour (including in curves) might change and that the
vehicle might become vulnerable to side winds when the carrier
is fitted.
D.8 Depending on the carrier model, the car’s tail lights can be
obstructed. If that is the case and if the carrier does not already
have integrated rear lights, an external light board must be fitted.
D.9 An additional number plate might be required. This should be
attached to the appropriate part of the carrier in accordance
with local laws.
D.10 The vehicle’s speed must always be adjusted to the load being
carried and the current driving conditions, such as the road type,
road quality, wind conditions, traffic intensity and applicable
speed limits, but must under no circumstances exceed 130 km/h.
Applicable speed limits and other traffic regulations must always
be observed.
D.11 Drive slowly over speed bumps, maximum speed 10 km/h.
D.12 Be aware that wind noise may be generated during transport and
may vary depending on the vehicle and load.
D.13 For reasons of fuel economy and environmental impact as well
as the safety of other road users, the carrier must be removed
from the vehicle when not in use.
E.0 Maintenance
E.1 Clean the carrier regularly using warm water or car shampoo,
especially when using or after using the carrier in coastal areas
(the effect of salt water) or during periods when salt is applied to
the roads (winter time).
E.2 Lubricate the coupling mechanism (but not the surfaces in
contact with the tow ball surface) and other moving parts of the
carrier when required.
E.3 Remove the carrier before using an automatic car wash.
E.4 When the carrier is removed from the vehicle, it must be stored
in a dry storage area. All the components of the carrier must
be stored safely. Remember to clean and maintain the carrier in
accordance with the instructions.
E.5 If you lose part(s) of the carrier or part(s) of the carrier wear out,
only use genuine Thule spare parts as replacements. Spare parts
can be purchased from your dealer or manufacturer.
E.6 To ensure that you receive the spare parts quickly and to avoid
time-consuming queries, please provide the relevant product
details and the serial number when placing an order or making
an inquiry.
E.7 In order to ensure that you are able to replace lost or defective
keys as quickly as possible, note down the lock and key number
which can be found on your key.
E.8 Check tightness of all bolts and knobs periodically.
E.9 Check rubber straps for wear and replace if worn.

20 506-7348-02
FR
A.0 Informations générales
A.1 Thule décline toute responsabilité en cas de dommages
corporels, de dommages matériels de biens mobiliers ou
immobiliers, de perte de profit, ou de tout autre dommage ou
perte résultant du montage ou de l’utilisation inappropriés du
porte-vélos, notamment, mais sans s’y limiter, en cas de montage
ou d’utilisation ne respectant pas les instructions d’assemblage
ou de montage, ou toute autre instruction, écrite ou verbale,
formulée par Thule ou un revendeur Thule.
A.2 Le porte-vélos et l’ensemble des pièces qui le composent ne
doivent en aucun cas être modifiés.
A.3 Consultez votre revendeur Thule pour toute question relative
au fonctionnement, à l’utilisation ou aux limites du porte-vélos.
Veuillez également lire attentivement toutes les instructions et
informations de garantie avant de monter et d’utiliser le porte-
vélos.
B.0 Installation
B.1 Reportez-vous aux instructions d’assemblage afin de contrôler la
présence de tous les éléments requis.
B.2 Lisez et suivez scrupuleusement les instructions d’assemblage
et les recommandations fournies, le cas échéant. Procédez au
montage de l’unité dans l’ordre indiqué, en commençant par
l’étape 1, puis 2, 3, etc.
B.3 Ne tentez en aucun cas d’installer le porte-vélos autrement que
conformément aux instructions de montage.
C.0 Chargement
C.1 Le poids de chargement maximal autorisé pour le porte-vélos, tel
que spécifié dans les instructions d’assemblage, ne doit en aucun
cas être dépassé. Par ailleurs, la charge maximale préconisée
pour le véhicule lui-même a toujours priorité sur les spécifications
indiquées dans les instructions d’assemblage. C’est toujours le
poids maximal recommandé le plus faible qui s’applique, et qui
ne doit en aucun cas être dépassé.
C.2 Le poids maximal autorisé pour le porte-vélos, tel que spécifié
dans les instructions d’assemblage, s’applique aux véhicules en
mouvement comme à l’arrêt.
C.3 Le chargement doit être correctement fixé. Notez que l’utilisation
de tendeurs élastiques est strictement prohibée.
C.4 Contrôlez le poids maximal autorisé par vélo indiqué dans les
instructions de montage, et veillez à ne pas le dépasser.
C.5 Lors du chargement de vélos sur un porte-vélos, veillez à
toujours placer les vélos les plus lourds et les plus volumineux du
côté le plus près de la voiture.
C.6 Le porte-vélos a été conçu pour des cadres de vélo standard.
Il est strictement interdit de transporter des tandems à l’aide
de ce porte-vélos. Contrôlez la taille de cadre de vélo maximale
autorisée (diamètre), telle qu’indiquée dans les instructions de
montage, et veillez à ne pas la dépasser.
C.7 Pour les vélos dotés d’un cadre ou de fourches en carbone,
consultez le fabricant ou le revendeur du vélo pour vous assurer
de l’utilisation possible du porte-vélos.
C.8 Nous recommandons l’utilisation de l’adaptateur pour cadre de
vélo Thule 982 pour les porte-vélos arrière, tels que les porte-
vélos sur boule d’attelage ou les porte-vélos sur hayon arrière.
C.9 Thule décline toute responsabilité quant à l’endommagement de
cadres ou de fourches en carbone survenant lors du montage et/
ou de l’utilisation du porte-vélos.
C.10 Tous les éléments pouvant être facilement démontés doivent
être retirés du vélo avant le transport, notamment le siège enfant,
panier, antivol (non fixes) ou pompe à air. Cette liste est non
exhaustive. Ces éléments pourraient en effet se détacher lors
du transport en raison de l’augmentation des vibrations et de la
résistance à l’air, et constituer un danger pour les autres usagers
de la route.
C.11 Si le véhicule est équipé d’une fonction d’ouverture automatique
du coffre ou du hayon arrière, celle-ci doit impérativement
être désactivée : le compartiment à bagages doit être ouvert
manuellement en cas d’utilisation d’un porte-vélos sur hayon
arrière, afin de ne pas endommager le véhicule et/ou le porte-
vélos.
C.12 Si nécessaire, le chargement doit être complété avec les feux et
signes d’avertissement appropriés, conformément à la législation
locale en vigueur.
C.13 Dans la catégorie des véhicules du premier type, approuvés
après le 1er octobre 1998, le porte-vélos sur hayon arrière et/ou
le chargement ne doivent en aucun cas couvrir le troisième feu
stop, qui doit pouvoir être visible à partir de :
• 10 degrés à gauche et à droite de l’axe longitudinal du véhicule
;
• 10 degrés au-dessus et 5 degrés en dessous de l’axe horizontal.
Si ces mesures ne sont pas respectées, il est impératif d’installer
un feu stop de remplacement. L’utilisation du porte-vélos doit en
tout temps tenir compte de la législation nationale en vigueur.
C.14 Conservez les instructions de montage ainsi que les consignes
de sécurité et, le cas échéant, l’attestation CE de type dans le
véhicule recevant le porte-vélos.
C.15 N’est pas prévu pour les tandems ni les vélos à position allongée
(VPA).
C.16 Ne l’installez pas sur une remorque ou un véhicule remorqué.
D.0 Réglementation et caractéristiques de conduite
D.1 Ce produit n’a pas été approuvé et ne doit pas être utilisé pour
la conduite tout-terrain. Adaptez votre vitesse aux conditions de
route et au chargement transporté. Contrôlez régulièrement la
fixation du chargement.
D.2 Il est de la seule responsabilité du conducteur de s’assurer
du bon état du porte-vélos ainsi que de la bonne fixation de
l’ensemble porte-vélos/chargement (même lorsque l’ensemble
est installé par un tiers).
D.3 Lors de chaque utilisation du porte-vélos, vérifiez qu’il est
correctement installé après avoir parcouru une courte distance
(50 km), puis à intervalles réguliers. En cas de bruit inhabituel,
de déplacement du chargement et/ou du porte-vélos, d’un
comportement inhabituel du véhicule ou de tout autre détail
inhabituel, arrêtez-vous afin de contrôler la fixation du porte-
vélos et du chargement, conformément aux instructions de
montage.
D.4 L’utilisation d’un porte-vélos peut entraîner l’augmentation de
la longueur et/ou de la hauteur totale du véhicule. Les vélos
eux-mêmes peuvent accroître la largeur et la hauteur totale du
véhicule. Soyez particulièrement vigilent lors des marches arrière
et/ou lors de l’entrée dans les garages ou les ferries, entre autres.
D.5 Remplacez immédiatement tout composant endommagé ou usé.
Lors du transport, tous les leviers, boulons et/ou écrous doivent
être serrés conformément aux instructions de montage.
D.6 Les porte-vélos fixés à l’aide d’un verrou doivent toujours être en
position verrouillée. Il est également impératif de retirer les clés
afin de les conserver dans le véhicule lors du transport.
D.7 Notez que l’utilisation d’un porte-vélos peut altérer les
caractéristiques de conduite et de freinage du véhicule (y
compris dans les virages) et le rendre sensible aux vents latéraux.
D.8 Selon le modèle de porte-vélos choisi, les feux arrière peuvent
être obstrués. Dans ce cas, et si le porte-vélos ne bénéficie pas
de feux arrière intégrés, il est indispensable d’ajouter un système
d’éclairage extérieur.
D.9 Il peut également s’avérer nécessaire d’ajouter une plaque
d’immatriculation, fixée à l’emplacement dédié sur le porte-vélos,
conformément à la législation locale en vigueur.
D.10 La vitesse du véhicule doit constament être ajustée en fonction
du chargement transporté et des conditions de route, telles que
le type et la qualité de la route, les conditions météorologiques,
l’intensité du trafic et les limitations de vitesse en vigueur, mais ne
doit en aucun cas dépasser 130 km/h. Les limitations de vitesse
applicables et l’ensemble de la législation routière en vigueur
doivent toujours être observées.
D.11 Roulez lentement sur les dos d’âne, à une vitesse maximum
de 10 km/h.
D.12 Notez que du bruit peut être induit par le vent lors du transport
et que ce phénomène varie en fonction du véhicule et du
chargement.
D.13 Pour des raisons d’économie de carburant et d’impact
environnemental ainsi que pour la sécurité des autres usagers de
la route, le porte-vélos doit être retiré lorsqu’il n’est pas utilisé.
E.0 Entretien
E.1 Nettoyez régulièrement le porte-vélos à l’eau chaude ou à l’aide
de shampooing pour voiture, en particulier en cas d’utilisation du
porte-vélos dans des régions côtières (en raison du sel) ou en
hiver, lorsque les routes sont salées.
E.2 Lubrifiez le mécanisme de couplage (à l’exception des surfaces
en contact avec la surface de la boule d’attelage) ainsi que les
A página está carregando ...
A página está carregando ...
A página está carregando ...
A página está carregando ...
-
 1
1
-
 2
2
-
 3
3
-
 4
4
-
 5
5
-
 6
6
-
 7
7
-
 8
8
-
 9
9
-
 10
10
-
 11
11
-
 12
12
-
 13
13
-
 14
14
-
 15
15
-
 16
16
-
 17
17
-
 18
18
-
 19
19
-
 20
20
-
 21
21
-
 22
22
-
 23
23
-
 24
24


Thule Apex XT Swing 4 Manual do usuário
- Categoria
- Acessórios para bicicletas
- Tipo
- Manual do usuário
em outros idiomas
- español: Thule Apex XT Swing 4 Manual de usuario
- français: Thule Apex XT Swing 4 Manuel utilisateur
Artigos relacionados
-
Thule 903750 Instruções de operação
-
Thule Gateway Pro 3 Manual do usuário
-
-
-
-
-
-
-
-