
PART. U2558A
Istruzioni d’uso
Gebrauchsanweisungen
Notice d’emploi
Instruction sheet
Instrucciones de uso
Gebruiksaanwijzing
Instruções para o uso
Instrukcja
04/08_01 PC
21
40°
40°
342560
5
USB
J1
J2
P
N
T
S
2
1
BUS
PL
S+
S−
ART.342560
1
2
3
4
USB
J1
J2
P
N
T
S
2
1
BUS
PL
S+
S−
ART.342560
1
2

6
8
7
2
1
BUS
PL
S+
S−
BUS
S+S- = 18V - 4A impulsivi - 250mA mantenimento (30Ω max)
S+S- = 18V - 4A impulsstrom - 250mA Haltestrom (30Ω max)
S+S- = 18V - 4A impulsifs - 250mA entretien (30Ω max)
S+S- = 18V - 4A impulsive - 250mA holding current (30Ω max)
S+S- = 18V - 4A impulsivos - 250mA mantenimiento (30Ω max)
S+S- = 18V - 4A impulsief - 250mA onderhoud (30Ω max)
S+S- = 18V - 4A instantâneos - 250mA continuos (30Ω max)
S+S- = 18V - 4A impulsowe - 250mA utrzymanie (30Ω max)
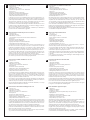
9
-20° ÷ +20°
1
2
3
-20° ÷ +20°
+
PL
S+
S- A
S- S+ C NC NO
NO
NC
C
8A cosφ = 1
4A cosφ = 0,7
3A cosφ = 0,4
24Vdc
24Vac
24Vac
24Vac
346250
Serratura a relè
Schloss mit Relais
Serrure à relais
Relay door lock
Cerradura de relé
Slot met relais
Trinco com relè
Sterowanym przez przeka źnik

10
11
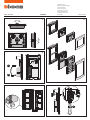
1 - Altoparlanti
2 - Telecamera
3 - Led bianchi: illuminazione notturna
4 - Led verde: indicazione porta aperta
5 - Microfono
6 - Pulsanti di chiamata
7 - A Led Verde: chiamata inoltrata
A Led Rosso: sistema occupato
8 - Led verde: comunicazione attiva
1 - Altavoz
2 - Telecámara
3 - Leds blancos: iluminación nocturna
4 - Led verde: indicación puerta abierta
5 - Micrófono
6 - Pulsadores de llamada
7 - Con el led verde: llamada enviada
Con el led rojo: sistema ocupado
8 - Led verde: comunicación activada
1 - Lautsprecher
2 - Kamera
3 - Weiße Leds: Nachtbeleuchtung
4 - Grüne Led: Meldet offene Tür
5 - Mikrophon
6 - Ruftasten
7 - Grüne Led: Ruf gesendet
Rote Led: System belegt
8 - Grüne Led: Kommunikation aktiv
1 - Luidspreker
2 - Televisiecamera
3 - Witte leds: nachtverlichting
4 - Groene led: aanduiding open deur
5 - Microfoon
6 - Knoppen oproep
7 - Groene led: oproep doorgestuurd
Rode led: systeem bezet
8 - Groene led: communicatie actief
1 - Haut-parleur
2 - Caméra
3 - Diodes blanches: éclairage nocturne
4 - Diode verte: indication porte ouverte
5 - Micro
6 - Poussoirs d’appel
7 - Avec diode verte: appel transmis
Avec diode rouge: système occupé
8 - Diode verte: communication active
1 - Altifalante
2 - Câmara
3 - Indicadores luminosos brancos: iluminação
nocturna
4 - Indicadores luminosos verde: indicação de
porta aberta
5 - Microfone
6 - Botões de chamada
7 - Indicadores luminosos Verde: chamada transmitida
Indicadores luminosos Vermelho: sistema ocupado
8 - Indicadores luminosos verde: comunicação activa
1 - Loudspeaker
2 - Camera
3 - White LED: night lighting
4 - Green LED: door open indication
5 - Microphone
6 - Call pushbuttons
7 - With Green LED: call forwarded
With Red LED: system busy
8 - Green LED: communication active
1 - Głośnik
2 - Telekamera
3 - Diody LED białe: oświetlenie nocne
4 - Dioda LED zielona: wskazanie otwartych drzwi
5 - Mikrofon
6 - Przyciski wywołania
7 - Dioda LED zielona: wywołanie dokonane
Dioda LED czerwona: system zajęty
8 - Dioda LED zielona: komunikacja aktywna
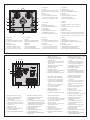
1 - Regolazione volume microfono
2 - Regolazione volume altoparlante
3 - J1: Estarre per alimentazione
supplementare
4 - J2: se inserito attiva due colonne di
pulsanti di chiamata, disinserito una
5 - Collegamento serratura e al pulsante
apriporta locale
6 - Collegamento al BUS
7 - Alimentazione locale
8 - Collegamento pulsanti aggiuntivi
9 - Sede dei configuratori
10 - USB per personalizzazione tramite SW
USB
J1
J2
P
N
T
S
2
1
BUS
PL
S+
S−
ART.342560
1 3
10
5678
2 4
9
1 - Mikrophon-Lautstärke einstellen
2 - Lautsprecher-Lautstärke einstellen
3 - J1: Für zusätzliche Speisung
herausziehen
4 - J2: wenn eingesteckt, werden die beiden
Ruftasten-Säulen aktiviert; wenn nicht
eingesteckt, wird nur eine Säule aktiviert
5 - Schlossanschluss und Verbindung
mit der lokalen Türöffner-Taste
6 - Anschluss an den BUS
7 - Lokale Speisung
8 - Anschluss an zusätzliche Tasten
9 - Sitz der Konfiguratoren
10 - USB zur benutzerspezifische Einstellung
durch die SW
1 - Microphone volume adjustment
2 - Loudspeaker volume adjustment
3 - J1: Take out for extra power supply
4 - J2: if inserted two call pushbutton
columns are active, if not inserted
one
5 - connection to door lock and to the
room open-door pushbutton
6 - Connection to the BUS
7 - Room power supply
8 - Extra pushbutton connection
9 - Configurator housing
10 - USB for customisation by means of SW
1 - Ajuste volumen micrófono
2 - Ajuste volumen altavoz
3 - J1: extraer para alimentación adicional
4 - J2: si se conecta, activa dos columnas
de pulsadores de llamada, al
desconectarlo una
5 - Conexión cerradura y al pulsador de
apertura puerta local
6 - Conexión al BUS
7 - Alimentación local
8 - Conexión pulsadores adicionales
9 - Alojamiento configuradores
10 - USB para personalización mediante
software
1 - Regulação volume microfone
2 - Regulação volume altifalante
3 - J1: Extrair para alimentação
suplementar
4 - J2: se estiver conectado activa duas
colunas de botões de chamada, se
estiver desconectado activa uma
coluna
5 - Conexão com a fechadura e com o
botão de abertura da porta local
6 - Ligação com o BUS
7 - Alimentação local
8 - Conexão com botões adicionais
9 - Alojamento configurador
10 -
USB para personalização por meio de SW
1 - Regulacja głośności mikrofonu
2 - Regulacja głośności głośnika
3 - J1: Wyciągnąć do zasilania
dodatkowego
4 - J2: jeśli włączony aktywuje dwie
kolumny przycisków wywołania,
wyłączony jedną
5 - Połączenie zamka i z miejscowym
przyciskiem otwierania drzwi
6 - Połączenie z BUS-em
7 - Zasilanie miejscowe
8 - Połączenie przycisków dodatkowych
9 - Miejsce konfiguratorów
10 - USB do ustawiania według osobistych
upodobań za pomocą SW
1 - Réglage volume micro
2 - Réglage volume haut-parleur
3 - J1: extraire pour alimentation
supplémentaire
4 - J2: introduit, active deux colonnes de
boutons d’appel - extrait, n’en active
qu’une seule
5 - Branchement serrure et au bouton
d’ouverture porte local
6 - Connexion au BUS
7 - Alimentation locale
8 - Branchement boutons supplémentaires
9 - Logement configurateurs
10 - USB pour personnalisation via logiciel
1 - Afstelling volume microfoon
2 - Afstelling volume luidspreker
3 - J1: Uittrekken voor supplementaire
voeding
4 - J2: indien ingeschakeld activeert
twee kolommen met drukknoppen
van oproep, uitgeschakeld één
5 - Verbinding slot en naar drukknop
plaatselijke deuropening
6 - Verbinding met de BUS
7 - Plaatselijke voeding
8 - Verbinding bijkomende drukknoppen
9 - Plaats van de configuratiemodules
10 -
USB voor verpersoonlijking middels SW
1
2
6 6
7
3
3
8 4
5

12
Caratteristiche modulo di ripresa a colori
- Sensore da 1/3”
- Obiettivo F1.5 f4.3mm
- Alimentazione 18 ÷ 27 V d.c.
- Assorbimento apparecchio acceso 140mA max
- Interlaccio 2:1
- Risoluzione 330 linee (orizzontale)
- llluminazione notturna tramite LED bianchi
- Regolazione automatica della luminosità
- Temperatura di funzionamento -25° + 70° C
I
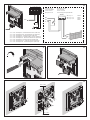
La telecamera non deve essere installata di fronte a grandi sorgenti luminose, op-
pure in luoghi dove il soggetto ripreso rimanga molto in controluce. Per risolvere i
problemi precedentemente descritti si consiglia di variare l’altezza di installazione
della telecamera, solitamente 160-165 cm, ad un’altezza di 180 cm e di orientare
l’obiettivo verso il basso in modo da migliorare la qualità delle riprese.
In condizioni di scarsa luminosità l’immagine visualizzata dalle telecamere a colori
potrebbe portare ad una diminuzione della resa cromatica a vantaggio di una mi-
gliore riconoscibilità della persona inquadrata.
Per una visione ottimale si consiglia comunque, in ambienti poco illuminati, di
prevedere una fonte di illuminazione aggiuntiva.
Eigenschaften des Aufnahme-Farbmoduls
- 1/3” Sensor
- Objektiv F1.5 f4.3mm
- Versorgungsspannung 18 ÷ 27 V d.c.
- Leistungsaufnahme (Betrieb) 140mA max
- Interlace 2:1
- Auflösung 330 Zeilen (horizontal)
- Nachtbeleuchtung durch weiße Leds
- Automatische Einstellung der Helligkeit
- Betriebstemperatur -25° + 70° C
D
Die Kamera darf nicht vor starken Lichtquellen oder an Orten installiert werden,
wo das Subjekt sich im Gegenlicht befindet. Um die zuvor Probleme zu lösen,
empfehlen wir die Installationshöhe der Kamera zu ändern, d.h. sie anstatt auf
160-165 cm Höhe, auf 180 cm Höhe zu installieren und das Objektiv nach unten
zu o rientieren, um die Aufnahmequalität zu verbessern.
Unter schlechten Lichtverhältnissen kann das von der Kamera wiedergegebene
Farbbild eine Verschlechterung der Farbwiedergabe zugunsten einer besseren
Erkennung der eingeblendeten Person aufweisen.
Für eine optimale Wiedergabe empfehlen wir in schlecht beleuchteten Bereichen,
eine zusätzliche Lichtquelle vorzusehen.
Caractéristiques module de prise de vue couleurs
- Capteur da 1/3”
- Objectif F1.5 f4.3mm
- Alimentation 18 ÷ 27V d.c.
- Consommation de l’ appareil en fonctionnement 140mA max
- Interlace 2:1
- Résolution 330 lignes (horizontal)
- Eclairage nocturne par LED blancs
- Réglage automatique de l’ intensité lumineuse
- Température de fonctionnement -25° + 70° C
F
La télécaméra ne doit pas être installée en face de fortes sources lumineuses, ou
bien dans des endroits où le sujet pris reste très à contrejour. Pour résoudre les
problèmes précédemment décrits, il est conseillé de porter la hauteur d’instal-
lation de la télécaméra, normalement 160-165 cm, à une hauteur de 180 cm et
d’orienter l’objectif vers le bas de façon à améliorer la qualité des prises de vue.
En conditions de faible luminosité, il est possible que l’image visualisée par les
caméras couleur offre un moindre rendement chromatique au bénéfice d’une
meilleure reconnaissance de la personne présente devant la caméra.
Pour assurer une vision optimale, il est dans tous les cas recommandé, sur les lieux
peu éclairés, de prévoir une source d’éclariage supplémentaire.
Colour shooting module features
- 1/3n sensor
- F1.5 f4.3mm lens
- Power supply 1 8÷ 27V d.c.
- Power absorption when on 140mA max
- Interlace 2:1
- Resolution 330 lines (horizontal)
- Night lighting with white LEDS
- Automatic brightness adjustment
- Operating temperature -25° +70° C
GB
The camera must not be installed in front of large light sources, or in places
where the subject viewed remains in deep shadow.
To solve the problems described above change the height at which the camera
is installed, normally 160 to 165 cm, to a height of 180 cm, and face the lens
downwards to improve the quality of the views.
In bad lighting conditions the chromatic efficiency of the image displayed by the
colour cameras could be reduced, thus making the person in the picture easier
to identify.
In any case, for better viewing, consider including an additional light source in
poorly illuminated environments.
Características módulo de filmación en color
- Sensor de 1/3”
- Objetivo F1.5 f4.3mm
- Alimentación 18 ÷ 27V d.c.
- Consumo en funcionamiento 140mA max
- Entrelazado 2:1
- Resolución 330 líneas (horizontal)
- Alumbrado nocturno mediante LEDS blancos
- Regulación automatica de luminosidad
- Temperatura de funcionamiento -25° + 70° C
E
La telecámara no debe ser instalada delante de fuentes luminosas grande en lu-
gares en donde el individuo filmado se encuentre demasiado en contraluz. Para
solucionar los problemas descritos antes, es aconsejable modificar la altura de
instalación de la telecamera, de 160-165 cm a 180 cm y enfocar el objetivo hacia
abajo para optimizar la calidad de la filmación.
En condiciones de escasa luminosidad, la imagen visualizada por las telecámaras
en color podría sufrir una disminución del rendimiento cromático para obtener en
cambio un mejor reconocimiento de la persona filmada.
Para una visualización óptima en ambientes escasamente iluminados, se aconseja
instalar una fuente de iluminación adicional.
Eigenschappen kleurencameramodule
- Sensorvan 1/3”
- Objectief F1.5 f4.3mm
- Spanningn 18 ÷ 27V d.c.
- Verbruik van het toestel in werking 140mA max
- Interlace 2:1
- Resolutie 330 lijnen (horizontaal)
- Nachtverlichting door witte LEDS
- Automatische afstelling van de lichtsterkte
- Werkingstemperatuur van -25° tot +70° C
NL
Installeer de camera niet tegenover grote lichtbronnen of op plaatsen waar de
opname van het onderwerp door sterk tegenlicht wordt gestoord. Voorgaande
problemen zijn op te lossen door de camera op een hoogte van 180 cm te in-
stalleren (in plaats van 160-165 cm) en het objectief omlaag te richten zodat de
kwaliteit van de opnames beter zal zijn.
In omstandigheden van zwakke lichtsterkte zou het beeld gevisualiseerd door de
televisiecamera’s kunnen leiden tot een vermindering van het kleurrendement
ten voordele van een betere herkenbaarheid van de gefilmde persoon.
Voor een optimaal zicht in weinig verlichte plaatsen adviseert men in ieder geval
te zorgen voor een bijkomende verlichtingsbron.
Características do módulo de filmagem em cores
- Sensor de 1/3”
- Objectiva F1.5 f4.3mm
- Alimentação 18 ÷ 27V d.c.
- Absorção do aparelho aceso 140mA max
- Enterlaçado 2:1
- Resolução 330 linhas (horizontal)
- lluminação nocturna por meio de LED’s brancos
- Ajuste automático de luminosidade
- Temperatura de funcionamento -25° + 70° C
P
A câmara não deve ser montada diante de fortes fontes de luz, ou então em luga-
res onde o elemento que deve ser filmado fique muito em contraluz. Para resolver
os problemas supramencionados recomenda-se variar a altura da instalação da
câmara, que habitualmente é de 160-165 cm, para uma altura de 180 cm e orien-
tar a objectiva para baixo a fim de melhorar a qualidade das filmagens.
Quando há pouca luminosidade a imagem visualizada pelas câmaras em cores
poderia levar a uma diminuição do rendimento cromático aumentando a possibi-
lidade de reconhecer melhor a pessoa enquadrada.
Para se ter uma visão óptima aconselha-se, porém, em locais com pouca ilumina-
ção, providenciar a uma fonte de iluminação adicional.
Dane modułu do ujęć kolorowych
- Czujnik 1/3”
- Obiektyw F1.5 f4.3mm
- Zasilanie 18 ÷ 27V d.c.
- Pochłanianie prądu przez urządzenie włączone, maks.140 mA
- Międzylinia 2:1
- Rozdzielczość 330 linie (poziome)
- Oświetlenie nocne za pomocą białych diod LED
- Automatyczna regulacja jasności
- Temperatura pracy: od -25° do 70° C
PL
Telekamera nie może być zainstalowana naprzeciw silnego źródła światła, lub w
miejscach, gdzie przedmiot filmowany znajduje się pod światło.
Aby rozwiązać tego rodzaju problemy zaleca się zainstalowanie kamery na
wysokości 180 cm zamiast na zazwyczaj stosowanej wysokości 160-165 cm;
obiektyw należy skierować ku dołowi, aby uzyskać lepszą jakość ujęć.
W warunkach słabego oświetlenia przekazany przez kolorowe kamery obraz
mógłby zostać gorzej odtworzony pod względem chromatycznym na korzyść
lepszej rozpoznawalności ujętej osoby.
W celu uzyskania obrazu optymalnego zaleca się jednak, w słabo oświetlonych
pomieszczeniach, zainstalowanie dodatkowego źródła światła.
-
 1
1
-
 2
2
-
 3
3
-
 4
4


em outras línguas
- español: Bticino 342560 Instrucciones de operación
- français: Bticino 342560 Mode d'emploi
- Nederlands: Bticino 342560 Handleiding
- polski: Bticino 342560 Instrukcja obsługi
Artigos relacionados
-
Bticino 343001 Instruções de operação
-
-
-
-
-
-
-
-
-
Bticino 368111 Instruções de operação