Celestron 21087 Manual do usuário
- Categoria
- Telescópios
- Tipo
- Manual do usuário

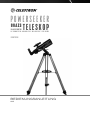
INSTRUCTION MANUAL
#21087
ENGLISH
80AZS
80 MM REFRACTOR
TELESCOPE
powerseeker
INCLUDES PRE-ASSEMBLED ALUMINUM TRIPOD WITH ACCESSORY TRAY
®


ENGLISH I 3
TABLE OF CONTENTS
INTRODUCTION . . . . . . . . . . . . . . . . . . . . . . . . . . . . . . . . . . . . . . . . . . . . . . . . . . . . .5
ASSEMBLY
. . . . . . . . . . . . . . . . . . . . . . . . . . . . . . . . . . . . . . . . . . . . . . . . . . . . . . . 7
What’s in the Box
. . . . . . . . . . . . . . . . . . . . . . . . . . . . . . . . . . . . . . . . . . . . . . . . . . . . . . . 7
Setting up the tripod . . . . . . . . . . . . . . . . . . . . . . . . . . . . . . . . . . . . . . . . . . . . . . . . . . . . . 7
Attaching the Telescope Tube to the Mount . . . . . . . . . . . . . . . . . . . . . . . . . . . . . . . . . . . . . . . . .8
Moving the Telescope . . . . . . . . . . . . . . . . . . . . . . . . . . . . . . . . . . . . . . . . . . . . . . . . . . . . .8
Installing the Diagonal & Eyepiece . . . . . . . . . . . . . . . . . . . . . . . . . . . . . . . . . . . . . . . . . . . . . .9
Installing the Finderscope . . . . . . . . . . . . . . . . . . . . . . . . . . . . . . . . . . . . . . . . . . . . . . . . . . .9
Aligning the Finderscope . . . . . . . . . . . . . . . . . . . . . . . . . . . . . . . . . . . . . . . . . . . . . . . . . . . 9
PowerSeeker 80AZS SPECIFICATIONS . . . . . . . . . . . . . . . . . . . . . . . . . . . . . . . . . . . . . . . 10
Warranty . . . . . . . . . . . . . . . . . . . . . . . . . . . . . . . . . . . . . . . . . . . . . . . . . . . . . . . . . . . .11

4 I ENGLISH

ENGLISH I 5
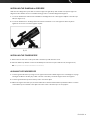
INTRODUCTION
Congratulations on purchasing your Celestron PowerSeeker 80AZS telescope! The
PowerSeeker is made of high-quality materials to ensure stability and durability. It features
a compact and portable design with ample optical performance to help you discover the
exciting world of amateur astronomy. This telescope is also ideal for terrestrial observations. It
comes with an easy-to-use tripod and mount, which allow you to move the telescope up and
down or left to right to point at a distant target. Your PowerSeeker will give you a lifetime of
pleasure with a minimal amount of maintenance.
Celestron backs the PowerSeeker telescope with a two-year limited warranty. For details, see our website at
www.celestron.com
Your Celestron PowerSeeker features:
• Fully coated glass optical elements for clear, crisp images
• Smooth functioning, rigid altazimuth mount
• Preassembled aluminum tripod
• Quick and easy no-tool setup
• Erect image prism, which ensures a correctly-oriented image when viewing terrestrial objects
• “TheSkyX – First Light Edition” astronomy software, which provides information about the night sky and printable sky maps
Take time to read through this manual before setting up your telescope. Try setting it up a few times during the day until
you become familiar with the use of your telescope. It is much easier to do this in the daytime than trying to set the tele-
scope up for the first time in the dark.
Your telescope is designed to give you years of fun and rewarding observations. However, there are a few things to consid-
er before using your telescope that will ensure your safety and protect your equipment.
WARNING:
Never look directly at the sun with the naked eye or with a telescope (unless you have the proper solar filter).
Permanent and irreversible eye damage may result.
Never use your telescope to project an image of the sun onto any surface. Internal heat build-up can damage the telescope and any accessories attached to it.
Never use an eyepiece solar filter or a Herschel wedge. Internal heat build-up inside the telescope can cause these devices to crack or break, allowing unfiltered sunlight to
pass through to the eye.
Do not leave the telescope unsupervised, especially when adults unfamiliar with your telescope or children are present.

6 I ENGLISH
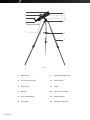
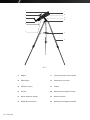
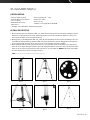
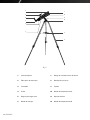
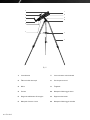
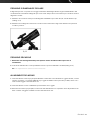
1. Objective Lens 7. Altitude Slow Motion Rod
2. Telescope Optical Tube 8. Accessory Tray
3. Finderscope 9. Tripod
4. Eyepiece 10. Azimuth Locking Knob
5. Erect Image Diagonal 11. Altazimuth Mount
6. Focus Knob 12. Altitude Locking Knob
Fig. 1-1
3
2
4
5
6
1
12
11
10
8
9
7

ENGLISH I 7
ASSEMBLY
WHAT’S IN THE BOX
• Telescope tube
• Altazimuth mount and tripod
• H20mm (20x) – 1.25”
• SR4mm (100x) – 1.25”
• 3x Barlow Lens
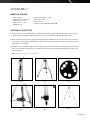
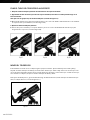
SETTING UP THE TRIPOD
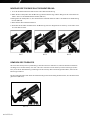
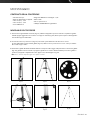
1. Remove the tripod from the box (Figure 2-1). Stand the tripod upright and separate the tripod legs. Then, push down
slightly on the tripod leg brace (Figure 2-2). Note: The very top of the tripod is called the altazimuth mount.
2. Next, install the tripod accessory tray (Figure 2-3) by placing the threaded post on the bottom of the tray over the hole
in the center of the leg support bracket (Figure 2-4). Turn the entire accessory tray clockwise to screw the tray in place.
Be careful not to over tighten.
3. Extend the legs to the desired height. Unlock the tripod leg lock knobs at the bottom of each leg (Figure 2-5) by turning
them counterclockwise and pull the legs out. Then lock the knobs securely. A fully extended tripod looks similar to the
image in Figure 2-6.
Fig. 2-4 Fig. 2-5
Fig. 2-6
Fig. 2-2
Fig. 2-1 Fig. 2-3
NOTE: The tripod will be the most rigid and stable at lower height settings.
• Erect image diagonal – 1.25”
• Finderscope: 5x24
• Accessory tray
• TheSkyX – First Light Edition DVD-ROM

8 I ENGLISH
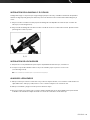
ATTACHING THE TELESCOPE TUBE TO THE MOUNT
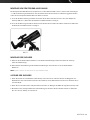
1. Loosen the silver lock knob on the right side of the altazimuth mount.
2. While holding the telescope tube above the altazimuth mount, insert the long, silver rod on the right side of the optical
tube into the hole under the lock knob (see Figure 2-7).
3. Move the telescope tube until you can insert the two altitude hubs on either side of the tube into the notches at the top
of the altazimuth mount (see Figure 2-8).
4. Tighten the silver lock knob.
5. Thread the two hand bolts through the altazimuth mount and into the two altitude hubs on the telescope tube to secure
the tube in place (see Figure 2-9).
MOVING THE TELESCOPE
The PowerSeeker is easy to move wherever you want to point it. Adjust the altitude (up-and-down position) by loosening
the altitude lock knob and moving the telescope tube up or down. To move the telescope in the azimuth (left-to-right) di-
rection, loosen the azimuth lock knob and move the telescope. When the telescope is centered on your target, lock down
the altitude and azimuth lock knobs.
For fine adjustments in altitude, turn the ring of the altitude slow motion rod (when the altitude lock is tight) in either direc-
tion (see Figure 2-10).
Fig. 2-7 Fig. 2-8 Fig. 2-9
Fig. 2-10

ENGLISH I 9
INSTALLING THE DIAGONAL & EYEPIECE
Other The mirror diagonal is a prism that corrects the image to be right side up and oriented correctly left-to-right. The
diagonal can be rotated to the most comfortable viewing position. To install the diagonal and eyepiece:
1. Loosen the thumbscrews and insert the small barrel of the diagonal into the 1.25” eyepiece adapter on the telescope
tube (see Figure 2-11).
2. Loosen the thumbscrew on the diagonal and insert the chrome barrel of one of the eyepieces all the way down.
Tighten the set screw to secure the eyepiece in place.
INSTALLING THE FINDERSCOPE
1. Remove the two silver nuts on the top left side of the telescope tube near the focuser.
2. Place the finderscope bracket over the two threaded posts and secure it in place with the nuts (see Figure 2-12).
NOTE: The larger diameter lens of the finderscope is pointed toward the front of the main telescope.
ALIGNING THE FINDERSCOPE
1. Look through the main telescope using a 20 mm eyepiece and locate a distant target such as a streetlight or stop sign.
The target should be as far away as possible or at least ¼ mile away. Center this target in the 20 mm eyepiece.
2. Look through the finderscope and note the position of the same object.
3. Without moving the main telescope, turn the thumbscrews located around the finderscope bracket until the crosshairs
of the finderscope are centered on the object seen in the center of the telescope’s 20 mm eyepiece.
Fig. 2-11

10 I ENGLISH
POWERSEEKER 80AZS SPECIFICATIONS
Model Number 21087
Description 80 AZS
Optical Design Air-spaced doublet achromatic refractor
Aperture 80 mm
Focal Length 400 mm
Focal Length f/5
Optical Coatings Fully Coated
Finderscope 5x24
Diagonal Erect Image
Eyepiece H 20 mm (20x) - 1.25”
Eyepiece SR 4 mm (100x) - 1.25”
Limiting Stellar Magnitude 11x
Resolution -- Raleigh (arc seconds) 1.74 arc seconds
Resolution -- Dawes Limit (arc seconds) 1.45 arc seconds
Light Gathering Power 131x the human eye
Mount Type Altazimuth
Tripod Adjustable height, aluminum
Telescope Tube Length 17 inches
Telescope Tube Width 4.25 inches

ENGLISH I 11
CELESTRON TWO YEAR LIMITED WARRANTY
A. Celestron warrants your telescope to be free from defects in materials and workmanship for two years. Celestron will repair or
replace such product or part thereof which, upon inspection by Celestron, is found to be defective in materials or workmanship. As
a condition to the obligation of Celestron to repair or replace such product, the product must be returned to Celestron together with
proof-of-purchase satisfactory to Celestron.
B. The Proper Return Authorization Number must be obtained from Celestron in advance of return. Call Celestron at (310) 328-9560
to receive the number to be displayed on the outside of your shipping container.
All returns must be accompanied by a written statement setting forth the name, address, and daytime telephone number of the owner,
together with a brief description of any claimed defects. Parts or product for which replacement is made shall become the property of
Celestron.
The customer shall be responsible for all costs of transportation and insurance, both to and from the factory of Celestron, and shall be
required to prepay such costs.
Celestron shall use reasonable efforts to repair or replace any telescope covered by this warranty within thirty days of receipt. In the
event repair or replacement shall require more than thirty days, Celestron shall notify the customer accordingly. Celestron reserves the
right to replace any product which has been discontinued from its product line with a new product of comparable value and function.
This warranty shall be void and of no force of effect in the event a covered product has been modified in design or function, or
subjected to abuse, misuse, mishandling or unauthorized repair. Further, product malfunction or deterioration due to normal wear is not
covered by this warranty.
CELESTRON DISCLAIMS ANY WARRANTIES, EXPRESS OR IMPLIED, WHETHER OF MERCHANTABILITY OF FITNESS FOR A PARTICULAR USE, EXCEPT AS EXPRESSLY
SET FORTH HEREIN. THE SOLE OBLIGATION OF CELESTRON UNDER THIS LIMITED WARRANTY SHALL BE TO REPAIR OR REPLACE THE COVERED PRODUCT, IN
ACCORDANCE WITH THE TERMS SET FORTH HEREIN. CELESTRON EXPRESSLY DISCLAIMS ANY LOST PROFITS, GENERAL, SPECIAL, INDIRECT OR CONSEQUENTIAL
DAMAGES WHICH MAY RESULT FROM BREACH OF ANY WARRANTY, OR ARISING OUT OF THE USE OR INABILITY TO USE ANY CELESTRON PRODUCT. ANY
WARRANTIES WHICH ARE IMPLIED AND WHICH CANNOT BE DISCLAIMED SHALL BE LIMITED IN DURATION TO A TERM OF TWO YEARS FROM THE DATE OF
ORIGINAL RETAIL PURCHASE.
Some states do not allow the exclusion or limitation of incidental or consequential damages or limitation on how long an implied
warranty lasts, so the above limitations and exclusions may not apply to you.
This warranty gives you specific legal rights, and you may also have other rights which vary from state to state.
Celestron reserves the right to modify or discontinue, without prior notice to you, any model or style telescope.
If warranty problems arise, or if you need assistance in using your telescope contact:
Celestron
Customer Service Department
2835 Columbia Street
Torrance, CA 90503
Tel. (310) 328-9560
Fax. (310) 212-5835
Monday-Friday 8AM-4PM PST
NOTE: This warranty is valid to U.S.A. and Canadian customers who have purchased this product from an authorized Celestron dealer in the U.S.A. or Canada. Warranty
outside the U.S.A. and Canada is valid only to customers who purchased from a Celestron’s International Distributor or Authorized Celestron Dealer in the specific
country. Please contact them for any warranty service.

21087
12-13
Printed in China
Product design and specifications are subject to change without prior notification.
This product is designed and intended for use by those 14 years of age and older.
© 2014 Celestron • All rights reserved
www.celestron.com
2835 Columbia Street • Torrance, CA 90503 U.S.A.
Telephone: 800.421.9649

GUIDE DE L’UTILISATEUR
#21087
FRANÇAIS
80AZS
LUNETTE ASTRONOMIQUE DE 80 MM
TÉLESCOPE
powerseeker
COMPREND LE TRÉPIED PRÉASSEMBLÉ EN ALUMINIUM AVEC PLATEAU POUR ACCESSOIRES
®

14 I FRANÇAIS
TABLE DES MATIÈRES
Introduction . . . . . . . . . . . . . . . . . . . . . . . . . . . . . . . . . . . . . . . . . . . . . . . . . . . . . . . 15
Assemblage
. . . . . . . . . . . . . . . . . . . . . . . . . . . . . . . . . . . . . . . . . . . . . . . . . . . . . . . 17
Contenu de la boîte
. . . . . . . . . . . . . . . . . . . . . . . . . . . . . . . . . . . . . . . . . . . . . . . . . . . . . . 17
Installation du trépied . . . . . . . . . . . . . . . . . . . . . . . . . . . . . . . . . . . . . . . . . . . . . . . . . . . . . 17
Installation du tube sur la monture . . . . . . . . . . . . . . . . . . . . . . . . . . . . . . . . . . . . . . . . . . . . . . 18
Mouvement du télescope . . . . . . . . . . . . . . . . . . . . . . . . . . . . . . . . . . . . . . . . . . . . . . . . . . .18
Installation du renvoi coudé et de l’oculaire . . . . . . . . . . . . . . . . . . . . . . . . . . . . . . . . . . . . . . . . . 19
Installation du chercheur . . . . . . . . . . . . . . . . . . . . . . . . . . . . . . . . . . . . . . . . . . . . . . . . . . . 19
Alignement du chercheur . . . . . . . . . . . . . . . . . . . . . . . . . . . . . . . . . . . . . . . . . . . . . . . . . . . `19
Caractéristiques du Powerseeker 80AZS . . . . . . . . . . . . . . . . . . . . . . . . . . . . . . . . . . . . . . 20
Garantie . . . . . . . . . . . . . . . . . . . . . . . . . . . . . . . . . . . . . . . . . . . . . . . . . . . . . . . . . . . . 21

FRANÇAIS I 15
INTRODUCTION
Nous vous félicitons de l’achat de votre télescope Celestron PowerSeeker 80AZS! Le
PowerSeeker est fait de matériaux de haute qualité pour garantir la stabilité et la durabilité.
Il se démarque par son design compact et portatif et ses grandes performances optiques
pour vous aider à découvrir le monde fascinant de l’astronomie amateur. Ce télescope est
également idéal pour des observations terrestres. Il est livré avec un trépied et une monture
faciles à utiliser, qui vous permettent de déplacer le télescope de haut en bas ou de gauche
à droite afin de viser une cible éloignée. Votre PowerSeeker est conçu pour vous donner
satisfaction pendant toute la vie et cela avec un minimum d’entretien.
Celestron soutient le télescope PowerSeeker avec une garantie limitée de deux ans. Pour plus d’informations, consultez
notre site Web au www.celestron.com
Votre télescope Celestron PowerSeeker est doté des caractéristiques suivantes:
• Éléments optiques en verre entièrement traité, pour des images claires et nettes
• Monture azimutale rigide au fonctionnement en douceur
• Trépied en aluminium préassemblé
• Installation rapide et facile sans outils
• Prisme redresseur d’image, ce qui assure une image correctement orientée lors de l’affichage des objets terrestres
• Le logiciel d’astronomie « TheSkyX - First Light Edition », lequel fournit des informations sur le ciel nocturne et des cartes
du ciel imprimable
Prenez le temps de lire entièrement ce manuel avant d’installer votre télescope. Essayez de l’installer à quelques reprises
pendant la journée jusqu’à ce que vous vous soyez familiarisé avec l’utilisation de votre télescope. Il est plus facile de le
faire pendant la journée que d’essayer d’installer le télescope pour la première fois dans l’obscurité.
Votre télescope est conçu pour vous donner des années d’observations amusantes et enrichissantes. Cependant, il y a
quelques points à considérer avant d’utiliser votre télescope afin d’assurer votre sécurité et la protection de votre équipement.
AVERTISSEMENT :
Ne regardez jamais directement le soleil à l’œil nu ou avec un télescope (à moins d’utiliser un filtre adapté). Cela pourrait entraîner des lésions oculaires permanentes et
irréversibles.
N’utilisez jamais votre télescope pour projeter une image du soleil sur une surface quelconque. Une accumulation de chaleur interne pourrait endommager le télescope et
tout accessoire qui s’y rattache.
N’utilisez jamais un filtre solaire oculaire ou un prisme (hélioscope) de Herschel. Une accumulation de chaleur à l’intérieur du télescope peut endommager ces dispositifs,
laissant alors la lumière non filtrée du soleil atteindre les yeux.
Ne laissez pas le télescope sans surveillance, ou particulièrement en présence d’enfants ou d’adulte qui ne sont pas familiarisés avec votre télescope.

16 I FRANÇAIS
1. Objectif 7. Tige de mouvement lent en altitude
2. Tube optique 8. Plateau pour accessoires
3. Chercheur (viseur) 9. Trépied
4. Oculaire 10. Molette de verrouillage de l’azimut
5. Renvoi redresseur d’image 11. Monture azimutale
6. Molette de mise au point 12. Molette de verrouillage de l’altitude
Fig. 1-1
3
2
4
5
6
1
12
11
10
8
9
7

FRANÇAIS I 17
ASSEMBLAGE
CONTENU DE LA BOÎTE
• Tube de télescope
• Trépied et monture azimutale
• H20 mm (20x) - 1,25 po
• SR4 mm (100x) - 1,25 po
• Lentille de Barlow 3x
INSTALLATION DU TRÉPIED
1. Retirez le trépied de la boîte (Figure 2-1). Mettez le trépied en position verticale et écartez les pieds du trépied. Ensuite,
appuyez légèrement sur l’entretoise du trépied (Figure 2-2). Remarque : La partie supérieure du trépied est appelée
monture azimutale.
2. Ensuite, installez le plateau pour accessoires du trépied (Figure 2-3) en plaçant le poteau fileté situé sous le plateau
par-dessus le trou au centre de l’entretoise (Figure 2-4). Tournez dans le sens horaire le plateau pour accessoires pour
visser le plateau en place. Veillez à ne pas trop le serrer.
3. Étendez les pieds à la hauteur souhaitée. Déverrouillez les molettes de verrouillage des pieds du trépied à la base de
chacun des pieds (Figure 2-5) en les tournant dans le sens horaire et tirez sur les pieds. Resserrez ensuite fermement
les molettes. La Figure 2-6 illustre une extension complète du trépied.
Fig. 2-4 Fig. 2-5
Fig. 2-6
Fig. 2-2
Fig. 2-1 Fig. 2-3
REMARQUE : Le trépied sera plus rigide et stable avec des réglages plus bas en hauteur. settings.
• Renvoi redresseur d’images - 1,25 po
• Chercheur 5x24
• Plateau pour accessoires
• DVD-ROM du logiciel « TheSkyX First Light Edition »

18 I FRANÇAIS
INSTALLATION DU TUBE SUR LA MONTURE
1. Desserrez la molette de verrouillage argenté située sur le côté droit de la monture azimutale.
2. Tout en tenant le tube au-dessus de la monture azimutale, insérez la tige longue et argentée située sur le côté droit du
tube optique dans le trou situé sous la molette de verrouillage (voir la Figure 2-7).
3. Déplacez le tube jusqu’à ce que vous puissiez insérer les deux moyeux d’altitude situés de chaque côté du tube dans
les encoches au-dessus de la monture azimutale (voir la Figure 2-8).
4. Serrez la molette de verrouillage argentée.
5. Vissez les deux boulons à serrage à main dans la monture azimutale, puis dans les deux moyeux de moyeux d’altitude
situés sur le tube pour fixer fermement le tube en place (voir la Figure 2-9).
MOUVEMENT DU TÉLESCOPE
Il est facile de déplacer le télescope dans la direction où vous voulez l’orienter. Ajustez l’altitude (position de haut en bas)
en desserrant légèrement la molette de verrouillage de l’altitude et en déplaçant le tube vers le haut ou vers le bas. Pour
déplacer le télescope en direction azimutale (gauche à droite), desserrez la molette de verrouillage de l’azimut et déplacez
le télescope. Quand le télescope est centré sur votre cible, serrez à fond les molettes de verrouillage de l’altitude et de
l’azimut.
Pour effectuer des réglages de l’altitude, tournez la bague moletée de la tige de contrôle lent de l’altitude (une fois le ver-
rouillage de l’altitude effectué) dans l’une ou l’autre des directions (voir la Figure 2-10).
Fig. 2-7 Fig. 2-8 Fig. 2-9
Fig. 2-10

FRANÇAIS I 19
19 I
INSTALLATION DU RENVOI COUDÉ ET DE L’OCULAIRE
Le renvoi coudé est un prisme qui corrige l’orientation de l’image (haut-bas et gauche-droite). Le renvoi coudé peut être
tourné à la position de visionnement la plus confortable. Pour installer le renvoi coudé et l’oculaire :
1. Desserrez les vis à serrage à main et insérez le petit barillet du renvoi coudé dans l’adaptateur d’oculaire 1,25 po du
tube (voir la Figure 2-11).
2. Desserrez la vis à serrage à main du renvoi coudé et insérez complètement vers le bas le barillet chromé de l’un des
oculaires. Serrez la vis de fixation pour maintenir l’oculaire bien en place.
INSTALLATION DU CHERCHEUR
1. Retirez les deux écrous argentés situés sur le côté gauche supérieur du tube, près du porte-oculaire.
2. Placez le support du chercheur au-dessus des deux poteaux filetés et fixez-le en place à l’aide des écrous
(voir la Figure 2-12).
REMARQUE: La lentille de plus grand diamètre du chercheur est dirigée vers l’avant du télescope principal.
ALIGNEMENT DU CHERCHEUR
1. Regardez dans le télescope principal à l’aide d’un oculaire de 20 mm et localisez une cible éloignée comme un lam-
padaire ou un panneau d’arrêt. La cible doit être le plus loin possible, de préférence à au moins un quart de mille (au
moins 400 m). Centrez cette cible dans l’oculaire de 20 mm.
2. Regardez à travers le chercheur et notez la position de cet objet.
3. Sans déplacer le télescope principal, tournez les vis à serrage à main situées près du support de chercheur jusqu’à ce
que les réticules du chercheur soient centrés sur l’objet observé au centre de l’oculaire du télescope.
Fig. 2-11

20 I FRANÇAIS
CARACTÉRISTIQUES DU POWERSEEKER 80AZS
Numéro de modèle 21087
Description 80 AZS
Conception optique Réfracteur achromatique à doublet, avec espaces d’air
Ouverture 80 mm
Distance focale 400 mm
Distance focale f/5
Revêtements optiques Entièrement traité
Chercheur 5x24
étoile Redresseur d’image
Oculaire H 20 mm (20x) - 1.25 po
Oculaire SR 4 mm (100x) - 1.25 po
Magnitude stellaire limite 11x
Résolution -- Raleigh (secondes d’arc) 1,74 seconde d’arc
Résolution -- Limites de Dawes (secondes d’arc) 1,45 seconde d’arc
Puissance de captage de la lumière 131x l’œil humain
Type de monture Altazimutale
Trépied Réglable en hauteur, en aluminium
Longueur du tube 17 pouces
Largeur du tube 4,25 pouces
A página está carregando...
A página está carregando...
A página está carregando...
A página está carregando...
A página está carregando...
A página está carregando...
A página está carregando...
A página está carregando...
A página está carregando...
A página está carregando...
A página está carregando...
A página está carregando...
A página está carregando...
A página está carregando...
A página está carregando...
A página está carregando...
A página está carregando...
A página está carregando...
A página está carregando...
A página está carregando...
A página está carregando...
A página está carregando...
A página está carregando...
A página está carregando...
A página está carregando...
A página está carregando...
A página está carregando...
A página está carregando...
A página está carregando...
A página está carregando...
A página está carregando...
A página está carregando...
-
 1
1
-
 2
2
-
 3
3
-
 4
4
-
 5
5
-
 6
6
-
 7
7
-
 8
8
-
 9
9
-
 10
10
-
 11
11
-
 12
12
-
 13
13
-
 14
14
-
 15
15
-
 16
16
-
 17
17
-
 18
18
-
 19
19
-
 20
20
-
 21
21
-
 22
22
-
 23
23
-
 24
24
-
 25
25
-
 26
26
-
 27
27
-
 28
28
-
 29
29
-
 30
30
-
 31
31
-
 32
32
-
 33
33
-
 34
34
-
 35
35
-
 36
36
-
 37
37
-
 38
38
-
 39
39
-
 40
40
-
 41
41
-
 42
42
-
 43
43
-
 44
44
-
 45
45
-
 46
46
-
 47
47
-
 48
48
-
 49
49
-
 50
50
-
 51
51
-
 52
52


Celestron 21087 Manual do usuário
- Categoria
- Telescópios
- Tipo
- Manual do usuário
em outras línguas
- español: Celestron 21087 Manual de usuario
- français: Celestron 21087 Manuel utilisateur
- italiano: Celestron 21087 Manuale utente
- English: Celestron 21087 User manual
- Deutsch: Celestron 21087 Benutzerhandbuch
Artigos relacionados
-
Celestron 18768 Pro Manual do usuário
-
Celestron 22462 Guia de usuario
-
Celestron 22035 Guia de usuario
-
Celestron 94256 Manual do usuário
-
-
Celestron 81037 Manual do usuário
-
-
Celestron 94038 Manual do usuário
-
Celestron 71390 Manual do usuário
-
Outros documentos
-
Philips TAS7505/00 Manual do usuário
-
NATURE & DECOUVERTES 53151590 Instruções de operação
-
Tasco 40-060675 Manual do proprietário
-
Bresser 4614909 Manual do proprietário
-
Barska AE10758 Manual do proprietário
-
-
Bushnell Deep Space - 786050 Manual do usuário
-
-
-