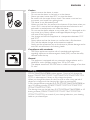
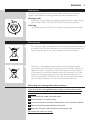
Philips PT856/26 Manual do usuário
- Categoria
- Barbeadores masculinos
- Tipo
- Manual do usuário

User manual
PT919
PT866
PT860
PT856
PT845
PT739
PT737
PT731
PT730
PT727
PT726
PT725
PT723
PT721
PT720

1


4
Introduction
Congratulations on your purchase and welcome to Philips!
To fully benet from the support that Philips offers, register your
product at www.philips.com/welcome.
Please read this user manual, as it contains information about the wonderful
features of this shaver as well as some tips to make shaving easier
and more enjoyable.
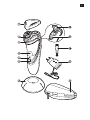
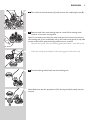
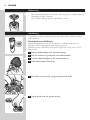
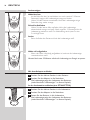
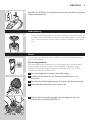
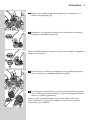
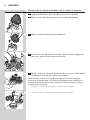
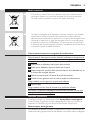
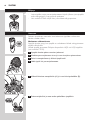
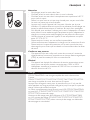
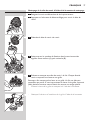
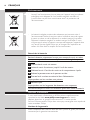
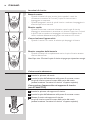
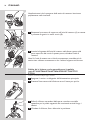
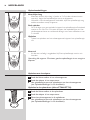
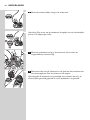
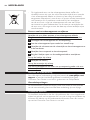
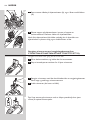
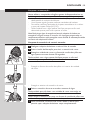
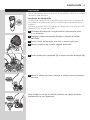
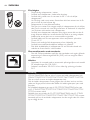
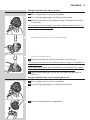
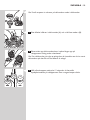
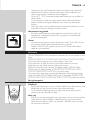
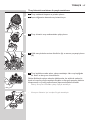
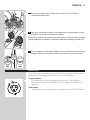
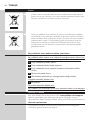
General description (Fig. 1)
1 Protection cap
2 Shaving unit
3 Shaving unit release button
4 Shaver on/off button
5 Shaving head symbol
6 Charging light
7 Charging stand (PT866*/PT739*)
8 Pouch (PT866*)
9 Adapter
10 Cleaning brush
11 Trimmer release slide (PT919/PT866/PT856/PT860/PT845/PT739/
PT737/PT731 only)
12 Trimmer (PT919/PT866/PT860/PT856/
PT845/PT739/PT737/PT731
only)
Note: You can nd the type number on the back of the shaver.
*
only for UK, Holland, Germany, France, Turkey, Sweden, Finland, Norwegia,
Denmark, Italy, Portugal, Spain and Greece.
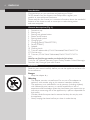
Important
Read this user manual carefully before you use the appliance and save it for
future reference.
Danger
- Keep the adapter dry.
Warning
- The adapter contains a transformer. Do not cut off the adapter to
replace it with another plug, as this causes a hazardous situation.
- The appliance is not intended for use by persons (including children)
with reduced physical, sensory or mental capabilities, or lack of
experience and knowledge, unless they have been given supervision or
instruction concerning use of the appliance by a person responsible for
their safety.
- Children should be supervised to ensure that they do not play with
the appliance.
- Always unplug the shaver before you clean it under the tap.
ENGLISH

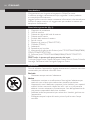
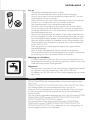
Caution
- Never immerse the shaver in water.
- Do not use the shaver in the bath or in the shower.
- Never use water hotter than 80°C to rinse the shaver.
- Be careful with hot water. Always check if the water is not too hot,
to prevent your hands from getting burnt.
- The shaver is not dishwasher-proof.
- Water may leak from the socket at the bottom of the shaver when you
rinse it. This is normal and not dangerous because all electronics are
enclosed in a sealed power unit inside the shaver.
- Do not use the shaver, adapter or any other part if it is damaged, as this
may cause injury. Always replace a damaged adapter, charger or part
with one of the original type.
- Use, charge and store the appliance at a temperature between 10°C
and 35°C.
- Always place and use the shaver on a surface that is uid-resistant.
- Only use the adapter, charger and accessories supplied.
- Always put the protection cap on the shaver to prevent damage and to
avoid dirt accumulation in the shaving heads.
Compliance with standards
- This Philips appliance complies with all standards and regulations
regarding exposure to electromagnetic elds (EMF) and can be safely
cleaned under the tap.
General
- The appliance is equipped with an automatic voltage selector and is
suitable for mains voltages ranging from 100 to 240 volts.
- The adapter transforms 100-240 volts to a safe low voltage of less than
24 volts.
Charging
PT919/PT866/PT860/PT856: It takes approx. 1 hour to fully charge the
shaver.
PT845/PT739/PT737/PT731/PT730//PT727/PT726/PT725/PT721/
PT720: It takes approx. 8 hours to fully charge the shaver.
When you charge the shaver for the rst time or after a long period of
disuse, let it charge until the charging light lights up continuously.
A fully charged shaver provides up to 50 (PT919/PT866/PT860/PT856) or
up to 45 shaving minutes (PT845/PT739/PT737/PT731/PT730//PT727/
PT726/PT725/PT721/PT720).
The shaving time may be less than 50 (PT919/PT866/PT860/PT856) or 45
shaving minutes (PT845/PT739/PT737/PT731/PT730//PT727/PT726/
PT725/PT721/PT720) as a result of your shaving behaviour, your cleaning
habits or your beard type.
ENGLISH 5

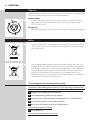
Charge indications
Battery low
- When the battery is almost empty (when there are only 5 or fewer
shaving minutes left), the charging light starts to ash orange.
- When you switch off the shaver, the charging light continues to ash
orange for a few seconds.
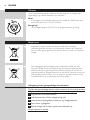
Quick charging
- When you start charging the empty battery, the charging light
alternately ashes orange and white. After approx. 3 minutes, the
charging light continues to ash white. The shaver now contains enough
energy for a 5-minute shave.
Charging
- When the shaver is charging, the charging light ashes white.
Battery fully charged
- When the battery is fully charged, the charging light lights up white
continuously.
Note: After approx. 30 minutes, the charging light goes out to save energy.
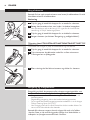
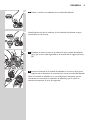
Charging with the adapter
1 Put the small plug in the shaver.
2 Put the adapter in the wall socket.
, The charging light shows the charging status of the shaver
(see section ‘Charge indications’ in this chapter).
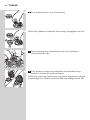
Charging in the charging stand (PT866/PT739 only)
1 Put the small plug in the charging stand.
2 Put the adapter in the wall socket.
3 Place the shaver in the charging stand.
, The charging light shows the charging status of the shaver
(see section ‘Charge indications’ in this chapter).
ENGLISH6

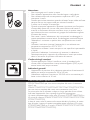
Using the shaver
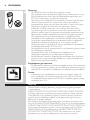
Note: You can also use the shaver directly from the mains. Simply connect the
shaver to the mains.
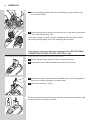
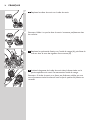
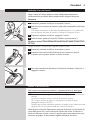
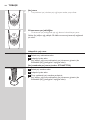
Shaving
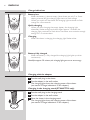
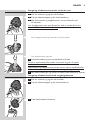
1 Press the on/off button once to switch on the shaver.
2 Move the shaving heads over your skin. Make circular movements.
- Your skin may need 2 or 3 weeks to get accustomed to the Philips
shaving system.
3 Press the on/off button once to switch off the shaver.
4 Clean the shaver (see chapter ‘Cleaning and maintenance’).
Trimming (PT919/PT866/PT860/PT856/PT845/PT739/PT737/
PT731 only
)
You can use the trimmer to groom your sideburns and moustache.
1 Press the on/off button once to switch on the shaver.
2 Push the trimmer slide downwards to open the trimmer.
, You can now start trimming.
3 After trimming, close the trimmer and switch off the shaver.
Cleaning and maintenance
Never use compressed air, scouring pads, abrasive cleaning agents or
aggressive liquids such as petrol or acetone to clean the appliance.
- Clean the shaver after every shave for optimal shaving performance.
- Regular cleaning guarantees better shaving performance.
- For the best cleaning results, we advise you to use the Philips Cleaning
spray (HQ110).
- Be careful with hot water. Always check if the water is not too hot,
to prevent your hands from getting burnt.
Note: Water may leak from the socket at the bottom of the shaver when you
rinse it. This is normal and not dangerous because all electronics are enclosed
in a sealed power unit inside the shaver.
ENGLISH 7

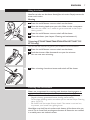
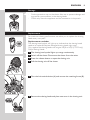
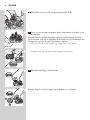
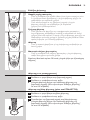
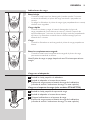
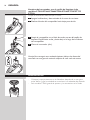
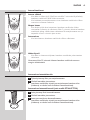
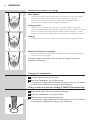
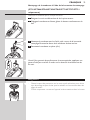
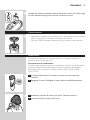
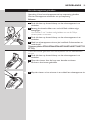
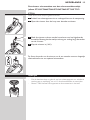
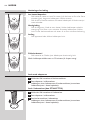
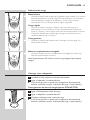
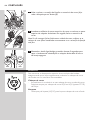
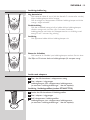
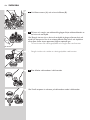
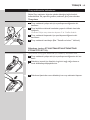
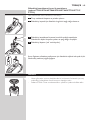
Cleaning the shaving unit under the tap
1 Switch off the shaver and disconnect it from the mains.
2 Press the release button to open the shaving unit.
3 Rinse the shaving unit and hair chamber under a hot tap for
30 seconds.
Be careful with hot water. Always check if the water is not too hot, to
prevent your hands from getting burnt.
- Rinse the hair chamber and the inside of the shaving unit.
- Rinse the outside of the shaving unit.
4 Close the shaving unit and shake off excess water.
Be careful not to hit the shaving unit against anything while shaking off
excess water.
Never dry the shaving unit and the hair chamber with a towel or tissue,
as this may damage the shaving heads and the coupling spindles.
5 Open the shaving unit again and leave it open to let the shaver dry
completely.
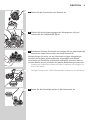
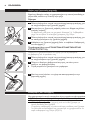
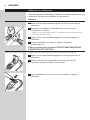
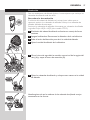
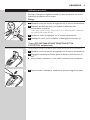
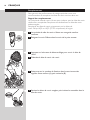
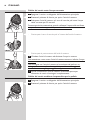
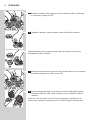
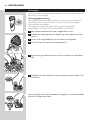
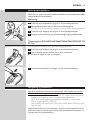
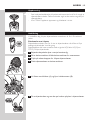
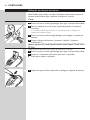
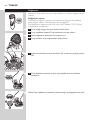
Cleaning the shaving unit with the cleaning brush
1 Switch off the shaver and disconnect it from the mains.
2 Press the release button to open the shaving unit.
3 Pull the shaving unit off the shaver.
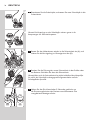
ENGLISH8

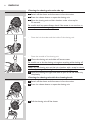
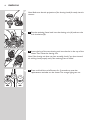
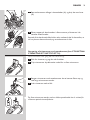
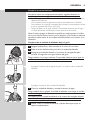
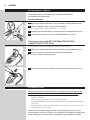
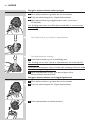
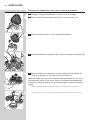
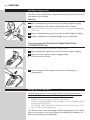
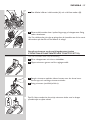
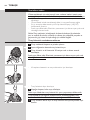
4 Turn the lock anticlockwise (A) and remove the retaining frame (B).
5 Remove and clean one shaving head at a time. Each shaving head
consists of a cutter and a guard.
Note: Do not clean more than one cutter and guard at a time, since they are
all matching sets. If you accidentally mix up the cutters and guards, it may take
several weeks before optimal shaving performance is restored.
- Remove the cutter from the shaving guard and clean it with the brush.
- Clean the inside and outside of the shaving guard with the brush.
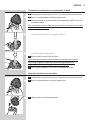
6 Put the shaving heads back into the shaving unit.
Note: Make sure that the projections of the shaving heads t exactly into the
recesses.
ENGLISH 9

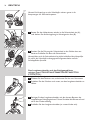
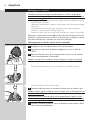
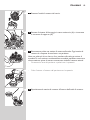
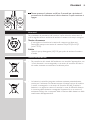
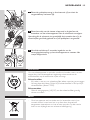
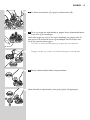
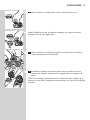
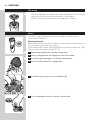
7 Put the retaining frame back into the shaving unit (A) and turn the
lock clockwise (B).
8 Insert the lug of the shaving unit into the slot in the top of the shaver.
Then close the shaving unit.
Note: If the shaving unit does not close smoothly, check if you have inserted
the shaving heads properly and if the retaining frame is locked.
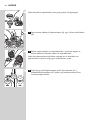
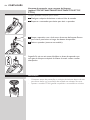
Cleaning the trimmer with the cleaning brush (PT919/PT866/
PT860/PT856/PT845/PT739/PT737/PT731 only)
Clean the trimmer every time you have used it.
1 Switch off the shaver and disconnect it from the mains.
2 Push the trimmer slide downwards to open the trimmer.
3 Clean the trimmer with the short-bristled side of the cleaning brush.
Brush up and down along the trimmer teeth.
4 Close the trimmer (‘ click’).
Tip: For optimal trimming performance, lubricate the trimmer teeth with a drop
of sewing machine oil every six months.
ENGLISH10

Storage
- Put the protection cap on the shaver after use to prevent damage and
to avoid dirt accumulation in the shaving heads.
- PT866 only: Store the appliance and the accessories in the pouch.
Replacement
For maximum shaving performance, we advise you to replace the shaving
heads every two years.
Replacement reminder
The shaving head symbol will light up to indicate that the shaving heads
need to be replaced. Replace damaged shaving heads right away.
Only replace the shaving heads with original HQ8 or HQ9 (PT919 only)
Philips Shaving Heads.
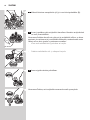
1 The shaving head symbol lights up orange continuously.
2 Switch off the shaver. Disconnect the shaver from the mains.
3 Press the release button to open the shaving unit.
4 Pull the shaving unit off the shaver.
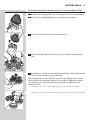
5 Turn the lock anticlockwise (A) and remove the retaining frame (B).
6 Remove the shaving heads and place new ones in the shaving unit.
ENGLISH 11

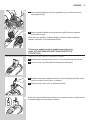
Note: Make sure that the projections of the shaving heads t exactly into the
recesses.
7 Put the retaining frame back into the shaving unit (A) and turn the
lock clockwise (B).
8 Insert the lug of the new shaving unit into the slot in the top of the
shaver. Then close the shaving unit.
Note: If the shaving unit does not close smoothly, check if you have inserted
the shaving heads properly and if the retaining frame is locked.
9 Press and hold the on/off button for 5 seconds to reset the
replacement reminder on the shaver. The orange light goes out.
ENGLISH12

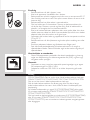
Accessories
To retain the top performance of your shaver, make sure you clean it
regularly and replace its shaving heads at the recommended time.
Shaving heads
- We advise you to replace your shaving heads every two years. Always
replace with HQ8 or HQ9 (PT919 only) Philips Shaving Heads
Cleaning
- Use Cleaning spray (HQ110) to clean the shaving heads thoroughly.
Environment
- Do not throw away the appliance with the normal household waste at
the end of their life, but hand them in at an ofcial collection point for
recycling. By doing this, you help to preserve the environment.
- The built-in rechargeable shaver battery contains substances that
may pollute the environment. Always remove the battery before you
discard or hand in the shaver at an ofcial collection point. Dispose
of the battery at an ofcial collection point for batteries. If you have
trouble removing the battery, you can also take the appliance to a
Philips service centre. The staff of this centre will remove the battery
for you and will dispose of it in an environmentally safe way.
Removing the rechargeable shaver battery
Only remove the rechargeable battery when you discard the shaver.
Make sure the rechargeable battery is completely empty when you
remove it.
1 Disconnect the shaver from the mains.
2 Let the shaver run until it stops.
3 Undo the screws in the back of the shaver and in the hair chamber.
4 Remove the front panel and the back panel.
5 Bend the 6 hooks aside and take out the power unit.
Be careful, the hooks are sharp.
ENGLISH 13

6 Remove the battery.
Be careful, the battery strips are sharp.
Do not connect the shaver to the mains again after you have removed
the rechargeable battery.
Guarantee and support
If you need information or support, please visit www.philips.com/
support or read the separate worldwide guarantee leaet. If there is no
Consumer Care Centre in your country, go to your local Philips dealer.
Guarantee restrictions
The shaving heads (cutters and guards) are not covered by the terms of
the international guarantee because they are subject to wear.
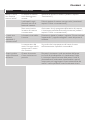
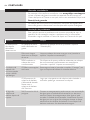
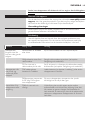
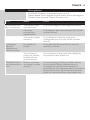
Troubleshooting
This chapter summarises the most common problems you could
encounter with the appliance. If you are unable to solve the problem with
the information below, contact the Consumer Care Centre in your country.
Problem Possible cause Solution
The shaver does
not shave as well
as it used to.
The shaving heads are
damaged or worn.
Replace the shaving heads (see chapter
‘Replacement’).
Long hairs obstruct the
shaving heads.
Clean the shaving heads one by one (see chapter
‘Cleaning and maintenance’).
You have not inserted the
shaving heads properly.
Make sure that the projections of the shaving heads
t exactly into the recesses (see chapter ‘Cleaning
and maintenance’).
The shaver does
not work when I
press the on/off
button.
The rechargeable battery
is empty.
Recharge the battery (see chapter ‘Charging’) or
connect the shaver to the mains.
The temperature of the
shaver is too high. In this
case, the shaver does
not work.
As soon as the temperature of the shaver has
dropped sufciently, you can switch on the shaver
again.
Water leaks from
the shaver after
cleaning.
This is normal and not
dangerous.
During rinsing some water may collect between
the power unit and the housing. After rinsing this
water ows out through the socket. The power unit
is completely watertight so water cannot reach the
electronic parts of the shaver. Your shaver continues
to be absolutely safe.
ENGLISH14

15
Introduktion
Tillykke med dit køb og velkommen til Philips! For at få fuldt udbytte
af den support, Philips tilbyder, skal du registrere dit produkt på
www.philips.com/welcome.
Vi beder dig læse brugervejledningen igennem, da den indeholder
oplysninger om shaverens unikke funktioner og tips til at gøre barbering
nemmere og sjovere.
1 Beskyttelseskappe
2 Skærhoved
3 Udløserknap til skærhoved
4 Shaver tænd/sluk-knap
5 Shaverhovedsymbol
6 Opladeindikator med lys
7 Opladeenhed (PT866*/PT739*)
8 Etui (PT866*)
9 Adapter
10 Rensebørste
11 Udløser til trimmer (kun PT919/PT866/PT860/PT856/PT845/PT739/
PT737/PT731
12 Trimmer (kun PT919/PT866/PT860/PT856/PT845/PT739/PT737/
PT731)
Bemærk: Du kan nde typenummeret bag på shaveren.
*
Kun til Storbritannien, Holland, Tyskland, Frankrig, Tyrkiet, Sverige, Finland,
Norge, Danmark, Italien, Portugal, Spanien og Grækenland.
Vigtigt
Læs denne brugsvejledning omhyggeligt igennem, inden apparatet tages i
brug, og gem den til eventuelt senere brug.
Fare
- Hold adapteren tør.
Advarsel
- Adapteren indeholder en transformer. Adapteren må ikke klippes af og
udskiftes med et andet stik, da dette vil forårsage en farlig situation.
- Apparatet er ikke beregnet til at blive brugt af børn eller af personer
med nedsatte fysiske eller mentale evner, nedsat følesans eller
manglende erfaring og viden, medmindre de er blevet vejledt eller
instrueret i apparatets anvendelse af en person, der er ansvarlig for
deres sikkerhed.
- Apparatet bør holdes uden for børns rækkevidde for at sikre, at de ikke
kan komme til at lege med det.
- Tag altid stikket ud af shaveren, inden den skylles under vandhanen.
DANSK

Forsigtig
- Kom aldrig shaveren ned i vand.
- Brug ikke shaveren i badet eller under bruseren.
- Rens aldrig shaveren med vand, der er varmere end 80°C.
- Vær forsigtig med varmt vand. Kontroller altid, at vandet ikke er for
varmt, så du ikke skolder dine hænder.
- Shaveren kan ikke vaskes i opvaskemaskinen.
- Når shaveren rengøres, kan der dryppe lidt vand ud af stikket i
bunden. Dette er helt normalt og ganske ufarligt, da al elektronikken er
indkapslet i en forseglet motorenhed inde i shaveren.
- Brug ikke shaveren, adapteren eller anden del, hvis den er beskadiget,
da dette kan forårsage personskade. Du skal altid erstatte en
beskadiget adapter, oplader eller del med en tilsvarende original type.
- Brug, oplad og opbevar altid apparatet ved en temperatur mellem
10°C og 35°C.
- Placer og anvend altid shaveren på et underlag, der kan tåle væske.
- Brug kun den medfølgende adapter og oplader og det medfølgende
tilbehør.
- Sæt altid beskyttelseskappen på shaveren for at undgå skader og
ophobning af støv i skærene.
Overholdelse af standarder
- Dette Philips-apparat overholder alle standarder og regler angående
eksponering for elektromagnetiske felter (EMF) og kan skylles under
rindende vand uden risiko.
Generelt
- Apparatet er udstyret med automatisk spændingstilpasning til
netspændinger mellem 100 og 240 volt.
- Adapteren omformer 100 - 240 Volt til en sikker lavspænding under
24 Volt.
Opladning
PT919/PT866/PT860/PT856: Det tager ca. 1 time at oplade shaveren helt.
PT845/PT739/PT737/PT731/PT730//PT727/PT726/PT725/PT721/PT720:
Det tager ca. 8 timer at oplade shaveren helt.
Når shaveren oplades for første gang eller efter en længere pause, skal den
oplade, indtil opladeindikatoren lyser konstant.
En fuldt opladet shaver giver op til 50 (PT919/PT866/PT860/PT856) eller
op til 45 minutters barbering (PT845/PT739/PT737/PT731/PT730 //
PT727/PT726/PT725/PT721/PT720).
Brugstiden kan være kortere end 50 (PT919/PT866/PT860/PT856) eller
45 minutters barbering (PT845/PT739/PT737/PT731/PT730 //PT727/
PT726/PT725/PT721/PT720) afhængigt af dine barberingsvaner, rensevaner
eller din skægtype.
DANSK16

Opladningsindikatorer
Lavt batteriniveau
- Når batteriet næsten er aadet (når der kun er 5 minutter eller færre
tilbage til barbering), lyser opladeindikatoren orange.
- Når du slukker for shaveren, forsætter opladningsindikatoren med at
blinke orange i nogle sekunder.
Lynopladning
- Når du starter opladningen af det tomme batteri, blinker
opladeindikatoren skiftevis orange og hvidt. Efter ca. 3 minutter blinker
opladeindikatoren hvidt. Shaveren har nu nok strøm til 5 minutters
barbering.
Opladning
- Når shaveren oplades, blinker opladeindikatoren hvidt.
Batteri fuldt opladet
- Når batteriet er fuldt opladet, lyser opladeindikatoren konstant hvidt.
Bemærk: Efter ca. 30 minutter slukker opladeindikatoren for at spare på energien.
Opladning med adapter
1 Sæt det lille stik i shaveren.
2 Slut adapteren til stikkontakten.
, Opladeindikatoren viser opladningsstatus for shaveren (se afsnittet
“Opladningsindikatorer” i dette kapitel).
Opladning i opladeenheden (kun PT866/PT739)
1 Sæt det lille stik i opladeenheden.
2 Slut adapteren til stikkontakten.
3 Placér shaveren i opladeenheden.
, Opladeindikatoren viser opladningsstatus for shaveren (se afsnittet
“Opladningsindikatorer” i dette kapitel).
DANSK 17

Brug af shaveren
Bemærk: Du kan også anvende shaveren med strøm fra stikkontakten. Du skal
blot tilslutte shaveren til stikkontakten.
Barbering
1 Tryk én gang på tænd/sluk-knappen for at tænde for shaveren.
2 Bevæg skærhovederne hen over huden i cirkulære bevægelser.
- Vær opmærksom på, at der kan gå 2-3 uger, før din hud helt har
vænnet sig til Philips’ barberingssystem.
3 Tryk én gang på tænd/sluk-knappen for at slukke for shaveren.
4 Rengør shaveren (se afsnittet “Rengøring og vedligeholdelse”).
Trimning (kun PT919/PT866/PT860/PT856/PT845/PT739/PT737/
PT731)
Trimmeren kan bruges til pleje af bakkenbarter og moustache.
1 Tryk én gang på tænd/sluk-knappen for at tænde for shaveren.
2 Tryk trimmerens skydekontakt nedad for at åbne trimmeren.
, Trimningen kan nu påbegyndes.
3 Efter trimning skal du lukke trimmeren og slukke for shaveren.
Rengøring og vedligeholdelse
Brug aldrig trykluft, skuresvampe eller skrappe rengøringsmidler som
f.eks. benzin, acetone eller lignende til rengøring af apparatet.
- Rengør shaveren efter hver barbering for at bevare den optimale
barberingsevne.
- Regelmæssig rengøring sikrer det bedste barberingsresultat.
- For at opnå det bedste rengøringsresultat anbefaler vi, at du bruger
Philips Cleaning Spray (HQ110).
- Vær forsigtig med varmt vand. Kontroller altid, at vandet ikke er for
varmt, så du ikke skolder dine hænder.
Bemærk: Når shaveren rengøres, kan der dryppe lidt vand ud af stikket
i bunden. Dette er helt normalt og ganske ufarligt, da al elektronikken er
indkapslet i en forseglet motorenhed inde i shaveren.
DANSK18

Rengøring af skærhovedet under rindende vand
1 Sluk for shaveren, og tag den ud af stikket.
2 Tryk på udløserknappen og luk skærhovedet op.
3 Skyl skærhovedet og skægkammeret i varmt rindende vand i
30 sekunder.
Vær forsigtig med varmt vand. Kontroller altid, at vandet ikke er for
varmt, så du ikke skolder dine hænder.
- Rens skægkammeret og indersiden af skærhovedet.
- Skyl skærhovedets yderside.
4 Luk skærhovedet, og ryst overskydende vand væk.
Pas på, at skærhovedet ikke støder mod andre ting, når du ryster
overskydende vand væk.
Skærhovedet og skægkammeret må ikke tørres med et håndklæde eller
køkkenrulle, da dette kan beskadige skærene og koblingsakslerne.
5
Åbn skærhovedet igen, og lad det stå åbent, indtil shaveren er helt tør.
Rengøring af skærhovedet med rengøringsbørsten
1 Sluk for shaveren, og tag den ud af stikket.
2 Tryk på udløserknappen og luk skærhovedet op.
3 Træk skærhovedet af shaveren.
DANSK 19

4 Drej låsen mod uret (A), og tag samlerammen af (B).
5 Fjern og rens et skær ad gangen. Hvert skær består af en kniv og en
lamelkappe.
Bemærk: Rens kun ét skær ad gangen, da knive og lamelkapper er slebet
parvis. Kommer man ved en fejltagelse til at blande knive og lamelkapper, kan
det tage ere uger, før shaveren igen barberer optimalt.
- Tag skærene ud af skærkappen, og rengør dem med børsten.
- Rengør inder- og yderside af skærkappen med børsten.
6 Sæt skærene tilbage i skærhovedet.
Bemærk: Sørg for, at de små tappe passer præcist ned i recesserne.
DANSK20
A página está carregando ...
A página está carregando ...
A página está carregando ...
A página está carregando ...
A página está carregando ...
A página está carregando ...
A página está carregando ...
A página está carregando ...
A página está carregando ...
A página está carregando ...
A página está carregando ...
A página está carregando ...
A página está carregando ...
A página está carregando ...
A página está carregando ...
A página está carregando ...
A página está carregando ...
A página está carregando ...
A página está carregando ...
A página está carregando ...
A página está carregando ...
A página está carregando ...
A página está carregando ...
A página está carregando ...
A página está carregando ...
A página está carregando ...
A página está carregando ...
A página está carregando ...
A página está carregando ...
A página está carregando ...
A página está carregando ...
A página está carregando ...
A página está carregando ...
A página está carregando ...
A página está carregando ...
A página está carregando ...
A página está carregando ...
A página está carregando ...
A página está carregando ...
A página está carregando ...
A página está carregando ...
A página está carregando ...
A página está carregando ...
A página está carregando ...
A página está carregando ...
A página está carregando ...
A página está carregando ...
A página está carregando ...
A página está carregando ...
A página está carregando ...
A página está carregando ...
A página está carregando ...
A página está carregando ...
A página está carregando ...
A página está carregando ...
A página está carregando ...
A página está carregando ...
A página está carregando ...
A página está carregando ...
A página está carregando ...
A página está carregando ...
A página está carregando ...
A página está carregando ...
A página está carregando ...
A página está carregando ...
A página está carregando ...
A página está carregando ...
A página está carregando ...
A página está carregando ...
A página está carregando ...
A página está carregando ...
A página está carregando ...
A página está carregando ...
A página está carregando ...
A página está carregando ...
A página está carregando ...
A página está carregando ...
A página está carregando ...
A página está carregando ...
A página está carregando ...
A página está carregando ...
A página está carregando ...
A página está carregando ...
A página está carregando ...
A página está carregando ...
A página está carregando ...
A página está carregando ...
A página está carregando ...
A página está carregando ...
A página está carregando ...
A página está carregando ...
A página está carregando ...
A página está carregando ...
A página está carregando ...
A página está carregando ...
A página está carregando ...
A página está carregando ...
A página está carregando ...
A página está carregando ...
A página está carregando ...
A página está carregando ...
A página está carregando ...
A página está carregando ...
A página está carregando ...
A página está carregando ...
A página está carregando ...
A página está carregando ...
A página está carregando ...
A página está carregando ...
A página está carregando ...
A página está carregando ...
A página está carregando ...
A página está carregando ...
A página está carregando ...
A página está carregando ...
A página está carregando ...
A página está carregando ...
A página está carregando ...
A página está carregando ...
A página está carregando ...
A página está carregando ...
A página está carregando ...
A página está carregando ...
A página está carregando ...
A página está carregando ...
A página está carregando ...
A página está carregando ...
A página está carregando ...
A página está carregando ...
A página está carregando ...
A página está carregando ...
A página está carregando ...
A página está carregando ...
A página está carregando ...
-
 1
1
-
 2
2
-
 3
3
-
 4
4
-
 5
5
-
 6
6
-
 7
7
-
 8
8
-
 9
9
-
 10
10
-
 11
11
-
 12
12
-
 13
13
-
 14
14
-
 15
15
-
 16
16
-
 17
17
-
 18
18
-
 19
19
-
 20
20
-
 21
21
-
 22
22
-
 23
23
-
 24
24
-
 25
25
-
 26
26
-
 27
27
-
 28
28
-
 29
29
-
 30
30
-
 31
31
-
 32
32
-
 33
33
-
 34
34
-
 35
35
-
 36
36
-
 37
37
-
 38
38
-
 39
39
-
 40
40
-
 41
41
-
 42
42
-
 43
43
-
 44
44
-
 45
45
-
 46
46
-
 47
47
-
 48
48
-
 49
49
-
 50
50
-
 51
51
-
 52
52
-
 53
53
-
 54
54
-
 55
55
-
 56
56
-
 57
57
-
 58
58
-
 59
59
-
 60
60
-
 61
61
-
 62
62
-
 63
63
-
 64
64
-
 65
65
-
 66
66
-
 67
67
-
 68
68
-
 69
69
-
 70
70
-
 71
71
-
 72
72
-
 73
73
-
 74
74
-
 75
75
-
 76
76
-
 77
77
-
 78
78
-
 79
79
-
 80
80
-
 81
81
-
 82
82
-
 83
83
-
 84
84
-
 85
85
-
 86
86
-
 87
87
-
 88
88
-
 89
89
-
 90
90
-
 91
91
-
 92
92
-
 93
93
-
 94
94
-
 95
95
-
 96
96
-
 97
97
-
 98
98
-
 99
99
-
 100
100
-
 101
101
-
 102
102
-
 103
103
-
 104
104
-
 105
105
-
 106
106
-
 107
107
-
 108
108
-
 109
109
-
 110
110
-
 111
111
-
 112
112
-
 113
113
-
 114
114
-
 115
115
-
 116
116
-
 117
117
-
 118
118
-
 119
119
-
 120
120
-
 121
121
-
 122
122
-
 123
123
-
 124
124
-
 125
125
-
 126
126
-
 127
127
-
 128
128
-
 129
129
-
 130
130
-
 131
131
-
 132
132
-
 133
133
-
 134
134
-
 135
135
-
 136
136
-
 137
137
-
 138
138
-
 139
139
-
 140
140
-
 141
141
-
 142
142
-
 143
143
-
 144
144
-
 145
145
-
 146
146
-
 147
147
-
 148
148
-
 149
149
-
 150
150
-
 151
151
-
 152
152
-
 153
153
-
 154
154


Philips PT856/26 Manual do usuário
- Categoria
- Barbeadores masculinos
- Tipo
- Manual do usuário
em outros idiomas
- français: Philips PT856/26 Manuel utilisateur
- italiano: Philips PT856/26 Manuale utente
- Nederlands: Philips PT856/26 Handleiding
- Deutsch: Philips PT856/26 Benutzerhandbuch
- dansk: Philips PT856/26 Brugermanual
- svenska: Philips PT856/26 Användarmanual
- Türkçe: Philips PT856/26 Kullanım kılavuzu
Artigos relacionados
-
Norelco PT730/14 Manual do usuário
-
Philips PT719/20 Manual do usuário
-
Philips HQ6921/16 Informação importante
-
Philips PT710/14 Manual do usuário
-
Philips PT717 Manual do usuário
-
-
Philips S1110 Manual do usuário
-
-
Philips S1510 Manual do usuário
-