Rowenta PRO PERFECT Manual do proprietário
- Categoria
- Estações de engomar a vapor
- Tipo
- Manual do proprietário

GB p. 2 - 7
F p. 8 - 13
D p. 14 - 19
NL p. 20 - 25
I p. 26 - 31
E p. 32 - 37
P p. 38 - 43
GR p. 44 - 49
Réf. 1800113724 • 11/2008 • Subject to modifications • JPM & Associés • marketing-design-communication • 33 (0)3 80 56 28 11
FerFocus_1800113724:FerClassic_BASE_110x154mm 28/11/08 15:34 Page A

www.rowenta.com
é 800 3 / 008 Subject to od cat o s J & ssoc és a et g des g co u cat o 33 (0)3 80 56 8
FerFocus_1800113724:FerClassic_BASE_110x154mm 28/11/08 15:34 Page B

1
3
4
5
6
8
9
7
10
11
13d
13
13e
13f
12
13a
13b
13c
2*
* depending on model
FerFocus_1800113724:FerClassic_BASE_110x154mm 28/11/08 15:34 Page C

fig.17 fig.18
fig.13 fig.16fig.14 fig.15
1/4
1/4
fig.1 fig.4fig.3fig.2
fig.6 fig.7 fig.8
fig.9 fig.10 fig.11 fig.12
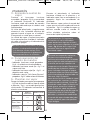
PREPARATION
• VORBEREITUNG • PREPARAZIONE • PRÉPARATION • VOORBEREIDING
• PREPARACIÓN • PREPARAÇÃO • PREPARATION • ΠΡΟΕ∆ΟπΜΑΣπΑ
USE
• GEBRAUCH • UTILIZZO • UTILISATION • GEBRUIK
• UTILIZACIÓN • UTILIZAÇÃO • USE • Χ ΗΣΗ
MAINTENANCE
• INSTANDHALTUNG • MANUTENZIONE • ENTRETIEN • ONDERHOUD
• MANTENIMIENTO • MANUTENÇÃO • MAINTENANCE • ΣΥΝ∆ΗΡΗΣΗ
fig.5
FerFocus_1800113724:FerClassic_BASE_110x154mm 28/11/08 15:34 Page 1

SAFETY RECOMMENDATIONS
Please read these instructions carefully
before first use. This product has been
designed for domestic use only. Any
commercial use, inappropriate use or
failure to comply with the instructions,
the manufacturer accepts no responsibility
and the guarantee will not apply.
For your safety, this appliance conforms
to the applicable standards and
regulations (Low Voltage, Electomagnetic
Compatibility, Materials in contact with
foodstuffs, Environmental Directives, as
applicable...).
Your steam generator is an electrical
appliance: it must be used in normal
conditions of use.
It is fitted with 2 safety systems:
- A pressure release valve which, in the
event of a malfunction, releases any
excess steam.
- A thermal fuse to prevent the appliance
from overheating.
Always plug in your steam generator:
- An electrical installation with voltage
between 220V and 240V.
- An earthed socket. If you are using a
mains extension lead, ensure that it is
correctly rated (10A) with an earth, and
is fully extended.
Connecting to the wrong voltage may
cause irreparable damage to the
appliance and will invalidate your
guarantee.
Unwind the electrical power cord
completely before plugging it in to a
mains socket with an earth pin.
Should the power cord or the boiler cord
linking the iron to the base unit become
damaged, it must be replaced by a
ROWENTA approved service centre to
avoid the risk of danger or injury.
Do not unplug the appliance by pulling
on the cord. Always unplug your appliance:
- before filling the water tank or rinsing
the collector;
- before cleaning your generator,
- after each use.
The appliance must be used and placed
on a flat, stable, heat-resistant work
surface.
When you place the iron on the iron rest,
make sure that the surface on which you
place it is stable.
This appliance is not intended for use by
persons (including children) with
reduced physical, sensory or mental
capabilities, or lack of experience and
knowledge, unless they have been given
supervision or instruction concerning
use of the appliance by a person
responsible for their safety.
Children should be supervised to ensure
that they do not play with the appliance.
Before unscrewing the boiler rinse plug,
wait until the generator is cold.
Never leave the appliance unattended:
- when it is connected to the mains,
-
until it has cooled down (around 1 hour).
The soleplate and generator iron-rest
can become very hot and cause burns:
never touch these parts. Never touch the
electric cords with the soleplate of the
iron.
Your appliance gives off steam which
can cause burns.
Handle your iron carefully, particularly
when using the vertical steam function.
Be careful when ironing near to the edge
of the ironing board as steam can vent
sideways.
Never direct the steam towards persons
or animals.
Always wait before rinsing the collector
until the steam generator has cooled
down and has been unplugged for at
least 2 hours before unscrewing the
collector.
If you lose or damage the collector, have
it replaced by an Approved Service
Centre.
Do not immerse your steam generator in
water or any other liquid. Do not rinse it
under a running tap.
The appliance must not be used if it has
fallen to the floor, shows evidence of
damage, leaks or fails to function correctly.
Never dismantle your appliance. To avoid
any danger, have it inspected in a
ROWENTA approved service centre.
2
Keep these instructions
FerFocus_1800113724:FerClassic_BASE_110x154mm 28/11/08 15:34 Page 2

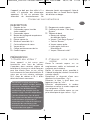
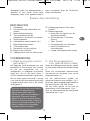
DESCRIPTION
1 • What water to use ?
Your appliance has been designed to
operate with untreated tap water.
If your water is very hard (check with
your local water authority) it is possible
to mix untreated tap water with store-
bought distilled or demineralised water
in the following proportions: 50%
untreated tap water, 50% distilled or
demineralised water.
2 • Preparing your steam
generator
Place the steam generator on a stable,
horizontal and heat-resistant surface.
Remove the water tank using the handle
(on the front of the steam generator).
Fill the tank with water, taking care not to
exceed the maximum level
- fig.1.
Slide the tank back into its housing until
its “clicks” into place.
Unwind the electrical power cord
completely and remove the steam cord
from its housing
- fig.2.
Plug your steam generator into a mains
socket with an earth pin
- fig.3.
For best results you should use a mesh
type/vented ironing board.
TYPES OF WATER NOT TO USE: Heat
concentrates the elements contained in
water during evaporation. The types of
water listed below may contain organic
waste, mineral or chemical elements that
can cause spitting, brown staining, or
premature wear of the appliance: water
from clothes dryers, scented or softened
water, water from refigerators, batteries,
air conditioners, rain water, boiled,
filtered or bottled water. Also only use
distilled or demineralised water as
advised above.
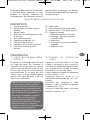
PREPARATION
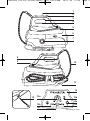
1. Iron handle
2. Humid steam button
(depending on model)
3. Steam control button
4. Temperature control dial for iron
soleplate
5. Iron rest
6. Removable 1.4 L water tank
7. Scale collector cover
8. Iron temperature control light
9. Iron positioning system
10. Steam cord
11. Steam cord storage clip
12. “Calc-Away System” scale collector
13. Control panel
a. Steam output control dial
b. “Calc-Away System” indicator
c. “Restart” button
d. “Steam ready” light
e. Illuminated on / off switch
f. ”Water tank empty” light
3
GB
F
D
NL
I
E
P
GR
FerFocus_1800113724:FerClassic_BASE_110x154mm 28/11/08 15:34 Page 3

3 • Switching on your steam
generator
Press on the on / off switch - fig.4, it
begins flashing. The green light (located
on the control panel) flashes and the
boiler heats up.
When starting, and regularly while it is
being used, your steam generator's
electric pump injects water into the boiler.
It makes a noise but this is quite normal.
The steam generator and the iron are
ready for use when the steam indicator
light is on and the iron light goes out.
4 •
Operating the control panel
• Flashing green light - fig.6 : the water is
heating up in the boiler.
• Continuous green light
- fig.7 : steam is
ready for use.
• Continuous red light
- fig.11 : the water
tank is empty.
• The “Calc-Away System” orange
indicator flashes
- fig. 13 : the collector
needs to be rinsed.
5 •
Using your steam generator
Place the iron’s temperature control -
fig.5
to the type of fabric to be ironed and
set the steam output
- fig.6 - see table
below. The iron temperature control light
turns on.
While ironing, the light on top of the iron
and the steam ready light turn on and
off, as the temperature adjusts without
interrupting ironing. To obtain steam,
press on the steam control button
beneath the iron handle and keep it
pressed
- fig.8. The steam will stop when
you release the button.
Always spray starch on the reverse side
of the fabric to be ironed.
The first time the appliance is used,
there may be some fumes and smell but
this is not harmful. They will not affect
use and will disappear quickly.
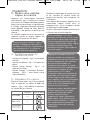
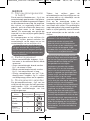
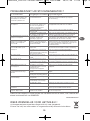
USE
T
YPE OF
FABRIC
S
ETTING
TEMPERATURE CONTROL
S
ETTING STEAM
CONTROL
COTTON /
L
INEN
•••
S
ILK
/ W
OOL
••
S
YNTHETICS
(Polyester, Acetate,
Acrylic, Polyamide)
•
Recommendations: To prime the
steam circuit, either before using the
iron for the first time, or if you have
not used the steam function for a few
minutes, press the steam control
button several times in a row - fig.8,
holding the iron away from your
clothes. This will enable any cold
water to be removed from the steam
circuit.
Iron temperature control setting: Start
with fabrics to be ironed at a low
temperature and finish with those
which need higher temperatures. Each
time you change fabrics, wait for the
light to turn off. Mixed fibre fabrics:
set the ironing temperature to the
setting for the most delicate fabric.
Woollen garments: press repeatedly
on the steam control button to obtain
short bursts of steam, without placing
the iron on the garment itself. This will
avoid making the fabric shiny. Steam
output control dial setting: Thick
fabric: increase the steam setting. At a
low temperature: set the steam output
control dial to the low position. For
delicate fabrics(•), press the steam
control button (under the handle of
the iron) intermittently to avoid
possible water droplets appearing
with the steam.
4
FerFocus_1800113724:FerClassic_BASE_110x154mm 28/11/08 15:34 Page 4

6 • The humid steam
(depending on the model)
Press 2 or 3 times on the humid steam
button
- fig.9 to obtain a more powerful,
heavier burst of steam:
• for ironing thicker fabrics,
• to eliminate creases,
• for powerful vertical steam ironing.
7 • Vertical steam ironing
Set the iron temperature control and the
steam output control dial (located on the
control panel) to the maximum position.
Hang the garment on a coat hanger and
hold the fabric slightly taut with one
hand. Press repeatedly on the steam
- fig.8 control button (beneath the iron
handle) moving the iron from top to
bottom
- fig.10.
8 • Dry ironing
Do not press on the steam control
button.
9 • Fill the water tank again
When there is no more steam and
the”Water tank empty” light flashes
-
fig.11
: water tank is empty .
Remove the water tank using the handle
(on the front of the steam generator)
-
fig. 12
and fill it - fig. 1 do not fill above
the Max. level.
Push the water tank into position until it
"clicks" into place. Press the Restart
button underneath the control panel.
The steam generator and the iron are
ready for use when the steam indicator
light is on and the iron indicator goes
out.
10 • Storing the steam generator
Press the illuminated on/off switch O/I
and unplug the generator. Place the iron
on the iron rest on the steam generator.
Fold the steam cord in two and place it in
its housing. Leave the steam generator
to cool for at least one hour before
putting it away if it is to be stored in a
cupboard or confined space. You can
store the steam generator in complete
safety.
Do not place the iron on a metal
support. When taking a break from
ironing, always place the iron on the
iron rest plate of the unit. It is
equipped with non-slip pads and has
been designed to withstand high
temperatures.
ATTENTION: Use the humid steam
function very carefully because of the
exceptional power of steam that may
cause burns.
As steam is very hot: never attempt to
remove creases from a garment while
it is being worn, always hang
garments on a coat hanger. For fabrics
other than linen or cotton, hold the
iron a few centimetres from the
garment to avoid burning the fabric.
If this occurs, remove the excess
water.
5
GB
F
D
NL
I
E
P
GR
FerFocus_1800113724:FerClassic_BASE_110x154mm 28/11/08 15:34 Page 5

11 • Cleaning the generator
The Iron soleplate: clean the soleplate of
your iron when it is cool with a damp
cloth or a non-abrasive sponge.
The base unit: Clean the plastic parts of
the appliance occasionally with a soft
cloth.
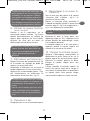
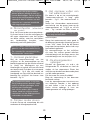
12 • Easy descaling of your
steam generator
To extend the life of your steam
generator and avoid scale on your
ironing, your steam generator is
equipped with a built-in scale collector.
This collector, located in the tank,
automatically removes the scale that
forms inside.
Operation:
An orange “Calc-Away System” light
located
- fig.13 on the control panel
starts flashing to tell you that the scale
collector needs rinsing.
Once the steam generator has cooled
down completely, remove the scale
collector cover
- fig.14.
Unscrew the scale collector valve and
remove it from the housing; it contains
the scale that has built up in the tank
-
fig.15.
To clean the collector properly, just rinse
it under running water to remove the
scale it contains
- fig.16.
Put the the collector back into its housing
and screw it in completely to keep it
watertight
- fig.17.
Put the scale collector cover back on -
fig.18.
IMPORTANT! This operation must
not be carried out unless the steam
generator has been unplugged for at
least two hours and has cooled down
completely.
To carry out this operation, the steam
generator must be close to a sink as
water may come out of the tank
when it is opened.
Do not use any descaling substances
(vinegar, industrial descaling
products, etc.) when rinsing the scale
collector : they could damage it.
Before emptying your steam
generator, it must always be left to
cool for 2 hours to avoid any risks of
scalding.
Do not use any cleaning or descaling
products for cleaning the soleplate or
the base-unit. Never hold the iron or
the base unit under the tap.
MAINTENANCE AND CLEANING
The next time you use your iron,
press the “Restart” button on the
control panel to turn off the orange
“Calc-Away System” light.
6
FerFocus_1800113724:FerClassic_BASE_110x154mm 28/11/08 15:34 Page 6

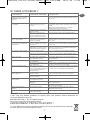
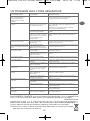
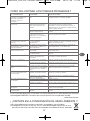
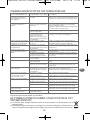
IS THERE A PROBLEM ?
Problems Possible causes Solutions
The steam generator does not
switch on or the iron indicator
and ON/OFF indicator do not
switch on.
The appliance is not switched on. Check that your appliance is correctly plugged in and
press the illuminated on/off switch (on the front of the
base-unit).
Water runs through the holes in
the soleplate.
You are using the steam control
button before the iron is hot
enough.
Decrease the steam output while ironing at low
temperature (steam output control dial on the control
panel).
Wait for the thermostat light to go out before
activating the steam control button.
You are using the humid steam
control too often.
Press the humid steam control 2 or 3 times.
Water has condensed in the
pipes because you are using
steam for the first time or you
have not used it for some time.
Press the steam control on the iron away from the
ironing board until steam comes out of the iron.
White streaks come through the
holes in the soleplate.
Your boiler has a build-up of
scale because it has not been
rinsed out regularly.
Rinse the collector when the “Calc-Away System”
indicator flashes. If your water is very hard, rinse it
more often.
Brown streaks come through
the holes in the soleplate and
stain the linen.
You are using chemical descaling
agents or additives in the water
for ironing.
Never add this type of product in the water tank or in
the boiler (see our recommendations regarding water
to be used).
Your linen is not rinsed
sufficiently or you have ironed a
new garment before washing it.
Ensure linen is rinsed thoroughly to remove any soap
deposits or chemicals on new garments which have
been sucked up by the iron.
The soleplate is dirty or brown
and my stain the linen.
You are ironing at too high
temperature.
See our recommendations regarding temperature
control setting.
You’re linen is not rinsed sufficiently
or you are using starch.
Ensure linen is rinsed thoroughly and always spray
starch on the reverse side of the fabric to be ironed.
There is no steam. The water tank is empty (water
tank empty light (f) is lit).
Fill the water tank and press the “Restart” button on
the control panel.
There is little steam.
The steam output control dial is
set at minimum.
Increase the steam output (control dial on the control
panel).
The soleplate temperature is set
to the maximum.
The generator is working but steam is very hot and
dry. As a consequence, it is less visible.
Water streaks appear on the
linen.
When taking a break from
ironing, if your ironing board
cover is soaked with water as it is
not suited to the power of a
steam generator.
Check that your ironing board is suitable. A mesh type
ironing board must be used to allow any excess steam
to escape and to avoid steam venting sideways.
The red “removable water tank
empty” light is on.
You have not pressed the
“Restart” button.
Check there is water in the water tank.
Press the “Restart” button on the control panel.
The water tank is not correctly
fitted into position.
Push it into position until it "clicks" into place.
Steam escapes from the scale
collector valve.
The scale collector valve has not
been tightened correctly.
Tighten the scale collector correctly.
The scale collector valve is
damaged.
Contact an Approved Service Centre to order a new
scale collector valve.
The generator is faulty. Do not use the steam generator and contact an
Approved Service Centre.
Steam escapes under the
appliance.
The generator is faulty. Do not use the steam generator and contact an
Approved Service Centre.
The scale collector light stays
on.
You have not pressed the restart
button after descaling.
Press the restart button on the control panel.
Your appliance contains valuable materials which can be recovered or recycled.
Leave it at a civic waste disposal centre.
ENVIRONMENT PROTECTION FIRST !
7
GB
F
D
NL
I
E
P
GR
HELPLINE
If you have any product problems or queries with your product, please telephone our
Customer Relations team on:
0845 602 1454 (UK) - (01) 677 4003 (Ireland)
Consult our web site: www.rowenta.co.uk
FerFocus_1800113724:FerClassic_BASE_110x154mm 28/11/08 15:34 Page 7

8
POUR VOTRE SÉCURITÉ
Lisez attentivement le mode d’emploi
avant la première utilisation de votre
appareil : une utilisation non conforme
au mode d’emploi dégagerait la marque
de toute responsabilité.
Pour votre sécurité, cet appareil est
conforme aux normes et réglementations
applicables (Directives Basse Tension,
Compatibilité Electromagnétique,
Environnement …).
Votre centrale vapeur est un appareil
électrique : elle doit être utilisée dans
des conditions normales d’utilisation.
Elle est prévue pour un usage
domestique uniquement.
Elle est équipé de 2 systèmes de sécurité :
- une soupape évitant toute surpression,
qui en cas de dysfonctionnement,
laisse échapper le surplus de vapeur ;
- un fusible thermique pour éviter toute
surchauffe.
Branchez toujours votre centrale vapeur
:
- sur une installation électrique dont la
tension est comprise entre 220 et
240 V ;
- sur une prise électrique de type
«terre». Si vous utilisez une rallonge,
vérifiez que la prise est bien de type
bipolaire I0A avec conducteur de terre.
Toute erreur de branchement peut
causer un dommage irréversible et
annule la garantie.
Déroulez complètement le cordon
électrique avant de la brancher sur une
prise électrique de type terre.
Si le cordon d’alimentation électrique ou
le cordon vapeur est endommagé, il doit
être impérativement remplacé par un
Centre Service Agréé afin d’éviter un
danger.
Ne débranchez pas l’appareil en tirant
sur le cordon. Débranchez toujours votre
appareil :
- avant de remplir le réservoir ou de
rincer le collecteur ;
- avant de le nettoyer ;
- après chaque utilisation.
L’appareil doit être utilisé et posé sur
une surface stable. Lorsque vous posez
le fer sur le repose-fer, assurez-vous que
la surface sur laquelle vous le reposez
est stable.
Cet appareil n’est pas prévu pour être
utilisé par des personnes (y compris les
enfants) dont les capacités physiques,
sensorielles ou mentales sont réduites, ou
des personnes dénuées d’expérience ou
de connaissance, sauf si elles ont pu
bénéficier, par l’intermédiaire d’une
personne responsable de leur sécurité,
d’une surveillance ou d’instructions
préalables concernant l’utilisation de
l’appareil.
Il convient de surveiller les enfants pour
s’assurer qu’ils ne jouent pas avec
l’appareil.
Avant le remplissage, vérifiez que votre
appareil est débranché et froid.
Ne laissez jamais l’appareil sans
surveillance :
- lorsqu’il est raccordé à l’alimentation
électrique ;
- tant qu’il n’a pas refroidi environ 1 heure.
La semelle de votre fer et la plaque
repose-fer du boîtier peuvent atteindre
des températures très élevées, et
peuvent occasionner des brûlures : ne
les touchez pas. Ne touchez jamais les
cordons électriques avec la semelle du
fer à repasser.
Votre appareil émet de la vapeur qui
peut occasionner des brûlures.
Manipulez le fer avec précaution, surtout
en repassage vertical. Ne dirigez jamais
la vapeur sur des personnes ou des
animaux.
Avant de rincer le collecteur, attendez
toujours que la centrale vapeur soit
froide et débranchée depuis plus de
2 heures pour dévisser le collecteur.
Si vous perdez ou abîmez le collecteur,
faites-le remplacer dans un Centre
Service Agréé.
Ne plongez jamais votre centrale vapeur
dans l’eau ou tout autre liquide. Ne la
passez jamais sous l’eau du robinet.
FerFocus_1800113724:FerClassic_BASE_110x154mm 28/11/08 15:34 Page 8

DESCRIPTION
1• Quelle eau utiliser ?
Votre appareil a été conçu pour
fonctionner avec l’eau du robinet.
Cependant, dans certaines régions de
bord de mer, la teneur en sel de votre eau
peut être élevée. Dans ce cas, utilisez
exclusivement de l'eau déminéralisée. Si
votre eau est très calcaire, mélangez
50 % d’eau du robinet et 50 % d’eau
déminéralisée du commerce.
2 • Préparez votre centrale
vapeur
Placez la centrale vapeur sur un
emplacement
stable et horizontal ne
craignant pas la chaleur.
Retirez le réservoir d’eau amovible à
l’aide de la poignée (située à l’avant de la
centrale vapeur).
Remplissez le réservoir d’eau sans
dépasser le niveau Max
. - fig.1.
Remettez le bien à fond dans son
logement jusqu’au “clic”.
Déroulez complètement le cordon
électrique et sortez le cordon vapeur de
son rangement
- fig.2.
Branchez votre centrale vapeur sur une
prise électrique de type «terre»
- fig.3.
IMPORTANT N’utilisez jamais d’eau
contenant des additifs (amidon, parfum,
substances aromatiques, adoucissant,
etc.), ni de l’eau de batterie ou de
condensation (par exemple l’eau des
séchoirs à linge, l’eau des réfrigérateurs,
l’eau des climatiseurs, l’eau de pluie).
Elles contiennent des déchets organiques
ou des éléments minéraux qui se
concentrent sous l’effet de la chaleur et
provoquent des crachements, des
coulures brunes ou un vieillissement
prématuré de votre appareil.
PRÉPARATION
1. Poignée du fer
2. Commande vapeur humide
(selon modèle)
3. Commande vapeur
4. Bouton de réglage de température
de la semelle
5. Plaque repose-fer
6. Réservoir amovible 1,4 L
7. Cache collecteur de tartre
8. Voyant du fer
9. Calage positionnement du fer
10. Cordon vapeur
11. Rangement cordon vapeur
12. Collecteur de tartre “Calc-Away
System”
13. Tableau de bord
a. Bouton de réglage
du débit de vapeur
b. Voyant “Calc-Away System”
c. Touche “Restart”
d. Voyant vapeur prête
e. Interrupteur lumineux
Marche/Arrêt
f. Voyant “Réservoir vide”
GB
F
D
NL
I
E
P
GR
L’appareil ne doit pas être utilisé s’il a
chuté, s’il présente des dommages
apparents, s’il fuit ou présente des
anomalies de fonctionnement. Ne
démontez jamais votre appareil : faites-le
examiner dans un Centre Service Agréé,
afin d’éviter un danger.
Conservez ces instructions
9
FerFocus_1800113724:FerClassic_BASE_110x154mm 28/11/08 15:34 Page 9

3 • Mettez votre centrale
vapeur en marche
Appuyez sur l’interrupteur lumineux
marche/arrêt - fig.4, il s’allume. Le voyant
vert situé sur le tableau de bord clignote.
Après une minute environ, et régulièrement
à l’usage, la pompe électrique équipant
votre appareil injecte de l’eau dans la
chaudière. Cela génère un bruit qui est
normal.
La centrale vapeur et le fer sont prêts à
repasser quand le voyant vapeur est
allumé et le voyant du fer éteint.
4 • Fonctionnement du
tableau de bord
•
Voyant vert clignote - fig.6 : la chaudière
chauffe.
• Voyant vert allumé
- fig.7 : la vapeur est
prête.
• Voyant rouge allumé
- fig.11 : le
réservoir est vide.
• Voyant orange “Calc-Away System”
clignote
- fig.13 : vous devez rincer
votre collecteur.
5 • Repassez à la vapeur
Placez le thermostat - fig.5 sur le type de
tissu à repasser et réglez le débit de
vapeur
- fig.6 - voir tableau ci-dessous.
Le voyant du fer s’allume.
Pendant le repassage, le voyant situé sur
le fer s’allume et s’éteint selon les
besoins de chauffe, sans incidence sur
l’utilisation.
Pour obtenir de la vapeur, appuyez sur la
commande vapeur située sous la
poignée du fer
- fig.8. La vapeur s’arrête
en relâchant la commande.
Si vous utilisez de l’amidon, pulvérisez-le
à l’envers de la face à repasser.
Durant la première utilisation, il peut se
produire un dégagement de fumée et
une odeur sans nocivité. Ce phénomène
sans conséquence sur l’utilisation de
l’appareil disparaîtra rapidement.
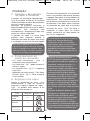
UTILISATION
T
ISSUS
P
OSITION DU
T
HERMOSTAT
P
OSITION DU
BOUTON DE VAPEUR
LIN / COTON
•••
S
OIE
/ L
AINE
••
S
YNTHÉTIQUES
(Polyester, Acétate,
Acrylique, Polyamide)
•
Recommandation : Lors de la
première utilisation ou si vous n’avez
pas utilisé la vapeur depuis quelques
minutes, appuyez plusieurs fois de
suite sur la commande vapeur - fig 8
en dehors de votre linge. Cela
permettra d’éliminer l’eau froide du
circuit de vapeur.
Réglage de la température du fer :
Votre fer chauffe vite, commencez
d’abord par les tissus qui se repassent
à basse température, puis terminez
par ceux qui demandent une
température plus élevée. A chaque
changement de textile, attendez que le
voyant du fer s’eteigne. Si vous
repassez des tissus en fibres
mélangées, réglez la température de
repassage sur la fibre la plus fragile.
Si vous repassez des vêtements en
laine, appuyez juste sur la commande
vapeur du fer par impulsions, sans
poser le fer sur le vêtement. Vous
éviterez ainsi de le lustrer.
Réglage du bouton de débit vapeur :
Si vous repassez un tissu épais,
augmentez le débit de vapeur.
Si vous repassez à basse
température, réglez le bouton de
débit vapeur sur la position mini.
Pour les tissus délicats (•), actionnez
très modérément la commande
vapeur pour éviter des coulures
éventuelles.
10
FerFocus_1800113724:FerClassic_BASE_110x154mm 28/11/08 15:34 Page 10

11
6 • Utilisez la vapeur humide
(selon modèle)
Donnez 2 ou 3 implusions sur la
commande vapeur humide
- fig.9 pour
obtenir ponctuellement un surplus de
vapeur pour repasser les tissus épais,
éliminer les faux plis ou pour un
défroissage vertical plus puissant.
7 • Défroissez verticalement
Réglez le bouton de température du fer
et le bouton de réglage du débit de
vapeur sur la position maxi.
Suspendez le vêtement sur un cintre et
tendez légèrement le tissu d’une main.
Appuyez sur la commande vapeur
- fig.8
par intermittence en effectuant un
mouvement de haut en bas
- fig.10.
8 • Repassez à sec
N’appuyez pas sur la commande vapeur.
9 • Remplissez à nouveau le
réservoir
Vous n’avez plus de vapeur et le voyant
“réservoir vide” s’allume
- fig.11 : le
réservoir d’eau est vide.
Retirez le réservoir d’eau amovible à
l’aide de la poignée (située à l’avant de la
centrale vapeur)
- fig.12 et remplissez-le -
fig.1
sans dépasser le niveau Max.
Remettez-le bien à fond dans son
logement jusqu’au “clic”. Appuyez sur la
touche Restart de redémarrage, située
sur le tableau de bord.
La centrale vapeur et le fer sont prêts à
repasser quand le voyant vapeur est
allumé et le voyant du fer éteint.
10 • Rangez la centrale vapeur
Eteignez l’interrupteur marche/arrêt et
débranchez la prise. Posez le fer sur la
plaque repose-fer de la centrale vapeur.
Saisissez le cordon, pliez-le en deux.
Rangez le cordon vapeur dans son
logement.
Laissez refroidir la centrale vapeur au
moins une heure avant de la ranger si
vous devez la stocker dans un placard ou
un espace étroit. Vous pouvez ranger
votre centrale vapeur en toute sécurité.
Pendant les pauses de repassage, ne
posez jamais le fer sur un repose-fer
métallique, ce qui pourrait l’abîmer
mais plutôt sur la plaque repose-fer
du boîtier : elle est équipée de patins
anti-dérapants et a été conçue pour
résister à des températures élevées.
ATTENTION ! Utilisez la fonction
vapeur humide avec précaution car
la puissance exceptionnelle de la
vapeur peut occasionner des
brûlures.
La vapeur produite étant très chaude,
ne défroissez jamais un vêtement sur
une personne, mais toujours sur un
cintre.
Pour les tissus autres que le lin ou le
coton, maintenez le fer à quelques
centimètres afin de ne pas brûler le
tissu.
En cas de débordement, éliminez le
surplus.
GB
F
D
NL
I
E
P
GR
FerFocus_1800113724:FerClassic_BASE_110x154mm 28/11/08 15:34 Page 11

12
11 • Nettoyez la centrale
vapeur
La semelle : nettoyez la semelle refroidie
de votre fer avec un chiffon humide ou
une éponge non abrasive.
Le boîtier : nettoyez de temps en temps
les parties plastiques de l’appareil à
l’aide d’un chiffon doux.
12 • Détartrez facilement
votre centrale vapeur
Pour prolonger la durée de vie de votre
centrale vapeur et éviter les rejets de
tartre, votre centrale vapeur est équipée
d’un collecteur de tartre intégré. Ce
collecteur, placé dans la cuve, récupère
automatiquement le tartre qui se forme à
l’intérieur.
Principe de fontionnement :
Un voyant orange “Calc-Away System”
clignote
- fig.13 au tableau de bord pour
vous indiquer qu’il faut rincer le
collecteur.
Une fois la centrale vapeur complètement
refroidi, retirer le cache collecteur de
tartre
- fig.14.
Dévissez complètement le collecteur et
retirer-le du boîtier, il contient le tartre
accumulé dans la cuve
- fig.15.
Pour bien nettoyer le collecteur il suffit
de le rincer à l’eau courante pour
éliminer le tartre qu’il contient
- fig.16.
Remettez le collecteur dans son
logement en le revissant complètement,
pour assurer l’étanchéité
- fig.17.
Remettez le cache collecteur de tartre en
place
- fig.18.
ATTENTION ! Cette opération ne doit
pas être effectuée tant que la centrale
vapeur n’est pas débranchée depuis
plus de deux heures et n’est pas
complètement froide.
Pour effectuer cette opération, la
centrale vapeur doit se trouver prêt
d’un évier car de l’eau peut couler de
la cuve lors de l’ouverture.
N‘introduisez pas de produits
détartrants (vinaigre, détartants
industriels...) pour rincer la
chaudière : ils pourraient
l’endommager.
Avant de procéder à la vidange de
votre centrale vapeur, il est impératif
de la laisser refroidir pendant plus
de 2 heures, pour éviter tout risque
de brûlure.
Ne passez jamais le fer ou le boîtier
sous l’eau du robinet.
N’utilisez aucun produit d’entretien
ou de détartrage pour nettoyer la
semelle ou le boîtier.
ENTRETIEN ET NETTOYAGE
Lors de la prochaine utilisation
appuyer sur la touche “Restart”
située sur le tableau de bord pour
éteindre le voyant orange “Calc-
Away System”.
FerFocus_1800113724:FerClassic_BASE_110x154mm 28/11/08 15:34 Page 12

GB
F
D
NL
I
E
P
GR
S’il n’est pas possible de déterminer la cause d’une panne, adressez-vous à un Centre Service
Agréé ROWENTA. ROWENTA assure une garantie contractuelle de 1 an sur l’appareil et de
2 ans sur la cuve à partir de la date d’achat, sauf législation spécifique à votre pays.
www.rowenta.com
UN PROBLEME AVEC VOTRE GENERATEUR
Votre appareil contient de nombreux matériaux valorisables ou recyclables.
Confiez celui-ci dans un point de collecte ou à défaut dans un centre service agrée
pour que son traitement soit effectué.
Problèmes Causes Solutions
La centrale vapeur ne s’allume
pas ou le voyant du fer et
l’interrupteur lumineux
marche/arrêt ne sont pas
allumés.
L’appareil n’est pas sous tension. Vérifiez que l’appareil est bien branché sur une prise
en état de marche et qu’il est sous tension
(interrupteur lumineux marche/arrêt).
L’eau coule par les trous de la
semelle.
Vous utilisez la commande
vapeur alors que votre fer n’est
pas suffisamment chaud.
Diminuez le débit de vapeur lorsque vous repassez à
basse température (bouton de réglage situé sur le
tableau de bord).
Attendez que le voyant du fer soit éteint avant
d’actionner la commande vapeur.
Vous utilisez trop fréquemment la
commande vapeur humide.
Donnez 2 ou 3 impulsions sur la commande vapeur
humide.
L’eau s’est condensée dans les
tuyaux car vous utilisez la vapeur
pour la première fois ou vous ne
l’avez pas utilisée depuis
quelques temps.
Appuyez sur la commande vapeur en dehors de votre
table à repasser, jusqu’à ce que le fer émette de la
vapeur.
Des coulures blanches sortent
des trous de la semelle.
Votre chaudière rejette du tartre
car elle n’est pas rincée
régulièrement.
Rincez le collecteur lorsque le voyant “Calc-Away
System” clignote. Si votre eau est très calcaire,
augmentez les fréquences.
Des coulures brunes sortent des
trous de la semelle et tachent le
linge.
Vous utilisez des produits
chimiques détartrants ou des
additifs dans l’eau de repassage.
N’ajoutez jamais aucun produit dans le réservoir d’eau
ou dans la chaudière (voir § 1).
La semelle est sale ou brune et
peut tacher le linge.
Vous utilisez une température
trop importante.
Reportez-vous à nos conseils sur le réglage des
températures (voir § 5).
Votre linge n’est pas
suffisamment bien rincé si vous
utilisez de l’amidon.
Pulvérisez toujours l’amidon sur l’envers de la face à
repasser.
Il n’y a plus de vapeur. Le réservoir d’eau est vide
(voyant allumé).
Remplissez le réservoir d’eau et appuyez sur la touche
“Restart” située sur le tableau de bord.
Il y a peu de vapeur.
Le débit de vapeur est réglé au
minimum.
Augmentez le débit de vapeur (bouton de réglage sur
le tableau de bord).
La température de la semelle est
réglée au maximum.
La vapeur, très chaude, est sèche, donc peu visible.
Des traces d’eau apparaissent
sur le linge.
Votre housse de table est saturée
en eau car elle n’est pas adaptée
à la puissance d’une centrale
vapeur.
Assurez-vous d’avoir une table adaptée (plateau
grillagé qui évite la condensation).
Le voyant «réservoir vide» est
allumé.
Vous n’avez pas appuyé sur la
touche “Restart” de
redémarrage.
Appuyez sur la touche “Restart” de redémarrage
située sur le tableau de bord.
Le réservoir n’est pas remis à
fond dans son logement.
Remettez-le bien à fond dans son logement jusqu’au
“clic”.
De la vapeur sort autour du
collecteur.
Le collecteur est mal serré. Resserrez le collecteur.
Le joint du collecteur est
endommagé.
Contactez un Centre Service Agréé.
L’appareil est défectueux. N’utilisez plus la centrale vapeur et contactez un
Centre Service Agréé.
De la vapeur sort en dessous du
boîtier.
L’appareil est défectueux. N’utilisez plus le centrale vapeur et contactez un
Centre Service Agréé.
Le voyant “Calc-Away System”
est allumé
Vous n’avez pas appuyé sur la
touche “Restart” redémarrage.
Appuyer sur la touche “Restart” de redémarrage situé
sur le tableau de bord.
13
PARTICIPONS À LA PROTECTION DE L’ENVIRONNEMENT !
FerFocus_1800113724:FerClassic_BASE_110x154mm 28/11/08 15:34 Page 13

SICHERHEITSHINWEISE
Lesen Sie diese Gebrauchsanleitung vor
dem ersten Einsatz Ihres Gerätes
sorgfältig durch: Eine unsachgemäße
Handhabung entbindet ROWENTA von
jeglicher Haftung.
Um Ihre Sicherheit zu gewährleisten,
entspricht dieses Gerät den anwendbaren
Normen und Bestimmungen (Bestimmungen
über Niederspannung, elektromagnetische
Verträglichkeit, Umweltverträglichkeit...).
Ihr Dampfgenerator ist ein elektrisches
Gerät: Es darf nur unter normalen
Anwendungsbedingungen eingesetzt
werden. Es ist ausschließlich für den
Hausgebrauch bestimmt.
Es ist mit 2 Sicherheitseinrichtungen
ausgestattet:
- einem Sicherheitsventil als Schutz
gegen Überdruck. Bei einem Defekt tritt
aus dem Verschluss Dampf aus.
- einer Thermosicherung, um einer
Überhitzung vorzubeugen.
Schließen Sie Ihren Dampfgenerator
stets:
- an ein Stromnetz an, dessen Spannung
zwischen 220 und 240 V beträgt.
- an eine geerdete Steckdose an. Falls
Sie ein Verlängerungskabel verwenden,
vergewissern Sie sich, dass es sich um
ein 10A zweipoliges Kabel mit Erdung
handelt, und verlegen Sie das Kabel so,
dass niemand darüber stolpern kann.
Ein fehlerhafter Anschluss kann zu
irreparablen Schäden am Dampfgenerator
führen und setzt die Garantie außer Kraft.
Ziehen Sie das Kabel komplett aus der
Kabelaufwicklung, bevor Sie das Gerät
an eine geerdete Steckdose anschließen.
Falls das Netzkabel oder das
Bügeleisenkabel beschädigt sein sollten,
müssen diese, um jegliche Gefahr zu
vermeiden, unbedingt von einem
zugelassenen Kundendienstzentrum
ausgetauscht werden.
Das Gerät nicht durch Ziehen am
Netzkabel vom Stromkreislauf trennen.
Ziehen Sie stets den Netzstecker des
Dampfgenerators:
-
vor dem Spülen des
Kalksammelbehäl-
ters;
- vor dem Reinigen des Generators,
- nach jedem Gebrauch.
Das Gerät darf nur auf stabilen Unterlagen
benutzt und abgestellt werden.
Das gleiche gilt für Personen, die keine
Erfahrung mit dem Gerät besitzen oder
sich mit ihm nicht auskennen, außer
wenn sie von einer für die Sicherheit
verantwortlichen Person beaufsichtigt
werden oder von dieser mit dem
Gebrauch des Gerätes vertraut gemacht
wurden.
Kinder müssen beaufsichtigt werden,
damit sie nicht mit dem Gerät spielen.
Warten Sie immer bis Ihr Generator
abgekühlt, d.h. mehr als 2 Stunden
ausgeschaltet ist, bevor Sie den
Verschluss des Boilers aufschrauben.
Lassen Sie den Generator niemals unbe-
aufsichtigt:
- wenn er an das Stromnetz
angeschlossen ist,
- bis er abgekühlt ist.
Die Sohle des Bügelautomaten erreicht
sehr hohe Temperaturen, was zu
Verbrennungen führen kann: Nicht
berühren! Vergewissern Sie sich, dass
der Stecker gezogen und das Gerät
abgekühlt ist, bevor Sie den Wassertank
füllen.
Ihr Gerät erzeugt Dampf, der zu
Verbrühungen führen kann.
Gehen Sie vorsichtig mit Ihrem
Bügelautomaten um, insbesondere wenn
Sie vertikal aufdämpfen.
Richten Sie den Dampfstrahl niemals auf
Personen oder Tiere.
Lassen Sie den Dampfgenerator vor
dem Spülen des Kalksammelbehälter
mindestens 2 Stunden lang ausgesteckt
abkühlen, bevor Sie den Kalksammelbehälter
öffnen.
Falls Sie den Verschluss des
Kalksammelbehälters verlieren oder er
beschädigt ist, lassen Sie ihn durch das
gleiche Modell ersetzen.
Tauchen Sie den Dampfgenerator nicht
in Wasser oder sonstige Flüssigkeiten.
Halten Sie ihn nie unter dem
Wasserhahn.
14
FerFocus_1800113724:FerClassic_BASE_110x154mm 28/11/08 15:34 Page 14

BESCHREIBUNG
1•
Welches Wasser verwenden ?
Ihr Gerät kann mit Leitungswasser
betrieben werden.
Bei härterem Wasser empfehlen wir ein
Mischverhältnis von 1:1 mit destiliertem
Wasser. Verwenden Sie niemals reines
destiliertes Waser.
2 • Bereiten Sie Ihren
Dampfgenerator vor
Stellen Sie den Dampfgenerator auf eine
stabile, horizontale und hitzeunempfindliche
Arbeitsfläche.
Ziehen Sie den abnehmbaren Wassertank
an
seinem Griff heraus (er befindet sich an
der Vorderseite des Dampfgenerators).
Füllen Sie den Wassertank bis zur
Höchststandsanzeige
– fig.1.
Setzen Sie ihn wieder ein und achten Sie
darauf, dass er hörbar einrastet.
Ziehen Sie das Stromkabel komplett aus
der Kabelaufwicklung und entnehmen
Sie das Dampfkabel aus seinem Fach
-
fig.2.
Schließen Sie den Dampfgenerator an
eine geerdete Steckdose an
- fig.3.
ACHTUNG ! Benutzen Sie kein
Wasser mit Zusätzen (Stärke, Parfum,
Aromazusätze, Entkalker usw.), kein
Batteriewasser und kein
Kondensationswasser (wie
beispielsweise Wasser aus
Wäschetrocknern, Kühlschränken,
Klimaanlagen oder Regenwasser).
Sie enthalten organische oder
mineralische Elemente, die sich
durch die Hitze konzentrieren und
bräunlich gefärbte Spritzer und eine
verfrühte Abnutzung Ihres Gerätes
hervorrufen können.
VORBEREITUNG
1. Bügeleisengriff
2. Feuchtdampftaste (je nach Modell)
3. Dampftaste
4. Temperaturregler für die
Sohlentemperatur
5. Bügeleisenablage
6. Abnehmbarer 1,4 l Wassertank
7.
Abdeckung des Kalksammelbehälters
8. Temperaturkontrolllampe
9. Positionsstütze für das Bügeleisen
10. Kabel Bügelautomat
11. Dampfkabelbefestigungsclip
12. „Calc-Away System”
Kalksammelbehälter
13. Bedienfeld
a. Dampfmengenregler
b. „Calc-Away System” Lämpchen
c. Wiedereinschalttaste "Restart"
d. Dampfbereitschaftsanzeige
e. Ein-/Ausschalter mit Kontrolllampe
f. Kontrolllampe " Wassertank leer"
Falls das Gerät heruntergefallen ist und
dabei sichtbare Schäden davongetragen
hat, Wasser verliert oder Betriebsstörungen
auftreten, darf es nicht mehr benutzt
werden. Nehmen Sie das Gerät nie selbst
auseinander, sondern lassen Sie es, um
jegliche Gefahr zu vermeiden, in einer
zugelassenen ROWENTA Kundendienst-
stelle überprüfen.
Bewahren Sie diese Griffbereit auf.
15
GB
F
D
NL
I
E
P
GR
FerFocus_1800113724:FerClassic_BASE_110x154mm 28/11/08 15:34 Page 15

Unsere Tipps: Bei der ersten Benutzung
oder wenn Sie die Dampftaste einige
Minuten nicht benutzt haben
- fig.8
,
müssen Sie diese mehrmals
hintereinander drücken, um Dampf zu
erzeugen. Halten Sie dabei das
Bügeleisen weg von der Bügelwäsche.
Hierdurch wird das kalte Wasser aus
dem Dampfkreislauf entfernt.
Einstellen des Temperaturreglers:
Bügeln Sie zuerst die Stoffe, die eine
niedrige Temperatur erfordern und
zum Schluss diejenigen, die eine hohe
Temperatur benötigen. Wenn Sie die
Textilarten wechseln, warten Sie bis
die Kontrollampe ausgeht.
Wenn Sie Mischgewebe bügeln,
stellen Sie die Bügeltemperatur auf
die empfindlichste Faser ein. Wenn
Sie Wollgewebe bügeln, betätigen Sie
die Dampftaste nur stoßweise, und
stellen Sie das Bügeleisen nicht auf
das Kleidungsstück. So werden
Glanzstellen vermieden. Einstellen der
Dampfleistung: Wenn Sie dickes
Gewebe bügeln, erhöhen Sie die
Dampfleistung. Um mit niedriger
Temperatur zu bügeln, stellen Sie den
Dampfmengenregler auf das
Leistungsminimum. Betätigen Sie die
Dampftaste unter dem Griff des
Bügelautomaten bei empfindlichen
Geweben (•) nur selten, um zu
vermeiden, dass evtl. Wassertropfen
mit dem Dampf austreten.
3 •
Nehmen Sie Ihren
Dampfgenerator in Betrieb
Schalten Sie den beleuchteten Ein
/Ausschalter an
- fig.4, dieser leuchtet auf.
Die grüne Kontrollleuchte (befindet sich
vorne auf dem Bedienungsfeld) blinkt
nach dem Einschalten. Bei regelmäßiger
Benutzung pumpt
die
elektrische Pumpe
Ihres Dampfgenerators
nach ca. einer
Minute Wasser in den Dampfboiler. Bei
diesem Vorgang ist ein Geräusch zu hören,
das durchaus normal ist.
Der Dampfgenerator ist betriebsbereit,
sobald die Dampfbereitschaftsanzeige
leuchtet und die Temepraturkontrolllampe
des Bügeleisens ausgegangen ist.
4 • Funktion des
Bedienungsfeldes
• Die grüne Dampfbereitschaftsanzeige
blinkt
- fig.6: Der Boiler heizt auf.
•
Die grüne Dampfbereitschaftsanzeige
leuchtet
- fig.7: Der Dampfgenerator ist
einsatzbereit.
•
Die rote Kontrolllampe "Wassertank leer"
leuchtet
- fig.11:
Der Wassertank ist leer.
•
Das orangefarbene „Calc-Away System“
Lämpchen beginnt zu blinken - fig. 13 : Ihr
Kalksammelbehälter muss ausgespült werden.
5 • Dampfbügeln
Stellen Sie den Temperaturregler
- fig.5
,
sowie den Dampfmenegenregler
- fig.6
entsprechend der unten stehenden Tabelle
ein. Die Kontrollleuchte
des Bügelautomaten
leuchtet auf.
Währe nd des Bügelns schaltet sich
die Temperaturkontrolllampe und die
Dampfbereitschaftsanzeige entsprechend
der
eingestellten Temperatur und Dampfmenge
ein und aus. Zur Dampfproduktion
drücken
Sie die unter dem Bügeleisengriff
befindliche
Dampftaste
- fig.8
. Die Dampfproduktion wird
durch Loslassen der Taste unterbrochen.
Falls Sie Bügelstärke verwenden, sprühen
Sie die Stärke immer auf die Rückseite der zu
bügelnden Fläche.
Bei der ersten Benutzung kann es zu
einer unschädlichen Rauch- und
Geruchsbildung kommen. Dies hat
keinerlei Folgen für die Benutzung des
Geräts und hört schnell wieder auf.
BENUTZUNG
G
EWEBEART
E
INSTELLUNG DES
T
EMPERATURREGLERS
E
INSTELLUNG DES
D
AMPFMENGENREGLERS
LEINEN,
B
AUMWOLLE
•••
W
OLLE
, S
EIDE
,
V
ISKOSE
••
S
YNTHETIK
(Polyester, Acetat,
Acryl, Polyamid)
•
16
FerFocus_1800113724:FerClassic_BASE_110x154mm 28/11/08 15:34 Page 16

6 • Feuchtdampffunktion
(je nach Modell)
Betätigen Sie 2 oder 3 Mal die Feucht-
dampftaste
- fig.9 um die Dampf-
erzeugung zwischendurch zu erhöhen:
• beim Bügeln von dicken Stoffen,
• zum Herausbügeln von Falten,
• für ein vertikales Aufdampfen.
7 • Vertikales Aufdampfen
Stellen Sie den Temperaturregler des
Bügelautomaten und die Dampfleistung
auf dem Bedienungsfeld auf die
Maximalposition. Hängen Sie das
Kleidungsstück auf einen Bügel, und
straffen Sie es mit der Hand. Neigen
Sie das Bügeleisen leicht nach
vorne, drücken Sie mehrmals auf die
Dampftaste
- fig.8 (unter dem Griff des
Bügelautomaten), und führen Sie eine
Auf- und Abwärtsbewegung aus
- fig.10.
8 • Trockenbügeln
Nicht die Dampftaste unter dem Griff des
Dampfgenerators betätigen.
9 • Befüllen des
Wassertanks während
der Benutzung
Die rote Kontrollleuchte “Wassertank
leer” bleibt an - fig.11. Sie haben kein
Wasser mehr.
Ziehen Sie den abnehmbaren Wassertank
an seinem Griff heraus (er befindet sich
am Vorderteil des Dampfgenerators)
-
fig.12
und füllen Sie ihn bis zur
Höchstfüllanzeige mit Wasser
- fig.1.
Setzen Sie ihn wieder richtig in sein Fach
ein, bis er hörbar einrastet. Drücken Sie
die Restart Taste auf dem Bedienfeld, um
das Gerät erneut in Betrieb zu setzen.
Die rote Leuchtanzeige geht aus. Nun
können Sie weiterbügeln.
10 • Räumen Sie den
Dampfgenerator weg
Schalten Sie den Generator am Schalter
O/I aus, und ziehen Sie den Netzstecker.
Stellen Sie das Bügeleisen auf die
Ablage des Dampfgenerators.
Nehmen Sie den Dampfschlauch hoch
und legen Sie ihn zusammen.
Legen Sie den Dampfschlauch in sein
Fach.
Lassen Sie das Bügeleisen (und die
Ablage) Minuten lang abkühlen. Sie
können Ihren Dampfgenerator nun
beruhigt wegräumen.
Der Bügelautomat darf nicht auf raue
Unterlagen gestellt werden. Während
des Bügelns muss der Bügelautomat
stets auf der Bügeleisenablage
abgestellt werden.
ACHTUNG: Benutzen Sie die
Feuchtdampffunktion mit äußerster
Vorsicht, da die hohe Dampfleistung
Verbrühungen verursachen kann.
Da der austretende Dampf sehr heiß
ist, dürfen Sie ein Kleidungsstück
niemals an einer Person, sondern nur
auf einem Bügel hängend, glätten.
Für das Aufdampfen anderer Stoffe
als Leinen und Baumwolle halten Sie
das Bügeleisen einige Zentimeter vom
Stoff entfernt, um Verbrennungen des
Materials zu vermeiden.
Übergelaufene Flüssigkeit gleich
entfernen.
17
GB
F
D
NL
I
E
P
GR
FerFocus_1800113724:FerClassic_BASE_110x154mm 28/11/08 15:34 Page 17
A página está carregando...
A página está carregando...
A página está carregando...
A página está carregando...
A página está carregando...
A página está carregando...
A página está carregando...
A página está carregando...
A página está carregando...
A página está carregando...
A página está carregando...
A página está carregando...
A página está carregando...
A página está carregando...
A página está carregando...
A página está carregando...
A página está carregando...
A página está carregando...
A página está carregando...
A página está carregando...
A página está carregando...
A página está carregando...
A página está carregando...
A página está carregando...
A página está carregando...
A página está carregando...
A página está carregando...
A página está carregando...
A página está carregando...
A página está carregando...
A página está carregando...
A página está carregando...
-
 1
1
-
 2
2
-
 3
3
-
 4
4
-
 5
5
-
 6
6
-
 7
7
-
 8
8
-
 9
9
-
 10
10
-
 11
11
-
 12
12
-
 13
13
-
 14
14
-
 15
15
-
 16
16
-
 17
17
-
 18
18
-
 19
19
-
 20
20
-
 21
21
-
 22
22
-
 23
23
-
 24
24
-
 25
25
-
 26
26
-
 27
27
-
 28
28
-
 29
29
-
 30
30
-
 31
31
-
 32
32
-
 33
33
-
 34
34
-
 35
35
-
 36
36
-
 37
37
-
 38
38
-
 39
39
-
 40
40
-
 41
41
-
 42
42
-
 43
43
-
 44
44
-
 45
45
-
 46
46
-
 47
47
-
 48
48
-
 49
49
-
 50
50
-
 51
51
-
 52
52


Rowenta PRO PERFECT Manual do proprietário
- Categoria
- Estações de engomar a vapor
- Tipo
- Manual do proprietário
em outras línguas
- español: Rowenta PRO PERFECT El manual del propietario
- français: Rowenta PRO PERFECT Le manuel du propriétaire
- italiano: Rowenta PRO PERFECT Manuale del proprietario
- English: Rowenta PRO PERFECT Owner's manual
- Nederlands: Rowenta PRO PERFECT de handleiding
- Deutsch: Rowenta PRO PERFECT Bedienungsanleitung
Artigos relacionados
Outros documentos
-
Tefal GV7150E0 Manual do proprietário
-
-
Tefal GV7485 EXPRESS POWER ZONE AUTOCLEAN Manual do proprietário
-
-
-
-
-
-
-
Kiwi KSI 6463 Manual do usuário