Briteq W-515D Manual do usuário
- Categoria
- Máquina de nevoeiro
- Tipo
- Manual do usuário
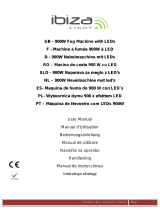
Este manual também é adequado para

>
W-515D/W-530D
Fog Machine User Manual
English Français Deutsch
© 2014 Antari Lighting and Effects Ltd.


User Manual
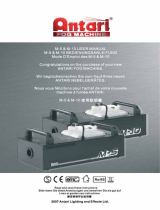
W-515D & W-530D Fog Machine
Congratulations on the purchase of your new ANTARI
W-Series FOG MACHINE.
Introduction
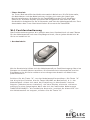
Thank you for choosing an ANTARI W-Series Fog Machine. You now own a rugged
and powerful state-of-the-art machine. Prior to use, we suggest that you
carefully read all of the instructions. By following the suggestions found in this
user manual, you can look forward to the reliable and satisfactory performance
of your ANTARI Fog Machine for years to come.
Please follow these operation, safety and maintenance instructions to ensure a
long and safe life for your fog machine.
CAUTION:
Risk of electric shock. Disconnect the appliance from the electric supply
before refilling liquid, cleaning or performing maintenance on the
machine.
Danger of Electric Shock
Keep this device dry.
Indoor use only. Not designed for outdoor use.
For all models, use 3-prong grounded electrical outlet only. Prior to use, take
care to determine that the unit is installed at the rated voltage.
Always unplug your ANTARI W-Series Fog Machine before filling its tank.
Always keep fog machine in upright position.
Turn off or unplug the machine when not in use.
This machine is not water-proof. If moisture, water, or fog fluid gets inside the
housing, immediately unplug the unit and contact a service technician or your
ANTARI dealer before using it again.
No user serviceable parts inside. Refer to your ANTARI dealer or other
qualified service personnel.
Danger of Burns
This device is for adult use only and must be installed out of the reach of

children. Never leave the unit running unattended.
Never aim the output nozzle directly at people.
Fog machine output is very hot. Avoid coming within 50 cm of the output
Nozzle during operation.
Locate the fog machine in a well-ventilated area. Never cover the unit's vents.
In order to guarantee adequate ventilation, allow a free air space of at least
20 cm around the sides and top of the unit.
Never aim the output nozzle at open flames.
If the supply cord is damaged, it must be replaced by manufacturer or its
service agent or similarly qualified personnel in order to avoid a hazard.
The output nozzle becomes very hot during operation (200°C). Keep
flammable materials at least 50 cm away from the nozzle.
Always allow your ANTARI Fog Machine to cool down before attempting to
clean or service it.
Danger of Explosion
Never add flammable liquids of any kind (such as oil, gas, perfume) to the fog
liquid.
Use only high-quality, water-based fog liquid that your dealer recommends.
Other fog liquids may cause clogging or “spitting”.
Always make sure there is sufficient liquid in the tank. Operating this unit
without liquid might cause damage to the pump as well as over-heating of the
heater.
If your ANTARI W-515D or W-530D Fog Machine fails to work properly,
discontinue use immediately. Drain all fog liquid from the tank, pack the unit
securely (preferably in the original packing material), and return it to your
ANTARI dealer for service.
Always drain tank before mailing or transporting this unit.
Never drink fog liquid. If it is ingested, call a doctor immediately. If fog liquid
comes in contact with skin or eyes, rinse thoroughly with water.
Note: Pay attention to all warning labels and instructions printed on the
exterior of your ANTARI Fog Machine.
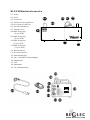
Unpacking &Inspection
Open the shipping carton and verify that all equipment necessary to operate
the system has arrived intact.
The shipping carton should contain the following items:
1. One unit of W-515Dor W-530D Fog Machine
2. Power cord
3. One Set of W-1 transmitter
4. User Manual
If any equipment is missing, contact your ANTARI dealer immediately.

Before beginning your initial setup on ANTARI W-515D & W-530D Fog Machine,
make sure that there is no evident damage caused by transportation. In the
event that the unit's housing or cable is damaged, do not plug it in and do not
attempt to use it until after contacting your ANTARI dealer for assistance.
Setup
Remove all packing materials from shipping box. Check that all foam and
plastic padding is removed, especially in the nozzle area.
Place fog machine on a flat surface and remove fog liquid tank cap.
Place the liquid tube into a properly filled liquid tank.
Fill with high-quality, water-based fog liquid recommended by ANTARI dealer.
The W-515D or W-530D only works with uncontaminated Antari FLR or FLG Fog
Liquid. Any other types of liquid can damage the unit resulting in spitting and
serious clogging problem. When filled, place cap back on liquid tank. Be
careful not to exceed the maximum fluid level. DO NOT OVERFILL.
Operation
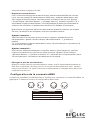
Control Panel
The built-in control panel on the rear of the machine features an LCD panel
displaying all operation status of the fog machine. The control panel allows the
user to customize fog machine functions by adjusting the fogging duration,
interval, and volume as well as the DMX and W-DMX address, the wireless
function and the fluid sensor. There are 4 buttons on the control board. All
current operating parameters are automatically stored in non-volatile memory,
allowing the machine to be powered down without losing function settings.
After powering on, the display shortly indicates »Antari W-515D/W-530D« . At
this time, users may press MENU button and hold for 2 seconds to switch the language
for control interface from English to Chinese.
After displaying the software version, the display indicates » AC Voltage AC-
XX0V X0Hz« . At this time, users may press MENU button and hold for 2
seconds to switch the power voltage between 100V, 110V, 120V, 220V, 230V
and 240V.
Then the display indicates » Wireless Detect…« . This indication lasts for 15
seconds. Users may register the W-1 wireless transmitter to the fog machine
by pressing Key A on the W-1 during this period. When the wireless control
function is off, this indication won’t be shown.
Then the fog machine starts with the warm-up process and the display
indicates » Warming Up« . While the unit is warming up, fog output will not be
possible yet. Program the necessary menu settings with the control panel.
Once the warm-up process is completed, fog output will be possible. The
display indicates » Ready to Fog« .
Additionally, a » P« for W-DMX, a » W« for wireless or an »S« for fluid sensor is
indicated if these functions are activated.

- Menu settings with the button MENU
▪ Setting time intervals for timer operation
Press the button MENU until the display indicates » Interval Set« . Use the
buttons UP and DOWN to adjust the intervals between the individual fog
outputs in timer mode within the range of 5 and 200 seconds.
▪ Setting the output duration for timer operation
Press the button MENU until the display indicates »Duration Set« . Use the
buttons UP and DOWN to adjust the duration of the fog outputs in timer mode
within the range of 1 and 200 seconds.
▪ Setting the fog output volume for timer operation
Press the button MENU until the display indicates » Timer Output« . Use the
buttons UP and DOWN to adjust the fog output volume in timer mode within
the range of 1 % and 100 %.
▪ Setting the fog output volume for continuous operation
Press the button MENU until the display indicates » Volume Output« . Use the
buttons UP and DOWN to adjust the fog output volume in continuous mode
within the range of 1 % and 100 %.
To set the unit to continuous fog output in continuous mode, select » NON
STOPBURST« below a value of 1 % or above a value of 100 %.
NOTE:
When setting a fog output volume higher than 30 % for continuous
operation, the fog machine occasionally needs to stop the fog output to
reheat. When» NONSTOPBURST« is selected, the fog machine adjusts the fog
output volume and heater temperature automatically and does not need to
stop the fog output to reheat.
▪ Setting the DMX512 address
Press the MENU until the display indicates » DMX512 Address: 001« . Use the
buttons UP and DOWN to set the machine to the same address as on your
DMX controller. Please refer to chapter DMX512 settings for more
information on DMX operation.
▪ Switching the wireless function on and off
Press the button MENU until the display indicates » Wireless ON« . Use the
buttons UP and DOWN to deactivate the wireless function (indication
» Wireless OFF«) and to reactivate it (indication » Wireless ON« ).
▪Switching the fluid sensor on and off
Press the button MENU until the display indicates » Fluid Sensor Set ON« .
Use the buttons UP and DOWN to deactivate the fluid sensor (indication
» Fluid Sensor Set OFF«) and to reactivate it (indication » Fluid Sensor Set ON« ).
▪Switching the W-DMX function on and off
Press the button MENU until the display indicates » W-DMX Power ON« . Use the
buttons UP and DOWN to deactivate the W-DMX function (indication » W-DMX Power
OFF« ) and to reactivate it (indication » W-DMX Power ON« ).

Note:
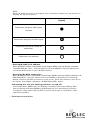
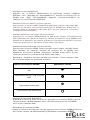
When W-DMX function is activated, the connection status will be shown on
display by below symbols.
Status of W-DMX connection
Symbol on the Liquid Crystal
Display
Transmitter assigned, DMX signal
received
●
Transmitter assigned, No DMX signal
◎
Transmitter link lost or linking to
transmitter
⊙
Transmitter not assigned
○
▪ Setting W-DMX 512 address
When W-DMX function is activated, press button MENU until the display indicates
» W-DMX Address: 001« . Use the buttons UP and DOWN to set the machine to
the same address as on your W-DMX console.
▪ Resetting W-DMX connection
When W-DMX function is activated, press button MENU until the display indicates » W-
DMX Reset OFF« . Use the buttons UP and DOWN to activate the resetting:
delete previous W-DMX connection and relink. Once the deletion and relink
are done, the dispay indicates » W-DMX Reset OFF« again.
▪Switching the run last setting function on and off
Press the button MENU until the display indicates » Run Last Setting ON« .
Use the buttons UP and DOWN to deactivate the fun last setting function
(indication » Run Last Setting OFF« ) and to reactivate it (indication » Run
Last Setting ON« ).
- Continuous operation

Press the button VOLUME, to activate continuous fog output. The display
indicates » Volume Output« followed by the value that was set in menu item
» Volume Output« or » NONSTOPBURST« when continuous fog output was
selected. To stop the fog output, press STOP button.
NOTE:
When a fog output volume higher than 30 % was set for continuous
operation, the fog machine occasionally needs to stop the fog output to
reheat. When » NONSTOPBURST« was selected, the fog machine adjusts
the fog output volume and heater temeperature automatically and does
not need to stop to reheat.
- Timer operation
In the timer mode, the fog machine will automatically emit fog. The time
intervals, duration and fog volume depend on the corresponding menu
settings. Press the button TIMER to activate the timer mode. The display
indicates the set time interval. The unit counts down to 0 seconds and emits
fog. To deactivate the timer mode, press STOP button.
W-1 Wireless Remote
The wireless remote control system W-1 consists of a transmitter equipped with
two buttons for fog on and off, and a receiver pre-attached to the rear panel of
each W-series model.
* Transmitter:
With the transmitter it is possible to emit fog via radio over a distance of up to
50 meters.The transmitter is compatible to any receiver of the W-series and
can control an unlimited number of machines in parallel.

Press the button “A”, to emit fog. The button “A” has the same function as the
button VOLUME on the control panel, i.e. the fog output depends on the setting
of menu item » Volume Output« . The display indicates » Volume« followed by
the defined value or » NONSTOPBURST« when continuous fog output was
selected. As additional control, the blue LED light. To stop the fog output, press
the button “B”.
* Receiver:
The receiver is tested and pre-attached to the rear panel of each W-series
model. Please do not try to remove it. The receiver responds to up to 5
different transmitters that are registered with the machine. The included
transmitter has been registered to the machine before shipment. It can be
directly operated without any start-up setting.
- Registering transmitters
To operate the machine with a different transmitter than the included one, or
to operate it with up to 5 different transmitters, each transmitter must be
registered first. For this purpose, turn on the machine. When the display
indicates » Wireless Detect…«, press the button “A” 1 second on each
transmitter. Thus the previous transmitters are cleared from the memory of
the receiver. The setting must be completed within 15 seconds at indication
» Wireless Detect…«.
If no transmitter is registered when the machine is switched on, the memory
of the receiver will keep the record of the previous operation.
Setting Example 1:
In order to register several transmitters with a machine, turn on the machine.
When the display indicates » Wireless Detect…«, press the button “A”1 second
on each transmitter within 15 seconds to establish the signal transmission.
Setting Example 2:
In order to use 1 transmitter to control 2 or more machines, turn on the

machines at the same time.When the displays indicate » Wireless Detect…«,
press the button “A” 1 second on the transmitter within 15 seconds to
establish the signal transmission.
- Battery change on the transmitter
If the range of the transmitter decreases, the battery is probably exhausted
and must be replaced. For this purpose, take off the housing cover and remove
the used battery. Insert a fresh 12 V battery, type 27A as indicated in the
battery compartment and refit the housing cover.
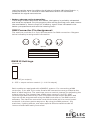
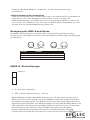
DMX Connector Pin Assignment
The machine provides 3 or 5 pin XLR connector for DMX connection. Diagram
below indicate pin assignment information
2 3
1
1 3
2
5 3
1
4
2
1 3
5
2
4
35 pinXLR
Pin
Function
1
Ground
2 Data
-
3 Data
+
DMX512 Settings
Channel A
0 - 5 = off (no output)
6 - 255 = output volume control (1 - 100 % output)
Both models are equipped with a DMX512 system. For connecting a DMX
controller, 3-pin and 5-pin male-female XLR connections are provided at the
back of each machine. The machines use one control channel for adjusting the
output volume. The channel has a DMX value range of 0 to 255. After
connecting a DMX controller, timer functions such as output duration and
interval can be programmed using the DMX controller or the DMX control
software. The machine cannot be controlled via the built-in control panel
northe W-1 wireless remote anymore. By using the DMX protocol, fog
machines, lighting effects, and other special effects machines can be
interconnected and easily controlled.

If channel A has a value from 0 to 5, the unit is off.
Between the values 6 to 255 the fog output volume is regulated. With
6 being the minimum output volume and 255 approaching the maximum
output volume.The output volume rises as the DMX value is increased.
Note: If, for example, the machine is assigned to the DMX address 124,
channel A corresponds to DMX address 124.
Note
If you experience low output, pump noise or no output at all, unplug
immediately. Check the fluid level, the external fuse, the connection to the
remote control, and power from the wall. If all of the above appears to be O.K.,
plug the unit again. If fog does not come out after holding the remote button
down for 30 seconds, check the hose attached to the tank to make sure there
is fluid going through the hose. If you are unable to determine the cause of the
problem, do not simply continue pushing the remote button, as this may
damage the unit. Return the machine to your Antari dealer.
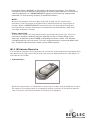
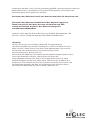
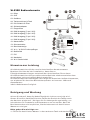
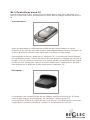
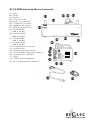
W-515D External View
01-Nozzle
02-Handle
03-Body
04-Tank &tank’s cap
05-PUtube &filter
06-Tube adaptor
07-Safety ring
02
08-Control outlet socket
(3 Pin XLR for DMX)
09-Control inlet socker
(3 Pin XLR for DMX)
10-Control outlet socket
01
(5 Pin XLR for DMX)
11-Control inlet socket
(5 Pin XLR for DMX)
12-Rocker switch / Power
13-Circuit breaker
14-Power socket
15-W-1 wireless receiver / W-DMX receiver
16-Control panel
17-Foot
18-Power cord
19-W-1 wireless transmitter
09

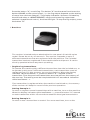
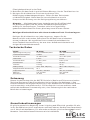
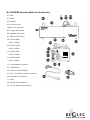
W-530DExternal
View
01-Nozzle
02-Handle
03-Body
04-Tank & tank’s cap
05-PU tube & filter
06-Tube adaptor
07-Safety ring
08-Control outlet socket
(3 Pin XLR for DMX)
09-Control inlet socker
(3 Pin XLR for DMX)
10-Control outlet socket
(5 Pin XLR for DMX)
11-Control inlet socket
(5 Pin XLR for DMX)
12-Rocker switch / Power
13-Circuit breaker
14-Power socket
15-W-1 wireless receiver / W-DMX
receiver
16-Control panel
17-Foot
18-Power cord
19-W-1 wireless transmitter

Performance Note
All fog machines develop condensation around the output nozzle. Because
this may result in some moisture accumulation on the surface below the
output nozzle, consider this condensation when installing your unit.
All fog machines may sputter small amounts of fog occasionally during
operation and for a minute or so after being turned off.
All fog machines have a recycling period after long bursts when the machine
will shut itself down for a short period in order to heat up again. During this
time no fog can be produced.
Cleaning and Storage
Do not allow the fog liquid to become contaminated. Always replace the cap on
the fog liquid container and the fog machine liquid tank immediately after filling.
Cleaning your fog machine regularly can help you to reduce the frequency of
parts replacement and maintenance costs. After every 40 hours of continuous
operation, it is recommended to use distilled water to clean the heater according
to the steps below.
The recommended cleaning regimen is as follows:
1. Fill properly distilled water into a clean tank and connect the fluid tube of the
fog machine to the tank.
2. Run the unit in a well-ventilated area until the tank is almost empty.
3. Use dry cloth to wipe the fog machine. Cleaning is now complete. Refill with fog
liquid. Run the machine briefly to clear any remaining liquid from the pump and
heater.
Note: All fog machines are prone to clogging due to the thick consistency of
fog liquidand the high temperature at which it vaporizes. However, a
properly maintained fog machine should provide years of reliable use.
Clean with a dry cloth only. Store dry.
If the fog machine is not in use, please clean it before storage. Store the fog
machine in a dry and cool place. Operate the fog machine at least once a
month. A test-run consists of warming-up the machine followed by a few
minutes of fog emission.

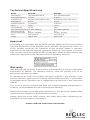
Technical Specifications
Model
Power
Supply
Power
Consumption
Output
Volume
Tank
Capacity
Fluid
Consumption
Warm-
up
TimeWeight
W-515D
100~240VAC50/60
Hz
1,500
W
20,000cu.ft/min(566
m³/min)
6
liters
10 min/
liter
10
min
14.5
kg
W-530D
100~240VAC50/60
Hz
3,000
W
40,000cu.ft/min(1132
m³/min)
6
liters
6 min/
liter
12
min
19
kg
Dimensions(LxWxH) 561x 278x 186
(mm)
581x 278x 186
(mm)
Remote
Included
C
arrier
frequencyBa
ttery
Range
W-1
433.92 / 315
MHz
12V, type
27A
approx.50
m
W-1
433.92 / 315
MHz
12V, type
27A
approx.50
m
Approval
This product is in accordance with the R&TTE directive (Radio and Telecommunication
Technical Equipment) of the European Union and falls into equipment Class 1. In
all EU member countries, the operation of this wireless system is generally
approved by the national telecom regulatory authority. The system is license-
free. In some countries outside the EU, the operation of this wireless system may
needs to be approved by the national telecoms regulatory authority.
Warranty
Warranty shall be valid only if the product is purchased from Antari's authorized
distributors or dealers. For warranty service, send the product only to an
authorized distributor or dealer.
All warranties are void if the product has been modified in any manner; if the
product has been repaired or serviced by unauthorized personnel; or the product
is damaged due to improper use or maintenance as set forth in the instruction
manual.
This is not a service contract and does not include standard maintenance or
cleaning. All expendables are not covered by this warranty.
Additional warranties provided at the discretion of the distributor dealers shall
remain the sole obligation of the distributor or dealer.
Always quote the unit's serial number and model name when contacting your
distributor for information or assistance.
Please read and save these instructions.

Bedienungsanleitung
W-515D & W-530D
Nebelmaschine
Herzlichen Glü ckwunsch zum Kauf Ihrer neuen
Antari-Nebelmaschine W-Serie.
Einfü hrung
Vielen Dank, dass Sie sich fü r eine Antari-Nebelmaschine der W-Serie
entschieden haben. Sie sindnunim Besitz einer robusten und leistungsstarken
Nebelmaschine. Vor Benutzung der Maschine bitte unbedingt diese
Bedienungsanleitung sorgfä ltig lesen. Wenn Sie die Hinweise in dieser
Bedienungsanleitung beachten, kö nnen Sie sich in den nächsten Jahren auf eine
zuverlässige und ü berzeugende Leistung Ihrer Antari-Nebelmaschine freuen.
Bitte halten Sie sich an diese Bedienungs- und Sicherheitsanweisungen, um
eine langeundsichere Lebensdauer Ihrer Nebelmaschine sicherzustellen.
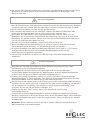
ACHTUNG
Stromschlaggefahr. Trennen Sie das Gerä t vom Netz, bevor Sie
Flü ssigkeit nachfü llen, sowie vor jeder Reinigung und Wartung.
Stromschlaggefahr
Vor Nässe schü tzen.
Nur innerhalb geschlossenerRäume betreiben. Nicht fü r den Betrieb im
Freien geeignet.
Verwenden Sie bitte ausschließlich 3-adrige, geerdete Steckdosen. Vor
Inbetriebnahme darauf achten, dass das Gerä t andie richtige Spannung
angeschlossen wird.
Vor Befü llen des Tanks istIhreAntari-Nebelmaschine immer vom Netz zu
trennen.
Achten Sie darauf, dass die Nebelmaschine stets aufrecht installiert ist. Nach
dem Betrieb trennen Sie bitte die Maschine vom Netz oderschalten sie aus.
Diese Maschine ist nicht wassergeschü tzt. Sollte Feuchtigkeit, Wasser
oderFlü ssigkeit ins Innere der Maschine gelangen, trennen Sie die Maschine
bitte sofort vom Netz und trocknen bzw. reinigen Sie sie. Sollte sich die
Maschine nicht reinigen lassen, kontaktieren Sie bitte einen Servicetechniker
oderIhren Antari-Händler bevor Sie die Maschine erneut benutzen.

Im Innern der Maschine befinden sich keine vom Benutzer zu wartenden Teile.
Wenden Sie sich an Ihren autorisierten Fachhä ndler fü r Wartungs- und
Servicearbeiten.
Stromschlaggefahr
Nur fü r Erwachsene. Die Maschine muss außerhalb der Reichweite von Kindern
installiert werden. Betreiben Sie das Gerä t niemals unbeaufsichtigt. Richten
Sie die Austrittsdü se niemals direkt auf Personen.
Der Ausstoß der Maschine ist sehrheiß . Halten Sie während des Betriebs
einen Sicherheitsabstand von ca. 50 cm zur Austrittsdü se ein.
Betreiben Sie das Gerä t in gut belü fteten Räumen, bis der Tank leer ist.
Bedecken Sie niemals den Luftaustritt der Maschine. Um eine ausreichende
Belü ftung zu gewä hrleisten, halten Sie bitte einen Mindestabstand von etwa
20 cm um und ü ber der Maschine ein.
Richten Sie die Austrittsdü se niemals auf offene Flammen.
Wenn die Netzleitung beschä digt wird, muss sie durch den autorisierten
Fachhandel ersetzt werden, um Gefä hrdungen zu vermeiden.
Die Austrittsdü se wird wä hrend des Betriebs sehr heiß (200° C). Fü r leicht
entflammbare Materialien muss einMindestabstand von 50 cm zur
Austrittsdü se eingehalten werden.
Lassen Sie die Maschine immer vor Reinigungs- und Wartungsarbeiten
abkü hlen.
Explosionsgefahr
Mischen Sie niemals entzü ndliche Flü ssigkeiten jeglicher Art (Ö l, Gas,
Duftstoffe) unter die Nebelflü ssigkeit.
Verwenden Sie ausschließlich hochwertige und von Ihrem Händler
empfohlene Nebelflü ssigkeiten auf Wasserbasis. Andere Nebelflü ssigkeiten
kö nnen zum Verstopfen oderTropfendes Gerä tes fü hren.
Achten Sie unbedingt darauf, dass sich immer eine ausreichende Menge
Nebelflü ssigkeit im Tank befindet. Der Betrieb ohne Nebelflü ssigkeit fü hrt zu
Pumpenschä den und zur Ü berhitzung des Heizelementes.
Sollte Ihre Antari-Nebelmaschine einmal nicht mehr ordnungsgemä ß arbeiten,
schalten Sie sie bitte sofort ab. Entleeren Sie den Tank vollständig, verpacken
Sie die Maschine sorgfä ltig (am besten in der Originalverpackung) und
schicken Sie sie bei Ihrem Antari-Händler ein.
Entleeren Sie den Tank immer, bevor Sie das Gerä t verschicken
odertransportieren.
Trinken Sie niemals Nebelflü ssigkeit. Sollte es dennoch einmal verschluckt
werden, konsultieren Sie bitte sofort einen Arzt. Solltendie Haut oder dieAugen
einmal mit Nebelflü ssigkeit in Berü hrung kommen, bitte sorgfä ltig mit Wasser
auswaschen.
Hinweis: Bitte beachten Sie alle auf Ihrer Antari-Maschine angebrachten
Warnhinweise und Anweisungen.

Auspacken und Prü fen der Maschine
Öffnen Sie den Versandkarton und stellen Sie sicher, dass alle Teile, die fü r den
Betrieb des Systems notwendig sind, in einem einwandfreien Zustand
eingetroffen sind.
Der Versandkarton sollte die folgenden Posten beinhalten:
1. Eine Nebelmaschine W-515DoderW-530D
2. Netzkabel
3. Eine W-1 Sendeeinheit
4. Bedienungsanleitung
Wenn Ausrü stungsteile fehlen sollten, nehmen Sie bitte sofort mit
Ihrem Antari-Hä ndler Kontakt auf.
Bevor Sie mit der Inbetriebnahme Ihrer Antari-Maschine beginnen, stellen Sie
sicher, dass kein offensichtlicher Transportschaden vorliegt. Falls das Gehä use
der Einheit oder dasKabel beschä digt sein sollte, stecken Sie sie nicht in die
Steckdose und versuchen Sie nicht, sie zu benutzen, bevor Sie Ihren Antari-
Händler kontaktiert haben.
Inbetriebnahme
Entfernen Sie jegliches Verpackungsmaterial vom Versandkarton.
Vergewissern Sie sich, dass alle Schaumstoff- und Plastikeinlagen entfernt
werden, insbesondere in der Nähe der Austrittsdü se.
Installieren Sie die Nebelmaschine auf einer ebenen Oberflä che und
schrauben Sie den Deckel des Flü ssigkeitstanks ab.
Stecken Sie den Flü ssigkeitsschlauch in einen ordnungsgemä ß gefü llten
Flü ssigkeitstank.
Fü llen Sie den Tank mit den Antari-Nebelflü ssigkeitenFLRoderFLGoder
anderen hochwertigen Nebelflü ssigkeiten auf Wasserbasis, die von Ihrem
Händler empfohlen wurden. Alle anderen Nebelflü ssigkeiten kö nnen
Beschä digungen am Gerä t zur Folge haben. Nach dem Befü llen verschließ en
Sie den Tank bitte wieder mit dem Deckel. Achten Sie darauf, den Tank nicht
zu ü berfü llen.NICHTÜ BERFÜ LLEN.
Bedienung
Bedienfeld
Das integrierte Bedienfeld auf der Maschinenrü ckseite verfügt ü ber eineLCD-
Anzeige, auf der alle Betriebszust ä nde der Maschine abgelesen werden kö nnen.
Mit dem Bedienfeld kann der Anwender individuell Nebeldauer, Intervall, und
Ausstoß volumen sowie dieDMX-Adresse, die W-DMX-Adresse, die Funkfunktion
und den Flü ssigkeitssensor einstellen. Das Bedienfeld umfasst 4Tasten. Alle
Betriebsparameter werden automatisch in einem nichtflü chtigen Speicher
gespeichert. Dadurch bleiben alle Einstellungen erhalten, auch wenn die
Maschine ausgeschaltet wird.
Nach dem Einschalten zeigt das Display kurz » Antari W-515D/W-530D« .
Jetzt lä sst sich die Menü sprache von Englisch auf Chinesisch umstellen.
Halten Sie dazu die Taste MENU 2 Sekunden gedrü ckt.
Nach der Anzeige der Software-Version zeigt das Display » AC Voltage AC-

XX0V X0Hz« . Jetzt lä sst sich die Netzspannung auf 100V, 110V, 120V, 220V,
230V oder 240V umstellen. Halten Sie dazu die Taste MENU 2 Sekunden
gedrü ckt.
Dann zeigt das Display fü r 15 Sekunden »Wireless Detect…«. Wä hrend
dieser Zeit kö nnen dem Gerä t W-1 Sendeeinheiten zugewiesen werden.
Drü cken Sie dazu dieTaste “A” 1 Sekunde auf den Sendeeinheiten. Bei
ausgeschalteter Funkfunktion, erscheint die Anzeige »Wireless Detect…«
nicht.
Danach beginnt die Aufheizphase und das Display zeigt » Warming Up« .
Während derAufheizphase kann noch kein Nebel ausgestoß en werden. Nehmen
Sie die notwendigen Menüeinstellungen mit dem Tastenfeld auf der
Empfä ngereinheit vor. Sobald die Aufheizphase beendet ist, ist die
Nebelmaschine bereit zum Nebelausstoß . Das Display zeigt » Ready to Fog« .
Zusä tzlich wird » P« fü r W-DMX, » W« fü r Wireless [Funk] oder»S« fü r Fluid
Sensor[Flü ssigkeitssensor] angezeigt, wenn diese Funktionen aktiviert sind.
- Menü einstellungen mit der Taste MENU
▪ Zeitintervalle fü r den Timer-Betrieb einstellen
Drü cken Sie die TasteMENU, bis aufder Anzeige » Interval Set« [Intervall
einstellen] erscheint. Verwenden Sie die Tasten UP und DOWN, um die
Zeitintervalle (d.h. die Pausen zwischen den einzelnen Nebelausstö ß en)
fü r den Timer-Betrieb zwischen 5und 200 Sekunden einzustellen.
▪ Nebeldauer fü r den Timer-Betrieb einstellen
Drü cken Sie die TasteMENU, bis aufder Anzeige »Duration Set« [Zeitdauer
einstellen] erscheint. Verwenden Sie die TastenUPundDOWN, um die
Zeitdauer der Nebelausstö ß e zwischen 1 und 200 Sekunden einzustellen.
▪ Nebelmenge fü r den Timer-Betrieb einstellen
Drü cken Sie die Taste MENU, bis aufder Anzeige » Timer Output«
[Nebelmenge einstellen] erscheint. Verwenden Sie die TastenUPund
DOWN, um einen Wert zwischen 1 % und 100 % fü r die Nebelmenge im
Timer-Betrieb einzustellen.
▪ Nebelmenge fü r den Dauerbetrieb einstellen
1. Drü cken Sie die TasteMENU, bis auf der Anzeige » Volume Output«
[Nebelmenge einstellen] erscheint. Verwenden Sie die TastenUPund
DOWN, um einen Wert zwischen 1 % und 100 % fü r die Nebelmenge im
Dauerbetrieb einzustellen.

2. Um die maximale Nebelmenge im Dauerbetrieb ausstoß en zu kö nnen,
wä hlen Sie die Einstellung » NONSTOPBURST« . Diese lässt sich unter einem
Wert von 1 % oderü ber einem Wert von 100 % anwä hlen.
HINWEIS: Wird ein Wert fü r die Nebelmenge im Dauerbetrieb ü ber 30 %
eingestellt, unterbricht die Maschine den Nebelausstoß von Zeit zu Zeit, um
wiederaufzuheizen. Wird » NONSTOPBURST« gewä hlt, reguliert dieMaschine die
Nebelmenge und die Heiztemperatur automatisch und muss
denNebelausstoß nicht unterbrechen, um aufzuheizen.
▪ DMX512-Adresse einstellen
Drü cken Sie die Taste MENU, bis auf der Anzeige » DMX512 Address:
001« [DMX512-Adresse einstellen] erscheint. Verwenden Sie die
TastenUPund DOWN, um die Maschine auf dieDMX-Adresse IhresDMX-
Steuergerä ts einzustellen. Bitte beachten Sie KapitelDMX512-Einstellungen
fü r weiterfü hrende Informationen zumDMX-Betrieb.
▪ Funkfunktion an- und ausschalten
Drü cken Sie die Taste MENU, bis auf der Anzeige » Wireless ON«
[Funkfunktion An] erscheint. Verwenden Sie die Tasten UP und DOWN, um die
Funkfunktion zu deaktivieren [Anzeige » Wireless OFF«] und wieder zu
aktivieren [Anzeige » Wireless ON« ].
▪ Flü ssigkeitssensor an- und ausschalten
Drü cken Sie die Taste MENU, bis auf der Anzeige » Fluid Sensor Set ON«
[Flü ssigkeitssensor An] erscheint. Verwenden Sie die Tasten UP und DOWN, um
den Flü ssigkeitssensor zu deaktivieren [Anzeige » Fluid Sensor Set OFF«] und
wieder zu aktivieren [Anzeige » Fluid Sensor Set ON« ].
▪ W-DMX-Funktion an- und ausschalten
Drü cken Sie die Taste MENU, bis auf der Anzeige » W-DMX Power ON« [W-
DMX-Funktion An] erscheint. Verwenden Sie die Tasten UP und DOWN, um die
Funkfunktion zu deaktivieren [Anzeige » W-DMX Power OFF« ] und wieder zu
aktivieren [Anzeige » W-DMX Power ON« ].
Hinweis:
Ist die W-DMX-Funktionaktiviert, wird der Verbindungsstatus im Display
durch folgende Symbole angezeigt.
Status der W-DMX-Verbindung
Symbol im Display
Sender adressiert, DMX-Signal wird
empfangen
●
Sender adressiert, kein DMX-Signal
◎

Verbindung zu Sender verloren oder
Verbindungsaufbau
⊙
Sender nicht adressiert
○
▪ W-DMX512-Adresse einstellen
Drü cken Sie die Taste MENU, bis auf der Anzeige » W-DMX Address: 001« .[W-
DMX-Adresse einstellen] erscheint. Verwenden Sie die Tasten UP und DOWN,
um die Maschine auf die DMX-Adresse Ihres W-DMX-Steuergerä ts
einzustellen.
▪ W-DMX-Verbindung zurü cksetzen
Drü cken Sie die Taste MENU, bis auf der Anzeige » W-DMX Reset OFF« [W-DMX-
Verbindungzurü cksetzen aus] erscheint. Verwenden Sie die Tasten UP und
DOWN, um die W-DMX-Verbindungzurü ckzusetzen.
▪Mit letzter Einstellung starten an- und ausschalten
Drü cken Sie die Taste MENU, bis auf der Anzeige » Run Last Setting ON«
[Mit letzter Einstellung starten an] erscheint. Verwenden Sie die Tasten UP
und DOWN, um die Funktionzu deaktivieren [Anzeige » Run Last Setting
OFF« ] und wieder zu aktivieren [Anzeige » Run Last SettingON« ].
- Dauerbetrieb
Drü cken Sie die TasteVOLUME,um einen dauerhaften Nebelausstoß auszulösen.
Auf dem Display erscheint » VolumeOutput« gefolgt von dem Wert, der im
Menü punkt » Volume Output« [Nebelvolumen einstellen] eingestellt wurde
oder bei Dauernebel » NONSTOPBURST« . Um den Nebelausstoß zu stoppen,
drü cken Sie erneut die Taste STOP.
HINWEIS:Ist ein Wert fü r die Nebelmenge im Dauerbetrieb ü ber 30 %
eingestellt, unterbricht die Maschine den Nebelausstoß von Zeit zu Zeit, um
wieder aufzuheizen. Ist » NONSTOPBURST« gewä hlt, reguliert die Maschine die
Nebelmenge und die Heiztemperatur automatisch und muss den Nebelausstoß
nicht unterbrechen, um aufzuheizen.
A página está carregando...
A página está carregando...
A página está carregando...
A página está carregando...
A página está carregando...
A página está carregando...
A página está carregando...
A página está carregando...
A página está carregando...
A página está carregando...
A página está carregando...
A página está carregando...
A página está carregando...
A página está carregando...
A página está carregando...
A página está carregando...
A página está carregando...
A página está carregando...
A página está carregando...
A página está carregando...
A página está carregando...
A página está carregando...
A página está carregando...
A página está carregando...
-
 1
1
-
 2
2
-
 3
3
-
 4
4
-
 5
5
-
 6
6
-
 7
7
-
 8
8
-
 9
9
-
 10
10
-
 11
11
-
 12
12
-
 13
13
-
 14
14
-
 15
15
-
 16
16
-
 17
17
-
 18
18
-
 19
19
-
 20
20
-
 21
21
-
 22
22
-
 23
23
-
 24
24
-
 25
25
-
 26
26
-
 27
27
-
 28
28
-
 29
29
-
 30
30
-
 31
31
-
 32
32
-
 33
33
-
 34
34
-
 35
35
-
 36
36
-
 37
37
-
 38
38
-
 39
39
-
 40
40
-
 41
41
-
 42
42
-
 43
43
-
 44
44


Briteq W-515D Manual do usuário
- Categoria
- Máquina de nevoeiro
- Tipo
- Manual do usuário
- Este manual também é adequado para
em outras línguas
- français: Briteq W-515D Manuel utilisateur
- English: Briteq W-515D User manual
- Deutsch: Briteq W-515D Benutzerhandbuch
Outros documentos
-
 Antari Lighting and Effects M-5 Manual do usuário
-
 Ibiza Light & Sound LSM1500PRO Manual do proprietário
-
 Ibiza Light & Sound LSM1200PRO Manual do proprietário
-
 Ibiza Light & Sound FOG900-RGB Manual do proprietário
-
JBSYSTEMS LIGHT FX-1000 Manual do proprietário
-
Chauvet Hurricane 1800 Flex Manual do usuário
-
CHAUVET DJ Hurricane 1600 Guia de referência
-
-
 Ibiza Light & Sound LSM900LED Manual do proprietário
-
 HIKMICRO Falcon Manual do usuário


