
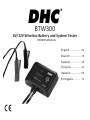
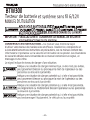
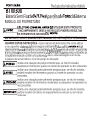
BTW300
6V/12V Wireless Battery and System Tester
English
...................... 02
Deutsch ....................... 16
Español
..................... 30
Français
................... 43
Italiano
.................
59
Português
.............. 72
OWNERS MANUAL


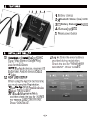
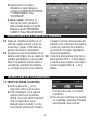
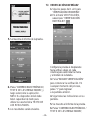
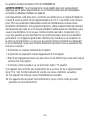
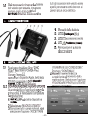
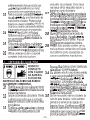
Bluetooth Status (blue) LED
Battery Status
Check

• 6 •
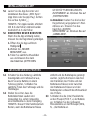
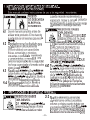
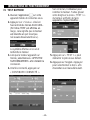
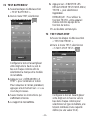
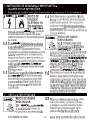
6. CONNECTING THE TESTER
6.1
Before you test a battery in a vehicle,
turn off the ignition, all accessories and
loads. Close all of the vehicle’s doors
and trunk lid.
6.2
Make sure the battery terminals are
clean. Use a wire brush to clean them,
if necessary. NOTE: This tester works
best if the battery connectors have
been removed and the battery posts
have been cleaned. Any corrosion
between the tester clamps and the
battery connectors, or between the
battery connectors and the battery
posts, will degrade the tester’s
efficiency.
6.3
Connect the positive (red) clamp to
the positive (POS, P, +) battery post.
Connect the negative (black) clamp to
the negative (NEG, N, -) battery post.
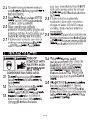
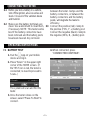
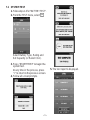
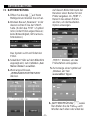
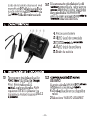
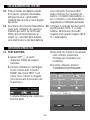
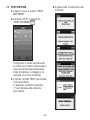
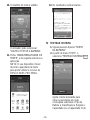
7. OPERATING INSTRUCTIONS
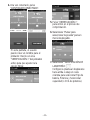
7.1
BATTERY TEST
1. Run the App on your mobile
device and log in.
2. Press “Scan+” in the upper right
corner of the HOME screen. (If
the TEST icon is red, the tester is
connected; no need to proceed to
Scan+.)
The system will scan and find the
tester.
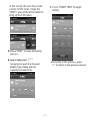
3. Once the tester shows on the
screen, select “Press To Start” to
connect.
4. When connected, press
“CONNECTED CONTINUE”.
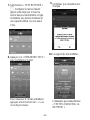
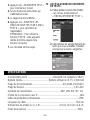
CONNECTED CONTINUE

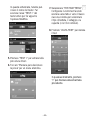
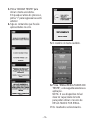
• 7 •
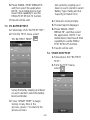
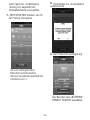
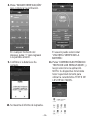
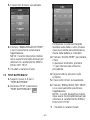
In this screen, the user may create
a name for the tester. Swipe the
“TEST>” area of the active tester to
bring up the Edit option.
5. Press “TEST” to enter the testing
process.
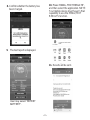
6. Select “battery test”.
Set up test on each icon to select
Battery Type, Rating and Set
Capacity (or Rated CCA).
7. Press “START TEST” to begin
testing.
At any time in the process, press
“< ” to return to the previous screen.

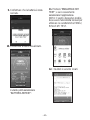
• 8 •
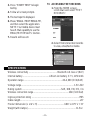
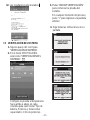
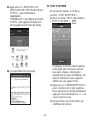
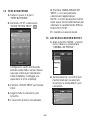
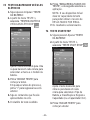
8. Confirm whether the battery has
been charged.
9. The test report is displayed.
User may select “RETEST
BATTERY”.
10. Press “EMAIL /TEXT RESULTS”,
and then select the application. NOTE:
Your mobile device must have E-Mail
capability to use the EMAIL/TEXT
RESULTS function.
11. Results will be sent.

• 9 •
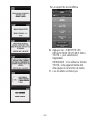
7.2
SYSTEM TEST
1.
Follow steps 1-6 for "BATTERY TEST".
2.
From the TEST menu, select
Select Battery Type, Rating and
Set Capacity (or Rated CCA).
3. Press “START TEST” to begin the
system test.
At any time in the process, press
“< ” to return to the previous screen.
4. Follow all screen prompts.
5. The test report is displayed.

• 10 •
6. Press “EMAIL /TEXT RESULTS”,
and then select the application.
NOTE: Your mobile device must
have E-Mail capability to use the
EMAIL/TEXT RESULTS function.
7. Results will be sent.
7.3
EV BATTERYTEST
1.
Follow steps 1-6 for "BATTERYTEST".
2. From the TEST menu, select
“EV BATTERY TEST”.
Set up the test by swiping up ordown
on each column to select the battery
brand and model.
3. Press “START TEST” to begin
testing. At any time in the
process, press“< ” to return to the
previous screen.
Set up test by swiping up or
down on each column to select
Battery Type, Rating and Set
Capacity (or Rated CCA)
4. Follow all screen prompts.
5. The test report is displayed.
6. Press “EMAIL /TEXT
RESULTS”, and then select
the application. NOTE: Your
mobile device must have E-Mail
capability to use the EMAIL/
TEXT RESULTS function.
7. Results will be sent.
7.4
START-STOP TEST
1.
Follow steps 1-6 for "BATTERY
TEST".
2. From the TEST menu,
select .

• 11 •
3. Press “START TEST” to begin
testing.
4. Follow all screen prompts.
5. The test report is displayed.
6. Press “EMAIL /TEXT RESULTS”,
and then select the application.
NOTE: Your mobile device must
have E-Mail capability to use the
EMAIL/TEXT RESULTS function.
7. Results will be sent.
7.5
ACCESSING TEST RECORDS
1. From the HOME screen,
scroll down and select "TEST
RECORDS".
2. Select from stored test records
to view, email/text or delete.
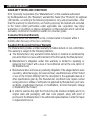
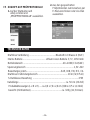
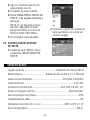
8. SPECIFICATIONS
Wireless connectivity ............................................... Bluetooth 4.0 class 2 (BLE)
Internal battery............................................ Lithium ion battery 3.7 V, 1150 mAh
Operation range.................................................................40~2,000 (CCA/SAE)
Voltage range....................................................................................... 1.5V~32V
Rating system .................................................................SAE, DIN, EN, IEC, CA
Wireless connection range...........................................................10m (32.8 feet)
Ingress protection rating ...............................................................................IP65
Cable length....................................................................................................20˝
Product dimension (L x W x H) ............................................3.88˝ x 2.75˝ x 1.13˝
Weight (with clamps)................................................................................ 11.5 oz

• 12 •
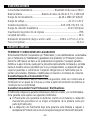
9. LIMITED WARRANTY
WARRANTY TERMS AND CONDITIONS
DHC Speciality Corporation (the “Manufacturer”) or the resellers authorized
by the Manufacturer (the “Reseller”) warrant this Tester (the “Product”) for eighteen
(18) months, according to the following stipulations. Any and all warranties, other
than the warranty included herein, are hereby expressly disclaimed and excluded
to the fullest extent permissible under applicable law. Legislation may imply
warranties or conditions or impose obligations on Manufacturer which cannot be
excluded, restricted or modified in relation to consumer goods.
Consumer End-User Warranty
Any claims under this warranty must be communicated to Reseller within 2
months after discovery of the non-conformity.
Resellers/Professional End-User Warranty
The Manufacturer provides a limited warranty for hidden defects or non-conformities.
This warranty is subject to the followingconditions:
a.
The Manufacturer only warrants hidden defects in material or workmanship
present in their root cause at the moment of the first sale by the Manufacturer;
b.
Manufacturer’s obligation under this warranty is limited to repairing or
replacing the Product with a new or reconditioned unit at the sole option of
the Manufacturer;
c.
Manufacturer does not have any warranty obligations if the alleged defects were
caused by abnormal usage, fair wear and tear, unauthorized use of the Product
or use of the Product differing from the description in the applicable manual or
other specifications given by the Manufacturer, insufficient care, repairs carried
out by persons or entities or with parts not approved by Manufacturer, poor care,
accidents, unauthorized changes or modifications, incorrect transport, storage
or treatment of the Product;
d.
In order to exercise this right, the Product must be returned complete and in its
original state and packaging, with mail costs prepaid, along with proof of
purchase to the Manufacturer or its authorized representatives in order for repair
or replacement tooccur.

• 13 •
Common Warranty Provisions
The warranty mentioned above only applies to the first professional or consumer
user having legally acquired the Product from the Manufacturer or a Reseller. No
warranty is extended towards clients, agents or representatives of those buyers.
The Product is sold under the specifications, for the use and purpose in
accordance with the provisions of this manual, with express exclusion and
disclaimer of warranty of any other specifications, uses and purposes.
Authorized Resellers are prohibited from making any statements or providing any
warranty in excess of the above warranties Non-authorized resellers may only
sell the product under the condition that they assume all warranty obligations with
the total exclusion of any warranty provided by the Manufacturer.
Manufacturer does not provide any warranty for any accessories used with the
Product that are not manufactured by Schumacher Electric Corporation.
This warranty does not exclude or diminish any claims the Manufacturer may
have against the distributors of The Product.
THE MANUFACTURER NEITHER ASSUMES NOR AUTHORIZES ANYONE TO
ASSUME OR MAKE ANY OTHER OBLIGATION TOWARDS THE PRODUCT
OTHER THAN THIS WARRANTY.
Warranty, Repair Service and Distribution Centers:
North America Office,
Johnson City, TN 37604
423-646-6697
Drock52496@aol.com
Taiwan: Head Office
8F, No.308, Datong Rd., Xizhi Dist.,22146
+886 2-2641-7399
service@dhc.com.tw
DHC
®
and the DHC logo
are registered trademarks of DHC Specialty Corporation.

• 14 •
FCC INFORMATION
This product contains transmitter FCC ID SH6MDBT40.
WARNING: Changes or modifications to this unit not expressly approved by the party
responsible for compliance could void the user’s authority to operate the equipment.
This equipment has been tested and found to comply with the limits for a Class B
Digital Device, pursuant to Part 15 of the FCC Rules. These limits are designed
to provide reasonable protection against harmful interference in a residential
installation. This equipment generates, uses, and can radiate radio frequency
energy and, if not installed and used in accordance with the instructions, may
cause harmful interference to radio communications. However, there is no
guarantee that interference will not occur in a particular installation. If this
equipment does cause harmful interference to radio or television reception, which
can be determined by turning the equipment off and on, the user is encouraged to
try to correct the interference by one or more of the following measures:
• Reorient or relocate the receiving antenna.
• Increase the separation between the equipment and receiver.
• Connect the equipment into an outlet on a circuit different from that to which the
receiver is connected.
• Consult the dealer or an experienced radio/TV technician for help.
This equipment complies with Part 15 of the FCC Rules. Operation is subject to
the following two conditions:
1. This equipment may not cause harmful interference.
2. This equipment must accept any interference received, including interference
that may cause undesired operation.
This equipment complies with FCC radiation exposure limits set forth for an
uncontrolled environment. This equipment should be installed and operated with
minimum 20cm between the radiator and your body. This transmitter must not be
collocated or operating in conjunction with any other antenna or transmitter unless
authorized to do so by the FCC.
Modifications not authorized by the manufacturer may void the user’s authority
to operate this device. This equipment complies with FCC RF radiation exposure
limits set forth for an uncontrolled environment. This transmitter must not be co-
located or operating in conjunction with any other antenna or transmitter.

• 15 •
CANADIAN REGULATION INFORMATION
CAN ICES-3 (B)/NMB-3(B)
Contains transmitter module IC: 8017A-MDBT40, Hardware Version Identification
Number (HVIN): MDBT40
This device complies with Industry Canada license exempt RSS standard(s).
Operation is subject to the following two conditions: (1) this device may not
cause interference, and (2) this device must accept any interference, including
interference that may cause undesired operation of the device.
Under Industry Canada regulations, this radio transmitter may only operate
using an antenna of a type and maximum (or lesser) gain approved for the
transmitter by Industry Canada. To reduce potential radio interference to other
users, the antenna type and its gain should be so chosen that the equivalent
isotropically radiated power (e.i.r.p.) is not more than that necessary for successful
communication.


19

• 20 •
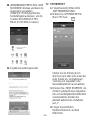
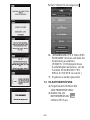
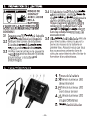
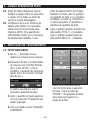
5. INSTALLATION DER APP
5.1 Laden Sie die App herunter und
installieren Sie diese: „DHC Sync“.
(App Store oder Google Play). Achten
Sie auf das Symbol .
HINWEIS: Für Apple-Geräte: erfordert
iOS 8.0 oder höher; Android-Geräte:
Android-OS 4.3 oder höher.
5.2 EINRICHTEN NEUER BENUTZER
Wenn Sie die App erstmalig nutzen,
müssen Sie die Registrierung erledigen.
1. Öffnen Sie die App auf Ihrem
Mobilgerät.
2. Wählen Sie „NEUER
BENUTZER“ aus.
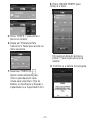
3. Füllen Sie sämtliche Mussfelder
aus und kreuzen Sie dann
das Kästchen „BITTE DEN
GESCHÄFTSBEDINGUNGEN
ZUSTIMMEN“ an. Drücken Sie auf
„FORTSETZEN“.
4. Anmelden: Geben Sie die bei der
Registrierung angegebene E-Mail-
Adresse an. Kreuzen Sie das
Kästchen „KONTO
SPEICHERN“ an. Drücken Sie auf
„ANMELDEN“.
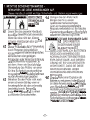
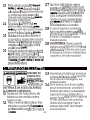
6. ANSCHLIESSEN DES PRÜFERS
6.1
Schalten Sie die Zündung, sämtliche
Zusatzgeräte und Verbraucher aus,
bevor Sie eine Batterie in einem
Fahrzeug prüfen,. Schließen Sie
sämtliche Türen des Fahrzeugs und die
Heckklappe.
6.2
Stellen Sie sicher, dass die
Batterieklemmen sauber sind.
Verwenden Sie, sofern notwendig,
eine Drahtbürste zu deren Reinigung.
HINWEIS: Dieser Prüfer funktioniert am
Besten, wenn die Batterieanschlüsse
entfernt und die Batteriepole gereinigt
wurden. Jegliche Korrosion zwischen
den Klemmen des Prüfers und den
Batterieanschlüssen oder zwischen
den Batterieanschlüssen und den
Batteriepolen schwächt die Wirksamkeit
des Prüfers.
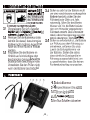
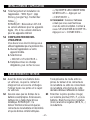
6.3
Schließen Sie die (rote) Plusklemme
an den Pluspol (POS P, +) der Batterie
an. Schließen Sie die (schwarze)
Minusklemme an den Minuspol (NEG,
N, -) der Batterie an.
A página está carregando ...
A página está carregando ...
A página está carregando ...
A página está carregando ...
A página está carregando ...
A página está carregando ...
A página está carregando ...
A página está carregando ...
A página está carregando ...
A página está carregando ...
A página está carregando ...
A página está carregando ...
A página está carregando ...
A página está carregando ...
A página está carregando ...
A página está carregando ...
A página está carregando ...
A página está carregando ...
A página está carregando ...
A página está carregando ...
A página está carregando ...
A página está carregando ...
A página está carregando ...
A página está carregando ...
A página está carregando ...
A página está carregando ...
A página está carregando ...
A página está carregando ...
A página está carregando ...
A página está carregando ...
A página está carregando ...
A página está carregando ...
A página está carregando ...
A página está carregando ...
A página está carregando ...
A página está carregando ...
A página está carregando ...
A página está carregando ...
A página está carregando ...
A página está carregando ...
A página está carregando ...
A página está carregando ...
A página está carregando ...
A página está carregando ...
A página está carregando ...
A página está carregando ...
A página está carregando ...
A página está carregando ...
A página está carregando ...
A página está carregando ...
A página está carregando ...
A página está carregando ...
A página está carregando ...
A página está carregando ...
A página está carregando ...
A página está carregando ...
A página está carregando ...
A página está carregando ...
A página está carregando ...
A página está carregando ...
A página está carregando ...
A página está carregando ...
A página está carregando ...
A página está carregando ...
-
 1
1
-
 2
2
-
 3
3
-
 4
4
-
 5
5
-
 6
6
-
 7
7
-
 8
8
-
 9
9
-
 10
10
-
 11
11
-
 12
12
-
 13
13
-
 14
14
-
 15
15
-
 16
16
-
 17
17
-
 18
18
-
 19
19
-
 20
20
-
 21
21
-
 22
22
-
 23
23
-
 24
24
-
 25
25
-
 26
26
-
 27
27
-
 28
28
-
 29
29
-
 30
30
-
 31
31
-
 32
32
-
 33
33
-
 34
34
-
 35
35
-
 36
36
-
 37
37
-
 38
38
-
 39
39
-
 40
40
-
 41
41
-
 42
42
-
 43
43
-
 44
44
-
 45
45
-
 46
46
-
 47
47
-
 48
48
-
 49
49
-
 50
50
-
 51
51
-
 52
52
-
 53
53
-
 54
54
-
 55
55
-
 56
56
-
 57
57
-
 58
58
-
 59
59
-
 60
60
-
 61
61
-
 62
62
-
 63
63
-
 64
64
-
 65
65
-
 66
66
-
 67
67
-
 68
68
-
 69
69
-
 70
70
-
 71
71
-
 72
72
-
 73
73
-
 74
74
-
 75
75
-
 76
76
-
 77
77
-
 78
78
-
 79
79
-
 80
80
-
 81
81
-
 82
82
-
 83
83
-
 84
84


DHC BATTERY TESTER BLUETOOTH Manual do proprietário
- Tipo
- Manual do proprietário
- Este manual também é adequado para
em outros idiomas
Outros documentos
-
 schulink SBT1SBT1 Manual do proprietário
-
Schumacher SBT1SBT1 Manual do proprietário
-
GYS MULTICHARGE STATION DHC 54 E Ficha de dados
-
Formuler Z10Pro Guia de usuario
-
Formuler Z10 SE Guia de usuario
-
-
Expert E201804 Manual do usuário
-
-
Facom 701B Manual do proprietário
-
