Oster Frozen Dessert Maker 4749 Manual do usuário
- Categoria
- Fabricantes de sorvete
- Tipo
- Manual do usuário
Este manual também é adequado para

Instruction Manual and Recipe Book
HOME SOFT SERVE™ ICE CREAM AND
FROZEN YOGURT MACHINE
Mode d’Emploi et Livre de Recettes
MACHINE POUR CRÈME GLACÉE ET
YOGOURT GLACÉ HOME SOFT SERVE™
Manual de Instrucciones y Libro de Recetas
MÁQUINA PARA PREPARAR HELADOS CREMOSOS Y
YOGHURT CONGELADO HOME SOFT SERVE™
Manual de Instruções e Livro de Receitas
MÁQUINA DE SORVETE HOME SOFT SERVE™ E
IOGURTE CONGELADO
MODEL/MODELO
MODÈLE/MODELO
4749
MODEL/MODELO
MODÈLE/MODELO
4749

2
CONGRATULATIONS!
Enjoy soft serve ice cream and frozen yogurt at home with your new
Home Soft Serve™ Machine!
We've done everything we can to make it as easy and simple as possible.
Our instruction book is designed to give you helpful information, tips and
a host of great recipes.
DETAILS ON YOUR NEW HOME SOFT SERVE
™
MACHINE:
• Quick, easy and convenient to use!
• Makes 6 – 8 full-size cones in approximately 20 minutes.
• Use the enclosed pre-mix or make your own great tasting ice cream and frozen yogurt
using the enclosed recipe book and common kitchen ingredients!
• Clean-up is quick and easy: all parts that come in contact with the
ice cream are removable and dishwasher-safe (on top rack only; however,
mixing canister should be washed with warm soapy water – not in the dishwasher
due to high heat of drying cycle).
• The valve has been pre-lubricated during manufacture to insure smooth operation.
If the valve becomes tight, smooth operation can be restored by a light application
of liquid or spray-on cooking oil.
• Most home freezer compartments maintain a temperature between 0ºF and 10ºF.
This range is necessary to insure proper freezing of the Mixing Canister. Thicker
ice cream textures can be obtained by reducing your freezer temperature setting.
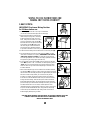
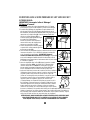
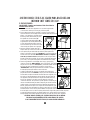
When using electrical appliances, basic safety precautions must always be followed,
including the following:
• READ ALL INSTRUCTIONS.
• Make sure the cord is not loose nor presents the possibility of
someone tripping over it.
• DO NOT MOVE THE SOFT SERVE MACHINE WHILE IT IS TURNED "ON".
• CLOSE SUPERVISION IS NECESSARY WHEN THE APPLIANCE IS IN USE.
• Disconnect the Soft Serve Machine from the wall outlet when the unit is
not in use and before cleaning. NOTE: MAKE SURE THE SOFT SERVE
MACHINE IS TURNED OFF "O" BEFORE DISCONNECTING.
• To protect against risk of electrical shock, do not immerse the appliance
or plug in water or other liquids.
• This appliance should not be used by unsupervised children. Close supervision
is always necessary when this or any other appliance is used near children.
IMPORTANT SAFEGUARDS

3
• Do not operate this or any appliance with a frayed or damaged cord or plug,
or after the appliance is dropped or has been damaged in any manner. Return the
appliance to the nearest Authorized Service Station for examination, repair or
electrical or mechanical adjustment.
• Do not use attachments not recommended by the manufacturer. They may cause
fire, electrical shock or injury.
• Do not use outdoors or for commercial purposes. Do not use this appliance
for other than the intended use.
• Do not let the cord hang over the edge of a table or counter, or touch hot surfaces.
• Never freeze mixing canister in dry ice or other medium that can achieve
temperatures of -30
º
F or lower as this can damage the canister.
• Do not place the appliance near a hot gas or electric burner or in a heated oven.
• Do not place any items on top of or next to this appliance at any time.
• Solid foods, fruits, nuts, candy or other solid items must not be inserted into
the Home Soft Serve™ Machine as they may get stuck in the dispensing
valve or mixing auger and block or hamper the flow of soft serve coming out
(all ingredients must be liquefied in a blender before being added to the machine).
• Do not clean with metal scouring pads or any abrasive materials. (Pieces can break
off the pad and touch electrical parts resulting in a risk of electrical shock).
• Do not place the Home Soft Serve™ Machine on an unstable cart, stand or table.
The Home Soft Serve™ Machine may fall, causing injury to child or adult,
and serious damage to the appliance. Use only with a cart or stand recommended
by the manufacturer, or sold with the Home Soft Serve™ Machine.
THIS UNIT FOR HOUSEHOLD USE ONLY
A short, power-supply cord is provided to reduce the risk of becoming entangled in or
tripping over a longer cord. Extension cords may be used if care is exercised in their
use. If an extension cord is used, the marked electrical rating of the extension cord
should be at least as great as the electrical rating of the appliance. The cord should be
arranged so that it will not drape over the countertop or tabletop where it can be
pulled on by children or tripped over unintentionally.
FOR UNITS PURCHASED IN THE U.S. AND CANADA ONLY:
To reduce the risk of electrical shock, this appliance has a polarized plug (one blade
is wider than the other). This plug fits a polarized outlet only one way; if the plug does
not fit fully into the outlet, reverse the plug. If it still does not fit, contact a qualified
electrician. Do not attempt to defeat this safety feature.
SAVE THESE INSTRUCTIONS

4
EASY-TO-USE SOFT SERVE INSTRUCTIONS
BEFORE USING FOR THE FIRST TIME
After unpacking the unit, wash the Mixing Canister, Mixing Auger, Valve and the
machine's Face Panel Assembly in warm, soapy water (all but the Mixing Canister are
also top-rack dishwasher-safe) and then dry thoroughly (especially the Mixing
Canister). Then place the Mixing Canister in your freezer and pre-freeze for at least
24 hours before use; you may also choose to simply store your canister in the freezer
so that it is always ready to make ice cream! Then you can have soft serve at home
whenever you like!
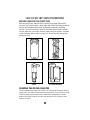
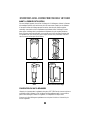
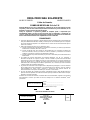
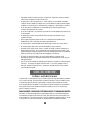
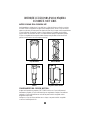
FREEZING THE MIXING CANISTER
The most important step in making SOFT SERVE is to make sure that the Mixing Canister is
properly frozen. The Mixing Canister requires thorough freezing. For best results, the Mixing
Canister should be placed in the back of your freezer, where the temperature is coldest.
Make sure the Mixing Canister is thoroughly dried and place in back of freezer or where
freezer is the coldest.
Mixing Canister Mixing Auger
3Valve Face Panel Assembly

5
SIMPLE-TO-USE INSTRUCTIONS FOR
MAKING SOFT SERVE AT HOME!!!
5 EASY STEPS:
IMPORTANT: Pre-freeze Mixing Canister
for 24 Hours before use.
1. Mix one bag of pre-mix with 2-1/2 cups of chilled water
(or use one of the enclosed recipes) and mix thoroughly.
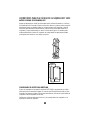
2. Remove Soft Serve Mixing Canister from
freezer and place upright on a countertop.
Slide the white mixing auger, solid end
down, slowly into the canister until it rests
snugly on the bottom of the canister (A).
Place the machine's face panel onto the top
of the Mixing Canister (B), making sure
the silver rod goes into the center of the
mixing auger. Apply downward pressure
as you twist it clockwise to lock it into place (C).
3. Slide the entire assembly into the machine until it clicks into place (D).
4. Turn blue dispensing knob on top of the machine to "FILL" and then
lift the knob to reveal the "fill" opening. IMPORTANT: Turn machine
"ON" before pouring in mixture (you may hear a slight churning
sound during operation; this is normal and simply represents the motor
and gear driving the mixing auger inside the unit).
5. Pour ingredients into the opening (E), close the cap and turn the knob
to the "MIX" position. In 20 – 25 minutes, turn blue dispensing knob to
"Serve" and you'll have Soft Serve! Do not turn the machine's power
switch to "OFF" until you have finished dispensing all contents of the
Soft Serve Machine.
• When finished dispensing all of the contents of the Soft Serve machine,
turn machine "OFF" and unplug it (while running, the machine will keep
the Soft Serve frozen and ready to dispense for approximately 30 minutes
after the ice cream initially freezes; you can then store any excess
Soft Serve in a freezer-safe storage container for later consumption)
.
Press the blue "Chamber Release" button on top of machine to remove
Mixing Canister assembly. Then twist face panel counter-clockwise to
disassemble Mixing Assembly; turn blue dispensing knob to "Remove"
position and pull up to remove Valve Assembly for cleaning. (If the valve
ever becomes difficult to turn or remove, smooth operation can be
restored by applying a light application of liquid or spray-on cooking oil).
All pieces can then be washed with warm, soapy water (all but Mixing
Canister are top-rack dishwasher-safe). Always make sure Canister is
dried thoroughly before placing in freezer.
CAUTION: NEVER IMMERSE THE MAIN BODY OF THE UNIT IN WATER SINCE THIS
IS WHERE THE MOTOR AND ELECTRICAL COMPONENTS ARE LOCATED;
WATER CAN DAMAGE THEM.
(A)
(B) (C)
(D)
(E)

6
HELPFUL HINTS
• Temperatures from freezer to freezer differ. If your freezer is set at a middle to warm setting,
the Canister will not freeze. The Canister freezes at 7ºF. If your ice cream is too soft or has
not hardened, check your freezer temperature and adjust settings to maintain freezer
temperatures below 5ºF (coldest setting).
• The Mixing Canister must be pre-frozen in the freezer for at least 24 hours prior to use.
If the Canister is used with less than the 24-hour freeze time, the ice cream may not freeze.
• The valve has been pre-lubricated during manufacture to ensure smooth operation.
If the valve is washed in a dishwasher, it may become tight. Smooth operation can be
restored by a light application of liquid or spray-on cooking oil.
• There is a circular ridge on the back side of the face panel assembly. The large, black gasket
should be placed on that circular ridge. If the gasket is not on the circular ridge, it will make
the assembly of the Mixing Canister to the Face Panel Assembly difficult and may result in
ice cream leaking out.
• Make sure the gasket is dry before assembling the Face panel Assembly to the
Mixing Canister. If the gasket is wet it will freeze very quickly and will make the assembly
of the unit difficult. Additionally, if assembly of the face panel onto the canister ever
becomes difficult, smooth operation can be restored by a light application of liquid
or spray-on cooking oil on the black gasket.
• The Valve must be inserted until it rests firmly at the bottom of the face panel assembly
to assure proper sealing.
• Ice cream in the Mixing Canister thickens with time. If the Soft Serve
™
Machine is left on
unattended for more than 30 – 35 minutes, the ice cream could thicken too much and
potentially stall the machine. If the machine stalls, it will not dispense ice cream.
• Make sure the Mixing Canister is completely dry after washing it. If the Canister is wet
when it is put in the freezer, the Canister gears may freeze and prevent the auger from
turning inside the unit.
• VERY IMPORTANT: The ice cream maker must be turned "ON" prior to pouring in the
ice cream mix. If the ice cream mix is poured into the Canister before the unit is turned on,
it will freeze rapidly, causing the Auger not to turn.
• If the Canister does not latch when inserted into unit, take the Canister out of the unit
and turn the gear behind the Canister slightly and insert back into ice cream maker.
This should allow proper engagement.
• The metal rod has a slight bend. Make sure that the bend is oriented toward the middle of
the Auger. If the bend is facing the outside of the Auger, the rod will hit the Auger as the
Auger turns making a rattling/clicking sound.
• Make sure the metal rod is on the Face Panel Assembly before assembling the unit together
to make ice cream. If the rod is left out, the unit will not mix and the ice cream will settle to
the bottom of the Canister.

7
EASY-TO-MAKE RECIPES
FOR SOFT SERVE AT HOME!!!
SOFT SERVE ICE CREAM RECIPES
Vanilla
12 oz. Whipping Cream 12 oz. Whole Milk
1/2 Cup Sugar 1-1/2 Teaspoon Vanilla Extract
Pour cream, milk, sugar and vanilla into a mixing bowl. Stir ingredients by hand until sugar is
dissolved. Follow Steps 1 – 3 in the instructions, turn machine "On" and then pour the mixed
ingredients into the "Fill" opening on the top of the machine (see Steps 4 – 5).
Chocolate
12 oz. Whipping Cream 12 oz. Whole Milk
3/4 Cup Sugar 1 Teaspoon Vanilla Extract
3 Tablespoons Cocoa Powder
Pour cream, milk, sugar, vanilla and cocoa powder into a mixing bowl. Stir ingredients by hand
until sugar is dissolved. Follow Steps 1 – 3 in the instructions, turn machine "On" and then pour
the mixed ingredients into the "Fill" opening on the top of the machine (see Steps 4 – 5).
Chocolate Almond
12 oz. Whipping Cream 12 oz. Whole Milk
3/4 Cup Sugar 1/2 Teaspoon Almond Extract
3 Tablespoons Cocoa Powder
Pour cream, milk, sugar, almond extract and cocoa powder into a mixing bowl. Stir ingredients by
hand until sugar is dissolved. Follow Steps 1 – 3 in the instructions, turn machine "On" and then
pour the mixed ingredients into the "Fill" opening on the top of the machine (see Steps 4 – 5).
Strawberry
8 oz. Frozen, Unsweetened Strawberries (Puréed) 4 oz. Whipping Cream
10 oz. Whole Milk 3/4 Cup Sugar
Purée strawberries in a blender. Pour puréed strawberries, cream, milk and sugar into a mixing
bowl. Stir ingredients by hand until sugar is dissolved. Follow Steps 1 – 3 in the instructions,
turn machine "On" and then pour the mixed ingredients into the "Fill" opening on the top of the
machine (see Steps 4 – 5).

8
Peach
8 oz. Frozen, Unsweetened Peaches (Puréed) 4 oz. Whipping Cream
10 oz. Whole Milk 3/4 Cup Sugar
Purée peaches in a blender. Pour puréed peaches, cream, milk and sugar into a mixing bowl.
Stir ingredients by hand until sugar is dissolved. Follow Steps 1 – 3 in the instructions,
turn machine "On" and then pour the mixed ingredients into the "Fill" opening on the top
of the machine (see Steps 4 – 5).
Blueberry
8 oz. Frozen, Unsweetened Blueberries (Puréed) 4 oz. Whipping Cream
10 oz. Whole Milk 3/4 Cup Sugar
Purée blueberries in a blender. Pour puréed blueberries, cream, milk and sugar into a mixing bowl.
Stir ingredients by hand until sugar is dissolved. Follow Steps 1 – 3 in the instructions,
turn machine "On" and then pour the mixed ingredients into the "Fill" opening on the top
of the machine (see Steps 4 – 5).
Pineapple
1 Cup Unsweetened, Canned Pineapple (Puréed) 6 oz. Whipping Cream
10 oz. Whole Milk 3/4 Cup Sugar
Purée pineapple in a blender. Pour puréed pineapple, cream, milk and sugar into a mixing bowl.
Stir ingredients by hand until sugar is dissolved. Follow Steps 1 – 3 in the instructions,
turn machine "On" and then pour the mixed ingredients into the "Fill" opening on the top of the
machine (see Steps 4 – 5).
Peach Dream
8 oz. Peach Soda 8 oz. Whipping Cream
8 oz. Whole Milk 1/2 Cup Sugar
Pour soda, cream, milk and sugar into a mixing bowl. Stir ingredients by hand until sugar is
dissolved. Follow Steps 1 – 3 in the instructions, turn machine "On" and then pour the mixed
ingredients into the "Fill" opening on the top of the machine (see Steps 4 – 5).
Strawberry Dream
8 oz. Strawberry Soda 8 oz. Whipping Cream
8 oz. Whole Milk 1/2 Cup Sugar
Pour soda, cream, milk and sugar into a mixing bowl. Stir ingredients by hand until sugar is
dissolved. Follow Steps 1 – 3 in the instructions, turn machine "On" and then pour the mixed
ingredients into the "Fill" opening on the top of the machine (see Steps 4 – 5).

9
Cinnamon-Banana-Almond
1 Banana (Puréed) 8 oz. Whipping Cream
8 oz. Whole Milk 2/3 Cup Sugar
1 Teaspoon Cinnamon 1 Tablespoon Lemon Juice
1 Teaspoon Almond Extract
Purée banana in a blender. Pour puréed banana, cream, milk, sugar, cinnamon, lemon juice
and almond extract into a mixing bowl. Stir ingredients by hand until sugar is dissolved.
Follow Steps 1 – 3 in the instructions, turn machine "On" and then pour the mixed ingredients
into the "Fill" opening on the top of the machine (see Steps 4 – 5).
Coffee
2 Tablespoons Instant Coffee* 10 oz. Whipping Cream
10 oz. Whole Milk 3/4 Cup Sugar
Pour coffee, cream, milk and sugar into a mixing bowl. Stir ingredients by hand until sugar is
dissolved. Follow Steps 1 – 3 in the instructions, turn machine "On" and then pour the mixed
ingredients into the "Fill" opening on the top of the machine (see Steps 4 – 5).
*
If this is too strong, reduce to 1-1/2 tablespoons coffee.
Coffee-Mocha
1 Tablespoon Instant Coffee 10 oz. Whipping Cream
10 oz. Whole Milk 3/4 Cup Sugar
1 Tablespoon Cocoa Powder
Pour coffee, cream, milk, sugar and cocoa powder into a mixing bowl. Stir ingredients by hand
until sugar is dissolved. Follow Steps 1 – 3 in the instructions, turn machine "On" and then pour
the mixed ingredients into the "Fill" opening on the top of the machine (see Steps 4 – 5).
Lemon
6 oz. Lemon Juice (bottled) 8 oz. Whipping Cream
8 oz. Whole Milk 3/4 Cup Sugar
Pour lemon juice, cream, milk and sugar into a mixing bowl. Stir ingredients by hand until sugar
is dissolved. Follow Steps 1 – 3 in the instructions, turn machine "On" and then pour the mixed
ingredients into the "Fill" opening on the top of the machine (see Steps 4 – 5).

10
SHERBET RECIPES
Lemon Sherbet
6 oz. Frozen Lemon Concentrate 18 oz. Whole Milk
2 Tablespoons Sugar 2 Drops Yellow Food Coloring (Optional)
Pour frozen concentrate, milk and sugar into a mixing bowl. Add food coloring if desired.
Stir ingredients by hand until sugar is dissolved. Follow Steps 1 – 3 in the instructions,
turn machine "On" and then pour the mixed ingredients into the "Fill" opening on the top
of the machine (see Steps 4 – 5).
Strawberry Sherbet
6 oz. Frozen, Unsweetened Strawberries (Puréed) 16 oz. Whole Milk
1/2 Cup Sugar 2 Tablespoons Lemon Juice
Purée strawberries in a blender. Pour puréed strawberries, milk, sugar and lemon juice into a
mixing bowl. Add food coloring if desired. Stir ingredients by hand until sugar is dissolved.
Follow Steps 1 – 3 in the instructions, turn machine "On" and then pour the mixed ingredients
into the "Fill" opening on the top of the machine (see Steps 4 – 5).
Orange Sherbet
6 oz. Frozen Orange Concentrate 18 oz. Whole Milk
2 Tablespoons Sugar
Pour frozen concentrate, milk and sugar into a mixing bowl. Add food coloring if desired.
Stir ingredients by hand until sugar is dissolved. Follow Steps 1 – 3 in the instructions,
turn machine "On" and then pour the mixed ingredients into the "Fill" opening on the top
of the machine (see Steps 4 – 5).

11
DRINK RECIPES
Strawberry/Cranberry Freeze
(Freeze for 15 minutes only)
2 Cups Strawberry/Cranberry Juice**
1-2/3 Cup Whole Milk
3/4 Cup Sugar
Pour juice, milk and sugar into a mixing bowl. Stir ingredients by hand until sugar is dissolved.
Follow Steps 1 – 3 in the instructions, turn machine "On" and then pour the mixed ingredients
into the "Fill" opening on the top of the machine (see Steps 4 – 5).
**NOTE: If using chilled juice, start checking machine after 7 minutes and dispense when mix has reached
desired consistency.
Cranberry/Raspberry Freeze
(Freeze for 15 minutes only)
2 Cups Cranberry/Raspberry Juice**
1-2/3 Cup Whole Milk
3/4 Cup Sugar
Pour juice, milk and sugar into a mixing bowl. Stir ingredients by hand until sugar is dissolved.
Follow Steps 1 – 3 in the instructions, turn machine "On" and then pour the mixed ingredients
into the "Fill" opening on the top of the machine (see Steps 4 – 5).
**NOTE: If using chilled juice, start checking machine after 7 minutes and dispense when mix has reached
desired consistency.

12
FROZEN YOGURT RECIPES
Strawberry Yogurt
(Requires 25 minutes to freeze)
10 oz. Frozen, Unsweetened Strawberries (Puréed)
10 oz. Whole Milk
4 oz. Vanilla Yogurt
1/2 Cup Sugar
Purée strawberries in a blender. Pour puréed strawberries, milk, yogurt and sugar into a mixing
bowl. Stir ingredients by hand until sugar is dissolved. Follow Steps 1 – 3 in the instructions,
turn machine "On" and then pour the mixed ingredients into the "Fill" opening on the top
of the machine (see Steps 4 – 5).
Raspberry Yogurt
(Requires 25 minutes to freeze)
10 oz. Frozen, Unsweetened Raspberries (Puréed)
10 oz. Whole Milk
4 oz. Vanilla Yogurt
1/2 Cup Sugar
Purée raspberries in a blender. Pour puréed raspberries, milk, yogurt and sugar into a mixing bowl.
Stir ingredients by hand until sugar is dissolved. Follow Steps 1 – 3 in the instructions,
turn machine "On" and then pour the mixed ingredients into the "Fill" opening on the top
of the machine (see Steps 4 – 5).
Orange Yogurt
(Requires 25 minutes to freeze)
4 oz. Frozen Orange Concentrate
10 oz. Whole Milk
4 oz. Whipping Cream
4 oz. Vanilla Yogurt
1/2 Cup Sugar
Pour frozen concentrate, milk, whipping cream, yogurt and sugar into a mixing bowl.
Stir ingredients by hand until sugar is dissolved. Follow Steps 1 – 3 in the instructions,
turn machine "On" and then pour the mixed ingredients into the "Fill" opening on the top
of the machine (see Steps 4 – 5).

13
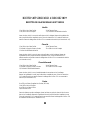
1 YEAR LIMITED WARRANTY
Sunbeam Products Inc. warrants that, for a period of one year from date of purchase, this
product shall be free of mechanical and electrical defects in material and workmanship.
Our obligation hereunder is limited to repair or replacement, at manufacturer's option,
of this product during the warranty period, provided that the product(s) purchased in the
United States are sent postage prepaid directly to:
SUNBEAM APPLIANCE SERVICE STATION
117 Central Industrial Row
Purvis, MS 39475
Answers to questions regarding this warranty or your nearest U.S.A. authorized service
location may be obtained by calling toll free 1-800-597-5978 or by writing to Sunbeam -
Consumer Affairs at P.O. Box 948389, Maitland, Florida 32794-8389.
For products purchased in Canada please call to:
SUNBEAM APPLIANCE SERVICE STATION (KND)
1-800-663-8623 or email us at
Answers to questions regarding this warranty or your nearest Canadian authorized service
location may be obtained by calling toll free in Canada 1-800-667-8623.
For warranty information or an authorized service location outside of the United States
and Canada please see the warranty service card inserted in the product packaging.
DO NOT RETURN THIS PRODUCT TO THE
PLACE OF PURCHASE; DOING SO MAY DELAY THE
PROCESSING OF YOUR WARRANTY CLAIM.
This warranty does not cover normal wear of parts or damage resulting from any of the
following: negligent use or misuse of the product, use on improper voltage or current, use
contrary to operating instructions, or disassembly, repair or alteration by any person other
than authorized by the service center. Product repair or replacement as provided under
this warranty is your exclusive remedy. Sunbeam Products Inc. shall not be liable for any
incidental or consequential damages for breach of any expressed or implied warranty
on this product. Except to the extent prohibited by applicable law, any implied warranty of
merchantability or fitness for a particular purpose on this product is limited in duration to
the duration of the above warranty. Some states and provinces do not allow the exclusion
or limitation of incidental or consequential damages, or allow limitation on how long an
implied warranty lasts, so the above limitations or exclusion may not apply to you. This
warranty gives you specific legal rights, and you may also have other rights which vary
state to state or province to province.

14
FÉLICITATIONS !
Appréciez les crèmes glacées et yaourts glacées Soft Serve à la maison avec votre machine Home
Soft Serve™!
Nous avons fait tout ce que pouvons pour rendre cette tâche aussi simple et facile que possible.
Notre manuel d’utilisation est dessiné pour vous donner des informations and conseils utiles ainsi
que de nombreuses recettes excellentes.
DETAILS CONCERNANT VOTRE NOUVELLE MACHINE HOME SOFT SERVE
™
:
• Emploi Facile, Rapide et Pratique!
• Pour préparer 6 à 8 grands cornets en 20 minutes environ.
• Utilisez le mélange inclus ou bien faites votre propre crème et yaourt glacés préférés en suivant
l’une des recettes du livre de recettes inclus et les ingrédients communs dans toute cuisine.
• Le nettoyage est facile et rapide. Toutes les pièces qui entrent en contact avec la crème glacée
sont amovibles et prévues pour lave-vaisselle (râtelier du haut seulement; toutefois le bac de
mixage devraient être lavés avec de l’eau savonneuse chaude - et non pas mis au lave-vaisselle
à cause la température élevée du cycle de séchage).
• Pour garantir un fonctionnement optimal, la vanne a été prélubrifiée lors de sa fabrication.
Si elle semble se durcir, il suffit d'appliquer une fine couche de liquide ou de vaporiser
de l'huile de friture pour lui redonner son jeu habituel.
• La température de la plupart des bacs de congélateur ménagers se maintient généralement
entre 0ºF/-17ºC et 10ºF/-12ºC. Cet intervalle est nécessaire afin d'assurer une bonne
congélation dans le récipient à mélanger. Il est possible d'obtenir une crème glacée plus
épaisse en réduisant le réglage de la température du congélateur.
Lors de l’utilisation d’appareils électriques toujours prendre les précautions nécessaires,
incluant celles qui suivent:
• LISEZ TOUTES LES DIRECTIVES .
• Assurez vous que le cordon d’alimentation est bien enfoncé et que personne ne puisse
se prendre les pieds dans le cordon.
• NE PAS DEPLACER LA MACHINE SOFT SERVE PENDANT QU’ELLE EST EN
FONCTIONNEMENT (“ON”).
• UN CONTROLE ATTENTIF EST NECESSAIRE LORSQUE LA MACHINE EST EN MARCHE.
• Débranchez la machine Soft Serve de la prise de courant lorsque la machine n’est pas en
service ainsi qu’avant de la nettoyer. NOTE: ASSUREZ VOUS QUE LA MACHINE SOFT
SERVE EST ARRETEE “O” AVANT DE DEBRANCHER.
• Pour vous protéger des risques d’électrocution, ne plongez jamais le cordon, ou l’appareil dans
l’eau ou tout autre liquide.
PRÉCAUTIONS IMPORTANTES

15
• Ne pas laisser des enfants utiliser cet appareil sans qu’ils soient supervisés. Faites
particulièrement attention lorsque l’appareil est utilisé par, ou en présence d’enfants.
• Ne pas utiliser un appareil électrique dont le cordon ou la fiche électrique sont endommagés,
ni un appareil qui présente des problèmes de fonctionnement ou qui a subi une chute ou a été
endommagé de quelqu’autre manière que ce soit.Retourner l’appareil au Centre de Service
Autorisé le plus près aux fins d’inspection, de réparation, de réglage électrique ou mécanique.
• L’utilisation d’accessoires non conseillés ou vendus par le fabricant présente des risques
d’incendie, d’électrocution ou de blessure.
• Ne pas utiliser à l’extérieur ou à des fins commerciales. Ne pas utiliser l’appareil autre que pour
son utilisation intentionnelle.
• Ne laissez pas que le cordon pendre du bord d’une table ou d’un meuble; ne le laissez pas non
plus entrer en contact avec des surfaces chaudes.
• Ne jamais congeler les récipients de mélange dans de la neige carbonique ou autre milieu qui
peut atteindre des températures de - 30° F (-34°C) ou moins.
• Ne pas placer sur ou près d’un poêle chaud ou dans un four chaud.
• Ne rien poser, à aucun moment, sur le dessus ou proche de cet appareil.
• Les aliments solides, fruits, noix, bonbons ou autre articles solides doivent être introduits
directement dans la machine Home Soft Serve™ parce qu’ils risquent de se trouver coincés
dans la valve de distribution ou dans la vis de mélange et soit bloquer ou entraver l’arrivée de la
farine de soft serve (tous les ingrédients doivent être liquéfiés dans un mixer avant d’être
ajoutés dans la machine).
• Ne pas nettoyer la machine Home Soft Serve™ avec des recurants abrasifs.
• Ne pas poser la machine Home Soft Serve™ sur une table à roulettes, un stand ou table
instable. La machine Home Soft Serve™ pourrait tomber, causant des blessures à un enfant ou
un adulte, et des dégâts sérieux à l’appareil. N’utiliser qu’avec une table ou le pied recommandé
par le fabricant ou vendeur avec la machine Home Soft Serve™.
POUR USAGE DOMESTIQUE SEULEMENT
Un cordon d’alimentation court est fourni afin de réduire le risque d’emmêlement ou de chute posé
par un cordon plus long. On peut utiliser une rallonge à condition d’agir avec précaution. Quand
on utilise une rallonge, la puissance électrique nominale de celle-ci doit correspondre à celle de
l’appareil. Le cordon doit être disposé de façon à ne pas pendre du bord du comptoir ou de la
table, où il pourrait être tiré par un enfant ou pourrait faire trébucher quelqu’un.
PRODUITS ACHETÉS AUX ÉTATS-UNIS ET AU CANADA UNIQUEMENT:
Pour réduire le risque de choc électrique, cet appareil est doté d’une fiche polarisée (une broche
est plus large que l’autre), cette fiche ne va que dans un sens seulement sur une prise de courant
polarisée. Si la fiche ne s’enfonce pas complètement dans la prise, la retourne et essayer de
nouveau. Si elle ne s’adapte toujours pas à fond, consulter un électricien qualifié. Veillez à
respecter les mesures de securité de la prise polarisée.
CONSERVER CES INSTRUCTIONS

16
INSTRUCTIONS FACILE A SUIVRE POUR UTILISER LE SOFT SERVE
AVANT LA PREMIERE UTILISATION
Près avoir déballé l'appareil, laver le Bac à Mélange, le Vis Mélangeuse, Valve et le Panneau
d'Assemblage Extérieur de la machine avec de l'eau savonneuse chaude (tous les éléments
à l'exception de Bacs de Mélange peuvent être mis au lave-vaisselle, râtelier supérieur
seulement) et ensuite les sécher complètement (spécialement le Bac à Mélange). Ensuite
placer le Bac à Mélange dans le compartiment congélateur et le pré-congeler pendant au
moins 24 heures avant votre utilisation, vous pouvez aussi choisir de ranger votre bac dans
le congélateur afin qu'il soit toujours prêt à l'emploi; ensuite vous pourrez avoir soft serve
chez vous aussi souvent que vous le désirez.
CONGÉLATION DU BAC À MÉLANGER
L'étape la plus importante dans la préparation des glaces SOFT SERVE est de s'assurer de la bonne
congélation du Bac à Mélanger. Le Bac à Mélanger doit être parfaitement gelé. Il est conseillé de
placer le Bac à Mélanger à l'arrière du congélateur, où la température est la plus basse.
S'assurer que le Bac à Mélanger est parfaitement sec et le placer à l'arrière ou à l'endroit le plus
froid du congélateur.
Bac à Mélange Vis Mélangeuse
Valve
Panneau Frontal d'Assemblage

17
INSTRUCTIONS FACILE A SUIVRE POUR FAIRE DES SOFT SERVE CHEZ SOI!!!
5 ETAPES FACILES:
IMPORTANT: Précongeler le Bac à Mélanger"
24 Heures
à l'avance.
1. Incorporer le contenu d'un sachet de préparation dans 2-1/2 tasses
d'eau froide (ou suivre l'une des recettes ci-jointes) et bien mélanger.
2. Prendre le Bac à Mélange du congélateur et le poser debout sur un
plan de travail. Glisser la Vis Mélangeuse plastique blanche vers le
bas fermement, laisser descendre lentement dans le bac jusqu'à ce qu'il
repose bien sur le fond du Bac (A). Placer le panneau Frontal de la
machine sur le Bac Mélangeur (B), en
s'assurant que la partie argentée soit logée
au centre de la Vis Mélangeuse.
Exercer une pression vers le bas tout en
tournant dans le sens des aiguilles d'une
montre pour verrouiller le tout (C).
3. Glisser l'ensemble dans la machine jusqu'à
ce que le déclic se fasse entendre signifiant
que tout est en place (D).
4. Turner le bouton du distributeur situé sur le dessus de la machine pour
l'amener sur la position «FILL» (REMPLIR) et relever le bouton pour
ouvrir l'ouverture de «remplissage». IMPORTANT: Mettre la
machine en MARCHE avant de verser le mélange (il est possible
qu'un bruit de battage soit audible durant le fonctionnement; ceci est
parfaitement normal et provient de l'actionnement de la Vis par le moteur
à l'intérieur de l'appareil).
5. Verser les ingrédients dans l'orifice (E), fermer le capuchon et mettre
le bouton en position «MIX». Au bout de 20 à 25 minutes, placer
le bouton verseur bleu sur «Serve» et voilà la glace Soft Serve!
Ne pas mettre l'interrupteur d'alimentation en position ARRÊT avant
d'avoir complètement vidé le contenu de la machine Soft Serve.
• Après avoir utilisé tout le contenu de la machine Soft Serve, l'arrêter et
la débrancher (lorsqu'elle est en marche, la machine conserve la glace
congelée et prête à servir pendant 30 minutes environ à partir de
l'instant ou la crème gèle pour la première fois; le surplus de glace Soft
Serve peut se conserver pour une consommation ultérieure dans un
récipient à mettre au congélateur). Appuyer sur le bouton bleu
«Chamber Release» au sommet de la machine pour pouvoir sortir le
Bac à Mélanger. Faire ensuite tourner le Panneau Frontal dans le sens
inverse des aiguilles d'une montre pour le démonter du Bac; mettre le
bouton verseur bleu en position «Remove» et tirer pour extraire le
robiner afin de le nettoyer (si le robinet devient de plus en plus difficile
à tourner ou à démonter, il est possible de le lubrifier par une petite application d'huile de cuisine
liquide ou à vaporiser). Les pièces se lavent toutes à l'eau chaude savonneuse (à l'exception du
Bac à Mélanger, elles sont toutes lavables au lave-vaisselle, dans le panier du dessus). Toujours
veiller à ce que le Bac soit bien sec avant de le placer au congélateur.
ATTENTION: NE JAMAIS IMMERGER LA PARTIE PRINCIPALE DE L'APPAREIL DANS
L'EAU ETANT DONNE QUE C'EST LA PARTIE OU LE MOTEUR ET LES ELEMENTS
ELECTRIQUES SONT SITUES; L'EAU PEUT ENDOMMAGER CES ELEMENTS.

18
TRUCS
• La température peut varier d'un congélateur à l'autre. Le Bac ne gèlera pas dans un congélateur
réglé sur une température moyenne ou élevée. Le Bac gèle à -14°C (7°F). Si la crème glacée
est trop molle ou ne durcit pas, vérifier la température du congélateur et le régler de manière
à le maintenir en dessous de -15°C (5°F) (réglage le plus froid).
• Le Bac à Mélanger doit être précongelé au congélateur pendant au moins 24 heures avant
utilisation. Si le Bac est utilisé après une congélation de moins de 24 heures, la glace ne
prendra pas.
• Le robinet est prélubrifié à l'usine pour assurer un fonctionnement sans problème.
S'il est lavé au lave-vaisselle, le robinet peut se gripper. Il peut être rendu à son état initial
par une petite application d'huile de cuisine liquide ou à vaporiser.
• Le dos du couvercle Frontal présente un rebord circulaire. Le grand joint noir doit être placé
sur ce rebord. En l'absence de ce joint sur le rebord circulaire, le montage du couvercle
Frontal sur le Bac peut être difficile et des fuites de glace sont possibles ultérieurement.
• Vérifier que le joint est sec avant de monter le Panneau Frontal sur le Bac à Mélanger. Un joint
mouillé gèle très rapidement et rend le remontage de l'appareil plus difficile. Par ailleurs, si le
montage du Panneau Frontal sur le Bac devient de plus en plus difficile, appliquer une petite
quantité d'huile de cuisine liquide ou à vaporiser sur le joint noir pour lubrifier.
• Le robinet doit être introduit de manière à appuyer fermement sur le fond du Panneau Frontal
afin d'assurer une bonne étanchéité.
• La crème glacée à l'intérieur du Bac se solidifie progressivement. Si la machine Soft Serve™
est laissée allumée sans surveillance pendant plus de 30 à 35 minutes, la glace peut durcir
au point de bloquer la machine. Si la machine est bloquée, elle ne peut pas servir de glace.
• Vérifier que le Bac à Mélanger est totalement sec après lavage. Si le Bac est placé au
congélateur encore mouillé, ses engrenages peuvent geler et bloquer l'actionnement
de la Vis sans fin à l'intérieur.
• TRÈS IMPORTANT: Veiller à mettre l'appareil en MARCHE avant de verser la préparation
à crème glacée. Si la préparation est versée dans le Bac avant d'allumer l'appareil,
elle durcira rapidement et empêchera la Vis sans fin de tourner.
• Si le Bac ne s'enclenche pas dans l'appareil lorsqu'il y est introduit, le ressortir et faire
légèrement tourner les engrenages à l'arrière du Bac avant de le remettre en place dans
la machine. Ceci devrait permettre un engagement correct.
• La tige métallique présente une légère courbure. S'assurer que cette courbure est orientée
vers le milieu de la Vis sans fin. Si la courbure est tournée vers l'extérieur de la Vis sans fin,
la tige heurtera la Vis durant sa rotation, ce qui produira un cliquetis.
• Vérifier que la tige métallique est sur le Panneau Frontal avant de monter l'ensemble sur
la machine. En l'absence de tige métallique, l'appareil ne mélange pas le contenu et la glace
se dépose au fond du Bac.

19
RECETTES SOFT SERVE FACILES A FAIRE CHEZ SOI!!!
RECETTES DE GLACES MOLLES SOFT SERVE
Vanille
12 oz./360 ml. de Crème Fraîche 1/2 de Tasse de Sucre
12 oz./360 ml. de Lait Complet 1-1/2 Cuillère à Café d'Extrait de Vanille
Verser la crème, le lait, le sucre et la vanille dans un bol à mélanger. Remuer les ingrédients à la
main jusqu'à dissolution complète du sucre. Suivre les instructions 1 à 3, mettre la machine en
marche et verser le mélange dans l'orifice «Fill» au sommet de la machine (voir intructions 4 et 5).
Chocolat
12 oz./360 ml. de Crème Fraîche 3/4 de Tasse de Sucre
3 Cuillerées à Soupe de Cacao en Poudre 12 oz./360 ml. de Lait Complet
1 Cuillère à Café d'Extrait de Vanille
Verser la crème, le lait, le sucre, le cacao et la vanille dans un bol à mélanger. Remuer les
ingrédients à la main jusqu'à dissolution complète du sucre. Suivre les instructions 1 à 3,
mettre la machine en marche et verser le mélange dans l'orifice «Fill» au sommet de la machine
(voir intructions 4 et 5).
Chocolat Amande
12 oz./360 ml. de Crème Fraîche 3/4 de Tasse de Sucre
3 Cuillerées à Soupe de Cacao en Poudre 12 oz./360 ml. de Lait Complet
1/2 Cuillerée à Café d'Extrait d'Amande
Verser la crème, le lait, le sucre, l'extrait d'amande et le cacao dans un bol à mélanger.
Remuer les ingrédients à la main jusqu'à dissolution complète du sucre. Suivre les instructions
1 à 3, mettre la machine en marche et verser le mélange dans l'orifice «Fill» au sommet de la
machine (voir intructions 4 et 5).
Fraise
8 oz./225 g de Fraises Surgelées Non Sucrées (En Purée)
10 oz./300 ml. de Lait Complet
4 oz./120 ml. de Crème Fraîche
3/4 de Tasse de Sucre
Passer les fraises en purée au mélangeur. Verser les fraises en purée, la crème, le lait et le sucre
dans un bol à mélanger. Remuer les ingrédients à la main jusqu'à dissolution complète du sucre.
Suivre les instructions 1 à 3, mettre la machine en marche et verser le mélange dans l'orifice «Fill»
au sommet de la machine (voir intructions 4 et 5).

20
Pêche
8 oz./225 g de Pêches Surgelées Non Sucrées (En Purée)
10 oz./300 ml. de Lait Complet
4 oz./120 ml. de Crème Fraîche
3/4 de Tasse de Sucre
Passer les pêches en purée au mélangeur. Verser les pêches en purée, la crème, le lait et le sucre
dans un bol à mélanger. Remuer les ingrédients à la main jusqu'à dissolution complète du sucre.
Suivre les instructions 1 à 3, mettre la machine en marche et verser le mélange dans l'orifice «Fill»
au sommet de la machine (voir intructions 4 et 5).
Bleuet
8 oz./225 g Bleuets Surgelés Non Sucrés (En Purée)
10 oz./300 ml. de Lait Complet
4 oz./120 ml. de Crème Fraîche
3/4 de Tasse de Sucre
Passer les bleuets en purée au mélangeur. Verser les bleuets en purée, la crème, le lait et le sucre
dans un bol à mélanger. Remuer les ingrédients à la main jusqu'à dissolution complète du sucre.
Suivre les instructions 1 à 3, mettre la machine en marche et verser le mélange dans l'orifice «Fill»
au sommet de la machine (voir intructions 4 et 5).
Ananas
1 Tasse d'Ananas En Boîte Non Sucré (En Purée)
10 oz./300 ml. de Lait Complet
6 oz./180 ml. de Crème Fraîche
3/4 de Tasse de Sucre
Passer l'ananas en purée au mélangeur. Verser l'ananas en purée, la crème, le lait et le sucre
dans un bol à mélanger. Remuer les ingrédients à la main jusqu'à dissolution complète du sucre.
Suivre les instructions 1 à 3, mettre la machine en marche et verser le mélange dans l'orifice «Fill»
au sommet de la machine (voir intructions 4 et 5).
Désir à la Pêche
8 oz./240 ml. de Soda à la Pêche
8 oz./240 ml. de Crème Fraîche
8 oz./240 ml. de Lait Complet
1/2 de Tasse de Sucre
Verser le soda, la crème, le lait et le sucre dans un bol à mélanger. Remuer les ingrédients à la
main jusqu'à dissolution complète du sucre. Suivre les instructions 1 à 3, mettre la machine en
marche et verser le mélange dans l'orifice «Fill» au sommet de la machine (voir intructions 4 et 5).
A página está carregando...
A página está carregando...
A página está carregando...
A página está carregando...
A página está carregando...
A página está carregando...
A página está carregando...
A página está carregando...
A página está carregando...
A página está carregando...
A página está carregando...
A página está carregando...
A página está carregando...
A página está carregando...
A página está carregando...
A página está carregando...
A página está carregando...
A página está carregando...
A página está carregando...
A página está carregando...
A página está carregando...
A página está carregando...
A página está carregando...
A página está carregando...
A página está carregando...
A página está carregando...
A página está carregando...
A página está carregando...
A página está carregando...
A página está carregando...
A página está carregando...
A página está carregando...
A página está carregando...
A página está carregando...
A página está carregando...
A página está carregando...
-
 1
1
-
 2
2
-
 3
3
-
 4
4
-
 5
5
-
 6
6
-
 7
7
-
 8
8
-
 9
9
-
 10
10
-
 11
11
-
 12
12
-
 13
13
-
 14
14
-
 15
15
-
 16
16
-
 17
17
-
 18
18
-
 19
19
-
 20
20
-
 21
21
-
 22
22
-
 23
23
-
 24
24
-
 25
25
-
 26
26
-
 27
27
-
 28
28
-
 29
29
-
 30
30
-
 31
31
-
 32
32
-
 33
33
-
 34
34
-
 35
35
-
 36
36
-
 37
37
-
 38
38
-
 39
39
-
 40
40
-
 41
41
-
 42
42
-
 43
43
-
 44
44
-
 45
45
-
 46
46
-
 47
47
-
 48
48
-
 49
49
-
 50
50
-
 51
51
-
 52
52
-
 53
53
-
 54
54
-
 55
55
-
 56
56


Oster Frozen Dessert Maker 4749 Manual do usuário
- Categoria
- Fabricantes de sorvete
- Tipo
- Manual do usuário
- Este manual também é adequado para
em outras línguas
Artigos relacionados
Outros documentos
-
Hamilton Beach 730N Guia de usuario
-
Philips HR 2303 Manual do usuário
-
Proctor-Silex 840292601 Guia rápido
-
Sunbeam 2504 Manual do usuário
-
-
Fagor ICE-15 Manual do proprietário
-
Philips HR 7756 Manual do usuário
-
Princess 282601 Especificação
-
Philips Essence HR7754 Manual do usuário
-