
STAND UP PADDLE BOARD
Version 2.0 – 03/2022
Bedienungsanleitung
User manual
Mode d‘emploi
Gebruiksaanwijzing
Brugermanual
Bruksanvisningar
Käyttöohjeet
Manuale d‘uso
Manual de usuario
Instrukcja użytkownika
Uživatelská příručka
Manual do utilizador
Navodila za uporabo
Naudotojo vadovas
Bruksanvisning
Manual de utilizare
DE
EN
FR
NL
DA
SE
FI
IT
ES
PL
CS
PT
SK
LT
NO
RO
002
012
021
031
041
050
059
068
078
088
098
106
115
124
133
142

2
DEUTSCH
LIEFERUMFANG
• Stand Up Paddel (SUP) Board
• Finne
• Luftpumpe
• Repair Kit
ALLGEMEINES
Bitte lesen Sie diese Anleitung sorgfältig durch.
Das Handbuch deckt keinen Kurs zu Sicherheitsrichtlinien ab. Eignen Sie sich vor dem ersten
Paddelausug zu Ihrer Sicherheit Erfahrung in der Handhabung und Bedienung an. Besorgen Sie
sich gegebenenfalls Informationen über Wassersportschulen oder besuchen Sie Kurse. Stellen
Sie sicher, dass die Vorhersage zu Wind und Seegang für Ihr Paddelboard geeignet ist und Sie es
unter diesen Bedingungen nutzen können.
Bitte informieren Sie sich vor Inbetriebnahme über örtliche Bestimmungen oder Sonderzulassungen
in jedem Land. Halten Sie Ihr Paddelboard immer ordnungsgemäß in Stand. Jedes Paddelboard
kann durch unsachgemäßen Gebrauch ernsthaft beschädigt werden. Berücksichtigen Sie bei der
Geschwindigkeit und Steuerung des Boards den Seegang. Jeder Nutzer des Boards sollte eine
geeignete Auftriebshilfe (Schwimmweste / Rettungsschwimmkörper) tragen.
Bitte beachten Sie, dass es in manchen Ländern vorgeschrieben ist, eine Auftriebshilfe, die den
nationalen Bestimmungen entspricht, zu tragen. Bitte bewahren Sie dieses Handbuch an einem
sicheren Ort auf und übergeben Sie es beim Verkauf an den neuen Besitzer.
ACHTUNG: NICHTBEACHTUNG DER SICHERHEITSVORGABEN UND DER HINWEISE IM HANDBUCH
ODER ZUM PRODUKT KANN ZU VERLETZUNGEN ODER IM EXTREMEN FALL SOGAR ZUM TOD
FÜHREN.
• Überprüfen Sie die maximale Belastbarkeit des Boards und halten Sie sich daran.
• Tragen Sie immer einen von der Küstenwache zugelassenen Rettungsschwimmkörper.
• Das Board-Set ist nur für Personen geeignet, die schwimmen können.
• Das Board erfordert die Fähigkeit auszubalancieren. Nutzen Sie das Board nur mit
entsprechenden Fähigkeiten.
• Gebrauchen Sie das Board niemals bei ablandigem Wind (Wind, der vom Land in Richtung
Gewässer weht).
• Gebrauchen Sie das Board niemals bei ablandiger Strömung (Strömung, die vom Ufer
fortführt).
• Gebrauchen Sie das Board nicht bei Wellengang.
• Halten Sie eine sichere Entfernung zum Ufer von 50m ein.
• Tragen Sie immer eine Sicherheitsleine/Leash (nur optional im Lieferumfang enthalten). Wind
und Strömung lassen das Board möglicherweise schneller abtreiben.

3
• Springen Sie nie mit dem Kopf voraus vom Board ins Wasser.
• Seien Sie vorsichtig bei Ris; fahren Sie nicht in Stromschnellen.
• Das Paddelboard darf nicht an ein Boot angehängt und gezogen werden.
• Das Stand Up Paddelboard ist kein Spielzeug und nicht für Kinder unter 14 Jahren geeignet.
Lassen Sie Minderjährige das Board nie ohne Aufsicht nutzen.
• Nutzen Sie das Board nie nach Sonnenuntergang, vor der Morgendämmerung oder in Zeiten
mit schlechten Lichtverhältnissen.
• Prüfen Sie örtliche Gesetze und Bestimmungen für den sachgemäßen und sicheren Gebrauch
dieses Produkts.
• Setzen Sie das Paddelboard außerhalb des Wassers keiner direkten Sonneneinstrahlung aus.
• Halten Sie das Board von scharfkantigen Gegenständen fern.
• Blasen Sie die Luftkammer mit dem vorschriftsmäßigen Druck auf.
• Pumpen Sie nicht mit einem Kompressor auf.
• Ziehen Sie das Ventil fest, bevor Sie das Board zu Wasser lassen. Lassen Sie nach Gebrauch
Druck ab.
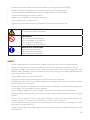
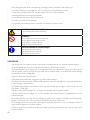
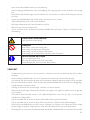
ACHTUNG/GEFAHR/WARNUNG
Kein Schutz vor Ertrinken
VERBOTEN
Einsatz im Wildwasser verboten
Einsatz bei Wellenbrechern verboten
Einsatz bei Strömung verboten
Einsatz bei ablandigem Wind verboten
VERBINDLICHE RICHTLINIEN
Lesen Sie zuerst die Anleitung
Pumpen Sie alle Luftkammern vollständig auf
Nur für Schwimmer geeignet
SICHERHEIT
• Paddeln Sie niemals ohne eine weitere Person in der Nähe, wenn Sie sich nicht in gesicherten
Badebereichen benden.
• Verwenden Sie das Board-Set niemals, wenn Sie unter Medikamenten-, Alkohol oder
Drogeneinuss stehen.
• Gehen Sie bei der Nutzung des Boards vorausschauend und vorsichtig vor und überschätzen
Sie nie lhre eigenen Fähigkeiten. Teilen Sie lhre Muskelkraft beim Paddeln so ein, dass Sie die
gefahrene Strecke immer wieder zurückpaddeln können.
• Paddeln Sie nur in küstennahen Gewässern.
• Halten Sie Abstand von Stromquellen, Treibgut und anderen Hindernissen.
• Machen Sie sich mit den örtlichen Sicherheitsvorschriften, Warnhinweisen und Regeln für
Bootsaktivitäten vertraut, bevor Sie aufs Wasser gehen.
• lnformieren Sie sich bei der örtlichen Wetterinformation über die aktuellen Wasser¬ und

4
Wetterbedingungen, bevor Sie aufs Wasser gehen. Paddeln Sie nicht bei Unwetter.
• Stellen Sie beim Paddeln sicher, dass das Gewicht auf dem Board stets gleichmäßig verteilt
ist.
• Achten Sie beim Paddeln darauf, dass sich lhre Füße nicht in der Befestigungsschnur oder
dem Tragegri verfangen.
• Verwenden Sie das Board nicht, wenn es ein Leck hat und Luft verliert. Reparieren Sie das
Leck wie im Kapitel ,,Reparaturen“ beschrieben oder wenden Sie sich über die Serviceadresse
an den Hersteller.
• Lassen Sie niemals mehrere Personen gleichzeitig das Board verwenden. Es ist ausschließlich
dazu konzipiert, die Last eines einzigen Erwachsenen zu tragen.
• Informieren Sie andere Personen gründlich über Regeln und Sicherheitshinweise, bevor Sie
sie das Board-Set benutzen lassen.
WARNUNG
• Paddel, Finnen und das aufgepumpte Board sind hart und können Verletzungen verursachen.
• chten Sie beim Transport des Board-Sets auf umstehende Personen.
• Achten Sie beim Paddeln auf andere Personen, die sich im Wasser benden.
• Wenn Sie bei kalten Temperaturen ins Wasser fallen, können Sie sich unterkühlen.
• Tragen Sie einen Thermoanzug, wenn Sie mit dem Board bei kalten Temperaturen paddeln.
• Strangulationsgefahr! Kleinkinder können sich in den Schnüren des Boards und der
Sicherungsleine verfangen und sich strangulieren.
• Halten Sie das Board von Kleinkindern fern!
HINWEIS
• Beschädigungsgefahr! Das Board ist für einen Fülldruck von maximal 1bar (15 PSI) zugelassen.
Bei höherem Druck wird das Material überdehnt und kann reißen.
• Pumpen Sie das Board auf einen Fülldruck bis maximal 1bar (15 psi) auf.
• Wenn der Druck über 1,0 bar (15 psi) liegt, önen Sie das Ventil und lassen Sie etwas Luft ab.
• Die Außenhaut des Boards kann bei Kontakt mit anderen Gegenständen und Materialien
beschädigt werden.
• Halten Sie sich mit dem Board von steinigen Ufern, Molen oder Untiefen fern.
• Lassen Sie keine Öle, ätzenden Flüssigkeiten oder Chemikalien wie Haushaltsreiniger,
Batteriesäure oder Treibstoe mit der Außenhaut in Kontakt kommen. Sollte dies dennoch
passieren, prüfen Sie die Außenhaut gründlich auf Lecks oder andere Beschädigungen.
• Halten Sie das Board von Feuer und heißen Gegenständen (wie z. B. glühenden Zigaretten)
fern.
• Gefahr von Druckverlust! Wenn das Ventil nicht richtig geschlossen ist, kann sich der Druck im
Board ungewollt verringern oder das Ventil kann verunreinigt werden.
• Halten Sie das Ventil immer geschlossen, wenn Sie das Board nicht gerade aufpumpen oder
die Luft ablassen.
• Achten Sie darauf, dass der Bereich um das Ventil immer sauber und trocken ist.
• Verhindern Sie, dass Sand oder andere Verunreinigungen in das Ventil gelangen.

5
• Bei einem Druckverlust überprüfen Sie auch das Ventil, falls dieses evtl. undicht ist. Bitte
befolgen Sie hierzu die Schritte in der Reparaturanleitung.
• Gefahr des Abtreibens! Ohne eine Sicherungsleine kann das Board abtreiben und verloren
gehen.
• Verwenden Sie eine Sicherungsleine mit dem Board, sofern Sie sich nicht in gesicherten
Bereichen aufhalten und das Ufer sicher schwimmend erreichen können.
Hinweise wenn das Board nicht im Einsatz auf dem Wasser ist
• Setzen Sie das Board nicht über längere Zeit der direkten Sonneneinstrahlung aus,
insbesondere bei heißen Temperaturen, wenn es nicht auf dem Wasser ist. Durch die starke
Erwärmung und Ausdehnung der Luft im Inneren des Boards (bis 100 Grad), kann sich der
Druck stark erhöhen und zu Beschädigungen des Boards bis hin zum Aufplatzen der Nähte
führen. Bei der Nutzung auf dem Wasser wird die Wärme durch den direkten Wasserkontakt
abgeführt. Auch ein Transport auf einem Dachgepäckträger ist unbedenklich, wenn das
Fahrzeug sich fortbewegt. Durch den Fahrtwind wird die Wärme abtransportiert.
• Lagern Sie das Board bei Nichtbenutzung im Schatten und vermeiden Sie direkte
Sonneneinwirkung.
• Reduzieren Sie den Druck durch Ablassen von Luft.
• Pumpen Sie das Board vor der Nutzung gemäß der allgemeinen Hinweise wieder auf.
AUFBAU
Bitte verwenden Sie kein scharfes Werkzeug!
ENTFALTEN DES BOARDS
Suchen Sie eine glatte und saubere Fläche zum Entfalten des Schlauchkörpers.
Zum ersten Aufpumpen und damit Sie sich mit Ihrem neuen Produkt vertraut machen, empfehlen
wir Ihnen, dieses bei Raumtemperatur aufzupumpen. Das PVC-Material ist weich, was die Montage
erleichtert. Wurde das Paddelboard bei einer Temperatur unter 0°C gelagert, so bewahren Sie es
vor dem Entfalten 12 Stunden lang bei 20°C auf.

6
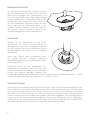
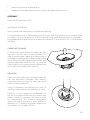
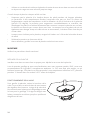
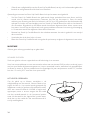
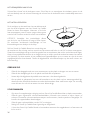
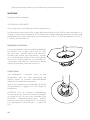
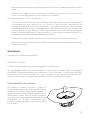
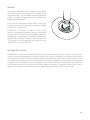
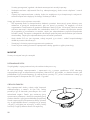
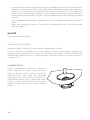
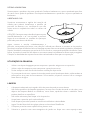
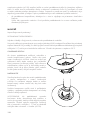
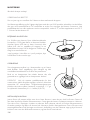
BEDIENUNG DES VENTILS
Um das Board aufzupumpen, nehmen Sie bitte
die Sicherheitskappe des Ventils ab. Drehen Sie
diese hierzu entgegen des Uhrzeigersinns auf.
Das Ventil wird durch einen federvorgespannten
Einsatz geönet (beim Luftablassen unten) oder
geschlossen (beim Aufpumpen oben). Bevor Sie
mit dem Aufpumpen beginnen, stellen Sie bitte
sicher, dass sich die Ventileinsatznadel in der
„oberen“ Position bendet. Steht die Nadel in
der „unteren“ Position, drücken Sie bitte auf die
Ventileinsatznadel bis sie nach oben springt.
AUFPUMPEN
Stecken Sie die Schlauchtülle in das Ventil
des Boards und drehen Sie den Aufsatz im
Uhrzeigersinn. Nach dem Aufpumpen nehmen
Sie den Schlauch ab und verschließen Sie die
Sicherheitskappe des Ventils, um es endgültig
abzudichten.
Durch den Einsatz eines Kompressors kann
Ihr Artikel Schaden nehmen; sämtliche
Gewährleistungsansprüche verfallen beim Einsatz
eines Kompressors.
ACHTUNG: Wenn Sie das Paddelboard der
heißen Sonne aussetzen, prüfen Sie bitte den
Luftdruck und lassen ein wenig Luft ab, andernfalls
könnte das Material überdehnt werden. Die
Umgebungstemperatur beeinusst den Innendruck der Kammern: eine Abweichung von 1°C führt
zu einer Druckabweichung in der Kammer von +/-4 mBar (.06 PSI).
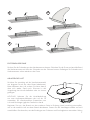
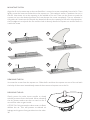
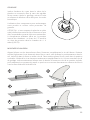
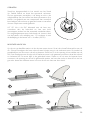
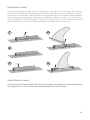
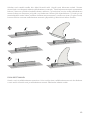
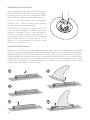
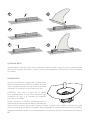
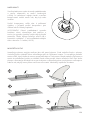
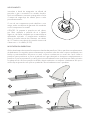
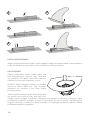
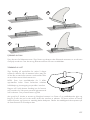
MONTAGE DER FINNE
Richten Sie die Finne wie die beiden xierten Finnen aus. Lösen Sie die Schraube komplett von der
Finne. Drehen Sie die lose Schraube dann wieder leicht in die Vierkantmutter ein. Dies erleichtert
die Positionierung der Mutter in der Schiene. Führen Sie nun diese in die Önung in der Mitte
der Schiene ein. Schieben Sie dann mit Hilfe der Schraube die Vierkantmutter in die gewünschte
Position und lösen Sie die Schraube nun komplett. Die Mutter verbleibt in der Führungsschiene.
Führen Sie nun die Finne mit dem Messingbolzen voran an der Önung der Schiene in gekippter
Stellung ein, richten Sie diese dann auf und schieben Sie die Finne so weit, bis das Loch direkt über
der Vierkantmutter steht und xieren Sie darin die Finne mit der Schraube.

7
ENTFERNEN DER FINNE
Drehen Sie die Schraube aus der Vierkantmutter heraus. Schieben Sie die Finne und anschließend
die Vierkantmutter mit Hilfe der Schraube aus der Schiene heraus. Befestigen Sie Schraube und
Vierkantmutter sofort wieder an der Finne.
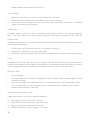
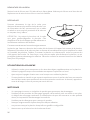
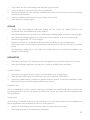
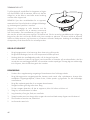
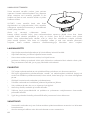
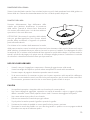
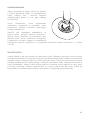
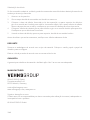
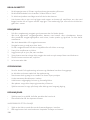
ABLASSEN DER LUFT
Drücken Sie vorsichtig auf die Ventileinsatznadel,
um langsam Druck aus dem Board abzulassen.
Beim Ablassen der Luft achten Sie bitte darauf,
dass sich weder Sand noch Schmutz in der
Umgebung des Ventils benden oder ins Innere
gelangen.
ACHTUNG: Nehmen Sie die Ventilabdeckung
nur zum Aufpumpen/Ablassen der Luft ab. So
vermeiden Sie versehentliches Entweichen von
Luft und Eindringen jeglicher Partikel ins Ventil.
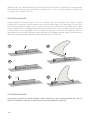
Beginnen Sie nun, das Board von der vorderen Seite in Richtung Ventil vorsichtig einzurollen,
um so die restliche Luft aus dem Board abzulassen. Setzen Sie die Ventilkappe wieder auf und
verschließen Sie diese fest, um das Eindringen von Schmutz und Feuchtigkeit zu vermeiden. Falten
2
3
4
1
5

8
Sie das Stand Up Paddelboard nun wieder auseinander und beginnen Sie mit dem Einrollen von
der anderen Seite aus, auf der sich das Ventil bendet. Auf diese Weise lässt sich das Board besser
falten und die Finnen sind gleichzeitig besser geschützt. Setzen Sie zum Schutz die mitgelieferten
Schaumstopolster auf die xierten Finnen auf.
BOARD VERWENDEN
• Verwenden Sie die Gepäckschnur, um auf dem Board zusätzliche Gegenstände zu
transportieren und zu sichern.
• Verwenden Sie den Tragegri, wenn Sie das Board an Land transportieren möchten.
• Führen Sie immer das mitgelieferte Paddel mit sich, wenn Sie das Board verwenden.
• Wenn Ihr Board gekentert ist und mit der Oberseite auf der Wasseroberache liegt, drehen
Sie es mit beiden Händen um, sodass die Oberseite wieder nach oben gerichtet ist. Begeben
Sie sich ggf. ans Ufer, wenn es Ihnen aus dem Wasser heraus nicht möglich ist.
REINIGUNG
• Unsachgemäße oder unregelmäßige Reinigung des Board-Sets kann zu Beschädigungen
führen.
• Verwenden Sie keine aggressiven Reinigungsmittel, Bürsten mit Metall- oder Nylonborsten
sowie keine scharfen oder metallischen Reinigungsgegenstände wie Messer, harte Spachtel
und dergleichen. Sie können die Oberächen beschädigen.
• Verwenden Sie keine Lösungsmittel zur Reinigung des Board-Sets.
• Reinigen Sie das Board nach jeder Verwendung gründlich.
• Sie können das Board reinigen, wenn es aufgepumpt ist oder wenn die Luft abgelassen ist:
• Vergewissern Sie sich, dass die Ventilkappe festgeschraubt ist.
1. Legen Sie das Board auf eine glatte, ebene und trockene Oberäche.
2. Sprühen Sie das Board mit einem Gartenschlauch ab oder reinigen Sie es mit einem weichen,
mit sauberem Leitungswasser angefeuchteten Schwamm.
3. Wischen Sie das Board mit einem trockenen, weichen Tuch sauber und lassen Sie es
vollständig trocknen.
LAGERUNG
• Beschädigungsgefahr! Unsachgemäße Lagerung des Boards und dessen Zubehör kann zu
Schimmelbildung führen.
• Lassen Sie alle Teile des Board-Sets vor der Lagerung vollständig trocknen.
• Lassen Sie die Luft vollständig aus dem Board ab und stellen Sie sicher, dass das Ventil in der
geöneten Position xiert ist.
• Lagern Sie das zusammengerollte Board in der Tragetasche.
• Lagern Sie das Board-Set für Kinder unzugänglich und sicher verschlossen.
• Legen Sie keine schweren oder scharfkantigen Gegenstände auf das Board-Set.
• Prüfen Sie das Board nach längerer Lagerung auf Abnutzungs- oder Alterungserscheinungen.

9
REPARATUREN
• Überprüfen Sie das Board vor jeder Verwendung auf Druckverlust, Löcher oder Risse.
• Lassen Sie immer die Luft ab, bevor Sie das Board reparieren.
LECKS SUCHEN
1. Überprüfen Sie, dass sich kein Sand oder andere Fremdkörper im Ventil benden.
2. Pumpen Sie das Board vollständig auf wie im Kapitel „Board aufpumpen“ beschrieben.
3. Spülen Sie das Board einschließlich des Bereichs um das Ventil herum mit Seifenwasser ab.
Wo es zu einer Blasenbildung kommt, bendet sich das zu reparierende Leck.
Undichtes Ventil
Falls die Blasen um das Ventil herum auftreten, bedeutet das wahrscheinlich, dass das Ventil
nicht vollständig fest schließt. Schrauben Sie das Ventil in diesem Fall mit dem im Reparaturset
mitgelieferten Ventilschlüssel im Uhrzeigersinn fest.
Defektes Ventil
Falls sich bei aufgepumptem Board weder auf der Hülle noch um das Ventil herum Blasen bilden,
kann das bedeuten, dass das Ventil defekt ist:
1. Setzen Sie die Ventilkappe auf das Ventil und drehen Sie sie im Uhrzeigersinn fest.
2. Befeuchten Sie die verschlossene Ventilkappe mit Seifenwasser.
3. Falls sich nun Blasen bilden, muss das Ventil vollständig ausgewechselt werden (siehe Kapitel
„Ventil auswechseln“).
Lecks
Falls sich auf der Außenhaut Blasen bilden, können Sie das Leck mit speziellem Klebsto und dem
im Reparaturset mitgelieferten Materialicken abdichten (siehe Kapitel „Lecks abdichten“). Falls
das aufgepumpte Board an Steigkeit verliert, muss nicht unbedingt ein Leck die Ursache sein.
Auch Temperaturschwankungen können zu Druckabfall führen.
LECKS ABDICHTEN
• Beschädigungsgefahr!
• Nicht jeder Klebsto ist zur Reparatur des Boards geeignet. Reparaturen mit ungeeignetem
Klebsto können zu weiteren Beschädigungen führen.
• Verwenden Sie ausschließlich speziellen Klebsto für Schlauchboote. Sie erhalten solchen
Klebsto im Fachhandel.
• Löcher oder Risse können Sie mit Klebsto und dem im Reparaturset mitgelieferten
Materialicken abdichten.
• Lassen Sie vor der Reparatur die Luft aus dem Board ab.

10
Kleinere Lecks (kleiner als 2 mm)
Lecks, die kleiner als 2 mm sind, lassen sich mit Klebsto reparieren:
1. Reinigen Sie die zu reparierende Stelle gründlich.
2. Lassen Sie die zu reparierende Stelle vollständig trocknen.
3. Tragen Sie auf das Leck einen kleinen Tropfen Klebsto auf.
4. Lassen Sie den Klebsto ca.12 Stunden trocknen.
Größere Lecks (größer als 2 mm)
Lecks, die größer als 2 mm sind, lassen sich mit Klebsto und Materialicken reparieren:
1. Reinigen Sie die zu reparierende Stelle gründlich und lassen Sie diese vollständig trocknen.
2. Schneiden Sie aus dem Materialicken ein Stück heraus, welches das Leck auf jeder Seite um
ca. 1,5 cm überragt.
3. Tragen Sie auf der Unterseite des herausgeschnittenen Materialickens Klebsto auf.
4. Bestreichen Sie das Leck und die umliegende Außenhaut über die gesamte Größe des
Materialickens dünn mit Klebsto.
5. Lassen Sie den Klebsto 2-4 Minuten anziehen, bis er sichtbar klebrig ist.
6. Setzen Sie den ausgeschnittenen Materialicken auf das Leck und drücken Sie ihn fest an.
7. Lassen Sie den Klebsto ca. 12 Stunden trocknen.
8. Um den Bereich vollständig zu versiegeln, tragen Sie nach dem Trocknen noch einmal
Klebsto auf die Ränder des Materialickens auf.
9. Lassen Sie den Klebsto ca. 4 Stunden trocknen.
Prüfen Sie vor dem nächsten Gebrauch des Boards im Wasser, ob das Leck wirklich vollständig
abgedichtet ist. Falls es immer noch zu Blasenbildung kommt, geben Sie das Board zur Reparatur
in eine Fachwerkstatt oder wenden Sie sich an die in dieser Anleitung angegebene Serviceadresse.
Ventil auswechseln
Falls das Ventil ausgewechselt werden muss, können Sie bei der angegebenen Serviceadresse ein
Ersatzventil bestellen.
1. Lassen Sie die Luft aus dem Board ab.
2. Drehen Sie die Ventilkappe gegen den Uhrzeigersinn und nehmen Sie sie ab.
3. Legen Sie den Ventilschlüssel aus dem mitgelieferten Reparaturset an das Oberteil des
Ventils und drehen Sie es gegen den Uhrzeigersinn los. Fixieren Sie dabei mit der Hand das
innerhalb des Boards liegende Unterteil des Ventils und achten Sie darauf, dass es nicht ins
Board rutscht.
4. Setzen Sie das Ersatzventil auf das Unterteil und drehen Sie es im Uhrzeigersinn fest. Achten
Sie dabei darauf, dass das Ventil mittig sitzt.
5. Nehmen Sie den Ventilschlüssel und ziehen Sie das Oberteil des Ventils im Uhrzeigersinn
fest.
Prüfen Sie vor der nächsten Verwendung des Boards, ob das Ventil wirklich schließt.

11
ENTSORGUNG
Entsorgen Sie die Verpackung sortenrein. Geben Sie Pappe und Karton zum Altpapier. Folien in
die Wertstosammlung.
Entsorgen Sie das Board-Set entsprechend der örtlichen Bestimmungen und Gesetze.
GARANTIE
Die Garantie auf Material- und Herstellungsfehler beträgt 2 Jahre bei ordnungsgemäßem
Gebrauch.
HERSTELLER
VEHNSGROUP GmbH
Theatinerstraße 40-42
80333 München
Deutschland
www.vehnsgroup.com, www.yeaz.eu
Änderungen und Irrtümer vorbehalten
Der Hersteller übernimmt keine Haftung für Schäden, die durch fehlerhafte, unsachgemäße oder
unvereinbare Verwendung des Produkts entstehen.
© VEHNS GROUP GmbH

12
ENGLISH
DELIVERY CONTENTS
• Stand Up Paddle (SUP) Board
• Fin
• Air pump
• repair kit
GENERAL
Please read this manual carefully.
The manual does not cover a course on safety guidelines. For your safety, gain experience in
handling and operation before your rst paddling trip. Obtain information on water sports schools
or attend classes if necessary. Make sure the forecast for wind and swell is suitable for your
paddleboard and that you can use it under these conditions.
Please check local regulations or special permits in each country before operating. Always keep
your paddleboard properly maintained. Any paddleboard can be seriously damaged by improper
use. Consider the sea state when speeding and steering the board. Each user of the board should
wear an appropriate buoyancy aid (life jacket/life preserver).
Please note that in some countries it is mandatory to wear a buoyancy aid that complies with
national regulations. Please keep this manual in a safe place and hand it over to the new owner
upon sale.
CAUTION: FAILURE TO FOLLOW THE SAFETY INSTRUCTIONS AND WARNINGS IN THE MANUAL OR
WITH THE PRODUCT MAY RESULT IN INJURY OR, IN EXTREME CASES, DEATH.
• Check and adhere to the maximum load capacity of the board.
• Always wear a Coast Guard approved rescue oat.
• The board set is only suitable for people who can swim.
• The board requires the ability to balance. Use the board only with appropriate skills.
• Never use the board in oshore wind (wind blowing from land towards water).
• Never use the board in oshore currents (currents moving away from the shore).
• Do not use the board in waves.
• Keep a safe distance from the shore of 50m.
• Always wear a safety leash (only included as an option). Wind and current may cause the
board to drift faster.
• Never jump o the board head rst into the water.
• Be careful of reefs; do not ride rapids.
• Do not hook the paddleboard to a boat and pull it.
• The Stand Up Paddleboard is not a toy and is not suitable for children under the age of 14.
Never allow minors to use the board without supervision.

13
• Never use the board after sunset, before dawn, or during periods of low light.
• Check local laws and regulations for proper and safe use of this product.
• Do not expose the paddleboard to direct sunlight when out of the water.
• Keep the board away from sharp objects.
• Inate the air chamber to the proper pressure.
• Do not inate with a compressor.
• Tighten the valve before launching the board. Release pressure after use.
CAUTION/DANGER/WARNING
No protection against drowning
PROHIBITED
Use in white water prohibited
Use in breakwaters prohibited
Use in currents prohibited
Use in oshore wind prohibited
MANDATORY GUIDELINES
Read the instructions rst
Fully inate all air chambers
Only suitable for swimmers
SAFETY
• Never paddle without another person nearby unless you are in secured bathing areas.
• Never use the board set if you are under the inuence of medication, alcohol or drugs.
• Exercise foresight and caution when using the board and never overestimate your own
abilities. When paddling, use your muscles in such a way that you can always paddle back the
distance you have covered.
• Only paddle in waters close to the coast.
• Keep your distance from power sources, otsam and other obstacles.
• Familiarise yourself with local safety regulations, warnings and rules for boating activities
before going out on the water.
• Check local weather information for current water and weather conditions before going out
on the water. Do not paddle in severe weather.
• When paddling, make sure that the weight on the board is always evenly distributed.
• When paddling, make sure that your feet do not get caught in the attachment cord or carrying
handle.
• Do not use the board if it has a leak and is losing air. Repair the leak as described in the
chapter „Repairs“ or contact the manufacturer via the service address.
• Never allow more than one person to use the board at the same time. It is designed to carry
the load of a single adult only.
• Inform other people thoroughly about rules and safety instructions before letting them use
the board set.

14
WARNING
• Paddles, ns and the inated board are hard and can cause injury.
• Watch out for bystanders when transporting the board set.
• Be aware of other people in the water when paddling.
• If you fall into the water in cold temperatures, you may get hypothermia.
• Wear a thermal suit when paddling the board in cold temperatures.
• Danger of strangulation! Small children can get caught in the board‘s cords and safety line
and strangle themselves.
• Keep the board away from small children!
NOTE
• Risk of damage! The board is approved for a maximum lling pressure of 1bar (15 PSI). At
higher pressures, the material is overstretched and may tear.
• Inate the board to a maximum lling pressure of 1bar (15 psi).
• If the pressure is above 1bar (15 psi), open the valve and let out some air.
• The outer skin of the board can be damaged if it comes into contact with other objects and
materials.
• Keep away from rocky shores, piers or shoals with the board.
• Do not allow oils, corrosive liquids or chemicals such as household cleaners, battery acid or
fuels to come into contact with the outer skin. If this does happen, check the shell thoroughly
for leaks or other damage.
• Keep the board away from re and hot objects (such as lit cigarettes).
• Do not transport the board in an inated state on vehicles.
• Danger of pressure loss! If the valve is not closed properly, the pressure in the board may
decrease unintentionally or the valve may become contaminated.
• Always keep the valve closed when you are not inating the board or deating it.
• Make sure that the area around the valve is always clean and dry.
• Prevent sand or other contaminants from getting into the valve.
• In the event of a pressure loss, also check the valve in case it may be leaking. Please follow the
steps in the repair instructions.
• Danger of drifting! Without a safety line, the board can drift and be lost.
• Use a safety line with the board unless you are in secured areas and can reach the shore
safely by swimming.
Notes when the board is not in use on the water
• Do not expose the board to direct sunlight for long periods of time, especially in hot
temperatures, when it is not on the water. Due to the strong heating and expansion of the
air inside the board (up to 100 degrees), the pressure can increase considerably and lead to
damage to the board and even bursting of the seams. When used on the water, the heat is
dissipated by direct contact with the water. Transport on a roof rack is also harmless when
the vehicle is moving. The heat is dissipated by the airstream.
• Store the board in the shade when not in use and avoid direct sunlight.

15
• Reduce the pressure by releasing air.
• Inate the board again before use according to the general instructions.
ASSEMBLY
Please do not use sharp tools!
UNFOLDING THE BOARD
Find a smooth and clean surface to unfold the tube body.
For initial ination and to familiarise yourself with your new YEAZ product, we recommend that
you inate it at room temperature. The PVC material is soft, which makes it easier to assemble. If
the paddleboard has been stored at a temperature below 0°C, store it at 20°C for 12 hours before
unfolding.
OPERATING THE VALVE
To inate the board, remove the safety cap from
the valve. To do this, turn it counterclockwise. The
valve is opened (when deating at the bottom) or
closed (when inating at the top) by a spring-loaded
insert. Before you start inating, please make sure
that the valve insert needle is in the „up“ position.
If the needle is in the „down“ position, please press
on the valve core needle until it pops up.
INFLATION
Insert the hose nozzle into the board‘s valve and
turn the attachment clockwise. After ination,
remove the hose and close the safety cap of the
valve to seal it permanently.
Using a compressor can damage your item; all
warranty claims are void if a compressor is used.
CAUTION: If you expose the paddleboard to
the hot sun, please check the air pressure and
release a little air, otherwise the material could
be overstretched. The ambient temperature
aects the internal pressure of the chambers: a
deviation of 1°C results in a pressure deviation in
the chamber of +/-4 mBar (.06 PSI).

16
MOUNTING THE FIN
Align the n in the same way as the two xed ns. Loosen the screw completely from the n. Then
lightly screw the loose screw back into the square nut. This makes it easier to position the nut in
the rail. Now insert it into the opening in the middle of the rail. Then use the screw to push the
square nut into the desired position and now loosen the screw completely. The nut remains in
the guide rail. Now insert the n with the brass bolt rst at the opening of the rail in tilted position,
then straighten it and push the n until the hole is directly above the square nut and x the n in
it with the screw.
REMOVING THE FIN
Unscrew the screw from the square nut. Slide the n and then the square nut out of the rail with
the help of the screw. Immediately reattach the screw and square nut to the n.
RELEASING THE AIR
Gently press the valve insert needle to slowly
release pressure from the board. When releasing
the air, please make sure that no sand or dirt is
around the valve or gets inside.
ATTENTION: Only remove the valve cover to inate/
deate the air. This will prevent accidental air
leakage and ingress of any particles into the valve.
2
3
4
1
5

17
Now begin to gently roll the board in from the front towards the valve to release any remaining
air from the board. Replace the valve cap and close it tightly to prevent dirt and moisture from
entering. Now unfold the stand up paddle board again and start rolling it in from the other side
where the valve is located. This way, the board is easier to fold and the ns are better protected at
the same time. Place the foam pads supplied on the xed ns for protection.
USING THE BOARD
• Use the luggage cord to carry and secure extra items on the board.
• Use the carry handle if you want to transport the board on land.
• Always carry the supplied paddle when using the board.
• If your board has capsized and is lying with the top of the board on the surface of the water,
turn it over with both hands so that the top is facing upwards again. If necessary, move to the
shore if you are unable to do so from the water.
CLEANING
• Improper or irregular cleaning of the board set may cause damage.
• Do not use aggressive cleaning agents, brushes with metal or nylon bristles or sharp or
metallic cleaning objects such as knives, hard spatulas and the like. They can damage the
surfaces.
• Do not use solvents to clean the board set.
• Clean the board thoroughly after each use.
• You can clean the board when it is inated or when the air is deated.
1. Place the board on a smooth, at and dry surface.
2. Spray the board with a garden hose or clean it with a soft sponge moistened with clean tap
water.
3. Wipe the board clean with a dry, soft cloth and allow it to dry completely.
STORAGE
• Risk of damage! Improper storage of the board and its accessories can lead to mould.
• Allow all parts of the board set to dry completely before storing.
• Deate the board completely and make sure the valve is xed in the open position.
• Store the rolled-up board in the carrying bag.
• Store the board set out of reach of children and securely closed.
• Do not place any heavy or sharp-edged objects on the board set.
• Check the board set for signs of wear or ageing after prolonged storage.
REPAIRS
• Check the board for pressure loss, holes or cracks before each use.

18
• Always deate before repairing the board.
LECKS SEARCH
1. Make sure that there is no sand or other impurities in the valve.
2. Inate the board completely as described in the section „Inating“.
3. Rinse the board, including the area around the valve, with mild soapy water. If bubbles
appear, the leak must be repaired.
Leaking valve
If bubbles appear around the valve, it probably means that the valve is not closing completely
tight. In this case, tighten the valve clockwise using the valve spanner provided in the repair kit.
Defective valve
If bubbles do not form on the shell or around the valve when the board is inated, this may mean
that the valve is defective:
1. Put the valve cap on the valve and turn it clockwise to tighten. 2.
2. Moisten the closed valve cap with soapy water.
3. If bubbles now form, the valve must be replaced completely (see chapter „Replacing the valve“).
Leaks
If bubbles form on the outer skin, you can seal the leak with special glue and the material patch
supplied in the repair kit (see chapter „Sealing leaks“). If the inated board loses stiness, a leak is
not necessarily the cause. Temperature uctuations can also cause a drop in pressure.
SEALING LEAKS
• Risk of damage!
• Not every adhesive is suitable for repairing the board. Repairs with unsuitable glue can lead
to further damage.
• Only use special glue for inatable boats. You can obtain such glue from specialist dealers.
• You can seal holes or cracks with glue and the material patches supplied in the repair kit.
• Deate the board before repairing.
Smaller leaks (smaller than 2 mm)
Leaks smaller than 2 mm can be repaired with glue.
1. thoroughly clean the area to be repaired.
2. Allow the area to be repaired to dry completely.
3. Apply a small drop of adhesive to the leak.
4. allow the adhesive to dry for approx. 12 hours.

19
Larger leaks (larger than 2 mm)
Leaks larger than 2 mm can be repaired with adhesive and material patches.
1. Clean the area to be repaired thoroughly and let it dry completely.
2. Cut out a piece of the material patch that overlaps the leak by approx. 1.5 cm on each side.
3. Apply glue to the underside of the cut-out patch.
4. Apply a thin layer of glue to the leak and the surrounding outer skin over the entire size of
the material patch.
5. Allow the adhesive to set for 2-4 minutes until it is visibly tacky.
6. Alace the cut-out material patch on the leak and press it rmly.
7. Allow the adhesive to dry for approx. 12 hours.
8. To seal the area completely, apply adhesive again to the edges of the material patch after it
has dried.
9. Allow the adhesive to dry for approx. 4 hours.
Before using the board in the water again, check that the leak is really completely sealed. If bubbling
still occurs, take the board to a specialist workshop for repair or contact the service address given
in these instructions.
Replacing the valve
If the valve needs replacing, you can order a replacement valve from the service address given.
1. Release the air from the board.
2. Turn the valve cap anticlockwise and remove it.
3. Place the valve spanner from the repair kit supplied on the top of the valve and turn it
counterclockwise to loosen it. While doing this, x the lower part of the valve inside the board
with your hand and make sure that it does not slip into the board.
4. Place the replacement valve on the bottom part and turn it clockwise to tighten it. Make sure
that the valve is centred.
5. Take the valve spanner and tighten the top of the valve clockwise.
Before using the board again, check that the valve really closes.

20
DISPOSAL
Dispose of the packaging according to type. Put cardboard and carton in the waste paper
collection. Foil to the recyclables collection.
Dispose of the board set according to local regulations and laws.
WARRANTY
The warranty on material and manufacturing defects is 2 years with proper use
MANUFACTURER
VEHNSGROUP GmbH
Theatinerstraße 40-42
80333 Munich
Germany
www.vehnsgroup.com, www.yeaz.eu
Subject to alterations and errors
The manufacturer accepts no liability for damage caused by incorrect, improper or incompatible
use of the product.
© VEHNS GROUP GmbH
A página está carregando...
A página está carregando...
A página está carregando...
A página está carregando...
A página está carregando...
A página está carregando...
A página está carregando...
A página está carregando...
A página está carregando...
A página está carregando...
A página está carregando...
A página está carregando...
A página está carregando...
A página está carregando...
A página está carregando...
A página está carregando...
A página está carregando...
A página está carregando...
A página está carregando...
A página está carregando...
A página está carregando...
A página está carregando...
A página está carregando...
A página está carregando...
A página está carregando...
A página está carregando...
A página está carregando...
A página está carregando...
A página está carregando...
A página está carregando...
A página está carregando...
A página está carregando...
A página está carregando...
A página está carregando...
A página está carregando...
A página está carregando...
A página está carregando...
A página está carregando...
A página está carregando...
A página está carregando...
A página está carregando...
A página está carregando...
A página está carregando...
A página está carregando...
A página está carregando...
A página está carregando...
A página está carregando...
A página está carregando...
A página está carregando...
A página está carregando...
A página está carregando...
A página está carregando...
A página está carregando...
A página está carregando...
A página está carregando...
A página está carregando...
A página está carregando...
A página está carregando...
A página está carregando...
A página está carregando...
A página está carregando...
A página está carregando...
A página está carregando...
A página está carregando...
A página está carregando...
A página está carregando...
A página está carregando...
A página está carregando...
A página está carregando...
A página está carregando...
A página está carregando...
A página está carregando...
A página está carregando...
A página está carregando...
A página está carregando...
A página está carregando...
A página está carregando...
A página está carregando...
A página está carregando...
A página está carregando...
A página está carregando...
A página está carregando...
A página está carregando...
A página está carregando...
A página está carregando...
A página está carregando...
A página está carregando...
A página está carregando...
A página está carregando...
A página está carregando...
A página está carregando...
A página está carregando...
A página está carregando...
A página está carregando...
A página está carregando...
A página está carregando...
A página está carregando...
A página está carregando...
A página está carregando...
A página está carregando...
A página está carregando...
A página está carregando...
A página está carregando...
A página está carregando...
A página está carregando...
A página está carregando...
A página está carregando...
A página está carregando...
A página está carregando...
A página está carregando...
A página está carregando...
A página está carregando...
A página está carregando...
A página está carregando...
A página está carregando...
A página está carregando...
A página está carregando...
A página está carregando...
A página está carregando...
A página está carregando...
A página está carregando...
A página está carregando...
A página está carregando...
A página está carregando...
A página está carregando...
A página está carregando...
A página está carregando...
A página está carregando...
A página está carregando...
A página está carregando...
A página está carregando...
A página está carregando...
A página está carregando...
A página está carregando...
-
 1
1
-
 2
2
-
 3
3
-
 4
4
-
 5
5
-
 6
6
-
 7
7
-
 8
8
-
 9
9
-
 10
10
-
 11
11
-
 12
12
-
 13
13
-
 14
14
-
 15
15
-
 16
16
-
 17
17
-
 18
18
-
 19
19
-
 20
20
-
 21
21
-
 22
22
-
 23
23
-
 24
24
-
 25
25
-
 26
26
-
 27
27
-
 28
28
-
 29
29
-
 30
30
-
 31
31
-
 32
32
-
 33
33
-
 34
34
-
 35
35
-
 36
36
-
 37
37
-
 38
38
-
 39
39
-
 40
40
-
 41
41
-
 42
42
-
 43
43
-
 44
44
-
 45
45
-
 46
46
-
 47
47
-
 48
48
-
 49
49
-
 50
50
-
 51
51
-
 52
52
-
 53
53
-
 54
54
-
 55
55
-
 56
56
-
 57
57
-
 58
58
-
 59
59
-
 60
60
-
 61
61
-
 62
62
-
 63
63
-
 64
64
-
 65
65
-
 66
66
-
 67
67
-
 68
68
-
 69
69
-
 70
70
-
 71
71
-
 72
72
-
 73
73
-
 74
74
-
 75
75
-
 76
76
-
 77
77
-
 78
78
-
 79
79
-
 80
80
-
 81
81
-
 82
82
-
 83
83
-
 84
84
-
 85
85
-
 86
86
-
 87
87
-
 88
88
-
 89
89
-
 90
90
-
 91
91
-
 92
92
-
 93
93
-
 94
94
-
 95
95
-
 96
96
-
 97
97
-
 98
98
-
 99
99
-
 100
100
-
 101
101
-
 102
102
-
 103
103
-
 104
104
-
 105
105
-
 106
106
-
 107
107
-
 108
108
-
 109
109
-
 110
110
-
 111
111
-
 112
112
-
 113
113
-
 114
114
-
 115
115
-
 116
116
-
 117
117
-
 118
118
-
 119
119
-
 120
120
-
 121
121
-
 122
122
-
 123
123
-
 124
124
-
 125
125
-
 126
126
-
 127
127
-
 128
128
-
 129
129
-
 130
130
-
 131
131
-
 132
132
-
 133
133
-
 134
134
-
 135
135
-
 136
136
-
 137
137
-
 138
138
-
 139
139
-
 140
140
-
 141
141
-
 142
142
-
 143
143
-
 144
144
-
 145
145
-
 146
146
-
 147
147
-
 148
148
-
 149
149
-
 150
150
-
 151
151
-
 152
152
-
 153
153
-
 154
154


Yeaz 50370963 Manual do usuário
- Tipo
- Manual do usuário
- Este manual também é adequado para
em outras línguas
- français: Yeaz 50370963 Manuel utilisateur
- italiano: Yeaz 50370963 Manuale utente
- Nederlands: Yeaz 50370963 Handleiding
- slovenčina: Yeaz 50370963 Používateľská príručka
- Deutsch: Yeaz 50370963 Benutzerhandbuch
- dansk: Yeaz 50370963 Brugermanual
- svenska: Yeaz 50370963 Användarmanual
- română: Yeaz 50370963 Manual de utilizare
Artigos relacionados

Outros documentos
-
Crivit IAN 71536 Instructions For Use Manual
-
Quicksilver B-480 Manual do proprietário
-
-
Sevylor POINTER K1-ST6107 Manual do proprietário
-
-
-
-
 Plastimo P240SH Manual do proprietário
-
mundoclima MUEX-H6 “MultiSplit System” Guia de instalação
-
