
Quick Start Guide
XGS 116(w)/126(w)/136(w)


1Quick Start Guide XGS 116(w)/126(w)/136(w)
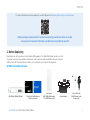
For more information about your appliance, scan the QR code or visit www.sophos.com/get-started-firewall
Before you begin, please confirm that you have a working Internet connection and make
sure you have the account information available that was provided by your ISP.
1. Before Deploying
Congratulations on the purchase of your Sophos XGS appliance. This Quick Start Guide describes in short
steps how to connect your appliance and explains how to open the web-based Admin Console from your
administration PC. The Admin Console allows you to configure every aspect of the appliance.
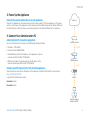
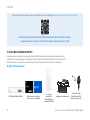
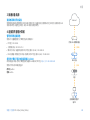
a) What is included in the box
Micro USB cable
RJ45 Ethernet cable
Power cable
This Quick Start Guide and
Safety Instructions
XGS 116(w)/126(w)/136(w)
3 antennas
(XGS 126w/136w model,
2 on XGS 116w model)
Power Adapter
ENGLISH

2
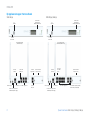
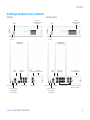
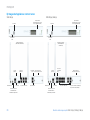
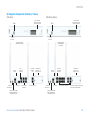
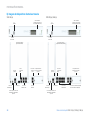
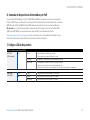
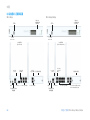
b) Appliance images: front and back
Quick Start Guide XGS 116(w)/126(w)/136(w)
XGS 116(w)
Status LEDs
(w-model has
additional WiFi LED)
1 x
USB 2.0
1 x COM
Micro USB
XGS 126(w)/136(w)
Status LEDs
(w-model has
additional WiFi LED)
1 x
USB 2.0
1 x COM
Micro USB
2 x external antenna
(XGS 116w only)
6 x GbE copper port
F1 1 x SFP
fiber port
1 x COM
(RJ45)
1 x USB 3.0Power supply
Connector for optional 2nd
redundant power supply
Optional module
expansion bay
3 x external antenna
(XGS 126w/136w only)
10 x GbE copper port
F1–F2 2 x
SFP fiber
ports
1 x COM
(RJ45)
1 x USB 3.0Power supply
Optional module
expansion bay
1 x GbE
PoE port
1 x GbE
copper port
2 x 2.5 GbE PoE port (136(w))
2 x GbE PoE port (126(w))
Connector for optional 2nd
redundant power supply
ENGLISH

3
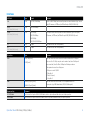
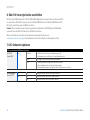
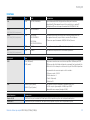
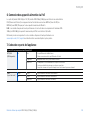
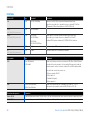
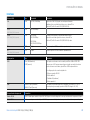
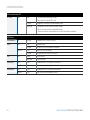
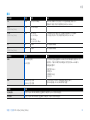
Interfaces
LAN Ports Type Speed Comment
1–8 RJ45 10/100/1000 Mbps Port 8 on XGS 116(w) can be used to power a connected device (e.g. access
point, IP camera, or IP Phone) via PoE with upto 30W (PoE 802.3at).
9–10
(XGS 126(w)/136(w) only)
RJ45 100/1000 Mbps
11–12
(XGS 126(w)/136(w) only)
RJ45 XGS 126(w):
100/1000 Mbps
XGS 136(w):
100/1000/2500 Mbps
Both ports can be used to power a connected device (e.g. access point,
IP camera, or IP Phone) via PoE with upto 30W (PoE 802.3at) each.
F1 SFP 1 Gbps SFP transceivers are sold separately.
F2
(XGS 126(w)/136(w) only)
SFP 1 Gbps SFP transceivers are sold separately.
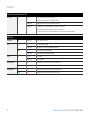
Other Ports Type Comment
COM Micro USB [front]
RJ45 [back]
You can connect a serial console to the Micro USB or RJ45 COM port
to access the CLI. Only one port can be used at any time. If both ports
are connected, then the Micro USB port will take precedence.
The required connection settings are:
ÌBits per second: 38,400
Ì Data bits: 8
ÌParity: N (none)
ÌStop bits: 1
USB USB 2.0 [Type A] [front]
USB 3.0 (Type A) [back]
You can connect a USB 2.0 and/or 3.0 compatible device to
these ports (e.g. USB thumb drive, UPS, 3G/4G dongles).
Expansion Bay Comment
3G/4G Module Can be used for Sophos XGS 3G/4G Module, which is optionally available from your Sophos partner.
WiFi Module Can be used for Sophos XGS WiFi Module, which is optionally available from your Sophos partner.
Quick Start Guide XGS 116(w)/126(w)/136(w)
ENGLISH

4
2. Mount and Connect the Appliance
Mount the antennas (for wireless models only)
Connect the provided antennas to the connectors on the back of your appliance and align them in a
vertical position.
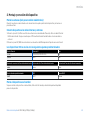
Connect the ports to the internal and external networks
1. Connect the port 1/LAN via a switch to the internal network. For this purpose, use the RJ45 Ethernet
cable provided. Note that your Administration PC must also be connected to this network.
2. Connect Port 2/WAN to the external network. The connection to the WAN depends on the type of
Internet access.
XGS appliances are shipped with the following default settings:
Ethernet Port IP Address Zone
1/LAN 172.16.16.16/255.255.255.0 LAN
2/WAN DHCP WAN
Admin Console Username Admin Console Password CLI Console Password
admin admin admin
Default Gateway DNS DHCP Service
DHCP DHCP Enabled
Mount the appliance to the rack
If you want to mount the device within a rack please use the optionally available rackmount kit for this
device.
Quick Start Guide XGS 116(w)/126(w)/136(w)
ENGLISH

5
3. Power Up the Appliance
Connect the power cable and turn on the appliance
Connect the appliance to the power supply using the power cable(s). Turn the appliance on. The power
switch is on the back of the appliance near the power connection. During boot up the Status LED on the
front will blink green. Once the device has booted completely the Status LED will turn to solid green.
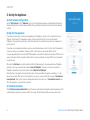
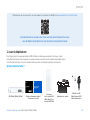
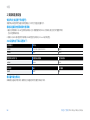
4. Connect Your Administration PC
Administration PC connection properties:
Use the settings below to configure your (PC/laptop) network interface:
ÌIP address: 172.16.16.2
ÌNetmask: Enter 255.255.255.0
ÌDefault Gateway: Enter the IP address of the appliance’s internal
network card (Port1/LAN): 172.16.16.16
ÌDNS Server: Enable this option and enter the IP address of the
internal network card (Port1/LAN): 172.16.16.16
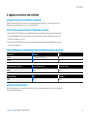
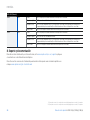
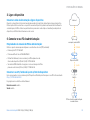
Connect your PC/laptop to Port 1/LAN of the appliance:
Start the browser and enter the IP address of the appliance’s LAN port that your PC is connected to:
https://172.16.16.16:4444
Login with the default details below:
Username: admin
Password: admin
Internet
e.g., DSL modem
Internal network
admin client PC
XGS Appliance
2/WAN
Switch
1/LAN
Quick Start Guide XGS 116(w)/126(w)/136(w)
ENGLISH

6
5. Set Up the Appliance
a) Start network configuration
Select ‘Click to begin’ on the ‘Welcome’ screen to start your basic appliance configuration. Change the
interface IP addresses, default gateway, DNS settings and date/time zone to match your local network
settings.
b) Register the appliance
If you have not previously registered your appliance on MySophos, you will see the registration screen
“Register Your Firewall.” The appliance requires Internet connectivity for it to be registered with
MySophos. If you want to register later, click the check box “I do not want to register now” and proceed
with section c).
If you have a serial number provided on your License Schedule please enter it into the first field and click
“I have an existing serial number,” otherwise click “I don’t have a serial number (Start a Trial).”
If you are upgrading from an existing UTM/SG appliance and want to migrate your existing UTM license to
your new firewall, click the respective button on the screen and browse for your UTM license to upload it
to your firewall.
After clicking ‘Continue’, you will be redirected to the MySophos portal. If you already have a MySophos
account, enter your login credentials under ‘Log in to MySophos’. If you are a new user, sign up for a
MySophos account by entering the details under ‘Register for MySophos’.
Click ‘Continue’ to complete the registration process. Please wait while the process completes – it will
take a few seconds. After successful registration, you will see a screen with the message, ‘Your device is
now registered’. Please note that you should proceed with the next step, i.e. ‘Synchronize License’ only
after the appliance is successfully registered.
c) Synchronize license
Click ‘Initiate License Synchronization’ to get the license information from Sophos onto the appliance. After
synchronization, you will see a screen with the message, “Synchronization with server was successful.”
Quick Start Guide XGS 116(w)/126(w)/136(w)
ENGLISH

7
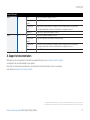
6. Connecting PoE Powered Devices
Ports 8 (on XGS 116(w) and 11/12 (on XGS 126(w)/136(w) are able to provide power over Ethernet (PoE)
to a connected PoE device which conforms to the standards 802.3af (max. 15.4W) or 802.3at (max.
30W). Each port can provide up to 30 watts max.
Please note: If a high performance expansion module is used in a XGS 126(w) or XGS 136(w) module slot
then the max. power of one PoE port will be limited to 15.4 watts.
Please visit www.sophos.com/en-us/support or contact your local Sophos reseller for more information
about high performance expansion modules.
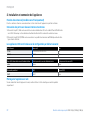
7. Appliance LED codes
LEDs on each RJ45 Ethernet Connector
ACT/LNK
(Left LED)
Green Solid 1. The Ethernet port has established link.
2. Good connection between the Ethernet port and hub.
Flashing The adapter is sending or receiving network data.
Off 1. The adapter and switch are not receiving power.
2. No connection between both ends of network.
3. Network drivers have not been loaded or do not function correctly.
Speed
(Right LED)
Amber On If Ethernet port is operating at 1000 Mbps.
Green On If Ethernet port is operating at 100 Mbps.
Off If Ethernet port is operating at 10 Mbps.
Quick Start Guide XGS 116(w)/126(w)/136(w)
ENGLISH

8
LEDs on each SFP Connector
ACT/LNK Green Solid 1. The SFP connector is receiving power.
2. Good connection between the SFP port and hub.
Flashing The adapter is sending or receiving network data.
Off 1. The adapter and switch are not receiving power.
2. No connection between both ends of network.
3. Network drivers have not been loaded or do not function correctly.
LEDs (Front)
Storage Blue Flashing SSD is being accessed.
Status Green Solid Normal operation.
Flashing Device is booting up or shutting down.
Red Solid SSD or boot failure.
Flashing General error (please contact support).
WiFi Green On WiFi is active.
Off WiFi is inactive.
Power 1 Green Solid Power adapter 1 in normal operation.
Red Solid Power adapter 1 failed or disconnected.
Power 2 Green Solid Power adapter 2 in normal operation.
Red Solid Power adapter 2 failed or disconnected.
Quick Start Guide XGS 116(w)/126(w)/136(w)
ENGLISH

9
PoE LEDs (Front)
PoE1 Green Solid PoE1 providing power to connected device.
Blinking fast*PoE1 has an internal hardware failure.
Blinking slowly** PoE1 is denied power (e.g. connected device requesting power above max.
power capacity) or is detecting a fault on connected device.
Off PoE1 not providing power to connected device.
PoE2 Green Solid PoE2 providing power to connected device.
Blinking fast*PoE2 has an internal hardware failure.
Blinking slowly** PoE2 is denied power (e.g. connected device requesting power above max.
power capacity) or is detecting a fault on connected device.
Off PoE2 not providing power to connected device.
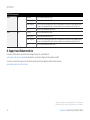
8. Support and Documentation
For more information and technical support, please visit www.sophos.com/en-us/support or contact
your local Sophos reseller.
Check our Getting Started resources to find out how you can get the most out of your purchase
www.sophos.com/get-started-firewall
* The blinking behavior is an on/off cycle approx. once every 0.3 seconds.
** The blinking behavior is an on/off cycle approx. once every 2.5 seconds.
Quick Start Guide XGS 116(w)/126(w)/136(w)
ENGLISH

10
Für weitere Informationen zu Ihrer Appliance scannen Sie den QR-Code oder gehen Sie auf www.sophos.com/get-started-firewall.
Bevor Sie beginnen, vergewissern Sie sich, dass Sie mit dem Internet verbunden sind
und die Kontodaten vorliegen, die Sie von Ihrem ISP erhalten haben.
1. Vor der Bereitstellung
Herzlichen Glückwunsch zum Kauf dieser Sophos XGS Appliance. Diese Kurzanleitung beschreibt schrittweise,
wie Sie die Appliance verbinden, und erläutert, wie Sie über Ihren Administrations-PC die webbasierte Admin
Console öffnen. Über die Admin Console können Sie jeden Aspekt der Appliance konfigurieren.
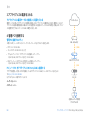
a) Lieferumfang
Micro USB-Kabel
RJ45 Ethernet-Kabel
Netzkabel
Diese Kurzanleitung und
Sicherheitsanweisungen
XGS 116(w)/126(w)/136(w)
3 Antennen
(Modell XGS 126w/136w,
2 bei Modell XGS 116w)
Netzadapter
DEUTSCH
Kurzanleitung XGS 116(w)/126(w)/136(w)

11Kurzanleitung XGS 116(w)/126(w)/136(w)
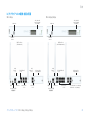
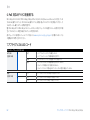
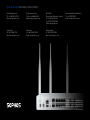
b) Abbildungen der Appliance: Vorder- und Rückseite
XGS 116(w)
Status-LEDs
(w-Modell hat zusätzliche
WLAN-LED)
1 x
USB 2.0
1 x COM
Micro-USB
XGS 126(w)/136(w)
Status-LEDs
(w-Modell hat zusätzliche
WLAN-LED)
1 x
USB 2.0
1 x COM
Micro-USB
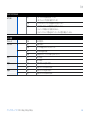
2externe Antennen
(nur XSG116w)
6 x Kupferport GbE
F1 1 x SFP
Glasfaserport
1 x COM
(RJ45)
1 x USB 3.0Stromversorgung
Optionaler
Modulerweiterungsschacht
3externe Antennen
(nur XGS126w/136w)
10 x Kupferport GbE
F1–F2 2 x SFP
Glasfaserports
1 x COM
(RJ45)
1 x USB 3.0
Optionaler
Modulerweiterungsschacht
1 x GbE PoE-Port
1 x
Kupferport
GbE
2 x 2,5 GbE PoE-Port (136(w))
2 x GbE PoE-Port (126(w))
Anschluss für optionale
zweite redundante
Stromversorgung
Anschluss für optionale
zweite redundante
Stromversorgung
Stromversorgung
DEUTSCH

12
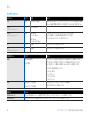
Schnittstellen
LAN-Ports Typ Geschwindigkeit Bemerkung
1–8 RJ45 10/100/1000 MBit/s Port 8 an XGS 116(w) kann verwendet werden, um ein
verbundenes Gerät (z. B. Access Point, IP-Kamera oder IP-Telefon)
über PoE mit bis zu 30 W (PoE 802.3at) zu versorgen.
9–10
(Nur XGS 126(w)/136(w))
RJ45 100/1000 MBit/s
11–12
(Nur XGS 126(w)/136(w))
RJ45 XGS 126(w):
100/1000 MBit/s
XGS 136(w):
100/1000/2500 MBit/s
Beide Ports können verwendet werden, um ein verbundenes
Gerät (z.B. Access Point, IP-Kamera oder IP-Telefon) über PoE
mit jeweils bis zu 30W (PoE 802.3at) zu versorgen.
F1 SFP 1GBit/s SFP Transceiver sind separat erhältlich.
F2
(Nur XGS 126(w)/136(w))
SFP 1GBit/s SFP Transceiver sind separat erhältlich.
Andere Ports Typ Bemerkung
COM Micro USB [Vorderseite]
RJ45 [Rückseite]
Sie können eine serielle Konsole entweder an den RJ45- oder
Micro-USB-COM-Port anschließen, um auf die Befehlszeile
zuzugreifen. Es kann immer nur ein Port genutzt werden. Wenn
beide Ports verbunden sind, hat der Micro-USB-Port Vorrang.
Die erforderlichen Verbindungseinstellungen lauten wie folgt:
ÌBits je Sekunde: 38.400
Ì Datenbits: 8
ÌParität: N (keine)
ÌStoppbits: 1
USB USB 2.0 [Typ A] [Vorderseite]
USB 3.0 [Typ A] [Rückseite]
Sie können ein USB 2.0- und/oder 3.0-kompatibles Gerät an diese
Ports anschließen (z. B. USB-Stick, UPS, 3G/4G-Dongle).
Erweiterungsschacht Bemerkung
3G/4G-Modul Kann für das Sophos XGS 3G/4G-Modul verwendet werden, das optional bei Ihrem Sophos Partner erhältlich ist.
WLAN-Modul Kann für das Sophos XGS WLAN-Modul verwendet werden, das optional bei Ihrem Sophos Partner erhältlich ist.
DEUTSCH
Kurzanleitung XGS 116(w)/126(w)/136(w)

13
2. Appliance montieren und verbinden
Antennen montieren (nur bei Wireless-Modellen)
Stecken Sie die mitgelieferten Antennen in die entsprechenden Anschlüsse auf der Rückseite Ihrer
Appliance ein und bringen Sie sie in eine vertikale Position.
Ports mit den internen und externen Netzwerken verbinden
1. Verbinden Sie Port 1/LAN über einen Switch mit dem internen Netzwerk. Verwenden Sie hierzu das
beiliegende RJ45 Ethernet-Kabel. Beachten Sie, dass Ihr Administrations-PC ebenfalls mit diesem
Netzwerk verbunden sein muss.
2. Verbinden Sie Port 2/WAN mit dem externen Netzwerk. Die Verbindung zum WAN hängt von der Art
des Internetzugangs ab.
Für die XGS Appliances sind werkseitig folgende Standardeinstellungen festgelegt:
Ethernet-Port IP-Adresse Zonen-
1/LAN 172.16.16.16/255.255.255.0 LAN
2/WAN DHCP WAN
Benutzername Admin Console Kennwort Admin Console Kennwort CLI Console
admin admin admin
Standard-Gateway DNS DHCP-Dienst
DHCP DHCP Aktiviert
Appliance im Rack montieren
Wenn Sie die Appliance in einem Rack montieren möchten, verwenden Sie das für dieses Gerät optional
erhältliche Rackmontage-Kit.
Kurzanleitung XGS 116(w)/126(w)/136(w)
DEUTSCH

14
3. Appliance einschalten
Netzkabel anschließen und Appliance einschalten
Schließen Sie die Appliance mit dem beiliegenden Netzkabel an eine Netzsteckdose an. Schalten Sie die
Appliance ein. Der Netzschalter befindet sich auf der Rückseite der Appliance neben dem Netzanschluss.
Beim Hochfahren blinkt die Status-LED auf der Vorderseite grün. Sobald die Appliance hochgefahren ist,
leuchtet die Status-LED grün.
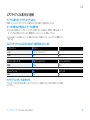
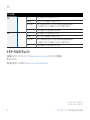
4. Administrations-PC verbinden
Verbindungseigenschaften des Administrations-PC:
Verwenden Sie die nachfolgenden Einstellungen für die Konfiguration Ihrer (PC-/Notebook-)
Netzwerkschnittstelle:
ÌIP-Adresse: 172.16.16.2
ÌNetzmaske: 255.255.255.0
ÌStandardgateway: Geben Sie die IP-Adresse der internen Netzwerkkarte
der Appliance ein (Port1/LAN): 172.16.16.16
ÌDNS-Server: Aktivieren Sie diese Option und geben Sie die IP-Adresse
der internen Netzwerkkarte ein (Port1/LAN): 172.16.16.16
Verbinden Sie Ihren PC/Ihr Notebook mit Port 1/LAN der Appliance:
Öffnen Sie den Browser und geben Sie die IP-Adresse des LAN-Ports der Appliance ein, mit dem Ihr PC
verbunden ist: https://172.16.16.16:4444
Melden Sie sich mit den nachfolgenden Standarddaten an:
Username: admin
Passwort: admin
Internet
z.B. DSL-Modem
Internes Netzwerk
Administrations-Client-PC
XGS Appliance
2/WAN
Switch
1/LAN
DEUTSCH
Kurzanleitung XGS 116(w)/126(w)/136(w)

15
5. Appliance einrichten
a) Netzwerkkonfiguration vornehmen
Wählen Sie „Klicken zum Beginnen“ auf dem Bildschirm „Willkommen“, um die Basiskonfiguration für
Ihre Appliance vorzunehmen. Ändern Sie die Schnittstellen-IP-Adressen, das Standard-Gateway, die
DNS-Einstellungen und das Datum/die Zeitzone entsprechend Ihren lokalen Netzwerkeinstellungen.
b) Appliance registrieren
Falls Sie Ihre Appliance noch nicht bei MySophos registriert haben, wird der Bildschirm „Ihre Firewall
registrieren“ angezeigt. Für die Registrierung bei MySophos muss die Appliance mit dem Internet
verbunden sein. Wenn Sie sich später registrieren möchten, klicken Sie in das Kontrollkästchen „Ich
möchte mich jetzt nicht registrieren“ und fahren Sie mit Abschnitt c) fort.
Wenn Ihre Lizenzdokumentation eine Seriennummer enthält, geben Sie diese bitte in das erste Feld ein
und klicken Sie auf „Ich habe eine bestehende Seriennummer“, andernfalls klicken Sie auf „Ich habe keine
Seriennummer (Testperiode starten)“.
Wenn Sie ein Upgrade von einer vorhandenen UTM/SG Appliance durchführen und Ihre vorhandene UTM-
Lizenz auf Ihre neue Firewall migrieren möchten, klicken Sie auf die entsprechende Schaltfläche auf dem
Bildschirm und suchen Sie nach Ihrer UTM-Lizenz, um sie zu Ihrer Firewall hochzuladen.
Wenn Sie auf „Weiter“ klicken, werden Sie zum MySophos-Portal weitergeleitet. Falls Sie bereits ein
MySophos-Konto besitzen, geben Sie Ihre Anmeldedaten unter „Bei MySophos anmelden“ ein. Als neuer
Benutzer müssen Sie sich für ein MySophos-Konto registrieren, indem Sie die erforderlichen Angaben
unter „Für MySophos registrieren“ eintragen.
Klicken Sie auf „Weiter“, um die Registrierung abzuschließen. Bitte warten Sie einige Sekunden, bis der
Vorgang abgeschlossen ist. Nach der erfolgreichen Registrierung wird ein Bildschirm mit der Meldung
„Ihre Appliance ist jetzt registriert“ angezeigt. Beachten Sie, dass Sie mit dem nächsten Schritt –
„Lizenz synchronisieren“ – erst nach erfolgreicher Registrierung der Appliance fortfahren sollten.
c) Lizenz synchronisieren
Klicken Sie auf „Lizenzsynchronisierung starten“, um Lizenzinformationen von Sophos auf die Appliance
abzurufen. Nach der Synchronisierung wird ein Bildschirm mit der Meldung „Synchronisierung mit Server
war erfolgreich“ angezeigt.
Kurzanleitung XGS 116(w)/126(w)/136(w)
DEUTSCH

16
6. Über PoE versorgte Geräte anschließen
Die Ports 8 (an XGS 116(w)) und 11/12 (an XGS 126(w)/136(w)) können über Power-over-Ethernet (PoE)
ein verbundenes PoE-Gerät versorgen, das den Standard 802.3af (max. 15,4 W) oder 802.3at (max. 30
W) erfüllt. Jeder Port kann bis zu 30 W bereitstellen.
Hinweis: Wird ein Hochleistungs-Erweiterungsmodul im Modul-Slot der XGS 126(w) oder XGS 136(w)
verwendet, kann der PoE-Port höchstens 15,4 Watt bereitstellen.
Weitere Informationen zu Hochleistungs-Erweiterungsmodulen finden Sie auf
www.sophos.com/de-de/support oder wenden Sie sich an Ihren Sophos Vertriebspartner vor Ort.
7. LED-Codes der Appliance
LEDs am jeweiligen RJ45 Ethernet-Anschluss
ACT/LNK
(Linke LED)
Grün Konstant 1. Der Ethernet-Port hat eine Verbindung hergestellt.
2. Verbindung zwischen Ethernet-Port und Hub funktioniert.
Blinkt Der Adapter sendet oder empfängt Netzwerkdaten.
Aus 1. Adapter und Switch werden nicht mit Strom versorgt.
2. Keine Verbindung zwischen beiden Netzwerkenden.
3. Netzwerktreiber wurden nicht geladen oder funktionieren nicht richtig.
Geschwindigkeit
(Rechte LED)
Gelb An Wenn der Ethernet-Port mit 1000MBit/s arbeitet.
Grün An Wenn der Ethernet-Port mit 100MBit/s arbeitet.
Aus Wenn der Ethernet-Port mit 10MBit/s arbeitet.
DEUTSCH
Kurzanleitung XGS 116(w)/126(w)/136(w)

17
LEDs am jeweiligen SFP-Anschluss
ACT/LNK Grün Konstant 1. Der SFP-Anschluss wird mit Strom versorgt.
2. Verbindung zwischen SFP-Port und Hub funktioniert.
Blinkt Der Adapter sendet oder empfängt Netzwerkdaten.
Aus 1. Adapter und Switch werden nicht mit Strom versorgt.
2. Keine Verbindung zwischen beiden Netzwerkenden.
3. Netzwerktreiber wurden nicht geladen oder funktionieren nicht richtig.
LEDs (Vorderseite)
Speicher Blau Blinkt Zugriff auf SSD.
Status Grün Konstant Normaler Betrieb.
Blinkt Appliance fährt hoch oder herunter.
Rot Konstant Problem mit SSD oder beim Hochfahren.
Blinkt Allgemeiner Fehler (bitte Support kontaktieren).
WLAN Grün An WLAN ist aktiv.
Aus WLAN ist inaktiv.
Power 1 Grün Konstant Netzadapter 1 funktioniert normal.
Rot Konstant Netzadapter 1 funktioniert nicht oder ist nicht verbunden.
Power 2 Grün Konstant Netzadapter 2 funktioniert normal.
Rot Konstant Netzadapter 2 funktioniert nicht oder ist nicht verbunden.
Kurzanleitung XGS 116(w)/126(w)/136(w)
DEUTSCH

18
POE-LEDS (Vorderseite)
PoE1 Grün Konstant PoE1 versorgt verbundenes Gerät.
Blinkt schnell*Interner Hardwareausfall bei PoE1.
Blinkt langsam** An PoE1 wird Versorgung verweigert (z. B. weil verbundenes Gerät einen höheren Bedarf hat als
die max. Leistungskapazität) oder es wurde ein Fehler beim verbundenen Gerät festgestellt.
Aus PoE1 versorgt verbundenes Gerät nicht.
PoE2 Grün Konstant PoE2 versorgt verbundenes Gerät.
Blinkt schnell*Interner Hardwareausfall bei PoE2.
Blinkt langsam** An PoE2 wird Versorgung verweigert (z. B. weil verbundenes Gerät einen höheren Bedarf hat als
die max. Leistungskapazität) oder es wurde ein Fehler beim verbundenen Gerät festgestellt.
Aus PoE2 versorgt verbundenes Gerät nicht.
8. Support und Dokumentation
Für weitere Informationen und technischen Support gehen Sie auf die Website
www.sophos.com/de-de/support oder wenden Sie sich an Ihren Sophos Vertriebspartner vor Ort.
Lesen Sie in unseren Ressourcen für den Einstieg nach, wie Sie Ihre Appliance optimal nutzen können:
www.sophos.com/get-started-firewall
* Das Blinken erfolgt in einem Ein/Aus-Zyklus ca. alle 0,3Sekunden.
** Das Blinken erfolgt in einem Ein/Aus-Zyklus ca. alle 2,5 Sekunden.
DEUTSCH
Kurzanleitung XGS 116(w)/126(w)/136(w)
A página está carregando...
A página está carregando...
A página está carregando...
A página está carregando...
A página está carregando...
A página está carregando...
A página está carregando...
A página está carregando...
A página está carregando...
A página está carregando...
A página está carregando...
A página está carregando...
A página está carregando...
A página está carregando...
A página está carregando...
A página está carregando...
A página está carregando...
A página está carregando...
A página está carregando...
A página está carregando...
A página está carregando...
A página está carregando...
A página está carregando...
A página está carregando...
A página está carregando...
A página está carregando...
A página está carregando...
A página está carregando...
A página está carregando...
A página está carregando...
A página está carregando...
A página está carregando...
A página está carregando...
A página está carregando...
A página está carregando...
A página está carregando...
A página está carregando...
A página está carregando...
A página está carregando...
A página está carregando...
A página está carregando...
A página está carregando...
A página está carregando...
A página está carregando...
A página está carregando...
A página está carregando...
A página está carregando...
A página está carregando...
-
 1
1
-
 2
2
-
 3
3
-
 4
4
-
 5
5
-
 6
6
-
 7
7
-
 8
8
-
 9
9
-
 10
10
-
 11
11
-
 12
12
-
 13
13
-
 14
14
-
 15
15
-
 16
16
-
 17
17
-
 18
18
-
 19
19
-
 20
20
-
 21
21
-
 22
22
-
 23
23
-
 24
24
-
 25
25
-
 26
26
-
 27
27
-
 28
28
-
 29
29
-
 30
30
-
 31
31
-
 32
32
-
 33
33
-
 34
34
-
 35
35
-
 36
36
-
 37
37
-
 38
38
-
 39
39
-
 40
40
-
 41
41
-
 42
42
-
 43
43
-
 44
44
-
 45
45
-
 46
46
-
 47
47
-
 48
48
-
 49
49
-
 50
50
-
 51
51
-
 52
52
-
 53
53
-
 54
54
-
 55
55
-
 56
56
-
 57
57
-
 58
58
-
 59
59
-
 60
60
-
 61
61
-
 62
62
-
 63
63
-
 64
64
-
 65
65
-
 66
66
-
 67
67
-
 68
68


em outras línguas
- español: Sophos XGS 116 Guía del usuario
- français: Sophos XGS 116 Mode d'emploi
- Deutsch: Sophos XGS 116 Benutzerhandbuch
- 日本語: Sophos XGS 116 ユーザーガイド