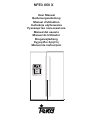
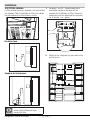
Teka NFE3 650 X Manual do usuário
- Categoria
- Geladeiras combinadas
- Tipo
- Manual do usuário
Este manual também é adequado para

NFE3 650 X
User Manual
Bedienungsanleitung
Manuel d’utilisation
Instrukcja użytkowania
Руководство пользователя
Manual del usuario
Manual do Utilizador
Brugervejledning
Εγχειρίδιο Χρήστη
Manual de instrucţiuni

Dear Customer,
We'd like you to achieve the optimal efficiency from our product, which has been manufactured in
modern facilities with meticulous quality controls.
For this purpose, please fully read the user guide before using the product and keep the guide as a
reference source. If you turn the product over to another person, provide this guide along with the
product.
User guide ensure the quick and safe use of the product.
t Please read the user guide before installing and operating the product.
t Always observe the applicable safety instructions.
t Keep the user guide within easy reach for future use.
t Please read any other documents provided with the product.
Keep in mind that this user guide may apply to several product models. The guide clearly indicates any
variations of different models.
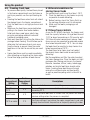
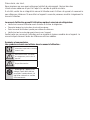
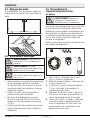
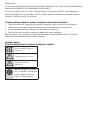
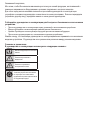
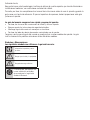
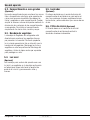
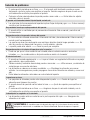
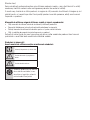
Symbols and Remarks
The following symbols are used in the user guide:
C
Important information and use-
ful tips.
A
Risk of life and property.
B
Risk of electric shock.
The product’s packaging is
made of recyclable materials,
in accordance with the National
Environment Legislation.

2 / 24 EN
Refrigerator / User Guide
1 Safety and environment instructions 3
1.1. General safety. . . . . . . . . . . . . . . . . . . . . . . 3
1.1.1 HC warning. . . . . . . . . . . . . . . . . . . . . . . . 4
1.1.2 For models with water fountain . . . . . . . . . 4
1.2. Intended use. . . . . . . . . . . . . . . . . . . . . . . . 4
1.3. Child safety. . . . . . . . . . . . . . . . . . . . . . . . . 4
1.4. Compliance with WEEE Directive and
Disposing of the Waste Product . . . . . . . . . 4
1.5. Compliance with RoHS Directive . . . . . . . . . 4
1.6. Package information . . . . . . . . . . . . . . . . . . 4
2 Refrigerator 5
3 Installation 6
3.1. Right place for installation . . . . . . . . . . . . . . 6
3.2. Attaching the plastic wedges. . . . . . . . . . . . 6
3.3. Adjusting the stands . . . . . . . . . . . . . . . . . . 7
3.4. Power connection . . . . . . . . . . . . . . . . . . . . 7
3.5. Water connection . . . . . . . . . . . . . . . . . . . . 7
3.6. Connecting water hose to the product . . . . . 8
3.7. Connecting to water mains . . . . . . . . . . . . . 8
3.8. For products using water carboy . . . . . . . . . 9
3.9 Water filter . . . . . . . . . . . . . . . . . . . . . . . . . . 9
3.9.1.Fixing external filter on the wall (Optional) 10
3.9.2.Internal filter . . . . . . . . . . . . . . . . . . . . . . 11
4 Preparation 13
4.1. What to do for energy saving. . . . . . . . . . . 13
4.2. First Use. . . . . . . . . . . . . . . . . . . . . . . . . . 13
5 Using the product 14
5.1. Activating the water filter replacing alert. . . 16
5.2. Zero degree compartment. . . . . . . . . . . . . 17
5.3. Vegetable bin . . . . . . . . . . . . . . . . . . . . . . 17
5.4. Blue light . . . . . . . . . . . . . . . . . . . . . . . . . 17
5.5. Ionizer . . . . . . . . . . . . . . . . . . . . . . . . . . . 17
5.6. Odour filter . . . . . . . . . . . . . . . . . . . . . . . . 17
5.7. Icematic and ice storage box . . . . . . . . . . . 18
5.8. Ice-maker . . . . . . . . . . . . . . . . . . . . . . . . 18
5.9. Freezing fresh food . . . . . . . . . . . . . . . . . . 19
5.10. Recommendations for storing frozen foods 19
5.11. Deep freezer details . . . . . . . . . . . . . . . . . 19
5.12. Placing the food. . . . . . . . . . . . . . . . . . . . 20
5.13. Door open alert . . . . . . . . . . . . . . . . . . . . 20
5.14. Interior light . . . . . . . . . . . . . . . . . . . . . . . 20
6 Maintenance and cleaning 21
6.1. Preventing malodour . . . . . . . . . . . . . . . . . 21
6.2. Protecting plastic surfaces . . . . . . . . . . . . 21
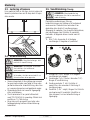
7 Troubleshooting 22
Table of Contents

3 / 24 EN
Refrigerator / User Guide
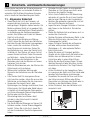
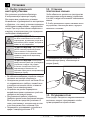
1 Safety and environment instructions
This section provides the safety instructions
necessary to prevent the risk of injury and material
damage. Failure to observe these instructions will
invalidate all types of product warranty.
1.1. General safety
t This product should not be used by persons
with physical, sensory and mental disabilities,
without sufficient knowledge and experience
or by children. The device can only be used by
such persons under supervision and instruction
of a person responsible for their safety.
Children should not be allowed to play with this
device.
t In case of malfunction, unplug the device.
t After unplugging, wait at least 5 minutes
before plugging in again. Unplug the product
when not in use. Do not touch the plug with
wet hands! Do not pull the cable to plug off,
always hold the plug.
t Wipe the power plug’s tip with a dry cloth
before plugging in.
t Do not plug in the refrigerator if the socket is
loose.
t Unplug the product during installation,
maintenance, cleaning and repair.
t If the product will not be used for a while,
unplug the product and remove any food
inside.
t Do not use steam or steamed cleaning
materials for cleaning the refrigerator and
melting the ice inside. Steam may contact
the electrified areas and cause short circuit or
electric shock!
t Do not wash the product by spraying or
pouring water on it! Danger of electric shock!
t In case of malfunction, do not use the product,
as it may cause electric shock. Contact the
authorized service before doing anything.
t Plug the product into an earthed socket.
Earthing must be done by a qualified
electrician.
t If the product has LED type lighting, contact the
authorized service for replacing or in case of
any problem.
t Do not touch frozen food with wet hands! It
may adhere to your hands!
t Do not place liquids in bottles and cans into the
freezer compartment. They may burst out!
t Place liquids in upright position after tightly
closing the lid.
t Do not spray flammable substances near the
product, as it may burn or explode.
t Do not keep flammable materials and products
with flammable gas (sprays, etc.) in the
refrigerator.
t Do not place containers holding liquids on
top of the product. Splashing water on an
electrified part may cause electric shock and
risk of fire.
t Exposing the product to rain, snow, sunlight
and wind will cause electrical danger. When
relocating the product, do not pull by holding
the door handle. The handle may come off.
t Take care to avoid trapping any part of your
hands or body in any of the moving parts inside
the product.
t Do not step or lean on the door, drawers and
similar parts of the refrigerator. This will cause
the product to fall down and cause damage to
the parts.
t Take care not to trap the power cable.

4 / 24 EN
Refrigerator / User Guide
Safety and environment instructions
1.1.1 HC warning
If the product comprises a cooling system using
R600a gas, take care to avoid damaging the
cooling system and its pipe while using and
moving the product. This gas is flammable. If the
cooling system is damaged, keep the product
away from sources of fire and ventilate the room
immediately.
C
The label on the inner left side indicates
the type of gas used in the product.
1.1.2 For models with water fountain
t Water supply pressure must be minimum 1 bar
and maximum 8 bars.
t Use drinking water only.
1.2. Intended use
t This product is designed for home use. It is not
intended for commercial use.
t The product should be used to store food and
beverages only.
t Do not keep sensitive products requiring
controlled temperatures (vaccines, heat
sensitive medication, medical supplies, etc.) in
the refrigerator.
t The manufacturer assumes no responsibility
for any damage due to misuse or mishandling.
t The product’s bench life is 10 years. The spare
parts necessary for the product to function will
be available for this period.
1.3. Child safety
t Keep packaging materials out of children’s
reach.
t Do not allow the children to play with the
product.
t If the product’s door comprises a lock, keep
the key out of children’s reach.
1.4. Compliance with WEEE Directive
and Disposing of the Waste Product
This product complies with EU WEEE
Directive (2012/19/EU). This product bears a
classification symbol for waste electrical and
electronic equipment (WEEE).
This product has been manufactured
with high quality parts and materials
which can be reused and are suitable
for recycling. Do not dispose of the
waste product with normal domestic
and other wastes at the end of its
service life. Take it to the collection
center for the recycling of electrical and
electronic equipment. Please consult your local
authorities to learn about these collection
centers.
1.5. Compliance with RoHS Directive
t This product complies with EU WEEE Directive
(2011/65/EU). It does not contain harmful and
prohibited materials specified in the Directive.
1.6. Package information
t Packaging materials of the product are
manufactured from recyclable materials in
accordance with our National Environment
Regulations. Do not dispose of the packaging
materials together with the domestic or other
wastes. Take them to the packaging material
collection points designated by the local
authorities.

5 / 24 EN
Refrigerator / User Guide
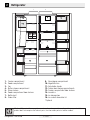
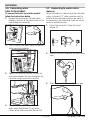
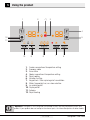
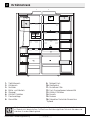
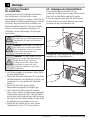
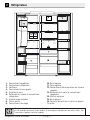
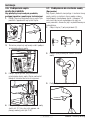
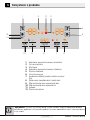
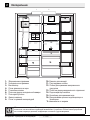
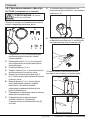
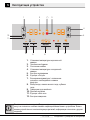
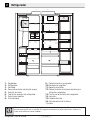
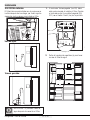
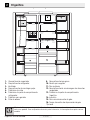
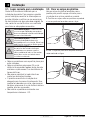
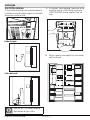
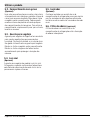
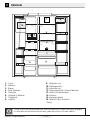
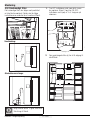
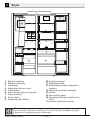
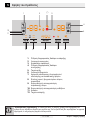
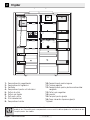
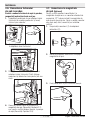
2 Refrigerator
C
*Optional: Figures in this user guide are schematic and may not be exactly match your product. If your
product does not comprise the relevant parts, the information pertains to other models.
1- Freezer compartment
2- Cooler compartment
3- Fan
4- Butter-cheese compartment
5- Glass shelves
6- Cooler compartment door shelves
7- Bottle shelf
8- Odour filter
9- Zero degree compartment
10- Vegetable bins
11- Adjustable stands
12- Frozen food storing compartments
13- Freezer compartment door shelves
14- Icematics
15- Ice storage box
16- Ice-maker decorative lid
*Optional
2
1
3
*4
5
*6
10
9
12
13
8
*7
*14
*15
*16
1111

6 / 24 EN
Refrigerator / User Guide
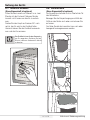
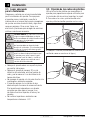
3 Installation
3.1. Right place for installation
Contact the Authorized Service for the product's
installation. To ready the product for installation,
see the information in the user guide and make
sure the electric and water utilities are as required.
If not, call an electrician and plumber to arrange
the utilities as necessary.
B
WARNING: The manufacturer assumes
no responsibility for any damage caused
by the work carried out by unauthorized
persons.
B
WARNING: The product’s power cable
must be unplugged during installation.
Failure to do so may result in death or
serious injuries!
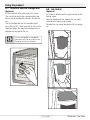
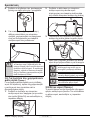
A
WARNING: : If the door span is too
narrow for the product to pass, remove
the door and turn the product sideways; if
this does not work, contact the authorized
service.
t1MBDFUIFQSPEVDUPOBGMBUTVSGBDFUPBWPJE
vibration.
t1MBDFUIFQSPEVDUBUMFBTUDNBXBZGSPNUIF
heater, stove and similar sources of heat and at
least 5 cm away from electric ovens.
t%POPUFYQPTFUIFQSPEVDUUPEJSFDUTVOMJHIUPS
keep in damp environments.
t5IFQSPEVDUSFRVJSFTBEFRVBUFBJSDJSDVMBUJPOUP
function efficiently. If the product will be placed
in an alcove, remember to leave at least 5 cm
distance between the product and the ceiling
and the walls.
t%POPUJOTUBMMUIFQSPEVDUJOFOWJSPONFOUTXJUI
temperatures below -5°C.
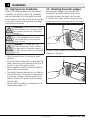
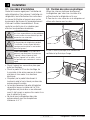
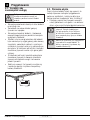
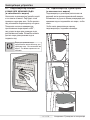
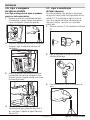
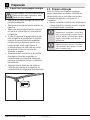
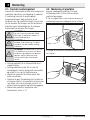
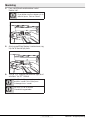
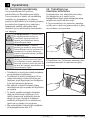
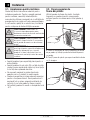
3.2. Attaching the plastic wedges
Use the plastic wedges in the provided with
the product to provide sufficient space for air
circulation between the product and the wall.
1.
To attach the wedges, remove the screws on the
product and use the screws provided with the wedges.
2.
Attach 2 plastic wedges on the ventilation cover
shown as j in the figure.

7 / 24 EN
Refrigerator / User Guide
Installation
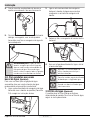
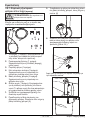
3.3. Adjusting the stands
If the product is not in balanced position, adjust the
front adjustable stands by rotating right or left.
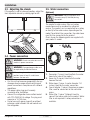
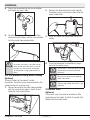
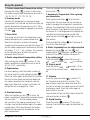
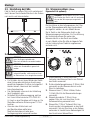
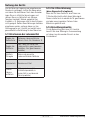
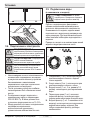
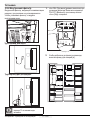
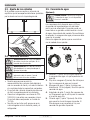
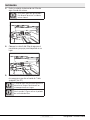
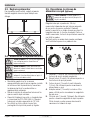
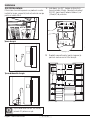
3.5. Water connection
(Optional)
A
WARNING: Unplug the product and
the water pump (if available) during
connection.
The product’s water mains, filter and carboy
connections must be rendered by authorizer
service. The product can be connected to a carboy
or directly to the water mains, depending on the
model. To establish the connection, the water hose
must first be connected to the product.
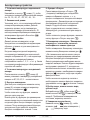
Check to see the following parts are supplied with
your product’s model:
3.4. Power connection
A
WARNING: Do not use extension or multi
sockets in power connection.
B
WARNING: Damaged power cable must
be replaced by Authorized Service.
C
When placing two coolers in adjacent
position, leave at least 4 cm distance
between the two units.
t Our firm will not assume responsibility for any
damages due to usage without earthing and
power connection in compliance with national
regulations.
t The power cable plug must be easily
accessible after installation.
t Connect the refrigerator to an earthed socket
with 220-240V/50 Hz voltage. The plug must
comprise a 10-16A fuse.
t Do not use multi-group plug with or without
extension cable between the wall socket and
the refrigerator.
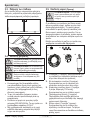
3
1
4
2
*5
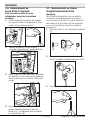
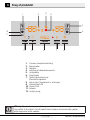
1. Connector (1 piece): Used to attach the water
hose to the rear of the product.
2. Hose clip (3 pieces): Used to fix the water
hose on the wall.
3. Water hose (1 piece, 5 meter diameter 1/4
inches): Used for the water connection.
4. Faucet adapter (1 piece): Comprises a porous
filter, used for connection to the cold water
mains.
5. Water filter (1 piece *Optional): Used to
connect the mains water to the product. Water
filter is not required if carboy connection is
available.

8 / 24 EN
Refrigerator / User Guide
Installation
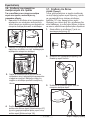
1
23
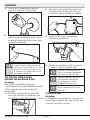
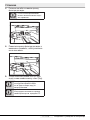
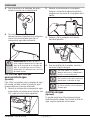
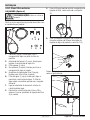
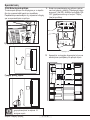
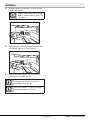
3.6. Connecting water
hose to the product
To connect the water hose to the product,
follow the instructions below.
1. Remove the connector on the hose nozzle
adaptor in the back of the product and run the
hose through the connector.
2. Push the water hose down tightly and connect
to the hose nozzle adaptor.
3. Tighten the connector manually to fix on the
hose nozzle adaptor. You may also tighten the
connector using a pipe wrench or pliers.
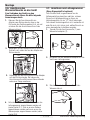
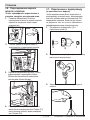
3.7. Connecting to water mains
(Optional)
To use the product by connecting to the cold water
mains, a standard 1/2” valve connector must be
installed to the cold water mains in your home. If
the connector is not available or if you are unsure,
consult a qualified plumber.
1. Detach the connector (1) from the faucet
adaptor (2).
1
2
3
2. Connect the faucet adaptor to the water mains
valve.
3. Attach the connector around the water hose.
4. Connect the other end of the hose to the
water mains (See Section 3.7) or, to use
carboy, to the water pump (See Section 3.8).

9 / 24 EN
Refrigerator / User Guide
Installation
4. Attach the connector into the faucet adaptor
and tighten by hand / tool.
2. Connect the other end of the water hose to
the water pump by pushing the hose into the
pump’s hose inlet.
5. To avoid damaging, shifting or accidentally
disconnecting the hose, use the clips provided
to fix the water hose appropriately.
A
WARNING: After turning the faucet
on, make sure there is no water leak on
either end of the water hose. In case of
leakage, turn the valve off and tighten
all connections using a pipe wrench or
pliers.
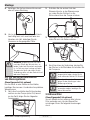
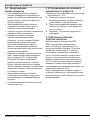
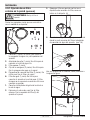
3.8. For products using water carboy
(Optional)
To use a carboy for the product’s water
connection, the water pump recommended by the
authorized service must be used.
1. Connect one end of the water hose provided
with the pump to the product (see 3.6) and
follow the instructions below.
3. Place and fasten the pump hose inside the
carboy.
4. Once the connection is established, plug in
and start the water pump.
C
Please wait 2-3 minutes after starting
the pump to achieve the desired
efficiency.
C
See also the pump’s user guide for
water connection.
C
When using carboy, water filter is not
required.
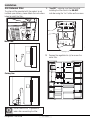
3.9 Water filter
(Optional)
The product may have internal or external filter,
depending on the model. To attach the water filter,
follow the instructions below.

10 / 24 EN
Refrigerator / User Guide
Installation
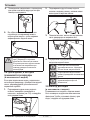
3.9.1.Fixing external filter
on the wall (Optional)
A
WARNING: Do not fix the filter on the
product.
Check to see the following parts are supplied with
your product’s model:
1. Connector (1 piece): Used to attach the water
hose to the rear of the product.
2. Faucet adapter (1 piece): Used for connection
to the cold water mains.
3. Porous filter (1 piece)
4. Hose clip (3 pieces): Used to fix the water
hose on the wall.
5. Filter connecting apparatus (2 pieces): Used to
fix the filter on the wall.
6. Water filter (1 piece): Used to connect the
product to the water mains. Water filter is not
necessary when using carboy connection.
1. Connect the faucet adaptor to the water mains
valve.
2. Determine the location to fix the external filter.
Fix the filter’s connecting apparatus (5) on the
wall.
3. Attach the filter in upright position on the filter
connecting apparatus, as indicated on the
label. (6)
4. Attach the water hose extending from the top
of the filter to the product’s water connection
adaptor, (see 3.6.)
After the connection is established, it should look
like the figure below.
1
2
3
4
5
6

11 / 24 EN
Refrigerator / User Guide
Installation
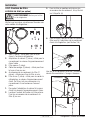
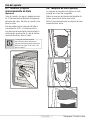
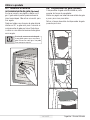
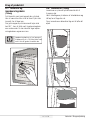
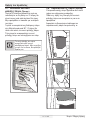
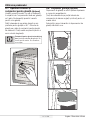
3.9.2.Internal filter
The internal filter provided with the product is not
installed upon delivery; please follow the instructions
below to install the filter.
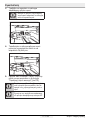
1. “Ice Off” indicator must be active while
installing the filter. Switch the ON-OFF
indicator using the “Ice” button on the screen.
Water line:
Carboy line:
2. Remove the vegetable bin (a) to access the
water filter.
C
Do not use the first 10 glasses of
water after connecting the filter.

12 / 24 EN
Refrigerator / User Guide
Installation
3. Remove the water filter by-pass cover by
pulling.
C
A few drops of water may flow out
after removing the cover; this is
normal.
4. Place the water filter cover into the
mechanism and push to lock in place.
5. Push the “Ice” button on the screen again to
cancel the “Ice Off” mode.
C
The water filter will clear certain foreign
particles in the water. It will not clear the
microorganisms in the water.
C
See section 5.2 for activating the filter
replacing period.

13 / 24 EN
Refrigerator / User Guide
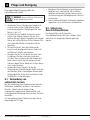
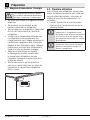
4 Preparation
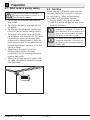
4.1. What to do for energy saving
mehmet
A
Connecting the product to electronic
energy-saving systems is harmful, as it
may damage the product.
t Do not keep the refrigerator doors open for
long periods.
t Do not place hot food or beverages into the
refrigerator.
t Do not overfill the refrigerator; blocking the
internal air flow will reduce cooling capacity.
t The energy consumption value specified for
the refrigerator was measured with the freezer
compartment’s upper shelf removed, other
shelves and the lowest drawers in place and
under maximum load. The top glass shelf can
be used, depending on the shape and size of
food to be frozen.
t Depending on the product’s features;
defrosting frozen foods in the cooler
compartment will ensure energy saving and
preserve food quality.
t Make sure the foods are not in contact with
the cooler compartment temperature sensor
described below.
4.2. First Use
Before using your refrigerator, make sure the
necessary preparations are made in line with
the instructions in “Safety and environment
instructions” and “Installation” sections.
t Keep the product running with no food
inside for 6 and do not open the door, unless
absolutely necessary.
C
A sound will be heard when the
compressor is engaged. It is normal to
hear sound even when the compressor is
inactive, due to the compressed liquids
and gasses in the cooling system.
C
It is normal for the front edges of the
refrigerator to be warm. These areas are
designed to warm up in order to prevent
condensation.

14 / 24 EN
Refrigerator / User Guide
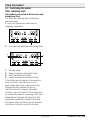
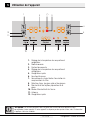
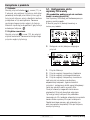
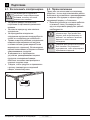
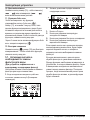
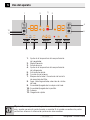
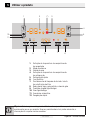
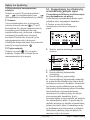
5 Using the product
C
*Optional: The figures in this user guide are intended as drafts and may not perfectly match your
product. If your product does not comprise the relevant parts, the information pertains to other models.
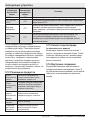
1. Freezer compartment temperature setting
2. Economy mode
3. Error status
4. Cooler compartment temperature setting
5. Rapid cooling
6. Vacation function
7. Keypad lock / filter replacing alert cancellation
8. Water, fragmented ice, ice cubes selection
9. Ice making on/off
10. Display on/off
11. Autoeco
12. Rapid freezing

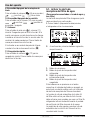
15 / 24 EN
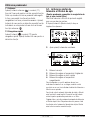
Refrigerator / User Guide
Using the product
1. Freezer compartment temperature setting
Pressing the button (
) number (1) will enable
the freezer compartment temperature to be set at
-18,-19,-20,-21 ,-22,-23,-24,-18...
2. Economy mode
Indicates the refrigerator is running on energy-
saving mode. This indicator will be active when the
freezer compartment temperature is set at -18 or
the energy-saving cooling is engaged by eco-extra
function. (
)
3. Error status
This sensor will activate if the refrigerator is not
cooling adequately or in case of sensor fault. (
)
When this indicator is activated, the freezer
compartment temperature indicator will display "E"
and the cooler compartment temperature indicator
will display "1, 2, 3..." etc. numbers. The numbers
on the indicator serve to inform the service
personnel about the fault.
4. Cooler compartment temperature setting
After pressing the button (
) number (4), the
cooler compartment temperature can be set to
8,7,6,5,4,3,2.. respectively.
5. Rapid cooling
For rapid cooling , press the button number (5);
this will activate the rapid cooling indicator (
).
Press this button again to deactivate this function.
Use this function when placing fresh foods into
the cooler compartment or to rapidly cool the
food items. When this function is activated, the
refrigerator will be engaged for 1 hour.
6. Vacation function
When the Vacation function (
) is active, the
cooler compartment temperature indicator displays
the inscription "- -" and no cooling process
will be active in the cooling compartment. This
function is not suitable to keep food in the cooler
compartment. Other compartments will remain
cooled with the respective temperature set for
each compartment.
Press the vacation function button again to cancel
this function. (
)
7.
Keypad lock / Keypad lock / filter replacing
alert cancellation
Press keypad lock button ( ) to activate the
keypad lock. You may also use this function to
prevent changing the refrigerator's temperature
settings. The refrigerator's filter must be replaced
every 6 months. If you follow the instructions in
the section 5.2, the refrigerator will automatically
calculate the remaining period and the filter
replacing alert indicator (
) will light up when
filter expires.
Press and hold the button (
) for 3 seconds to
turn off the filter alert light.
8. Water, fragmented ice, ice cubes selection
Navigate the water (
), ice cube ( ) and
fragmented ice ( ) selections using the button
number 8. The active indicator will remain lit.
9. Ice making on/off
Press the button (
) number (9) to cancel (
) or activate ( ) ice-making.
10. Display on/off
Press the button (
) number (10) to
cancel (XX) or activate ( ) display on/
off.
11. Autoeco
Press the auto eco button (
), number (11),
for 3 seconds to activate this function. If the
door remains closed for a long time when this
function is activated, the cooler section will switch
to economic mode. Press the button again to
deactivate this function.
The indicator will light up after 6 hours when the
auto eco function is active. (
)
12. Rapid freezing
Press the button (
) number (12) for rapid
freezing. Press the button again to deactivate the
function.

16 / 24 EN
Refrigerator / User Guide
Using the product
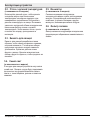
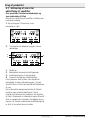
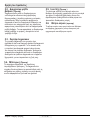
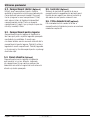
5.1. Activating the water
filter replacing alert
(For products connected to water mains and
comprising filter)
The water filter replacing alert is adjusted as
described below.
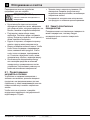
1.
Press the A (Keypad lock) button while the
refrigerator is operational.
A
3
4
2
1
2. Then press the following buttons respectively
A
3
4
2
1
1. Vacation button
2. Cooler temperature adjustment button
3. Rapid cool adjustment button
4. Freezer temperature adjustment button
If the buttons are not pressed in the respective
order, the button I indicator will turn off, a
short audible alert will be heard and the Filter
Replacement Alert indicator will light up.
The filter service life automatic calculation
function is inactive by default. This function must
be activated for products comprising a filter. Your
refrigerator will automatically indicate the filter
replacement period after 6 months. Repeating
this process when the filter service life automatic
calculation is active will cancel this function.

17 / 24 EN
Refrigerator / User Guide
Using the product
5.2. Zero degree compartment
(Optional)
Use this compartment to keep delicatessen
at lower temperatures or meat products for
immediate consumption. Do not place fruits and
vegetables in this compartment. You can expand
the product's internal volume by removing any
of the zero degree compartments. To remove the
compartment, simply pull forth, lift up and pull out.
5.3. Vegetable bin
The refrigerator's vegetable bin is designed to
keep vegetables fresh by preserving humidity.
For this purpose, the overall cold air circulation is
intensified in the vegetable bin. Keep fruits and
vegetables in this compartment. Keep the green-
leaved vegetables and fruits separately to prolong
their life.
5.4. Blue light
(Optional)
The product's vegetable bins comprise blue
light. The vegetables in the bin will continue
photosynthesize under the blue light's wavelength
effect and remain live and fresh.
5.5. Ionizer
(Optional)
The ionizer system in the cooler compartment's
air duct serves to ionize the air. The negative
ion emissions will eliminate bacteria and other
molecules causing odour in the air.
5.6. Odour filter
(optional)
The odour filter in the cooler compartment's air
duct will prevent undesirable odour formation.

18 / 24 EN
Refrigerator / User Guide
Using the product
5.7. Icematic and ice storage box
(Optional)
Fill the icematic with water and put in place.
The ice will be ready after approximately two
hours. Do not remove the icematic to take the
ice.
Turn the buttons on the ice chambers right-
hand side by 90°; the ice will fall to the ice sto-
rage box below. You may then remove the ice
storage box and serve the ice.
C
The ice storage box is intended for
storing ice only. Do not fill with water.
Doing so will cause it to break.
5.8. Ice-maker
(Optional)
Ice maker is located on the upper section of the
freezer cover.
Hold the handles on the sides of the ice stock
reservoir and move up to remove.
Remove the ice-maker decorative lid by moving
up.

19 / 24 EN
Refrigerator / User Guide
Using the product
5.9. Freezing fresh food
t To preserve food quality, the food items placed
in the freezer compartment must be frozen as
quickly as possible, use the rapid freezing for
this.
t Freezing the food items when fresh will extend
the storage time in the freezer compartment.
t Pack the food items in air-tight packs and seal
tightly.
t Make sure the food items are packed before
putting in the freezer. Use freezer holders,
tinfoil and damp-proof paper, plastic bag
or similar packaging materials instead of
traditional packaging paper.
t Mark each food pack by writing the date on the
package before freezing. This will allow you to
determine the freshness of each pack every
time the freezer is opened. Keep the earlier
food items in the front to ensure they are used
first.
t Frozen food items must be used immediately
after defrosting and should not be frozen again.
t Do not free large quantities of food at once.
Freezer
Compartment
Setting
Cooler
Compartment
Setting
Descriptions
-18°C 4°C This is the default, recommended setting.
-20,-22 veya
-24°C
4°C
These settings are recommended for ambient temperatures
exceeding 30°C.
Rapid Freeze 4°C
Use this to freeze food items in a short time, the product will reset to
previous settings when the process is completed.
-18°C or colder 2°C
Use these settings if you believe the cooler compartment is not cold
enough due to ambient temperature or frequently opening the door.
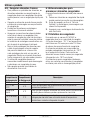
5.10. Recommendations for
storing frozen foods
The compartment must be set to at least -18°C.
1. Place the food items in the freezer as quickly
as possible to avoid defrosting.
2. Before freezing, check the “Expiry Date” on
the package to make sure it is not expired.
3. Make sure the food’s packaging is not
damaged.
5.11. Deep freezer details
As per the IEC 62552 standards, the freezer must
have the capacity to freeze 4,5 kg of food items at
-18°C or lower temperatures in 24 hours for each
100 litres of freezer compartment volume. Food
items can only be preserved for extended periods
at or below temperature of -18°C . You can keep
the foods fresh for months (in deep freezer at or
below temperatures of 18°C ).
The food items to be frozen must not contact
the already-frozen food inside to avoid partial
defrosting.
Boil the vegetables and filter the water to extend
the frozen storage time. Place the food in air-tight
packages after filtering and place in the freezer.
Bananas, tomatoes, lettuce, celery, boiled eggs,
potatoes and similar food items should not be
frozen. Freezing these food items will simply
reduce the nutritional value and food quality,
as well as possible spoiling which is harmful to
health.
A página está carregando ...
A página está carregando ...
A página está carregando ...
A página está carregando ...
A página está carregando ...
A página está carregando ...
A página está carregando ...
A página está carregando ...
A página está carregando ...
A página está carregando ...
A página está carregando ...
A página está carregando ...
A página está carregando ...
A página está carregando ...
A página está carregando ...
A página está carregando ...
A página está carregando ...
A página está carregando ...
A página está carregando ...
A página está carregando ...
A página está carregando ...
A página está carregando ...
A página está carregando ...
A página está carregando ...
A página está carregando ...
A página está carregando ...
A página está carregando ...
A página está carregando ...
A página está carregando ...
A página está carregando ...
A página está carregando ...
A página está carregando ...
A página está carregando ...
A página está carregando ...
A página está carregando ...
A página está carregando ...
A página está carregando ...
A página está carregando ...
A página está carregando ...
A página está carregando ...
A página está carregando ...
A página está carregando ...
A página está carregando ...
A página está carregando ...
A página está carregando ...
A página está carregando ...
A página está carregando ...
A página está carregando ...
A página está carregando ...
A página está carregando ...
A página está carregando ...
A página está carregando ...
A página está carregando ...
A página está carregando ...
A página está carregando ...
A página está carregando ...
A página está carregando ...
A página está carregando ...
A página está carregando ...
A página está carregando ...
A página está carregando ...
A página está carregando ...
A página está carregando ...
A página está carregando ...
A página está carregando ...
A página está carregando ...
A página está carregando ...
A página está carregando ...
A página está carregando ...
A página está carregando ...
A página está carregando ...
A página está carregando ...
A página está carregando ...
A página está carregando ...
A página está carregando ...
A página está carregando ...
A página está carregando ...
A página está carregando ...
A página está carregando ...
A página está carregando ...
A página está carregando ...
A página está carregando ...
A página está carregando ...
A página está carregando ...
A página está carregando ...
A página está carregando ...
A página está carregando ...
A página está carregando ...
A página está carregando ...
A página está carregando ...
A página está carregando ...
A página está carregando ...
A página está carregando ...
A página está carregando ...
A página está carregando ...
A página está carregando ...
A página está carregando ...
A página está carregando ...
A página está carregando ...
A página está carregando ...
A página está carregando ...
A página está carregando ...
A página está carregando ...
A página está carregando ...
A página está carregando ...
A página está carregando ...
A página está carregando ...
A página está carregando ...
A página está carregando ...
A página está carregando ...
A página está carregando ...
A página está carregando ...
A página está carregando ...
A página está carregando ...
A página está carregando ...
A página está carregando ...
A página está carregando ...
A página está carregando ...
A página está carregando ...
A página está carregando ...
A página está carregando ...
A página está carregando ...
A página está carregando ...
A página está carregando ...
A página está carregando ...
A página está carregando ...
A página está carregando ...
A página está carregando ...
A página está carregando ...
A página está carregando ...
A página está carregando ...
A página está carregando ...
A página está carregando ...
A página está carregando ...
A página está carregando ...
A página está carregando ...
A página está carregando ...
A página está carregando ...
A página está carregando ...
A página está carregando ...
A página está carregando ...
A página está carregando ...
A página está carregando ...
A página está carregando ...
A página está carregando ...
A página está carregando ...
A página está carregando ...
A página está carregando ...
A página está carregando ...
A página está carregando ...
A página está carregando ...
A página está carregando ...
A página está carregando ...
A página está carregando ...
A página está carregando ...
A página está carregando ...
A página está carregando ...
A página está carregando ...
A página está carregando ...
A página está carregando ...
A página está carregando ...
A página está carregando ...
A página está carregando ...
A página está carregando ...
A página está carregando ...
A página está carregando ...
A página está carregando ...
A página está carregando ...
A página está carregando ...
A página está carregando ...
A página está carregando ...
A página está carregando ...
A página está carregando ...
A página está carregando ...
A página está carregando ...
A página está carregando ...
A página está carregando ...
A página está carregando ...
A página está carregando ...
A página está carregando ...
A página está carregando ...
A página está carregando ...
A página está carregando ...
A página está carregando ...
A página está carregando ...
A página está carregando ...
A página está carregando ...
A página está carregando ...
A página está carregando ...
A página está carregando ...
A página está carregando ...
A página está carregando ...
A página está carregando ...
A página está carregando ...
A página está carregando ...
A página está carregando ...
A página está carregando ...
A página está carregando ...
A página está carregando ...
A página está carregando ...
A página está carregando ...
A página está carregando ...
A página está carregando ...
A página está carregando ...
A página está carregando ...
A página está carregando ...
A página está carregando ...
A página está carregando ...
A página está carregando ...
A página está carregando ...
A página está carregando ...
A página está carregando ...
A página está carregando ...
A página está carregando ...
A página está carregando ...
A página está carregando ...
A página está carregando ...
A página está carregando ...
A página está carregando ...
A página está carregando ...
A página está carregando ...
A página está carregando ...
-
 1
1
-
 2
2
-
 3
3
-
 4
4
-
 5
5
-
 6
6
-
 7
7
-
 8
8
-
 9
9
-
 10
10
-
 11
11
-
 12
12
-
 13
13
-
 14
14
-
 15
15
-
 16
16
-
 17
17
-
 18
18
-
 19
19
-
 20
20
-
 21
21
-
 22
22
-
 23
23
-
 24
24
-
 25
25
-
 26
26
-
 27
27
-
 28
28
-
 29
29
-
 30
30
-
 31
31
-
 32
32
-
 33
33
-
 34
34
-
 35
35
-
 36
36
-
 37
37
-
 38
38
-
 39
39
-
 40
40
-
 41
41
-
 42
42
-
 43
43
-
 44
44
-
 45
45
-
 46
46
-
 47
47
-
 48
48
-
 49
49
-
 50
50
-
 51
51
-
 52
52
-
 53
53
-
 54
54
-
 55
55
-
 56
56
-
 57
57
-
 58
58
-
 59
59
-
 60
60
-
 61
61
-
 62
62
-
 63
63
-
 64
64
-
 65
65
-
 66
66
-
 67
67
-
 68
68
-
 69
69
-
 70
70
-
 71
71
-
 72
72
-
 73
73
-
 74
74
-
 75
75
-
 76
76
-
 77
77
-
 78
78
-
 79
79
-
 80
80
-
 81
81
-
 82
82
-
 83
83
-
 84
84
-
 85
85
-
 86
86
-
 87
87
-
 88
88
-
 89
89
-
 90
90
-
 91
91
-
 92
92
-
 93
93
-
 94
94
-
 95
95
-
 96
96
-
 97
97
-
 98
98
-
 99
99
-
 100
100
-
 101
101
-
 102
102
-
 103
103
-
 104
104
-
 105
105
-
 106
106
-
 107
107
-
 108
108
-
 109
109
-
 110
110
-
 111
111
-
 112
112
-
 113
113
-
 114
114
-
 115
115
-
 116
116
-
 117
117
-
 118
118
-
 119
119
-
 120
120
-
 121
121
-
 122
122
-
 123
123
-
 124
124
-
 125
125
-
 126
126
-
 127
127
-
 128
128
-
 129
129
-
 130
130
-
 131
131
-
 132
132
-
 133
133
-
 134
134
-
 135
135
-
 136
136
-
 137
137
-
 138
138
-
 139
139
-
 140
140
-
 141
141
-
 142
142
-
 143
143
-
 144
144
-
 145
145
-
 146
146
-
 147
147
-
 148
148
-
 149
149
-
 150
150
-
 151
151
-
 152
152
-
 153
153
-
 154
154
-
 155
155
-
 156
156
-
 157
157
-
 158
158
-
 159
159
-
 160
160
-
 161
161
-
 162
162
-
 163
163
-
 164
164
-
 165
165
-
 166
166
-
 167
167
-
 168
168
-
 169
169
-
 170
170
-
 171
171
-
 172
172
-
 173
173
-
 174
174
-
 175
175
-
 176
176
-
 177
177
-
 178
178
-
 179
179
-
 180
180
-
 181
181
-
 182
182
-
 183
183
-
 184
184
-
 185
185
-
 186
186
-
 187
187
-
 188
188
-
 189
189
-
 190
190
-
 191
191
-
 192
192
-
 193
193
-
 194
194
-
 195
195
-
 196
196
-
 197
197
-
 198
198
-
 199
199
-
 200
200
-
 201
201
-
 202
202
-
 203
203
-
 204
204
-
 205
205
-
 206
206
-
 207
207
-
 208
208
-
 209
209
-
 210
210
-
 211
211
-
 212
212
-
 213
213
-
 214
214
-
 215
215
-
 216
216
-
 217
217
-
 218
218
-
 219
219
-
 220
220
-
 221
221
-
 222
222
-
 223
223
-
 224
224
-
 225
225
-
 226
226
-
 227
227
-
 228
228
-
 229
229
-
 230
230
-
 231
231
-
 232
232
-
 233
233
-
 234
234
-
 235
235
-
 236
236
-
 237
237
-
 238
238
-
 239
239
-
 240
240
-
 241
241
-
 242
242


Teka NFE3 650 X Manual do usuário
- Categoria
- Geladeiras combinadas
- Tipo
- Manual do usuário
- Este manual também é adequado para
em outros idiomas
- español: Teka NFE3 650 X Manual de usuario
- français: Teka NFE3 650 X Manuel utilisateur
- Deutsch: Teka NFE3 650 X Benutzerhandbuch
- dansk: Teka NFE3 650 X Brugermanual
- polski: Teka NFE3 650 X Instrukcja obsługi
- română: Teka NFE3 650 X Manual de utilizare