CYBEX PallaS Guia de usuario
- Categoria
- Assentos de carro
- Tipo
- Guia de usuario
A página está carregando ...
A página está carregando ...

1
EN
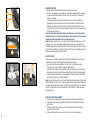
Warning! This short manual serves as an overview only. For maximum protection and best comfort for your child, it is essential to read and
follow the entire instruction manual carefully.
NO
Advarsel! Denne hurtigveiledningen er bare ment å gi en oversikt. For maksimal beskyttelse og best mulig komfort for barnet, er det viktig
at du leser og følger anvisningene i den fullstendige bruksanvisningen.
PT
Atenção: Estas instruções são um resumo abreviado. Para garantir segurança e um conforto máximos para sua criança, é muito
importante ler cuidadosamente todo o manual de instruções.
SE
Varning! Denna kortversion är bara en sammanfattning. För att säkerställa maximal säkerhet och komfort för barnet är det mycket viktigt
att du läser igenom och följer hela bruksanvisningen noga.
ES
¡Advertencia! Estas instrucciones sólo son un resumen. Para garantizar la máxima seguridad y confort para su hijo, es muy importante leer
completa y atentamente el manual de instrucciones.
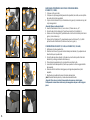
ES – Grupo 1 (9–18 kg) / PT – Grupo 1 (9–18 kg) / EN – Group 1 (9-18 kg) / SE – Grupp 1 (9-18 kg) / NO – Gruppe 1 (9–18 kg) /
FI – Ryhmä 1 (9–18 kg) / DK – Gruppe 1 (9-18 kg) / SI – Skupina 1 (9 do 18 kg) / HR – Skupina 1 (9-18 kg)
ES – Instrucciones abreviadas / PT – Instruções abreviadas / EN – Short manual / SE – Kortversion / FI – Lyhyt käyttöopas /
NO – Hurtigveiledning / DK – Kort vejledning / SI – Kratka navodila / HR
A página está carregando ...
A página está carregando ...

4
Dear Customer!
THANK YOU FOR PURCHASING THE CYBEX PALLAS.
WE ASSURE YOU THAT IN THE PROCESS OF DEVELOPING THE CYBEX PALLAS WE FOCUSED ON SAFETY, COMFORT AND
USER FRIENDLINESS. THE PRODUCT IS MANUFACTURED UNDER SPECIAL QUALITY SURVEILLANCE AND COMPLIES WITH
THE STRICTEST SAFETY REQUIREMENTS.
¡Apreciado cliente!
MUCHAS GRACIAS POR COMPRAR LA CYBEX PALLAS.
LE ASEGURAMOS QUE EN EL DESARROLLO DE LA CYBEX PALLAS SE HAN TENIDO EN CUENTA LA SEGURIDAD, EL
CONFORT Y LA PRACTICIDAD. EL PRODUCTO SE HA DESARROLLADO BAJO UN ESTRICTO CONTROL DE CALIDAD Y
TENIENDO EN CUENTA TODOS LOS ESTÁNDARES DE SEGURIDAD.
Caro cliente!
MUITO OBRIGADO PELA DECISÃO DE COMPRAR A CYBEX PALLAS.
ASSEGURAMOS QUE NO DESENVOLVIMENTO DE CYBEX PALLAS, A SEGURANÇA, O CONFORTO E O FÁCIL
MANUSEAMENTO SÃO O FOCO PRINCIPAL. O PRODUTO FOI DESENVOLVIDO SOB UM CONTROLO DE QUALIDADE
SUPERIOR CUMPRE TODAS AS NORMAS DE SEGURANÇA STANDARD.
A página está carregando ...

6
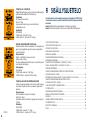
Note! Please keep the user guide close by for further references (e.g. under the
elastic cover on the rear side of the backrest).
Note! According to local codes the product characteristic can be different.
Warning! For your child’s maximum protection it is essential to use and install the
CYBEX PALLAS according to the instructions in this user guide.
SHORT MANUAL GROUP 1 ...........................................................................................................1
SHORT MANUAL GROUP 2/3 ....................................................................................................... 2
HOMOLOGATION ........................................................................................................................ 5
THE BEST POSITION IN THE CAR ................................................................................................... 8
SECURING THE CHILD ................................................................................................................ 10
ADJUSTMENT TO THE BODY SIZE ................................................................................................10
REMOVING THE BOOSTER INLAY ............................................................................................... 10
SAFETY CUSHION ADJUSTMENT - ECE GROUP 1 (9-18 KG) ..................................................... 12
SEATING AND LIE DOWN POSITION – ECE GROUP 1 (9-18 KG) ............................................... 12
ADJUSTMENT OF THE HEADREST ............................................................................................... 12
FASTENING OF SEATBELT WITH SAFETY CUSHION ATTACHED - ECE GROUP 1 (9-18 KG) ........ 14
CHANGE OVER FROM ECE GROUP 1 (9-18 KG) TO ECE GROUP 2/3 (15-36 KG) ................... 14
FASTENING OF SEAT BELT WITHOUT THE SAFETY CUSHION - ECE GROUP 2/3 (15-36 KG)....... 16
IS YOUR CHILD PROPERLY SECURED? ....................................................................................... 16
PRODUCT CARE ......................................................................................................................... 18
REMOVING THE SEAT COVER .................................................................................................... 18
REMOVING THE SEAT COVER OF THE BACKREST ...................................................................... 18
CLEANING ................................................................................................................................. 18
WHAT TO DO AFTER AN ACCIDENT ...........................................................................................20
DURABILITY OF THE PRODUCT ................................................................................................... 20
DISPOSAL .................................................................................................................................... 20
WARRANTY ................................................................................................................................. 22
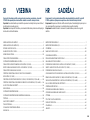
CONTENT
EN
Aviso! Guarde sempre o manual de instruções debaixo da capa elástica que
encontrará na parte traseira do encosto para que o possa ter perto de sí sempre
que tenha alguma dúvida.
Aviso!
podem mudar.
Atenção: Para garantir que a sua criança está segura, é muito importante que
utilize e monte a CYBEX Pallas segundo este manual de instruções.
MANUAL ABREVIADO GRUPO 1 ................................................................................................. 1
MANUAL ABREVIADO GRUPO 2/3 .............................................................................................2
HOMOLOGAÇÃO ....................................................................................................................... 5
POSIÇÃO CORRECTA NO VEÍCULO ........................................................................................... 8
PRENDER A CRIANÇA ................................................................................................................ 10
REGULAÇÃO DA ALTURA DESEJADA ....................................................................................... 10
RETIRAR O REFORÇO DE ALTURA DO ASSENTO ....................................................................... 10
REGULAÇÃO DA ALMOFADA DE SEGURANÇA - ECE GUPO 1 (9-18 KG.) ............................ 12
POSIÇÃO DE SENTADO E RECLINADO - ECE GUPO 1 (9-18 KG.) ........................................... 12
REGULAÇÃO DO REPOUSA CABEÇAS .................................................................................... 12
APERTAR O CINTO DO SEU FILHO: ECE - GRUPO 1 (9-18 KG) .................................................. 14
CONVERSÃO DO ECE GRUPO 1 (9-18 KG) AO ECE GRUPO 2/3 (15-36 KG) ......................... 14
COLOCAR A CRIANÇA SEM ALMOFADA DE SEGURANÇA ECE - GRUPO 2/3 (15-36 KG) ... 16
O SEU FILHO ESTÁ ADEQUADAMENTE SEGURADO? ............................................................... 16
CUIDADO DA CADEIRA ............................................................................................................ 18
RETIRAR O FORRO ...................................................................................................................... 18
RETIRAR A FORRO DO ENCOSTO .............................................................................................. 18
LIMPEZA ...................................................................................................................................... 18
QUE FAZER DEPOIS DE UM ACIDENTE ....................................................................................... 20
DURAÇÃO DO PRODUTO ......................................................................................................... 20
RECICLAGEM ............................................................................................................................. 20
GARANTIA .................................................................................................................................. 22
PT
CONTÉM
A página está carregando ...

8
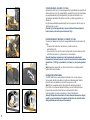
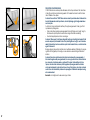
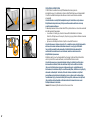
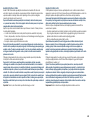
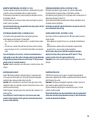
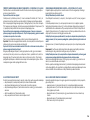
THE BEST POSITION IN THE CAR
The CYBEX child seat can be used on all vehicle seats with a three-point
automaticretractor belt. We generally recommend using the seat in the back of
the vehicle. In the front, your child is usually exposed to higher risks in case of an
accident.
In exceptions, the child seat may be used on the passenger seat. Please note the
following for such cases:
Luggage or other objects in the vehicle which may cause injuries in an accident
must always be secured properly. Loose parts may turn into deadly projectiles
during an impact.
Note! Please never leave your child unattended in the car.
– In cars equipped with airbags you should push the passenger seat as far back
as possible. Please make sure that the upper point of the vehicle seat belt
staysbehind the belt guide of the child seat.
– You must follow the recommendations of the vehicle manufacturer.
Warning! You must not use the CYBEX child seat with a two-point belt or a lap belt.
When securing your child with a two-point belt, the child may sustain lethal injuries
in an accident.
Warning! The seat belt (f) must run diagonally from the back and must never lead
to the front to the upper belt point of the front seat of in your vehicle. Should you be
unable to adjust this for example by pushing the seat to the front or by using the seat
on a different seat in the car, then the child seat is not suitable for this vehicle.
Warning! For vehicles with passenger seats that are positioned sideways, the use of
this child seat is not allowed. For seats that are positioned against the direction of
travel, e.g. in a van or a minibus, the use of the child seat is allowed, assuming the
seat is approved to carry an adult. Please ensure that the headrest is not taken off
when mounting the child seat on a passenger seat which is positioned against the
direction of travel! The child seat must have the seat belt fastened even when not
in use. This is necessary to avoid the driver or passenger getting injured by a loose
child seat when making an emergency stop or in case of a crash.
A CYBEX Pallas pode ser utilizada em todos os assentos auto com três pontos de
traseiros do veículo. Na frente, a criança normalmente está exposta a maiores
riscos em caso de acidente.
Em excepcções o assento da criança pode ser utilizado no lugar do passageiro à
frente. Neste caso siga as seguintes recomendações:
Bagagem ou outros objectos soltos dentro do automóvel devem ser presos
comsegurança para evitar danos em caso de acidente.
– Em automóveis com airbag deve posicionar o assento do automóvel do
passageiro o mais para trás possível. Por favor certifique-se de que a parte mais
alta do cinto do veículo fica por trás da guia do cinto do assento.
– Deve seguir as recomendações do fabricante do veículo.
O LUGAR CORRECTO NO AUTOMÓVEL
Aviso: Não deve utilizar o assento com cintos de segurança de 2 pontos ou de
ventre. A utilização de um cinto de segurança de 2 pontos pode causar danos
severos ou fatais à criança em caso de acidente.
Atenção! O cinto de segurança(f)deve passar diagonalmente desde trás e nunca
passar acima do ponto mais alto do cinto do assento da frente do veículo. Não
deve ser possível ajustar por exemplo empurrando o assento do veículo para a
frente ou utilizar num outro assento do veículo, desta maneira a cadeira auto de
criança não se destina a este veículo.
Atenção! Para os veículos em que os assentos estão situados lateralmente, o uso
desta cadeira infantil não é permitido. Para os assentos que estão situados no
sentido contra a marcha do veículo, por exemplo um monovolume ou minibus, a
utilização é permitida sempre que o assento seja homologado para um adulto.
a instalar num veiculo com assento em posição contrária ao sentido da marcha.
A cadeira infantil deve ser presa com o cinto de segurança, mesmo quando a
criança não está sentada nela. Isto é necessário para evitar que o condutor ou
travagem brusca ou em caso de colisão
Aviso! Por favor nunca deixe a criança no automóvel sem a supervisão de um
adulto.
A página está carregando ...

10
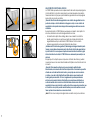
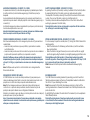
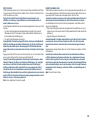
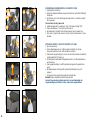
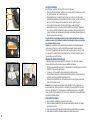
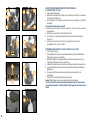
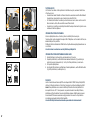
For proper height adjustment of the CYBEX child seat an inlay (i) is included and
already mounted under the seat cover when purchased.
Note! Only a shoulder and head rest (e) optimally adjusted in height provides the
best protection and comfort for your child and also guarantees the optimal position
of the diagonal belt (f). You can adjust the height (e) in 11 positions. The shoulder
rest is attached to the head rest and does not have to be adjusted separately.
REMOVING THE BOOSTER INLAY
– It is recommended to use this height adjustment inlay (i) between the age of 9
and 18 months.
– For children over 19 months the inlay may be removed
– Afterwards the height adjustment should be regulated by moving the headrest
(e) into the correct position. Pull the slider (h) in order to release the headrest.
– The seat is correctly adjusted if you can fit 2 fingers between the bottom edge
of the head rest and the shoulder of the child. Pull the adjustment handle (h) in
order to unlock the shoulder and headrest.
1. Open the forefront press buttons of the booster cover.
2. Lift the booster cover until the seat inlay can be easily removed from the front.
3. Remove the seat inlay according to the above age recommendation.
4. Put the seat cover back in its original position and fasten the press buttons.
SECURING THE CHILD
Note! It is possible that some car seats that are made of soft material (e.g. velours,
leather, etc.) may show signs of usage and/or discolouration. In order to avoid this,
you could, for example, place a cover or towel underneath it. In this context, we
would also like to refer to you to our cleaning instructions, which must absolutely be
Place the child seat on the respective seat in the car.
– Please make sure that the backrest (a) of the child seat rests flat against the
backrest of the car seat so that the child seat is under no circumstances in a
sleeping position.
– Should the headrest of the vehicle seat interfere, please pull it out completely
and turn it around or take it off entirely. The backrest (a) optimally adjusts to
almost any inclination of the vehicle seat.
part of the car seat. Pushing the booster rearwards the seat should be tightly pressed
against the seat. For the best possible protection of your child, the seat must be in a
normal upright position!
Para uma adequada regulação de altura da cadeira infantil CYBEX, está incluído
um reforço de altura por debaixo do tecido do assento da cadeira.
Aviso! A melhor protecção e conforto são obtidos se a regulação do repousa
cabeças e protectores de ombros (e) for adequada na altura, assegurando
pode ser regulada em 11 posições. O protector de ombros está unido ao repousa
cabeças e não deverá ser regulado separadamente.
Aviso! É possível que alguns assentos de automóvel de material mais sensível (ex:
veludo, pele, etc.) demonstrem.sinais de descoloração e desgaste. De forma
a evitar este desgaste poderá, por exemplo, colocar uma toalha debaixo da
deverão ser consideradas antes da primeira utilização.
REGULAÇÃO DA ALTURA
– Recomenda-se a utilização deste reforço de altura (i) entre os 9 e os 18 meses
de idade.
– Para crianças com mais de 19 meses o reforço de altura deve ser retirado.
– Posteriormente, a altura deverá ser regulada e ajustada à posição mais
adequada (e). Pressione o botão para deslizar a cadeira (h).
– A regulação depende sempre um pouco do tamanho da criança, o importante
parte inferior do repousa cabeças e os ombros da criança.
RETIRAR O REFORÇO DE ALTURA DO ASSENTO
1. Abra os botões da parte frontal do forro.
2.
fácilmente pela parte frontal.
3. Retire um ou dois reforços de altura seguindo as recomendações das idades
assinaladas.
4. Coloque o forro na sua posição inicial e aperte os botões.
PRENDER A CRIANÇA
Coloque a cadeira auto de segurança no assento escolhido do automóvel.
– Por favor certifique-se de que o apoio de costas (a) da cadeira auto de criança
apoia directamente nas costas da cadeira do veículo, assim a cadeira auto de
criança estará na posição correcta.
– Se o apoio de cabeça do automóvel interferir com a cadeira auto decriança,
deve retirá-lo. O apoio de costas (a) normalmente ajusta-se a qualquer
inclinação dos assentos dos automóveis. Para a melhor protecção possível da
sua criança, o assento deve estar numa posição normal e direita.
do automóvel. Empurrando a base para trás deve pressionar ligeiramente contra o
assento.
A página está carregando ...

12
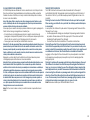
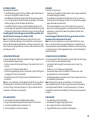
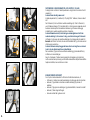
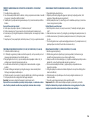
It is not necessary to open the car belt system (f), to bring the CYBEX child seat into
reclining position.
The CYBEX Pallas has a reclining headrest (r) preventing your child‘s head from
falling forward when asleep. Furthermore, this adjustable headrest contributes to
the comfort of your child during the car ride.
By slightly lifting the headrest, the inclination of the headrest (r) can be adjusted in
three different positions.
Note! Please ensure that the child‘s head always remains in contact with the
protective function.
Note! Make sure that both lap belt and the shoulder belt are always tightly
fastened.
Warning! Make sure that the handle (v) of the reclining mechanism is audibly
locked in any position. The reclining position is only approved for ECE Group 1 (9-18
kg), in conjunction with main frame (w) and safety cushion (p)!
Warning! The locking device (t) must never be blocked by any objects! In case
of an accident, the free movement of the inclination must be guaranteed since
otherwise your child might be injured.
SITTING AND RECLINING POSITION – ECE GROUP 1 (9 - 18 KG)
RECLINING HEAD REST
– When the child is about to fall asleep, pull the handle (v) and the seat slides
down automatically.
– When the child is no longer in the seat you can move the seat into an upright
position by again pulling the handle (v) and slightly pressing against the booster.
By pushing the buttons (z) the safety cushion (p) will slide into the forefront position.
By releasing the buttons (z) the safety cushion (p) will be locked in position.
cushion. They connect the safety cushion (p) and the booster (d).
The safety cushion should be well adjusted to touch the child‘s chest without
exerting any pressure on the child`s body.
Warning! Safety cushion (p) may only be used in conjunction with the main frame
(w) and only up to a mximum weight of 18kg!
SAFETY CUSHION ADJUSTMENT - ECE GROUP 1 (9-18 KG)
RECLINAÇÃO DO ENCOSTO DE CABEÇA
A CYBEX Pallas tem um encosto de cabeça reclínavel (r) que previne que a
cabeça se desloque para a frente no caso da criança adormecer. Assim como
proporciona o conforto da criança enquanto anda de automóvel.
Subindo com cuidado o apoio de cabeça, a inclinação do encosto de cabeça (r)
pode ajustar-se em 3 posições diferentes.
Aviso! Por favor assegure-se de que a cabeça da criança está sempre em
contacto com o apoio de cabeça reclínavel, doutra maneira a função de
Aviso: O mecanismo de reclinação (t) nunca deve ser obstruído com nenhum
objecto.Em caso de acidente, o movimento de reclinação deve ser garantido para
evitar que a criança sofra danos.
cadeira Pallas.
Aviso!
bloqueada seja qual for a posição. A posição de reclinar só está aprovada para
o Grupo 1 (9 a 18 Kgs.), conjuntamente com a base (w) e almofada de segurança
(p).
POSIÇÃO DE SENTADO E RECLINADO - ECE GRUPO 1 (9 A 18 KG.)
– Quando a criança adormecer, puxe a patilha (v) para reclinar a cadeira
automáticamente.
– Quando a criança não se encontrar no automóvel, pode colocar a cadeira na
posição vertical puxando a patilha (v) e empurrando o assento.
Ao pressionar os botões (z) a almofada de segurança (p) deslizará para a frente.
desejada.
As peças laterais da almofada de segurança (p) encaixam exactamente nos
apoios de braços do assento. Estas peças juntam a almofada de segurança (p) e
o assento (d).
mas não deverá pressionar o seu corpo.
Atenção! A almofada de segurança (p) e a base (w) devem ser utilzados sempre
de forma conjunta e só até um peso máximo de 18 Kgs!
ALMOFADA DE SEGURANÇA - ECE GRUPO 1 (9 A 18 KG)
A página está carregando ...

14
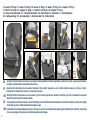
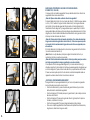
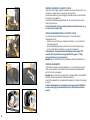
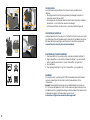
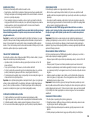
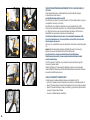
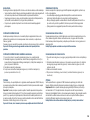
FASTENING OF SEATBELT WITH SAFETY CUSHION ATTACHED - ECE GROUP 1 (9-18 KG)
CHANGE OVER FROM ECE GROUP 1 (9-18 KG) TO ECE GROUP 2/3 (15-36 KG)
1. Place the child in the car seat.
2. Attach the previously adjusted safety cushion to the child seat (see chapter
„Safety cushion adjustment“).
3. Take the lap belt (n) and slide it into the dedicated belt routings (x) (marked red)
of the safety cushion.
4. Insert the belt guide (m) into the belt buckle (l). Listen for an audible „CLICK“
5. Now take the shoulder belt (f) and pull it to tighten lap belt (n).
6. Please slide the shoulder belt (f) parallely to the lap belt into the same belt
routing (x).
7. Pull the belt (f) tight and make sure that the belts (f) and (n) are running
completely inside (over the whole width) of the belt routing (x).
1. Remove the safety cushion (p).
2. Press the release buttons (q) until you can feel some resistance (d) and pull it
away from the main frame until you feel a resistance.
3. Now pull the reclining handle (v) situated centrally on the bottom of the booster
(d) and completely pull the booster off the frame (w) .
4. For removal of the spacers (s) it is recommended to bring the seat into reclining
position.
5. Pull up the backrest cover (a) to reveal the finger hole on the back side of the
backrest.
6. Push the release button inside the finger hole and pull the spacers (s) out of the
backrest.
7. Repeat this procedure on the other side of the backrest.
Note! Please keep all spare parts together and store them properly.
Warning! Never twist the belt!
Warning! For reassembly please proceed with these steps in reverse order. Check
the instruction manual in advance to make sure no parts are missing.
COLOCAR A CRIANÇA COM A ALMOFADA DE SEGURANÇA ECE GRUPO 1 (9-18 KG.)
MUDAR DO ECE GRUPO 1 (9-18 KG.) AO ECE GRUPO 2/3 (15-36 KG.)
1. Coloque a criança na cadeira.
2.
capitulo de regulação da almofada de segurança.
3. Puxe o cinto horizontal (n) e introduza-o na guia (x) (vermelho) da almofada de
segurança.
Atenção! Nunca enrole/gire o cinto!
4. Enfie a fivela do cinto (m) no fecho (l). Deverá ouvir um „clic“.
5. Agora puxe o cinto diagonal (f) para esticar o cinto horizontal (n).
6. Deslize o cinto diagonal (f) paralelamente ao cinto horizontal pela mesma guia
(x).
7. Estique o cinto vertical (f) e certifique-se de que s cintos (f) e (n) estão
perfeitamente introduzidos (toda a sua largura) na guia (x).
1. Retire a almofada de segurança (p).
2. Pressione os botões (q) que encontrará por debaixo do assento (d) e separe-o
3. Agora puxe a patilha de reclinação (v) localizada no centro da parte inferior do
assento (d)e retire o assento da base (w)
4. Para retirar os separadores (s) recomendamos que recline a cadeira.
5.
encosto.
6. Pressione o botão do interior do orificio e retire os separadores (s) do encosto.
7. Repita este procedimento para o outro lado do encosto.
Aviso! Guarde todas as peças e conserve-as adequadamente.
Atenção! Para voltar a montar a base, repita estes passos em ordem inversa.
Consulte sempre este manual antes de o fazer para assegurar de que não falta
nenhuma peça.
A página está carregando ...

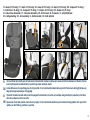
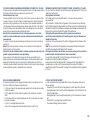
16
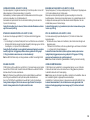
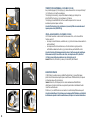
Warning! The lap belt must, on both sides, run as low across the groin of your child as
possible in order to take optimal effect in case of an accident.
Now lead the diagonal belt (f) through the upper red belt guide (g) in the
shoulder rest (e) until it is inside the belt guide.
Please make sure that the diagonal belt (f) runs between the outer edge of the
shoulder and your child‘s neck. If necessary, adjust the running of the belt by
adjusting the height of the headrest. The height of the headrest can still be adjusted
in the car.
FASTENING OF SEAT BELT WITHOUT THE SAFETY CUSHION - ECE GROUP 2/3 (15-36 KG)
Put your child in the child seat. Pull out the three-point belt and lead it in front of your
child to the belt buckle (l).
Warning! Never twist the belt!
Put the belt guide (m) into the belt buckle (l). If you hear a clicking sound it is
securely locked.
The lap belt (n) should be placed in the bottom belt guides (k) on both sides of the
seat (d).
Note! Teach your child from the beginning to always pay attention to a tight belt
and that it should pull the belt tight by itself if necessary.
Put the lap belt (n) in the bottom belt guides (k) of the child seat. Now pull the lap
belt (n) tight by pulling the diagonal belt (f) until there is no slack. The tighter the belt
the better it can protect from injuries. The diagonal belt and lap belt should both be
inserted in the bottom belt guide at the side of the belt buckle.
Warning! The belt buckle of the car seat (l) must under no circumstances
reach into the bottom belt guide (k). If the belt strap is too long, the child seat is not
suitable for this vehicle.
In order to guarantee the best possible safety for your child, please check prior to
the ride, whether …
– the lap belt (n) runs in the bottom belt guides (k) on both sides of the child seat.
– the diagonal belt (f) also runs in the bottom belt guide (k) of the child seat on the
side of the belt buckle.
– the diagonal belt (f) runs through the belt guide (g) of the shoulder rest, marked
red.
– the seat belt (f) runs diagonally towards the back.
– the entire belt sits tight and is not twisted.
IS YOUR CHILD PROPERLY SECURED?
Coloque a criança na cadeira auto de segurança. Puxe o cinto de segurança de 3
pontos em volta da criança e em direção ao fecho do cinto.
O cinto de cintura (n) deve passar pelas guias na base (k) em ambos os lados do
assento (d).
no lugar. Coloque o cinto de cintura (n) nas aberturas para o cinto (k) do assento
auto para criança. Agora puxe o cinto de cintura (n) bem apertado puxando o
protecção terá em caso de acidente. Tanto o cinto diagonal como o de cintura
devem ambos passar juntos pela guia da base lateral.
Atenção! Em caso nenhum deve o fecho (l) atingir as guias para o cinto (k) do
assento. Se o fecho for demasiado comprido, este assento não é destinado para
este automóvel.
Atenção! Nunca torça o cinto.
De maneira a garantir a melhor segurança possível para a sua criança, por favor
– O cinto de cintura (n) tem de passar pelas guias do cinto na base (k) em ambos
os lados do assento.
–
fecho.
– O cinto diagonal (f) tem de passar pela guia do cinto (g) do apoio dos ombros,
marcado a vermelho.
– O cinto (f) corre diagonalmente por trás.
– –Todo o cinto de segurança deve estar bem esticado e não torcido.
ESTÁ A SUA CRIANÇA BEM SEGURA?
Aviso! Ensine à criança desde o começo como se aperta o cinto, para poder
apertá-lo sozinho se for necessário.
Atenção! O cinto de cintura deve estar o mais baixo possível acima da virilha, para
garantir a segurança máxima em caso de acidente.
Agora coloque o cinto diagonal (f) na guia do cinto de cor vermelha (g) no
diagonal (f) passa entre o pescoço da criança e a parte exterior do ombro. Se
necessário, ajuste a altura do encosto de cabeça. A altura do encosto de cabeça
pode ser ajustada quando a cadeira estiver no automóvel.
COLOCAR A CRIANÇA SEM ALMOFADA DE SEGURANÇA ECE GRUPO 2/3 (15-36 KG)
A página está carregando ...

18
1. Pull the headrest (e) into top position, by using release handle (h).
2. To release the headrest (e), simultaneously pull handle (h) and the lower rim
of the upper rib of the backrest (a). Now the headrest (e) can be completely
detached.
3. Now the cover can be removed.
4. For reassembly pull the adjustment handle (h) and insert the headrest (e) into the
backrest (a).
REMOVING THE SEAT COVER FROM THE BACKREST
In order to guarantee the best possible protection of your child seat, it is necessary
that you take note of the following:
PRODUCT CARE
– All important parts of the child seat should be examined for any damages on a
regular basis. The mechanical parts must function flawlessly.
– It is essential that the child seat does not get jammed between hard objects e.g.
like the door of the car, seat rail etc. causing possible damage to the seat.
– The child seat must be examined by the manufacturer after a fall or similar
situations.
REMOVING THE SEAT COVER
can be removed.
In order to put the covers back on the seat, proceed in the reversed order as
removing them.
Warning! The child seat must never be used without the cover.
CLEANING
It is important to use only an original CYBEX seat cover since the cover is also an
essential part of the function. You may obtain spare covers at your retailer.
Note!
washable at max. 30°C on delicate cycle. If you wash it at higher temperature,
the cover fabric may lose colour. Please wash the cover separately and never dry
it mechanically! Do not dry the cover in direct sunlight! You can clean the plastic
parts with a mild detergent and warm water.
Warning! Please do not use chemical detergents or bleaching agents under any
circumstances!
necessário tomar em conta o seguinte:
MANUTENÇÃO DO PRODUTO
– Todas as partes importantes da cadeira auto de criança devem ser verificadas
peri odicamente para detectar possíveis danos. As partes mecânicas devem
funcionar correctamente.
– Preste especial atenção ao facto de que a cadeira auto de criança foi
danificada pela porta do automóvel ou outros obstáculos.
– A cadeira auto de criança deve ser verificada pelo fabricante em caso de
danos, cair ou situações similares.
uma parte importante da funcionalidade da cadeira. Pode obter forras em
separado no representante da marca.
Aviso! Lave separadamente o produto antes da primeira utilização. A cobertura
temperatura mais elevada a cobertura pode decolorar. Por favor, lave a cobertura
separadamente e nunca a seque numa secadora. Não seque a cobertura com luz
directa do sol. Pode limpara as peças de plástico com detergente suave e água
temperada.
Para repôr as forras no assento, siga as instruções em ordem inversa.
Atenção! A cadeira auto de criança nunca deve ser utilizada sem forra.
Atenção! Em nenhuma circunstância utilize detergentes químicos ou lixívia.
1. Coloque o encosto na posição mais elevada, utilizando o botão (h).
2. Para soltar o encosto (e), puxe a asa (h) e ao mesmo tempo pressione a parte
inferior central do encosto.
3. Agora o repousa cabeças (e) pode ser retirado completamente.
4. Para voltar a montar, pressione de novo o botão de regulação de altura (h) e
introduza o repousa cabeças (e) no encosto (a).
RETIRAR O FORRO
RETIRAR O FORRO DO ENCOSTO DA CADEIRA
podem ser retiradas.
A página está carregando ...

20
In an accident the seat can sustain damages which are invisible to the eye.
Therefore the seat should be replaced immediately in such cases. If in doubt please
contact your retailer or the manufacturer.
WHAT TO DO AFTER AN ACCIDENT
might occur and since there might be unforeseeable exposures to the child seat, it
is important to note the following:
– If the car is exposed to direct sunlight for a longer period of time, the child seat
must be taken out of the car or covered with a cloth.
– Examine all plastic and metal parts of the seat for any damages or changes
about their form or colour on a yearly basis. If you notice any changes, you need
to dispose of the child seat or it must be examined by the manufacturer and
replaced if necessary.
– Changes to the fabric, in particular the fading of colour, are normal after
yearlong use in a car and do not constitute a fault.
DURABILITY OF THE PRODUCT
At the end of the durability of the child seat, you must dispose it properly. Waste
disposal regulations may vary regionally. In order to guarantee a proper disposal
of the child seat, please contact your communal waste management or
administration of your city. In all cases, please note the waste disposal regulations of
your country.
DISPOSAL
CYBEX PALLAS foi desenhada para durar 11 anos aproximadamente (para
idades entre 1 ano e 12 anos). Devido às grandes mudanças de temperatura e
seguinte:
– Se o automóvel estiver exposto à luz solar directa durante um longo período de
tempo, a cadeira auto de criança deve ser retirada do automóvel ou tapada
com um pano.
– Inspecione todas as partes plásticas do assento, veja se não há alterações de
cor ou forma. Se verificar alguma alteração, não deve utilizar o assento ou este
ser examinado pelo fabricante e substituilo se necessário.
– Alterações dos tecidos, em particular as cores alteram-se quando existe muito
DURABILIDADE DO PRODUTO
As regras de reciclagem podem variar de país para país. Para poder garantir
uma reciclagem correcta da sua cadeira auto de criança, contacte os serviços
reciclagem do seu país.
RECICLAGEM
Em caso de acidente a cadeira pode sofrer danos que podem não ser visíveis
numa primeira observação. Por este motivo, a cadeira deverá ser imediatamente
substituída. Se tem qualquer dúvida, por favor contacte com o distribuidor ou com
o fabricante.
PROCEDIMENTOS DEPOIS DE UM ACIDENTE
A página está carregando ...

22
The following warranty applies solely in the country where this product was initially
sold by a retailer to a customer. The warranty covers all manufacturing and material
defects, existing and appearing, at the date of purchase or appearing within
a term of three (3) years from the date of purchase from the retailer who initially
sold the product to a consumer (manufacturer’s warranty). In the event that a
manufacturing or material defect should appear, we will – at our own discretion –
either repair the product free of charge or replace it with a new product. To obtain
such warranty it is required to take or ship the product to the retailer, who initially
sold this product to a customer and to submit an original proof of purchase (sales
receipt or invoice) that contains the date of purchase, the name of the retailer and
the type designation of this product. This warranty shall not apply in the event that
this product is taken or shipped to the manufacturer or any other person other than
the retailer who initially sold this product to a consumer. Please check the product
with respect to completeness and manufacturing or material defects immediately
at the date of purchase or, in the event that the product was purchased in distance
selling, immediately after receipt. In case of a defect stop using the product and
take or ship it immediately to the retailer who initially sold it. In a warranty case the
product has to be returned in a clean and complete condition. Prior to contacting
the retailer, please read this instruction manual carefully. This warranty does not
accidents etc.) or normal wear and tear. It does solely apply in the event that the
use of the product was always in compliance with the operating instructions, if any
original components and accessories were used. This warranty does not exclude,
limit or otherwise affect any statutory consumer rights, including claims in tort and
claims with respect to a breach of contract, which the buyer may have against the
seller or the manufacturer of the product.
WARRANTYGARANTÍA
A presente garantia só se aplica no país em que o consumidor adquiriu a
cadeira. A garantia cubre todos os defeitos de material e/ou de fabricação que
possam existir ou surgir num período de três (3) anos desde a data da compra
inicial (garantia do fabricante). Em caso de que apareça qualquer defeito, a
Cybex decidirá reparar o produto sem gastos extra ou, em caso de que o veja
ou enviar o produto em questão ao vendedor que inicialmente lhe vendeu o
produto apresentando, ao mesmo tempo, a factura ou recibo de compra que
mostra a data, o nome do vendedor e o modelo em questão. Esta garantia não
será aplicada em caso de que não envie o produto directamente ao vendedor.
No momento da compra, ou se o compra à distância, njo momento em que o
receba, faça o favor de revisar se o produto está completo e que não apresenta
qualquer tipo de defeito. Em caso de que encontre algum defeito não utilize o
produto e entregue-o ou envie-o de novo ao vendedor. O produto dever-se-á
ao final. Esta garantia não cobre estragos causados pelo mau uso, das condições
externas (água, fogo, irregularidades do terreno, etc.) ou o desgaste normal do
o seu manual de instrucções e se qualquer modificação ou reparação foi feita por
pessoal autorizado e se foram utilizadas peças e acessórios originais. A garantia
não exluiu, limita ou afecta os direitos dos consumidores esatabelecidos por lei,
incluindo reclamações por responsabillidade civil ou queixas por inconprimento do
contracto entre o consumidor e vendedor, o fabricante e o produto.
A página está carregando ...
A página está carregando ...
A página está carregando ...
A página está carregando ...
A página está carregando ...
A página está carregando ...
A página está carregando ...
A página está carregando ...
A página está carregando ...
A página está carregando ...
A página está carregando ...
A página está carregando ...
A página está carregando ...
A página está carregando ...
A página está carregando ...
A página está carregando ...
A página está carregando ...
A página está carregando ...
A página está carregando ...
A página está carregando ...
A página está carregando ...
A página está carregando ...
A página está carregando ...
A página está carregando ...
A página está carregando ...
A página está carregando ...
A página está carregando ...
A página está carregando ...
A página está carregando ...
A página está carregando ...
A página está carregando ...
A página está carregando ...
A página está carregando ...
A página está carregando ...
A página está carregando ...
A página está carregando ...
A página está carregando ...
A página está carregando ...
A página está carregando ...
A página está carregando ...
-
 1
1
-
 2
2
-
 3
3
-
 4
4
-
 5
5
-
 6
6
-
 7
7
-
 8
8
-
 9
9
-
 10
10
-
 11
11
-
 12
12
-
 13
13
-
 14
14
-
 15
15
-
 16
16
-
 17
17
-
 18
18
-
 19
19
-
 20
20
-
 21
21
-
 22
22
-
 23
23
-
 24
24
-
 25
25
-
 26
26
-
 27
27
-
 28
28
-
 29
29
-
 30
30
-
 31
31
-
 32
32
-
 33
33
-
 34
34
-
 35
35
-
 36
36
-
 37
37
-
 38
38
-
 39
39
-
 40
40
-
 41
41
-
 42
42
-
 43
43
-
 44
44
-
 45
45
-
 46
46
-
 47
47
-
 48
48
-
 49
49
-
 50
50
-
 51
51
-
 52
52
-
 53
53
-
 54
54
-
 55
55
-
 56
56
-
 57
57
-
 58
58
-
 59
59
-
 60
60
-
 61
61
-
 62
62
-
 63
63
-
 64
64


CYBEX PallaS Guia de usuario
- Categoria
- Assentos de carro
- Tipo
- Guia de usuario
em outros idiomas
- español: CYBEX PallaS Guía del usuario
- English: CYBEX PallaS User guide
- dansk: CYBEX PallaS Brugervejledning
- svenska: CYBEX PallaS Användarguide
- suomi: CYBEX PallaS Käyttöohjeet
Artigos relacionados
-
CYBEX Solution X2 Manual do usuário
-
CYBEX Pallas 2-fix Manual do usuário
-
-
CYBEX PALLAS S-FIX Manual do usuário
-
CYBEX PALLAS M SL Manual do usuário
-
CYBEX SOLUTION M-FIX Manual do usuário
-
-
-
CYBEX Juno 2-fix Manual do usuário
-
CYBEX Juno-Fix Manual do usuário