
Setup and Reference Guide
9Einrichtungs- und Benutzerhandbuch
DE
15
Istruzioni di installazione e guida di riferimento
IT
21Manuel d’installation et guide de référence
FR
27Installatie- en naslaggids
NL
33Guía de referencia y conguración (Lea ésto primero)
ES
39Guia de conguração e referência
PT
45Kongurations- och funktionshandbok
SV
51Asennus- ja viiteopas
FI
57Oppsett og referanseveiledning
NO
63Vejledning til opsætning og reference
DA
Seadistus- ja kasutusjuhend 69
ET
Iestatīšanas un uzziņu instrukcija 75
LV
Sąrankos ir informacinis vadovas 81
LT
HP Smart Tank
5100 series


3
English
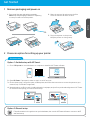
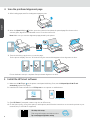
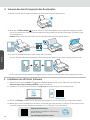
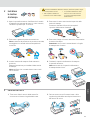
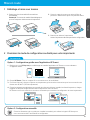
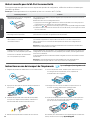
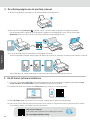
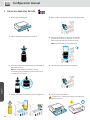
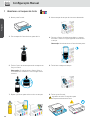
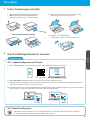
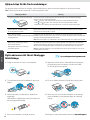
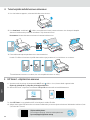
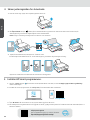
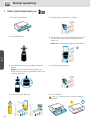
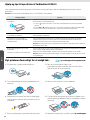
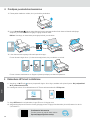
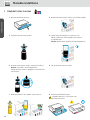
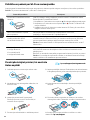
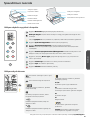
3. Plug in and power on the printer.
Keep the printer on during setup.
2. Open the scanner lid and remove the lm.
Close the scanner lid and front door.
Remove packaging and power on
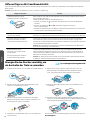
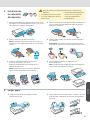
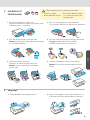
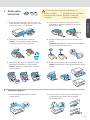
Choose an option for setting up your printer
1. Remove all the tape and packing materials.
Note: Keep the packaging materials for repacking
in case you need to move the printer.
12 3
123
12 3
123
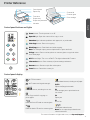
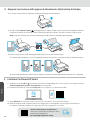
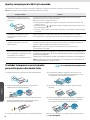
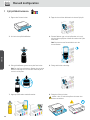
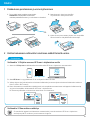
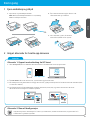
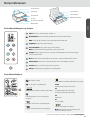
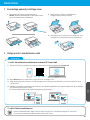
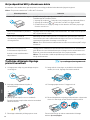
Option 1: Guided setup with HP Smart
1. Go to 123.hp.com on a mobile device or computer to install the HP Smart software.
2. Open HP Smart. If prompted, create or sign in to an HP account.
3. On the Home screen, choose the option to add a printer, and follow the instructions to connect the printer to your
network (only 2.4 GHz Wi-Fi supported).
4. View animations to ll ink tanks, install printheads, load paper, and perform printheads alignment in HP Smart.
HP Smart has everything you need to nish setup.
123.hp.com
Recommended
Recommended
Option 2: Manual setup
Follow illustrations in this guide to set up the hardware, then use the HP Smart software to connect to Wi-Fi
and nish setup.
1
2
Get Started

4
English
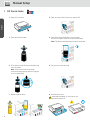
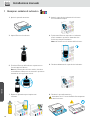
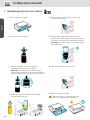
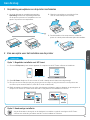
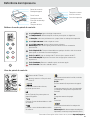
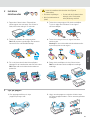
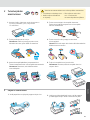
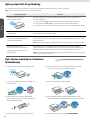
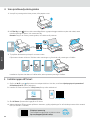
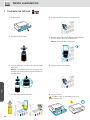
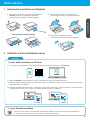
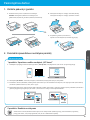
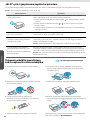
Fill the ink tanks
1. Open the front door. 2. Open the cap of the ink tank you want to ll.
3. Twist open the ink bottle. 4. Place the bottle upside down onto the tank
and click into place. Wait for the ink to ll the tank.
6. Securely close the tank cap.
7. Repeat to ll all tanks. 8. Close the front door.
Wait approximately 15 seconds for the
printer to detect ink.
1
15
Manual Setup
Note: The black bottle will have ink left in the bottle.
5. Close the ink bottle, rmly pushing the cap
onto the bottle.
Note: If there is ink left in the bottle,
close the bottle properly and store upright
in a cool, dark place.

5
English
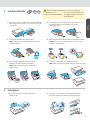
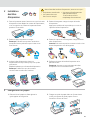
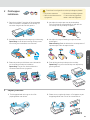
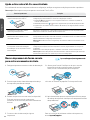
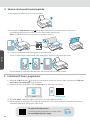
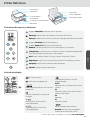
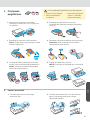
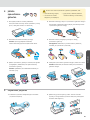
Install printheads Before installing printheads, ensure the following:
• The printer is on.
• All four ink tanks are lled.
• You have closed the front door
for approximately 15 seconds
after lling ink.
2
1. Open the front door. Make sure the print carriage
has moved to the center; if not, close the door for
15 seconds.
2. Remove the orange tape from the printhead cover.
Press and release the blue latch to open the
printhead cover.
5. Insert the printhead and click into place.
Repeat to install the other printhead.
Note: Make sure the electric contacts are
facing inside.
Note: Make sure the printhead cover is properly closed.
3. Remove and discard the orange guard.
Note: Keep the guard upright; handle carefully
to avoid ink leaks.
4. Remove the orange cap and tape from both printheads.
Caution: Do not touch the electric contacts or print
nozzles under the tape.
6. Close the printhead cover and the front door.
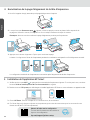
1. Pull up the paper tray, and slide out the
paper guide.
Load paper3
2. Load new, unused Letter or A4 paper, and adjust
the paper guide. Open the output tray extender.

6
English
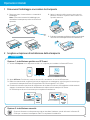
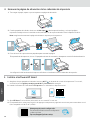
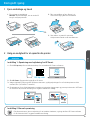
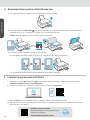
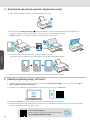
Install the HP Smart software
Scan the printhead alignment page
1. Make sure the Wi-Fi light on the printer control panel is blinking. If not, see the Help and tips for Wi-Fi and
connectivity section in this guide.
2. Install the HP Smart software from 123.hp.com on a computer or mobile device.
3. Open HP Smart. If prompted, create or sign in to an HP account.
4. On the Home screen, choose the option to add a printer, and follow the instructions to connect the printer to your
network (only 2.4 GHz Wi-Fi supported).
5
4
123.hp.com
Get help with setup
Find setup information and videos online.
hp.com/support/printer-setup
2. When the Open Lid light blinks, open the scanner lid and place the printed page face-down on the
scanner glass, aligned to the indicated corner. Close the scanner lid.
3. Press the blinking copy button to scan the page.
On the printer display, the icon "A" blinks during the scan and disappears when alignment is done.
Printer hardware setup is complete after printhead alignment is done.
1. After loading paper, wait for the alignment page to print.
Note: Make sure you scan the alignment page printed by the printer.

7
English
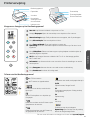
For more information on lights and errors, visit hp.com/support
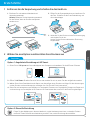
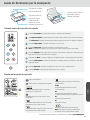
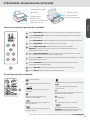
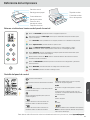
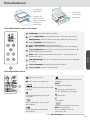
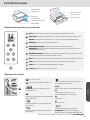
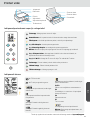
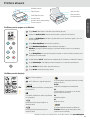
Printer Reference
12
Power button: Turn the printer on or o.
Open Lid light: Open the scanner lid to copy or scan.
Attention light: Indicates problems with paper, ink, orprintheads.
Color Copy button: Start color copying.
Black Copy button: Start black-and-white copying.
Note: For multiple copies, press multiple times or press and hold.
ID Copy button: Place a card anywhere on scanner glass to copy both sides
onto same page.
Wi-Fi button/light: Turn on or o Wi-Fi. The light indicates Wi-Fi status.
Information button: Print summary of printer settings and status.
Resume button: Resume a job after a disruption.
Cancel button: Cancel the current job.
Control panel buttons and lights
Control panel
Paper tray
Scanner glass
Front door Print carriage
Output tray
Output tray extender
Ink tanks
Scanner lid
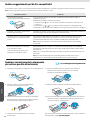
Media related issues, including out of paper.
E1/E2
Paper size/length mismatch.
E3
Print carriage jam or printhead cover
not closed.
E4
Paper jam.
E7
Out of ink.
Printheads related issues.
Note: Do not open the printhead cover
unless instructed.
Wi-Fi Direct status.
Wi-Fi status and signal strength.
Ink related issues, including low on ink.
Photo Copy mode for copying on
photo paper.
1
Place the front of ID card on scanner glass.
2
Place the back of ID card on scanner glass.
Control panel display
12

8
English
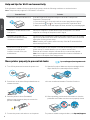
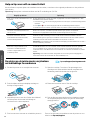
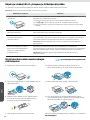
5. Pack the printer in a box (if available).
While moving the printer, keep it horizontal to
prevent ink leakage.
6. After unpacking, push down the blue latch to close the
printhead cover. Make sure the cover is properly closed.
1. Turn o the printer and remove the power cord. 2. Open the front door. Make sure the print carriage is all the
way to the left; if not, manually move it to the left.
7. Connect the power cord and turn on the printer. For printer troubleshooting and videos, visit hp.com/support
3. Press down on the side of the printhead cover to
release the cover.
4. Insert a cardboard restraint. Close the front door.
Help and tips for Wi-Fi and connectivity
If the software is unable to nd your printer during setup, check the following conditions to resolve the issue.
Note: This printer only supports a 2.4 GHz Wi-Fi connection.
Potential Issue Solution
Printer Wi-Fi setup mode timed out If the Wi-Fi light is o, the printer might not be in Wi-Fi setup mode.
Restart Wi-Fi setup mode:
1. Press and hold for 5 seconds until the control panel buttons light up.
2. Press and hold and for 5 seconds until the Wi-Fi light blinks blue.
3. Wait for one minute. Close and reopen HP Smart, and then try connecting again.
Computer or mobile device too far
from printer
Move your computer or mobile device closer to the printer. Your device
might be out of range of the printer’s Wi-Fi signal.
Computer connected to a
Virtual Private Network (VPN)
or remote work network
Disconnect from a VPN before installing HP Smart software. You can’t install
apps from the Microsoft Store when connected to a VPN. Connect to the VPN
again after nishing printer setup.
Note: Consider your location and the security of the Wi-Fi network before
disconnecting from a VPN.
Bluetooth is turned o on your
computer or mobile device
Location is turned o on your
mobile device
Turn on Bluetooth for the computer or mobile device being used to complete
printer setup. For mobile devices, turn on Location services also.
Bluetooth and Location help the software nd your network and printer.
Note: Your location is not being determined and no location information is
being sent to HP as part of the setup process.
Move printer properly to prevent ink leaks hp.com/support/movingsmarttank

9
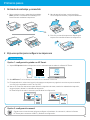
Deutsch
3. Verbinden Sie den Drucker mit der Stromversorgung
und schalten Sie ihn ein.
Lassen Sie den Drucker während der Einrichtung
eingeschaltet.
2. Önen Sie die Scannerabdeckung und entfernen Sie
den Film. Schließen Sie die Scannerabdeckung und
die vordere Klappe.
Entfernen Sie die Verpackung und schalten Sie das Gerät ein
Wählen Sie eine Option zum Einrichten Ihres Druckers aus
Erste Schritte
1. Entfernen Sie vorhandenes Klebeband und
Verpackungsmaterial.
Hinweis: Bewahren Sie das Verpackungsmaterial
für den Fall auf, dass der Drucker transportiert
werden muss.
12 3
123
12 3
123
Option1: Angeleitete Einrichtung mit HP Smart
1. Gehen Sie zu 123.hp.com auf einem Mobilgerät oder Computer und installieren Sie die HP Smart Software.
2. Önen Sie HP Smart. Erstellen Sie ein HP-Konto oder melden Sie sich an, wenn Sie dazu aufgefordert werden.
3. Wählen Sie auf dem Startbildschirm die Option zum Hinzufügen eines Druckers und folgen Sie den Anweisungen,
um den Drucker mit Ihrem Netzwerk zu verbinden (nur 2,4-GHz-Wi-Fi wird unterstützt).
4. Sehen Sie sich Animationen zum Befüllen von Tintentanks, Einsetzen von Druckköpfen, Einlegen von Papier und
zur Ausrichtung von Druckköpfen in HP Smart an. HP Smart bietet alles, was Sie für die Einrichtung benötigen.
123.hp.com
Recommended
Empfohlen
Option2: Manuelle Einrichtung
Folgen Sie den Abbildungen in diesem Handbuch, um die Hardware einzurichten, und stellen Sie dann
mit der HP Smart Software eine Verbindung zum Wi-Fi her, um die Einrichtung abzuschließen.
1
2

10
Deutsch
Füllen Sie die Farbbehälter auf
Manuelle Einrichtung
1. Önen Sie die vordere Klappe. 2. Önen Sie die Kappe des zu befüllenden Tintentanks.
3. Önen Sie die Tintenasche. 4. Legen Sie die Flasche mit der Oberseite nach
unten auf den Tank, und rasten Sie sie ein. Warten
Sie, bis der Tank mit Tinte aufgefüllt ist.
6. Verschließen Sie die Tankkappe fest.
7. Wiederholen Sie das Auüllen mit allen Tanks. 8. Schließen Sie die vordere Klappe.
Warten Sie etwa 15 Sekunden, bis der Drucker
die Tinte erkennt.
1
15
Hinweis: In der Tintenasche mit der schwarzen
Tinte wird nach dem Füllen noch Tinte übrig sein.
5. Verschließen Sie die Tintenasche, indem Sie die
Kappe fest auf die Flasche drücken.
Hinweis: Wenn Tinte in der Flasche übrig ist,
schließen Sie die Flasche und lagern sie aufrecht
an einem kühlen, dunklen Ort.

11
Deutsch
1. Ziehen Sie das Papierfach nach oben und
schieben Sie die Papierführung heraus.
Druckköpfe
einsetzen
1. Önen Sie die vordere Klappe. Stellen Sie sicher, dass
der Patronenwagen in die Mitte gefahren ist; wenn
nicht, schließen Sie die Klappe für 15Sekunden.
2. Entfernen Sie das orangefarbene Klebeband von der
Druckkopfabdeckung.
Drücken Sie die blaue Verriegelung und lassen Sie sie
wieder los, um die Druckkopfabdeckung zu önen.
3. Entfernen und entsorgen Sie den orangefarbenen
Schutz.
Hinweis: Halten Sie den Schutz aufrecht. Vorsichtig
vorgehen, um ein Auslaufen von Tinte zu vermeiden.
4. Entfernen Sie die orangefarbene Kappe und das
Klebeband von beiden Druckköpfen.
Achtung: Berühren Sie nicht die elektrischen Kontakte
oder die Druckdüsen unter dem Klebeband.
6. Schließen Sie die Druckkopfabdeckung und die
vordere Klappe.
5. Setzen sie den Druckkopf ein und rasten Sie ihn ein.
Wiederholen Sie zum Einsetzen des Druckkopfes
den Vorgang.
Hinweis: Achten Sie darauf, dass die elektrischen
Kontakte nach innen gerichtet sind.
Einlegen von Papier
Stellen Sie vor dem Einsetzen der Druckköpfe Folgendes sicher:
• Der Drucker ist eingeschaltet.
• Alle vier Farbtanks sind gefüllt.
• Sie haben die vordere Klappe
nach dem Befüllen von Tinte etwa
15 Sekunden lang geschlossen.
2
3
Hinweis: Stellen Sie sicher, dass die Druckkopfabdeckung
richtig geschlossen ist.
2. Legen Sie unbenutztes Letter- oder A4-Papier
ein und passen Sie die Papierführung an. Önen
Sie die Verlängerung des Ausgabefachs.

12
Deutsch
Hilfe bei der Einrichtung
Informationen und Videos zur Einrichtung
nden Sie online.
hp.com/support/printer-setup
Installieren der HP Smart Software
Scannen der Ausrichtungsseite des Druckkopfes
2. Wenn die LED Oene Klappe leuchtet, önen Sie die Scannerabdeckung und legen die ausgedruckte Seite
mit der Druckseite nach unten und mit der markierten Ecke ausgerichtet auf das Scannerglas. Schließen Sie die
Scannerabdeckung.
3. Drücken Sie die blinkende Kopie-Taste, um die Seite zu scannen.
Auf dem Druckerdisplay blinkt während des Scanvorgangs das Symbol "A", das nach der Ausrichtung erlischt.
Die Einrichtung der Druckerhardware ist abgeschlossen, nachdem die Druckkopfausrichtung abgeschlossen ist.
1. Warten Sie nach dem Einlegen des Papiers, bis die Ausrichtungsseite gedruckt wird.
1. Stellen Sie sicher, dass die Wi-Fi-LED auf dem Bedienfeld des Druckers blinkt. Falls nicht, siehe Abschnitt
Hilfe und Tipps zu Wi-Fi und Konnektivität in diesem Handbuch.
2. Installieren Sie die HP Smart Software von 123.hp.com auf einem Computer oder mobilen Gerät.
123.hp.com
3. Önen Sie HP Smart. Erstellen Sie ein HP-Konto oder melden Sie sich an, wenn Sie dazu aufgefordert werden.
4. Wählen Sie auf dem Startbildschirm die Option zum Hinzufügen eines Druckers und folgen Sie den Anweisungen,
um den Drucker mit Ihrem Netzwerk zu verbinden (nur 2,4-GHz-Wi-Fi wird unterstützt).
5
4
Hinweis: Stellen Sie sicher, dass Sie die vom Drucker gedruckte Ausrichtungsseite scannen.

13
Deutsch
Für weitere Informationen zu den LEDs und Fehlern besuchen Sie hp.com/support
Druckerreferenz
Bedienfelddisplay
12
Wi-Fi Direct-Status
Wi-Fi Status und Signalstärke.
Probleme mit der Tinte, einschließlich
geringer Tintenfüllstand.
Fotokopie-Modus für das Kopieren auf
Fotopapier.
1
Legen Sie die Vorderseite der ID-Card auf das
Scannerglas.
2
Legen Sie die Rückseite der ID-Card auf das
Scannerglas.
12
Ein/Aus Taste: Schalten Sie den Drucker ein oder aus.
Oene Klappe LED: Önen Sie den Scannerabdeckung zum Kopieren oder Scannen.
Warnanzeige LED: Weist auf Probleme mit Papier, Tinte oder Druckköpfen hin.
Farbkopie Taste: Farbkopie starten.
Schwarzweiß-Kopie Taste: Schwarzweißkopieren starten:
Hinweis: Für mehrere Kopien drücken Sie mehrmals oder halten Sie die Taste gedrückt.
Ausweiskopie Taste: Legen Sie eine Karte auf das Scannerglas, um beide Seiten der
Karte auf eine Seite zu kopieren.
Wi-Fi Taste/LED: Wi-Fi ein- oder ausschalten. Die LED weist auf den Wi-Fi-Status hin.
Info Taste: Drucken einer Übersicht der Druckereinstellungen und des Druckerstatus.
Fortsetzen Taste: Fortfahren mit einem Auftrag nach einer Unterbrechung.
Abbrechen Taste: Brechen Sie den aktuellen Job ab.
Bedienfeld-Tasten und LEDs des Bedienfelds
Bedienfeld
Papierfach
Scannerglas
Vordere Klappe Patronenwagen
Ausgabefach
Ausgabefachverlängerung
Farbtanks
Scannerabdeckung
Probleme mit Medien, einschließlich „Kein Papier“.
E1/E2
Papierformat/Längenabweichung.
E4
Papierstau.
E7
Die Tinte ist aufgebraucht.
Probleme mit Druckköpfen.
Hinweis: Önen Sie die Druckkopfabdeckung nur,
wenn Sie dazu aufgefordert werden.
E3
Wagenstau oder Druckkopfabdeckung nicht
geschlossen.

14
Deutsch
Hilfe und Tipps zu Wi-Fi und Konnektivität
Wenn die Software Ihren Drucker während der Einrichtung nicht nden kann, prüfen Sie zur Behebung des Problems die folgenden
Bedingungen.
Hinweis: Dieser Drucker unterstützt nur eine 2,4 GHz Wi-Fi-Verbindung.
Mögliches Problem Lösung
Zeitüberschreitung im Wi-Fi-
Einrichtungsmodus des Druckers
Wenn die Wi-Fi-LED nicht leuchtet, bendet sich der Drucker möglicherweise nicht im
Wi-Fi-Einrichtungsmodus.
Starten Sie erneut den Wi-Fi-Einrichtungsmodus:
1. Drücken und halten Sie 5 Sekunden lang gedrückt, bis die LED am Bedienfeld
leuchtet.
2. Drücken und halten Sie und 5Sekunden lang gedrückt, bis das
Wi-Fi-Licht blau blinkt.
3. Warten Sie eine Minute lang. Schließen und önen Sie HP Smart neu und versuchen
Sie dann erneut eine Verbindung herzustellen.
Computer oder mobiles Gerät zu weit
vom Drucker entfernt
Bewegen Sie den Computer bzw. das mobile Geräte näher zum Drucker. Ihr Gerät
bendet sich möglicherweise außerhalb der Reichweite des Wi-Fi-Signals des Druckers.
Computer verbunden mit einem
Virtual Private Network (VPN)
oder entfernten Arbeitsnetzwerk
Trennen Sie die Verbindung zum VPN, bevor Sie die HP Smart Software installieren.
Das Installieren von Apps aus dem Microsoft Store ist nicht möglich, solange eine
Verbindung zu einem VPN besteht. Sie können die Verbindung zum VPN nach Abschluss
der Druckereinrichtung wieder herstellen.
Hinweis: Berücksichtigen Sie Ihren Standort und die Sicherheit des Wi-Fi-Netzwerks,
bevor Sie die Verbindung zum VPN trennen.
Bluetooth ist auf Ihrem
Computer oder mobilen Gerät
ausgeschaltet
Der Ortungsdienst ist auf Ihrem
mobilen Gerät ausgeschaltet
Schalten Sie das Bluetooth für den Computer oder das mobile Gerät ein, mit dem
die Druckereinrichtung abgeschlossen wurde. Aktivieren Sie für mobile Geräte auch
die Ortungsdienste. Mithilfe von Bluetooth und Ortungsdienst kann die Software Ihr
Netzwerk und Ihren Drucker nden.
Hinweis: Ihr Standort wird nicht ermittelt und es werden keine Standortinformationen
im Rahmen des Einrichtungsvorgangs an HP gesendet.
Bewegen Sie den Drucker vorsichtig, um
ein Auslaufen der Tinte zu vermeiden.
5. Packen Sie den Drucker in eine Box (falls verfügbar).
Halten Sie den Drucker beim Transport waagerecht, um
ein Auslaufen der Tinte zu vermeiden.
6. Drücken Sie nach dem Auspacken die blaue Verriegelung nach
unten, um die Druckkopfabdeckung zu schließen. Stellen Sie sicher,
dass die Abdeckung richtig geschlossen ist.
1. Schalten Sie den Drucker aus, und ziehen Sie das Netzkabel ab. 2. Önen Sie die vordere Klappe. Stellen Sie sicher, dass der
Patronenwagen vollständig nach links gefahren ist; Wenn
nicht, den Wagen mit der Hand nach links verschieben.
7. Schließen Sie das Netzkabel wieder an und schalten Sie
den Drucker ein.
Für Informationen zur Fehlerbeseitigung und Videos besuchen Sie
hp.com/support
3. Drücken Sie die Seite der Druckkopfabdeckung nach
unten, um die Abdeckung zu lösen.
4. Setzen Sie eine Halterung aus Karton ein. Schließen Sie die
Frontklappe.
hp.com/support/movingsmarttank

15
Italiano
3. Collegare la stampante all'alimentazione e accenderla.
Tenere accesa la stampante durante l'installazione.
2. Aprire il coperchio dello scanner e rimuovere la
pellicola. Chiudere il coperchio dello scanner e lo
sportello anteriore.
Rimuovere l'imballaggio e accendere la stampante
Scegliere un'opzione di installazione della stampante
Operazioni iniziali
1. Rimuovere tutto il nastro adesivo e i materiali di
imballaggio.
Nota: conservare i materiali di imballaggio per
reimballare la stampante qualora sia necessario
spostarla.
12 3
123
12 3
123
Opzione 1: installazione guidata con HP Smart
1. Visitare 123.hp.com su un dispositivo mobile o un computer per installare il software HP Smart.
2. Aprire HP Smart. Se richiesto, creare un account HP o accedere a un account HP esistente.
3. Nella schermata iniziale, scegliere l'opzione per aggiungere una stampante, quindi seguire le istruzioni per
connettere la stampante alla rete (è supportata solo la tecnologia Wi-Fi a 2,4 GHz).
4. Guardare le animazioni pertinenti al riempimento dei serbatoi di inchiostro, all'installazione delle testine di
stampa, al caricamento della carta e all'allineamento delle testine di stampa in HP Smart.
HP Smart dispone di tutto il necessario per completare l'installazione.
Recommended
Consigliato
Opzione 2: installazione manuale
Seguire le illustrazioni nella presente guida per installare l'hardware, quindi utilizzare il software HP
Smart per connettere la stampante al Wi-Fi e completare l'installazione.
1
2
123.hp.com

16
Italiano
Riempire i serbatoi di inchiostro
Installazione manuale
1. Aprire lo sportello anteriore. 2. Aprire il coperchio del serbatoio di inchiostro
che si desidera riempire.
3. Aprire il acone di inchiostro. 4. Posizionare il acone capovolto sul serbatoio
e farlo scattare in posizione. Attendere che
l'inchiostro riempia il serbatoio.
6. Chiudere saldamente il coperchio del serbatoio.
7. Ripetere l'operazione per riempire tutti
i serbatoi.
8. Chiudere lo sportello anteriore.
Attendere circa 15 secondi ainché la stampante
rilevi l'inchiostro.
1
15
Nota: nel acone nero è rimasto dell'inchiostro.
5. Chiudere il acone dell'inchiostro e premere con
forza il tappo sul acone.
Nota: in presenza di inchiostro residuo, chiudere
correttamente il acone e conservarlo in posizione
verticale in un luogo fresco e buio.

17
Italiano
1. Tirare verso l'alto il vassoio della carta e far
scorrere verso l'esterno la guida della carta.
Installare
le testine
di stampa
1. Aprire lo sportello anteriore. Vericare che il carrello
di stampa si sia spostato al centro; in caso contrario,
chiudere lo sportello per 15 secondi.
2. Rimuovere il nastro arancione dal coperchio delle
testine di stampa.
Premere e rilasciare il fermo blu per aprire il
coperchio delle testine di stampa.
3. Rimuovere e gettare la protezione arancione.
Nota: mantenere la protezione in posizione verticale;
maneggiare con cautela onde evitare perdite di
inchiostro.
4. Rimuovere il tappo e il nastro arancione da entrambe
le testine di stampa.
Attenzione: non toccare i contatti elettrici o l'ugello
di stampa sotto il nastro.
6. Chiudere il coperchio delle testine di stampa e
lo sportello anteriore.
5. Inserire la testina di stampa e farla scattare in
posizione.
Ripetere l'operazione per installare l'altra testina
di stampa.
Nota: vericare che i contatti elettrici siano rivolti
verso l'interno.
Caricare la carta
Prima di installare le testine di stampa, vericare quanto segue:
• La stampante è accesa.
• Tutti i quattro serbatoi di
inchiostro sono stati riempiti.
• Lo sportello anteriore è stato
chiuso e sono trascorsi circa
15 secondi dal riempimento
dell'inchiostro.
2
3
Nota: assicurarsi che il coperchio delle testine
di stampa sia ben chiuso.
2. Caricare carta nuova in formato Letter o A4 e
regolare la guida della carta. Aprire l'estensione
del vassoio di uscita.

18
Italiano
Ottenere assistenza per l'installazione
Online sono disponibili informazioni e video
pertinenti all'installazione.
hp.com/support/printer-setup
Installare il software HP Smart
Eseguire la scansione della pagina di allineamento delle testine di stampa
2. Quando la spia Coperchio aperto lampeggia, aprire il coperchio dello scanner e posizionare la pagina stampata
rivolta verso il basso sul vetro dello scanner, allineandola all'angolo indicato. Chiudere il coperchio dello scanner.
3. Premere il pulsante di copia lampeggiante per eseguire la scansione della pagina.
Sul display della stampante, l'icona "A" lampeggia durante la scansione e scompare al termine dell'allineamento.
Al termine dell'allineamento delle testine di stampa, l'installazione dell'hardware della stampante è completata.
1. Una volta caricata la carta, attendere la stampa della pagina di allineamento.
1. Vericare che la spia Wi-Fi sul pannello di controllo stia lampeggiando. In caso contrario, consultare la sezione
Guida e suggerimenti per Wi-Fi e connettività in questa guida.
2. Installare il software HP Smart da 123.hp.com su un computer o un dispositivo mobile.
123.hp.com
3. Aprire HP Smart. Se richiesto, creare un account HP o accedere a un account HP esistente.
4. Nella schermata iniziale, scegliere l'opzione per aggiungere una stampante, quindi seguire le istruzioni per
connettere la stampante alla rete (è supportata solo la tecnologia Wi-Fi a 2,4 GHz).
5
4
Nota: accertarsi di eseguire la scansione della pagina di allineamento stampata dalla stampate.

19
Italiano
Per ulteriori informazioni su spie ed errori, visitare hp.com/support
Guida di riferimento per la stampante
Display del pannello di controllo
12
Stato di Wi-Fi Direct
Stato del Wi-Fi e intensità del segnale.
Problemi relativi all'inchiostro, compreso
l'inchiostro in esaurimento.
Modalità Copia foto per la copia su carta
fotograca.
1
Posizionare il lato anteriore del documento
di identità sul vetro dello scanner.
2
Posizionare il lato posteriore del documento
di identità sul vetro dello scanner.
12
Pulsante Accensione: consente di accendere o spegnere la stampante.
Spia Coperchio aperto: consente di aprire il coperchio dello scanner per la copia o la scansione.
Spia Attenzione: segnala i problemi riguardanti la carta, l'inchiostro o le testine di stampa.
Pulsante Copia colore: consente di avviare la copia a colori.
Pulsante Copia nero: consente di avviare la copia in bianco e nero.
Nota: per eseguire molteplici copie, premere più volte o tenere premuto il pulsante.
Pulsante Copia ID: posizionare un documento sul vetro dello scanner per copiare entrambi
i lati del documento sullo stesso lato del foglio.
Pulsante/spia Wi-Fi: consente di attivare o disattivare il Wi-Fi. La spia indica lo stato del Wi-Fi.
Pulsante Informazioni: consente di stampare un riepilogo delle impostazioni e dello stato
della stampante.
Pulsante Riprendi: consente di riprendere un processo dopo un'interruzione.
Pulsante Annulla: consente di annullare il processo corrente.
Pulsanti e spie del pannello di controllo
Pannello di controllo
Vassoio della carta
Vetro dello scanner
Sportello anteriore Carrello di stampa
Vassoio di uscita
Estensione del
vassoio di uscita
Serbatoi di inchiostro
Coperchio dello scanner
Problemi relativi ai supporti, compresa la
carta esaurita.
E1/E2
Formato/lunghezza della carta non
corrispondente.
E4
Inceppamento della carta.
E7
Inchiostro esaurito.
Problemi relativi alle testine di stampa.
Nota: non aprire il coperchio delle testine
di stampa se non viene richiesto di farlo.
E3
Inceppamento del carrello di stampa
o coperchio delle testine di stampa non chiuso.

20
Italiano
Guida e suggerimenti per Wi-Fi e connettività
Se il software non è in grado di trovare la stampante durante l'installazione, vericare le seguenti condizioni per risolvere il problema.
Nota: questa stampante supporta unicamente una connessione Wi-Fi a 2,4 GHz.
Possibile problema Soluzione
Timeout della modalità di
congurazione Wi-Fi della stampante
Se la spia Wi-Fi è spenta, la stampante potrebbe non essere nella modalità di
congurazione Wi-Fi.
Riattivare la modalità di congurazione Wi-Fi:
1. Tenere premuto per 5 secondi, nché i pulsanti sul pannello di controllo non si
accendono.
2. Tenere premuto e per 5 secondi, nché la spia Wi-Fi non lampeggia in blu.
3. Attendere un minuto. Chiudere e riaprire HP Smart, quindi provare di nuovo a connettersi.
Computer o dispositivo mobile troppo
lontano dalla stampante
Avvicinare il computer o il dispositivo mobile alla stampante. Il dispositivo potrebbe non
essere nel raggio d'azione del segnale Wi-Fi della stampante.
Computer connesso a una rete privata
virtuale (VPN) o a una rete lavorativa
remota
Disconnettersi dalla VPN prima di installare il software HP Smart. Non è possibile
installare app da Microsoft Store quando si è connessi a una VPN. Connettersi
nuovamente alla VPN dopo aver completato l'installazione della stampante.
Nota: valutare la posizione e la sicurezza della rete Wi-Fi prima di disconnettersi
da una VPN.
Bluetooth è disattivato sul computer
o sul dispositivo mobile
I servizi relativi alla posizione sono
disattivati sul dispositivo mobile
Attivare Bluetooth sul computer o sul dispositivo mobile utilizzato per completare
l'installazione della stampante. Per i dispositivi mobili, attivare anche i servizi relativi
alla posizione.
Bluetooth e i servizi relativi alla posizione aiutano il software a individuare la rete e la
stampante.
Nota: la posizione dell'utente non viene determinata e durante il processo di
installazione non viene inviata ad HP alcuna informazione sulla posizione.
Spostare correttamente la stampante
per evitare perdite di inchiostro
5. Imballare la stampante in una scatola (se disponibile).
Durante il trasporto, tenere la stampante in posizione
orizzontale onde evitare perdite di inchiostro.
6. Dopo aver disimballato la stampante, premere il fermo blu per
chiudere il coperchio delle testine di stampa. Vericare che il
coperchio sia chiuso correttamente.
1. Spegnere la stampante e scollegare il cavo di alimentazione. 2. Aprire lo sportello anteriore. Vericare che il carrello di
stampa si trovi del tutto a sinistra; in caso contrario,
spostarlo manualmente a sinistra.
7. Collegare il cavo di alimentazione e accendere
la stampante.
Per la risoluzione dei problemi della stampante e i video pertinenti
alla stampante, visitare hp.com/support
3. Premere sul lato del coperchio delle testine
di stampa per sbloccare il coperchio.
4. Inserire un fermo in cartone. Chiudere lo sportello anteriore.
hp.com/support/movingsmarttank
A página está carregando...
A página está carregando...
A página está carregando...
A página está carregando...
A página está carregando...
A página está carregando...
A página está carregando...
A página está carregando...
A página está carregando...
A página está carregando...
A página está carregando...
A página está carregando...
A página está carregando...
A página está carregando...
A página está carregando...
A página está carregando...
A página está carregando...
A página está carregando...
A página está carregando...
A página está carregando...
A página está carregando...
A página está carregando...
A página está carregando...
A página está carregando...
A página está carregando...
A página está carregando...
A página está carregando...
A página está carregando...
A página está carregando...
A página está carregando...
A página está carregando...
A página está carregando...
A página está carregando...
A página está carregando...
A página está carregando...
A página está carregando...
A página está carregando...
A página está carregando...
A página está carregando...
A página está carregando...
A página está carregando...
A página está carregando...
A página está carregando...
A página está carregando...
A página está carregando...
A página está carregando...
A página está carregando...
A página está carregando...
A página está carregando...
A página está carregando...
A página está carregando...
A página está carregando...
A página está carregando...
A página está carregando...
A página está carregando...
A página está carregando...
A página está carregando...
A página está carregando...
A página está carregando...
A página está carregando...
A página está carregando...
A página está carregando...
A página está carregando...
A página está carregando...
A página está carregando...
A página está carregando...
A página está carregando...
A página está carregando...
-
 1
1
-
 2
2
-
 3
3
-
 4
4
-
 5
5
-
 6
6
-
 7
7
-
 8
8
-
 9
9
-
 10
10
-
 11
11
-
 12
12
-
 13
13
-
 14
14
-
 15
15
-
 16
16
-
 17
17
-
 18
18
-
 19
19
-
 20
20
-
 21
21
-
 22
22
-
 23
23
-
 24
24
-
 25
25
-
 26
26
-
 27
27
-
 28
28
-
 29
29
-
 30
30
-
 31
31
-
 32
32
-
 33
33
-
 34
34
-
 35
35
-
 36
36
-
 37
37
-
 38
38
-
 39
39
-
 40
40
-
 41
41
-
 42
42
-
 43
43
-
 44
44
-
 45
45
-
 46
46
-
 47
47
-
 48
48
-
 49
49
-
 50
50
-
 51
51
-
 52
52
-
 53
53
-
 54
54
-
 55
55
-
 56
56
-
 57
57
-
 58
58
-
 59
59
-
 60
60
-
 61
61
-
 62
62
-
 63
63
-
 64
64
-
 65
65
-
 66
66
-
 67
67
-
 68
68
-
 69
69
-
 70
70
-
 71
71
-
 72
72
-
 73
73
-
 74
74
-
 75
75
-
 76
76
-
 77
77
-
 78
78
-
 79
79
-
 80
80
-
 81
81
-
 82
82
-
 83
83
-
 84
84
-
 85
85
-
 86
86
-
 87
87
-
 88
88


em outras línguas
- español: HP 5100 Series Guía del usuario
- français: HP 5100 Series Mode d'emploi
- italiano: HP 5100 Series Guida utente
- Nederlands: HP 5100 Series Gebruikershandleiding
- Deutsch: HP 5100 Series Benutzerhandbuch
- dansk: HP 5100 Series Brugervejledning
- eesti: HP 5100 Series Kasutusjuhend
- svenska: HP 5100 Series Användarguide
Artigos relacionados
-
HP 7300 Series Guia de usuario
-
HP Smart Tank Wireless 450 Manual do proprietário
-
HP DesignJet T2300 Multifunction Printer series Instruções de operação
-
HP DesignJet T1700 Printer series Instruções de operação
-
HP Smart Tank Plus 551 Wireless All-in-One Guia rápido
-
HP DesignJet Z6 PostScript Printer series Instruções de operação
-
-
HP Smart Tank 518 Wireless All-in-One Guia rápido
-