Indesit FK 62 C X S Guia de usuario
- Categoria
- Fornos
- Tipo
- Guia de usuario
Este manual também é adequado para

FK 62C X S
FK 62 X S
FK 62C S
FK 62 S
FK 62 C X CN S
FK 62 C CN S
English
Operating Instructions
OVEN
Français
Mode d’emploi
FOUR
Español
Manual de instrucciones
HORNO
Portuges
Instruções para a utilização
FORNO
Contents
Operating Instructions,1
Warnings,3
Assistance,6
Description of the appliance,7
Description of the appliance,9
Installation,10
Start-up and use,12
Modes,12
Precautions and tips,15
Maintenance and care,15
Sommaire
Mode d’emploi,1
Avertissements,3
Assistance,6
Description de l’appareil,7
Description de l’appareil,9
Installation,17
Mise en marche et utilisation,19
Programmes,19
Précautions et conseils,22
Nettoyage et entretien,22
Sumario
Manual de instrucciones,1
Advertencias,4
Asistencia,6
Descripción del aparato,7
Descripción del aparato,9
Instalación,24
Puesta en funcionamiento y uso,26
Programas,26
Precauciones y consejos,29
Mantenimiento y cuidados,29
Índice
Instruções para a utilização,1
Advertências,4
Descrição do aparelho,7
Descrição do aparelho,9
Instalação,31
Início e utilização,33
Programas,33
Precauções e conselhos,36
Manutenção e cuidados,36
1
5
6
7
9
44
42
41
39
38

Arabian
1
5
6
8
9
51
50
49
46
45

3
Warnings
WARNING: The appliance and its
accessible parts become hot during use.
Care should be taken to avoid touching
heating elements. Children less than 8
years of age shall be kept away unless
continuously supervised. This appliance
can be used by children aged from 8 years
and above and persons with reduced
physical, sensory or mental capabilities
or lack of experience and knowledge
if they have been given supervision
or instruction concerning use of the
appliance in a safe way and understand
the hazards involved. Children shall not
play with the appliance. Cleaning and
user maintenance shall not be made by
children without supervision.
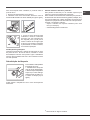
Do not use harsh abrasive cleaners or
sharp metal scrapers to clean the oven
door glass since they can scratch the
surface, which may result in shattering
of the glass.
Never use steam cleaners or pressure
cleaners on the appliance.
WARNING: Ensure that the appliance is
switched off before replacing the lamp to
avoid the possibility of electric shock.
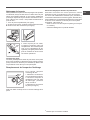
! When you place the rack inside, make
sure that the stop is directed upwards and
in the back of the cavity.
Avertissements
ATTENTION : Cet appareil ainsi que
ses parties accessibles deviennent très
chauds pendant leur fonctionnement.
Il faut faire attention à ne pas toucher
les éléments chauffants. Ne pas faire
approcher les enfants de moins de 8 ans
à moins qu’ils ne soient sous surveillance
constante. Le présent appareil peut
être utilisé par des enfants de plus de
8 ans et par des personnes présentant
des capacités physiques, sensorielles
ou mentales réduites ou n’ayant pas
l’expérience ou les connaissances
indispensables, à condition qu’ils soient
sous bonne surveillance ou qu’ils aient
reçu les instructions nécessaires pour une
utilisation de l’appareil en toute sécurité
et à condition qu’ils se rendent compte
des dangers encourus. Les enfants ne
doivent pas jouer avec l’appareil. Les
opérations de nettoyage et d’entretien
ne doivent pas être effectuées par des
enfants non surveillés.
Ne pas utiliser de produits abrasifs ni
de spatules métalliques coupantes pour
nettoyer la porte du four en verre, sous peine
Ne jamais nettoyer l’appareil avec des
nettoyeurs vapeur ou haute pression.
ATTENTION : s’assurer que l’appareil est
éteint avant de procéder au remplacement
d’électrocution.
! Lors de l’introduction de la grille,
s’assurer que l’arrêt est bien tourné vers
le haut et se trouve dans la partie arrière
de l’enceinte.

4
Advertencias
ATENCIÓN: Este aparato y sus partes
accesibles se vuelven muy calientes
durante el uso. Por lo tanto, es importante
evitar tocar los elementos calentadores.
Mantenga alejados a los niños menores
de 8 años si no son continuamente
vigilados. El presente aparato puede ser
utilizado por niños mayores de 8 años y
por personas con capacidades físicas,
sensoriales o mentales disminuidas o
sin experiencia ni conocimientos, si se
encuentran bajo una adecuada vigilancia
o si han sido instruidos sobre el uso del
aparato de modo seguro y comprenden
los peligros relacionados con el mismo.
Los niños no deben jugar con el aparato.
Las operaciones de limpieza y de
mantenimiento no deben ser realizadas
por niños sin vigilancia.
No utilice productos abrasivos ni espátulas
de metal cortantes para limpiar la puerta
de cristal del horno ya que podrían rayar
No utilice nunca limpiadores a vapor o de
alta presión para la limpieza del aparato.
ATENCIÓN: Antes de sustituir la lámpara
controle que el aparato esté apagado
para evitar la posibilidad de choques
eléctricos.
! Cuando introduzca la parrilla, controle
que el tope esté dirigido hacia arriba y en
la parte posterior de la cavidad.
Advertências
ATENÇÃO: Este aparelho e as suas
partes acessíveis aquecem muito durante
a utilização. É preciso ter atenção e evitar
tocar os elementos que aquecem. Manter
afastadas as crianças com menos de 8
anos, caso não estejam a ser vigiadas.
O presente aparelho pode ser utilizado
por crianças com mais de 8 anos e
por pessoas com capacidades físicas,
sensoriais ou mentais reduzidas ou com
pouca experiência e conhecimentos,
caso sejam adequadamente vigiadas
ou caso tenham recebido instruções
em relação ao uso do aparelho de
forma segura e tenham conhecimento
dos perigos associados. As crianças
não devem brincar com o aparelho. As
operações de limpeza e manutenção não
devem ser efectuadas por crianças sem
vigilância.
Não utilizar produtos abrasivos nem
espátulas de metal cortantes para limpar
a porta em vidro do forno, uma vez que
pode riscar a superfície, provocando a
ruptura do vidro.
Nunca utilize equipamento de limpeza a
vapor ou de alta pressão para limpar o
aparelho.
ATENÇÃO: Assegure-se de que o
aparelho esteja desligado antes de
substituir a lâmpada, para evitar a
possibilidade de choques eléctricos.
! Quando inserir a grelha, assegure-se de
que o bloqueio esteja voltado para cima
e na parte posterior da cavidade.

5
8
8
!
8
8
!

6
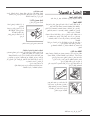
Assistance
! Never use the services of an unauthorised technician.
Please have the following information to hand:
The latter two pieces of information can be found on the
data plate located on the appliance.
Assistance
! Ne jamais faire appel à des techniciens non agréés.
Lui indiquer :
Ces informations figurent sur la plaque signalétique
apposée sur l’appareil
Asistencia
! No llame nunca a técnicos no autorizados.
Comunique:
Esta información se encuentra en la placa de características
colocada en el aparato.
La siguiente información es válida solo para España.
Para otros países de habla hispana consulte a su
vendedor.
Ampliación de garantía
Llame al 902.363.539 y le informaremos sobre el fantástico
plan de ampliación de garantía hasta 5 años.
Consiga una cobertura total adicional de
Y NO PAGUE AVERIAS NUNCA MAS
Servicio de asistencia técnica (SAT)
Llame al 902.133.133 y nuestros técnicos intervendrán con
condiciones óptimas de funcionamiento.
En el SAT encontrará recambios, accesorios y productos
específicos para la limpieza y mantenimiento de su
electrodoméstico a precios competitivos.
ESTAMOS A SU SERVICIO
Mod.
Mod.

7
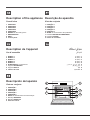
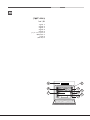
Description of the appliance
Overall view
1 POSITION 1
2 POSITION 2
3 POSITION 3
4 POSITION 4
5 POSITION 5
6 GUIDES for the sliding racks
7 DRIPPING PAN
8 GRILL
9 Control panel
Description de l’appareil
Vue d’ensemble
1 NIVEAU 1
2 NIVEAU 2
3 NIVEAU 3
4 NIVEAU 4
5 NIVEAU 5
6 GLISSIERES de coulissement
7 Support LECHEFRITE
8 Support GRILLE
9 Tableau de bord
Descripción del aparato
Vista en conjunto
1 POSICIÓN 1
2 POSICIÓN 2
3 POSICIÓN 3
4 POSICIÓN 4
5 POSICIÓN 5
6 GUÍAS de deslizamiento de las bandejas
7 Bandeja GRASERA
8 Bandeja PARRILLA
9 Panel de control
Descrição do aparelho
Vista de conjunto
1 POSIÇÃO 1
2 POSIÇÃO 2
3 POSIÇÃO 3
4 POSIÇÃO 4
5 POSIÇÃO 5
6 GUIAS de escorrimento das prateleiras
7 Prateleira BANDEJA PINGADEIRA
8 Prateleira GRADE
9 Painel de comandos
1 1
2 2
3 3
4 4
5 5
6
7
8
9
7
8
9 6
1
2
3
4
5

8
7
8
9 6
1
2
3
4
5
1 1
2 2
3 3
4 4
5 5
6
7
8
9

9
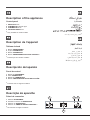
Description of the appliance
Control panel
1 SELECTOR knob
2 THERMOSTAT indicator light
3 THERMOSTAT knob
4 COOKING TIMER knob *
* Only available in certain models.
Description de l’appareil
Tableau de bord
1 Bouton PROGRAMMES
2 Voyant THERMOSTAT
3 Bouton THERMOSTAT
4 Bouton PROGRAMMATEUR FIN DE CUISSON *
* N’existe que sur certains modèles
Descripción del aparato
Panel de control
1 Mando de PROGRAMAS
2 Piloto TERMOSTATO
3 Mando del TERMOSTATO
4 Mando TEMPORIZADOR DE FIN DE COCCIÓN *
* Presente sólo en algunos modelos.
Descrição do aparelho
Painel de comandos
1 Selector PROGRAMAS
2 Indicador luminoso do TERMOSTATO
3 Selector do TERMOSTATO
4 Selector do TIMER DE FIM DE COZEDURA *
* Há somente em alguns modelos.
2
3
4
1
*
1
2
3
* 4
*
1
2
4
3

10
GB
Installation
! Please keep this instruction booklet in a safe place for
future reference. If the appliance is sold, given away or
moved, please make sure the booklet is also passed on to
contained within it.
! Please read this instruction manual carefully: it contains
important information concerning the safe operation,
installation and maintenance of the appliance.
Positioning
!
should be disposed of in accordance with local separated
!
in accordance with the instructions provided. Incorrect
installation may damage property or cause harm to people
or animals.
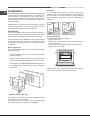
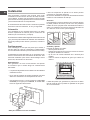
Built-in appliances
Use an appropriate cabinet to ensure that the appliance
operates properly:
resistant material.
glues which can withstand temperatures of up to 100°C.
under the counter
in a kitchen unit, the cabinet must have the following
dimensions:
590 mm.
595 mm.
22,5 mm.*
20,5 mm.
550 mm.
570 mm.
20 mm.
575-585 mm.
45 mm.
560 mm.
550 mm.
min.
* Stainless steel models only
! The appliance must not come into contact with electrical
parts once it has been installed.
The indications for consumption given on the data plate
have been calculated for this type of installation.
Ventilation
To ensure adequate ventilation, the back panel of the
cabinet must be removed. It is advisable to install the oven
so that it rests on two strips of wood, or on a completely
560 mm.
45 mm.
Secure the appliance to the cabinet:
the perimeter frame.
! All parts which ensure the safe operation of the appliance
must not be removable without the aid of a tool.

GB
11
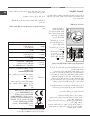
Electrical connection
Ovens equipped with a three-pole power supply cable are
designed to operate with alternating current at the voltage
and frequency indicated on the data plate located on the
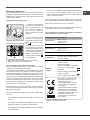
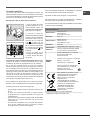
Fitting the power supply cable
1. Open the terminal board
by inserting a screwdriver
into the side tabs of the
cover. Use the screwdriver
as a lever by pushing it
2. Install the power supply
cable by loosening the
cable clamp screw and the
three wire contact screws
L-N- .
Connect the wires to the
corresponding terminals:
the Blue wire to the terminal
to the terminal marked
3. Secure the cable by fastening the clamp screw.
4. Close the cover of the terminal board.
Connecting the supply cable to the mains
Install a standardised plug corresponding to the load
The appliance must be directly connected to the mains using
an omnipolar switch with a minimum contact opening of 3
mm installed between the appliance and the mains. The
switch must be suitable for the charge indicated and must
must be positioned so that it does not come into contact
! The installer must ensure that the correct electrical
connection has been performed and that it is fully compliant
with safety regulations.
Before connecting the appliance to the power supply, make
sure that
the law.
appliance, which is indicated on the data plate.
on the data plate.
N
L
If the socket is incompatible with the plug, ask an
authorised technician to replace it. Do not use extension
cords or multiple sockets.
! Once the appliance has been installed, the power supply
cable and the electrical socket must be easily accessible.
! The cable must not be bent or compressed.
! The cable must be checked regularly and replaced by
! The manufacturer declines any liability should these
safety measures not be observed.
Electrical
connections
voltage:
220-240V~ 50/60Hz or 50Hz
(see data plate) maximum power
absorbed 2800W
ENERGY
LABEL
APPLIANCE SPECIFICATIONS
Dimensions*
width 43,5 cm
height 32,4 cm
depth 41,5 cm
Dimensions**
width 45,5 cm
height 32,4 cm
depth 41,5 cm
Volume*
59 lt.
Volume**
62 lt.
* Only for models with drawn rails.
** Only for models with wire rails.
Directive 2002/40/EC on the label
of electric ovens.
Standard EN 50304
Energy consumption for Natural
convection – heating mode:
Traditional
Declared energy consumption for
Forced convection
Class – heating mode: Baking
This appliance conforms to the
following European Economic
Community directives:
- 2006/95/EEC dated 12/12/06
(Low Voltage) and subsequent
amendments
- 2004/108/EEC dated 03/05/89
(Electromagnetic Compatibility)
and subsequent amendments
- 93/68/EEC dated 22/07/93 and
subsequent amendments.
- 2012/19/EC and subsequent
amendments.

12
GB
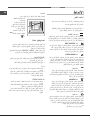
Start-up and use
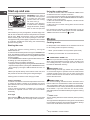
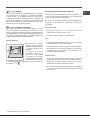
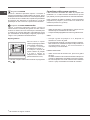
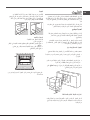
WARNING ! The oven is
provided with a stop system
to extract the racks and
prevent them from coming
As shown in the drawing,
to extract them completely,
simply lift the racks, holding
them on the front part, and
!
with its door closed at its maximum temperature for at least
half an hour. Make sure that the room is well ventilated
before switching the oven off and opening the oven door.
The appliance may emit a slightly unpleasant odour caused
by protective substances used during the manufacturing
process burning away.
Starting the oven
1. Select the desired cooking mode by turning the
SELECTOR knob.
2. Select the desired temperature using the THERMOSTAT
knob. A list detailing cooking modes and suggested cooking
3. The THERMOSTAT indicator light indicates that the oven
is heating up to the temperature set.
4. During cooking it is always possible to:
- stop cooking by turning the SELECTOR knob to the “0”
position.
!
will prevent the enamel coating from being damaged.
!
Cooling ventilation
In order to cool down the external temperature of the oven,
a cooling fan blows a stream of air between the control
panel and the oven door, as well as towards the bottom of
the oven door.
! Once cooking has been completed, the cooling fan
continues to operate until the oven has cooled down
Oven light
When selecting with the SELECTOR knob the oven light
goes on. It remains lit when a cooking mode is selected.
Using the cooking timer*
1. To set the buzzer, turn the COOKING TIMER knob
clockwise almost one complete revolution.
2. Turn the knob anticlockwise to set the desired time: align
the minutes shown on the COOKING TIMER knob with the
indicator on the control panel.
3. When the selected time has elapsed, a buzzer sounds
and the oven turns off.
4. When the oven is off the cooking timer can be used as
a normal timer.
! To use the oven manually, in other words when you do not
wish to use the end of cooking timer, turn the COOKING
TIMER knob until it reaches the symbol.
Modes
Cooking modes
! A temperature value between 60°C and MAX can be set
for all cooking modes except the following:
TRADITIONAL OVEN mode
Both the top and bottom heating elements will come on.
When using this traditional cooking mode, it is best to use
one cooking rack only. If more than one rack is used, the
heat will be distributed unevenly.
MULTILEVEL mode
on and the fan begins to operate. Since the heat remains
constant throughout the oven, the air cooks and browns
food in a uniform manner. A maximum of two racks may be
used at the same time.
PIZZA OVEN mode
The circular heating elements and the elements at the
bottom of the oven are switched on and the fan is activated.
This combination heats the oven rapidly by producing a
considerable amount of heat, particularly from the element
at the bottom. If you use more than one rack at a time,
switch the position of the dishes halfway through the cooking
process.
GRILL mode
come on.
The high and direct temperature of the grill is recommended
for food which requires a high surface temperature. Always
cook in this mode with the oven door closed.
* Only available in certain models.

GB
13
GRATIN mode
combination of features increases the effectiveness of the
unidirectional thermal radiation provided by the heating
elements through forced circulation of the air throughout the
oven. This helps prevent food from burning on the surface
and allows the heat to penetrate right into the food. Always
cook in this mode with the oven door closed.
BAKING mode
The rear heating element and the fan are switched on,
thus guaranteeing the distribution of heat in a delicate and
uniform manner throughout the entire oven. This mode is
pastries” on 3 shelves simultaneously.
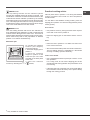
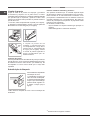
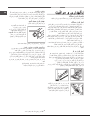
Rotisserie spit*
To operate the rotisserie
proceed as follows:
1. Place the dripping pan in
position 1.
2. Place the rotisserie
support in position 3 and
insert the spit in the hole
provided on the back panel
of the oven.
3. Start the rotisserie
function by selecting the or
Practical cooking advice
! Do not place racks in position 1 or 5 during fan-assisted
cooking. Excessive direct heat can burn temperature
sensitive foods.
! In the GRILL and GRATIN cooking modes, place the
MULTILEVEL
more heat on the rack in position 2.
top.
GRILL
in the centre of the rack.
The top heating element is regulated by a thermostat
and may not always operate constantly.
PIZZA OVEN MODE
rack provided.
extends the total cooking duration and prevents the crust
from forming.
the mozzarella cheese to the top of the pizza halfway
through the cooking process.
* Only available in certain models.

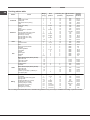
14
GB
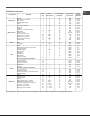
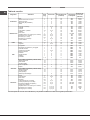
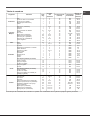
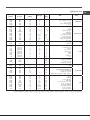
Modes Foods
Weight
(in kg)
Rack
position
Preheating time
(minutes)
Recommended
temperature
Cooking
duration
(minutes)
Traditional
Duck
Roast veal or beef
Roast pork
Biscuits (shortcrust pastry)
Tarts
1
1
1
-
1
3
3
3
3
3
15
15
15
15
15
200
200
200
180
180
65-75
70-75
70-80
15-20
30-35
Multilevel
Pizza (on 2 racks)
Lasagne
Lamb
Roast chicken + potatoes
Mackerel
Sponge cake made with yoghurt
Cream puffs (on 2 racks)
Biscuits (on 2 racks)
Sponge cake (on 1 rack)
Sponge cake (on 2 racks)
Savoury pies
1
1
1
1+1
1
1
0.5
0.5
0.5
1
1.5
2 and 4
3
2
2 and 4
2
2
2 and 4
2 and 4
2
2 and 4
3
15
10
10
15
10
10
10
10
10
10
15
230
180
180
200
170-180
170
190
180
170
170
200
15-20
30-35
40-45
60-70
30-35
40-50
20-25
10-15
15-20
20-25
30-40
Pizza
Pizza
Focaccia bread
0.5
1
3
2 or 3
15
10
220
200
15-20
15-20
Grill
Sole
Squid and prawn kebabs
Cod fillet
Grilled vegetables
Veal steak
Cutlets
Hamburgers
Mackerel
Toast
1
1
1
1
1
1
1
1
no. 4
4
4
4
3 or 4
4
4
4
4
4
5
5
5
5
5
5
5
5
5
MAX
MAX
MAX
MAX
MAX
MAX
MAX
MAX
MAX
8-10
6-8
10
10-15
15-20
15-20
7-10
15-20
2-3
With rotisserie spit (where present)
Spit-roast veal
Spit-roast chicken
Spit-roast lamb
1.0
1.5
1.0
-
-
-
-
-
-
100%
100%
100%
80-90
70-80
70-80
Gratin
Grilled chicken
Cuttlefish
1.5
1.5
2
2
5
5
200
200
55-60
30-35
With rotisserie spit (where present)
Spit-roast veal
Spit-roast lamb
Chicken (on the spit) + potatoes (on
the dripping pan)
1.5
1.5
1.5
-
-
-
-
2
10
10
10
10
200
200
200
200
70-80
70-80
70-75
70-75
Baking
Tarts
Fruit cakes
Sponge cake made with yoghurt
Sponge cake
Stuffed pancakes (on 2 racks)
Small cakes (on 2 racks)
Cheese puffs (on 2 racks)
Cream puffs (on 3 racks)
Biscuits (on 3 racks)
Meringues (on 3 racks)
0.5
1
0.7
0.5
1.2
0.6
0.4
0.7
0.7
0.5
3
2 or
3
3
3
2 and 4
2 and 4
2 and 4
1, 3 and 5
1, 3 and 5
1, 3 and 5
15
15
15
15
15
15
15
15
15
15
180
180
180
160
200
180-190
200-210
180
180
90
20-30
40-45
40-50
25-35
30-35
20-25
15-20
20-25
20-25
180
! The cooking times listed above are intended as guidelines only and may be modified according to personal tastes.
Cooking advice table

GB
15
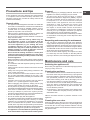
Precautions and tips
! This appliance has been designed and manufactured
in compliance with international safety standards. The
following warnings are provided for safety reasons and
must be read carefully.
General safety
home and is not intended for commercial or industrial use.
covered areas. It is extremely dangerous to leave the
appliance exposed to rain and storms.
the handles provided on the sides of the oven.
damp hands and feet.
The appliance must be used by adults only for
the preparation of food, in accordance with the
instructions provided in this booklet. Any other
use of the appliance (e.g. for heating the room)
constitutes improper use and is dangerous. The
manufacturer may not be held responsible for any
damage caused as a result of improper, incorrect
and unreasonable use of the appliance.
Do not touch the heating elements or certain parts
of the oven door when the appliance is in use; these
from the appliance.
appliances do not come into contact with the hot parts of
the oven.
be obstructed.
may be hot.
oven or when removing it.
appliance is switched on accidentally, the materials could
” quand l’appareil n’est pas utilisé.
having disconnected the appliance from the electricity mains.
should you attempt to perform the repairs yourself.
capacities, by inexperienced individuals or by anyone
who is not familiar with the product. These individuals
should, at the very least, be supervised by someone who
assumes responsibility for their safety or receive preliminary
instructions relating to the operation of the appliance.
Disposal
legislation so that the packaging may be reused.
that old household electrical appliances must not
be disposed of in the normal unsorted municipal
waste stream. Old appliances must be collected
separately in order to optimise the recovery and
recycling of the materials they contain and reduce
the impact on human health and the environment.
The crossed out “wheeled bin” symbol on the product
reminds you of your obligation, that when you dispose
of the appliance it must be separately collected.
Consumers should contact their local authority or retailer
for information concerning the correct disposal of their
old appliance.
Respecting and conserving the environment
supply network companies by using the oven in the hours
between late afternoon and the early hours of the morning.
and GRATIN modes: this will achieve improved results
to ensure they are free of debris so that they adhere
properly to the door, thus avoiding the dispersal of heat.
Maintenance and care
Switching the appliance off
Disconnect your appliance from the electricity supply before
carrying out any work on it.
Cleaning the appliance
the rubber seals may be cleaned using a sponge that
has been soaked in lukewarm water and neutral soap.
Use specialised products for the removal of stubborn
stains. After cleaning, rinse and dry thoroughly. Do not
use abrasive powders or corrosive substances.
each use, while it is still lukewarm. Use hot water and
detergent, then rinse well and dry with a soft cloth. Do
not use abrasive products.
- can be washed like everyday crockery, and are even
dishwasher safe.
! Never use steam cleaners or pressure cleaners on the
appliance.
Cleaning the oven door
Clean the glass part of the oven door using a sponge and
a non-abrasive cleaning product, then dry thoroughly with
a soft cloth. Do not use rough abrasive material or sharp
metal scrapers as these could scratch the surface and cause
the glass to crack.

16
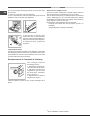
GB
be removed:
2. Use a screwdriver to lift up and turn the small levers F
F
3. Grip the door on the two outer
sides and close it approximately
half way. Pull the door towards you,
To replace the door, reverse this
sequence.
Inspecting the seals
Check the door seals around the oven regularly. If the seals
are damaged, please contact your nearest Service Centre
until the seals have been replaced.
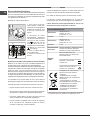
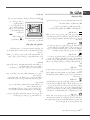
Remplacement de l’ampoule d’éclairage
Pour changer l’ampoule
d’éclairage du four:
1. Dévissez le couvercle en
verre du boîtier de la lampe.
2. Dévissez l’ampoule et
remplacez-la par une autre
de même type : puissance
25 W, culot E 14.
3. Remontez le couvercle à
! Ne pas utiliser la lampe du four comme éclairage de la
pièce.
Side and rear catalytic liners*
These are panels coated with a special enamel, which is
able to absorb the fat released by food as it cooks.
This enamel is quite strong, so that the various accessories
these are not a cause for concern.
Nevertheless, the following should be avoided:
- using detergents or abrasive materials.
* Only available in certain models.

17
FR
Installation
! Conservez ce mode d’emploi pour pouvoir le consulter
à tout moment. En cas de vente, de cession ou de
déménagement, veillez à ce qu’il suive l’appareil pour
informer le nouveau propriétaire sur son fonctionnement
et lui fournir les conseils correspondants.
! Lisez attentivement les instructions : elles contiennent
des conseils importants sur l’installation, l’utilisation et la
sécurité de votre appareil
Positionnement
! Les emballages ne sont pas des jouets pour enfants, il
faut les mettre au rebut en respectant la réglementation
! L’installation doit être effectuée par un professionnel du
secteur conformément aux instructions du fabricant. Une
mauvaise installation peut causer des dommages à des
personnes, des animaux ou des biens.
Encastrement
Pour garantir le bon fonctionnement de l’appareil, il faut
que le meuble possède des caractéristiques bien précises:
dimensions suivantes:
590 mm.
595 mm.
22,5 mm.*
20,5 mm.
550 mm.
570 mm.
20 mm.
575-585 mm.
45 mm.
560 mm.
550 mm.
min.
! Après encastrement de l’appareil, il ne doit plus y avoir
Les déclarations de consommation indiquées sur la plaque
signalétique ont été mesurées pour ce type d’installation.
Aération
Pour garantir une bonne aération, la cavité d’encastrement
doit être dépourvue de paroi arrière. Il est conseillé
d’installer le four de manière à ce qu’il repose sur deux
cales en bois ou bien sur un plan d’appui continu qui ait une
560 mm.
45 mm.
! Toutes les parties qui servent de protection doivent être
d’un outil.

18
FR
Raccordement électrique
Les fours munis d’un câble d’alimentation tripolaire sont prévus
pour un fonctionnement au courant alternatif à la tension et
à la fréquence indiquées sur la plaque signalétique apposée
Montage du câble d’alimentation
1. Pour ouvrir le bornier,
faire pression à l’aide d’un
tournevis sur les languettes
latérales du couvercle : tirer
2. Montage du câble
d’alimentation : dévisser la
vis du serre-câble ainsi que
les trois vis des contacts
L-N- puis fixer les fils
sous les têtes de vis en
respectant les couleurs Bleu
serre-câble prévu.
bornier.
Branchement du câble d’alimentation au réseau électrique
Montez sur le câble une prise normalisée adaptée à la
charge indiquée sur l’étiquette des caractéristiques.
En cas de raccordement direct au réseau, il faut intercaler entre
l’appareil et le réseau un interrupteur à coupure omnipolaire
ayant au moins 3 mm d’écartement entre les contacts,
dimensionné à la charge et conforme aux normes en vigueur
Le câble d’alimentation ne doit atteindre, en aucun point, des
températures dépassant de 50°C la température ambiante.
! L’installateur est responsable du bon raccordement
électrique de l’appareil et du respect des normes de sécurité.
Avant de procéder au branchement, assurez-vous que :
n’utilisez ni rallonges ni prises multiples.
N
L
! Après installation de l’appareil, le câble électrique et la
prise de courant doivent être facilement accessibles
! Le câble ne doit être ni plié ni excessivement écrasé.
!
! Nous déclinons toute responsabilité en cas de non
respect des normes énumérées ci-dessus.
Raccordements
électriques
tension 220-240V~ 50/60Hz ou 50Hz
puissance maximum absorbée
2800W (voir plaque signalétique)
ENERGY
LABEL
Directive 2002/40/CE sur
l'étiquette des fours électriques
Norme EN 50304
Consommation énergie convection
Naturelle – fonction four :
Traditionnel ;
Consommation énergie déclaration
Classe convection Forcée –
fonction four : Pâtisserie
Cet appareil est conforme aux
Directives Communautaires
suivantes:
- 2006/95/CEE du 12/12/06
(Basse Tension) et modifications
successives
- 2004/108/CEE du 15/12/04
(Compatibilité Electromagnétique)
et modifications successives
- 93/68/CEE du 22/07/93 et
modifications successives.
- 2012/19/CE et modifications
successives.
PLAQUE SIGNALETIQUE
Dimensions*
largeur 43,5 cm
hauteur 32,4 cm
profondeur 41,5 cm
Dimensions**
largeur 45,5 cm
hauteur 32,4 cm
profondeur 41,5 cm
Volume*
L. 59
Volume**
L. 62
* Uniquement pour les modèles avec glissières embouties.
** Uniquement pour les modèles avec glissières en fil.

19
FR
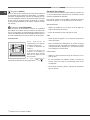
Mise en marche et utilisation
ATTENTION ! Le four est
équipé d’un système d’arrêts
de grilles qui permet de les
retirer sans que ces
dernières sortent
Pour sortir complètement
illustré, de les soulever en
! Lors de son premier allumage, faire fonctionner le four à
vide, porte fermée, pendant au moins une heure en réglant
le thermostat sur le maximum. Puis éteindre le four, ouvrir
la porte et aérer la pièce. L’odeur qui se dégage est due
à l’évaporation des produits utilisés pour protéger le four.
Mise en marche du four
1. Pour sélectionner le programme de cuisson souhaité,
tourner le bouton PROGRAMMES.
2. Pour choisir la température, tourner le bouton
THERMOSTAT. Un tableau de cuisson sert de guide
sur les cuissons et indique notamment les températures
3. Le voyant THERMOSTAT reste allumé pendant la durée
de montée en température.
4. En cours de cuisson, il est possible à tout moment de :
- stopper la cuisson en ramenant le bouton PROGRAMMES
! Ne jamais poser d’objets à même la sole du four, l’émail
risque de s’abîmer.
! Il faut toujours enfourner les plats sur la grille fournie avec
l’appareil.
Ventilation de refroidissement
Pour obtenir un abaissement des températures extérieures,
par une fente située entre le tableau de bord, la porte du
four et la partie basse de la porte du four.
! Le ventilateur continue à tourner après l’arrêt du four
Eclairage du four
Pour l’allumer, sélectionnez à l’aide du bouton
PROGRAMMES La lampe reste allumée en cas de sélection
d’un programme de cuisson.
1. Il faut avant tout remonter la sonnerie en faisant faire un
DE CUISSON dans le sens des aiguilles d’une montre.
2. Puis en faisant marche arrière, sélectionnez le temps
désiré en amenant les minutes indiquées sur le bouton
3. Une fois le temps écoulé, un signal sonore retentit et le
four s’éteint.
peut être utilisé comme une simple minuterie.
! Pour utiliser le four en fonctionnement manuel, c’est-
du symbole .
Programmes
Programmes de cuisson
! Pour tous les programmes, une température comprise
entre 60°C et MAX. peut être sélectionnée, sauf pour :
Programme FOUR TRADITION
Mise en marche des résistances de voûte et de sole. Pour
cette cuisson traditionnelle, mieux vaut cuire sur un seul
niveau : la cuisson sur plusieurs niveaux entraînerait une
mauvaise distribution de la chaleur.
Programme MULTICUISSON
et bien répartie à l’intérieur du four, l’air cuit et dore de façon
uniforme en tous points. Possibilité de cuire au maximum
sur deux niveaux en même temps.
Programme FOUR PIZZA
Mise en marche de la résistance de sole et de la résistance
circulaire ainsi que du ventilateur. Cette combinaison permet
une montée en température rapide avec un fort apport de
chaleur provenant surtout de la sole. En cas de cuisson
sur plusieurs niveaux, ne pas oublier de les changer de
place à mi-cuisson.
Programme GRIL
Mise en marche de la résistance de voûte et du tournebroche
La température élevée et directe du gril est conseillée pour
tous les aliments qui exigent une haute température en
surface. Cuisson porte du four fermée.
* N’existe que sur certains modèles

20
FR
Programme GRATIN
Mise en marche de la résistance de voûte, de la turbine et
thermique unidirectionnelle s’ajoute au brassage de l’air
pour une répartition uniforme de la chaleur dans l’enceinte
du four. Plus de risque de brûler les aliments en surface
et plus grande pénétration de la chaleur. Cuisson porte du
four fermée.
Programme FOUR PATISSERIE
Mise en marche de la résistance arrière et du ventilateur
pour obtenir une chaleur douce et uniforme à l’intérieur du
four. Ce programme est particulièrement indiqué pour la
et certains petits-fours sur trois niveaux en même temps.
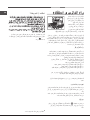
Tournebroche*
Pour actionner le
procéder comme suit :
1. placer la lèchefrite au
2. placer le berceau au
niveau 3 et encastrer le
bout arrière de la broche
dans le trou situé au fond
3. pour actionner le
tournebroche sélectionner les programmes ou
Conseils de cuisson
! Pour les cuissons ventilées ne pas utiliser les gradins 1et
5 : ils sont directement frappés par l’air chaud qui pourrait
brûler les préparations délicates.
! En cas de cuisson en mode GRIL ou GRATIN, placez la
lèchefrite au gradin 1 pour récupérer les jus de cuisson.
MULTICUISSON
exigent davantage de chaleur.
GRIL
milieu de la grille.
maximum. Ne pas s’inquiéter si la résistance de voûte
n’est pas allumée en permanence : son fonctionnement
grille du four.
En cas d’utilisation du plateau émaillé, le temps de
cuisson sera plus long et la pizza beaucoup moins
croustillante.
qu’à mi-cuisson.
* N’existe que sur certains modèles
A página está carregando...
A página está carregando...
A página está carregando...
A página está carregando...
A página está carregando...
A página está carregando...
A página está carregando...
A página está carregando...
A página está carregando...
A página está carregando...
A página está carregando...
A página está carregando...
A página está carregando...
A página está carregando...
A página está carregando...
A página está carregando...
A página está carregando...
A página está carregando...
A página está carregando...
A página está carregando...
A página está carregando...
A página está carregando...
A página está carregando...
A página está carregando...
A página está carregando...
A página está carregando...
A página está carregando...
A página está carregando...
A página está carregando...
A página está carregando...
A página está carregando...
A página está carregando...
-
 1
1
-
 2
2
-
 3
3
-
 4
4
-
 5
5
-
 6
6
-
 7
7
-
 8
8
-
 9
9
-
 10
10
-
 11
11
-
 12
12
-
 13
13
-
 14
14
-
 15
15
-
 16
16
-
 17
17
-
 18
18
-
 19
19
-
 20
20
-
 21
21
-
 22
22
-
 23
23
-
 24
24
-
 25
25
-
 26
26
-
 27
27
-
 28
28
-
 29
29
-
 30
30
-
 31
31
-
 32
32
-
 33
33
-
 34
34
-
 35
35
-
 36
36
-
 37
37
-
 38
38
-
 39
39
-
 40
40
-
 41
41
-
 42
42
-
 43
43
-
 44
44
-
 45
45
-
 46
46
-
 47
47
-
 48
48
-
 49
49
-
 50
50
-
 51
51
-
 52
52


Indesit FK 62 C X S Guia de usuario
- Categoria
- Fornos
- Tipo
- Guia de usuario
- Este manual também é adequado para
em outras línguas
- español: Indesit FK 62 C X S Guía del usuario
- français: Indesit FK 62 C X S Mode d'emploi
Artigos relacionados
Outros documentos
-
Whirlpool FK 1032E X S Guia de usuario
-
Ariston FK 103E P X S Guia de usuario
-
-
-
-
-
-