De Dietrich dop 499 xe1 Manual do proprietário
- Categoria
- Fornos
- Tipo
- Manual do proprietário
Este manual também é adequado para

Le guide d’utilisation de votre four
Using your oven
Bedienungsanleitung Ihres Backofens
Gebruiksaanwijzing van uw oven
B
etjeningsvejledning til ovnen
Instrucciones de uso de su horno
O guia de utilização do seu forno
DOP399*
FR
GB
DE
NL
DK
ES
PT
99627823_ML_A.qxd 03/05/04 15:32 Page 1

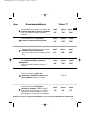
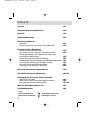
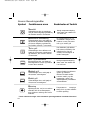
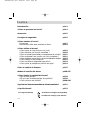
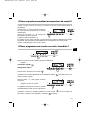
Sommaire
2
Edito p.3
Comment se présente votre four ? p.4
Accessoires p.5
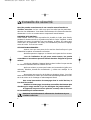
Conseils de sécurité p.6
Comment installer votre four ?
Raccordement p.7
Dimensions utiles pour encastrer votre four p.8
Comment utiliser votre four ?
Comment mettre à l’heure votre four ? p.9
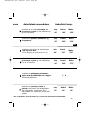
Comment faire une cuisson immédiate ? p.10
Comment personnaliser la température de cuisson ? p.11
Comment programmer une cuisson départ immédiat ? p.11
Comment programmer une cuisson heure de fin choisie ? p.12
Comment utiliser la minuterie ? p.13
Comment utiliser la sécurité enfant ? p.13
Comment mettre en veille votre afficheur ? p.14
Comment changer l’ampoule ? p.15
Modes de cuisson du four p.16-17
Comment nettoyer la cavité de votre four ?
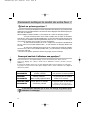
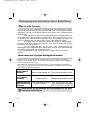
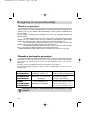
Qu’est-ce qu’une pyrolyse ? p.18
Dans quel cas faut-il effectuer une pyrolyse ? p.18
Comment faire une pyrolyse ? p.19-20
Que faire en cas d’anomalies de fonctionnement ? p.21
Qui contacter ? p.22
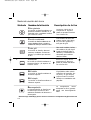
Tout au long de la notice,
vous signale les consignes de sécurité,
vous signale les conseils et les astuces
99627823_ML_A.qxd 03/05/04 15:32 Page 2
A página está carregando...

4
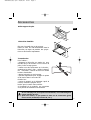
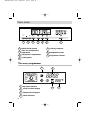
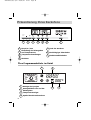
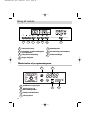
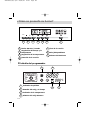
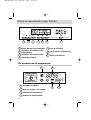
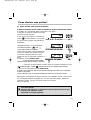
Comment se présente votre four ?
Bouton : Marche/Arrêt
Réglages des temps et des
températures
Réglage des températures
Durée de cuisson
Fin de cuisson
Minuteur indépendant
Sélecteur de fonctions
1
2
3
4
5
6
7
Le détail de votre programmateur
1
2
3
4
1
2
3
4
Indicateur de pyrolyse
Afficheur de l’horloge et des
temps
Indicateur de température
Symbole du minuteur
START
STOP
1
32
4
5
6
7
99627823_ML_A.qxd 03/05/04 15:32 Page 4
A página está carregando...
A página está carregando...
A página está carregando...

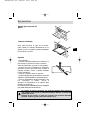
8
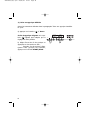
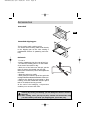
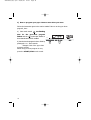
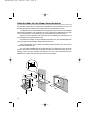
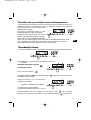
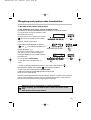
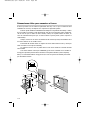
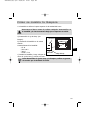
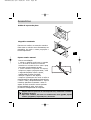
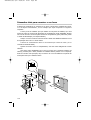
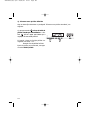
Dimensions utiles pour encastrer votre four
Votre four possède une circulation d’air optimisée qui permet d’obtenir des résultats de
cuisson et de nettoyage remarquables en respectant les éléments suivants :
Le four peut indifféremment être installé sous un plan de travail ou dans un meuble
en colonne ayant les dimensions d’encastrement adaptées. Pratiquez, dans la paroi arrière
de la niche, une découpe de 50mmx50mm pour le passage du cordon d’alimentation (voir
schéma ci-dessous).
Centrez le four dans le meuble de façon à garantir une distance de 2 mm mini avec le
meuble voisin.
La matière du meuble d’encastrement doit résister à la chaleur (ou être revêtu d’une
telle matière).
Le four à encastrer ne doit être placé dans la niche que si son alimentation en courant
électrique est coupée.
Pour plus de stabilité, fixez le four dans le meuble par 2 vis dans les trous prévus à cet
effet sur les montants latéraux (cf schéma). Auparavant, effectuer un trou de Ø 3 mm dans
la paroi du meuble pour éviter l’éclatement du bois.
560
595
540
22
376
380
560-580
20
50
10
50
550
mini
560-580
550 mini
400
310
390
99627823_ML_A.qxd 03/05/04 15:32 Page 8

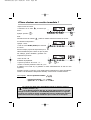
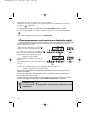
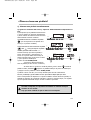
9
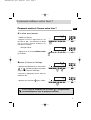
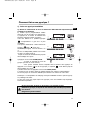
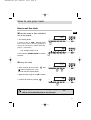
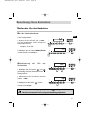
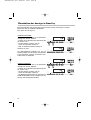
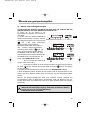
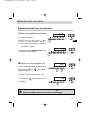
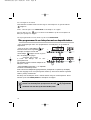
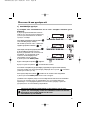
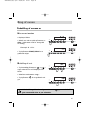
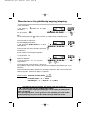
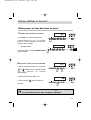
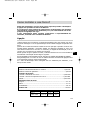
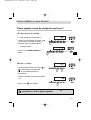
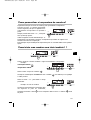
Comment mettre à l'heure votre four ?
S’il n’y a pas de validation par la touche , l’enregistrement
est automatique au bout de quelques secondes.
START
STOP
Comment utiliser votre four ?
START
STOP
START
STOP
START
STOP
Remise à l’heure de l’horloge
• Appuyez simultanément sur les touches
et pendant quelques secondes
jusqu’à faire clignoter l’affichage.
• Ajustez le réglage de l’heure avec les
touches + ou -.
• Appuyez sur la touche pour valider.
A la mise sous tension
• L’afficheur clignote.
• Réglez l’heure en appuyant sur les
touches + ou - (le maintien du doigt
sur la touche permet d’obtenir un
défilement rapide)
Exemple:12h30.
• Appuyez sur la touche START/STOP
pour valider.
FR
99627823_ML_A.qxd 03/05/04 15:32 Page 9
A página está carregando...
A página está carregando...
A página está carregando...
A página está carregando...
A página está carregando...

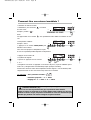
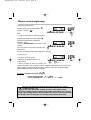
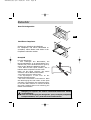
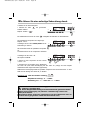
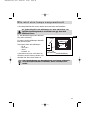
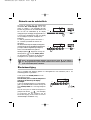
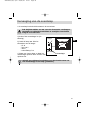
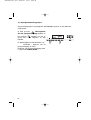
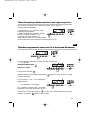
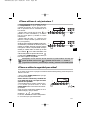
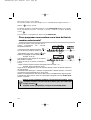
15
• L’ampoule se situe au plafond de la cavité de votre four.
a) Dévissez le hublot (voir ci-contre).
b) Dévissez l'ampoule dans le même
sens.
Caractéristiques de l'ampoule :
- 15 W
- 220-240 V
- 300°C
- culot E 14
c) Changez l'ampoule puis remontez le
hublot et rebranchez votre four.
Débranchez votre four avant toute intervention sur l'ampoule
pour éviter tout risque de choc électrique et laisser refroidir si
besoin l’appareil.
Comment changer l’ampoule ?
Ampoule
Dévissez
Hublot
Pour dévisser le hublot et la lampe, utilisez un gant de caout-
chouc qui facilitera le démontage.
FR
99627823_ML_A.qxd 03/05/04 15:33 Page 15
A página está carregando...

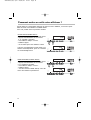
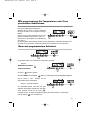
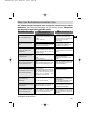
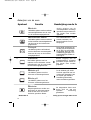
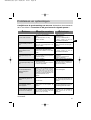
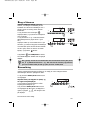
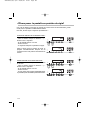
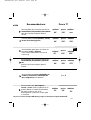
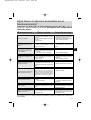
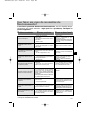
17
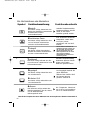
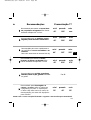
Recommandé pour les quiches,
tourtes, tartes aux fruits juteux.
Recommandé pour griller les
côtelettes, saucisses, tranches de
pain, gambas posées sur la grille.
Recommandations
Recommandé pour garder le moelleux des
viandes blanches, poissons, légumes
Pour les cuissons multiples jusqu’à 3
niveaux.
Recommandé poursaisir et cuire à coeur
viandes rouges et blanches.
Pour cuire doucement les volailles jusqu’à
2 kg
Préco T°
mini
préco
40°
180°
250°
mini
préco
maxi
40°
200°
250°
1 à 4
Recommandé pour garder le moelleux
des viandes blanches, poissons,
légumes
Pour les cuissons multiples jusqu’à 3
niveaux.
Recommandé pour décongeler
viandes et volailles. Utilisez la grille
avec la lèche-frite dessous ou la plaque
à pâtisserie. N’utilisez jamais le jus de
décongélation, il n’est pas consommable.
mini
préco
maxi
30°
40°
50°
mini
préco
maxi
40°
195°
250°
mini
préco
maxi
40°
220°
275°
maxi
ction
mément à la norme européenne EN 50304 et selon la directive Européenne 2002/40/CE.
FR
99627823_ML_A.qxd 03/05/04 15:33 Page 17
A página está carregando...
A página está carregando...
A página está carregando...
A página está carregando...
A página está carregando...

GB
99627823_ML_A.qxd 03/05/04 15:33 Page 23

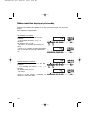
24
List of contents
Introduction p.25
Your oven p.26
Accessories p.27
Safety recommendations p.28
How to install your oven
Connecting up p.29
Dimensions for installation use p.30
How to use your oven
How to set the clock p.31
How to cook straightaway p.32
Entering your own choice of cooking temperature p.33
Programming a cooking session to start right away ? p.33
Programming your chosen cooking end time p.34
How to use the timer p.35
Using the child safety p.35
Putting your display on standby mode p.36
Changing a bulb p.37
Cooking methods p.38-39
Cleaning the oven cavity
Pyrolysis explained p.40
When to clean by pyrolysis p.40
How to use the pyro-clean program p.41-42
Troubleshooting p.43
How to contact us p.44
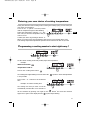
Throughout this manual,
indicates safety recommendations,
indicates advice to help you make the best
use of your oven
99627823_ML_A.qxd 03/05/04 15:33 Page 24
A página está carregando...

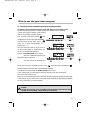
26
Your oven
START/STOP button
Time and temperature
adjustment
Temperature adjustment
Cooking time
Cooking complete
Independent timer
Programme selector
1
2
3
4
5
6
7
The oven programmer
1
2
3
4
1
2
3
4
Pyrolysis indicator
Clock and time display
Temperature indicator
Timer indicator
START
STOP
1
3
2
4
5
6
7
99627823_ML_A.qxd 03/05/04 15:33 Page 26
A página está carregando...
A página está carregando...
A página está carregando...

30
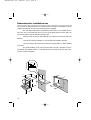
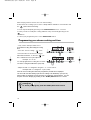
Dimensions for installation use
The oven has an high-performance air circulation system which gives remarkable results for
cooking and cleaning, as long as the following points are applied:
The oven may be fitted either underneath a work surface or in a suitable sized co-
lumn unit. Cut a hole measuring 50 mm x 50 mm in the back wall of the insert space for
the electric cable to pass through (See diagram, left).
Centre the oven in the unit, and make that it is at least 2 mm from any other unit
beside it.
The unit must be heat-resistant (or covered with heat-resistant material).
The oven must be disconnected from the power supply while it is being installed
in the unit.
For greater stability, fix the oven in the unit with 2 screws in the holes on the si-
de uprights (see diagram). Make a 3 mm diameter hole in the side of the unit first to pre-
vent the wood from splitting.
560
595
540
22
376
380
560-580
20
50
10
50
550
mini
560-580
550 mini
400
310
390
99627823_ML_A.qxd 03/05/04 15:33 Page 30
A página está carregando...
A página está carregando...
A página está carregando...
A página está carregando...
A página está carregando...
A página está carregando...

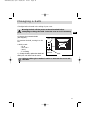
37
GB
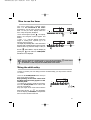
•The light bulb is housed in the ceiling of your oven.
a) Unscrew the protective shade
(see diagram).
b) Unscrew the bulb, turning it to the
left.
A bulb is used:
- 15 W
- 220-240 V
- 300°C
- E 14 fitting
c) Change the bulb, replace the shade and
switch your oven back on at the mains.
Warning! Switch off the power at the main switch before
attempting to change the bulb. Leave the oven to cool if necessary.
Changing a bulb
bulb fitting
unscrew
cover
Using a rubber glove makes it easier to unscrew the cover and
the bulb.
99627823_ML_A.qxd 03/05/04 15:34 Page 37
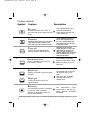
A página está carregando...

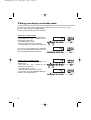
39
Recommended for juicy quiches, pies
and fruit tarts.
Recommended for grilling chops,
sausages, and large prawns and for
making toast.
Recommendations
Recommended to prevent meat drying
out, and for cooking vegetables and
fish and food placed on up to 3 shelves.
Recommended for sealing red and
white meat and cooking it through and
through.
Also for gently cooking poultry up to
2kg.
Cº Recom’d
mini
recom’d
40°
180°
250°
mini
recom’d
maxi
40°
200°
250°
1 to 4
Recommended to prevent meat drying
out, and for cooking vegetables and
fish and food placed on up to 3
shelves.
Recommended for defrosting meat
and poultry. Use the shelf with the
dripping pan placed below it, or the pas-
try tray. Never use the juice from
defrosted meat, as this is not edible.
mini
recom’d
maxi
30°
40°
50°
mini
recom’d
maxi
40°
195°
250°
mini
recom’d
maxi
40°
220°
275°
maxi
rdance with European Standard EN50304 and the European Directive 2002/40/EC.
GB
99627823_ML_A.qxd 03/05/04 15:34 Page 39
A página está carregando...
A página está carregando...
A página está carregando...
A página está carregando...

44
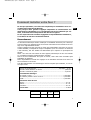
Copy here the details that are on your oven manufacturer's plate:
How to contact us
MADE IN FRANCE
220 - 240V ~ 50 Hz
BRANDT APPLIANCES SAS
7 rue Henri Becquerel
92500 RUEIL MALMAISON
De Dietrich
99627823_ML_A.qxd 03/05/04 15:34 Page 44

45
DE
99627823_ML_A.qxd 03/05/04 15:34 Page 45

46
Inhalt
Vorwort s.47
Präsentierung Ihres Backofens s.48
Zubehör s.49
Sicherheitshinweise s.50
Backofeninstallation
Anschluss s.51
Nützliche Maße für den Einbau Ihres Backofens s.52
Benutzung Ihres Backofens
Stellen der Uhr des Backofens s.53
Wie führen Sie eine sofortige Zubereitung durch s.54
Wie programmieren Sie Temperaturen nach Ihren
persönlichen Bedürfnissen s.55
Garen mit programmiertem Sofortstart s.55
Programmieren eines Garvorgangs mit gewähltem Gardauerende s.56
Wie wird die unabhängige Schaltuhr benutzt s.57
Wie wird die Kindersicherung betätigt s.57
Umschalten der Anzeige in Stand-by s.58
Wie wird eine lampe ausgewechselt s.59
Die Garfunktionen des Backofens s.60-61
Reinigung des Garraums Ihres Backofens
Was ist eine Pyrolyse s.62
Wann muss eine Pyrolyse durchgeführt werden s.62
Wie wird eine pyrolyse durchgeführt s.63-64
Was bei Betriebsanomalien tun s.65
Kontaktaufnahme s.66
In der
Gebrauchsanweisung
geben Ihnen die Zeichen,
Sicherheitshinweise und,
Ratschläge und Tips.
99627823_ML_A.qxd 03/05/04 15:34 Page 46
A página está carregando...

48
Präsentierung Ihres Backofens
Knopf An / Aus
Einstellung der Zeitangaben
und Temperaturen
Temperatureinstellungen
Gardauer
Ende der Gardauer
Unabhängiger Zeitschalter
Funktionswählschalter
1
2
3
4
5
6
7
I
hre Programmschaltuhr im Detail
1
2
3
4
1
2
3
4
Anzeige der Pyrolyse
Anzeigefeld der Uhr und der
Zeitangaben
Temperaturanzeiger
Symbol des Kurzzeitweckers
START
STOP
1
3
2
4
5
6
7
99627823_ML_A.qxd 03/05/04 15:34 Page 48
A página está carregando...
A página está carregando...
A página está carregando...

52
Nützliche Maße für den Einbau Ihres Backofens
Ihr Backofen verfügt über eine optimierte Luftzirkulation, die bemerkenswerte Gar- und
Reinigungsergebnisse erlaubt, wenn folgende Elemente berücksichtigt werden:
Der Backofen muß in einem Kastenschrank eingebaut werden, wobei die notwendigen
Einbaumaße einzuhalten sind. Schneiden Sie in der Rückwand der Einbaunische eine Öff-
nung von 50x50mm für die Durchführung des Stromkabels (siehe Schema unten).
Zentrieren Sie den Backofen so in dem Möbel, dass ein Abstand von mindestens 2 mm
zum benachbarten Möbel eingehalten wird.
Das Material des Möbels, in das der Backofen eingebaut wird, muss hitzebeständig sein
(oder mit einem hitzebeständigen Material beschichtet sein).
Der Einbau-Backofen darf nur dann in die Nische gebracht werden, wenn seine Strom-
versorgung unterbrochen ist.
Für eine größere Stabilität müssen Sie den Backofen mit 4 Schrauben in den für diesen
Zweck in den Seitenverstrebungen vorgesehenen Löchern im Möbel befestigen (siehe Ab-
bildung). Führen Sie dazu zunächst eine Bohrung Ø 3 mm in den entsprechenden Mö-
belwänden aus, damit das Holz beim Einschrauben nicht splittert.
560
595
540
22
376
380
560-580
20
50
10
50
550
mini
560-580
550 mini
400
310
390
99627823_ML_A.qxd 03/05/04 15:35 Page 52
A página está carregando...
A página está carregando...
A página está carregando...
A página está carregando...
A página está carregando...
A página está carregando...
A página está carregando...
A página está carregando...

61
Empfohlen für Speckkuchen, Pasteten
und Obstkuchen mit saftigen Früchten.
Empfohlen zum Grillen von auf den Rost
gelegten Koteletts, Würstchen, Brot in
Scheiben und Kaisergranaten.
Garfunktionen des Backofens
Empfohlen, damit weißes Fleisch, Fisch
und Gemüse saftig bleiben.
Für vielfältiges Garen in bis zu 3 Einschubebenen.
Empfohlen zum Anbraten und Braten von
rotem und weißem Fleisch.
Zum langsamen Braten von Geflügel bis 2 kg.
Empf. T°
mini
empf.
40°
180°
250°
mini
empf.
maxi
40°
200°
250°
1 - 4
Empfohlen, damit weißes Fleisch,
Fisch und Gemüse saftig bleiben.
Für vielfältiges Garen in bis zu 3
Einschubebenen.
Empfohlen zum Auftauen von Fleisch
und Geflügel. Den Rost mit der darun-
ter gestellten Fettpfanne oder dem
darunter eingeschobenen Backblech
benutzen. Das Auftauwasser nie zum
Kochen verwenden, es ist zum Verzehr
nicht geeignet.
mini
empf.
maxi
30°
40°
50°
mini
empf.
maxi
40°
195°
250°
mini
empf.
maxi
40°
220°
275°
maxi
bung
für die schriftliche Auszeichnung auf dem energetischen Etikett benutzte(n) Sequenz(en).
DE
99627823_ML_A.qxd 03/05/04 15:36 Page 61
A página está carregando...
A página está carregando...
A página está carregando...
A página está carregando...

66
Notieren Sie hier die auf dem Geräteschild Ihrer Abzugshaube stehenden Angaben:
Kontaktaufnahme
MADE IN FRANCE
220 - 240V ~ 50 Hz
BRANDT APPLIANCES SAS
7 rue Henri Becquerel
92500 RUEIL MALMAISON
De Dietrich
99627823_ML_A.qxd 03/05/04 15:36 Page 66
A página está carregando...
A página está carregando...
A página está carregando...
A página está carregando...
A página está carregando...
A página está carregando...
A página está carregando...
A página está carregando...
A página está carregando...
A página está carregando...
A página está carregando...
A página está carregando...
A página está carregando...
A página está carregando...
A página está carregando...
A página está carregando...
A página está carregando...
A página está carregando...
A página está carregando...
A página está carregando...
A página está carregando...
A página está carregando...
A página está carregando...
A página está carregando...
A página está carregando...
A página está carregando...
A página está carregando...
A página está carregando...
A página está carregando...
A página está carregando...
A página está carregando...
A página está carregando...
A página está carregando...
A página está carregando...
A página está carregando...
A página está carregando...
A página está carregando...
A página está carregando...
A página está carregando...
A página está carregando...
A página está carregando...
A página está carregando...
A página está carregando...
A página está carregando...
A página está carregando...
A página está carregando...
A página está carregando...
A página está carregando...
A página está carregando...
A página está carregando...
A página está carregando...
A página está carregando...
A página está carregando...
A página está carregando...
A página está carregando...
A página está carregando...
A página está carregando...
A página está carregando...
A página está carregando...
A página está carregando...
A página está carregando...
A página está carregando...
A página está carregando...
A página está carregando...
A página está carregando...
A página está carregando...
A página está carregando...
A página está carregando...
A página está carregando...
A página está carregando...
A página está carregando...
A página está carregando...
A página está carregando...
A página está carregando...
A página está carregando...
A página está carregando...
A página está carregando...
A página está carregando...
A página está carregando...
A página está carregando...
A página está carregando...
A página está carregando...
A página está carregando...
A página está carregando...
A página está carregando...
A página está carregando...
A página está carregando...
A página está carregando...
A página está carregando...
A página está carregando...
-
 1
1
-
 2
2
-
 3
3
-
 4
4
-
 5
5
-
 6
6
-
 7
7
-
 8
8
-
 9
9
-
 10
10
-
 11
11
-
 12
12
-
 13
13
-
 14
14
-
 15
15
-
 16
16
-
 17
17
-
 18
18
-
 19
19
-
 20
20
-
 21
21
-
 22
22
-
 23
23
-
 24
24
-
 25
25
-
 26
26
-
 27
27
-
 28
28
-
 29
29
-
 30
30
-
 31
31
-
 32
32
-
 33
33
-
 34
34
-
 35
35
-
 36
36
-
 37
37
-
 38
38
-
 39
39
-
 40
40
-
 41
41
-
 42
42
-
 43
43
-
 44
44
-
 45
45
-
 46
46
-
 47
47
-
 48
48
-
 49
49
-
 50
50
-
 51
51
-
 52
52
-
 53
53
-
 54
54
-
 55
55
-
 56
56
-
 57
57
-
 58
58
-
 59
59
-
 60
60
-
 61
61
-
 62
62
-
 63
63
-
 64
64
-
 65
65
-
 66
66
-
 67
67
-
 68
68
-
 69
69
-
 70
70
-
 71
71
-
 72
72
-
 73
73
-
 74
74
-
 75
75
-
 76
76
-
 77
77
-
 78
78
-
 79
79
-
 80
80
-
 81
81
-
 82
82
-
 83
83
-
 84
84
-
 85
85
-
 86
86
-
 87
87
-
 88
88
-
 89
89
-
 90
90
-
 91
91
-
 92
92
-
 93
93
-
 94
94
-
 95
95
-
 96
96
-
 97
97
-
 98
98
-
 99
99
-
 100
100
-
 101
101
-
 102
102
-
 103
103
-
 104
104
-
 105
105
-
 106
106
-
 107
107
-
 108
108
-
 109
109
-
 110
110
-
 111
111
-
 112
112
-
 113
113
-
 114
114
-
 115
115
-
 116
116
-
 117
117
-
 118
118
-
 119
119
-
 120
120
-
 121
121
-
 122
122
-
 123
123
-
 124
124
-
 125
125
-
 126
126
-
 127
127
-
 128
128
-
 129
129
-
 130
130
-
 131
131
-
 132
132
-
 133
133
-
 134
134
-
 135
135
-
 136
136
-
 137
137
-
 138
138
-
 139
139
-
 140
140
-
 141
141
-
 142
142
-
 143
143
-
 144
144
-
 145
145
-
 146
146
-
 147
147
-
 148
148
-
 149
149
-
 150
150
-
 151
151
-
 152
152
-
 153
153
-
 154
154
-
 155
155
-
 156
156


De Dietrich dop 499 xe1 Manual do proprietário
- Categoria
- Fornos
- Tipo
- Manual do proprietário
- Este manual também é adequado para
em outras línguas
- español: De Dietrich dop 499 xe1 El manual del propietario
- français: De Dietrich dop 499 xe1 Le manuel du propriétaire
- English: De Dietrich dop 499 xe1 Owner's manual
- Nederlands: De Dietrich dop 499 xe1 de handleiding
- Deutsch: De Dietrich dop 499 xe1 Bedienungsanleitung
- dansk: De Dietrich dop 499 xe1 Brugervejledning
