Yamaha NX-SW70 Manual do usuário
- Categoria
- Alto-falantes da barra de som
- Tipo
- Manual do usuário

86150
OWNER’S MANUAL
MODE D’EMPLOI
BEDIENUNGSANLEITUNG
BRUKSANVISNING
MANUALE DI ISTRUZIONI
MANUAL DE INSTRUCCIONES
GEBRUIKSAANWIJZING
NX-SW70
Subwoofer/Rear Speakers
Enceinte a caisson de grave/
Enceintes arrières
G B
3/29/0, 3:08 PM

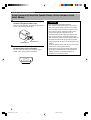
CAUTION
CAUTION: READ THIS BEFORE OPERATING YOUR UNIT.
1. To assure the finest performance, please read this
manual carefully. Keep it in a safe place for future
reference.
2. Install the speakers in a cool, dry, clean place — away
from windows, heat sources, sources of excessive
vibration, dust, moisture and cold. Avoid sources of
humming (transformers, motors). To prevent fire or
electrical shock, do not expose the speakers to rain or
water.
3. To prevent the enclosure from warping or discoloring,
do not place the speakers where they will be exposed
to direct sunlight or excessive humidity.
4. Do not place the speakers where they are liable to be
knocked over or struck by falling objects. Stable
placement will also ensure better sound performance.
5. Placing the speakers on the same shelf or rack as the
turntable can result in feedback.
6. As these speakers contain strong magnets (though all
of them are magnetically shielded types), avoid placing
watches, magnetic tapes, etc. near them. Also, placing
the speakers near a TV set may impair picture color. If
this happens, move the speakers away from the TV set.
7. Do not attempt to clean the speakers with chemical
solvents as this might damage the finish. Use a clean,
dry cloth.
8. Be sure to read the “TROUBLESHOOTING” section
regarding common operating errors before
concluding that the unit is faulty.
9. Secure placement or installation is the owner’s
responsibility. YAMAHA shall not be liable for any
accident caused by improper placement or
installation of speakers.
■ For U.K. customers
If the socket outlets in the home are not suitable for the plug
supplied with this appliance, it should be cut off and an
appropriate 3 pin plug fitted. For details, refer to the instructions
described below.
Note
• The plug severed from the mains lead must be destroyed, as a plug
with bared flexible cord is hazardous if engaged in a live socket outlet.
■ Special Instructions for U.K. Model
IMPORTANT
THE WIRES IN MAINS LEAD ARE COLOURED IN
ACCORDANCE WITH THE FOLLOWING CODE:
Blue: NEUTRAL
Brown: LIVE
As the colours of the wires in the mains lead of this
apparatus may not correspond with the coloured markings
identifying the terminals in your plug, proceed as follows:
The wire which is coloured BLUE must be connected to the
terminal which is marked with the letter N or coloured
BLACK. The wire which is coloured BROWN must be
connected to the terminal which is marked with the letter L
or coloured RED. Making sure that neither core is connected
to the earth terminal of the three pin plug.
■ For SW-AVS70
1. Never open the cabinet. If something drops into the
set, contact your dealer.
2. Do not use force on switches, controls or connection
cables. When moving the unit, first disconnect the
power cord and the cables connected to other
components. Never pull the cables themselves.
3. When not planning to use this unit for a long period
of time (e.g., vacation), disconnect the AC power
cord from the wall outlet.
4. To prevent lightning damage, disconnect the AC
power cord when there is an electric storm.
5. Since this unit has a built-in power amplifier, heat
will radiate from the rear panel. Place the unit apart
from the walls, allowing enough space above, behind
and on the both sides of the unit to prevent fire or
damage. Furthermore, do not position with the rear
panel facing down the floor or other surfaces.
6. Super-bass frequencies reproduced by this unit may
cause a turntable to generate a howling sound. In
such a case, move this unit away from the turntable.
7. If you hear distorted noise (i.e., unnatural,
intermittent “rapping” or “hammering” sounds)
coming from this unit, reduce the volume level.
Extremely loud playing of a movie soundtrack’s low
frequency, bass-heavy sounds or similarly loud
popular music passages can damage this speaker
system.
WARNING
TO REDUCE THE RISK OF FIRE OR ELECTRIC
SHOCK, DO NOT EXPOSE THIS UNIT TO RAIN OR
MOISTURE.
0101NX-SW70_caution_EN 3/29/0, 10:37 AM2

1
English
FEATURES
● Home Theater Sound
Connecting this system to the AV-S70 (sold
separately) allows you to enjoy the power of low bass
sounds plus surround effects.
● Centralized Control with the AV-S70
(sold separately)
The AV-S70 is used to do things such as adjust the
subwoofer level and adjust the speaker level using test
tones. Refer to the AV-S70 (sold separately) owner’s
manual.
● Advanced YST v
This subwoofer incorporates advanced YAMAHA
Active Servo Technology to achieve superior bass
reproduction.
y indicates a tip for your operation.
CONTENTS
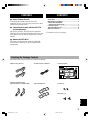
Checking the Package Contents
Check that the following accessories are included in the package.
Speaker cords (15 m x 2) System connector cable (3 m) Connection guide
Speaker mounting brackets
Type A brackets (x 2) (wall brackets) Type B brackets (x 2) Screws (x 2)
Wing nuts (x 2)
FEATURES .................................................................. 1
SPEAKER PLACEMENT .......................................... 2
USING THE SPEAKER
MOUNTING BRACKETS ...................................... 3
CONNECTIONS.......................................................... 5
TROUBLESHOOTING .............................................. 8
SPECIFICATIONS...................................................... 9
0102NX-SW70_01_EN 3/29/0, 10:21 AM1

2
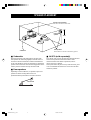
SPEAKER PLACEMENT
AV-S70 (sold separately)
Place above the monitor in the center.
Subwoofer
Left rear
speaker
Rear speakers
Place behind or to the sides of the listening position.
Right rear
speaker
1.8 m
■ Subwoofer
Place the subwoofer at the either right or left side of the
front speaker unit and facing slightly toward the center of
the room so that the sound from it and the sound reflected
by the wall should not cancel out each other. Try altering the
position of the subwoofer versus the listening position as the
relative position will affect the way the bass sounds.
■ Rear speakers
Depending on room conditions, it is possible to place rear
speakers on shelves or hang them on the wall.
Speakers should be placed about 1.8 m above the floor.
About 1.8 m
■ AV-S70 (sold separately)
Place the AV-S70 on top of the television and align the front
surface of the speakers with the front surface of the
television monitor. For details on placement, refer to
the AV-S70 owner’s manual.
If the system cannot be placed on top of the television, place
it on a rack beneath the television as close to the television
monitor as possible.
0102NX-SW70_01_EN 3/29/0, 10:21 AM2

3
English
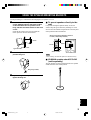
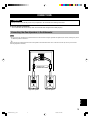
USING THE SPEAKER MOUNTING BRACKETS
Use the provided type A wall brackets when hanging the rear speakers on a wall.
1 Attach two commercially available wood
screws (diameter about 4 mm) in the location
on the wall where the rear speaker is to be
hung, and then mount the bracket on the wood
screws.
Check that the wood screws are secure inside the
narrow portion of the holes in the bracket.
65 mm
20 mm or more
Type A bracket
2 Attach the speaker to the bracket using the
provided wing nut.
Wing nut (provided)
3 Adjust the angle of the speaker and then
tighten the wing nut.
■ To mount speakers directly to the
wall
It is possible to hang the speakers directly on the wall
without using the type A brackets by attaching two wood
screws to the wall and then using the holes on the rear panel
of the speakers for direct attachment.
Wood screws having a diameter of about 4
to 5 mm (commercially available)
65 mm
65 mm
5 mm
20 mm or more
Note
• After mounting, check that the speakers are attached securely.
■ YAMAHA speaker stand SPS-AV1
(sold separately)
The rear speakers can also be attached to SPS-AV1 speaker
stands and used as floor stand speakers.
0102NX-SW70_01_EN 3/29/0, 10:21 AM3

4
USING THE SPEAKER MOUNTING BRACKETS
Using Commercially Available Speaker Stands (distance between screw
holes: 60 mm)
1 Attach the type B brackets to the bottom of the
speakers using the provided screws.
Align so that the protrusion on the bracket goes into the
groove on the bottom of the speaker.
2 Mount the speaker on the speaker stand using
the bracket holes (spaced at 60 mm).
Be sure to ready the small screws (diameter: 4 mm,
length: 8 mm), spring washers and washers.
CAUTION
Be sure to read these important precautions.
• Each speaker weighs approximately 0.7 kg. Select a
firm wall or pillar to attach screws to. Do not attach
screws to material such as mortar or veneer as screws
may come loose easily, causing the speaker to fall.
• Do not mount speakers using nails or tape as
vibrations during operation may cause nails to come
loose or tape to peel off, causing the speaker to fall.
• Take care that the speaker cord is not pinched between
the speaker and the bracket. Be sure that the speaker
cord passes through the groove on the rear panel of the
speaker.
• Secure the speaker cords so that they will not catch on
hands or feet, causing speakers to drop.
• Be absolutely sure to check for safety after speakers
are mounted. YAMAHA bears no responsibility for
damage caused due to improper installation or
installation in an improper location.
60 mm
Provided screw
Type B bracket
0102NX-SW70_01_EN 3/29/0, 10:21 AM4

5
English
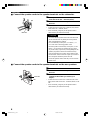
CONNECTIONS
CAUTION
Always be sure to turn off the power of any component to be connected when making connections.
To ensure proper connections
• After connections have been made, check one more time that wiring has been made properly.
Connecting the Rear Speakers to the Subwoofer
Note
• Do not connect any speakers to the speaker terminals on the subwoofer except for provided rear speakers (NX-AVS70). Damage may result
if a different speaker is connected.
y
Remove the plastic insulation from the ends of the speaker cords and twist the bare wires. (The bare wire will stay neat if you twist while
removing the plastic insulation.)
R L
REAR SPEAKERS
SYSTEM
CONNECTOR
MARK
DO NOT CONNECT THIS UNIT TO
SPEAKERS OTHER THAN NX-AVS70
+
–
+
–
REAR R
REAR L
Speaker cord
identification labels
Right rear speaker Left rear speaker
0102NX-SW70_01_EN 3/29/0, 10:21 AM5

6
CONNECTIONS
■ Connect the speaker cords to the speaker terminals on the subwoofer.
Tab
Bare wire
1 Hold up the tab for the + terminal (red), or hold
down the tab for the – terminal (black).
2 Insert the bare wire of the speaker cord into
the hole.
3 Release the tab.
• Connect the line-in cord to the + terminal (red), and the
other cord to the – terminal (black).
• Once connected, pull gently on the speaker cords to
check that they are connected securely.
CAUTION
• Do not let the bare speaker wire touch each other and
do not let them touch any metal part of the speakers.
This could damage the speakers.
• Do not mistakenly connect plus (+) to minus (–) or
vice versa when connecting speaker cords.
• Insert the speaker cords securely so that plus (+) and
minus (–) do not short. The speaker may not output
any sound or may output noise, causing damage to the
speakers, if speaker cords are not inserted securely.
• Only insert the bare wire portion of the speaker cords
into the holes. Sound will not be output if you insert as
far as the plastic insulation part of the cord.
• Secure the speaker cords so that they will not catch on
hands or feet.
■ Connect the speaker cords to the speaker terminals on the rear speakers.
Tab
Bare wire
1 Hold down the tab.
2 Insert the bare wire of the speaker cord into
the hole.
3 Release the tab. (The tab will return to its
original position when you release your
finger.)
• Connect the line-in cord to the + terminals (red) on the
right, and the other cord to the – terminals (black) on the
left.
• Once connected, pull gently on the speaker cords to
check that they are connected securely.
1
2
3
1
2
3
0102NX-SW70_01_EN 3/29/0, 10:21 AM6

7
English
CONNECTIONS
R L
++
––
REAR SPEAKERS
SYSTEM
CONNECTOR
MARK
DO NOT CONNECT THIS UNIT TO
SPEAKERS OTHER THAN NX-AVS70
INPUT
L
AUX TV VIDEO
MARK
SUBWOOFER
SYSTEM
CONNECTOR
THROUGH
OUT
R
DIGITAL 2
( /PCM)
DIGITAL 1
( /PCM)
Connecting the Subwoofer to the AV-S70
Connect the SYSTEM CONNECTOR terminal on the AV-S70 (sold separately) to the SYSTEM CONNECTOR terminal on
the subwoofer using the system connector cable.
Match the b mark on the plugs with those on the terminals and insert the plugs.
AV-S70 (sold separately)
Provided
system
connector
cable
To SYSTEM
CONNECTOR terminal
Match the b mark on the plug
with the a mark on the terminal
and insert.
Note
• Do not scratch, forcibly bend, or pull the system connector cable as this may damage the cable, causing loss of audio output, and possibly
result in fire or electric shock. Take particular care that the cable is not squashed by a rack or caster.
y
Turning off the power of the AV-S70 will also turn off the power on the subwoofer.
Connecting the AC Power Supply Cord
Once all connections have been made, check them one more
time. Finally, insert the plug of the AC power supply cord of
the subwoofer into an AC outlet.
AC outlet
R L
++
––
REAR SPEAKERS
SYSTEM
CONNECTOR
MARK
DO NOT CONNECT THIS UNIT TO
SPEAKERS OTHER THAN NX-AVS70
MAINS
To SYSTEM
CONNECTOR
terminal
0102NX-SW70_01_EN 3/29/0, 10:21 AM7

8
TROUBLESHOOTING
Be sure to investigate thoroughly before requesting repairs or after service. If it cannot be corrected, or if the problem is not
listed in the SYMPTOM column, disconnect the power cord and connect your authorized YAMAHA dealer or service center.
Notes
• Sometimes the system may cease to recognize operations due to a mistaken operation or as a result of strong external noise (such as
irregular voltage due to shock of impact, excessive static electricity, or lightning strike). If this happens, first disconnect the power cord,
wait about 30 seconds, re-connect the power cord, and try the desired operation again.
• When requesting repairs or after service, be sure to bring along with the AV-S70 (sold separately).
SYMPTOM CHECK Refer to page
No sound output at all. • Is the AC power supply cord connected?
• Has the AV-S70’s audio temporarily been lowered? Refer to the owner‘s
manual for the AV-S70 (sold separately).
• Is the input source to the AV-S70 correctly? Refer to the owner‘s manual
for the AV-S70 (sold separately).
No sound output from
subwoofer.
• Is the system connector cable connected correctly?
• Is the subwoofer level of the AV-S70 set too low? Refer to the owner’s
manual for the AV-S70 (sold separately).
No sound output from rear
speakers.
• Are the speaker cords connected correctly?
• Is the rear speaker level of the AV-S70 set too low for the test tone? Refer
to the owner’s manual for the AV-S70 (sold separately).
• Has VIRTUAL SURROUND been selected as the DSP program on the
AV-S70? Refer to the owner’s manual for the AV-S70 (sold separately).
• Is DOLBY PRO LOGIC or DOLBY PRO LOGIC ENHANCED being
used as the DSP program with a monaural source? Refer to the owner’s
manual for the AV-S70 (sold separately).
A “humming” noise is present. • Hum caused by external electromagnetic waves may be generated.
Try inverting the right-left polarity of the power cord and re-insert into
the AC outlet.
7
—
—
7
—
5, 6
—
—
—
7
0102NX-SW70_01_EN 3/29/0, 10:21 AM8

9
English
SPECIFICATIONS
Amplifier Section
Rated Output
Subwoofer ............................ 50 W (100 Hz, 10% THD, 4 ohms)
Rear speakers ................... 30 W x 2 (1 kHz, 10% THD, 6 ohms)
Subwoofer (SW-AVS70)
Type .......... Advanced YAMAHA Active Servo Technology System
Speaker ...................................... 16-cm cone, magnetically shielded
Maximum Input Power............................................................. 50 W
Impedance ............................................................................. 4 ohms
Dimensions (W x H x D) .................................. 200 x 395 x 399 mm
Weight...................................................................................... 9.7 kg
Rear Speakers (NX-AVS70)
Type .......................................................... Acoustic suspension type
Speakers....................................... 8-cm cone, magnetically shielded
Maximum Input Power............................................................. 30 W
Impedance ............................................................................. 6 ohms
Dimensions (W x H x D) .................................. 100 x 140 x 113 mm
Weight...................................................................................... 0.7 kg
General
Power Supply .........................................................AC 230 V, 50 Hz
Power Consumption ................................................................. 80 W
Accessories ................................................Speaker cords (15 m x 2)
.................................................. System connector cable (3 m)
...................................................................... Connection guide
Parts for speaker installation...................... Type A brackets (x 2)
................................................................Type B brackets (x 2)
.............................................................................. Screws (x 2)
......................................................................... Wing nuts (x 2)
Specifications are subject to change without notice.
0102NX-SW70_01_EN 3/29/0, 10:21 AM9

YAMAHA ELECTRONICS CORPORATION, USA 6660 ORANGETHORPE AVE., BUENA PARK, CALIF. 90620, U.S.A.
YAMAHA CANADA MUSIC LTD. 135 MILNER AVE., SCARBOROUGH, ONTARIO M1S 3R1, CANADA
YAMAHA ELECTRONIK EUROPA G.m.b.H. SIEMENSSTR. 22-34, 25462 RELLINGEN BEI HAMBURG, F.R. OF GERMANY
YAMAHA ELECTRONIQUE FRANCE S.A. RUE AMBROISE CROIZAT BP70 CROISSY-BEAUBOURG 77312 MARNE-LA-VALLEE CEDEX02, FRANCE
YAMAHA ELECTRONICS (UK) LTD. YAMAHA HOUSE, 200 RICKMANSWORTH ROAD WATFORD, HERTS WD1 7JS, ENGLAND
YAMAHA SCANDINAVIA A.B. J A WETTERGRENS GATA 1, BOX 30053, 400 43 VÄSTRA FRÖLUNDA, SWEDEN
YAMAHA MUSIC AUSTRALIA PTY, LTD. 17-33 MARKET ST., SOUTH MELBOURNE, 3205 VIC., AUSTRALIA
Printed in China ID V586150
00NX-SW70-cv 1

connection guide 3/29/0, 3:14 PM1

connection guide 3/29/0, 3:14 PM2
-
 1
1
-
 2
2
-
 3
3
-
 4
4
-
 5
5
-
 6
6
-
 7
7
-
 8
8
-
 9
9
-
 10
10
-
 11
11
-
 12
12
-
 13
13
-
 14
14


Yamaha NX-SW70 Manual do usuário
- Categoria
- Alto-falantes da barra de som
- Tipo
- Manual do usuário
em outros idiomas
- español: Yamaha NX-SW70 Manual de usuario
- français: Yamaha NX-SW70 Manuel utilisateur
- italiano: Yamaha NX-SW70 Manuale utente
- English: Yamaha NX-SW70 User manual
- русский: Yamaha NX-SW70 Руководство пользователя
- Nederlands: Yamaha NX-SW70 Handleiding
- Deutsch: Yamaha NX-SW70 Benutzerhandbuch
- dansk: Yamaha NX-SW70 Brugermanual
- čeština: Yamaha NX-SW70 Uživatelský manuál
- svenska: Yamaha NX-SW70 Användarmanual
- polski: Yamaha NX-SW70 Instrukcja obsługi
- Türkçe: Yamaha NX-SW70 Kullanım kılavuzu
- suomi: Yamaha NX-SW70 Ohjekirja
- română: Yamaha NX-SW70 Manual de utilizare
Artigos relacionados
-
Yamaha AVS70 Manual do usuário
-
-
-
Yamaha S90 Manual do proprietário
-
-
-
-
-
Yamaha NS-P210 Manual do proprietário
-
Yamaha NX-C430 Manual do proprietário