Elta EK111 Manual do usuário
- Categoria
- Panelas de ovo
- Tipo
- Manual do usuário

BEDIENUNGSANLEITUNG
INSTRUCTION MANUAL
MODE D'EMPLOI
HASZNÁLATI UTASÍTÁS
LIBRETTO ISTRUZIONI
MANUAL DE INSTRUCCIONES
MANUAL DE INSTRUÇÕES
INSTRUKCJA OBSŁUGI
GEBRUIKSAANWIJZING
NÁVOD K POUŽITÍ
KULLANIM KLAVUZU
EIERKOCHER IM EDELSTAHL DESIGN
EGG BOILER IN STAINLESS STEEL
CUIT OEUFS EN INOX
TOJÁSFÃZÃ ROZSDAMENTES ACÉLBÓL
CUOCIUOVA IN ACCIAIO INOSSIDABILE
COCEDOR DE HUEVOS DISEÑADO EN ACERO
COZEDOR DE OVOS EM AÇO INOXIDÁVEL
MASZYNKA ZE STALI SZLACHETNEJ DO GOTOWANIA JAJ
EIERKOKER MET EDELSTAAL DESIGN
VA¤Iâ NA VAJÍâKA V NEREZOVÉM DESIGNU
PPAASSLLAANNMMAAZZ ÇÇEELLIIKK YYUUMMUURRTTAA PPIIŞŞIIRRIICCII
R

BEDIENUNGSANLEITUNG EK111 EIERKOCHER IM EDELSTAHL DESIGN
Liebe Kundin, lieber Kunde,
bitte lesen Sie die Bedienungsanleitung aufmerksam durch, bevor Sie Ihr Gerät ans Netz
anschließen, um Schäden durch nicht sachgemäßen Gebrauch zu vermeiden. Beachten Sie
besonders die Sicherheitshinweise. Sollten Sie dieses Gerät an Dritte weitergeben, muss diese
Bedienungsanleitung mit ausgehändigt werden.
AUFBAU
1. Motoreinheit
2. Eiablage
3. Eipicker
4. Eieinsatz
5. Abdeckhaube
6. Dampföffnung
7. Netzkabel mit Netzstecker
8. Handgriff (Haube)
9. Handgriff (Eiablage)
10. Schalter O/I
11. Wasserbecken
12. Messskala
13. Messbecher
SICHERHEITSHINWEISE
• Falsche Bedienung und unsachgemäße Behandlung können zu Störungen am Gerät und zu
Verletzungen des Benutzers führen.
• Das Gerät darf nur für den vorgesehenen Zweck benutzt werden. Bei nicht bestimmungsgemäßem
Gebrauch oder falscher Handhabung kann keine Haftung für evtl. auftretende Schäden
übernommen werden.
• Vor Anschluss ans Netz prüfen, ob Stromart und Netzspannung mit den Angaben auf dem
Typenschild am Gerät übereinstimmen.
• Gerät und Netzstecker nicht in Wasser oder andere Flüssigkeiten tauchen. Sollte das Gerät
dennoch einmal ins Wasser gefallen sein, sofort den Netzstecker ziehen und das Gerät vor
erneutem Gebrauch von einem Fachmann überprüfen lassen. Es besteht Lebensgefahr durch
Stromschlag!
• Niemals selbst versuchen, das Gehäuse zu öffnen!
• Keinerlei Gegenstände in das Innere des Gehäuses führen.
• Das Gerät nicht mit nassen Händen, auf feuchtem Boden oder wenn es nass ist benutzen.
• Den Netzstecker nie mit nassen oder feuchten Händen anfassen.
• Netzkabel und Netzstecker regelmäßig auf evtl. Beschädigungen überprüfen. Im Falle von
Beschädigungen müssen Netzkabel und Netzstecker vom Hersteller bzw. einem qualifizierten
Fachmann ersetzt werden, um Gefährdungen zu vermeiden.
• Das Gerät nicht in Betrieb nehmen, wenn Netzkabel oder Netzstecker Schäden aufweisen oder
falls das Gerät auf den Boden gefallen sein sollte oder anderweitig beschädigt wurde. In solchen
Fällen das Gerät zur Überprüfung und evtl. Reparatur in die Fachwerkstatt bringen.
• Nie versuchen, das Gerät selbst zu reparieren. Es besteht Gefahr durch Stromschlag!
• Das Netzkabel nicht über scharfe Kanten hängen lassen und von heißen Gegenständen und
offenen Flammen fernhalten. Nur am Stecker aus der Steckdose ziehen.
• Einen zusätzlichen Schutz bietet der Einbau einer Fehlerstrom-Schutzeinrichtung mit einem
Nennauslösestrom von nicht mehr als 30 mA in der Hausinstallation. Lassen Sie sich von Ihrem
Elektroinstallateur beraten.
• Das Kabel sowie ein evtl. benötigtes Verlängerungskabel so verlegen, dass ein unbeabsichtigtes
Ziehen daran bzw. ein Darüberstolpern nicht möglich ist.
1 2
D
D
D
D
• Wird ein Verlängerungskabel benutzt, muss dieses für die entsprechende Leistung geeignet sein,
ansonsten kann es zu Überhitzung von Kabel und/oder Stecker kommen.
• Dieses Gerät ist weder für den gewerblichen Gebrauch noch für den Gebrauch im Freien geeignet.
• Während des Gebrauchs das Gerät nie unbeaufsichtigt lassen.
• Kinder können die Gefahren, die im unsachgemäßen Umgang mit Elektrogeräten liegen, nicht
erkennen. Deshalb elektrische Haushaltsgeräte nie von Kindern ohne Aufsicht benutzen lassen.
• Vor Ziehen des Netzsteckers das Gerät ausschalten.
• Vorsicht! Das Gerät steht unter Strom solange es ans Stromnetz angeschlossen ist.
• Das Gerät nie an dessen Netzkabel tragen.
BESONDERE SICHERHEITSHINWEISE
• Das Gerät heizt sich schnell auf und kühlt nur langsam wieder ab. Daher während und nach
der Benutzung stets auf heisses Wasser und aufsteigende Wasserdämpfe achten! Nur die
Handgriffe berühren.
• Kein Zubehör benutzen, welches nicht mit diesem Gerät mitgeliefert wurde!
• Das Gerät darf nicht neben heißen Geräten platziert werden (z.B. neben einem Herd oder Ofen).
• Achtung: Das Netzkabel darf während des Betriebes nicht die heißen Teile des Gerätes
berühren!
• Dieses Gerät ist nur zum Kochen von Eiern geeignet. Bitte nicht versuchen, andere Nahrungs-
mittel aufzuwärmen.
• Das Gerät darf nicht ohne die Abdeckhaube (6) und nicht ohne die Eiablage (2) betrieben werden.
VOR ERSTER INBETRIEBNAHME
• Alle Verpackungsmaterialien entfernen.
• Das Gerät vor der ersten Benutzung reinigen (s. REINIGUNG UND PFLEGE).
• Bei der ersten Benutzung kann es zu leichter Rauchs- und Geruchsentwicklung kommen. Dabei
handelt es sich um fabrikationsbedingte Rückstände, die auf der Geräteoberfläche verbrannt werden.
BEDIENUNG
• Mit dem Gerät können bis zu 7 Hühnereier pro Kochvorgang zubereitet werden. Bitte nur frische
Eier verwenden.
• Eiablage (2) auf der Motoreinheit (1) positionieren.
• Bitte mit dem Eipicker (3) ein kleines Loch in das stumpfe Ende der Eier
stechen. Dabei keine Gewalt ausüben, um die Eierschale nicht zu zerbrechen.
Achtung, Verletzungsgefahr: Die Nadel des Eipickers (3) ist sehr spitz!
• In jeden der sieben Eieinsätze (4) kann nun ein Ei eingesetzt werden. Bitte
jeweils die stumpfe Seite des Eies in den jeweiligen Eieinsatz (4) einlegen
(siehe Abbildung).
• Nun die benötigte Menge an kaltem, klaren Wasser in den Messbecher (13)
einfüllen. Die Wassermenge ist von der Anzahl der zu kochenden Eier und
vom gewünschten Härtegrad (weich, mittel oder hart gekocht) abhängig. Am
Messbecher (13) befinden sich drei Messskalen (12), die anzeigen, wieviel Wasser benutzt
werden sollte (Angaben in Englisch, Deutsch und Französisch):
Skala 1 – soft, weich, mollet Kochzeit: ca. 12 Minuten
Skala 2 – medium, mittel, medium Kochzeit: ca. 15 Minuten
Skala 3 – hard, hart, dur Kochzeit: ca. 17 Minuten
• Beispiel: Wenn vier weich gekochte Eier zubereitet werden sollen, bei Messskala 1 (12) Wasser
bis zur Markierung 4 einfüllen.
• Falls Ihr Wasser sehr hart sein sollte, kann dem Wasser ein halber Teelöffel Essig zugegeben
werden. Ansonsten bitte keine anderen Flüssigkeiten als Wasser benutzen. Es dürfen auch keine
Zusätze (wie etwa Salz) in das Wasser eingegeben werden.
• Das Wasser nun aus dem Messbecher (13) in das Wasserbecken (11) giessen. Dabei bitte kein
Wasser auf das Gehäuse der Motoreinheit (1) schütten!
2
1
4
9
5
8
2
7
6
1
3
12
10
13
11

3 4
D
D
• Eieinsatz (4) mit der Abdeckhaube (5) bedecken. Bitte sicherstellen, dass Eieinsatz (4) und
Abdeckhaube (5) sicher auf der Motoreinheit (1) aufsitzen.
• Schalter O/I (10) auf Position O stellen (= Gerät aus).
• Netzstecker (7) mit einer geeigneten Steckdose verbinden und Schalter O/I (10) auf Position I
stellen. Die Kontrollleuchte im Schalter O/I (10) leuchtet auf.
• Die Kochplatte der Motoreinheit (1) beginnt, das Wasser im Wasserbecken (11) aufzuheizen.
• Achtung: Teile des Gerätes sind während und nach der Benutzung sehr heiss!! Während und
nach der Benutzung nur die Handgriffe (8, 9) berühren. Bitte besonders auf Heisswasser und
aufsteigende Wasserdämpfe achten!
• Verbrennungsgefahr: Das Gerät darf während der Benutzung nicht verschoben werden.
• Das Wasser kocht und heisser Wasserdampf entweicht durch die Dampföffnung (6).
• Die Abdeckhaube (5) darf während des Eierkochens nicht abgenommen werden. Der
Wasserdampf würde ansonsten sofort entweichen.
• Sobald das Wasser im Wasserbecken verdampft ist, sind die Eier fertig gekocht. Ein Signalton
ertönt. Die Kontrollleuchte im Schalter O/I (10) erlischt. Die Kochplatte der Motoreinheit (1) kühlt
nun ab.
• Schalter O/I (10) auf Position O stellen. Der Signalton endet. Netzstecker (7) ziehen.
• Verbrennungsgefahr: Bitte Abdeckhaube (5) vorsichtig vom Gerät abheben. Dabei Handgriff (8)
anfassen!
• Die Eiablage (2) am Handgriff (9) vom Gerät abnehmen. Eier kurz unter kaltem, fliessenden
Wasser abschrecken. Die Eier sind jetzt servierbereit. Bitte mit einem Tuch von den Eieinsätzen
(4) in Eierbecher einlegen.
REINIGUNG UND PFLEGE
• Dazu auch unbedingt die Sicherheitshinweise beachten.
• Das Gerät vollständig abkühlen lassen, bevor mit der Reinigung begonnen wird.
• Abdeckhaube (6) und Eiablage (2) können mit Wasser und Geschirrspülmittel gereinigt werden.
• Zur Reinigung von Gehäuse und Wasserbecken (11) ein mit Wasser und Reinigungsmittel
angefeuchtetes Tuch verwenden. Nach der Reinigung sorgfältig abtrocknen.
• Vorsicht! Die elektrischen Elemente des Gerätes dürfen nicht mit Wasser in Berührung kommen!
• Entkalken des Wasserbeckens (11): Eierschalen sind stark kalkhaltig. Dieser Kalk kann sich im
Wasserbecken (11) ansetzen, wenn es nicht regelmässig entkalkt wird. Dazu ein wenig
Haushaltsessig in den Messbecher (13) giessen. Messbecher (13) mit Wasser auffüllen. Diese
Mischung nun bitte in das Wasserbecken (11) eingeben. Nach 30 Minuten Einwirken kann die
Mischung ausgegossen werden. Wasserbecken (11) mit einem Tuch trocken wischen.
Diese Mischung bitte NICHT im Gerät aufkochen!
• Wir empfehlen, das Gerät nach der Reinigung im Verkaufskarton aufzubewahren.
TECHNISCHE DATEN
Betriebsspannung : 230V~ 60Hz
Leistungsaufnahme : 350 Watt
HINWEISE ZUM UMWELTSCHUTZ
Dieses Produkt darf am Ende seiner Lebensdauer nicht über den normalen
Haushaltsabfall entsorgt werden, sondern muss an einem Sammelpunkt für das
Recycling von elektrischen und elektronischen Geräten abgegeben werden. Das
Symbol auf dem Produkt, der Gebrauchsanleitung oder der Verpackung weist darauf
hin.
Die Werkstoffe sind gemäß ihrer Kennzeichnung wiederverwertbar. Mit der Wiederverwendung, der
stofflichen Verwertung oder anderen Formen der Verwertung von Altgeräten leisten Sie einen
wichtigen Beitrag zum Schutze unserer Umwelt.
Bitte erfragen Sie bei der Gemeindeverwaltung die zuständige Entsorgungsstelle.
D
D
GARANTIE UND KUNDENDIENST
Vor Auslieferung werden unsere Geräte einer strengen Qualitätskontrolle unterworfen. Sollte trotz
aller Sorgfalt bei der Produktion oder beim Transport ein Schaden entstanden sein, bitten wir Sie,
das Gerät zu Ihrem Händler zurück zu bringen. Neben den gesetzlichen Gewährleistungs-
ansprüchen hat der Käufer nach seiner Wahl folgenden Garantieanspruch: Für das gekaufte Gerät
leisten wir 2 Jahre Garantie, beginnend mit dem Verkaufstag. In diesem Zeitraum beseitigen wir
kostenlos alle Mängel, die nachweislich auf Material- oder Fabrikationsfehler zurückzuführen sind,
durch Instandsetzung oder Umtausch. Mängel, die infolge unsachgemäßer Behandlung des Gerätes
und Fehler, die durch Eingriffe und Reparaturen Dritter oder den Einbau fremder Teile entstehen,
fallen nicht unter diese Garantie.
EK111
08/05
Das Gerät ist mit dem CE-Zeichen
gekennzeichnet und entspricht damit
den einschlägigen europäischen Richtlinien.
elta GmbH
Carl-Zeiss-Str. 8
63322 Rödermark

5 6
INSTRUCTION MANUAL EK111 EGG BOILER IN STAINLESS STEEL
Dear customer,
Please read these Operating Instructions through carefully before connecting your device to the
mains, in order to avoid damage due to incorrect use. Please pay particular attention to the safety
information. If you pass the device on to a third party, these Operating Instructions must also be
handed over.
DESIGN
1. Motor unit
2. Egg tray
3. Egg pecker
4. Egg insert
5. Cover hood
6. Steam opening
7. Power cord with power plug
8. Handle (hood)
9. Handle (egg tray)
10. Switch I O
11. Water tray
12. Scale
13. Measuring beaker
SAFETY INFORMATION
• Incorrect operation and improper use can damage the appliance and cause injury to the user.
• The appliance may be used only for it’s intended purpose. No responsibility can be taken for any
possible damage caused through incorrect use or improper handling.
• Before connecting the appliance to the power source, check that the current and power match
those given on the rating plate.
• Do not put the appliance or the plug in water or any other liquid. However should the appliance
accidentally fall into water, unplug the appliance immediately and have it checked by a qualified
person before using it again. Non-observance could cause a fatal electric shock!
• Never attempt to open the housing yourself.
• Do not place any kind of object into the inside of the housing.
• Do not use the appliance with wet hands, on a damp floor or when the appliance itself is wet.
• Do not touch the plug with wet or damp hands.
• Check the cord and the plug regularly for any possible damage. If the cord or plug is damaged, it
must be replaced by the manufacturer or a qualified person in order to avoid a hazard.
• Do not use the appliance if it is dropped or otherwise damaged or if the cord or plug are damaged.
In the case of damage, take the appliance to an electrical repair shop for examination and repair if
necessary.
• Never attempt to repair the appliance yourself. This could cause an electric shock.
• Do not allow the cord to hang over sharp edges and keep it well away from hot objects and naked
flames. Remove the plug from the socket only by holding the plug.
• For extra protection it is possible to fit the electric household installation with a fault current
breaker with a rated breaking current of not more than 30mA. Ask your electrician for advice.
• Make sure that there is no danger that the cord or extension cord may inadvertently be pulled or
cause anyone to trip when in use.
• If an extension cord is used it must be suited to the power consumption of the appliance,
otherwise overheating of the extension cord and/or plug may occur.
• This appliance is not suitable for commercial use nor for use in the open air.
• Never leave the appliance unattended while it is in use.
• Children cannot recognise the dangers involved in the incorrect use of electrical appliances.
Therefore never allow children to use household appliances without supervision.
2
1
4
9
5
8
2
7
6
1
3
12
10
13
11
GB
GB
GB
GB
• Always remove the plug from the socket when the appliance is not in use and each time before it
is cleaned.
• Danger! Nominal voltage is still present in the appliance as long as the appliance is connected to
the mains socket.
• Switch the appliance off before disconnecting from the mains.
• Never use the cord to carry the appliance.
SPECIAL SAFETY INSTRUCTIONS
• The unit heats up very quickly and cools down only very slowly. Watch out therefore
constantly for hot water and steam emitted during use. Touch it only on the handles.
• Do not use any accessories not supplied with this unit!
• Do not place this unit next to hot devices (e.g. next to a cooker or oven).
• Caution: The power cord must not touch the hot parts of the unit during operation!
• This unit is suitable only for boiling eggs. Please do not try to heat up other foodstuff with this unit.
• Do not operate this unit without the cover (6) and without the egg tray (2).
BEFORE STARTING FOR THE FIRST TIME
• Remove all packing material.
• Clean the unit before using it for the first time (see CLEANING AND CARE).
• There can be some smoke and smell when using it for the first time. Residues left over from the
manufacturing process are being burned on the surface of the unit.
OPERATION
• You can boil up to 7 hen’s eggs per cooking session. Please always use only
fresh eggs.
• Place the egg tray (2) on the motor unit (1).
• Please use the egg-pick (3) to pierce a hole in the egg's blunt end. Please
do not use force, otherwise the egg might break.
Caution, Danger of injury: The needle of the egg pecker (3) is very sharp!
You can place only one egg in each of the seven egg inserts (4). Please put
in the bigger end of the egg into the egg insert (4) (see the figure).
• Now fill in the required quantity of cold, clear water into the measuring
beaker (13). The quantity of water depends upon the number of eggs to be
boiled and the hardness desired (soft, medium or hard boiled). There are three scales (12) on the
measuring beaker (13) showing how much water to use (indications are in English, German and
French).
Scale 1 – soft, weich, mollet Cooking time approx. 12 min.
Scale 2 – medium, mittel, medium Cooking time approx. 15 min.
Scale 3 – hard, hart, dur Cooking time approx. 17 min.
• Example: If you want to make four soft-boiled eggs, fill water up to the marking 4 on scale 1 (12).
• If the water is very hard, you can add half a teaspoon of vinegar. Please do not otherwise use any
fluids other than water. Also, do not add any additives (such as salt) into the water.
• Now pour the water from the measuring beaker (13) into the water tray (11). Take care not to spill
any water on the housing of the motor unit (1)!
• Cover the egg insert (4) with the cover (5). Please ensure that egg insert (4) and cover (5) fit
properly on the motor unit (1).
• Put the switch I O (10) in position O (= Unit off).
• Connect the mains plug (7) through a suitable plug socket and put the switch O/I (10) in position I.
The indicator lamp in the switch O/I (10) lights up.
• The hot plate on the motor unit (1) begins to heat up the water in the water tray (11).
• Caution: Parts of the unit become very hot during and after use! While the unit is in use, touch it
only at the handles (8, 9). Please watch out particularly for hot water and emitted steam!
• Burning hazard: Do not shift the unit while it is in use.

• The water is boiling and hot steam escapes through the steam opening (6).
• The cover (5) must not be taken off while eggs are being boiled. Or the steam would all escape
immediately.
• When the water in the water tray has all evaporated, the eggs are done. An audible signal is
emitted. The indicator lamp in the switch O/I (10) goes off. The hot plate on the motor unit (1) now
starts cooling off.
• Put the switch O/I (10) in position O. The audible signal discontinues. Pull out the mains plug (7).
• Burning hazard: Please lift up cover (5) from the unit carefully. Hold it by the handle (8)!
• Remove the egg tray (2) from the unit by the handle (9). Help the eggs shrink by holding them
under cold, flowing water. The eggs are now ready to serve. Please put back the egg inserts (4) in
the eggs tray using a piece of cloth.
CLEANING AND MAINTENANCE
• In addition to this, you must observe the safety instructions.
• Let the unit cool down completely before starting to clean it.
• You can clean the cover (6) and egg tray (2) with water and dish washing medium.
• Use a piece of cloth moistened with water and cleaning medium for cleaning the housing and
water tray (11). Dry them carefully after cleaning.
• Caution! Do not let the electrical elements in the unit come in contact with water!
• Decalcification of the water tray (11): Egg shells contain a lot of calcium salts. This salt can
deposit in the water tray (11), unless it is decalcified regularly. To do this, pour a little household
vinegar into the measuring beaker (13). Fill up the measuring beaker (13) with water. Pour this
mixture now into the water tray (11). After 30 minutes of working, the mixture can be poured out.
Wipe the water tray (11) dry using a piece of cloth.
• Please do NOT boil this mixture in the unit.
• We recommend that you store the unit, after cleaning, back into the carton, in which you received
the unit.
TECHNICAL DATA
Operating voltage : 230V~ 50Hz
Power consumption : 350 Watt
INSTRUCTIONS ON ENVIRONMENT PROTECTION
Do not dispose of this product in the usual household garbage at the end of its life
cycle; hand it over at a collection point for the recycling of electrical and electronic
appliances. The symbol on the product, the instructions for use or the packing will
inform about the methods for disposal.
The materials are recyclable as mentioned in its marking. By recycling, material recycling or other
forms of re-utilization of old appliances, you are making an important contribution to protect our
environment.
Please inquire at the community administration for the authorized disposal location.
7 8
approved
GB
GB
GB
GB
GUARANTEE AND CUSTOMER SERVICE
Before delivery our devices are subjected to rigorous quality control. If, despite all care, damage has
occurred during production or transportation, please return the device to your dealer. In addition to
statutory legal rights, the purchaser has an option to claim under the terms of the following
guarantee:
For the purchased device we provide 2 years guarantee, commencing from the day of sale. During
this period we will remedy all defects free of charge, which can be demonstrably attributed to
material or manufacturing defects, by repair or exchange.
Defects which arise due to improper handling of the device and malfunctions due to interventions
and repairs by third parties or the fitting of non-original parts, are not covered by this guarantee.
elta GmbH
Carl-Zeiss-Str. 8
63322 Rödermark

MODE D’EMPLOI EK111 CUIT OEUFS EN INOX
Chère Cliente, cher Client,
Avant de brancher votre appareil, il est indispensable, pour la sécurité d’emploi du matériel, de lire
attentivement le présent manuel d’utilisation et de respecter, en particulier, les consignes de
sécurité. Si cet appareil est cédé à des tiers, ne pas oublier de joindre le présent mode d’emploi.
STRUCTURE
1. Bloc moteur
2. Bac à œufs
3. Pique à œuf
4. Supports à œuf
5. Couvercle
6. Évacuation de la vapeur
7. Cordon et fiche d'alimentation
8. Poignée (couvercle)
9. Poignée (bac à œufs)
10. Interrupteur I O
11. Bac à eau
12. Échelle graduée
13. Verre à mesure
INFORMATIONS CONCERNANT LA SÉCURITÉ
• Une mauvaise manipulation ou un usage anormal peut endommager l’appareil et causer des blessures
à son usager.
• L'appareil doit être employé uniquement pour l'usage prévu. Aucune responsabilité ne peut être
retenue dans l’éventualité d’un incident survenu suite à un usage anormal ou une mauvaise
manipulation.
• Avant de brancher l’appareil à une prise électrique murale, vérifiez que le courant électrique local
correspond à celui spécifié sur la plaque de l’appareil.
• Ne placez jamais l’appareil ou la prise électrique dans de l’eau ou dans un quelconque autre
liquide. Cependant, si l’appareil tombe accidentellement dans de l’eau, débranchez
immédiatement l’appareil et faites-le réviser par du personnel qualifié avant toute nouvelle
utilisation. Ne pas respecter ceci peut résulter en une électrocution fatale!
• N’essayez jamais d’ouvrir le boîtier vous-même.
• Ne placez aucun objet de quelque type que ce soit à l'intérieur du boîtier.
• N'employez pas l'appareil avec les mains mouillées, sur un sol humide ou lorsque l'appareil lui-
même est mouillé.
• Ne touchez pas la fiche avec les mains mouillées ou humides.
• Vérifiez régulièrement le fil électrique et la prise afin de voir s’ils ne sont pas endommagés. Si le fil
électrique ou la prise sont endommagés, un remplacement est nécessaire, soit par le fabricant,
soit par une personne qualifiée, afin d’éviter tout risque d’accident.
• Ne pas utiliser l’appareil après une chute ou tout autre incident ou si le câble ou la fiche électrique
sont endommagés. En cas d’incident, apporter l’appareil à un atelier de réparation électrique pour
un contrôle et une réparation éventuelle.
• N'essayez jamais de réparer vous-même l'appareil. Il y a risque d'électrocution.
• Ne pas laisser le câble au contact d’arêtes vives et l’éloigner de tous objets chauds ou de
flammes. Débrancher la fiche électrique de la prise de courant en maintenant sur la fiche.
• Un disjoncteur à courant de défaut dans l'installation électrique domestique offre une protection
supplémentaire avec un courant differentiel de déclenchement ne dépassant pas 30 mA. Prenez
conseil auprès de votre électricien.
• S’assurer qu’il n’y a pas de danger que le câble ou sa rallonge ne soit par inadvertance tiré ou ne
gêne le passage une fois branché.
• En cas d’utilisation de rallonge, s’assurer s'assurer que la puissance maximale du câble est bien
adaptée à la consommation de l'appareil pour éviter un échauffement anormal de la rallonge et/ou
de la prise.
• Cet appareil n’est pas destiné à une utilisation commerciale ni à une utilisation de plein air.
• Ne jamais laisser l’appareil en marche sans surveillance.
• Les enfants peuvent ignorer les dangers encourus par une utilisation incorrecte des appareils
électriques. Ne jamais laisser des enfants utiliser des appareils ménagers sans la surveillance
d’un adulte.
• Toujours débrancher la fiche de la prise électrique quand l’appareil n’est pas utilisé et chaque fois
qu’il doit être nettoyé.
• Danger! L’ appareil est sous tension nominale tant qu’il est branché à une prise électrique murale.
• Arrêtez/éteignez l'appareil avant de le débrancher du secteur.
• Ne jamais porter l'appareil par son câble.
CONSIGNES DE SÉCURITÉ SPÉCIFIQUES
• L'appareil chauffe très rapidement et refroidit très lentement. Par conséquent, faites
attention à l'eau chaude et aux échappées de vapeur pendant et après l'utilisation de
l'appareil ! Saisissez toujours l'appareil par sa poignée.
• N'utilisez aucun accessoire qui ne serait pas livré avec l'appareil !
• Ne placez jamais l'appareil à proximité d'autres appareils chauffants (une cuisinière ou un four, par
exemple).
• Attention : pendant l'utilisation de l'appareil, le cordon d'alimentation ne doit pas entrer en
contact avec les parties chaudes de l'appareil !
• Cet appareil est destiné uniquement à la cuisson des œufs. N'essayez pas de l'utiliser pour cuire
un autre aliment.
• N'utilisez jamais l'appareil sans le couvercle (6) ni le bac à œufs (2).
AVANT LA PREMIÈRE UTILISATION
• Retirez tous les matériaux d'emballage.
• Nettoyez l'appareil avant sa première utilisation (voir la section Nettoyage et Entretien).
• Lors de la première utilisation, vous pouvez constater un léger dégagement de fumée et d’odeur
provoqué par des résidus de fabrication se mettant à brûler à la surface de l'appareil.
UTILISATION
• Cet appareil permet de préparer 7 œufs de poule par cycle de cuisson.
Veillez à n'utiliser que des œufs frais.
• Positionnez le bac à œufs (2) sur le bloc moteur (1).
• Avec la pique (3), faites un petit trou sur la calotte pointue de chaque œuf.
Agissez avec délicatesse afin de ne pas briser la coquille des œufs.
• Attention : risque de blessure ! La pointe de la pique (3) est très pointue.
• Placez un œuf dans chacun des 7 supports (4), calotte pointue vers le haut
(voir illustration).
• Versez la quantité d'eau froide nécessaire dans le verre à mesure (13). La
quantité d'eau dépend du nombre d'œufs à cuire et du degré de cuisson
(mollet, moyen ou dur). Sur le verre à mesure (13), trois échelles graduées (12) indiquent la
quantité d'eau nécessaire pour la cuisson (en anglais, en allemand et en français) :
Échelle 1 – soft, weich, mollet Temps de cuisson : 12 minutes env.
Échelle 2 – medium, mittel, moyen Temps de cuisson : 15 minutes env.
Échelle 3 – hard, hart, dur Temps de cuisson : 17 minutes env.
• Exemple : pour préparer quatre œufs mollets, versez de l'eau jusqu'au repère 4 de l'échelle 1.
• Si votre eau est trop dure, vous pouvez y ajouter une demie cuillère à café de vinaigre. En dehors
du vinaigre, n'utilisez aucun autre liquide que l'eau. Et n'ajoutez aucun autre ingrédient (du sel, par
exemple).
• Versez ensuite le contenu du verre à mesure (13) dans le bac à eau (11). Veillez alors à ne pas
9 10
F
F
F
F
2
1
4
9
5
8
2
7
6
1
3
12
10
13
11

verser d'eau sur le boîtier du bloc moteur (1) !
• Couvrez les supports à œuf avec le couvercle prévu à cet effet (5). Assurez-vous que les supports
(4) et le couvercle (5) sont correctement placés sur le bloc moteur.
• Mettez l'interrupteur O/I (10) sur la position O (= appareil éteint).
• Branchez la fiche électrique (7) dans une prise de courant appropriée et mettez l'interrupteur O/I
(10) sur la position I. Le témoin lumineux de l'interrupteur O/I s'allume.
• La plaque de cuisson du bloc moteur (1) commence à chauffer le contenu du bac à eau (11).
• Attention : certaines parties de l'appareil sont très chaudes pendant et après la cuisson des œufs !
Saisissez toujours l'appareil par ses poignées (8, 9) pendant et après son utilisation. Faites
particulièrement attention à l'eau chaude et aux échappées de vapeur !
• Risque de brûlure : ne déplacez jamais l'appareil pendant son utilisation !
• Lorsque l'eau arrive à température, la vapeur chaude s'échappe par la sortie d'évacuation (6)
prévue à cet effet.
• Ne retirez jamais le couvercle (5) pendant la cuisson des œufs ! La vapeur d'eau s'échapperait
immédiatement par cette ouverture.
• La cuisson des œufs est terminée dès que le contenu du bac à eau s'est entièrement évaporé. Un
signal sonore retentit et le témoin lumineux de l'interrupteur O/I (10) s'éteint. La plaque de cuisson
du bloc moteur (1) commence alors à refroidir.
• Mettez l'interrupteur O/I (10) sur la position O. Le signal sonore s'arrête. Retirez ensuite la fiche
d'alimentation (7) de la prise.
• Risque de brûlure : Retirez le couvercle (5) avec prudence en le saisissant par sa poignée (8).
• Soulevez le bac à œufs (2) par sa poignée (9) et sortez-le de l'appareil. Passez rapidement les
œufs sous l'eau froide avant de les servir. Prenez un torchon et sortez les œufs de leur support (4)
pour les poser dans un coquetier.
NETTOYAGE ET ENTRETIEN
• Observez scrupuleusement les consignes de sécurité.
• Laissez refroidir entièrement l'appareil avant de commencer le nettoyage.
• Nettoyez le couvercle (6) et le bac à œufs (2) avec de l'eau et un produit de vaisselle.
• Pour nettoyer le boîtier extérieur et le bac à eau (11), utilisez un chiffon imbibé d'eau et de produit
d'entretien. Après le nettoyage, séchez soigneusement.
• Attention : les composants électriques de l'appareil ne doivent jamais être mis au contact de l'eau !
• Refroidissement du bac à eau (11) : les coquilles d'œuf sont riches en calcaire. Ce calcaire peut
se déposer sur les parois du bac à eau (11) si vous ne procédez pas à un détartrage régulier de
l'appareil. Pour cela, versez un peu de vinaigre alimentaire dans le verre à mesure (13) puis
remplissez d'eau. Versez le mélange dans le bac à eau (11) et laissez agir 30 minutes. Videz le
bac à eau (11) puis essuyez-le avec un chiffon. Ne faites PAS chauffer ce mélange dans l'appareil.
• Après le nettoyage, il est conseillé de remettre l'appareil dans son carton d'emballage.
DONNÉES TECHNIQUES
Tension d’alimentation : 230V~ 50Hz
Puissance : 350 Watt
INDICATIONS RELATIVES À LA PROTECTION DE L’ENVIRONNEMENT
Au terme de sa durée de vie, ce produit ne doit pas être éliminé avec les ordures
ménagères mais doit être remis à un point de collecte destiné au recyclage des
appareils électriques et électroniques. Le symbole figurant sur le produit, la notice
d’utilisation ou l’emballage vous indique cela.
Les matériaux sont recyclables conformément à leur marquage. Vous apportez une large
contribution à la protection de l’environnement par le biais du recyclage, de la réutilisation
matérielle ou par les autres formes de réutilisation des appareils usagés.
Veuillez vous adresser à la municipalité pour connaître la déchetterie compétente.
11 12
Agréé
F
F
GARANTIE ET SERVICE APRES-VENTE
Nos appareils ont fait l’objet d’un contrôle qualité scrupuleux, avant de quitter l’usine. S’il arrivait,
malgré tout le soin apporté à la production et au transport, que l’appareil soit endommagé, nous
vous prions de bien vouloir le retourner à votre revendeur habituel. Outre les garanties légales, nous
accordons les garanties suivantes :
Nous garantissons l’appareil contre tout défaut de fabrication ou vice de matière pendant une
période de 2 ans, à compter de la date d’achat. Pendant cette période nous nous engageons à le
réparer ou à le remplacer. La garantie ne s’appliquera pas en cas d’utilisation incorrecte de
l’appareil ou de défauts résultant d’une intervention ou réparation par une tierce personne
ou de remplacement par des pièces autres que les pièces originales.
F
F
elta GmbH
Carl-Zeiss-Str. 8
63322 Rödermark

13 14
HASZNÁLATI UTASÍTÁS EK111 TOJÁSFÃZÃ ROZSDAMENTES ACÉLBÓL
Tisztelt vásárlónk!
MielŒtt a hálózathoz kötné a készüléket, a nem rendeltetésszer használatból származó károk
elkerülése érdekében kérjük figyelmesen olvassa végig a Használati Útmutatót. Kérjük fordítson
különösen nagy figyelemet a biztonsági tájékoztatóra.Ha harmadik félnek adja át a készüléket, a
Használati Útmutatót is adja át.
FELÉPÍTÉS
1. Motoros egység
2. Ojástartó
3. Tojáslyukasztó
4. Tojásfészek
5. Zárófedél
6. GŒznyílás
7. Hálózati csatlakozókábel, dugasszal
8. Fogantyù (fedél)
9. Fogantyù (tojástartó)
10. Kapcsoló I O
11. Víztartály
12. MérŒskála
13. MérŒedény
BIZTONSÁGI ELÃÍRÁSOK
• A helytelen és szakszer tlen kezelés a készülék üzemzavarát és a felhasználó sérülését
okozhatja.
• A készüléket csak eredeti rendeltetésének megfelelŒen szabad használni. A nem rendeltetésszer
használat vagy a helytelen kezelés esetén a gyártó az esetlegesen fellépŒ károkért nem tud
felelŒsséget vállalni.
• MielŒtt a készüléket a hálózathoz csatlakoztatnánk, ellenŒrizzük, hogy a hálózati áram jellemzŒi és
feszültsége megfelelnek-e a készülék adattábláján megadottaknak.
• A készüléket és a hálózati csatlakozót ne tegyük vízbe vagy egyéb folyadékba. Ha a készülék
ennek ellenére mégis vízbe esik, azonnal hùzzuk ki a hálózati csatlakozót és a készüléket az
ùjabb használatbavétel elŒtt ellenŒriztessük szakemberrel. EllenkezŒ esetben életveszélyes
áramütésnek tehetjük ki magunkat!
• Tilos házilag a készülékház megnyitásával próbálkozni!
• Ne dugjunk be a készülék belsejébe semmiféle tárgyat.
• Ne használjuk a készüléket nedves kézzel, vagy nedves talajon, vagy nedves környezetben.
• A hálózati csatlakozódugaszt tilos vizes vagy nedves kézzel megfogni.
• Rendszeresen ellenŒrizzük a hálózati csatlakozókábelt és csatlakozódugaszt, hogy nincsenek-e
rajtuk sérülések. Amennyiben ilyen sérüléseket felfedezünk, feltétlenül cseréltessük ki a kábelt és
a dugaszt a gyártóval, illetve képzett szakemberrel, hogy a kockázatokat elkerüljük.
• Ne vegyük használatba a készüléket, ha a hálózati csatlakozókábelen vagy a csatlakozódugaszon
sérülések láthatók, vagy ha a készülék a földre esett, vagy egyéb módon megsérült. Ilyen esetben
a készüléket ellenŒrzésre és esetleges javításra vigyük szakemberhez.
• Semmiképpen ne próbálkozzunk a készülék házilagos megjavításával. Ez áramütés veszélyével
járhat!
• Ne vezessük a hálózati csatlakozókábelt éles peremeken keresztül, és tartsuk azt távol forró
tárgyaktól és a nyílt lángtól. A hálózati csatlakozókábelt mindig a csatlakozódugasznál fogva
hùzzuk ki az aljzatból.
• KiegészítŒ védelmet nyùjt egy legfeljebb 30 mA névleges kioldási áramerŒsség hibaáram-
védŒberendezés beépítése. Ezzel kapcsolatban kérje ki villanyszerelŒjének tanácsát.
• A kábelt és az esetleg szükséges hosszabbítókábelt ùgy vezessük, hogy ne legyen lehetŒség
annak megrántására, illetve arra, hogy valaki rálépjen.
H
H
2
1
4
9
5
8
2
7
6
1
3
12
10
13
11
• Amennyiben hosszabítókábelt használunk, ennek alkalmasnak kell lennie a megfelelŒ teljesítmény
átvitelére, mert ellenkezŒ esetben a kábel és/vagy az aljzat tùlforrósodhat.
• A készülék nem alkalmas sem az üzemi használatra, sem a szabadban történŒ használatra.
• A készüléket használat közben ne hagyjuk felügyelet nélkül.
• A gyermekek nem képesek azoknak a veszélyeknek a felismerésére, amelyek a villamos
berendezések szakszer tlen használatából származnak. Éppen ezért ne engedjük meg a
gyermekeknek, hogy a villamos háztartási eszközöket felügyelet nélkül használják.
• Ha a készülék nincs használatban, valamint ha azt tisztítani akarjuk, hùzzuk ki az aljzatból a
hálózati csatlakozódugaszt.
• Vigyázat! A készülék mindaddig áram alatt van, amíg a hálózathoz van csatlakoztatva.
• A hálózati csatlakozó kihùzása elŒtt kapcsoljuk ki a készüléket.
• A készüléket nem szabad a hálózati csatlakozó kábelnél fogva vinni.
KÜLÖNLEGES BIZTONSÁGI ELÃÍRÁSOK
• A készülék gyorsan felforrósodik, és csak lassan h l le újra. Éppen ezért a készülék
használata során mindig ügyeljünk a forró vízre és a kicsapódó gŒzre! Csak a fogantyúkat
szabad megérinteni.
• Ne használjunk olyan tartozékokat, amelyek nem a készülékkel együtt kerültek leszállításra!
• A készüléket ne helyezzük el forró berendezések (például t zhely vagy kályha) közelébe.
• Figyelmeztetés: A hálózati csatlakozókábelnek üzemeltetés közben nem szabad hozzáérnie
a készülék forró alkatrészeihez!
• Ez a készülék kizárólag tojásfŒzésre alkalmas. Ne próbálkozzunk más élelmiszerek
felmelegítésével.
• A készüléket nem szabad a zárófedél (6) nélkül és a tojástartó (2) nélkül üzemeltetni.
AZ ELSÃ HASZNÁLATBAVÉTEL ELÃTT
• Távolítsunk el minden csomagolóanyagot.
• Ta készüléket az elsŒ üzembe helyezés elŒtt tisztítsuk meg (lásd TISZTÍTÁS ÉS ÁPOLÁS).
• Taz elsŒ használatbavétel során enyhe füst- és szagképzŒdés elŒfordulhat. Ilyenkor a gyártási
maradványok égnek le a készülék felületérŒl.
KEZELÉS
• A készülékkel fŒzési m veletenként legfeljebb 7 tyùktojást lehet megfŒzni.
Kizárólag friss tojást használjunk.
• Tegyük a tojástartót (2) a motoros egységre (1).
• A tojáshéjon a tojáshéj-fùró (3) segítségével képezzen kisméret lyukat!. Ne
fejtsünk ki nagy erŒt, nehogy összetörjük a tojáshéjat.
Vigyázat, sérülés veszélye áll fenn: A tojáslyukasztó (3) t je nagyon hegyes!
• Ezután a hét tojásfészek (4) mindegyikébe behelyezhetünk egy-egy tojást.
Mindig a tojás tompa (kerek) végét tegyük be a fészekbe (4) (lásd az ábrát).
• Töltsük fel a mérŒedényt (13) a szükséges mennyiség tiszta hidegvízzel: a
víz mennyisége a megfŒzésre kerülŒ tojások számától és a tojás kívánt
keménységétŒl (lágy, félkemény vagy kemény) függ. A mérŒedényen (13)
három mérŒskála (12) található, amelyek mutatják, hogy mennyi vizet kell használni (az adatok
angolul, németül és franciául láthatók):
Skála 1 – soft, weich, mollet (lágy) FŒzési idŒ: kb. 12 perc
Skála 2 – medium, mittel, medium (közepes) FŒzési idŒ: kb. 15 perc
Skála 3 – hard, hart, dur (kemény) FŒzési idŒ: kb. 17 perc
• Például: Ha négy lágy tojást kívánunk készíteni, akkor a vizet az 1 mérŒskálán (12) található 4
jelölésig töltsük be.
• Ha a környéken a víz nagyon kemény, a vízbe fél kávéskanál ecetet tehetünk. Egyébként a
fŒzéshez a vízen kívül semmilyen más folyadékot nem szabad használni. A vízbe nem szabad
más adalékokat (pl. sót) sem beletenni.
H
H

• Öntsük be a vizet a mérŒedénybŒl (13) a víztartályba (11). Ügyeljünk arra, hogy a víz ne
fröccsenjen a motoros egység (1) házára!
• A tojástartót (4) takarjuk le a fedéllel (5). Ügyeljünk arra, hogy a tojástartó (4) és a fedél (5)
biztonságosan helyezkedjék el a motoros egységen (1).
•A O/I kapcsolót (10) állítsuk O állásba (= kikapcsolva).
• A hálózati csatlakozót (7) csatlakoztassuk egy erre alkalmas aljzathoz, és az O/I kapcsolót (10)
állítsuk I állásba. A O/I kapcsolóba (10) beépített ellenŒrzŒlámpa kigyullad.
• A motoros egység (1) fŒzŒlapja kezdi felmelegíteni a víztartályban (11) található vizet.
• Vigyázat: A készülék alkatrészei a használat alatt és utána nagyon forróak!! A készülék
használata alatt és azt követŒen csakis a fogantyùkat (8, 9) szabad megérinteni. Külön ügyeljünk
a forró vízre és a kicsapódó gŒzre!
• Égési veszély áll fenn: A készüléket használat közben nem szabad a helyérŒl elmozdítani.
• A víz forrni kezd, és forró vízgŒz lép ki a gŒznyíláson (6).
• A zárófedelet (5) a tojásfŒzés alatt nem szabad levenni. EllenkezŒ esetben a vízgŒz azonnal
kicsapna.
• Amikorra a víztartályban lévŒ víz elgŒzölög, a tojások fŒzése befejezŒdik. Ezt jelzŒhang jelzi. A O/I
kapcsolóba (10) beépített jelzŒlámpa kialszik. A motoros egység (1) fŒzŒapja kezd lehŒlni.
• Állítsuk a O/I kapcsolót (10) O állásba. A jelzŒhang elhallgat. Hùzzuk ki a hálózati
csatlakozódugaszt (7).
• Égési veszély áll fenn: A zárófedelet (5) óvatosan vegyük le a készülékrŒl. Mindig a fogantyùt (8)
fogjuk meg!
• A tojástartót (2) a fogantyùjánál (9) fogva vegyük le a készülékrŒl. Tartsuk a tojásokat rövid ideig
hideg folyóvíz alá. Ezután a tojások tálalásra készen állnak. A tojásokat egy tiszta kendŒvel fogjuk
meg és így emeljük ki a tojásfészekbŒl (4), és helyezzük az asztali tojástartóba.
TISZTÍTÁS ÉS ÁPOLÁS
• A m velet során feltétlenült tartsuk be a biztonsági elŒírásokat.
• A készüléket teljesen hagyjuk leh lni, mielŒtt hozzákezdenénk a tisztításához.
• A zárófedelet (6) és a tojástartót (2) vízzel és mosogatószerrel elmosogathatjuk.
• A készülékház és a víztartály (11) megtisztításához vízzel és mosogatószerrel megnedvesített
ruhát használjunk. A tisztítás után a készüléket gondosan szárítsuk meg.
• Vigyázat! Nem szabad víznek érnie a készülék villamos berendezéséhez!
• A víztartály (11) vízkŒmentesítése: A tojás héja magas mésztartalmù. Ez a mész a víztartályban
(11) lerakódhat, ha nem végezzük el rendszeresen a vízkŒmentesítést. A m velethez töltsünk
kevés háztartási ecetet a mérŒtartályba (13). Töltsük fel a mérŒtartályt (13) vízzel. Ezt a keveréket
öntsük be a víztartályba (11). 30 perces várakozás után a keveréket kiönthetjük. Töröljük a
víztartályt (11) egy száraz ruhával szárazra. Ezt a keveréket NEM SZABAD a készülékben felforralni!
• Ajánlatos a készüléket a megtisztítás után az eredeti dobozában tárolni.
M SZAKI ADATOK
Tápfeszültség : 230V~ 50Hz
Energiafogyasztás : 350 Watt
15 16
H
H
H
H
által elismert
KÖRNYEZETVÉDELMI TANÁCSOK
Ezt a terméket az élettartama végén ne dobjuk a normál háztartási szemétbe, hanem
adjuk le a villamos és elektronikai hulladékok átvevŒhelyén. A terméken található
szimbólum, a használati ùtmutató vagy a csomagolás felirata erre hívja fel a figyelmet.
A készülék anyagai a jelölésüknek megfelelŒen ùjrahasznosíthatóak. Az ùjrahasznosítással, az
anyagok ismételt felhasználásával, illetve a használt készülékek egyéb felhasználásával sokat
tehetünk környezetünk megóvásáért.
A megfelelŒ hulladék-átvevŒhelyrŒl a helyi önkormányzatnál érdeklŒdhetünk.
GARANCIAFELTÉTELEK ÉS ÜGYFÉLSZOLGÁLAT
Készülékeinket szállítás elŒtt rendkívül pontos minŒségi ellenŒrzésnek vetjük alá. Ha ennek ellenére
gyártás vagy szállítás közben károsodás történt, kérjük, juttassa vissza a készüléket a
kereskedŒnek. A törvény által meghatározott jogokon kívül a vásárló a következŒ garancia
értelmében is követeléssel élhet: A megvásárolt készülékekre 2 év garanciát biztosítunk, a vásárlás
napjától számítva. Ezalatt az idŒszak alatt ingyen vállalunk minden javítást, amely bizonyíthatóan
gyártási vagy anyaghibának tudható be. Ekkor vagy kicseréljük készülékét, vagy ingyen megjavítjuk.
Nem érvényes a garancia azokra a meghibásodásokra, melyek helytelen használat vagy harmadik
személy által történŒ javítás, beavatkozás vagy nem gyári alkatrész
behelyezése közben vagy után jönnek létre.
elta GmbH
Carl-Zeiss-Str. 8
63322 Rödermark

LIBRETTO ISTRUZIONI EK111 CUOCIUOVA IN ACCIAIO INOSSIDABILE
Gentile cliente,
Per evitare eventuali danni e rischi risultanti da un uso erroneo, leggete attentamente il presente
libretto istruzioni prima di adoperare l’apparecchio. Badate a sempre osservare i cenni di sicurezza.
Se l'apparecchio viene consegnato a terzi, consegnare anche le istruzioni per l'uso.
STRUTTURA
1. Unità motore
2. Scomparto uova
3. Fora-uova
4. Supporto uova
5. Calotta di copertura
6. Sfiato vapore
7. Cavo di alimentazione con spina
8. Maniglia (calotta)
9. Maniglia (deposito uova)
10. Interruttore I O (acceso / spento)
11. Vaschetta acqua
12. Scala graduata
13. Misurino
NORME DI SICUREZZA
• Funzionamento scorretto e uso improprio possono danneggiare l’apparecchio e causare danni
all’utente.
• L’apparecchio deve essere utilizzato solo per lo scopo per cui è stato previsto. Non ci si assume
responsabilità per possibili danni causati da uso scorretto o trattamento improprio.
• Prima di collegare il dispositivo alla presa di corrente, verificare che la corrente ed il voltaggio
siano analoghi a quelli indicati sulla piastrina.
• Non mettere l’apparecchio o la spina in acqua o in qualunque altro liquido. Nel caso in cui il
dispositivo dovesse accidentalmente cadere in acqua, staccare immediatamente la spina e fare
controllare il dispositivo da una persona qualificata prima di riutilizzarlo. La mancata
osservazione di queste indicazione potrebbe causare una scarica elettrica.
• Non cercare di aprire la scatola da soli.
• Non introdurre alcun oggetto estraneo all’interno dell’apparecchio.
•
Non utilizzare l’apparecchio con le mani bagnate, o quando il pavimento è umido, o se l’apparecchio
stesso è umido.
• Non toccare la spina con mani bagnate o umide.
• Verificare il filo e la spina periodicamente per escludere possibili danni. Se il filo o la spina
dovessero essere danneggiati, farli sostituire dal fabbricante o da persona qualificata al fine di
evitare rischi.
• Non usare l’apparecchio se è caduto o in altro modo danneggiato o se il cavo o la spina siano
danneggiati. In caso di danni, portare l’apparecchio per un controllo da un riparatore di strumenti
elettrici e se necessario farlo riparare.
• Non tentare mai di riparare l’apparecchio da soli, per evitare tutti i pericoli connessi
all’elettricità.
• Non far pendere il cavo su spigoli aguzzi e tenerlo lontano da fonti di calore e fiamma nuda.
Togliere la spina dalla presa tenendo solo la spina.
• Ad ulteriore protezione, è possibile corredare l’impianto interno di un dispositivo di sicurezza per
correnti di guasto con una corrente di apertura nominale non superiore ai 30mA. Per ulteriori
informazioni rivolgersi al proprio elettricista.
• Assicurarsi che non ci sia pericolo che il cavo o la prolunga possano inavvertitamente essere tirati
da qualcuno o possano far inciampare qualcuno durante l’uso.
• Se si adopera una prolunga, accertarsi che sia adatta alla potenza elettrica dell’apparecchio; in
caso contrario potrebbe verificarsi surriscaldamento della prolunga stessa e/o della presa.
• Il presente apparecchio non è adatto ad uso commerciale o per uso all’aria aperta.
• Non lasciare mai l’apparecchio senza controllo durante l’uso.
• I bambini non riconoscono i pericoli connessi ad un uso scorretto degli apparecchi elettrici. Per
questo non permettere ai bambini di usare apparecchi domestici senza controllo.
• Estrarre sempre la spina dalla presa se l’apparecchio non è in uso e ogni volta prima di pulirlo.
• Attenzione! Il voltaggio indicato persiste fintanto che il dispositivo rimane collegato alla presa di
corrente.
• Spegnere l’apparecchio prima di togliere la spina dalla presa a muro.
• Non mantenere l'apparecchio dal cavo.
SPECIALI NORME DI SICUREZZA
• L’apparecchio si riscalda rapidamente e torna a raffreddarsi molto lentamente. Di
conseguenza, durante e dopo l’uso, fare sempre attenzione all’acqua calda e all’emissione
di vapore acqueo! Si raccomanda di toccare esclusivamente le maniglie.
• Non utilizzare accessori che non siano in dotazione all’apparecchio!
• Non collocare il cuociuova in prossimità di apparecchi che scaldano (es. vicino a un fornello o a un
forno).
• Attenzione: durante il funzionamento, il cavo di alimentazione non deve toccare le parti
calde dell’apparecchio!
• Quest’apparecchio è esclusivamente destinato alla cottura di uova. Non tentare di utilizzarlo per
scaldare altri generi alimentari.
• Il cuociuova non deve essere azionato senza la calotta di copertura (6) e senza lo scomparto uova (2).
PRIMO UTILIZZO
• Rimuovere tutti i materiali dell’imballo.
• Pulire l’apparecchio prima di procedere al primo utilizzo (vedi il paragrafo PULIZIA E CURA).
• In occasione del primo utilizzo, il cuociuova potrebbe sviluppare un leggero fumo e un odore
sgradevole. Si tratta semplicemente di residui del processo di fabbricazione, che vengono bruciati
sulla superficie dell’apparecchio.
IMPIEGO
• Con quest’apparecchio è possibile cuocere fino a 7 uova di gallina
contemporaneamente. Si raccomanda di usare esclusivamente uova fresche.
• Posizionare lo scomparto uova (2) sull’unità motore (1).
• Usare il fora uova (3) per praticare un foro nella sommità dell'uovo. Non
esercitare una forza eccessiva, per non rompere il guscio delle uova.
Attenzione, pericolo di lesioni: l’ago del fora-uova (3) è molto affilato!
• Ognuno dei sette supporti uova (4) può alloggiare soltanto un uovo. Collocare
ogni uovo nel rispettivo alloggiamento (4), appoggiandolo sul suo lato
schiacciato (vedi figura).
• Riempire il misurino (13) della quantità di acqua fredda necessaria. La
quantità di acqua da utilizzare dipende dal numero di uova che si desidera
cuocere e dal grado di durezza (tenero, medio o duro) che si desidera ottenere a fine cottura. Sul
misurino (13) si trovano tre scale graduate (12), che indicano la quantità di acqua occorrente
(indicazioni in inglese, tedesco e francese):
Scala 1 – soft, morbido, mollet Tempo di cottura: circa 12 minuti
Scala 2 – medium, medio, medium Tempo di cottura: circa 15 minuti
Scala 3 – hard, duro, dur Tempo di cottura: circa 17 minuti
• Esempio: Per preparare quattro uova cotte morbide, riempire nella scala di misurazione 1 (12)
con acqua fino al segno 4.
• Se l’acqua è molto dura, aggiungere un cucchiaio da tè di aceto. Non utilizzare liquidi diversi
dall’acqua. Inoltre non utilizzare additivi (come il sale) nell’acqua.
• Versare l’acqua dalla caraffa (13) nel recipiente (11). Prestare attenzione a non schizzare acqua
17 18
I
I
I
I
2
1
4
9
5
8
2
7
6
1
3
12
10
13
11

sull’unità motore (1)!
• Coprire l’unità per le uova (4) con il coperchio (5). Accertarsi che l’unità per le uova (4) e il
coperchio (5) siano ben fissati sull’unità motore (1).
• Posizionare l’interruttore O/I (10) su O (= apparecchio spento).
• Collegare la spina elettrica (7) con una presa idonea e posizionare l’interruttore O/I (10) su I. La
spia di controllo dell’interruttore O/I (10) si accende.
• La piastra di cottura dell’unità motore (1) inizia a scaldare l’acqua contenuta nella vaschetta (11).
• Attenzione: durante e dopo l’uso, le parti dell’apparecchio sono molto calde!! Durante e dopo
l’uso, si raccomanda di toccare solo le due maniglie (8, 9). Fare particolare attenzione all’acqua
calda e all’emissione di vapore acqueo.
• Pericolo di ustioni: durante l’uso, l’apparecchio non deve essere spostato.
• L’acqua bolle e vapore acqueo caldo fuoriesce dallo sfiato vapore (6).
• Non rimuovere la calotta di copertura (5) durante la cottura delle uova. In caso contrario, si
verificherebbe una fuoriuscita immediata di vapore acqueo.
• Appena evapora l’acqua nel recipiente, la cottura delle uova è terminata. Suona un segnale
acustico. Si spegne la spia di controllo dell’interruttore O/I (10). La piastra di cottura dell’unità
motore (1) si raffredda.
• Posizionare l’interruttore O/I (10) su O. Il segnale acustico si interrompe. Scollegare la spina
elettrica (7).
• Attenzione: Sollevare con cautela la calotta di copertura (5) del cuociuova. Servirsi al riguardo
dell’apposita maniglia (8)!
• Rimuovere lo scomparto uova (2) dall’apparecchio, servendosi della maniglia (9). Raffreddare per
pochi istanti le uova sotto l’acqua fredda corrente. Ora le uova sono pronte per essere servite.
Con un panno, estrarre le uova dal relativo supporto (4) e collocarle su un portauovo.
SUGGERIMENTI
• A tale scopo, rispettare scrupolosamente le norme di sicurezza.
• Lasciar raffreddare completamente l’apparecchio, prima di procedere alla sua pulizia.
• La calotta di copertura (6) e il supporto uova (2) possono essere puliti con acqua e detersivo per
stoviglie.
• Per la pulizia del corpo dell’apparecchio e della vaschetta acqua (11), utilizzare un panno inumidito
con acqua e detersivo per stoviglie. Dopo la pulizia, asciugare con cura.
• Attenzione! Gli elementi elettrici dell’apparecchio non devono venire a contatto con l’acqua!
• Decalcificazione della vaschetta acqua (11): i gusci d’uovo sono molto calcarei. Questo calcare
si può depositare nella vaschetta acqua (11), se questa non è regolarmente decalcificata. A tale
scopo, si raccomanda di versare un po’ di aceto nel misurino (13). Riempire quindi il misurino (13)
con acqua. Versare la miscela così ottenuta nella vaschetta acqua (11). Lasciar agire per 30 minuti
e poi gettare via la miscela. Asciugare la vaschetta acqua (11) strofinandola con un panno.
• NON cuocere questa miscela nell’apparecchio!
• Dopo la pulizia, si raccomanda di conservare l’apparecchio nel suo imballo originale.
DATI TECNICI
Tensione di alim : 230 Volt ~ 50 Hz
Potenza assorbita : 350 W
AVVERTENZE PER LA TUTELA DELL’AMBIENTE
Una volta inutilizzabile il prodotto non deve essere smaltito con i rifiuti domestici ma
portato presso un punto di raccolta per il riciclo di apparecchiature elettriche. Ciò è
indicato dal simbolo presente sul prodotto, sulle istruzioni per l’uso o sulla confezione.
I materiali riciclabili sono riutilizzabili a seconda delle loro caratteristiche. Con il riutilizzo, con il
riciclaggio di materiale o altri tipi di riciclaggio di apparecchi vecchi fornirete un importante contributo
alla tutela ambientale.
Informatevi presso l’amministrazione comunale sui punti di smaltimento competenti.
19 20
Omologazione
I
I
GARANZIA E SERVIZIO CLIENTI
Prima della conségna i nostri prodotti sono sottoposti a rigorosi controlli di qualità.
Nonostante ciò, se danni dovessero essere stati causati durante la produzione o il trasporto, per
favore restituite il dispositivo al venditore. In aggiunta ai diritti stabiliti dalla legge, l’acquirente ha la
possibilità di usufruire, nei termini indicati della seguente garanzia:
Per il dispositivo acquistato forniamo 2 anni di garanzia, a partire dalla data di acquisto. Durante
questo periodo correggeremo ogni possibile difetto gratuitamente, se è dimostrato che tale anomalia
è dovuta a difetti del materiale o di fabbricazióne, provvederemo alla riparazione o sostituzione del
prodotto. Difetti dovuti ad uso improprio di questo dispositivo, o cattivo funzionaménto causato da
riparazioni eseguite da terzi, oppure all’uso di parti non originali, non sono coperti da questa
garanzia.
I
I
elta GmbH
Carl-Zeiss-Str. 8
63322 Rödermark

21 22
MANUAL DE INSTRUCCIONES EK111 COCEDOR DE HUEVOS DISEÑADO EN ACERO
Estimado cliente,
Por favor lea las instrucciones de uso con atención antes de conectar su aparato a la red eléctrica,
para evitar daños que un uso no adecuado pudiese provocar. Observe especialmente las
indicaciones de seguridad. Si cede este aparato a terceras personas, deberá entregar las
instrucciones de uso con él.
ELEMENTOS
1. Bloque motor
2. Bandeja para huevos
3. Pica-huevos
4. Porta-huevos
5. Tapadera de protección
6. Orificio para el vapor
7. Cable con enchufe
8. Asa (tapadera)
9. Asa (bandeja para huevos)
10. Interruptor I O
11. Tanque de agua
12. Escala de medida
13. Vaso medidor
INFORMACIONES DE SEGURIDAD
• Una utilización incorrecta y mal uso pueden dañar el aparato y ocasionar heridas al usuario.
• Este aparato sólo puede ser destinado al uso para el que fue fabricado. No se puede asumir
responsabilidad por cualquier posible daño causado por utilización o manejo incorrectos.
• Antes de conectar el dispositivo a la toma de corriente, verificar que la corriente y el voltaje
correspondan a aquellos indicados sobre la chapa.
• No colocar el dispositivo o el enchufe en agua o cualquier otro liquido. En caso de que el
dispositivo caiga en agua accidentalmente, desconectar el enchufe imediatamente y hacer
verificar el aparato por una persona cualificada antes de utilizarlo nuevamente. La no
observancia de esta regla podria causar una descarga electrica fatal.
• No ententar abrir el alojamiento sin la ayuda de un experto.
• No coloque ninguna clase de objetos dentro de la carcasa.
• No utilice el aparato con las manos húmedas, sobre un suelo húmedo o cuando el aparato mismo
esté mojado.
• No toque el enchufe con las manos húmedas o mojadas.
• Verificar el cable y el enchufe con regularidad para excluir eventuales daños. En caso de que uno
de estos dos estè dañado, tendrà que ser substituido por el fabricante o por persona cualificada
para evitar riesgos.
• No utilice el aparato si se ha caído o se ha dañado de alguna otra manera o si el cable o el
enchufe presentan daños. En caso de daño, lleve el aparato a una tienda de reparaciones
eléctricas para que sea examinado y reparado si fuese necesario.
• Nunca intente reparar Ud. mismo el aparato. Puede dar lugar a una descarga eléctrica.
• No permita que el cable cuelgue sobre bordes afilados y manténgalo bien apartado de objetos
calientes y llamas vivas. Desconecte la unidad del tomacorriente de pared solamente cogiéndolo
por el enchufe.
• Para una protección adicional se puede colocar un interruptor diferencial, para una intensidad no
mayor a 30mA, en la instalación del hogar. Consulte con su electricista para mayor información.
• Verifique que no exista peligro de que el cable de la unidad o un cable de prolongación sean
accidentalmente arrancados o que se pueda tropezar con ellos miestras están en uso.
• Si se utiliza un cable prolongador debe ser el adecuado para el consumo eléctrico del aparato,
porque lo contrario puede dar lugar a un calentamiento del mismo cable prolongador o del enchufe.
E
E
2
1
4
9
5
8
2
7
6
1
3
12
10
13
11
• Este aparato no es apropiado para su utilización comercial ni para utilizarse al aire libre.
• Nunca deje la unidad desatendida cuando se está utilizando.
• Los niños no pueden reconocer los peligros que implican la utilización incorrecta de los aparatos
eléctricos, por lo tanto, no permita nunca que los niños utilicen aparatos domésticos sin supervisión.
• Desenchufe siempre el aparato cuando no esté en uso y también cuando se disponga a limpiarlo.
• Atenciòn! El voltaje indicado persiste en cuanto el aparato estè conectado a la toma de corriente.
• Apague el aparato antes de desenchufarlo.
• No sostenga el aparato por el cable.
INSTRUCCIONES DE SEGURIDAD
• El aparato se calienta rápidamente y se enfría lentamente. Por ello tenga cuidado con el
agua caliente y el vapor de agua que desprende durante y después de su utilización y
agárrelo sólo por el asa.
• ¡No utilice ningún accesorio que no haya sido suministrado con el aparato!
• No coloque el aparato al lado de fuentes de calor (p. ej. una cocina o una estufa).
• Precaución: durante el funcionamiento del aparato, el cable no debe estar en contacto con
las piezas calientes.
• Este aparato ha sido diseñado sólo para cocer huevos, no intente calentar otros alimentos.
• No ponga nunca en marcha el aparato sin haber colocado la tapadera de protección (5) y la
bandeja para huevos (2).
ANTES DE LA PRIMERA PUESTA EN FUNCIONAMIENTO
• Retire todos los materiales de embalaje.
• Limpie al aparato antes de utilizarlo por primera vez (véase LIMPIEZA Y CUIDADOS).
• Al utilizar el aparato por primera vez éste puede desprender humo o un ligero olor. Se trata de
restos de fabricación que se queman en la superficie del aparato.
MANEJO
• Con este aparato podrá preparar hasta 7 huevos en cada cocción. Se
recomienda que utilice sólo huevos frescos.
• Coloque la bandeja para huevos (2) sobre el bloque motor (1).
• Con ayuda del picador de huevos (3) haga un pequeño agujero en el extremo
puntiagudo del huevo. No ejerza mucha fuerza pues podría romper la cáscara
del huevo.
Precaución, peligro de heridas: ¡la aguja del pica-huevos (3) es muy puntiaguda!
• A continuación introduzca un huevo en cada uno de los siete porta-huevos (4). Se
recomienda que los coloque con la parte roma del huevo hacia abajo (véase figura).
• Vierta la cantidad necesaria de agua fría y limpia en el vaso medidor (13). La
cantidad de agua dependerá del número de huevos que desee cocer y del grado de dureza
deseado (blando, medio o duro). En el vaso medidor (13) hay tres escalas de medida (12) que
indican la cantidad de agua necesaria (indicaciones en inglés, alemán y francés):
Escala 1 – soft, weich, mollet Tiempo de cocción aprox.: 12 Minutos
Escala 2 – medium, mittel, medium Tiempo de cocción aprox.: 15 Minutos
Escala 3 – hard, hart, dur Tiempo de cocción aprox.: 17 Minutos
• Ejemplo: si desea preparar cuatro huevos ligeramente cocidos deberá utilizar la escala de medida
1 (12) y añadir agua hasta la marca 4.
• En caso de que la dureza del agua sea muy alta añada media cucharada de vinagre. De no
hacerlo, no utilice más líquidos que el agua. Tampoco añada otros ingredientes al agua (como p. ej. sal).
• Vierta a continuación el agua del vaso medidor (13) en el tanque de agua (11) procurando que no
caiga nada sobre el bloque motor (1).
• Cubra el porta-huevos (4) con la tapadera de protección (5) y asegúrese de que ambos se
encuentran correctamente ajustados al bloque motor.
• Desplace el interruptor O/I (10) hasta la posición O (= aparato apagado).
E
E

23 24
• Conecte el enchufe (7) a una toma y desplace el interruptor O/I (10) hasta la posición I. En ese
momento se iluminará la luz del piloto situada en el interruptor O/I (10).
• La placa térmica del bloque motor (1) comenzará a calentar el agua que se encuentra en el tanque (11).
• Precaución: las piezas del aparato alcanzan una temperatura elevada durante y después de su
utilización. Agárrelo sólo por las asas (8, 9). Tenga cuidado también con el agua caliente y el
vapor que desprende.
• Peligro de quemaduras: No desplace el aparato mientras éste se encuentre en
funcionamiento.
• Mientras el agua cuece, el vapor sale por el orificio para el vapor (6).
• No retire la tapadera (5) durante la cocción de los huevos pues de lo contrario el vapor se
esparciría rápidamente.
• Cuando el agua del tanque se haya evaporado, los huevos ya estarán listos y sonará una señal
de aviso. La luz del piloto situada en el interruptor O/I (10) se apagará y la placa térmica del
bloque motor (1) empezará a enfriarse.
• Desplace el interruptor O/I (10) hasta la posición O. En ese momento dejará de sonar la señal de
aviso. Desconecte el enchufe (7).
• Peligro de quemaduras: Retire con cuidado la tapadera de protección del aparato (5)
agarrándola por el asa (8).
• Extraiga la bandeja para huevos (2) agarrándola por el asa (9). Coloque los huevos durante unos
segundos bajo el chorro de agua fría. Ahora los huevos están listos para servir. Se recomienda
colocar un paño en la huevera del porta-huevos (4).
LIMPIEZA Y CUIDADOS
• Se recomienda que respete también las instrucciones de seguridad.
• Antes de empezar a limpiar el aparato deje que éste se enfríe completamente.
• La tapadera de protección (5) y la bandeja para huevos (2) pueden lavarse con agua y detergente.
• Para limpiar la carcasa y el tanque de agua (11) utilice un paño ligeramente humedecido en agua
y detergente. Y a continuación séquelos cuidadosamente.
• ¡Atención! ¡Las partes eléctricas del aparato no deben estar en contacto con el agua!
• Descalcificación del tanque de agua (11): las cáscaras de huevo son altamente calcáreas. Si
no se descalcifica regularmente, esta cal puede depositarse en el tanque de agua (11). Para ello,
vierta un poco de vinagre en el vaso medidor (13) y llene el resto con agua. A continuación, vierta
esta mezcla en el tanque de agua (11). Déjela actuar 30 minutos y aclare. A continuación seque
cuidadosamente el tanque de agua (11) con un paño. ¡NO hierva esta mezcla en el aparato!
• Se recomienda guardar el aparato en su embalaje después de haberlo limpiado.
DATOS TÉCNICOS
Tensión de funcionamiento : 230V ~ 50Hz
Potencia : 350 vatios
Homologado
E
E
E
E
INDICACIONES SOBRE EL MEDIO AMBIENTE
No deseche este producto en la basura doméstica una vez que se haya cumplido su
vida de funcionamiento, deposítelo en un punto de recogida de aparatos eléctricos y
electrónicos. El símbolo que se encuentra en el producto, el manual de usuario o el
embalaje, hacen referencia a este punto.
El plástico es reutilizable según esté indicado. Con la reutilización de productos de plástico
reciclado u otra clase de reciclaje de aparatos viejos, está contribuyendo de forma importante a la
conservación del medio ambiente.
Infórmese en su administración local sobre la entidad de eliminación de residuos competente.
GARANTÍA Y SERVICIO AL CLIENTE
Antes de la entrega, nuestros aparatos se someten a un estricto control de calidad.
En el caso de que, a pesar de una cuidada producción, se detecten daños, también como
consecuencia del transporte, le agradeceremos que devuelva el aparato a nuestro representante.
Además de los derechos de garantía que contempla la legislación, el comprador puede ejercer los
siguientes derechos de garantía:
Para el aparato comprado ofrecemos una garantía de 2 años, a contar a partir de la fecha de
compra. Durante este período, le subsanaremos sin cargo alguno por cualquier defecto que se
detecte con posterioridad en el material o cualquier error de fabricación, mediante su reparación o
sustitución.
Los defectos ocasionados por una manipulación incorrecta del aparato y los que se originen tras la
intervención de otros reparadores o la incorporación de piezas que no corresponden al aparato no
se incluyen en esta garantía.
elta GmbH
Carl-Zeiss-Str. 8
63322 Rödermark

• Este aparelho não é adequado para uso comercial nem para utilização ao ar livre.
• Nunca deixar o aparelho sem vigilância quando em uso.
• As crianças não reconhecem os perigos associados ao uso incorrecto de aparelhos eléctricos.
Por isso, nunca permita que as crianças utilizem electrodomésticos sem supervisão.
• Retirar sempre a ficha da tomada de corrente quando o aparelho não está a ser usado e antes de
ser limpo.
• Atencão! A voltagem nominal estará presente enquanto o aparelho estiver ligado a corrente.
• Desligue o aparelho antes de o desligar da tomada de electricidade.
• Não segurar o aparelho pelo cabo de alimentação.
CONSELHOS DE SEGURANÇA ESPECIAIS
• O aparelho aquece muito depressa e arrefece lentamente. Por conseguinte, esteja atento(a)
à água quente e ao vapor de água que se liberta, durante e após a utilização! Toque apenas
na pega manual.
• Não utilize nenhum acessório que não tenha sido fornecido com este aparelho!
• Este aparelho não deve ser colocado perto de outros aparelhos quentes (por exemplo, perto de
um fogão ou de um forno).
• Atenção: Durante o funcionamento, o cabo não deve ficar em contacto com as peças
quentes do aparelho!
• Este aparelho foi concebido para cozer ovos. Por favor, não o utilize para aquecer outros
alimentos.
• O aparelho não deve ser utilizado sem a tampa (6) e sem o recipiente para ovos (2).
ANTES DA PRIMEIRA COLOCAÇÃO EM FUNCIONAMENTO
• Retire todos os materiais de embalagem.
• O aparelho deve ser limpo antes da primeira utilização (consultar LIMPEZA E CUIDADOS).
• Aquando da primeira utilização, pode ser libertado um leve fumo e odores. Trata-se de resíduos
dos materiais de fabrico, que são queimados na superfície do aparelho
UTILIZAÇÃO
• Neste aparelho, pode preparar até 7 ovos de galinha por cozedura. Por favor,
utilize apenas ovos frescos.
• Posicione o recipiente para ovos (2) na unidade do motor (1).
• Por favor utilize o furados de ovo (3) para fazer um pequeno orifício na ponta
do ovo. Desta forma, não há risco do ovo quebrar.
Atenção, perigo de ferimento: A agulha do furador de ovos (3) é muito
afiada!
• Em cada um dos sete porta-ovos (4), apenas pode ser colocado um ovo. Por
favor, coloque a parte mais arredondada do ovo no respectivo porta-ovos (4)
(consultar figura).
• A seguir, introduza a quantidade necessária de água limpa e fria no copo graduado (13). A
quantidade de água depende do número de ovos a cozer e do grau de firmeza do ovo (mal
cozido, bem cozido ou mediamente cozido). No copo graduado (13), encontram-se três escalas
graduadas (12) que indicam a quantidade de água a utilizar (indicações em inglês, alemão e
francês):
Escala 1 – soft, weich, mollet (mal cozido) Tempo: aprox. 12 minutos
Escala 2 – medium, mittel, medium (medianamente cozido) Tempo: aprox. 15 minutos
Escala 3 – hard, hart, dur (bem cozido) Tempo: aprox. 17 minutos
• Exemplo: Se desejar preparar quatro ovos mais cozidos, encha com água até à marca 4 da
escala graduada 1 (12).
• Se a sua água for muito dura, pode acrescentar meia colher de chá de vinagre. Por favor, não
utilize outro líquido para além da água. Também não deverá colocar outros ingredientes (como,
por exemplo, sal) na água.
• A água deve ser introduzida apenas no copo graduado (13) do recipiente para água (11). Por
25 26
Pt
Pt
Pt
Pt
2
1
4
9
5
8
2
7
6
1
3
12
10
13
11
MANUAL DE INSTRUÇÕES EK111 COZEDOR DE OVOS EM AÇO INOXIDÁVEL
Caro consumidor
Para evitar danos ou acidentes causados pelo uso inadequado, leia cuidadosamente este manual
de instruções antes de operar o aparelho. Siga as instruções de segurança todas as vezes que
utilizar o aparelho. Se este aparelho passer para as mãos de uma outra pessoa, certifique-se de
que as instruções de funcionamento da ventoinha/aquecedor vão juntamente com o aparelho.
ESTRUTURA
1. Unidade do motor
2. Recipiente para ovos
3. Furador de ovos
4. Porta-ovos
5. Tampa
6. Abertura para vapor
7. Cabo com ficha
8. Pega manual (tampa)
9. Pega manual (recipiente para ovos)
10. Interruptor I O
11. Recipiente para água
12. Escala graduada
13. Copo graduado
INFORMAÇÕES RELATIVAS À SEGURANÇA
• A utilização incorrecta pode danificar o aparelho e causar ferimentos ao utilizador.
• O aparelho apenas pode ser utilizado para o seu fim previsto. Não será assumida qualquer
responsabilidade por possíveis danos causados pelo uso incorrecto ou manuseamento impróprio.
• Antes de ligar o dispositivo a fonte de corrente, verificar que a corrente e a voltagem
correspondam aquelas indicadas na chapa.
• Não colocar o aparelho ou a tomada em agua ou otro liquido. Em caso que isso acontese-se
acidentalmente, disligar o aparelho imediatamente e fazer-lo examinar por pessoa qualificada
antes de utiliza-lo novamente. A não observancia desta regra pode causar un choque eletrico
fatal.
• Não procurar abrir a caixa sozihnos.
• Não coloque quaisquer objectos no interior da caixa.
• Não use o aparelho com as mãos molhadas, sobre uma superfície húmida ou quando o próprio
aparelho estiver molhado.
• Não toque na tomada com as mãos molhadas ou húmidas.
• Verificar o fio e a tomada regularmente para excluir posiveis danos. Si o fio ou a tomada
estiverem prejudicados, terão que ser substituidos pelo fabricante ou por pessoa qualificada para
excluir posiveis perigos.
• Não utilizar o aparelho no caso de cair ou ficar danificado de outro modo, ou ainda se o cabo ou a
ficha estiverem danificados. No caso de avaria, levar o aparelho a uma oficina de reparações
eléctricas para ser examinado e reparado se necessário.
• Nunca tente reparar o aparelho por si próprio. Poderá sofrer um choque eléctrico.
• Não deixar o cabo pendurado sobre arestas cortantes e mantê-lo afastado de objectos quentes e
chamas vivas. Para retirar a ficha da tomada segurar sempre pela ficha.
• Para protecção adicional, é possível equipar a instalação eléctrica doméstica com um disjuntor de
corte de corrente, com uma corrente de interrupção nominal não superior a 30mA. Aconselhe-se
com o seu electricista.
• Certifique-se de que não há perigo de o cabo ou a extensão serem puxados ou de alguém
tropeçar neles durante a utilização.
• Se for utilizado um cabo de extensão, terá de ser apropriado para o consumo de energia do
aparelho; caso contrário, pode ocorrer um sobreaquecimento do cabo de extensão e/ou da ficha.

favor, não deite água no invólucro da unidade do motor (1)!
• Tape o acessório para ovos (4) com a tampa (5). Por favor, certifique-se de que o acessório para
ovos (4) e a tampa (5) estão bem colocados sobre a unidade do motor (1).
• Coloque o interruptor O/I (10) na posição O (= aparelho desligado).
• Ligue a ficha (7) a uma tomada adequada e coloque o interruptor O/I (10) na posição I. A luz de
controlo do interruptor O/I (10) acende-se.
• A placa de cozedura da unidade do motor (1) começa a aquecer a água contida no recipiente
para água (11).
• Atenção: As peças do aparelho ficam muito quentes durante e após o funcionamento!! Durante e
após o funcionamento, toque apenas nas pegas manuais (8, 9). Preste uma atenção especial à
água a ferver e ao vapor de água libertado!
• Perigo de queimadura: Durante o funcionamento, o aparelho não pode ser transportado.
• A água ferve e é libertado vapor de água a ferver através da abertura para vapor (6).
• A tampa (5) não pode ser retirada durante a cozedura dos ovos. O vapor de água seria
imediatamente libertado para fora.
• Logo que a água do recipiente para água se evapore, os ovos estão cozidos. É emitido um sinal
sonoro. A luz de controlo do interruptor O/I (10) apaga-se. A placa de cozedura da unidade do
motor (1) arrefece.
• Coloque o interruptor O/I (10) na posição O. O sinal sonoro é desactivado. Desligue a ficha (7).
• Perigo de queimadura: Por favor, levante cuidadosamente a tampa (5) do aparelho. Para tal,
segure na pega manual (8)!
• Retire o recipiente para ovos (2) do aparelho, segurando pela pega manual (9). Passe os ovos
por água fria e corrente durante alguns instantes. Os ovos estão, agora, prontos a servir. Com um
pano, passe-os do porta-ovos (4) para um oveiro.
LIMPEZA E CUIDADOS
• Para este efeito, também deverão ser observados os conselhos de segurança.
• Deixe o aparelho arrefecer completamente antes de iniciar a respectiva limpeza.
• A tampa (6) e o recipiente para ovos (2) podem ser limpos com água e detergente para a loiça.
• Utilize um pano humedecido com água e detergente para limpar o invólucro e o recipiente para
água (11). Após a limpeza, seque cuidadosamente todas as peças.
• Cuidado! Os elementos eléctricos do aparelho não devem ficar em contacto com água!
• Descalcificação do recipiente para água (11): A casca dos ovos é extremamente calcária. Este
calcário pode depositar-se no recipiente para água (11), se este não for regularmente
descalcificado. Para tal, deite um pouco de vinagre de cozinha no copo graduado (13). Encha o
copo graduado (13) com água. Deite esta mistura no recipiente para água (11). Deixe actuar
durante 30 minutos e despeje a mistura. Seque o recipiente para água (11) com um pano.
• Por favor, NÃO deixe esta mistura ferver no aparelho!
• Recomendamos que o aparelho seja arrumado na respectiva caixa de cartão após a limpeza.
DADOS TÉCNICOS
Tensão de funcionamento : 230 V~ 50 Hz
Consumo de energia : 350 W
27 28
Pt
Pt
Aprovada pela
CONSELHOS PARA PROTECÇÃO DO AMBIENTE
Este produto, no fim do seu período de vida útil, não deve ser depositado no lixo
doméstico normal. Deverá ser, pelo contrário, depositado num ponto de recolha para
reciclagem de aparelhos eléctricos e electrónicos. O símbolo no produto, as instruções
de utilização e a embalagem chamam a atenção para esse facto.
As matérias-primas são reutilizáveis de acordo com as suas características. Com a reutilização, a
utilização material ou outras formas de utilização de aparelhos velhos fazem com que dê um
contributo valioso para a protecção do nosso ambiente.
Por favor, informe-se junto das autoridades locais sobre os centros de recolha competentes.
GARANTIA E SERVIÇO PÓS-VENDA
Antes da entrega os nossos aparelhos são submetidos a um severo controlo de qualidade. Se,
apesar de todos os cuidados tanto no processo de produção como no transporte, o aparelho
apresentar algum defeito, agradecemos o favor de o devolver ao vendedor. Independentemente de
todos os direitos de garantia legais, o comprador tem os seguintes prorrogativas em relação à
garantia: Para o aparelho adquirido, oferecemos uma garantia de 2 anos a começar no dia da
aquisição. Durante este período eliminamos gratuitamente qualquer deficiência provadamente
atribuível a defeitos de materiais ou de fabricação, quer por meio de reparação, quer por troca.
As deficiências provocadas por utilização inadequada do aparelho, por intervenção ou reparação
por parte de terceiros ou pela montagem de peças estranhas não são cobertas pelo âmbito desta
garantia.
elta GmbH
Carl-Zeiss-Str. 8
63322 Rödermark

29 30
INSTRUKCJA OBSŁUGI
EK111 MASZYNKA ZE STALI SZLACHETNEJ DO GOTOWANIA JAJ
Szanowny Kliencie,
W celu unikni∏cia niepo àdanych uszkodzeƒ i wypadków, spowodowanych przez nieprawidłowe
u ycie urzàdzenia, nale y przed uruchomieniem go uwa nie przeczyta poni szà instrukcj∏ obsługi.
Prosimy stosowa jà zawsze i bez wyjàtku. Przekazujàc urzàdzenie osobie trzeciej, nale y dołàczy
do niego instrukcj∏ obsługi.
BUDOWA
1. Jednostka nap∏dowa
2. Wkładka na jaja
3. Przyrzàd do nakłuwania
4. Przegroda na jajo
5. Pokrywa
6. Otwór wylotu pary
7. Kabel zasilajàcy z wtyczkà
8. Uchwyt (pokrywa)
9. Uchwyt (wkładka)
10. Wyłàcznik I O
11. Zbiornik na wod∏
12. Skala pomiarowa
13. Miarka
WARUNKI BEZPIECZE¡STWA
• Nieprawidłowa obsługa oraz nieodpowiednie obchodzenie si∏ z urzàdzeniem mogà prowadzi do
zakłóceƒ jego pracy i do obra eƒ ciała u ytkownika.
• Urzàdzenie mo e by u ywane jedynie do przewidzianego celu. W przypadku niezgodnego z
przeznaczeniem u ycia lub nieodpowiedniej obsługi nie b∏dzie przej∏ta odpowiedzialnoÊ za
powstałe szkody.
• Przed podłàczeniem urzàdzenia do sieci nale y sprawdzi , czy rodzaj pràdu oraz napi∏cie
sieciowe zgadza si∏ z danymi na tabliczce znamionowej urzàdzenia.
• Nie zanurza urzàdzenia i wtyczki w wodzie lub innych płynach. Je eli jednak zdarzy si∏, e
urzàdzenie wpadnie do wody, natychmiast wyciàgnà wtyczk∏ z gniazdka, a urzàdzenie przekaza
przed ponownym u yciem do przeglàdu przez fachowca. Istniej niebezpieczeƒstwo zagro enia
ycia przez pora enie pràdem!
• Nigdy nie otwiera samemu obudowy!
• W adnym wypadku nie wprowadza przedmiotów do wn∏trza obudowy.
• Nie dotyka urzàdzenia mokrymi r∏kami, nie stawia go na wilgotnym podło u i nie u ywa go,
je eli jest mokre.
• Nigdy nie chwyta wtyczki mokrymi r∏kami.
• Kontrolowa regularnie kabel zasilajàcy i wtyczk∏ pod wzgl∏dem ewentualnych uszkodzeƒ. W
przypadku uszkodzeƒ kabel zasilajàcy i wtyczka muszà zosta wymienione przez producenta lub
wykwalifikowanego fachowca w celu unikni∏cia nara enia na niebezpieczeƒstwo.
• Nie u ywa urzàdzenia, je eli kabel zasilajàcy i wtyczka wykazujà uszkodzenia, urzàdzenie upadło
na ziemi∏ lub uszkodzone zostało uszkodzone w inny sposób. W takich przypadkach przekaza
urzàdzenie do kontroli wzgl∏dnie naprawy w specjalistycznym warsztacie.
• Nie próbowa nigdy naprawy samemu. Istnieje niebezpieczeƒstwo pora enia pràdem!
• Nie zawiesza kabla sieciowego nad ostrymi kantami i trzyma z dala od goràcych przedmiotów i
otwartego płomienia. Odłàcza kabel od gniazdka ciàgnàc tylko za wtyczk∏.
• Dodatkowà ochron∏ zapewnia monta w instalacji domowej zabezpieczenia o znamionowym
pràdzie wyzwalajàcym nie wi∏kszym jak 30 mA. Prosz∏ zasi∏gnà rady u instalatora urzàdzeƒ
elektrycznych.
Pol
Pol
2
1
4
9
5
8
2
7
6
1
3
12
10
13
11
• kabel zasilajàcy, jak i ewentualny przedłu acz tak uło y , eby nie było mo liwe niezamierzone
pociàgni∏cie oraz potkni∏cie si∏ o niego.
• Je eli u ywany jest przedłu acz, musi on posiada odpowiednie parametry. W przeciwnym
wypadku nastàpi mo e przegrzanie kabla i/lub wtyczki.
• Urzàdzenie nie jest przeznaczone do u ytku przemysłowego i do stosowania na zewnàtrz.
• Nigdy nie pozostawia urzàdzenia bez nadzoru w trakcie jego u ytkowania.
• Dzieci mogà nie rozpozna niebezpieczeƒstwa wynikajàcego z nieumiej∏tnego obchodzenia si∏
urzàdzeniami elektrycznymi. Dlatego nigdy nie wolno pozwoli dzieciom obsługiwa urzàdzenia
bez nadzoru.
• Wyciàgnà wtyczk∏ z gniazdka, je eli urzàdzenie nie jest u ywane i przed czyszczeniem.
• Uwaga! Urzàdzenie jest pod napi∏ciem dopóki podłàczone jest ono gniazdka.
• Wyłàczy urzàdzenie przed wyciàgni∏ciem wtyczki z gniazdka.
• Nigdy nie przenosi urzàdzenia trzymajàc za kabel.
SZCZEGÓLNE WSKAZÓWKI BEZPIECZE¡STWA
• Urzàdzenie nagrzewa si∏ szybko, a wolno stygnie. Dlatego podczas u ytkowania i po jego
zakoƒczeniu uwa a na goràcà wod∏ i wydostajàcà si∏ par∏ wodnà! Urzàdzenie dotyka
tylko za uchwyty.
• Nie stosowa akcesoriów, które nie były dostarczone wraz z urzàdzeniem!
• Nie ustawia maszynki w pobli u goràcych urzàdzeƒ (np. kuchenki lub piece).
• Uwaga: Kabel zasilajàcy nie mo e dotyka podczas u ytkowania goràcych cz∏Êci urzàdzenia!
• Urzàdzenie przeznaczone jest tylko do gotowania jajek. Nie nale y podgrzewa w nim innych
produktów spo ywczych.
• Urzàdzenie nie mo e pracowa bez pokrywy (6) i bez wkładki (2).
PRZED PIERWSZYM URUCHOMIENIEM
• Usunà wszystkie materiały opakunkowe.
• Urzàdzenie oczyÊci jak opisano w punkcie Czyszczenie i piel´gnacja.
• Podczas pierwszego u ytkowania dojÊ mo e do powstania charakterystycznego zapachu i
pojawienia si∏ dymu. Chodzi tu o pozostałoÊci poprodukcyjne, które spalajà si∏ na powierzchni
zewn∏trznej urzàdzenia.
OBSŁUGA
• Za pomocà urzàdzenia gotowa mo na jednorazowo do 7 jaj. Prosz∏ u ywa tylko Êwie e jaja.
• Wkładk∏ (2) umiejscowi na jednostce nap∏dowej (1).
• Za pomocà przyrzàdu do nakłuwania (3) nale y zrobi mały otwór po
szpiczastej stronie jaja. Nie stosowa przy tym siły, aby nie rozbi skorupki.
Uwaga, niebezpieczeƒstwo skaleczenia: Igła przyrzàdu do nakłuwania jest
bardzo ostra!
• Do ka dej z siedmiu przegród na jaja (4) wsadzi mo na tylko jedno jajo.
Jaja wsadzamy do przegród (4) rozwartà stronà jaja (patrz rysunek).
• Przed umieszczeniem jaja na tacce nale y za pomocà urzàdzenia do
nakłuwania wykona mały otwór po szpiczastej stronie jaja. IloÊ wody
zale na jest od iloÊci gotowanych jaj oraz od wymaganego stopnia twardoÊci
(na mi∏kko, Êrednio, na twardo). Na miarce (13) znajdujà si∏ trzy skale
pomiarowe (12), które wskazujà, ile wody powinno by zastosowane (dane w j∏zykach angielskim,
niemieckim i francuskim).
Pozycja 1 – soft, weich, mollet (na mi∏kko) Czas gotowania około 12 minut
Pozycja 2 – medium, mittel, medium (na półtwardo) Czas gotowania około 15 minut
Pozycja 3 – hard, hart, dur (na twardo) Czas gotowania około 17 minut
• Przykład: W celu ugotowania czterech jajek na mi∏kko nale y napełni miark∏ wodà do poziomu
czwartej kreski skali pomiarowej (12).
Pol
Pol

• Je eli woda jest bardzo twarda, mo na doda do niej pół ły eczki octu. Nie nale y u ywa adnych
innych płynów ni woda. Do wody nie nale y dodawa adnych produktów (na przykład soli).
• Wod∏ nale y wla do pojemnika na wod∏ (11) za pomocà miarki (13) uwa ajàc aby woda nie
wylała si∏ na obudow∏ silnika (1) !
• Na pojemnik na jajka (4) nało y pokryw∏ (5). Upewni si∏ czy pojemnik na jajka (4) i pokrywa (5)
sà dobrze osadzone na cz∏Êci silnikowej (1).
• Włàcznik O/I (10) nastawi na pozycj∏ O (= Aparat wyłàczony).
• Wło y wtyczk∏ (7) do odpowiedniego gniazdka po czym włàcznik O/I (10) nastawi na pozycj∏ I.
Zapala si∏ lampka kontrolna włàcznika O/I (10).
• Płyta grzewcza jednostki nap∏dowej (1) rozpoczyna podgrzewanie wody w zbiorniku (11).
• Uwaga: Niektóre cz∏Êci urzàdzenia sà podczas u ytkowania i po jego zakoƒczeniu bardzo goràce!
Podczas u ytkowania urzàdzenia i po jego zakoƒczeniu dotyka tylko za uchwyty (8, 9). Prosz∏
szczególnie uwa a na goràcà wod∏ i wychodzàcà par∏ wodnà!
• Niebezpieczeƒstwo oparzenia: Nie wolno przesuwa urzàdzenia w takcie jego pracy.
• Woda gotuje si∏, a para wodna wydostaje si∏ przez otwór wylotu pary (6).
• Podczas gotowania jaj nie wolno zdejmowa pokrywy (5), gdy zebrana para natychmiast si∏ ulotni.
• W momencie gdy woda z pojemnika wyparuje, jajka sà ugotowane. Włàcza si∏ sygnał dêwi∏kowy.
Lampka kontrolna włàcznika O/I (10) gaÊnie. Płytka grzejna cz∏Êci silnikowej (1) zaczyna wtedy
stygnà .
• Włàcznik O/I (10) nastawi na pozycj∏ O . Wyłàczy si∏ wtedy sygnał dêwi∏kowy. Wtyczk∏ (7)
wyciàgnà z gniazdka.
• Niebezpieczeƒstwo oparzenia: Z urzàdzenia zdjà ostro nie pokryw∏ (5), chwytajàc za uchwyt (8)!
• Wkładk∏ (2) trzymajàc za uchwyt (9) zdjà z urzàdzenia. Jaja wystudzi krótko w zimnej, bie àcej
wodzie. Jaja mo na teraz poda do stołu. Jaja wyjmowa z przegród (4) przez Êciereczk∏.
CZYSZCZENIE I PIEL¢GNACJA
• Koniecznie przestrzega wskazówek bezpieczeƒstwa
• Przed przystàpieniem do czyszczenia urzàdzenie nale y całkowicie wystudzi .
• Pokrywa (6) i wkładka (2) mogà by zmywane w wodzie z dodatkiem płynu do naczyƒ..
• Do czyszczenia obudowy i zbiornika na wod∏ (11) stosowa zwil onà w wodzie z płynem do
naczyƒ Êciereczk∏. Po zakoƒczeniu czyszczenia urzàdzenie starannie wysuszy .
• Uwaga! Elektryczne elementy urzàdzenia nie mogà wejÊ w kontakt z wodà!
• Usuwanie kamienia ze zbiornika na wod∏ (11): Skorupki jaj zawierajà du o wapna. Wapno to
mo e pokry zbiornik na wod∏ (11), je eli nie b∏dzie regularnie usuwane. W tym celu do miarki (13)
wla nale y octu i dopełni jà wodà. Mieszank∏ tà przela nale y nast∏pnie do zbiornika na wod∏
(11). Po 30 minutach działania mieszank∏ tà mo na wyla . Zbiornik na wod∏ wytrze (11) do sucha.
• NIE gotowa tej mieszanki w aparacie !
• Polecamy przechowywanie urzàdzenia po umyciu w oryginalnym kartonie.
DANE TECHNICZNE
Napi∏cie znamionowe : 230V~ 50Hz
Moc : 350 W
WSKAZÓWKI DOTYCZÑCE OCHRONY ÂRODOWISKA
Po zakoƒczeniu okresu trwałoÊci produktu nie wolno wyrzuca do Êmieci z
gospodarstwa domowego. Powinien by on oddany do punktu zbiórki urzàdzeƒ
elektronicznych i elektrycznych przeznaczonych do recyclingu. Wskazuje na to symbol
na produkcie, w instrukcji obsługi lub opakowaniu.
Materiały nadajà si∏ do ponownego przetworzenia zgodnie z ich oznakowaniem. Dzi∏ki ponownemu
przetworzeniu, właÊciwej utylizacji lub innym formom wykorzystania starych urzàdzeƒ majà Paƒstwo
wa ny wkład w ochronie naszego Êrodowiska.
Prosz∏ zapyta si∏ w administracji gminnej o właÊciwe miejsce utylizacji.
31 32
Pol
Pol
Pol
Pol
Zatwierdzone
GWARANCJA I ZAKŁADY USŁUGOWE
Wszystkie nasze wyroby s∏ starannie testowane jakoÊciowo przed przekazeniem na sprzeda . W
wypadku jednak uszkodzeƒ, spowodowanych transportem lub fabrycznych, nale y urzàdzenie
zwróci do sklepu, w którym zostało kupione. Oprócz wszelkich praw gwarancyjnych producent
zapewnia nabywcom:
Produkt ma 2-latnià gwarancj∏ poczàwszy od dnia zakupu. W tym terminie, ka de uszkodzenie na
skutek fabrycznej wadliwoÊci, lub wadliwoÊci materialów, usuwana b∏dzie bezpłatnie poprzez
wymian∏ urzàdzenia lub remont. Gwarancja nie dotyczy uszkodzeƒ spowodowanzch nieprawidłowà
eksploatacjà, nie przestrzeganiem instrukcji, nie dozwolonymi zmianami lub
remontowaniem przez osob∏ nie uprawnionà.
elta GmbH
Carl-Zeiss-Str. 8
63322 Rödermark

GEBRUIKSAANWIJZING EK111 EIERKOKER MET EDELSTAAL DESIGN
Beste Klant,
Om schade te voorkomen door verkeerd gebruik lees eerst de gebruiksaanwijzing goed door. Volg
altijd de veiligheidsinstructies. Wanneer dit apparaat doorgegeven wordt aan een ander persoon
zorg dan dat de gebruiksaanwijzing aanwezig is.
OPBOUW
1. Motoreenheid
2. Eierschaal
3. Eierprikker
4. Eierinzet
5. Afdekkap
6. Dampopening
7. Netsnoer met netstekker
8. Handgreep (kap)
9. Handgreep (Eierschaal)
10. Aan/uit-schakelaar I O
11. Waterreservoir
12. Meetschaal
13. Maatbeker
VEILIGHEIDSINSTRUCTIES
• Een verkeerd gebruik of een onjuiste behandeling kan tot storingen van het apparaat en
verwondingen bij de gebruiker leiden.
• Het apparaat mag enkel voor de voorziene doeleinden gebruikt worden. Bij een onjuist gebruik, of
bij een verkeerde hantering wordt geen aansprakelijkheid voor eventueel optredende schade
aanvaard.
• Gelieve voor de aansluiting op het net te controleren of het stroomtype en de netspanning
overeenkomen met de desbetreffende gegevens op het typeplaatje van het apparaat.
• Het apparaat en de netstekker niet in water of andere vloeistoffen onderdompelen. Als het
apparaat toch ooit in het water terechtkomt, onmiddellijk de stekker uittrekken en het apparaat bij
een vakman laten controleren alvorens het opnieuw te gebruiken. Anders bestaat levensgevaar
wegens het risico van een elektrische schok.
• Probeer nooit zelf om de behuizing te openen!
• Steek niet met voorwerpen in de binnenkant van de behuizing.
• Gebruik het apparaat niet als u natte handen heeft, op een vochtige vloer of als het apparaat nat
is.
• De netstekker nooit met natte of vochtige handen aanraken.
• De netkabel en de netstekker regelmatig op eventuele beschadigingen controleren. Bij
beschadigingen moeten de netkabel en de netstekker door een hersteller, resp. een bevoegde
technische dienst vervangen worden om gevaar te vermijden.
• Het apparaat niet in gebruik nemen als de netkabel of de netstekker schade vertonen, of als op
het apparaat op de grond gevallen is, of op een andere manier beschadigd werd. In dergelijke
gevallen moet het apparaat ter controle en eventuele herstelling naar een bevoegde technische
dienst gebracht worden.
• Porbeer nooit om het apparaat zelf te herstellen. U zou het gevaar lopen een elektrische schok
te krijgen!
• De netkabel niet over scherpe kanten latenB hangen en uit de buurt houden van verhitte
voorwerpen en open vlammen. Trek de kabel enkel aan de stekker uit het stopcontact.
• De inbouw van een verliesstroomschakelaar met een nominale afvalstroom van niet meer dan 30
mA in de huisinstallatie biedt een bijkomende bescherming. Vraag raad aan uw elektro-installateur.
• Leg de kabel en de eventueel benodigde verlengkabel zodanig dat men er niet ongewild aan kan
trekken of erover kan vallen.
• Als een verlengkabel gebruikt wordt, moet deze voor het overeenkomstig vermogen geschikt zijn.
Anders kan het tot een oververhitting van de kabel en/of stekker komen.
• Dit apparaat is noch voor commercieel gebruik, noch voor gebruik in openlucht geschikt.
• Laat het apparaat tijdens het gebruik nooit onbewaakt achter.
• Kinderen kunnen de gevaren die in de verkeerde omgang met elektro-toestellen schuilen niet
herkennen.
Laat elektrische huishoudelijke apparatuur daarom nooit zonder toezicht door kinderen gebruiken.
• Trek de netstekker uit het stopcontact als het apparaat niet in gebruik is en voor elke reiniging.
• Opgelet! Het apparaat staat onder stroom zolang het op het stroomnet aangesloten is.
• Schakel het apparaat uit voordat u de stekker uit het stopcontact trekt.
• Het apparaat mag enkel gebruikt worden voor de doeleinden waarvoor het voorzien is.
• Er mogen enkel onderdelen van de fabrikant of van zijn plaatselijke verdeler gebruikt worden.
• Het apparaat nooit aan het netsnoer dragen.
BIJZONDERE VEILIGHEIDSINSTRUCTIES
• Het toestel warmt snel op en koelt slechts langzaam terug af. Let daarom tijdens en na het
gebruik steeds op voor het heet water en de opstijgende waterdampen! Raak alleen de
handgrepen aan.
• Gebruik geen toebehoren dat niet bij het toestel geleverd werd!
• Het toestel niet naast hete toestellen plaatsen (bv. naast een kookvuur of oven).
• Opgelet: Het netsnoer mag tijdens de werking niet in aanraking komen met de hete delen van het
toestel!
• Dit toestel is enkel geschikt voor het koken van eieren. Probeer aub niet om er andere
voedingsmiddelen in op te warmen.
• Het toestel mag niet zonder de afdekkap (6) en niet zonder de eierschaal (2) gebruikt worden.
VOOR DE EERSTE INGEBRUIKNEMING
• Alle verpakkingsmaterialen verwijderen.
• Het toestel voor het eerste gebruik reinigen (zie REINIGING EN ONDERHOUD).
• Bij het eerste gebruik kan een lichte rook- en geurontwikkeling ontstaan. Het gaat daarbij om
eventuele kleine restanten uit de fabriek die op het oppervlak van het toestel verbrand worden.
BEDIENING
• Met het toestel kunnen tot 7 kippeneieren per keer gekookt worden. Gelieve
enkel verse eieren te gebruiken.
• De eierschaal (2) op de motoreenheid (1) plaatsen.
• Gelieve met de eierprikker (3) een klein gaatje in de smalle punt van het ei te
steken. Daarbij geen geweld uitoefenen om de eierschaal niet te breken.
Opgelet, gevaar van verwondingen: De naald van de eierprikker (3) is zeer
scherp!
• In elk van de zeven eierinzetten (4) kan slechts één ei gezet worden. Gelieve
het ei steeds met de brede kant in de eierinzet (4) te zetten (zie afbeelding).
• Nu de nodige hoeveelheid koud, zuiver water in de maatbeker (13) vullen. De
hoeveelheid water is afhankelijk van het aantal te koken eieren en van de gewenste
hardheidsgraad (zacht, middelmatig of hard gekookt). Op de maatbeker (13) bevinden zich drie
meetschalen (12) die aangeven hoeveel water gebruikt moet worden (aangegeven in het Engels,
Duits en Frans):
Schaal 1 – soft, weich, mollet (zacht) Kooktijd: ca. 12 minuten
Schaal 2 – medium, mittel, medium, (middelmatig) Kooktijd: ca. 15 minuten
Schaal 3 – hard, hart, dur (hard) Kooktijd: ca. 17 minuten
• Voorbeeld: Als vier eieren zacht gekookt moeten worden, bij meetschaal 1 (12) het water tot aan
de markering 4 vullen.
33 34
NL
NL
NL
NL
2
1
4
9
5
8
2
7
6
1
3
12
10
13
11

• Als uw water erg hard zou zijn, kan aan het water een halve theelepel azijn toegevoegd worden.
Gelieve geen andere vloeistoffen dan water te gebruiken. Er mogen ook geen toevoegingen (zoals
zout) aan het water toegevoegd worden.
• Het water nu uit de maatbeker (13) in het waterreservoir (11) gieten. Gelieve erop te letten dat u
geen water op de behuizing van de motoreenheid (1) morst!
• Eierinzet (4) met de afdekkap (5) bedekken. Gelieve goed na te kijken of de eierinzet (4) en de
afdekkap (5) veilig op de motoreenheid (1) bevestigd zijn.
• De schakelaar O/I (10) op de positie O zetten (= apparaat uitgeschakeld).
• De netstekker (7) met een geschikt stopcontact verbinden en de schakelaar O/I (10) op positie I
zetten. De controlelamp in de schakelaar O/I (10) licht op.
• De kookplaat van de motoreenheid (1) begint het water in het waterreservoir (11) op te warmen.
• Opgelet: De delen van het toestel zijn tijdens en na het gebruik zeer heet! Tijdens en na het
gebruik enkel de handgrepen (8,9) aanraken. Let vooral op voor het heet water en de opstijgende
waterdampen!Gevaar van brandwonden!
• Het toestel mag tijdens het gebruik niet verschoven worden!
• Het water kookt en de hete waterdamp ontsnapt door de dampopening (6).
• De afdekkap (5) mag tijdens de kookprocedure niet verwijderd worden. De waterdamp zou anders
meteen ontsnappen.
• Zodra het water in het waterreservoir verdampt is, is het koken van de eieren klaar. Er volgt een
signaaltoon. De controlelamp in de schakelaar O/I (10) dooft. De kookplaat van de motoreenheid
(1) koelt nu af.
• De schakelaar O/I (10) op de positie O zetten. De signaaltoon stopt. De netstekker (7) uittrekken.
• Gelieve de afdekkap (5) voorzichtig van het toestel af te nemen. Daarbij de handgreep (8) gebruiken!
• De eierschaal (2) aan de handgreep (9) van het toestel nemen. De eieren kort onder koud,
stromend water laten schrikken. De eieren zijn nu klaar om opgediend te worden. Gelieve de
eieren met een doek van de eierinzetten (4) in de eierdopjes over te brengen.
REINIGING EN ONDERHOUD
• Let hierbij ook zeker op de veiligheidsinstructies.
• Het toestel volledig laten afkoelen voordat u met de reiniging ervan begint.
• De afdekkap (6) en de eierinzet (2) kunnen met water en wat vaatwasmiddel gereinigd worden.
• Voor de reiniging van de behuizing en het waterreservoir (11) een met water en wat
reinigingsmiddel bevochtigd doek gebruiken. Na de reiniging zorgvuldig afdrogen.
• Voorzichtig! De elektrische elementen van het toestel mogen niet met water in aanraking komen!
• Ontkalken van het waterreservoir (11): Eierschalen zijn zeer kalkhoudend. Deze kalk kan zich in
het waterreservoir (11) vastzetten als het niet regelmatig ontkalkt wordt. Daarvoor een beetje
huishoudelijke azijn in de maatbeter (13) gieten. De maatbeker (13) met water vullen. Gelieve
deze mengeling nu in het waterreservoir (11) te gieten. Na 30 minuten inwerking mag de
mengeling uitgegoten worden. Het waterreservoir (11) met een doek drogen.
• Deze mengeling NIET in het apparaat opkoken!
• We raden aan om het toestel na de reiniging in zijn originele doos te bewaren.
TECHNISCHE GEGEVENS
Bedrijfsspanning : AC 230V~ 50Hz
Vermogensopname : 350 Watt
AANWIJZINGEN INZAKE DE MILIEUBESCHERMING
Dit product mag aan het einde van zijn levensduur niet samen met het normale
huishoudelijke afval verwijderd worden, maar moet afgegeven worden op een
verzamelpunt voor de recycling van elektrische en elektronische apparatuur. Het
symbool op het product, in de gebruiksaanwijzing of op de verpakking maakt u daarop
attent.
De werkstoffen zijn volgens hun kenmerking herbruikbaar. Met het hergebruik, de stoffelijke
verwerking of andere vormen van recycling van oude apparaten levert u een belangrijke bijdrage
tot de bescherming van ons milieu.
Gelieve bij het gemeentebestuur informatie te vragen over het bevoegde verzamelpunt.
GARANTIE EN KLANTENDIENST
Alvorens onze apparaten de fabriek verlaten, worden ze aan een strenge kwaliteitscontrole onderworpen.
Indien niettegenstaande alle zorg tijdens de productie of tijdens het transport schade ontstaan zou zijn,
verzoeken wij u het apparaat terug te brengen naar uw verdeler. Naast de wettelijke waarborg heeft de
koper naar keuze recht op de volgende waarborgprestaties: Wij bieden op het gekocht apparaat 2 jaar
waarborg die op de dag van de verkoop begint te lopen. Binnen deze periode verhelpen we kostenloos
alle defecten die toe te schrijven zijn aan materiaal- of fabricagefouten, hetzij door herstelling, hetzij door
omruiling. Defecten die ontstaan zijn door een onjuist gebruik en door fouten die door ingrepen en
herstellingen van derden, of door de montage van vreemde onderdelen ontstaan zijn, vallen niet onder
deze garantie.
35 36
Conform
NL
NL
NL
NL
elta GmbH
Carl-Zeiss-Str. 8
63322 Rödermark

NÁVOD K POUŽITÍ EK111 VA¤I NA VAJÍ KA V NEREZOVÉM DESIGNU
Milá zákaznice, mil zákazníku,
proãtûte si prosím pozornû návod k použití pfiedtím, než pfiístroj pfiipojíte do sítû, abyste se
vyvarovali škod kvÛli nesprávnému použití. Obzvláštû dbejte bezpeãnostních upozornûní. Pokud
budete tento pfiístroj pfiedávat tfietím osobám, musíte pfiedat také tento návod k použití.
ÁSTI ZA¤ÍZENÍ
1. Hlavní ãást
2. Zásobník na vajíãka
3. Propichovaã vajíãek
4. Schránka na vajíãko
5. Kryt
6. Otvor na páru
7. SíÈov kabel a zástrãka
8. RukojeÈ (kryt)
9. RukojeÈ (zásobník na vajíãka)
10. Zap./vyp. spínaã O/I
11. Nádržka na vodu
12. Stupnice
13. Odmûrka
BEZPE NOSTNÍ UPOZORNùNÍ
• Nesprávná obsluha a neodborné zacházení mÛže vést k poruchám pfiístroje a zranûní uživatele.
• Pfiístroj smí b t používán pouze k urãenému ùãelu. Pfii použití k jinému než k urãenému ùãelu nebo
pfii nesprávném zacházení nemÛže b t pfievzata záruka za pfiípadné škody, které se vyskytnou.
• Pfied pfiipojením do sítû provûfite, zda druh proudu a síÈové napûtí odpovídají ùdajÛm na typovém
štítku na pfiístroji.
• Pfiístroj a síÈová zástrãka se nesmûjí ponofiovat do vody nebo jin ch tekutin. Pokud by pfiesto
pfiístroj spadl do vody, síÈovou zástrãku ihned vytáhnûte a pfiístroj nechte pfied dalším použitím
pfiekontrolovat u odborníka. Vzniká smrtelné nebezpe í kvÛli elektrické ránû!
• Nikdy sami nezkoušejte skfiíÀ otevírat!
• Nezavádûjte žádné pfiedmûty dovnitfi do skfiínû.
• Nepoužívejte pfiístroj, máte-li mokré ruce, na vlhkém podkladu, nebo je-li mokr .
• SíÈové zástrãky se nikdy nedot kejte mokr ma ani vlhk ma rukama.
• Kontrolujte pravidelnû síÈov kabel a síÈovou zástrãku kvÛli pfiípadn m poškozením. Dojde-li k
poškození, musí b t síÈov kabel a síÈová zástrãka vymûnûny v robcem, popfi. kvalifikovan m
pracovníkem, aby se zabránilo ohrožení.
• Pfiístroj neuvádûjte do provozu, vykazuje-li síÈov kabel nebo síÈová zástrãka vady, nebo pokud
pfiístroj upadl na zem, nebo byl jinak poškozen. V takov ch pfiípadech pfiístroj pfiineste k
pfiekontrolování a popfi. opravû do specializované opravny.
• Nikdy nezkoušejte pfiístroj sami opravovat. Vzniká nebezpeãí elektrické rány!
• SíÈov kabel nenechávejte viset pfies ostré hrany a nenechávejte jej v blízkosti hork ch pfiedmûtÛ a
otevfieného ohnû. Ze zásuvky ho vytahujte pouze za zástrãku.
• Dodateãnou ochranu zajišÈuje zabudování ochranného zafiízení pfii nedostateãném proudu se
jmenovit m vybavovacím proudem s více než 30 mA ve vnitfiní instalaci. Poraìte se se sv m
elektrikáfiem.
• Kabel a také popfi. potfiebn prodlužovací kabel položte tak, aby nebylo možné jej neùmyslnû
vytáhnout, popfi. zakopnout o nûj.
• Je-li používán prodlužovací kabel, musí b t tento vhodn pro odpovídající v kon, jinak dojde k
pfiehfiátí kabelu a/nebo zástrãky.
• Tento pfiístroj není vhodn ani pro prÛmyslové použití ani pro použití v pfiírodû.
• Bûhem používání pfiístroj nikdy nenechávejte bez dozoru.
• Dûti nemohou rozpoznat nebezpeãí, která vznikají neodborn m zacházením s elektrospotfiebiãi.
Proto nikdy nenechávejte dûti bez dozoru používat domácí spotfiebiãe.
• Pozor! Pfiístroj je pod proudem do té doby, dokud je pfiipojen do elektrické sítû.
• Pfied vytažením síÈové zástrãky pfiístroj vypnûte.
• Pfiístroj nikdy nenoste za jeho síÈov kabel.
ZVLÁŠTNÍ BEZPE NOSTNÍ POKYNY
• Zafiízení se velmi rychle zahfiívá, ale pomalu ochlazuje. Bûhem užívání a i po nûm vždy
dávejte pozor na horkou vodu i stoupající páru. Dot kejte se jen rukojetí.
• Nepoužívejte žádné pfiíslušenství, které nebylo souãástí balení.
• Zafiízení se nesmí umístit v blízkosti dalších hork ch pfiedmûtÛ (napfi. vafiiãe nebo trouby)
• Pozor: Napájecí kabel nesmí bûhem chodu pfiijít do styku s hork mi ástmi pfiístroje.
• Pfiístroj se smí používat pouze k vafiení vajec. Nezkoušejte prosím ohfiívat jiné potraviny.
• Zafiízení nezapínejte bez krytu (5) a bez zásobníku na vajíãka (2).
P¤ED PRVNÍM POUŽITÍM
• OdstraÀte vešker balící materiál.
• Zafiízení pfied prvním použitím oãistûte (viz.
âIŠTúNÍ A PÉâE
).
• Bûhem prvního spuštûní se mÛže objevit zápach nebo koufi. V tomto pfiípadû se jedná pouze o
drobné zbytky z v roby, které se spalují na povrchu zafiízení.
OVLÁDÁNÍ
• Najednou lze pfiipravit až sedm slepiãích vajíãek. Používejte prosím jen
ãerstvá vajíãka.
• Zásobník na vajíãka (2) umístûte na hlavní ãást (1).
• Špiãku vajíãka probodnûtû propichovaãem vajíãek (3). Nepoužívejte ale sílu,
aby nedošlo k prasknutí skofiápky. Upozornûní, nebezpe í úrazu: Jehla
propichovaãe vajíãek (3) je velmi ostrá.
• Vložte vždy jen jedno vajíãko do každé schránky na vajíãko (4). Vajíãko
umístûte nešpiãatou stranou smûrem dolÛ do schránky na vajíãko (4) (viz.
obrázek).
• Odmûrku (13) naplÀte správn m množstvím chladné a ãisté vody. Množství vody zavísí na poãtu
vajíãek a na délce vafiení (namûkko, stfiednû uvafiené nebo natvrdo). Na odmûrce (13) jsou
vyznaãeny tfii stupnice (12).
Tyto stupnice ukazují, kolik vody je tfieba použít (ùdaje v angliãtinû, nûmãinû a francouzštinû):
Stupnice 1 – soft, weich, mollet [namûkko] Doba vafiení: 12 minut
Stupnice 2 – medium, mittel, medium [stfiednû uvafiené] Doba vafiení: 15 minut
Stupnice 3 – hard, hart, dur [natvrdo] Doba vafiení: 17 minut
• Pfiíklad: Pokud chcete uvafiit ãtyfii vajíãka namûkko, naplÀte vodu po znaãku 4 na stupnici 1 (12).
• V pfiípadû, že je voda pfiíliš tvrdá, mÛžete pfiidat pÛl lžiãky octa. Jinak žádné další kapaliny do vody
nepfiídávejte. Do vody se nesmí pfiidávat ani žádné další pfiísady (napfi. sÛl).
• Vodu nalévejte do nádržky (11) jen odmûrkou (13). Vyhnûte se polití vodou krytu hlavní ãásti (1).
• Schránku na vajíãko (4) zavfiete krytem (5). Ujistûte se, že schránka na vajíãko (4) a kryt jsou
správnû umístûny na hlavní ãásti (1).
• Zap./vyp. spínaã O/I (10) nastavte do pozice
O
(= zafiízení je vypnuto).
• Zapojte zástrãku (7) do odpovídající zásuvky a zap./vyp. spínaã I/O (10) nastavte do pozice
I
.
Kontrolní signálka na zap./vyp. spínaãi I/O (10) se rozsvítí.
• Plot nka hlavní ãásti (1) zaãne ohfiívat vodu v nádržce (11).
• Upozornûní: Pfii užívaní a po nûm jsou ásti zafiízení velmi horké. Bûhem chodu se dot kejte
pouze rukojeti zafiízení (8, 9). Dávejte pozor pfiedevším na horkou vodu i stoupající páru.
• Nebezpeãí požáru! Bûhem chodu se zafiízení nesmí pfiemisÈovat.
• Horká voda a pára uniká otvorem na páru (6).
• Bûhem vafiení vajíãek nesmí b t snímán kryt (5). Pára v tomto pfiípadû okamžitû uniká.
37 38
2
1
4
9
5
8
2
7
6
1
3
12
10
13
11
CZ
CZ
CZ
CZ
A página está carregando...
A página está carregando...
A página está carregando...
-
 1
1
-
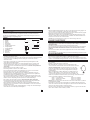 2
2
-
 3
3
-
 4
4
-
 5
5
-
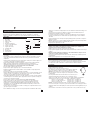 6
6
-
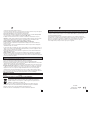 7
7
-
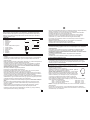 8
8
-
 9
9
-
 10
10
-
 11
11
-
 12
12
-
 13
13
-
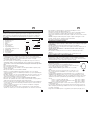 14
14
-
 15
15
-
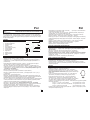 16
16
-
 17
17
-
 18
18
-
 19
19
-
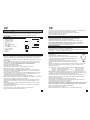 20
20
-
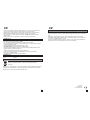 21
21
-
 22
22
-
 23
23


Elta EK111 Manual do usuário
- Categoria
- Panelas de ovo
- Tipo
- Manual do usuário
em outras línguas
- español: Elta EK111 Manual de usuario
- français: Elta EK111 Manuel utilisateur
- italiano: Elta EK111 Manuale utente
- Nederlands: Elta EK111 Handleiding
- Deutsch: Elta EK111 Benutzerhandbuch
- Türkçe: Elta EK111 Kullanım kılavuzu
Artigos relacionados
Outros documentos
-
Tristar EK-3074 Manual do usuário
-
Tristar EK-3076 Manual do proprietário
-
Princess 01.262046.01.001 Egg Boiler Manual do usuário
-
Tristar EK-3076AH Manual do usuário
-
-
Silvercrest SEKD 400 A1 Operating Instructions Manual
-
Princess 261905 Instruções de operação
-
Clatronic EK 3321 Manual do proprietário
-
Sinbo SEB 5802 Guia de usuario
-
OK OEB 102 Manual do usuário