ZAPTEC Go Next Generation EV Charging Guia de instalação
- Tipo
- Guia de instalação

Zaptec
Smart, small
and safe
Zaptec Go
Installation Manual


English 6
Norsk 24
Svenska 42
Dansk 60
Deutsch 78
Français 96
Italiano 114
Nederlands 132
íslenska 114
Polski 132
Português 150
ไทย 168
Spanish 186

Zaptec Go
works with
any car
No matter what you drive or where
you’re going, Zaptec Go is the surest
way to power your journey. Built on
leading edge Norwegian green tech,
we’ve created a charger, that’s as
smart on the inside as it is simple
on the outside.

6
English
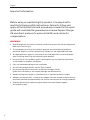
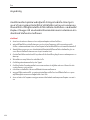
Important information
Before using or maintaining this product, it is important to
read the following safety instructions. Failure to follow and
apply all the instructions and procedures covered in this quick
guide will invalidate the guarantee and cause Zaptec Charger
AS and direct partners towaive all liability and claims for
compensation.
WARNING!
!Read through the instructions carefully and familiarize yourself with the equipment
before you start using it.
!This equipment must only be installed, repaired, and maintained by qualified
personnel. Repairs must be carried out by Zaptec or a pre-approved workshop.
!All applicable local, regional, and national laws and regulations must be followed
when installing, repairing, and maintaining the product.
!Do not install or use a product which is damaged in any way. See the information
in the chapter on Support and Repairs.
!Only use approved cabling for the installation.
!Do not insert foreign objects into the Type 2 socket.
!Do not use high-pressure washers to clean the charger station.
Follow the instructions in the chapter Storage and Maintenance.
!Avoid installing the charger in a location which is exposed to direct sunlight.
!Adapters are permissible – A conversion adapter from the charger outlet must only
be used if specified and approved by the vehicle manufacturer or charger producer
!Read the guarantee at zaptec.com/guarantee or contact Zaptec support
and request a copy.

7
English
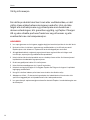
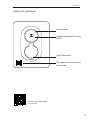
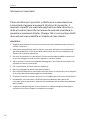
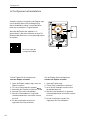
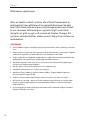
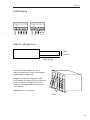
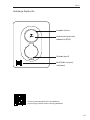
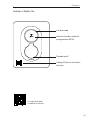
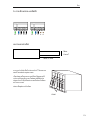
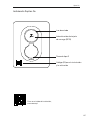
Installing Zaptec Go
Status light
Type 2 socket
Charge card
authentication (RFID)
Zaptec
QR-code for installation
and activation
Scan here for the
installation video

8
English
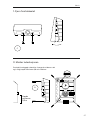
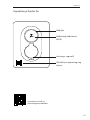
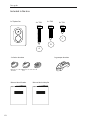
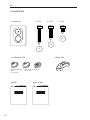
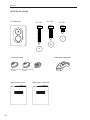
Included in the box
3 x Cable seals 1 x Cable clamp
1 x Zaptec Go
User Manual Installation Manual
4 x T20 2 x T20 2 x T20
A
B
C
12-18 mm
cable diameter
8-14 mm
cable diameter

9
English
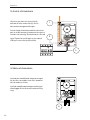
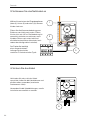
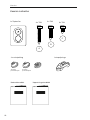
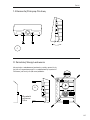
1. Remove the front cover
C
2. Mount the charging station
A
Height
minimum
0,9 m
Using the built-in spirit level, make sure it’s straight and at
the appropriate height. Minimum of 0,9 m from the ground.

10
English
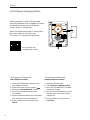
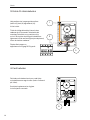
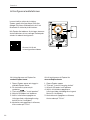
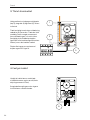
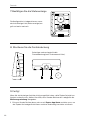
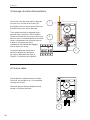
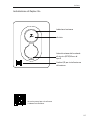
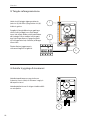
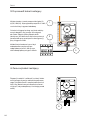
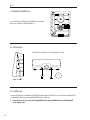
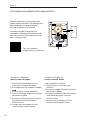
3. Connect the power cable
Choose between three entry options
(top, back and bottom). Punch out the hole.
Carefully pull the terminal cover downwards
to remove it. Do not pull it towards you. The
cover is much easier to remove if you gently
press on the retaining tab (through the hole
by the configuration switch) while pulling
downwards.
The Zaptec Go needs an upstream
circuit breaker and RCD Type A
1
2
3
4. Secure cable
B
Prevent the cable from being dislocated by
using the cable clamp and screws
(max torque 3 Nm).
Use the cable seals to make the installation
water resistant.

11
English
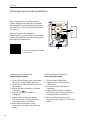
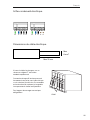
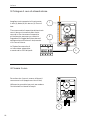
5. Electrical connection
PE N L1 L2 L3 PE N L1 L2 L3
PE L1 L2 L3 PE L1 L2
Max
6 mm2
Max 12 mm
Click!
If you are installing the charger on an IT
grid, please check zendesk.zaptec.com
Connect all wires and firmly press down
all levers as illustrated. When the wires are
safely attached, replace the terminal cover
and turn on the circuit breaker.
Ferrules are optional.
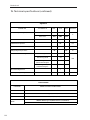
Electrical wire dimensions

12
English
6. Configure charging station
To configure the Zaptec Go
with a Zaptec account
1. Open the Zaptec app and log in with
your Zaptec account
2. From the Home, tap the symbol
3. Select the “Install product” button
4. Scan the QR code located inside
the charger
5. Set the installation details (circuit breaker
size, maximum current and phase)
6. If the settings are set correctly, tap
Finish
To configure the Zaptec Go
without a Zaptec account
1. Open the Zaptec App
2. Tap “Install a charging station”
3. Scan the QR code that is located
inside the charger
4. Set the installation details (circuit
breaker size, maximum current,
and phase)
5. If the settings are set correctly,
tap Finish
Zaptec
Before you begin, install the Zaptec App
from the App Store (iOS) or Google Play Store
(Android) and make sure the Bluetooth
on your phone is switched on.
When the Zaptec Go charger is switched on,
the status indicator will be orange.
This means it is ready to be configured.
Scan here for the
configuration video

13
English
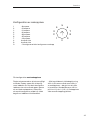
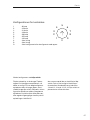
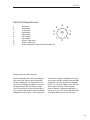
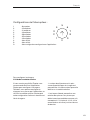
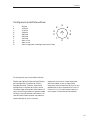
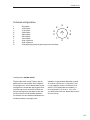
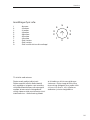
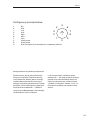
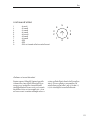
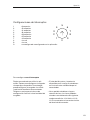
To configure with the switch
Zaptec recommends that you use the
Zaptec App to configure the charger
whenever possible. However, you can
configure the charger without using
the app by using the switch. Note that
configuring this way will limit the
functionality of the charger:
• Circuit breaker value and available
power for charging is set to the same
value set by the switch
• It is not possible to set any phase
rotation. The default phases will be set
1-phase: L1 3-phase: L1, L2, L3 The
switch is located above the connector
terminal.
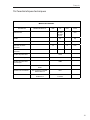
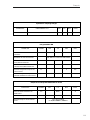
Switch configurations:
1 - 6 Amps
2 - 10 Amps
3 - 13 Amps
4 - 16 Amps
5 - 20 Amps
6 - 25 Amps
7 - 32 Amps
8 - Not in use
9 - Not in use
0 - Unconfigured or configured with App
0
5
1
2
3
4 6
7
8
9

14
English
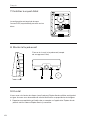
7. Confirm status indicator
9. That’s it!
8. Mount the front cover
C
Configuration is complete when the circular
light (status indicator) changes from green
to white.
Secure and lock the front cover
(max torque 1 Nm).
If you have followed all the steps so far, then the Zaptec Go should be configured
and online. Make sure you hand over the User Manual to the owner of the charger.
!Remind the owner that they should create a Zaptec App account to activate
and connect to the Zaptec Go charger.

15
English
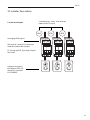
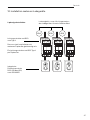
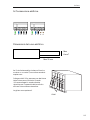
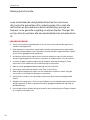
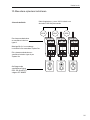
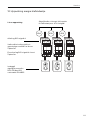
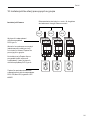
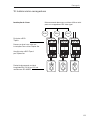
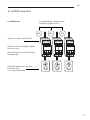
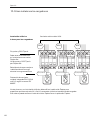
Load Balance = max 32A in total
to the chargers. NB: Equal value
40A 40A 40A
Circuit breaker and RCD
type A.
Must be equal in value
on installations with several Zaptec Go.
One circuit breaker and RCD
type A per Zaptec Go.
Integrated residual
current protection
RDC-DD (6mA DC)
according to IEC 62955
1 phase installation
10. Install multiple chargers

16
English
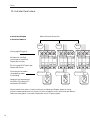
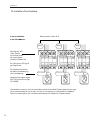
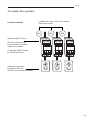
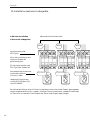
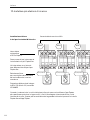
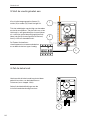
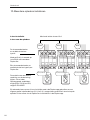
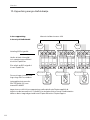
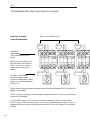
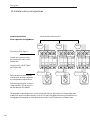
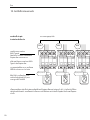
10. Install multiple chargers (continued)
Maximum total current 32A
Circuit breaker and RCD
type A.
Must be equal in value
on installations with
several Zaptec Go.
One circuit breaker
and RCD Type A per
Zaptec Go.
Phase rotation for
better load distribution
during 1 phase charging.
Integrated residual current
protection RDC-DD (6mA DC)
according to IEC 62955
40A 40A 40A
3 phase installation
3 phase for the chargers
N, L1, L2. L3 N, L3, L1. L2 N, L2, L3. L1
When rotating phases on a 3-phase installation, you must use the Zaptec app
to specify which incoming phase (L1, L2 or L3) is connected to the phase 1 terminal
on the charger. This can only be done via the Install Zaptec Go journey in the Zaptec app.

17
English
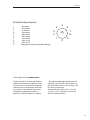
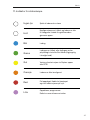
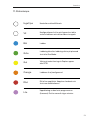
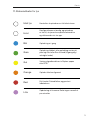
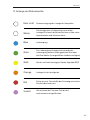
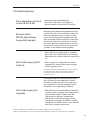
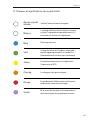
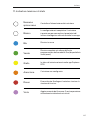
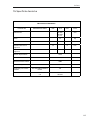
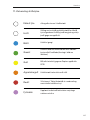
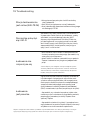
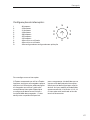
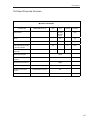
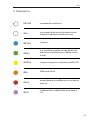
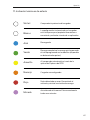
No light
Updating firmware.
This normally takes a few minutes.
Error detected. Unplug vehicle
and restart the charging station.
Charger not configured
Waiting for authorization
via Zaptec App or RFID
Charging complete or charging is waiting
for scheduled start or Eco Mode
(available in selected countries)
Charging.
The configuration is complete and the charger
is ready for the owner to start connecting and
activating it through their app.
Check charger power.
Purple
Red
Orange
Yellow
Green
Blue
White
11. Status light indicator

18
English
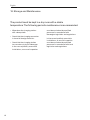
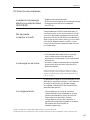
12. Support and repairs
If you discover an issue, please read the Troubleshooting section
before contacting Zaptec Support, or visit zaptec.com/support.

19
English
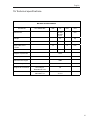
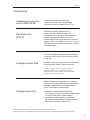
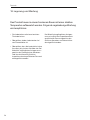
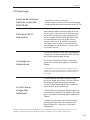
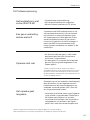
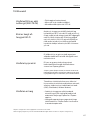
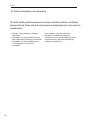
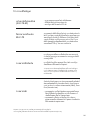
13. Troubleshooting
• Inadequate network coverage.
• 4G not activated on the charging station.
• 4G base station not supporting LTE -M.
The charging station
is not online (4G LTE-M)
Unable to connect
to Wi-Fi
Check that the SSID (network name)
and the password for the Wi-Fi are correct.
If the network is not visible, you must check
that the Wi-Fi access point uses 2.4 GHz
(5 GHz is not supported), and that it uses
channels between 1 and 11.
If the SSID is hidden, you must enter the SSID
and password manually using “Other” in the
network list.
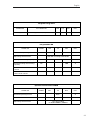
Charging does
not start
• If the status indicator is yellow, this is
because it is waiting for authorization.
Check if authorization is enabled.
• If it is green, then check that the charger
has the correct current allocated in the
Zaptec portal*.
*Zaptec Portal is the brains behind our smart charging
infrastructure. It continuously monitors, balances,
and optimizes the load between the various charging
stations.
The charging
is slow
The limitation on the charging effect will be
governed by the weakest of the following
factors: main power grid, the circuit breaker,
charging cable, On-Board Charger (OBC), Eco
Mode (in selected countries).
• Check the standalone current setting is set
to the correct value by repeating the «Install
Zaptec Go in the Zaptec App»
• Check the installation and charger power
management settings in the Zaptec Portal.
Read more on zendesk.zaptec.com
Zaptec Charger AS collects data from the product via the network.
More information on our privacy guidelines can be found at zaptec.com/privacy.

20
English
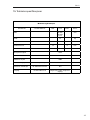
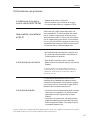
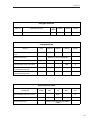
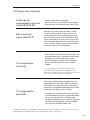
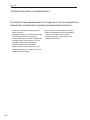
14. Storage and Maintenance
• Wipe down the charging station
with a damp cloth.
• Check that the charging connector
is free of all foreign materials.
• Check that the charging station
has no external, physical damage.
In the case of publicly accessible
installations, an annual inspection
must be carried out by qualified
personnel in accordance with
Norwegian legislation and regulations.
In the case of publicly accessible
installations, an annual inspection
must be carried out by qualified
personnel in accordance with local
legislation and regulations.
The product must be kept in a dry room with a stable
temperature. The following periodic maintenance is recommended:
A página está carregando...
A página está carregando...
A página está carregando...
A página está carregando...
A página está carregando...
A página está carregando...
A página está carregando...
A página está carregando...
A página está carregando...
A página está carregando...
A página está carregando...
A página está carregando...
A página está carregando...
A página está carregando...
A página está carregando...
A página está carregando...
A página está carregando...
A página está carregando...
A página está carregando...
A página está carregando...
A página está carregando...
A página está carregando...
A página está carregando...
A página está carregando...
A página está carregando...
A página está carregando...
A página está carregando...
A página está carregando...
A página está carregando...
A página está carregando...
A página está carregando...
A página está carregando...
A página está carregando...
A página está carregando...
A página está carregando...
A página está carregando...
A página está carregando...
A página está carregando...
A página está carregando...
A página está carregando...
A página está carregando...
A página está carregando...
A página está carregando...
A página está carregando...
A página está carregando...
A página está carregando...
A página está carregando...
A página está carregando...
A página está carregando...
A página está carregando...
A página está carregando...
A página está carregando...
A página está carregando...
A página está carregando...
A página está carregando...
A página está carregando...
A página está carregando...
A página está carregando...
A página está carregando...
A página está carregando...
A página está carregando...
A página está carregando...
A página está carregando...
A página está carregando...
A página está carregando...
A página está carregando...
A página está carregando...
A página está carregando...
A página está carregando...
A página está carregando...
A página está carregando...
A página está carregando...
A página está carregando...
A página está carregando...
A página está carregando...
A página está carregando...
A página está carregando...
A página está carregando...
A página está carregando...
A página está carregando...
A página está carregando...
A página está carregando...
A página está carregando...
A página está carregando...
A página está carregando...
A página está carregando...
A página está carregando...
A página está carregando...
A página está carregando...
A página está carregando...
A página está carregando...
A página está carregando...
A página está carregando...
A página está carregando...
A página está carregando...
A página está carregando...
A página está carregando...
A página está carregando...
A página está carregando...
A página está carregando...
A página está carregando...
A página está carregando...
A página está carregando...
A página está carregando...
A página está carregando...
A página está carregando...
A página está carregando...
A página está carregando...
A página está carregando...
A página está carregando...
A página está carregando...
A página está carregando...
A página está carregando...
A página está carregando...
A página está carregando...
A página está carregando...
A página está carregando...
A página está carregando...
A página está carregando...
A página está carregando...
A página está carregando...
A página está carregando...
A página está carregando...
A página está carregando...
A página está carregando...
A página está carregando...
A página está carregando...
A página está carregando...
A página está carregando...
A página está carregando...
A página está carregando...
A página está carregando...
A página está carregando...
A página está carregando...
A página está carregando...
A página está carregando...
A página está carregando...
A página está carregando...
A página está carregando...
A página está carregando...
A página está carregando...
A página está carregando...
A página está carregando...
A página está carregando...
A página está carregando...
A página está carregando...
A página está carregando...
A página está carregando...
A página está carregando...
A página está carregando...
A página está carregando...
A página está carregando...
A página está carregando...
A página está carregando...
A página está carregando...
A página está carregando...
A página está carregando...
A página está carregando...
A página está carregando...
A página está carregando...
A página está carregando...
A página está carregando...
A página está carregando...
A página está carregando...
A página está carregando...
A página está carregando...
A página está carregando...
A página está carregando...
A página está carregando...
A página está carregando...
A página está carregando...
A página está carregando...
A página está carregando...
A página está carregando...
A página está carregando...
A página está carregando...
A página está carregando...
A página está carregando...
A página está carregando...
A página está carregando...
A página está carregando...
A página está carregando...
A página está carregando...
A página está carregando...
A página está carregando...
A página está carregando...
A página está carregando...
A página está carregando...
A página está carregando...
A página está carregando...
A página está carregando...
A página está carregando...
A página está carregando...
A página está carregando...
A página está carregando...
A página está carregando...
A página está carregando...
A página está carregando...
A página está carregando...
A página está carregando...
A página está carregando...
A página está carregando...
A página está carregando...
A página está carregando...
A página está carregando...
A página está carregando...
A página está carregando...
A página está carregando...
A página está carregando...
A página está carregando...
A página está carregando...
A página está carregando...
A página está carregando...
A página está carregando...
A página está carregando...
A página está carregando...
A página está carregando...
A página está carregando...
A página está carregando...
A página está carregando...
-
 1
1
-
 2
2
-
 3
3
-
 4
4
-
 5
5
-
 6
6
-
 7
7
-
 8
8
-
 9
9
-
 10
10
-
 11
11
-
 12
12
-
 13
13
-
 14
14
-
 15
15
-
 16
16
-
 17
17
-
 18
18
-
 19
19
-
 20
20
-
 21
21
-
 22
22
-
 23
23
-
 24
24
-
 25
25
-
 26
26
-
 27
27
-
 28
28
-
 29
29
-
 30
30
-
 31
31
-
 32
32
-
 33
33
-
 34
34
-
 35
35
-
 36
36
-
 37
37
-
 38
38
-
 39
39
-
 40
40
-
 41
41
-
 42
42
-
 43
43
-
 44
44
-
 45
45
-
 46
46
-
 47
47
-
 48
48
-
 49
49
-
 50
50
-
 51
51
-
 52
52
-
 53
53
-
 54
54
-
 55
55
-
 56
56
-
 57
57
-
 58
58
-
 59
59
-
 60
60
-
 61
61
-
 62
62
-
 63
63
-
 64
64
-
 65
65
-
 66
66
-
 67
67
-
 68
68
-
 69
69
-
 70
70
-
 71
71
-
 72
72
-
 73
73
-
 74
74
-
 75
75
-
 76
76
-
 77
77
-
 78
78
-
 79
79
-
 80
80
-
 81
81
-
 82
82
-
 83
83
-
 84
84
-
 85
85
-
 86
86
-
 87
87
-
 88
88
-
 89
89
-
 90
90
-
 91
91
-
 92
92
-
 93
93
-
 94
94
-
 95
95
-
 96
96
-
 97
97
-
 98
98
-
 99
99
-
 100
100
-
 101
101
-
 102
102
-
 103
103
-
 104
104
-
 105
105
-
 106
106
-
 107
107
-
 108
108
-
 109
109
-
 110
110
-
 111
111
-
 112
112
-
 113
113
-
 114
114
-
 115
115
-
 116
116
-
 117
117
-
 118
118
-
 119
119
-
 120
120
-
 121
121
-
 122
122
-
 123
123
-
 124
124
-
 125
125
-
 126
126
-
 127
127
-
 128
128
-
 129
129
-
 130
130
-
 131
131
-
 132
132
-
 133
133
-
 134
134
-
 135
135
-
 136
136
-
 137
137
-
 138
138
-
 139
139
-
 140
140
-
 141
141
-
 142
142
-
 143
143
-
 144
144
-
 145
145
-
 146
146
-
 147
147
-
 148
148
-
 149
149
-
 150
150
-
 151
151
-
 152
152
-
 153
153
-
 154
154
-
 155
155
-
 156
156
-
 157
157
-
 158
158
-
 159
159
-
 160
160
-
 161
161
-
 162
162
-
 163
163
-
 164
164
-
 165
165
-
 166
166
-
 167
167
-
 168
168
-
 169
169
-
 170
170
-
 171
171
-
 172
172
-
 173
173
-
 174
174
-
 175
175
-
 176
176
-
 177
177
-
 178
178
-
 179
179
-
 180
180
-
 181
181
-
 182
182
-
 183
183
-
 184
184
-
 185
185
-
 186
186
-
 187
187
-
 188
188
-
 189
189
-
 190
190
-
 191
191
-
 192
192
-
 193
193
-
 194
194
-
 195
195
-
 196
196
-
 197
197
-
 198
198
-
 199
199
-
 200
200
-
 201
201
-
 202
202
-
 203
203
-
 204
204
-
 205
205
-
 206
206
-
 207
207
-
 208
208
-
 209
209
-
 210
210
-
 211
211
-
 212
212
-
 213
213
-
 214
214
-
 215
215
-
 216
216
-
 217
217
-
 218
218
-
 219
219
-
 220
220
-
 221
221
-
 222
222
-
 223
223
-
 224
224
-
 225
225
-
 226
226
-
 227
227
-
 228
228
-
 229
229
-
 230
230
-
 231
231
-
 232
232
-
 233
233
-
 234
234
-
 235
235
-
 236
236
-
 237
237
-
 238
238
-
 239
239
-
 240
240


ZAPTEC Go Next Generation EV Charging Guia de instalação
- Tipo
- Guia de instalação
em outras línguas
- español: ZAPTEC Go Next Generation EV Charging Guía de instalación
- français: ZAPTEC Go Next Generation EV Charging Guide d'installation
- italiano: ZAPTEC Go Next Generation EV Charging Guida d'installazione
- Deutsch: ZAPTEC Go Next Generation EV Charging Installationsanleitung
- dansk: ZAPTEC Go Next Generation EV Charging Installationsvejledning
Artigos relacionados
Outros documentos
-
Webasto NEXT Manual do usuário
-
Charge Amps CHA0002 Guia de usuario
-
 Charge Amps Halo Guia de usuario
-
Charge Amps AURA Manual do usuário
-
Wallbox 229229 Guia de instalação
-
Wallbox Commander 2 Guia de instalação
-
 Charge Amps Halo Guia de usuario
-
Wallbox Pulsar Guia de instalação
-
Black & Decker RVA425B Manual do usuário
-
Charge Amps CHA0001 Manual do usuário

