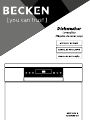
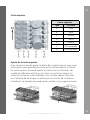
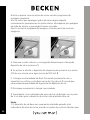
Becken MAQ LAVAR LOICA BDW1965N Manual do proprietário
- Categoria
- Máquinas de lavar louça
- Tipo
- Manual do proprietário
Este manual também é adequado para

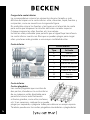
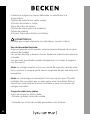
Dishwasher | Lavavajillas | Máquina de Lavar Loiça

Dear client,
Thank you for purchasing this product.
The quality of this appliance has been certified by several
laboratory tests. This instructions manual is provided to
simplify the use of the appliance as well as to guarantee a
safe use.
Please read carefully the instructions and safety measures
described in this manual.
We sincerely hope you will be satisfied when using your new
appliance.

3
EN
Dishwasher | Lavavajillas | Máquina de Lavar Loiça
INDEX
1. SAFETY INSTRUCTIONS 4
1.1. Power Supply 5
1.2. Power Cord and Other Cables 5
1.3. Humidity and Water 5
1.4. Cleaning 5
1.5. General Precautions 6
2. OPERATING INSTRUCTIONS 9
2.1. Product Description 9
2.2. Product usage 11
2.3. Maintenance 34
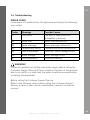
2.4. Troubleshooting 39
3. TECHNICAL SPECIFICATIONS 44
4. POSTSALE SERVICE 45
5. ENVIRONMENTAL PROTECTION 46

4
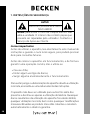
1. SAFETY INSTRUCTIONS
Important Warnings
Before using your appliance read this instructions manual
carefully and keep it in a safe place as you may need to
consult it in the future.
Before turning on your appliance, and to ensure a safe and
correct operation, do not use if:
• It has fallen to the ground;
• You notice any evidence of damage;
• Any anomaly occurs during its operation.
To avoid hazards or deterioration of your appliance through
incorrect use it is advisable to read these instructions thoroughly.
Your appliance should not be used for other purposes than
the ones intended and solely for household use. Any damage
resulting from using the appliance outside this scope, any
incorrect use, as well as any manual modifications to the product
will not be covered and automatically voids the warranty.
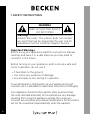
WARNING
RISK OF ELECTRIC SHOCK
DO NOT OPEN
Warning: to avoid the risk of electric shock, do not
remove the cover. The interior does not contain
any parts that can be repaired by the user. Ask for
assistance from the Customer Support Service.

5
EN
Dishwasher | Lavavajillas | Máquina de Lavar Loiça
Assistance
In case of malfunction, take your appliance to the Customer
Support Service for assistance.
This appliance can be used by children from the age of 8
and by people with reduced physical, sensorial or mental
capabilities and/or lack of experience and knowledge if they
have been given instructions on using the appliance safely
and if they understand the hazards involved. Children may
not play with the appliance. Cleaning and maintenance must
not be carried out by children without supervision.
These instructions are also available at www.suporteworten.pt
1.1. Power Supply
Make sure the main voltage is compatible with the appliance’s. If this is
not the case, please consult the Customer Support Service.
1.2. Power Cord and Other Cables
Do not tangle the cord or pull it to disconnect the appliance. Also, keep
the cord away from warm surfaces.
Never use the appliance if it has a damaged cable or socket.
Take it to the Customer Support Service for replacement.
1.3. Humidity and Water
Do not use your appliance in humid places. Do not allow the appliance
to become wet under any circumstances as this may be dangerous.
To avoid fire hazard or electric shock do not expose your appliance
to humidity or water. Furthermore, do not place your appliance under
water (e.g. for cleaning).
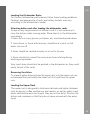
1.4. Cleaning
Before cleaning, be sure to switch o the appliance and remove the plug from
the main power supply. Always allow the unit to cool down before cleaning.
To clean the exterior of the product, use a dry soft cloth only.

6
1.5. General Precautions
• Please follow the instructions in the user manual which will help you
to properly install and operate this product and enjoy its advanced
features. Please keep the instructions for future reference.
• Read all instructions before using the product.
• Maintenance and service operations are only to be carried out by
authorized professionals.
• Any damage caused by manual modifications to the product is not
covered by the warranty.
• If this product is used for other purposes than the ones originally
intended, or if it is not correctly connected, the product may become
damaged and the warranty will be voided.
• Please read this user manual carefully and keep it for future
reference. Pass it on to any future owner of the appliance.
• This manual contains Safety Instructions, Operating Instructions,
Installation Instructions and Troubleshooting Tips, etc. Read it
carefully before using the dishwasher, as it will help you use and
maintain the dishwasher properly.
• Review the section on Troubleshooting before calling for assistance,
as it will help you solve some common problems by yourself without
professional technicians.
Note: The manufacturer, following a policy of constant product
development and up-dating, may make modifications without giving
prior notice.
WARNING!
When using your dishwasher, take basic precautions, namely:

7
EN
Dishwasher | Lavavajillas | Máquina de Lavar Loiça
WARNING! PROPER USE
• Do not apply pressure to, sit on or stand on the dishwasher’s door or
rack.
• Do not touch the heating element during or immediately after using
the dishwasher.
• Do not operate your dishwasher unless all enclosure panels are
properly in place. Open the door very carefully if the dishwasher is
operating, as there is a risk of water squirting out.
• Do not place any heavy objects on the door when it is open, as the
appliance could tip forward.
• When loading items to be washed:
• No not load sharp items near the door as they might damage
the door seal;
• Load sharp knives with the handles up in order to reduce the
risk of cuts;
• Warning: other utensils with sharp points must be loaded in
the rack with their points down or placed horizontally.
• When using your dishwasher, prevent plastic items from being in
contact with heating elements.
• Check to make sure the soap dispenser is empty after a washing
programme.
• Do not wash plastic items unless they are marked as dishwasher
safe or equivalent. For plastic items without this marking, check the
manufacturer’s recommendations.

8
• Use only detergent and rinse additives designed for an automatic
dishwasher. Never use soap, laundry detergent or hand washing
detergent in your dishwasher.
• Other means to disconnect the dishwasher from the power supply
must be incorporated in the fixed wiring with a minimum 3 mm
contact separation in all poles.
• Keep children away from dishwasher detergent and rinse aid and
the dishwasher’s open door, as there could still be some detergent
left inside.
• To protect against the risk of electrical shock, do not immerse the
cord or plug in water or other liquid.
• Dishwasher detergents are very alkaline. They can be extremely
dangerous if swallowed. Avoid contact with skin and eyes and keep
children away from the dishwasher when the door is open.
• The door should not be left open since this could present a tripping
hazard.
• If the supply cord is damaged, it must be replaced by the
manufacturer or its service agent or a similarly qualified person in
order to avoid a hazard.
• Dispose of packing materials properly.
• During installation, the power supply must not be excessively or
dangerously bent or flattened.
• Do not tamper with the dishwasher’s controls.
• Make sure that carpet does not obstruct the dishwasher’s openings
at the bottom base.

9
EN
Dishwasher | Lavavajillas | Máquina de Lavar Loiça
• Use the dishwasher only for its intended function.
• The dishwasher is intended for indoor use only.
• The dishwasher is not designed for commercial use. It is intended
for use in domestic households and in similar working and
residential environments.
2. OPERATING INSTRUCTIONS
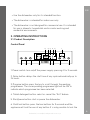
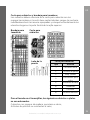
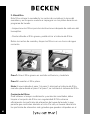
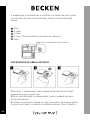
2.1. Product Description
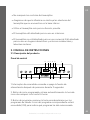
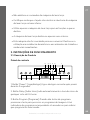
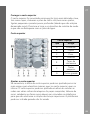
Control Panel
1 2 4 53 7
11 1214 1310 6
8 9
1. Power switch: turn on/o the power supply pressing it for 3 seconds.
2. Delay button: delays the start time of any cycle automatically up to
24 hours.
3. Program button: press the key to scroll through the washing
programmes. The corresponding programme light will be ON to
indicate which programme has been selected.
4. Tablet detergent button: select or cancel the “3in1” feature.
5. Start/pause button: start or pause the dishwasher.
6. Child lock button: press the two buttons for 3 seconds and the
appliance will lock the use of any button. It is only possible to lock the

10
panel during program operation. For safety reasons the power button
will always be unlocked.
7. Programme indicator light: lights up the corresponding washing
programme selected.
8. Rinse aid refill indicator: lights up when the dispenser needs to be refilled.
9. Salt refill indicator: lights up when the softener needs to be refilled.
10. Child lock indicator: this feature will be active when you press the
button 3 seconds, and the indicator lights up after flashing 6 times.
11. Tablet detergent indicator: lights up when the additional feature is
selected.
12. Washing light: this light will be active when the dishwasher is
washing.
13. Drying light: this light will be active when the dishwasher is drying.
14. Digital display: display the running time remain, error codes and
delay time.
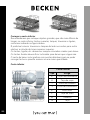
Dishwasher Features
Front View
1 Upper Rack
2 Spray Arms
3 Lower Rack
4 Water Softener
5 Filters
6 Detergent Dispenser
7 Rinse Aid Dispenser
8 Cutlery basket
9 Fork shelf

11
EN
Dishwasher | Lavavajillas | Máquina de Lavar Loiça
2.2. Product usage
Installation
If the appliance must be moved at any time, keep it in an upright
position; if absolutely necessary, it may be tilted onto its back.
Positioning and levelling
1. Remove all appliance packaging and check that it has not been
damaged during transportation. If it has been damaged, contact the
retailer and do not proceed with the installation process.
2. Check the dishwasher by placing it so that its sides or back panel
are in contact with the adjacent cabinets or even with the wall. This
appliance can also be recessed under a single worktop.
3. Position the dishwasher on a levelled, sturdy floor. If the floor is
uneven, the front feet of the appliance may be adjusted until it reaches
a horizontal position (the angle of inclination must not exceed 2
degrees). If the appliance is levelled correctly, it will be more stable
and much less likely to move or cause vibrations and noise while it is
operation.
Connecting the water and electricity supplies
Connection to the water and electricity supplies should only be
performed by a qualified technician.
The dishwasher should not stand on top of the water hoses or the
electricity supply cable.
The appliance is to be connected to the water mains using new
hose sets and the old hose-sets should not be reused.
Connecting the water inlet hose
Connect the cold water supply hose to
a threaded ¾ (inch) connector and
make sure that it is fastened tightly in
place.
If the water pipes are new or have not
been used for an extended

12
period of time, let the water run to make sure that the water is clear
and free of impurities. If this precaution is not taken, there is a risk that
the water inlet can get blocked and the appliance could be damaged.
Connecting the water outlet hose
Fit your dishwasher’s drainage hose to
the drainage pipe without bending it.
If the length of the hose is not
suicient, request an extension from
the same material as the original
from the Customer Support Service.
Remember that the length of the hose
should not exceed 4 meters even with
an extension.
If the drainage hose is longer the 4 m,
the dishes will not be cleaned properly.
Secure your hose firmly to the drainage pipe to avoid it coming o
during the washing process.
Electrical connection
Before inserting the plug into the electrical socket, make sure:
• the socket is earthed and complies with current regulations;
• the socket can withstand the maximum load of the appliance, which
is indicated on the data plate;
• the power supply voltage falls within the values indicated on the
data plate;
• the socket is compatible with the plug of the appliance. If this is not
the case, ask an authorized technician to replace the plug (contact
the Customer Support Service); do not use extension cables or
multiple sockets.
Once the appliance has been installed, the power supply cable and
the electrical socket should be easily accessible.

13
EN
Dishwasher | Lavavajillas | Máquina de Lavar Loiça
The cable should not be bent or compressed.
If the power supply cable is damaged, it must be replaced by the
manufacturer or its Customer Support Service in order to prevent all
potential hazards (contact the Customer Support Service).
The company shall not be held responsible for any incidents that
occur if these regulations are not observed.
Advice regarding the first washing programme
After the appliance has been installed, immediately before running
the first washing programme, completely fill the salt dispenser and
add approximately 2 Kg of salt. The water may overflow: this is normal
and is not a cause for concern. It is also normal that the LOW SALT
indicator light continues to flash for a few cycles after the salt has been
loaded.
Positioning the Appliance
Position the appliance in the desired location. The back should rest
against the wall behind it, and the sides, along the adjacent cabinets
or wall. The dishwasher is equipped with water supply and drain
hoses that can be positioned to the right or the left to facilitate proper
installation.
Levelling the Appliance
Once the appliance is positioned, adjust the feet (screwing them in or
out) to adjust the height of the dishwasher, making it level. In any case,
the appliance should not be inclined more than 2°.
Note: the maximum adjustment height of the feet is 20 mm.
How to drain excess water from hoses
If the sink is 1000 mm higher from the floor, the excess water in the
hoses cannot be drained directly into the sink. It will be necessary to
drain the excess water from the hoses into a bowl or into a suitable
container that is held outside and lower than the sink.

14
Water outlet
Connect the water drain hose. The drain hose must be correctly fitted
to avoid water leaks. Ensure that the water inlet hose is not kinked or
squashed.
Extension hose
If you need a drain hose extension, try to use a similar drain hose, no
longer than 4 metres; otherwise the cleaning eect of the dishwasher
could be reduced.
Syphon connection
The waste connection must be at a height of between 50 cm
(minimum) and 100 cm (maximum) from the bottom of the dish. The
water drain hose should be fixed by a hose clip.
Before starting the dishwasher
The followings should be observed before starting the dishwasher:
1. Whether the dishwasher is levelled and fixed;
2. Whether the inlet valve is opened;
3. Whether there is a leakage at the connections of the conducts;
4. Whether the wires are tightly connected;
5. Whether the power is switched on;
6. Whether the inlet and drain hoses are knotted;
7. All packing materials and printings should be taken out from the
dishwasher.
Attention
After installation, please put this manual into the bags of printings, as
its content is very helpful to the users.

15
EN
Dishwasher | Lavavajillas | Máquina de Lavar Loiça
Prior Using for the First Time
Before using your dishwasher for the first time, refer to the following
items:
A. Set the water softener
B. Fill the salt container
C. Fill the rinse aid dispenser
D. Detergent
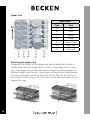
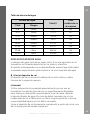
A. Set the water softener
The water softener is designed to remove minerals and salts from
the water, which would have a detrimental or adverse eect on the
dishwasher’s operation. The higher the content of these minerals
and salts, the harder the water is. The softener should be adjusted
according to your area’s water hardness. Your local Water Authority can
advise you on the water hardness in your area.
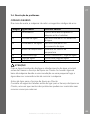
Setting
The amount of salt dispensed can be set from H0 to H7.
Salt is not required at the set value H0.
1. Find out about the water hardness in your area. Your water utility
company will help you with this.
2. Set value can be found in the water hardness table.
3. Close the door.
4. Switch on “Power” switch.
5. Hold down “ Delay” button and then press “Programme” button for 5
seconds.
The buzzer rings one time and “H...” flashes on the digital display
(factory setting is H4).

16
To change the setting:
1. Press the “Delay” button.
Each time the button is pressed, the set value increases by one level;
when the value of H7 has been reached, the display jumps back to H0
(o).
2. Press the “Programme” button. The chosen setting has now been
stored.
Contact your local water board for information on the hardness of
your water supply.
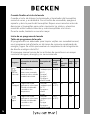
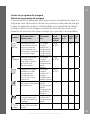
Water hardness table
Water hardness Mmol/l Set value on
the machine
°Clark Range
0-8 soft 0-1.1 H0
9-10 soft 1.2-1.4 H1
11-12 medium 1.5-1.8 H2
13-15 medium 1.9-2.1 H3
16-20 medium 2.2-2.9 H4
21-26 hard 3.0-3.7 H5
27-38 hard 3.8-5.4 H6
39-62 hard 5.5-8.9 H7
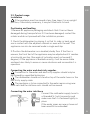
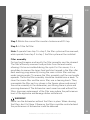
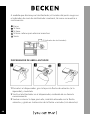
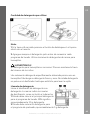
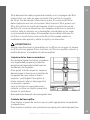
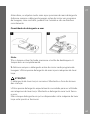
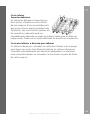
Loading Salt into the Softener dispenser
Always use dishwasher salt.
WATER SOFTENER
The hardness of the water varies from place to place. If hard water is
used in the dishwasher, deposits will form on the dishes and utensils.
The appliance is equipped with a special softener that uses salts
specifically designed to eliminate lime and minerals from the water.

17
EN
Dishwasher | Lavavajillas | Máquina de Lavar Loiça
B. Fill the salt container
The salt container is located beneath the lower basket and should be
filled as follows:
Attention!
Only use salt specifically designed for use in dishwashers! All other
types of salt not specifically designed for use in a dishwasher,
especially table salt, will damage the water softener. In case of damages
caused by the use of unsuitable salt the manufacturer does not give
any warranty nor is liable for any caused damages.
Only fill with salt just before starting one of the complete washing
programmes.
This will prevent any grains of salt or salty water, which may have been
split, remaining on the bottom of the machine for any period of time,
which may cause corrosion.
After the first washing programme the control panel light expires.
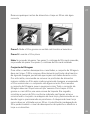
A. Remove the lower basket and then unscrew and remove the cap
from the salt container. 1
B. If you are filling the container for the first time, fill 2/3 of its volume
with water (around 500ml). 2
C. Place the end of the funnel (supplied) into the hole and introduce
about 2kg of salt. It is normal for a small amount of water to come out
of the salt container.

18
D. Carefully screw the cap back on.
E. Usually, the salt warning light will be o in 2-6 days after the salt
container is filled with salt.
Note:
1. The salt container must be refilled when the salt warning light in the
control panel comes on. Though the salt container may be full, the light
indicator may not be o until the salt fully dissolves. If there is no salt
warning light in the control panel.
2. If the salt overspills, a soak programme can be run to eliminate them.
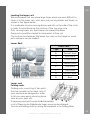
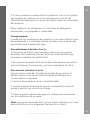
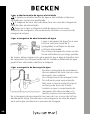
C. Fill the Rinse Aid Dispenser
Rinse Aid feature
The rinse aid is automatically added during the last rinse, ensuring a
thorough rinsing, spot and streak free drying.
Attention!
Only use branded rinse aid for dishwasher. Never fill the rinse aid
dispenser with any other substances (e.g. dishwasher cleaning agent,
liquid detergent), as this would damage the appliance.
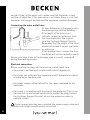
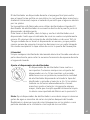
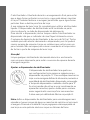
When to Refill the Rinse Aid Dispenser
If there is no rinse aid warning light on the control panel, you can
estimate the amount of rinse aid to be added by the colour of the
optical level indicator “D” located next to the cap. When the rinse aid
container is full, the whole indicator will be dark . As the rinse aid is
lower, the size of the dark dot decreases. You should never let the rinse
aid get below ¼ full.

19
EN
Dishwasher | Lavavajillas | Máquina de Lavar Loiça
As the rinse aid diminishes, the size of the black dot on the rinse aid
level indicator changes, as illustrated below.
Full
¾ full
½ full
¼ full - Should refill to eliminate spotting
Empty
D (Rinse aid indicator)
RINSE AID DISPENSER
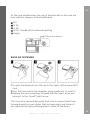
1 To open the dispenser, turn the cap to the “open” (left) arrow and lift
it out.
2 Pour the rinse aid into the dispenser, being careful not to overfill it.
3 Replace the cap by inserting it aligned with the “open” arrow and
turning it to the “closed” (right) arrow.
The rinse aid is released during the final rinse to prevent water from
forming droplets on your dishes that can leave spots and streaks. It
also improves drying by allowing water to sheet o the dishes.

20
Your dishwashers are designed to use liquid rinse aids. The rinse aid
dispenser is located inside the door next to the detergent dispenser.
To fill the dispenser, open the cap and pour the rinse aid into the
dispenser until the level indicator turns completely black. The volume
of the rinse aid container is about 140 ml. Be careful not to overfill the
dispenser, as it could cause excess suds. Wipe away any spills with
a damp cloth. Don’t forget to replace the cap before you close the
dishwasher door.
Attention!
Clean up any rinse aid split during filling with an absorbent cloth to
avoid excess suds during the next wash.
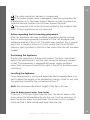
Adjusting Rinse Aid Dispenser
The rinse aid dispenser has four or six settings.
Always start with the dispenser set on “4” If
spots and poor drying are problems, increase the
amount of rinse aid dispensed by removing the
dispenser lid and rotating the dial to “5”. If the
dishes still are not drying properly or are spotted,
adjust the dial to the next higher number until
your dishes are spot-free. The dose is factory set
in the position 5.
Note: set the rinse aid dispenser to a higher dosage if there are drops
of water or lime spots on the dishes after washing. Reduce it if there
are sticky whitish streaks on the dishes or a bluish film on glassware or
knife blades.
D. Detergent
Detergents with its chemical ingredients are necessary to remove dirt,
crush dirt and transport it out of the dishwasher. Most commercial
quality detergents are suitable for this purpose.
A página está carregando...
A página está carregando...
A página está carregando...
A página está carregando...
A página está carregando...
A página está carregando...
A página está carregando...
A página está carregando...
A página está carregando...
A página está carregando...
A página está carregando...
A página está carregando...
A página está carregando...
A página está carregando...
A página está carregando...
A página está carregando...
A página está carregando...
A página está carregando...
A página está carregando...
A página está carregando...
A página está carregando...
A página está carregando...
A página está carregando...
A página está carregando...
A página está carregando...
A página está carregando...
A página está carregando...
A página está carregando...
A página está carregando...
A página está carregando...
A página está carregando...
A página está carregando...
A página está carregando...
A página está carregando...
A página está carregando...
A página está carregando...
A página está carregando...
A página está carregando...
A página está carregando...
A página está carregando...
A página está carregando...
A página está carregando...
A página está carregando...
A página está carregando...
A página está carregando...
A página está carregando...
A página está carregando...
A página está carregando...
A página está carregando...
A página está carregando...
A página está carregando...
A página está carregando...
A página está carregando...
A página está carregando...
A página está carregando...
A página está carregando...
A página está carregando...
A página está carregando...
A página está carregando...
A página está carregando...
A página está carregando...
A página está carregando...
A página está carregando...
A página está carregando...
A página está carregando...
A página está carregando...
A página está carregando...
A página está carregando...
A página está carregando...
A página está carregando...
A página está carregando...
A página está carregando...
A página está carregando...
A página está carregando...
A página está carregando...
A página está carregando...
A página está carregando...
A página está carregando...
A página está carregando...
A página está carregando...
A página está carregando...
A página está carregando...
A página está carregando...
A página está carregando...
A página está carregando...
A página está carregando...
A página está carregando...
A página está carregando...
A página está carregando...
A página está carregando...
A página está carregando...
A página está carregando...
A página está carregando...
A página está carregando...
A página está carregando...
A página está carregando...
A página está carregando...
A página está carregando...
A página está carregando...
A página está carregando...
A página está carregando...
A página está carregando...
A página está carregando...
A página está carregando...
A página está carregando...
A página está carregando...
A página está carregando...
A página está carregando...
A página está carregando...
A página está carregando...
A página está carregando...
A página está carregando...
A página está carregando...
A página está carregando...
A página está carregando...
A página está carregando...
A página está carregando...
A página está carregando...
A página está carregando...
A página está carregando...
A página está carregando...
A página está carregando...
A página está carregando...
A página está carregando...
-
 1
1
-
 2
2
-
 3
3
-
 4
4
-
 5
5
-
 6
6
-
 7
7
-
 8
8
-
 9
9
-
 10
10
-
 11
11
-
 12
12
-
 13
13
-
 14
14
-
 15
15
-
 16
16
-
 17
17
-
 18
18
-
 19
19
-
 20
20
-
 21
21
-
 22
22
-
 23
23
-
 24
24
-
 25
25
-
 26
26
-
 27
27
-
 28
28
-
 29
29
-
 30
30
-
 31
31
-
 32
32
-
 33
33
-
 34
34
-
 35
35
-
 36
36
-
 37
37
-
 38
38
-
 39
39
-
 40
40
-
 41
41
-
 42
42
-
 43
43
-
 44
44
-
 45
45
-
 46
46
-
 47
47
-
 48
48
-
 49
49
-
 50
50
-
 51
51
-
 52
52
-
 53
53
-
 54
54
-
 55
55
-
 56
56
-
 57
57
-
 58
58
-
 59
59
-
 60
60
-
 61
61
-
 62
62
-
 63
63
-
 64
64
-
 65
65
-
 66
66
-
 67
67
-
 68
68
-
 69
69
-
 70
70
-
 71
71
-
 72
72
-
 73
73
-
 74
74
-
 75
75
-
 76
76
-
 77
77
-
 78
78
-
 79
79
-
 80
80
-
 81
81
-
 82
82
-
 83
83
-
 84
84
-
 85
85
-
 86
86
-
 87
87
-
 88
88
-
 89
89
-
 90
90
-
 91
91
-
 92
92
-
 93
93
-
 94
94
-
 95
95
-
 96
96
-
 97
97
-
 98
98
-
 99
99
-
 100
100
-
 101
101
-
 102
102
-
 103
103
-
 104
104
-
 105
105
-
 106
106
-
 107
107
-
 108
108
-
 109
109
-
 110
110
-
 111
111
-
 112
112
-
 113
113
-
 114
114
-
 115
115
-
 116
116
-
 117
117
-
 118
118
-
 119
119
-
 120
120
-
 121
121
-
 122
122
-
 123
123
-
 124
124
-
 125
125
-
 126
126
-
 127
127
-
 128
128
-
 129
129
-
 130
130
-
 131
131
-
 132
132
-
 133
133
-
 134
134
-
 135
135
-
 136
136
-
 137
137
-
 138
138
-
 139
139
-
 140
140
-
 141
141
-
 142
142
-
 143
143
-
 144
144


Becken MAQ LAVAR LOICA BDW1965N Manual do proprietário
- Categoria
- Máquinas de lavar louça
- Tipo
- Manual do proprietário
- Este manual também é adequado para
em outras línguas
Artigos relacionados
Outros documentos
-
Whirlpool ADP 974 A+ WH Guia de usuario
-
Infiniton DIW-G62W Manual do proprietário
-
Samsung DW-FN320T/XFA Manual do usuário
-
-
Aeg-Electrolux F50870B Manual do usuário
-
Fagor 3LVF-423.1X Manual do usuário
-
Aeg-Electrolux F65010VI Manual do usuário
-
-
AEG F99020IMM Manual do usuário
-