Baby Jogger CITY MINI GT 2 Assembly Instructions Manual
- Categoria
- Carrinhos de bebê
- Tipo
- Assembly Instructions Manual
Este manual também é adequado para

©2018 Baby Joer NWL0000900948B 4/19
babyjogger.com
Pushchair
city mini GT2
®
ASSEMBLY INSTRUCTIONS
INSTRUCTIONS D’ASSEMBLAGE
INSTRUCCIONES DE MONTAJE
ISTRUZIONI PER IL MONTAGGIO
GEBRAUCHSANLEITUNG
NÁVOD K SESTAVENÍ
SAMLINGSANVISNINGER
KOKOAMISOHJEET
ΟΔΗΓΙΕΣ ΣΥΝΑΡΜΟΛΟΓΗΣΗΣ
UPUTE ZA SASTAVLJANJE
ÖSSZESZERELÉSI UTASÍTÁSOK
MONTAGEINSTRUCTIES
MONTERINGSANVISNING
INSTRUKCJA MONTAŻU
INSTRUÇÕES DE MONTAGEM
INSTRUCȚIUNI DE ASAMBLARE
ИНСТРУКЦИИ ПО СБОРКЕ
UPUTSTVA ZA SASTAVLJANJE
NÁVOD NA MONTÁŽ
NAVODILA ZA SESTAVO
MONTERINGSINSTRUKTIONER
MONTAJ TALİMATLARI
CITY
MINI
®
GT2
IMPORTANT: READ CAREFULLY AND KEEP FOR FUTURE REFERENCE.
Your child’s safety may be aected if you do not follow these instructions.

2
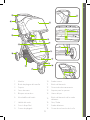
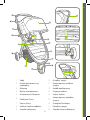
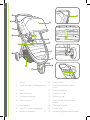
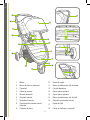
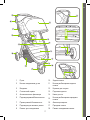
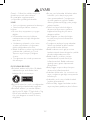
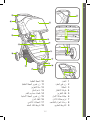
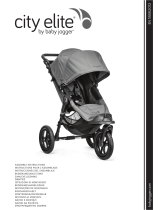
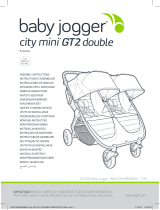
1 Handlebar 10 Rear Wheel
2 Handlebar Fold Button 11 Rear Wheel Release Button
3 Canopy 12 Storae Basket
4 Parkin Brake 13 Le Support
5 Auto-lock 14 Footwell
6 Harness Pads 15 Front Wheel Release Button
7 Harness Buckle 16 Swivel/Lock
8 Crotch Strap Pad 17 Front Wheel
9 Fold Strap 18 Seat Recline Strap
2
5
11
18
1
10
12
14
7
6
17
3
15
16
4
2
5
13
8
9
EN

3
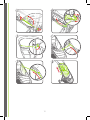
3 4
5 6
2
1
CLICK

4
9 10
87
11 12
13
SNAP SNAP

5
14
15
16
17

6
22
CLICK!
24
CLICK!
2120
18
19
23

7
28
27
2625
29

8
31
CLICK!
3433
31
SNAP!
30
A
B
32

9
35
37 38
A39
A
B
C
36

10
B
42
43
41
40
C

11
EN
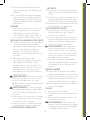
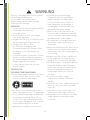
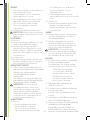
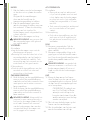
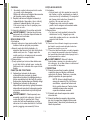
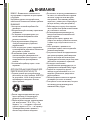
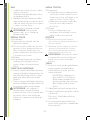
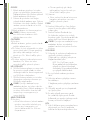
WARNING
IMPORTANT - Read carefully and keep for
future reference.
Your child’s safety may be aected if you
do not follow these instructions.
WARNING
• Never leave the child unattended.
• Always use the restraint system.
• This product is not suitable for runnin or
skatin
• Ensure that all the lockin devices are
enaed before use.
• To avoid injury, ensure that the child is
kept away when unfoldin and foldin
this product.
• To prevent injury, remove Child Tray or
Belly Bar accessory when foldin or
unfoldin the stroller.
• Do not let the child play with this
product.
ADDITIONAL SAFETY INFORMATION
• This pushchair seats one passener.
NEVER allow more than one child at a
time on this stroller.
• The seat unit is suitable for one child from
birth up to 22 k.
• Total weiht load recommended for this
pushchairis 28 k. 22 k in the seat,
1 k in the seat back pocket, and 4.5
k in the basket. Excessive weiht may
cause a hazardous unstable condition to
exist.
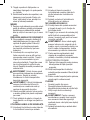
• For car seats used in conjunction with
a chassis, this vehicle does not replace
a cot or a bed. Should your child need
to sleep, then it should be placed in a
suitable pram body, cot or bed.
• Any load attached to the handle and/
or on the back of the backrest and/or
on the sides of the vehicle will aect the
stability of the vehicle.
• For new born babies we recommend
always to use the most reclined seat
position.
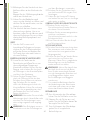
• Lock the brakes before loadin and
unloadin your child and whenever the
pushchair is not movin.
• Ensure that the brake is properly
enaed by movin the pushchairslihtly
back and forth.
• Pushchair is not meant to be used
for transportin children up or down
stairs or escalators. Damae resultin
to pushchair will not be covered under
warranty.
• Accessories which are not approved by
Baby Joer shall not be used.
• Watch out for cars - never assume that a
driver can see you and your child.
• The passener shall remain seated (no
standin in the stroller).
• Use only replacement parts supplied or
approved by Baby Joer.
max 22 kg

12
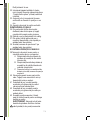
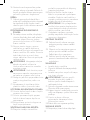
F
RAME
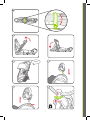
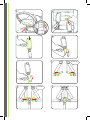
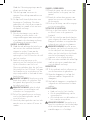
1 Unpack the pushchair frame from the
box and set the wheels aside.
Unlock the pushchair by pullin the
storae lock Lever.
2 Unfold the pushchair by pullin the
handlebar away from the frame. Then
lift the handlebar away from the seat.
The pushchair will lock into place and
you will hear a click.
3 Place the pushchair in the upriht
position.
WARNING: Ensure that all the lockin
devices are enaed before use.
FRONT WHEEL
4 Installation
• Lay pushchair on its back so the
handlebar is restin on the floor.
• Attach the Front Wheel by slidin
it into the front wheel mount until it
clicks. Gently pull on the Front Wheel
to make sure it is properly attached.
5 Removal
• While pressin the front wheel release
button, ently slide the Front Wheel
out of the front wheel mount.
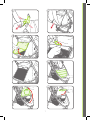
SWIVEL FEATURE
6 Push the swivel button down and
rotate to the left to lock the front wheel
assembly in a fixed position for lon
distance strollin.
7 Push the swivel button down and rotate
to the riht to allow the front wheel
assembly to swivel.
WARNING: When loadin and
unloadin child, lock the front wheel in a
fixed position. Althouh the front wheel
of your pushchair lock, it is not intended
for join or exercise purposes.
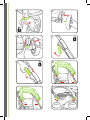
REAR WHEELS
8 Installation
• Alin the rear wheel axle with the
wheel mount on the pushchair frame
and insert it into the wheel mount until
it locks into place. You will hear a click.
• Gently pull on the rear wheel to make
sure it is properly attached.
9 Removal
• While pressin down on the wheel
release button, ently slide the rear
wheel out of the wheel mount.
BRAKE
10 To Lock the Brakes: ently pull the Brake
Lever into upriht position until it clicks
into place.
11 To Release the Brakes: Pinch the ray
tabs and pull the lever towards you. Push
the Brake Lever down until it is parallel
with the frame.
WARNING: Lock the brakes before
loadin and unloadin your child and
whenever the pushchair is not movin.
CANOPY
12 Attach the canopy to the frame by
slidin the canopy onto one of two
mountin brackets. To remove, slide
canopy o of mounts.
NOTE: When usin a City Go/
Graco or Britax car seat, the
canopy must be in the top position.
For all other carseats, canopy must
be removed.
13 Snap the two snaps to the pushchair
frame.
14 Zip the back of the seat to the canopy
top.
Attach the 2 fastenin strips on the side
of the canopy.
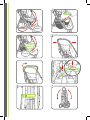
15 Pull forward to open canopy and push
backwards to close canopy.
16 There are two canopy windows, a top
one and back one. To use them, roll the
shade up towards the top and secure
with the elastic and button.
HANDLE
17 To chane the handle to one of 6 use
positions, press the handle release
buttons on both sides and rotate up or
down to the new position.
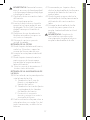
ADJUSTING SAFETY HARNESS
18 From the back of the seat, unfasten and
open the pocket to locate the plastic
square stopper. Turn stopper and pass
throuh the openins in the PE board
EN

13
and seat fabric.
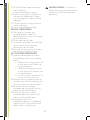
19 Reinsert stopper at seat openin closest
to child’s shoulders. Pass back throuh
seat fabric and PE board. Tu on strap to
ensure stopper is locked. Repeat on both
sides.
WARNING: Avoid serious injury from
fallin or slidin out. Always properly
adjust and fasten safety harness.
WARNING: Always use the crotch strap
in combination with the shoulder straps
and waist belt.
20 Slide the harness pads up to access
plastic uide on strap.
21 Hold the plastic uide and pull strap to
tihten or loosen.
USING SAFETY HARNESS
22 Insert side strap buckle into harness
buckle on both sides.
23 Insert connected harness and side strap
buckles into the sides of the crotch
buckle.
24 Press button on crotch buckle to release.
RECLINE THE SEAT
25 Pinch the clamp behind the seat, and
slide it down to desired recline.
26 Pull seat down on both sides to match
the clamp position. Reverse steps to
return to the upriht position.
WARNING: When makin adjustments
to the stoller seat, make sure child’s head,
arms, and les are clear of movin seat
parts and pushchair frame.
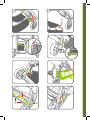
27 For extra ventilation, roll up the seat back
flap and secure with elastic and button.
LEG SUPPORT
28 To use the le support, lift the front of
the seat pad.
29 Rotate the support arm out and lower
the seat pad. Lock the support arm.
30 To lower le support, reverse the steps.
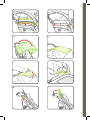
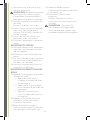
FOLDING
• Remove your child from the seat.
• Disenae front wheel swivel locks.
• Remove all attachments and all items
from basket.
WARNING: To prevent injury, remove
Child Tray or Belly Bar accessory when
foldin or unfoldin the stroller.
31 Press buttons on both sides of frame.
Rotate handle up.
32
A. Insert finer into loop and pull up, then
B. Pull up on the “Pull to Fold” foldin
handle and let the frame collapse.
33 Make sure the auto-lock lever clicks into
place.
34 Place pushchair upriht in standin
position.
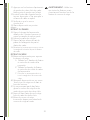
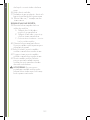
BASKET REMOVAL
35 From the front of the pushchair, unsnap
the 2 snaps and pull the straps out of
the foot well.
36 Lift basket o the hook.
37 From the back, lift the top of the basket
o the tab on both sides of the frame.
38 Remove the strap from the C clamp on
both sides of frame.
REMOVING THE SEAT FABRIC
39 Flip the pushchair over to expose the
seat bottom.
A Unfasten the 2 fastenin strips
and pull them out of the pushchair
frame.
B Unfasten the fastenin strip and
pull them out of the sides of the
pushchair frame.
C Unscrew the riht carabiner hook
and pull strap out from the seat
pad.
40 Flip the seat back over on its wheels.
Pull seat fabric up and o of buttons.
41 Startin from the bottom, slide the seat
pad out from the stroller frame on both
sides.
42 From the top, slide the seat pad out of
the frame on both sides.
43 Remove seat fabric.
Reverse the steps to reattach the seat
pad to the frame.
WARNING: Make sure that all fasteners
are properly closed when re-attachin
the seat pad.
EN

14
EN
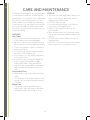
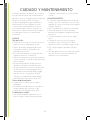
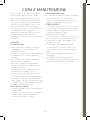
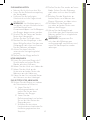
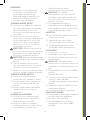
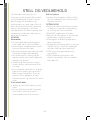
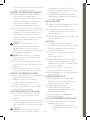
CARE AND MAINTENANCE
To preserve the lonevity of your pushchair,
it is important to perform simple, reular
maintenance. From time to time, make sure
that the joints and foldin areas are still in
ood condition. If you hear any squeakin
or feel tension, you can take your pushchair
to a local bike shop for added lubrication.
All repairs should only be carried out by an
authorized dealer.
WASHING
Seat Fabric
• You can hand wash your pushchair’s seat
in cold water with a mild deterent.
• Be sure to remove the metal frame and
PE boards from the seat before washin.
• Do not use solvents, caustic or abrasive
cleanin materials.
• To minimize shrinkae, simply reattach
the seat to the frame to dry.
• Do not press, iron, dry clean, tumble dry
or wrin the fabric.
• If the seat covers need to be replaced,
only use parts from a Baby Joer
Authorized Dealer. They are the only
ones that are uaranteed to have been
safety tested and desined to fit this
seat.
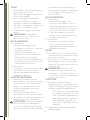
Plastic/Metal Parts
• Wipe clean usin a mild soap and warm
water.
• You must not remove, dismantle or alter
any part of the seat foldin mechanism
or brakes.
Wheel Care
• The wheels can be cleaned usin a
damp cloth. They will need to be dried
completely with a soft towel or cloth.
STORING
• Sunshine can fade seat fabric and dry out
tires, so storin your pushchair indoors
will prolon its ood looks.
• DO NOT store outside.
• Ensure that the pushchair is dry before
storin for proloned periods.
• Always store the pushchair in a dry
environment.
• Store the pushchair in a safe place when
not in use (i.e. where children cannot play
with it).
• DO NOT place heavy objects on top of
the pushchair.
• DO NOT store the pushchair near a direct
heat source such as a radiator or fire.

15
EN
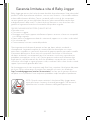
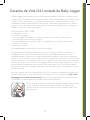
Baby Joer warrants that the frame is free of manufacturer defects for the lifetime of
the product. Manufacturer’s defects include but are not limited to the breakin of welds
and frame tube damae. Textile or soft side materials and all other components shall be
warranted for one year from the date of purchase (except for tubes and tires). Proof of
purchase is required to make a warranty claim and the warranty is only extended to the
oriinal purchaser.
THIS WARRANTY DOES NOT COVER:
• Normal wear and tear
• Corrosion or rust
• Incorrect assembly, or the installation of third party parts or accessories not compatible
with the oriinal desin
• Accidental or intentional damae, abuse or nelect, or use on stairs or escalators.
• Commercial use
• Improper storae/care of the unit
This warranty specifically excludes claims for indirect, incidental, or consequential
damaes. The implied warranties of merchantibility and fitness for a particular purpose is
accordin to the specific warranty period for this model unit at time of purchase. Some
states do not allow the exclusion or limitation of incidental or consquential damaes, so
the above limitations or exclustions may not apply to you. This warranty ives you specific
leal rihts, and you may also have other rihts which vary from state to state. To know
what your leal rihts are in your state, consult your local or state consumer aairs oce
or your State’s Attorney General.
If your pushchair was purchased outside of the United States, please contact the
distributor in the country nearest you. Their contact information can be found on our
website at http://www.babyjogger.com/retailers/#international. Claims for warranty
outside of the country in which the product was purchased may incure shippin chares.
NOTE: When contactin Baby Joer distributor reardin your
pushchair, please have your pushchair’s serial number ready. It can be
located just below the hub on the outside of rear le.
Baby Jogger’s Limited Lifetime Warranty:

16
FR
2
5
11
18
1 Guidon 10 Roue arrière
2 Bouton d’ajustement de uidon 11
Bouton de déverrouillae
de la roue arrière
3 Canopy 12 Panier de ranement
4 Frein de stationnement 13 Repose-jambes
5 Verrou 14 Repose-pieds
6 Coussins du harnais 15
Bouton de déverrouillae de la
roue avant
7 Boucle du harnais 16 Bouton de verrouillae du pivot
8 Coussin de la sanle d’entre-
jambes
17 Roue avant
9 Poinée de pliae 18 Sanle d’inclinaison du sièe
1
10
12
14
7
6
17
3
15
16
4
2
5
13
8
9

17
FR
AVERTISSEMENTS
IMPORTANT – A lire attentivement et à
conserver pour référence ultérieure.
La sécurité de votre enfant risque d’être
aectée si vous ne suivez pas ces
instructions.
AVERTISSEMENTS
• Ne jamais laisser un enfant sans
surveillance.
• Toujours utiliser le système de retenue.
• Ce produit ne convient pas pour faire du
join ou des promenades en rollers.
• S’assurer que tous les dispositifs de
verrouillae soient enclenchés avant
utilisation.
• Pour éviter toute blessure, maintenir
l’enfant à l’écart lors du dépliae et du
pliae du produit.
• Pour prévenir les blessures, retirez le
plateau pour enfants ou l’arceau de
protection lors du pliae ou dépliae de
la poussette.
• Ne pas laisser un enfant jouer avec ce
produit.
CONSIGNES DE SÉCURITÉ
ADDITIONNELLES
• Cette poussette ne peut accommoder
qu’un seul enfant. NE laissez JAMAIS
plus d’un enfant à la fois sur cette
poussette.
• Cette unité de sièe convient à un enfant
à partir de la naissance jusqu’à un poids
de 22 k.
• La chare de poids totale recommandée
pour cette poussette est de 28 k. 22 k
dans le sièe, 1 k dans la poche arrière
du sièe et 4,5 k dans le panier. Un
poids excessif peut entraîner l’existence
une instable et danereuse.
• Pour les sièes-auto utilisés en
conjonction avec une poussette, ce sièe-
auto ne remplace pas un berceau ou un
lit. Si votre enfant a besoin de dormir, il
doit être placé dans un landau, berceau
ou lit approprié.
• Toute chare attachée au uidon et/ou
sur l’arrière du dossier et/ou sur les côtés
de la poussette aectera la stabilité de la
poussette.
• Pour les nouveau-nés, nous
recommandons de toujours utiliser la
position de sièe la plus inclinée.
• Verrouillez les freins avant de mettre
l’enfant dans ou de le sortir de la
poussette, et lorsque la poussette ne
boue pas.
• Assurez-vous que le frein est
correctement enclenché en déplaçant
la poussette léèrement en avant et en
arrière.
• La poussette n’est pas destinée à être
utilisée pour transporter les enfants
dans les escaliers ou les escalators. Les
dommaes résultant sur la poussette ne
seront pas couverts par la arantie.
• Les accessoires qui ne sont pas
approuvés par Baby Joer ne doivent
pas être utilisés.
• Faites attention aux voitures - ne
supposez jamais qu’un conducteur peut
vous voir, vous et votre enfant.
• Le passaer devra rester assis (pas de
position debout dans la poussette).
• Utilisez uniquement les pièces de
rechane fournies ou approuvées par
Baby Joer.
max 22 kg

18
FR
CADRE
1
Déballez le cadre de la poussette du
carton et mettez les roues de côté.
Déverrouillez la poussette en tirant sur
le levier de verrou.
2 Dépliez la poussette en écartant le
uidon du cadre. Ensuite, soulevez
le uidon en l’écartant du sièe. La
poussette se verrouillera et un déclic
retentira.
3 Placez la poussette en position
debout.
AVERTISSEMENT : Vérifiez que
tous les dispositifs de verrouillae
soient bien enclenchés avant toute
utilisation.
ROUE AVANT
4 Installation
• Déposez la poussette sur son dos de
sorte que le uidon repose sur le sol.
• Attachez la roue avant en la faisant
lisser dans la monture de roue
avant jusqu’à ce qu’elle s’enclenche.
Tirez délicatement sur la roue
avant pour vous assurer qu’elle soit
correctement attachée.
5 Retrait
• Tout en appuyant sur le bouton de
déblocae de la roue avant, faites
délicatement lisser la roue avant
hors de la monture de roue avant.
FONCTION PIVOTANTE
6
Appuyez sur le bouton de verrouillae
du pivot et faites lisser le verrouillae
du pivot vers la auche pour verrouiller
l’ensemble de la roue avant en position
fixe pour une promenade de lonue
distance.
7 Appuyez sur le bouton de verrouillae du
pivot et faites lisser le verrou du pivot
vers la droite pour permettre à l’ensemble
de la roue avant de pivoter.
AVERTISSEMENT : Pour mettre l’enfant
dans la poussette ou le faire sortir,
verrouillez la roue avant en position fixe.
Bien que la roue avant de votre poussette
se verrouille, elle n’est pas prévue pour
faire du join ou des exercices.
ROUES ARRIÈRE
8 Installation
• Alinez l’axce de la roue arrière sur
la monture de roue sur le cadre de
la poussette et insérez-le dans la
monture de roue jusqu’à ce qu’il se
verrouille. Un déclic retentira.
• Tirez délicatement sur la roue
arrière pour vous assurer qu’elle
soit correctement attachée.
9 Retrait
• Tout en appuyant sur le bouton
de déverrouillae de la roue, faites
délicatement lisser la roue arrière
hors de la monture de roue.
FREIN
10 Pour verrouiller les freins : tirez
délicatement le levier de frein en
position verticale jusqu’à ce qu’il
s’enclenche.
11 Pour déverrouiller les freins : pincez
les pattes rises et tirez le levier
vers vous. Poussez sur le levier de
frein jusqu’à ce qu’il soit parallèle
avec le cadre.
AVERTISSEMENT : Verrouillez
les
freins avant de mettre l’enfant dans
ou de le sortir de la poussette, et
lorsque la poussette ne boue pas.
CANOPY
12 Attachez la canopy au cadre en la
faisant lisser dans l’un des deux
montants de fixation. Pour l’enlever,
faites lisser la canopy hors des
montants..
NOTE : Lors de l’utilisation d’un
sièe-auto City Go i-Size/Graco
ou Britax, la capote doit se
trouver en position supérieure.
Pour tous les autres sièes-auto,
il faut enlever la canopy.
13 Attachez les deux boutons-pression
sur le cadre de la poussette.
14 Fermez la la fermeture éclair à l’arrière
du sièe sur le haut de la canopy.
Attachez les 2 bandes de fixation sur
le côté de la canopy.

19
FR
15 Poussez vers l’avant pour ouvrir la
canopy et poussez vers l’arrière pour
la fermer.
16 Il y a deux fenêtres dans la canopy,
une sur le dessus et l’autre à l’arrière.
Pour les utiliser, enroulez le store vers
le haut et attachez le avec l’élastique
et le bouton.
POIGNÉE
17 Pour réler le uidon sur l’une des 6
positions, appuyez sur les boutons
d’ajustement du uidon des deux
côtés et faites pivoter vers le haut ou
vers le bas sur la nouvelle position
.
RÉGLAGE DU HARNAIS DE SÉCURITÉ
18 À partir de l’arrière du sièe, détachez
et ouvrez la poche pour localiser
l’obturateur carré en plastique.
Faites
tourner l’obturateur et passez-le
à travers les ouvertures dans le
panneau en polyéthylène et le tissu
du sièe.
19
Réinsérez l’obturateur dans
l’ouverture du sièe la plus proche
des épaules de l’enfant. Faites
repasser par le tissu du sièe et le
panneau en polyéthylène. Tirez sur
la sanle pour vous assurer que
l’obturateur soit verrouillé. Répétez
des deux côtés.
AVERTISSEMENT : Évitez les risques
d’accidents raves dus à une chute
ou à une lissade hors du sièe.
Rélez et fixez toujours correctement
le harnais de sécurité.
AVERTISSEMENT : Utilisez toujours
la sanle l’entrejambe en association
avec les sanles des épaules et la
ceinture.
20
Faites lisser les coussins du harnais
vers le haut pour accéder au uide
en plastique sur la sanle.
21
Tenez le uide en plastique et tirez
la sanle pour serrer ou desserrer.
UTILISATION DU HARNAIS DE
SÉCURITÉ
22
Insérez la boucle de sanle latérale
dans la boucle du harnais des deux
côtés.
23
Insérez les boucles du harnais et de
la sanle latérale connectées dans
les côtés de la boucle d’entrejambe.
24
Appuyez sur le bouton de la boucle
d’entrejambe pour débloquer.
INCLINAISON DU SIÈGE
25
Pincez la pince derrière le sièe
et faites-la lisser vers le bas à
l’inclinaison souhaitée.
26
Tirez le sièe vers le bas des deux
côtés pour l’aliner à la position de
la pince. Inverser les étapes pour
revenir en position verticale.
AVERTISSEMENT :
Pour ajuster le
sièe de la poussette, veillez à ce
que la tête, les bras et les jambes
de l’enfant se trouvent à l’écart des
pièces du sièe en mouvement et
du cadre de la poussette.
27 Pour une ventilation additionnelle,
enroulez le rabat de l’arrière du sièe
et attachez le avec l’élastique et le
bouton.
REPOSE-JAMBES
28 Pour utiliser le support des jambes,
relevez le devant du coussin de sièe.
29 Faites tourner le bras de support vers
l’extérieur et abaissez le coussin du
sièe. Verrouillez le bras de support.
30 Pour abaisser le support des jambes,
inversez les étapes.
PLIAGE
•
Retirez l’enfant du sièe.
• Déaez les verrous pivots des roues
avant.
•
Retirez tous les accessoires et tous
les articles du panier.
AVERTISSEMENT :
Pour prévenir les
blessures, retirez le plateau pour enfants
ou l’arceau de protection lors du pliae
ou dépliae de la poussette.

20
FR
31 Appuyez sur les boutons d’ajustement
du uidon des deux côtés du cadre.
Faites pivoter le uidon vers le haut.
32 Insérez l’index dans la petite boucle,
tirez sur la poinée « Tirer pour plier »
et laissez le cadre se replier.
33
Veillez à ce que le verrou
s’enclenche.
34 Placez la poussette en position
debout.
RETRAIT DU PANIER
35 Depuis le devant de la poussette,
détachez les 2 boutons-pression et
sortez les sanles du repose-pieds.
36 Enlevez le panier du crochet.
37 Depuis l’arrière, enlevez le haut du
panier de la lanuette de part et
d’autre du cadre.
38 Détachez les boutons-pression puis retirez
la sanle de la boucle de part et d’autre
du cadre.
RETRAIT DU SIÈGE
39 Retournez la poussette pour exposer
le dessous du sièe.
A Défaites les 2 bandes de fixation
et sortez-les du cadre de la
poussette.
B Défaites les bandes de fixation
et sortez-les des côtés du cadre
de la poussette.
C Dévissez le mousqueton droit et
tirez la sanle hors du coussin de
sièe.
40 Retournez la poussette sur ses roues.
Tirez le tissu du sièe vers le haut et
hors des boutons.
41 En commençant par le bas, faites
lisser le coussin du sièe hors du
cadre de poussette des deux côtés.
42 Depuis le haut, faites lisser le sièe
hors du cadre des deux côtés.
43 Retirez le coussin du sièe.
Inversez les étapes pour rattacher le
coussin du sièe au cadre.
AVERTISSEMENT : Veillez à ce
que toutes les fixations soient
correctement fermées lors de la
fixation du coussin du sièe.
A página está carregando...
A página está carregando...
A página está carregando...
A página está carregando...
A página está carregando...
A página está carregando...
A página está carregando...
A página está carregando...
A página está carregando...
A página está carregando...
A página está carregando...
A página está carregando...
A página está carregando...
A página está carregando...
A página está carregando...
A página está carregando...
A página está carregando...
A página está carregando...
A página está carregando...
A página está carregando...
A página está carregando...
A página está carregando...
A página está carregando...
A página está carregando...
A página está carregando...
A página está carregando...
A página está carregando...
A página está carregando...
A página está carregando...
A página está carregando...
A página está carregando...
A página está carregando...
A página está carregando...
A página está carregando...
A página está carregando...
A página está carregando...
A página está carregando...
A página está carregando...
A página está carregando...
A página está carregando...
A página está carregando...
A página está carregando...
A página está carregando...
A página está carregando...
A página está carregando...
A página está carregando...
A página está carregando...
A página está carregando...
A página está carregando...
A página está carregando...
A página está carregando...
A página está carregando...
A página está carregando...
A página está carregando...
A página está carregando...
A página está carregando...
A página está carregando...
A página está carregando...
A página está carregando...
A página está carregando...
A página está carregando...
A página está carregando...
A página está carregando...
A página está carregando...
A página está carregando...
A página está carregando...
A página está carregando...
A página está carregando...
A página está carregando...
A página está carregando...
A página está carregando...
A página está carregando...
A página está carregando...
A página está carregando...
A página está carregando...
A página está carregando...
A página está carregando...
A página está carregando...
A página está carregando...
A página está carregando...
A página está carregando...
A página está carregando...
A página está carregando...
A página está carregando...
A página está carregando...
A página está carregando...
A página está carregando...
A página está carregando...
A página está carregando...
A página está carregando...
A página está carregando...
A página está carregando...
A página está carregando...
A página está carregando...
A página está carregando...
A página está carregando...
A página está carregando...
A página está carregando...
A página está carregando...
A página está carregando...
A página está carregando...
A página está carregando...
A página está carregando...
A página está carregando...
A página está carregando...
A página está carregando...
A página está carregando...
A página está carregando...
A página está carregando...
A página está carregando...
A página está carregando...
A página está carregando...
A página está carregando...
A página está carregando...
A página está carregando...
A página está carregando...
A página está carregando...
A página está carregando...
A página está carregando...
A página está carregando...
A página está carregando...
A página está carregando...
A página está carregando...
A página está carregando...
A página está carregando...
A página está carregando...
A página está carregando...
A página está carregando...
A página está carregando...
A página está carregando...
A página está carregando...
A página está carregando...
A página está carregando...
A página está carregando...
A página está carregando...
A página está carregando...
A página está carregando...
A página está carregando...
A página está carregando...
A página está carregando...
A página está carregando...
A página está carregando...
A página está carregando...
A página está carregando...
A página está carregando...
A página está carregando...
A página está carregando...
A página está carregando...
A página está carregando...
A página está carregando...
A página está carregando...
A página está carregando...
-
 1
1
-
 2
2
-
 3
3
-
 4
4
-
 5
5
-
 6
6
-
 7
7
-
 8
8
-
 9
9
-
 10
10
-
 11
11
-
 12
12
-
 13
13
-
 14
14
-
 15
15
-
 16
16
-
 17
17
-
 18
18
-
 19
19
-
 20
20
-
 21
21
-
 22
22
-
 23
23
-
 24
24
-
 25
25
-
 26
26
-
 27
27
-
 28
28
-
 29
29
-
 30
30
-
 31
31
-
 32
32
-
 33
33
-
 34
34
-
 35
35
-
 36
36
-
 37
37
-
 38
38
-
 39
39
-
 40
40
-
 41
41
-
 42
42
-
 43
43
-
 44
44
-
 45
45
-
 46
46
-
 47
47
-
 48
48
-
 49
49
-
 50
50
-
 51
51
-
 52
52
-
 53
53
-
 54
54
-
 55
55
-
 56
56
-
 57
57
-
 58
58
-
 59
59
-
 60
60
-
 61
61
-
 62
62
-
 63
63
-
 64
64
-
 65
65
-
 66
66
-
 67
67
-
 68
68
-
 69
69
-
 70
70
-
 71
71
-
 72
72
-
 73
73
-
 74
74
-
 75
75
-
 76
76
-
 77
77
-
 78
78
-
 79
79
-
 80
80
-
 81
81
-
 82
82
-
 83
83
-
 84
84
-
 85
85
-
 86
86
-
 87
87
-
 88
88
-
 89
89
-
 90
90
-
 91
91
-
 92
92
-
 93
93
-
 94
94
-
 95
95
-
 96
96
-
 97
97
-
 98
98
-
 99
99
-
 100
100
-
 101
101
-
 102
102
-
 103
103
-
 104
104
-
 105
105
-
 106
106
-
 107
107
-
 108
108
-
 109
109
-
 110
110
-
 111
111
-
 112
112
-
 113
113
-
 114
114
-
 115
115
-
 116
116
-
 117
117
-
 118
118
-
 119
119
-
 120
120
-
 121
121
-
 122
122
-
 123
123
-
 124
124
-
 125
125
-
 126
126
-
 127
127
-
 128
128
-
 129
129
-
 130
130
-
 131
131
-
 132
132
-
 133
133
-
 134
134
-
 135
135
-
 136
136
-
 137
137
-
 138
138
-
 139
139
-
 140
140
-
 141
141
-
 142
142
-
 143
143
-
 144
144
-
 145
145
-
 146
146
-
 147
147
-
 148
148
-
 149
149
-
 150
150
-
 151
151
-
 152
152
-
 153
153
-
 154
154
-
 155
155
-
 156
156
-
 157
157
-
 158
158
-
 159
159
-
 160
160
-
 161
161
-
 162
162
-
 163
163
-
 164
164
-
 165
165
-
 166
166
-
 167
167
-
 168
168
-
 169
169
-
 170
170
-
 171
171
-
 172
172


Baby Jogger CITY MINI GT 2 Assembly Instructions Manual
- Categoria
- Carrinhos de bebê
- Tipo
- Assembly Instructions Manual
- Este manual também é adequado para
em outras línguas
- español: Baby Jogger CITY MINI GT 2
- français: Baby Jogger CITY MINI GT 2
- italiano: Baby Jogger CITY MINI GT 2
- English: Baby Jogger CITY MINI GT 2
- русский: Baby Jogger CITY MINI GT 2
- Nederlands: Baby Jogger CITY MINI GT 2
- slovenčina: Baby Jogger CITY MINI GT 2
- Deutsch: Baby Jogger CITY MINI GT 2
- dansk: Baby Jogger CITY MINI GT 2
- čeština: Baby Jogger CITY MINI GT 2
- svenska: Baby Jogger CITY MINI GT 2
- polski: Baby Jogger CITY MINI GT 2
- Türkçe: Baby Jogger CITY MINI GT 2
- suomi: Baby Jogger CITY MINI GT 2
- română: Baby Jogger CITY MINI GT 2
Artigos relacionados
-
Baby Jogger City Elite 2 Assembly Instructions Manual
-
Baby Jogger City Mini Single Assembly Instructions Manual
-
Baby Jogger CITY SELECT Assembly Instructions Manual
-
 Baby Jogger CITY ELITE SINGLE Assembly Instructions Manual
-
 Baby Jogger CITY MINI GT 2 Assembly Instructions Manual
-
 Baby Jogger Maxi Cosi Car seat adapter Instructions For Use Manual
-
 Baby Jogger BENCH SEAT Assembly Instructions Manual


Outros documentos
-
Quinny Speedi Instructions For Use & Warranty
-
Quinny BUZZ 3-WHEELER Instructions For Use Manual
-
-
-
Graco Ultima + TS Manual do usuário
-
Graco Travel System Mirage + Manual do usuário
-
Britax Romer GO BIG User Instructions
-
-
Graco TREKKO DUO Manual do proprietário
-