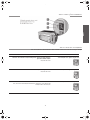
HP Business Inkjet 1200 Printer series Guia de instalação
- Tipo
- Guia de instalação

Getting Started Guide
Guida introduttiva
Guia de Primeiros Passos
Guía de instalación inicial
Oδηγός για τα πρώτα βήµατα
Cover.fm Page 1 Thursday, May 20, 2004 5:26 PM
‰Â˘‡¯ ‰‰ÏÚÙ‰Ï ÍÍȯ„Ó

1
Copyright Information
© 2004 Copyright Hewlett-Packard Development Company, L.P.
Edition 1, 9/2004
Reproduction, adaptation or translation without prior written
permission is prohibited, except as allowed under the
copyright laws.
The information contained herein is subject to change
without notice.
The only warranties for HP products and services are set forth in
the express warranty statements accompanying such products
and services. Nothing herein should be construed as constituting
an additional warranty. HP shall not be liable for technical or
editorial errors or omissions contained herein.
Trademark credits
Microsoft® and Windows® are U.S. registered trademarks of
Microsoft Corporation. All other products mentioned herein may
be trademarks of their respective companies.
Safety Information
Always follow basic safety precautions when using this product to
reduce risk of injury from fire or electric shock.
1 Read and understand all instructions in the documentation that
comes with the printer.
2 Use only a grounded electrical outlet when connecting this
product to a power source. If you do not know whether the
outlet is grounded, check with a qualified electrician.
3 Observe all warnings and instructions marked on the product.
4 Unplug this product from wall outlets before cleaning.
5 Do not install or use this product near water, or when
you are wet.
6 Install the product securely on a stable surface.
7 Install the product in a protected location where no one can
step on or trip over the line cord, and the line cord cannot
be damaged.
8 If the product does not operate normally, see “Maintaining and
troubleshooting” in the onscreen user’s guide on the Starter
CD for your operating system.
9 There are no user-serviceable parts inside. Refer servicing to
qualified service personnel.
Informazioni sulla sicurezza
Durante l’utilizzo di questo prodotto, attenersi sempre alle
precauzioni di sicurezza di base al fine di ridurre il rischio di
lesioni alle persone derivanti da incendi o scariche elettriche.
1 Si consiglia di leggere e apprendere tutte le istruzioni
contenute nei documenti forniti insieme alla stampante.
2 Per collegare il prodotto a una presa di corrente,
utilizzare esclusivamente una presa elettrica collegata
a massa. In caso di dubbio, contattare un elettricista
qualificato per verificare che la presa elettrica sia
collegata a massa.
3 Attenersi a tutte le avvertenze e le istruzioni indicate
sul prodotto.
4 Prima di effettuare la pulizia, scollegare il prodotto dalle
prese a parete.
5 Non installare o utilizzare il prodotto nelle vicinanze di acqua o
se non si è perfettamente asciutti.
6 Posizionare il prodotto su una superficie stabile.
7 Posizionare il prodotto in un luogo riparato, dove non si
possa inciampare sul cavo di alimentazione, che non deve
essere danneggiato.
8 Se il prodotto non funziona normalmente, consultare la
sezione “Manutenzione e risoluzione dei problemi”
della Guida in linea disponibile sul CD di avviamento.
9 Il prodotto non include parti riparabili dall’utente. Per le
riparazioni rivolgersi esclusivamente al personale qualificato.
HPCrickMLK_GSG_UIPSGH.book Page 1 Wednesday, May 19, 2004 9:24 PM

2
Informações de segurança
Siga sempre as precauções de segurança básicas ao utilizar
este produto para reduzir o risco de ferimentos provocados por
incêndios ou choque elétrico.
1 Leia e certifique-se de que entende todas as instruções na
documentação que acompanha a impressora.
2 Utilize somente uma tomada elétrica aterrada ao conectar
este produto a uma fonte de energia. Se você não souber
se a tomada está aterrada, peça ajuda a um eletricista.
3 Respeite todos os avisos e instruções das etiquetas
da impressora.
4 Desligue a impressora da tomada, antes de limpá-la.
5 Não instale ou utilize este produto perto de substâncias
líquidas ou quando estiver com as mãos molhadas.
6 Instale o produto com segurança em uma superfície estável.
7 Instale o produto em um local protegido onde ninguém possa
pisar ou tropeçar no cabo de alimentação e onde esse cabo
não possa ser danificado.
8 Caso o produto não opere normalmente, consulte
“Manutenção e solução de problemas” no guia do usuário
exibido na tela do Starter CD do seu sistema operacional.
9 O produto não contém peças que possam ser reaproveitadas
pelo usuário. Em caso de problemas com a impressora,
entre em contato com o pessoal qualificado para assistência
e manutenção da impressora.
Información de seguridad
Siga siempre las precauciones básicas de seguridad al utilizar
este producto para reducir el riesgo de lesiones por incendio o
descargas eléctricas.
1 Lea y comprenda todas las instrucciones de la documentación
que viene con la impresora.
2 Al conectar este producto a una fuente de poder, utilice
solamente una toma de corriente con conexión a tierra.
Si no sabe si la toma tiene conexión a tierra, verifíquelo con
un electricista calificado.
3 Tenga en cuenta todas las advertencias e instrucciones
indicadas en el producto.
4 Antes de limpiarlo, desenchufe este producto de la toma de
corriente de pared.
5 No instale ni utilice este producto cerca de agua o cuando
esté mojado.
6 Instale el producto de manera segura sobre una
superficie estable.
7 Instale el producto en un lugar protegido donde nadie pueda
pisar el cable de alimentación eléctrica ni tropezar con él,
y donde dicho cable no sufra daños.
8 Si el producto no funciona normalmente, consulte
“Mantenimiento y solución de problemas” en la guía del
usuario en pantalla en el Starter CD de su sistema operativo.
9 Dentro del producto no hay piezas que el usuario pueda
reparar. Confíe las tareas de servicio a personal de
servicio calificado.
Πληροφορίες ασφάλειας
Ακολουθείτε πάντα τα βασικά προληπτικά µέτρα ασφαλείας όταν
χρησιµοποιείτε το προϊόν, προκειµένου να µειώσετε τον κίνδυνο
τραυµατισµού από πυρκαγιά ή ηλεκτροπληξία.
1 ∆ιαβάστε και κατανοήσετε όλες τις οδηγίες που περιέχονται
στην τεκµηρίωση που συνοδεύει τον εκτυπωτή.
2 Χρησιµοποιήστε αποκλειστικά γειωµένη πρίζα όταν συνδέετε
το παρόν προϊόν σε πηγή τροφοδοσίας. Σε περίπτωση που
δεν γνωρίζετε αν η πρίζα είναι γειωµένη, ρωτήστε έναν
ειδικευµένο ηλεκτρολόγο.
3 Τηρήστε όλες τις υποδείξεις και τις οδηγίες που αναγράφονται
στο προϊόν.
4 Αποσυνδέστε αυτό το προϊόν από την πρίζα πριν
τον καθαρισµό.
5 Μην εγκαταστήσετε ή χρησιµοποιήσετε αυτό το προϊόν κοντά
στο νερό ή µε βρεγµένα χέρια.
6 Εγκαταστήστε το προϊόν µε ασφάλεια σε µια
σταθερή επιφάνεια.
7 Εγκαταστήστε το προϊόν σε µια προστατευµένη θέση όπου
δεν µπορεί να πατηθεί το καλώδιο ή να αποτελέσει εµπόδιο,
ώστε να µην πάθει βλάβη το καλώδιο.
8 Εάν το προϊόν δεν λειτουργεί κανονικά, ανατρέξτε στο
κεφάλαιο “Συντήρηση και αντιµετώπιση προβληµάτων”
στις οδηγίες χρήσης του CD εκκίνησης για το λειτουργικό
σας σύστηµα.
9 ∆εν περιλαµβάνεται κανένα εξάρτηµα που να επισκευάζεται
από τον χρήστη. Αναθέσετε τη συντήρηση σε καταρτισµένο
προσωπικό τεχνικής υποστήριξης.
HPCrickMLK_GSG_UIPSGH.book Page 2 Wednesday, May 19, 2004 9:24 PM

English
Português
Eλληνικά
Italiano
Español
3
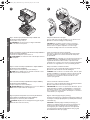
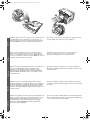
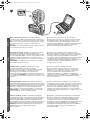
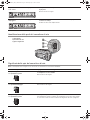
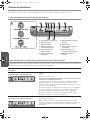
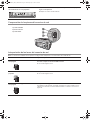
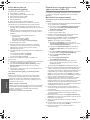
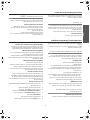
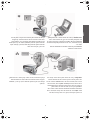
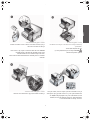
Check the package contents.
1) Printer, 2) power adapter, 3) power cord, 4) four ink cartridges
(cyan, magenta, yellow, black), 5) four printheads (CMYB),
6) Starter CD (software and onscreen user’s guide),
7) printed documentation (setup poster and getting started guide),
8) auto-duplex unit (for automatic two-sided printing;
HP Business Inkjet 1200d/1200dn/1200dtn/1200dtwn),
9) rear-access panel (HP Business Inkjet 1200),
10) tray 2 (HP Business Inkjet 1200dtn/1200dtwn),
11) cross cable (HP Business Inkjet 1200dtwn only).
Verificare il contenuto dell’imballo.
1) Stampante, 2) adattatore, 3) cavo di alimentazione,
4) quattro cartucce di stampa (CMYB), 5) quattro testine di
stampa (CMYB), 6) CD di avviamento (software e Guida in linea),
7) documentazione stampata (poster di configurazione e
Guida introduttiva),
8) unità duplex automatico (per la stampa fronte/
retro automatica; HP Business Inkjet 1200d/1200dn/
1200dtn/1200dtwn), 9) Pannello di accesso posteriore
(stampante HP Business Inkjet 1200),
10) vassoio 2 (HP Business Inkjet 1200dtn/1200dtwn),
11) cavo incrociato (solo HP Business Inkjet 1200dtwn).
Verifique o conteúdo dos pacotes.
1) Impressora, 2) Adaptador de alimentação, 3) Cabo de
alimentação, 4) Quatro cartuchos de tinta (ciano, magenta,
amarelo, preto - CMYB), 5) Quatro cabeçotes de impressão
(CMYB), 6) Starter CD (software e guia do usuário exibido
na tela), 7) Documentação impressa (pôster de instalação
e guia de primeiros passos),
8) Unidade dúplex automática (para impressão automática
nos dois lados; HP Business Inkjet 1200d/1200dn/
1200dtn/1200dtwn), 9) Painel de acesso traseiro
(impressora HP Business Inkjet 1200),
10) Bandeja 2 (HP Business Inkjet 1200dtn/1200dtwn),
11) Cabo cross (somente HP Business Inkjet 1200dtwn).
Revise el contenido del paquete.
1) Impresora, 2) adaptador de corriente, 3) cable de alimentación,
4) cuatro cartuchos de tinta (cian, magenta, amarillo, negro),
5) cuatro cabezales (CMYB), 6) Starter CD (software y guía del
usuario en pantalla), 7) documentación impresa (mapa de
instalación y guía de instalación inicial),
8) unidad automática de doble cara (para impresión a doble cara
en forma automática; HP Business Inkjet 1200d/1200dn/
1200dtn/1200dtwn), 9) Panel de acceso posterior
(impresora HP Business Inkjet 1200),
10) bandeja 2 (HP Business Inkjet 1200dtn/1200dtwn),
11) cable cruzado (únicamente HP Business Inkjet 1200dtwn).
Ελέγξτε το περιεχόµενο της συσκευασίας.
1) Εκτυπωτής, 2) προσαρµογέας τροφοδοσίας ρεύµατος,
3) καλώδιο τροφοδοσίας ρεύµατος, 4) τέσσερα φυσίγγια
µελάνης (κυανό, µατζέντα, κίτρινο, µαύρο), 5) τέσσερις κεφαλές
εκτύπωσης (CMYB), 6) CD εκκίνησης (λογισµικό και
ηλεκτρονικές οδηγίες), 7) έντυπη τεκµηρίωση (φυλλάδιο
εγκατάστασης και οδηγός για τα πρώτα βήµατα),
8) µονάδα αυτόµατης εκτύπωσης διπλής όψης (για αυτόµατη
εκτύπωση διπλής όψης. Εκτυπωτής HP Business
Inkjet 1200d/1200dn/1200dtn/1200dtwn), 9) πίσω κάλυµµα
πρόσβασης (HP Business Inkjet 1200), 10) δίσκος 2 (εκτυπωτής
HP Business Inkjet 1200dtn/1200dtwn), 11) ανάστροφο καλώδιο
(µόνο µε εκτυπωτή HP Business Inkjet 1200dtwn).
11
10
8
7
5
4
321
6
9
HPCrickMLK_GSG_UIPSGH.book Page 3 Wednesday, May 19, 2004 9:24 PM

4
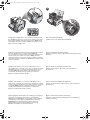
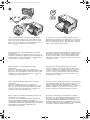
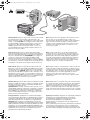
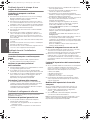
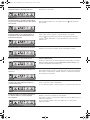
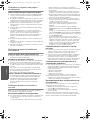
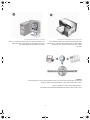
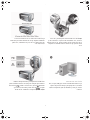
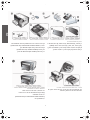
Step 1: Remove the packing tape and materials.
Remove all packing tape from the printer. Open the top cover and
remove the tape from the inside of the printer.
Step 2: Install the rear-access panel or the auto-duplex unit.
On the back of the printer, insert the rear-access panel
(HP Business Inkjet 1200) or the auto-duplex unit
(HP Business Inkjet 1200d/1200dn/1200dtn/1200dtwn)
until it clicks.
Punto 1: Rimuovere il nastro e il materiale di imballo.
Togliere completamente il nastro di imballo dalla stampante.
Aprire il coperchio superiore e rimuovere il nastro dall’interno
della stampante.
Punto 2: Installare il pannello di accesso posteriore o l’unità
duplex automatico.
Inserire il pannello di accesso posteriore (HP Business
Inkjet 1200) o l’unità duplex automatico (HP Business
Inkjet 1200d/1200dn/1200dtn/1200dtwn) sul retro della
stampante e premere finché non scatta in posizione.
Etapa 1: Remova os materiais e a fita de embalagem.
Remova toda a fita de embalagem da impressora. Abra a tampa
superior e remova a fita da parte interna da impressora.
Etapa 2: Instale a painel de acesso traseiro ou unidade
dúplex automática.
Atrás da impressora, insira o painel de acesso traseiro
(HP Business Inkjet 1200) ou unidade dúplex (HP Business
Inkjet 1200d/1200dn/1200dtn/1200dtwn) até ouvir um clique.
Paso 1: Retire la cinta y los materiales de embalaje.
Retire la cinta de embalaje de la impresora. Abra la cubierta
superior y retire la cinta del interior de la impresora.
Paso 2: Instale el panel de acceso posterior o la unidad
automática de doble cara.
En la parte posterior de la impresora, inserte el panel de acceso
posterior (HP Business Inkjet 1200) o la unidad automática
de doble cara (HP Business Inkjet 1200d/1200dn/
1200dtn/1200dtwn) hasta que escuche un clic.
Βήµα 1: Αφαιρέστε την ταινία και τα υλικά συσκευασίας.
Αφαιρέστε την ταινία συσκευασίας από τον εκτυπωτή. Ανοίξτε το
πάνω κάλυµµα και αφαιρέστε την ταινία από το εσωτερικό
του εκτυπωτή.
Βήµα 2: Εγκαταστήστε το πίσω κάλυµµα πρόσβασης ή τη
µονάδα αυτόµατης εκτύπωσης διπλής όψης.
Εισάγετε, στο πίσω µέρος του εκτυπωτή, το πίσω κάλυµµα
πρόσβασης (εκτυπωτής HP Business Inkjet 1200) ή τη µονάδα
αυτόµατης εκτύπωσης διπλής όψης (εκτυπωτές HP Business
Inkjet 1200d/1200dn/1200dtn/1200 dtwn), µέχρι να ακουστεί ο
χαρακτηριστικός ήχος που δηλώνει ότι ασφάλισε στη θέση της.
1 2
HPCrickMLK_GSG_UIPSGH.book Page 4 Wednesday, May 19, 2004 9:24 PM

English
Português
Eλληνικά
Italiano
Español
5
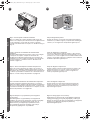
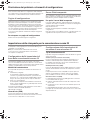
Step 3: Install tray 2 (HP Business Inkjet 1200dtn and
HP Business Inkjet 1200dtwn).
Set the printer on top of tray 2.
WARNING! Be careful to keep your fingers and hands
clear of the bottom of the printer.
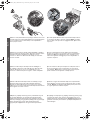
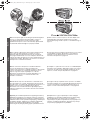
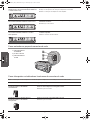
Step 4: Install the ink cartridges.
1) Press and release the ink cartridge cover to open the cover.
2) Remove each ink cartridge from its package.
CAUTION: HP recognizes customer’s choice, but cannot
guarantee the quality or reliability of non-HP ink cartridges.
Printer services or repairs required as a result of using
non-HP ink cartridges will not be covered under warranty.
Punto 3: Installare il vassoio 2 (HP Business Inkjet 1200dtn e
HP Business Inkjet 1200dtwn).
Posizionare la stampante sopra il vassoio 2.
AVVERTENZA: non avvicinare mani e dita alla parte inferiore
della stampante.
Punto 4: Installare le cartucce di stampa.
1) Premere e rilasciare il coperchio della cartuccia di stampa
per aprirlo. 2) Rimuovere ciascuna cartuccia di stampa dal
proprio imballo.
ATTENZIONE: pur rispettando le scelte dei propri clienti, HP non
garantisce la qualità o l’affidabilità di cartucce di stampa non
originali HP. Gli interventi di assistenza o riparazione della
stampante che si rendono necessari in conseguenza dell’utilizzo
di cartucce non originali HP non sono coperti dalla garanzia.
Etapa 3: Instale a bandeja 2 (HP Business Inkjet 1200dtn e
HP Business Inkjet 1200dtwn).
Defina a impressora na parte superior da bandeja 2.
AVISO! Tome cuidado para não prender seus dedos e suas
mãos na parte inferior da impressora.
Etapa 4: Instale os cartuchos de tinta.
1) Pressione e solte a tampa do cartucho de tinta para abri-la.
2) Remova cada cartucho de tinta da embalagem.
CUIDADO: A HP reconhece a escolha do cliente, mas não pode
garantir a qualidade ou confiança de cartuchos de tinta não-HP.
Os serviços ou consertos da impressora necessários como
resultado do uso de cartuchos de tinta não-HP não serão
cobertos pela garantia.
Paso 3: Instale la bandeja 2 (HP Business Inkjet 1200dtn y
HP Business Inkjet 1200dtwn).
Coloque la impresora sobre la bandeja 2.
¡ADVERTENCIA! Tenga cuidado de no tocar con los dedos ni
con las manos la parte inferior de la impresora.
Paso 4: Instale los cartuchos de tinta.
1) Presione y suelte la cubierta del cartucho de tinta para abrirla.
2) Retire cada cartucho de tinta de su paquete.
PRECAUCIÓN: HP reconoce las preferencias del cliente, pero no
puede garantizar la calidad o confiabilidad de los cartuchos de
tinta que no sean HP. Los servicios de impresora o reparación
que se requieren por usar cartuchos de tinta que no sean HP no
serán cubiertos por la garantía.
Βήµα 3: Εγκατάσταση δίσκου 2 (εκτυπωτές HP Business
Inkjet 1200dtn και HP Business Inkjet 1200dtwn).
Τοποθετήστε τον εκτυπωτή πάνω στο δίσκο 2.
ΠΡΟΣΟΧΗ! Βεβαιωθείτε ότι τα δάχτυλα και τα χέρια σας δεν
βρίσκονται κάτω από τον εκτυπωτή.
Βήµα 4: Τοποθέτηση φυσιγγίων µελάνης.
1) Πιέστε και ελευθερώστε το κάλυµµα του φυσιγγίου µελάνης για
να ανοίξετε το κάλυµµα. 2) Αφαιρέστε την κασέτα µελανιού από τη
συσκευασία της.
ΠΡΟΣΟΧΗ: Η HP αναγνωρίζει το δικαίωµα επιλογής των
πελατών της, αλλά δεν µπορεί να εγγυηθεί την ποιότητα ή την
αξιοπιστία των κασετών µελανιού τρίτων κατασκευαστών.
Οι συντηρήσεις και οι επισκευές εκτυπωτών που οφείλονται
στη χρήση κασετών µελανιού κατασκευαστών εκτός της HP,
δεν θα καλύπτονται από την εγγύηση.
3 4
2
1
HPCrickMLK_GSG_UIPSGH.book Page 5 Wednesday, May 19, 2004 9:24 PM

6
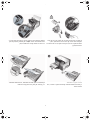
3) Align each cartridge with its color-coded slot, and then insert
the cartridge into the slot. To ensure proper contact, press down
firmly on the cartridges until they snap into place. Note: All four
ink cartridges must be correctly installed for the printer to work.
4) Close the ink cartridge cover.
Step 5: Install the printheads.
1) Open the top cover. 2) Lift the printhead latch.
3) Allineare ciascuna cartuccia al relativo alloggiamento codificato
in colore, quindi inserire la cartuccia nell’alloggiamento.
Per assicurare un corretto contatto, premere con decisione sulle
cartucce finché non scattano in posizione. Nota: perché la
stampante funzioni, è necessario che tutte e quattro le cartucce
siano state installate correttamente. 4) Chiudere il coperchio delle
cartucce di stampa.
Punto 5: Installare le testine di stampa.
1) Aprire il coperchio superiore. 2) Sollevare il fermo della testina
di stampa.
3) Alinhe cada cartucho com seu slot codificado por cores e,
em seguida, insira o cartucho no slot. Para assegurar um contato
adequado, pressione os cartuchos firmemente até que eles se
encaixem. Nota: Os quatro cartuchos de tinta devem estar
corretamente instalados para que a impressora funcione.
4) Feche a tampa do cartucho de tinta.
Etapa 5: Instale os cabeçotes de impressão.
1) Abra a tampa superior. 2) Levante a trava do cabeçote
de impressão.
3) Alinee cada cartucho con su ranura codificada por color y
luego inserte el cartucho en la ranura. Para asegurar un contacto
correcto, presione firmemente los cartuchos hasta que se ajusten
en su lugar. Nota: Para que la impresora funcione, los cuatro
cartuchos de tinta deben estar instalados correctamente.
4) Cierre la cubierta del cartucho de tinta.
Paso 5: Instale los cabezales de impresión.
1) Cierre la cubierta superior. 2) Levante el seguro del cabezal
de impresión.
3) Ευθυγραµµίστε κάθε κασέτα µε την υποδοχή µε το αντίστοιχο
χρώµα και, στη συνέχεια, τοποθετήστε τη στην υποδοχή.
Προκειµένου να εξασφαλίσετε σωστή επαφή, πιέστε τις κασέτες
σταθερά προς τα κάτω µέχρι να ασφαλίσουν στη θέση τους.
Σηµείωση: Και οι τέσσερις κασέτες µελανιού πρέπει να
εγκατασταθούν σωστά για να λειτουργήσει ο εκτυπωτής.
4) Κλείστε το κάλυµµα των κασετών µελανιού.
Βήµα 5: Τοποθέτηση κεφαλών εκτύπωσης.
1) Ανοίξτε το πάνω κάλυµµα. 2) Ανασηκώστε την ασφάλεια της
κεφαλής εκτύπωσης.
4
3
5
2
1
HPCrickMLK_GSG_UIPSGH.book Page 6 Wednesday, May 19, 2004 9:24 PM

English
Português
Eλληνικά
Italiano
Español
7
3) Remove each printhead from its package, and then remove the
protective tape from each printhead. 4) Insert each printhead into
its color-coded slot. Press down firmly on each printhead to
ensure proper contact.
5) Pull the printhead latch all the way forward and press down
to ensure that the latch is properly engaged. Note: You might
have to apply some pressure to engage the latch. 6) Close the
top cover.
3) Rimuovere ciascuna testina di stampa dall’imballo e quindi il
nastro protettivo da ciascuna testina. 4) Inserire ciascuna testina
di stampa nel relativo alloggiamento codificato in colore.
Premere con decisione sulla testina di stampa per assicurare
il corretto contatto.
5) Tirare completamente il fermo della testina di stampa e
premere verso il basso per assicurarsi che sia correttamente
agganciato. Nota: per agganciare il fermo, potrebbe essere
necessario applicare una leggera pressione. 6) Chiudere il
coperchio superiore.
3) Remova cada cabeçote de impressão da embalagem e,
em seguida, a fita protetora de cada cabeçote. 4) Insira cada
cabeçote de impressão em seu slot codificado por cores.
Pressione-os firmemente para assegurar o contato adequado.
5) Puxe a trava do cabeçote de impressão toda para frente e
pressione para baixo para assegurar que ela esteja presa
corretamente. Nota: Talvez seja necessário pressionar para
poder encaixar a trava. 6) Feche a tampa superior.
3) Retire cada cabezal de impresión de su embalaje y luego
extraiga la cinta protectora de cada cabezal de impresión.
4) Inserte el cabezal de impresión en la ranura con el mismo
código de color. Presione cada cabezal de impresión firmemente
para asegurar un contacto correcto.
5) Mueva el seguro del cabezal de impresión completamente
hacia adelante y presiónelo para asegurarse de que esté bien
cerrado. Nota: Es posible que deba aplicar presión para cerrar
el seguro. 6) Cierre la cubierta superior.
3) Βγάλτε τις κεφαλές εκτύπωσης από τη συσκευασία τους και
στη συνέχεια αφαιρέστε την προστατευτική ταινία από κάθε
κεφαλή εκτύπωσης. 4) Τοποθετήστε κάθε κεφαλή εκτύπωσης
µέσα στην υποδοχή µε τη χρωµατιστή ένδειξη που της αντιστοιχεί.
Πιέστε σταθερά προς τα κάτω κάθε κεφαλή εκτύπωσης
ξεχωριστά για να βεβαιωθείτε ότι έχουν τοποθετηθεί σωστά.
5) Τραβήξτε το κούµπωµα της κεφαλής εκτύπωσης τελείως προς
τα εµπρός και πιέστε προς τα κάτω για να βεβαιωθείτε πως η
κεφαλή εκτύπωσης είναι καλά κλειστή. Σηµείωση: Ενδέχεται να
χρειαστεί να πιέσετε για να κλείσετε την ασφάλεια. 6) Κλείστε το
πάνω κάλυµµα.
4
3
5
6
HPCrickMLK_GSG_UIPSGH.book Page 7 Wednesday, May 19, 2004 9:24 PM

8
Step 6: Load paper in the trays.
1) Pull the tray out of the printer. 2) If you are loading tray 1,
raise the output tray.
3) For paper between 11 inches and 14 inches (356 mm and
279 mm) long, move the latch on the tray to the right;
4) then lower the front of the tray.
Punto 6: Caricare la carta nei vassoi.
1) Estrarre il vassoio dalla stampante. 2) Se si sta caricando il
vassoio 1, sollevare il vassoio di raccolta.
3) Per caricare carta di formato compreso tra 11 e 14 pollici
(279 e 356 mm) di lunghezza, spostare il fermo del vassoio
verso destra. 4) Abbassare la parte anteriore del vassoio.
Etapa 6: Coloque papel nas bandejas.
1) Puxe a bandeja para fora da impressora. 2) Se estiver
carregando a bandeja 1, levante a bandeja de saída.
3) Para papéis entre 11 e 14 pol (356 e 279 mm), mova a trava
da bandeja para a direita e; 4) em seguida, abaixe a parte frontal
da bandeja.
Paso 6: Cargue papel en las bandejas.
1) Saque la bandeja de la impresora. 2) Si carga la bandeja 1,
levante la bandeja de salida.
3) Para cargar papel que mida entre 279 y 356 mm
(11 y 14 pulgadas) de largo, mueva el seguro de la bandeja hacia
la derecha; 4) y baje la parte delantera de la bandeja.
Βήµα 6: Τοποθετήστε χαρτί στους δίσκους.
1) Τραβήξτε το δίσκο προς τα έξω. 2) Αν τοποθετείτε χαρτί στο
δίσκο 1, σηκώστε και αφαιρέστε το δίσκο εξόδου.
3) Για χαρτί µήκους από 11 έως και 14 ίντσες (356 mm και
279 mm), µετακινήστε την ασφάλεια του δίσκου προς τα δεξιά
4) και στη συνέχεια χαµηλώστε το µπροστινό µέρος του δίσκου.
6
2
1
4
3
HPCrickMLK_GSG_UIPSGH.book Page 8 Wednesday, May 19, 2004 9:24 PM

English
Português
Eλληνικά
Italiano
Español
9
5) Slide the guides in the tray to adjust them for the size that you
are loading. 6) Insert up to 150 sheets of paper into tray 1 or
250 sheets of paper into tray 2, print-side down along the right
of the tray. Note: Tray 2 can be loaded only with plain paper.
7) Lower the output tray (if you loaded tray 1). 8) Gently reinsert
the tray. 9) Pull out the extension on the output tray.
5) Fare scorrere le guide nel vassoio per regolarle in base al
formato che si sta caricando. 6) Inserire fino a 150 fogli nel
vassoio 1 o 250 fogli nel vassoio 2, con il lato di stampa rivolto
verso il basso e allineato a destra del vassoio. Nota: nel vassoio 2
è possibile caricare soltanto carta comune.
7) Abbassare il vassoio di raccolta (se è stato caricato il
vassoio 1). 8) Reinserire il vassoio con delicatezza.
9) Estrarre la prolunga del vassoio di raccolta carta.
5) Deslize as guias na bandeja para ajustá-las ao tamanho que
você está carregando. 6) Insira até 150 folhas de papel
na bandeja 1 ou 250 folhas de papel na bandeja 2, com o
lado de impressão voltado para baixo e junto à lateral direita
da bandeja. Nota: A Bandeja 2 pode ser carregada somente
com papel comum.
7) Abaixe a bandeja de saída (se você carregou a bandeja 1).
8) Reinsira a bandeja cuidadosamente. 9) Retire a extensão da
bandeja de saída.
5) Deslice las guías en la bandeja para ajustarlas según el
tamaño del papel que está cargando. 6) Inserte hasta 150 hojas
de papel en la bandeja 1 ó 250 hojas de papel en la bandeja 2,
con la cara de impresión del papel hacia abajo, hacia el lado
derecho de la bandeja. Nota: La bandeja 2 puede cargarse sólo
con papel normal.
7) Baje la bandeja de salida (si cargó la bandeja 1). 8) Vuelva a
insertar suavemente la bandeja. 9) Tire la extensión en la bandeja
de salida.
5) Σύρετε τους οδηγούς στο δίσκο για να τους προσαρµόσετε στο
µέγεθος του χαρτιού που τοποθετείτε. 6) Τοποθετήστε έως 150
φύλλα στο δίσκο 1 ή 250 φύλλα χαρτιού στο δίσκο 2, µε την
πλευρά εκτύπωσης προς τα κάτω, κατά µήκος της δεξιάς
πλευράς του δίσκου. Σηµείωση: Στο δίσκο 2 µπορείτε να
τοποθετήσετε µόνο απλό χαρτί.
7) Τοποθετήστε πάλι το δίσκο εξόδου (αν τοποθετήσατε χαρτί στο
δίσκο 1). 8) Τοποθετήστε το δίσκο µε προσοχή. 9) Τραβήξτε προς
τα έξω την επέκταση του δίσκου εξόδου.
5
6
8
7
9
HPCrickMLK_GSG_UIPSGH.book Page 9 Wednesday, May 19, 2004 9:24 PM

10
Step 7: Connect the power cord and turn on the printer.
1) Connect the power adapter into the printer. 2) Connect the
power cord to the power adapter. 3) Connect the other end of
the power cord to an alternating current (AC) power outlet.
4) Press the (power button) to turn on the printer.
To ensure the best possible print quality, the printer aligns the
printheads. At the beginning of the alignment process, the Power
light blinks and the printer prints a status page. At the end of the
process, the printer prints two auto-alignment pages. Printhead
alignment takes approximately 7 minutes.
Punto 7: Collegare il cavo di alimentazione e accendere
la stampante.
1) Collegare l’adattatore alla stampante. 2) Collegare il cavo di
alimentazione all’adattatore. 3) Collegare l’altra estremità del cavo
di alimentazione a una presa CA. 4) Premere il (pulsante di
accensione) per accendere la stampante.
Per assicurare la migliore qualità di stampa, la stampante esegue
l’allineamento delle testine. All’inizio di tale procedura, la spia
di accensione lampeggia e viene stampata una pagina di stato.
Al termine della procedura, vengono stampate due pagine di
allineamento automatico. L’allineamento delle testine di stampa
richiede circa 7 minuti.
Etapa 7: Conecte o cabo de alimentação e ligue
a impressora.
1) Conecte o adaptador de alimentação na impressora.
2) Conecte o cabo de alimentação ao adaptador de alimentação.
3) Conecte a outra extremidade do cabo de alimentação a uma
tomada de corrente alternada (CA). 4) Pressione o (Botão
Liga/Desliga) para ligar a impressora.
Para garantir a melhor qualidade de impressão possível,
a impressora alinha os cabeçotes de impressão. No início do
processo de alinhamento, o indicador luminoso de energia pisca
e a impressora imprime uma página de status. No final do
processo, a impressora imprime duas páginas de alinhamento
automático. O alinhamento dos cabeçotes de impressão leva
aproximadamente 7 minutos.
Paso 7: Conecte el cable de alimentación y encienda
la impresora.
1) Conecte el adaptador de corriente a la impresora.
2) Conecte el cable de alimentación al adaptador de corriente.
3) Conecte el otro extremo del cable de alimentación en una
toma de corriente alterna (CA). 4) Presione el (botón de
alimentación) para encender la impresora.
La impresora alinea los cabezales de impresión para garantizar la
mejor calidad de impresión posible. Al comienzo del proceso de
alineación, la luz de alimentación parpadea y la impresora
imprime una página de estado. Al final del proceso, la impresora
imprime dos páginas de auto alineación. La alineación de
cabezales de impresión tarda aproximadamente 7 minutos.
Βήµα 7: Συνδέστε το καλώδιο τροφοδοσίας ρεύµατος και
ενεργοποιήστε τον εκτυπωτή.
1) Συνδέστε τον προσαρµογέα τροφοδοσίας ρεύµατος στον
εκτυπωτή. 2) Συνδέστε το καλώδιο τροφοδοσίας στον
προσαρµογέα τροφοδοσίας ρεύµατος. 3) Συνδέστε το άλλο άκρο
του καλωδίου τροφοδοσίας σε πρίζα εναλλασσόµενου ρεύµατος
(AC). 4) Πατήστε το (κουµπί τροφοδοσίας) για να
ενεργοποιήσετε τον εκτυπωτή.
Ο εκτυπωτής εκτελεί αυτόµατη ευθυγράµµιση των κεφαλών
εκτύπωσης, ώστε να διασφαλιστεί η καλύτερη δυνατή ποιότητα
εκτύπωσης. Στην αρχή της διαδικασίας ευθυγράµµισης,
το λαµπάκι τροφοδοσίας αναβοσβήνει και ο εκτυπωτής τυπώνει
µια σελίδα κατάστασης. Στο τέλος της διαδικασίας, ο εκτυπωτής
τυπώνει δύο σελίδες αυτόµατης ευθυγράµµισης. Η ευθυγράµµιση
των κεφαλών εκτύπωσης διαρκεί περίπου 7 λεπτά.
7
4
3
2
1
HPCrickMLK_GSG_UIPSGH.book Page 10 Wednesday, May 19, 2004 9:24 PM

English
Português
Eλληνικά
Italiano
Español
11
Note: If other printer lights are lit during the printhead alignment
process, see “Interpreting control panel lights” on page 17.
If the alignment page does not print, follow these steps.
1) Check that the power cord is connected firmly. 2) Check that
the printheads and ink cartridges are properly installed.
3) Make sure the rear-access panel or the auto-duplex unit is
installed. 4) Turn off the printer, and then turn it on again.
If the alignment page still do not print, see “Troubleshooting” on
page 17.
Nota: se durante l’allineamento delle testine di stampa restano
accese altre spie della stampante, consultare la sezione
“Significato delle spie del pannello di controllo" a pagina 24.
Se la pagina di allineamento non viene stampata, attenersi alla
seguente procedura. 1) Verificare che il cavo di alimentazione sia
correttamente collegato. 2) Verificare che le testine e le cartucce
di stampa siano correttamente installate.
3) Assicurarsi di avere installato il pannello di accesso posteriore
o l’unità duplex automatico. 4) Spegnere e riaccendere la
stampante. Se il problema persiste, consultare la sezione
“Risoluzione dei problemi" a pagina 24.
Nota: Se outras luzes da impressora acenderem durante o
processo de alinhamento do cabeçote de impressão,
consulte “Como interpretar os indicadores luminosos do painel de
controle” na página 31. Se a página de alinhamento não for
impressa, siga estas etapas. 1) Verifique se o cabo de
alimentação está firmemente conectado. 2) Verifique se os
cabeçotes de impressão e os cartuchos de tinta estão
instalados corretamente.
3) Verifique se o painel de acesso traseiro ou a unidade dúplex
automática estão instalados. 4) Desligue a impressora e ligue-a
novamente. Se ainda assim a página de alinhamento não for
impressa, consulte “Solução de problemas” na página 31.
Nota: Si durante el proceso de alineación se encienden otras
luces de la impresora, consulte “Interpretación de las luces del
panel de control” en la página 38. Si la página de alineación no se
imprime, siga estos pasos. 1) Verifique que el cable de
alimentación esté conectado firmemente. 2) Verifique que los
cabezales de impresión y los cartuchos de tinta estén instalados
correctamente.
3) Asegúrese de que el panel de acceso posterior o la unidad
automática de doble cara esté instalada. 4) Apague la impresora
y vuelva a encenderla. Si la página de alineación aún no se
imprime, consulte “Solución de problemas” en la página 38.
Σηµείωση: Αν και άλλα λαµπάκια είναι ενεργοποιηµένα κατά τη
διαδικασία ευθυγράµµισης των κεφαλών εκτύπωσης, ανατρέξτε
στην ενότητα “Ερµηνεία φωτεινών ενδείξεων πίνακα ελέγχου” στη
σελίδα 45. Αν δεν τυπωθεί η σελίδα ευθυγράµµισης, ακολουθήστε
τα παρακάτω βήµατα. 1) Ελέγξτε ότι το καλώδιο τροφοδοσίας
ρεύµατος έχει συνδεθεί καλά. 2) Ελέγξτε ότι οι κεφαλές
εκτύπωσης και τα φυσίγγια µελάνης έχουν εγκατασταθεί σωστά.
3) Βεβαιωθείτε πως έχετε εγκαταστήσει το πίσω κάλυµµα
πρόσβασης ή την αυτόµατη µονάδα εκτύπωσης διπλής όψης.
4) Απενεργοποιήστε τον εκτυπωτή και, στη συνέχεια,
ενεργοποιήστε τον ξανά. Αν εξακολουθείτε να µην µπορείτε να
τυπώσετε τη σελίδα ευθυγράµµισης, ανατρέξτε στην ενότητα
“Αντιµετώπιση προβληµάτων” στη σελίδα 45.
HPCrickMLK_GSG_UIPSGH.book Page 11 Wednesday, May 19, 2004 9:24 PM

12
Step 8: Connect the printer.
See the following instructions for your connection type (USB,
parallel, wireless network, or wired network). For more information
about installing software, see the onscreen user’s guide on the
Starter CD.
USB or parallel connection: 1) Insert the Starter CD into the
CD drive. 2) Follow the onscreen instructions for your connection
and connect the USB ( ) or parallel ( ) (sold separately)
when prompted. Note: Connect only a parallel cable or a USB
cable — not both.
Punto 8: Collegare la stampante.
Vedere le istruzioni di seguito per il tipo di collegamento
(USB, parallelo, rete con o senza fili). Per ulteriori informazioni
sull’installazione del software, consultare la Guida in linea sul CD
di avviamento.
Collegamento parallelo o USB: 1) Inserire il CD di avviamento
nella relativa unità. 2) Attenersi alle istruzioni visualizzate
sullo schermo ed effettuare il collegamento del cavo USB ( )
o parallelo ( ) (venduto separatamente) quando richiesto.
Nota: collegare solo un cavo parallelo o un cavo USB,
non entrambi.
Etapa 8: Conecte a impressora.
Veja as instruções a seguir para o seu tipo de conexão
(USB, paralela, rede sem fio ou rede com fio). Para obter mais
informações sobre instalação do software, consulte o guia do
usuário na tela do Starter CD.
Conexão USB ou paralela: 1) Insira o Starter CD na
unidade de CD. 2) Siga as instruções exibidas na tela
para sua conexão e conecte o cabo USB ( ) ou paralelo
( ) (vendido separadamente), quando solicitado.
Nota: Conecte somente um cabo paralelo ou um cabo
USB – não conecte os dois.
Paso 8: Conecte la impresora.
Consulte las siguientes instrucciones para su tipo de conexión
(USB, paralelo, red inalámbrica o red por cable). Para obtener
mayor información acerca de la instalación de software,
consulte la guía del usuario en pantalla en el Starter CD.
Conexión de cable USB o paralelo: 1) Inserte el Starter CD en
la unidad de CD. 2) Siga las instrucciones en pantalla para su
conexión y conecte el cable USB ( ) o paralelo ( ) (que se
vende por separado) cuando se le solicite.
Nota: Conecte sólo un cable paralelo o uno USB, no ambos.
Βήµα 8: Σύνδεση εκτυπωτή.
∆είτε τις ακόλουθες πληροφορίες για τον τύπο σύνδεσής σας
(USB, παράλληλη, ασύρµατο δίκτυο ή ενσύρµατο δίκτυο).
Για περισσότερες πληροφορίες σχετικά µε την εγκατάσταση
του λογισµικού, ανατρέξτε στις οδηγίες χρήσης του CD
εκκίνησης στην οθόνη.
Σύνδεση παράλληλη ή USB: 1) Εισάγετε το CD εκκίνησης στον
οδηγό CD-ROM. 2) Ακολουθείστε τις οδηγίες στην οθόνη για τη
σύνδεση σας και συνδέστε τη USB ( ) ή την παράλληλη
( ) (πωλούνται χωριστά) όταν σας ζητηθεί.
Σηµείωση: Συνδέστε µόνο το παράλληλο καλώδιο ή
το καλώδιο USB — όχι και τα δύο.
8
HPCrickMLK_GSG_UIPSGH.book Page 12 Wednesday, May 19, 2004 9:24 PM

English
Português
Eλληνικά
Italiano
Español
13
Wireless connection: 1) Obtain the following information:
the network name (SSID), communication mode (infrastructure or
ad hoc), and the type of security the network uses (such as WPA,
WEP, or none). For information about configuring these settings,
see “Setting up the printer for wireless communication” on
page 21.
CAUTION: It is recommended that the printer and the computers
that use the printer be on the same subnet.
2) Remove the protective cover from the network port.
3) Temporarily connect the cross cable to the printer’s network
port and the computer. 4) Install the printer software for your
communication mode. (See “Installing printer software and
sharing the printer (Windows)” on page 22 and “Installing printer
software and sharing the printer (Mac OS)” on page 22.)
5) When prompted, disconnect the cross cable.
Collegamento senza fili: 1) Ottenere le seguenti informazioni:
il nome della rete (SSID), la modalità di comunicazione
(infrastruttura oppure ad hoc) e il tipo di sicurezza utilizzato dalla
rete (ad esempio WPA, WEP o nessuna). Per informazioni sulla
configurazione di queste impostazioni, consultare la sezione
“Impostazione della stampante per la comunicazione senza fili" a
pagina 28.
ATTENZIONE: si consiglia di avere la stampante e il computer
che la utilizza nella stessa sottorete.
2) Rimuovere il coperchio di protezione dalla porta di rete.
3) Collegare temporaneamente il cavo incrociato alla porta di
rete della stampante e al computer. 4) Installare il software della
stampante relativo alla propria modalità di comunicazione.
Consultare la sezione “Installazione del software della stampante
e condivisione della stampante (Windows)" a pagina 29 e
“Installazione del software della stampante e condivisione della
stampante (Mac OS)" a pagina 29. 5) Quando richiesto,
scollegare il cavo incrociato.
Conexão sem fio: 1) Obtenha as informações a seguir:
O nome da rede (SSID), o modo de comunicação
(de infra-estrutura ou ad hoc) e o tipo de segurança utilizada
pela rede (como WPA, WEP ou nenhuma). Para obter
informações sobre como definir essas configurações,
consulte “Configuração da impressora para a comunicação sem
fio” na página 35. CUIDADO: É recomendado que a impressora
e os computadores que utilizam a impressora estejam na mesma
sub-rede.
2) Remova a capa protetora da porta de rede.
3) Conecte temporariamente o cabo cross à porta de rede
da impressora e ao computador. 4) Instale o software da
impressora correspondente ao seu modo de comunicação.
(Consulte “Instalação do software da impressora e o
compartimento da impressora (Windows)” na página 36 e
“Instalação do software da impressora e o compartilhamento da
impressora (Mac OS)” na página 36.) 5) Quando solicitado,
desconecte o cabo cross.
Conexión inalámbrica: 1) Obtenga la siguiente información:
nombre de la red (SSID), modo de comunicación (infraestructura
o ad hoc) y tipo de seguridad que utiliza la red (como por ejemplo
WPA, WEP o ninguna). Para obtener información acerca de cómo
definir estas configuraciones, consulte “Configuración de la
impresora para la comunicación inalámbrica” en la página 42.
PRECAUCIÓN: Se recomienda que la impresora y los equipos
que usen la impresora estén en la misma subred.
2) Retire la cubierta protectora del puerto de red. 3) Conecte
temporalmente el cable cruzado al puerto de red de la impresora
y al equipo. 4) Instale el software de la impresora para su modo
de comunicación. (Consulte “Instalación del software de la
impresora y cómo compartirla (Windows)” en la página 43 y
“Instalación del software de la impresora y cómo compartirla
(Mac OS)” en la página 43.) 5) Cuando se le indique, desconecte
el cable cruzado.
Ασύρµατη σύνδεση: 1) Λάβετε τις ακόλουθες πληροφορίες:
το όνοµα δικτύου (SSID), τη λειτουργία επικοινωνίας (υποδοµή ή
συγκεκριµένη) και το είδος της ασφάλειας που χρησιµοποιεί το
δίκτυο (όπως WPA, WEP ή καµία). Για πληροφορίες σχετικά
µε τη διαµόρφωση αυτών των ρυθµίσεων, ανατρέξτε στην ενότητα
“Ρύθµιση εκτυπωτή για ασύρµατη επικοινωνία” στη σελίδα 49.
ΠΡΟΣΟΧΗ: Συνιστάται η εγκατάσταση του εκτυπωτή και των
υπολογιστών που θα τον χρησιµοποιούν στο ίδιο
δευτερεύον δίκτυο.
2) Αφαιρέστε το προστατευτικό κάλυµµα από τη θύρα δικτύου.
3) Συνδέστε προσωρινά το ανάστροφο καλώδιο µε τη θύρα
δικτύου του εκτυπωτή και τον υπολογιστή. 4) Εγκαταστήστε
το λογισµικό του εκτυπωτή για τη λειτουργία επικοινωνίας.
(Ανατρέξτε στις ενότητες “Εγκατάσταση λογισµικού εκτυπωτή και
κοινή χρήση του εκτυπωτή (Windows)” στη σελίδα 50 και
“Εγκατάσταση λογισµικού και κοινή χρήση εκτυπωτή (Mac OS)”
στη σελίδα 51.) 5) Όταν σας ζητηθεί, αποσυνδέστε το
ανάστροφο καλώδιο.
4
3
2
HPCrickMLK_GSG_UIPSGH.book Page 13 Wednesday, May 19, 2004 9:24 PM

14
Wired network: 1) Remove the protective cover from the network
port. 2) Connect the network cable (sold separately) to the
printer’s network port and to an available port on the network hub,
switch, or router. CAUTION: Do not plug the network cable into a
port labeled WAN or Uplink in the hub, switch, or router. Do not
plug the cross cable (provided with the HP Business Inkjet
1200dtwn printer) into the network hub, switch, or router. It is
recommended that the printer and the computers that use the
printer be on the same subnet.
Note: Repeat step 2 if the Link light on the network connector
does not turn on. See “Troubleshooting” on page 17 for
more information. 3) Using the information on the configuration
pages (such as the printer’s IP address), install the printer
software on each computer that will use the printer. For more
information about sharing the printer on a network, see the
onscreen user’s guide.
Rete con fili: 1) Rimuovere il coperchio di protezione dalla
porta di rete. 2) Collegare il cavo di rete (veduto separatamente)
alla porta di rete della stampante e a una porta del commutatore,
del router o dell’hub della rete. ATTENZIONE: non collegare il
cavo di rete a una porta contrassegnata da WAN o Uplink
nell’hub, nel commutatore o nel router. Non collegare il cavo
incrociato (fornito con la stampante HP Business Inkjet 1200dtwn)
nel commutatore, nel router o nell’hub di rete. Si consiglia di avere
la stampante e il computer che la utilizza nella stessa sottorete.
Nota: ripetere il punto due se la spia del collegamento del
connettore di rete non si accende. Per ulteriori informazioni,
consultare la sezione “Risoluzione dei problemi" a pagina 24.
3) Utilizzando le informazioni delle pagine di configurazione
(come ad esempio l’indirizzo IP della stampante), installare il
software della stampante nei computer che utilizzeranno la
stampante. Per ulteriori informazioni sulla condivisione della
stampante in una rete, consultare la Guida in linea.
Rede com fio: 1) Remova a capa protetora da porta de rede.
2) Conecte o cabo de rede (vendido separadamente) à porta de
rede da impressora e a uma porta disponível no hub, interruptor
ou roteador de rede. CUIDADO: Não conecte o cabo de rede a
uma porta nomeada WAN ou Uplink no hub, no interruptor ou no
roteador. Não conecte o cabo cross (fornecido com a impressora
HP Business Inkjet 1200dtwn) no hub, interruptor ou roteador de
rede. É recomendado que a impressora e os computadores que
utilizam a impressora estejam na mesma sub-rede.
Nota: Repita a etapa 2 se a luz de link no conector de rede não
acender. Consulte “Solução de problemas” na página 31 para
obter mais informações. 3) Usando as informações nas páginas
de configuração (como o endereço IP da impressora), instale o
software da impressora em cada computador que usará a
impressora. Para obter mais informações sobre como
compartilhar a impressora na rede, consulte o guia do usuário
exibido na tela.
Red por cable: 1) Retire la cubierta protectora del puerto de red.
2) Conecte el cable de red (que se vende por separado) al puerto
de red de la impresora y a un puerto disponible del dispositivo,
conmutador o enrutador de red.
PRECAUCIÓN: No enchufe el cable de red en un puerto con la
etiqueta WAN o Uplink en el dispositivo, conmutador o enrutador
de red. No enchufe el cable cruzado (del modelo HP Business
Inkjet 1200dtwn) en el dispositivo, conmutador o enrutador de
red. Se recomienda que la impresora y los equipos que usen la
impresora estén en la misma subred.
Nota: Repita el paso 2 si la luz de enlace del conector de red no
se enciende. Consulte “Solución de problemas” en la página 38
para obtener más información. 3) Con la información de las
páginas de configuración (como la dirección IP de la impresora),
instale el software de la impresora en cada equipo que vaya a
usarla. Para obtener más información acerca de cómo compartir
la impresora en una red, consulte la guía del usuario en pantalla.
Ενσύρµατο δίκτυο: 1) Αφαιρέστε το προστατευτικό κάλυµµα
από τη θύρα δικτύου. 2) Συνδέστε το καλώδιο δικτύου (πωλείται
χωριστά) στη θύρα δικτύου του εκτυπωτή και σε µια διαθέσιµη
θύρα του διανοµέα δικτύου, του διακόπτη ή του δροµολογητή.
ΠΡΟΣΟΧΗ: Μην συνδέσετε το καλώδιο δικτύου σε θύρα του
διανοµέα δικτύου, του διακόπτη ή του δροµολογητή µε την ένδειξη
WAN ή Uplink. Μην συνδέσετε το ανάστροφο καλώδιο (το οποίο
παρέχεται µε τον εκτυπωτή HP Business Inkjet 1200dtwn) στον
διανοµέα δικτύου, στο διακόπτη ή τον δροµολογητή. Συνιστάται η
εγκατάσταση του εκτυπωτή και των υπολογιστών που θα τον
χρησιµοποιούν στο ίδιο δευτερεύον δίκτυο.
Σηµείωση: Επαναλάβετε το βήµα 2, αν ο λαµπτήρας συνδέσµου
που βρίσκεται στη σύνδεση δικτύου δεν ενεργοποιηθεί.
Για περισσότερες πληροφορίες, ανατρέξτε στην ενότητα
“Αντιµετώπιση προβληµάτων” στη σελίδα 45. 3)
Χρησιµοποιώντας τις πληροφορίες που σας παρέχονται στις
σελίδες ρυθµίσεων
(όπως η διεύθυνση IP του εκτυπωτή), εγκαταστήστε το λογισµικό
του εκτυπωτή σε κάθε υπολογιστή που θα τον χρησιµοποιεί.
Για περισσότερες πληροφορίες σχετικά µε την κοινή χρήση του
εκτυπωτή σε δίκτυο, ανατρέξτε στις οδηγίες χρήσης στην οθόνη.
3
2
1
2
HPCrickMLK_GSG_UIPSGH.book Page 14 Wednesday, May 19, 2004 9:24 PM

English
Português
Eλληνικά
Italiano
Español
15
Step 9: Test the printer software installation.
After you complete the software installation and connect the
printer to the computer, print a document from an application that
you use frequently to ensure that the software is installed
correctly. If the document does not print, see “Troubleshooting” on
page 17.
Step 10: Register the printer.
Register the printer to receive important support and technical
information. If you did not register your printer while installing the
software, you can register later at http://www.register.hp.com.
Punto 9: Verificare l’installazione del software della
stampante.
Al termine dell’installazione del software e dopo avere collegato
la stampante al computer, stampare un documento da
un’applicazione utilizzata frequentemente per assicurarsi che
l’installazione sia stata eseguita correttamente. Se il documento
non viene stampato, consultare la sezione “Risoluzione dei
problemi" a pagina 24
Punto 10: Registrare la stampante.
Per ricevere importanti informazioni tecniche e sull’assistenza,
è necessario effettuare la registrazione della stampante. Se tale
operazione non è stata eseguita al momento dell’installazione del
software, sarà possibile registrare la stampante successivamente
all’indirizzo http://www.register.hp.com.
Etapa 9: Teste a instalação do software da impressora.
Depois de concluir a instalação do software e de conectar a
impressora ao computador, imprima um documento a partir de
um aplicativo que você utiliza com freqüência para assegurar que
o software seja instalado corretamente. Se o documento não for
impresso, consulte “Solução de problemas” na página 31.
Etapa 10: Registre a impressora.
Registre a impressora para receber informações técnicas e de
suporte importantes. Se você não registrou sua impressora
durante a instalação do software, é possível registrá-la no
endereço http://www.register.hp.com.
Paso 9: Pruebe la instalación del software de la impresora.
Luego de completar la instalación del software y conectar la
impresora al equipo, imprima un documento desde una aplicación
que use con frecuencia para asegurarse de que el software esté
correctamente instalado. Si el documento no se imprime, consulte
“Solución de problemas” en la página 38.
Paso 10: Registre la impresora.
Registre la impresora para obtener importante información
técnica y de soporte. Si no registró la impresora durante la
instalación del software, puede hacerlo posteriormente en
http://www.register.hp.com.
Βήµα 9: ∆οκιµάστε την εγκατάσταση του λογισµικού
του εκτυπωτή.
Αφού ολοκληρώσετε την εγκατάσταση του λογισµικού και
συνδέσετε τον εκτυπωτή µε υπολογιστή, τυπώστε ένα έγγραφο
από µια εφαρµογή που χρησιµοποιείτε συχνά, ώστε να
βεβαιωθείτε πως το λογισµικό έχει εγκατασταθεί σωστά.
Αν το έγγραφο δεν εκτυπωθεί, ανατρέξτε στην ενότητα
“Αντιµετώπιση προβληµάτων” στη σελίδα 45
Βήµα 10: Καταχωρήστε τον εκτυπωτή.
Καταχωρήστε τον εκτυπωτή σας για να λαµβάνετε σηµαντικές
παροχές υποστήριξης και τεχνικές πληροφορίες. Αν δεν έχετε
δηλώσει τον εκτυπωτή σας κατά την εγκατάσταση του λογισµικού,
µπορείτε να τον δηλώσετε αργότερα στη διεύθυνση
http://www.register.hp.com.
10
9
HPCrickMLK_GSG_UIPSGH.book Page 15 Wednesday, May 19, 2004 9:24 PM

16
Congratulations!
Your printer is ready to use. For information about using the
printer and troubleshooting, see the following resources:
• Onscreen user’s guide and Readme file on the Starter CD.
• HP Instant Support (see the onscreen user’s guide)
• Product support site at
http://www.hp.com/support/businessinkjet1200
Congratulazioni!
La stampante è pronta per l’uso. Per informazioni sull’utilizzo della
stampante e sulla risoluzione dei problemi, fare riferimento alle
risorse seguenti:
• Guida in linea e file Readme nel CD di avviamento.
• HP Instant Support (vedere la Guida in linea)
• Sito assistenza prodotti all’indirizzo
http://www.hp.com/support/businessinkjet1200
Parabéns!
Sua impressora está pronta para ser usada. Para obter mais
informações sobre como utilizar a impressora e solucionar
problemas, consulte os seguintes recursos:
• O guia do usuário e o arquivo Leiame exibidos na
tela do Starter CD.
• HP Instant Support (consulte o guia do usuário
exibido na tela)
• Site de assistência ao produto
http://www.hp.com/support/businessinkjet1200
¡Felicitaciones!
Su impresora está lista para que la use. Para obtener información
acerca de cómo usar la impresora y solucionar problemas,
consulte los siguientes recursos:
• La guía del usuario en pantalla y el archivo
Léame del Starter CD.
• HP Instant Support (consulte la guía del usuario
en pantalla)
• Sitio de soporte del producto en
http://www.hp.com/support/businessinkjet1200
Συγχαρητήρια!
Ο εκτυπωτής σας είναι έτοιµος προς λειτουργία. Για περισσότερες
πληροφορίες για τη χρήση του εκτυπωτή και την αντιµετώπιση
προβληµάτων, ανατρέξτε στα εξής βοηθήµατα:
• Τις ηλεκτρονικές οδηγίες χρήσης και το αρχείο Readme που
περιέχονται στο CD εκκίνησης.
• To HP Instant Support (δείτε τις οδηγίες χρήσης στην οθόνη)
• Την τοποθεσία υποστήριξης προϊόντος
http://www.hp.com/support/businessinkjet1200
HPCrickMLK_GSG_UIPSGH.book Page 16 Wednesday, May 19, 2004 9:24 PM

17
English
Troubleshooting
This section provides troubleshooting suggestions for some of the most common issues associated with hardware and
software installation.
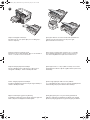
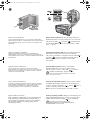
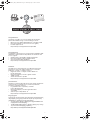
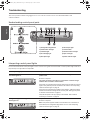
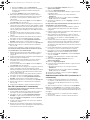
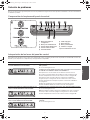
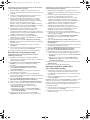
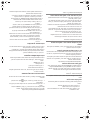
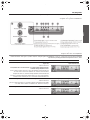
Understanding control panel parts
Interpreting control panel lights
For more information about control panel lights, see the onscreen user’s guide on the Starter CD or visit the product support website at
http://www.hp.com/support/businessinkjet1200.
1 2 3 4 5 6 7
9
10
8
1) Configuration Page button
2) Power button and light
3) Printhead light
4) Ink Cartridge light
5) Door Open light
6) Out of Paper light
7) Cancel button
8) Resume button and light
9) Paper Jam light
10) Color indicator lights
Control panel light pattern Explanation and recommended action
Configuration page button is off.
The Power light is on.
The printer is turned on and idle. It is connected using a USB or
parallel cable.
No action is required.
The printer is turned on and idle. It is connected to a network using a
network cable or wireless communication.
If the printer is connected using a network cable, check the network connector
lights to verify that the printer is connected to the network. See “Interpreting
network connector lights” on page 19.
If the printer is connected using wireless communication, make sure that the
wireless communication settings are set correctly. See “Setting up the printer
for wireless communication” on page 21.
Verify that the printer is set up properly on the network. See “Problems
connecting to a network” on page 20.
Configuration page button is green.
Power light is on.
The printer is connected to a wired network. It is turned on and idle.
No action is required.
Note: If the printer supports wireless communication but is connected to a
wired network, the Configuration page button is not on. See “Interpreting
network connector lights” on page 19.
HPCrickMLK_GSG_UIPSGH.book Page 17 Wednesday, May 19, 2004 9:24 PM

18
Configuration page button is blue.
Power light is on.
The printer is connected to a wireless network. It is turned on and idle.
No action is required.
Power light is on. Out of Paper light blinks.
Resume light blinks.
The printer is out of paper.
Load paper in the printer, and then press (Resume button) to continue.
Power light is on. Paper Jam light blinks.
Resume light blinks.
Paper is jammed in the printer.
Clear the paper jam, and then press (Resume button) to continue.
For more information, see the “Maintaining and troubleshooting” chapter in the
onscreen user’s guide.”
Power light is on. Door Open light is on. A cover is not closed completely.
Make sure all covers are completely closed.
Power light is on. Door Open light blinks. The rear-access panel or the auto-duplex unit is not inserted completely.
Make sure the rear-access panel (HP Business Inkjet 1200) or the
auto-duplex unit (HP Business Inkjet 1200d/1200dn/1200dtn/1200dtwn) is
inserted completely in the back of the printer.
Power light is on. Printhead light is on. The printhead latch is not secured properly.
Open the top cover and press down firmly on the printhead latch to ensure
that it is secured properly. Also, make sure the protective tape on each
printhead has been removed.
The Power light, the Ink Cartridge light, and one or
more of the color indicator lights are on.
One or more of the ink cartridges is missing.
Install the ink cartridges and try to print.
If the error persists, replace the ink cartridge or cartridges indicated.
Power light is on. Printhead light and appropriate
color indicator light blink.
One or more of the printheads needs attention.
Reinstall the printheads and try to print.
Try cleaning the printhead contacts. See Maintaining the printheads.
If the error persists, replace the printhead or printheads indicated.
The Power light, the Printhead light, and one or
more of the color indicator lights are on.
One or more of the printheads is missing.
Make sure that the protective tape on the printhead has been removed.
Reinstall the printheads and try to print.
HPCrickMLK_GSG_UIPSGH.book Page 18 Wednesday, May 19, 2004 9:24 PM

19
English
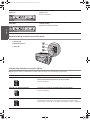
Understanding network connector parts
Interpreting network connector lights
Note: The printer’s wireless communication is turned off when the printer is connected using a network cable.
Power light is on. One or more color indicator
lights is on.
One or more ink cartridges is low on ink and will need to be
replaced soon.
No action is required.
Power light is on. One or more color indicator
lights blinks.
An ink cartridge is out of ink and must be replaced before you can
continue printing.
Replace the ink cartridge indicated.
1) Activity light
2) Network connector
3) Link light
1
2
3
Network light pattern Explanation and recommended action
Link light is on. Activity light is off. The printer is connected to the network but is not receiving or transmitting
data over the network. The printer is turned on and idle.
No action is required.
Link light is on. Activity light blinks. The printer is receiving or transmitting data over the network.
No action is required.
Link light is off. Activity light is off. The printer is turned off or is not connected to the network.
If the printer is turned off, turn on the printer. If the printer is turned on and a
network cable is connected, see “Problems connecting to a network” on page 20.
HPCrickMLK_GSG_UIPSGH.book Page 19 Wednesday, May 19, 2004 9:24 PM
A página está carregando...
A página está carregando...
A página está carregando...
A página está carregando...
A página está carregando...
A página está carregando...
A página está carregando...
A página está carregando...
A página está carregando...
A página está carregando...
A página está carregando...
A página está carregando...
A página está carregando...
A página está carregando...
A página está carregando...
A página está carregando...
A página está carregando...
A página está carregando...
A página está carregando...
A página está carregando...
A página está carregando...
A página está carregando...
A página está carregando...
A página está carregando...
A página está carregando...
A página está carregando...
A página está carregando...
A página está carregando...
A página está carregando...
A página está carregando...
A página está carregando...
A página está carregando...
A página está carregando...
A página está carregando...
A página está carregando...
A página está carregando...
A página está carregando...
A página está carregando...
A página está carregando...
A página está carregando...
A página está carregando...
A página está carregando...
A página está carregando...
A página está carregando...
A página está carregando...
A página está carregando...
A página está carregando...
A página está carregando...
A página está carregando...
A página está carregando...
A página está carregando...
A página está carregando...
A página está carregando...
A página está carregando...
A página está carregando...
A página está carregando...
-
 1
1
-
 2
2
-
 3
3
-
 4
4
-
 5
5
-
 6
6
-
 7
7
-
 8
8
-
 9
9
-
 10
10
-
 11
11
-
 12
12
-
 13
13
-
 14
14
-
 15
15
-
 16
16
-
 17
17
-
 18
18
-
 19
19
-
 20
20
-
 21
21
-
 22
22
-
 23
23
-
 24
24
-
 25
25
-
 26
26
-
 27
27
-
 28
28
-
 29
29
-
 30
30
-
 31
31
-
 32
32
-
 33
33
-
 34
34
-
 35
35
-
 36
36
-
 37
37
-
 38
38
-
 39
39
-
 40
40
-
 41
41
-
 42
42
-
 43
43
-
 44
44
-
 45
45
-
 46
46
-
 47
47
-
 48
48
-
 49
49
-
 50
50
-
 51
51
-
 52
52
-
 53
53
-
 54
54
-
 55
55
-
 56
56
-
 57
57
-
 58
58
-
 59
59
-
 60
60
-
 61
61
-
 62
62
-
 63
63
-
 64
64
-
 65
65
-
 66
66
-
 67
67
-
 68
68
-
 69
69
-
 70
70
-
 71
71
-
 72
72
-
 73
73
-
 74
74
-
 75
75
-
 76
76


HP Business Inkjet 1200 Printer series Guia de instalação
- Tipo
- Guia de instalação
em outras línguas
Artigos relacionados
-
HP Business Inkjet 1100 Printer series Guia rápido
-
-
HP BUSINESS INKJET 1000 PRINTER Guia rápido
-
-
-
HP Laser 107w Guia de referência
-
HP COLOR LASER 150NW Guia de referência
-
-
HP PageWide Pro 777 Multifunction Printer series Guia de instalação
-
Outros documentos
-
Dell 5100cn Color Laser Printer Guia de usuario
-
Canon PIXMA MG4250 Manual do usuário
-
Canon Pixma TR-4540 Manual do usuário
-
Canon PIXMA TS6240 Manual do usuário
-
Canon PIXMA TS9140 Manual do usuário
-
Canon TS 8250 Manual do usuário
-
Canon PIXMA TS6151 Manual do usuário
-
Canon Pixma TR7500 series Manual do usuário