Neomounts FPMA-MOBILE1700 Manual do usuário
- Tipo
- Manual do usuário

FPMA-MOBILE1700
IT
EN
NL
DE
FR
ES
PT
DK
Mobile workstation
Mobiele werkplek
Mobiler Arbeitsplatz
Station de travail mobile
Postazione di lavoro mobile
Estación de trabajo móvil
Estação de trabalho móvel
Mobil arbejdsstation
NO
SE
FI
PL
CS
SK
RO
Mobil arbeidstasjon
Mobil arbetsstation
Mobiilityöasema
Mobilna stacja robocza
Mobilní pracovní stanice
Prenosná pracovná plocha
Stație de lucru mobilă
WWW.NEOMOUNTS.COM
INSTRUCTION MANUAL

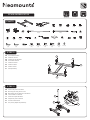
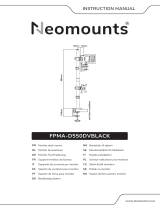
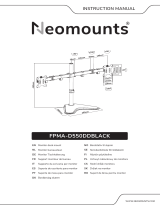
PARTS
FPMA-MOBILE1700
Tool
M-A. M4x12
(x4)
O. M6x6
(x3)
P. M6x12
(x4)
Q. M6x16
(x2)
R. (x2) S. (x5) T. (x2) U. (x1) V. (x1) W. (x2) X. (x2) Y. (x2)
M-B. M4x16
(x4)
M-C. M5x12
(x4)
M-D. M5x16
(x4)
M-E. D5
(x4)
M-F. (x4)
A. (x1)
H. (x1) I. (x1) J. (x1) K. (x1) L. (x1) M. (x1) N. (x3)
Z1. 4mm
(x1)
Z2. 5mm
(x1)
Z3. (x1)
B. (x1) C. (x1) D. (x1) E. (x1) F. (x2) G. (x2)
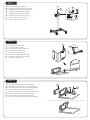
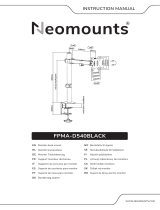
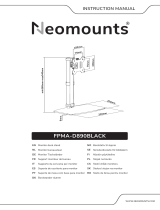
Assemble the base
Monteer de voet
Montieren Sie die Basis
Assemblez la base
Montare la base
Montar la base
Montar a base
Złóż podstawę
EN
NL
DE
FR
IT
ES
PT
PL
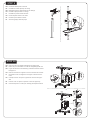
STEP 1
F
G
F
L
D
M
Z1
P
G
A
Z3
Attach the pole to the base
Bevestig de stang aan de voet
Befestigen Sie die Stange an der Basis
Fixez le tube sur la base
Attaccare il palo alla base
Adjunte el poste a la base
Anexe o tubo à base
Przymocuj słupek do podstawy
EN
NL
DE
FR
IT
ES
PT
PL
STEP 2
S
N
75x75 -
100x100 mm
0-8 kg
94-175 cm

K
I
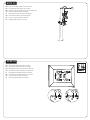
Install the upper part of the rod
Installeer het bovenste deel van de stang
Montieren Sie den oberen Teil der Stange
Installer la partie supérieure de la tige
Installare la parte superiore dell'asta
Instale la parte superior de la varilla
Instalar a parte superior da haste
Zamontuj górną część drążka
EN
NL
DE
FR
IT
ES
PT
PL
Disassemble the PC holder
Demonteer de PC-houder
Demontieren Sie die PC-Halterung
Désassemblez le support PC
Smontare il supporto del PC
Desmontar el soporte del ordenador
Desmonte o suporte do computador
Zdemontuj uchwyt do PC
EN
NL
DE
FR
IT
ES
PT
PL
Attach the PC holder to the installation plate
Bevestig de PC-houder aan het montageplaatje
Befestigen Sie den PC-Halter an der Montageplatte
Fixer le support PC à la plaque d'installation
Fissare il supporto del PC alla piastra di installazione
Fije el soporte del PC a la placa de instalación
Fixar o suporte do PC à placa de instalação
Przymocuj uchwyt komputera do płyty instalacyjnej
EN
NL
DE
FR
IT
ES
PT
PL
STEP 4
STEP 3
STEP 5
V
RN
S
E
OZ1

WJ
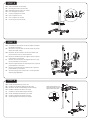
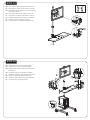
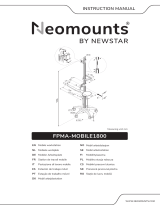
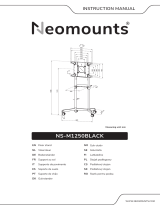
Attach the holder to the trolley
Bevestig de houder aan de trolley
Befestigen Sie den Halter am Trolley
Fixer le support au chariot
Fissare il supporto al carrello
Fijar el soporte al carro
Fixar o suporte no carrinho
Przymocuj uchwyt do wózka
EN
NL
DE
FR
IT
ES
PT
PL
Assemble the second part of the PC holder and adjust
the depth if necessary
Monteer het tweede deel van de PC houder en pas de
diepte aan indien nodig
Montieren Sie den zweiten Teil des PC-Halters und
passen Sie die Tiefe an, falls erforderlich
Monter la deuxième partie du support de PC et ajuster
la profondeur si nécessaire
Montare la seconda parte del supporto per PC e rego-
lare la profondità, se necessario
Monte la segunda parte del soporte para PC y ajuste la
profundidad si es necesario
Montar a segunda parte do suporte do PC e ajustar a
profundidade, se necessário
Zamontuj drugą część uchwytu PC i w razie potrzeby
dostosuj jego głębokość
EN
NL
DE
FR
IT
ES
PT
PL
Install the keyboard tray to the rod
Installeer de keyboard-plateau aan de stang
Montieren Sie die Tastaturablage auf der Stange
Installer le plateau du clavier sur la tige
Installare il vassoio della tastiera sull'asta
Instale la bandeja del teclado en la varilla
Instalar o tabuleiro do teclado na haste
Zainstaluj półkę na klawiaturę na drążku
EN
NL
DE
FR
IT
ES
PT
PL
STEP 7
STEP 6
STEP 8
QZ1
T
X
Make sure the bump on C
and the bolt hole on B are
aligned with each other. B
C
U

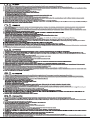
Install the VESA plate to the rod
Installeer de VESA-plaat op de stang
Befestigen Sie die VESA-Platte an der Stange
Installer la plaque VESA sur la tige
Installare la piastra VESA sull'asta
Instale la placa VESA en la varilla
Instalar a placa VESA na haste
Zamontuj płytkę VESA do pręta
EN
NL
DE
FR
IT
ES
PT
PL
Place the PC in the holder and tighten the safety belt
Plaats de pc in de houder en maak de veiligheidsgordel vast
Legen Sie den PC in die Halterung und ziehen Sie den Sicher-
heitsgurt an
Placez le PC dans le support et serrez la ceinture de sécurité
Posizionare il PC nel supporto e stringere la cintura di sicu-
rezza
Coloque el PC en el soporte y apriete el cinturón de seguri-
dad
Colocar o PC no suporte e apertar o cinto de segurança
Umieść komputer w uchwycie i zaciśnij pas bezpieczeństwa
EN
NL
DE
FR
IT
ES
PT
PL
STEP 9
STEP 10
H
Y
1
2
1
2
3

* Not Included
Remove the VESA plate from the mount
Verwijder de VESA plaat van de steun
Entfernen Sie die VESA-Platte von die Halterung
Retirez la plaque VESA du support
Rimuovere la piastra VESA dal supporto
Desconecte la placa VESA del soporte
Remova a placa VESA do suporte
Zdejmij płytkę VESA z uchwytu
EN
NL
DE
FR
IT
ES
PT
PL
Attach the VESA plate to the monitor
Bevestig de VESA-plaat op de monitor
Befestigen Sie die VESA-Platte am Monitor
Fixation de la plaque VESA sur le moniteur
Collegamento del piatto VESA al monitor
Colocación de la Placa VESA en el monitor
Colocar a placa VESA no monitor
Zamontuj płytki VESA do monitora
EN
NL
DE
FR
IT
ES
PT
PL
STEP 11
STEP 12
M-E M-E
Z1
M-A
M-C M-F
M-B
M-D

Attach the screen to the bracket and secure it
Bevestig het scherm aan de steun en zet vast
Befestigen Sie den Bildschirm an der Halterung
und sichern Sie ihn
Accrochez l'écran sur le support et fixez-le
Appendere lo schermo sulla staffa e fissarlo
Cuelgue la pantalla en el soporte y asegúrela
Pendure a tela no suporte e prenda-a
Zawieś ekran na wsporniku i zabezpiecz go
EN
NL
DE
FR
IT
ES
PT
PL
Adjust the mount to the desired position
Stel de steun in op de gewenste positie
Stellen Sie die Halterung auf die gewünschte
Position ein
Ajuster la monture à la position souhaitée
Regolare il supporto nella posizione desiderata
Ajuste el soporte a la posición deseada
Ajustar o suporte para a posição pretendida
Ustaw uchwyt w żądanej pozycji
EN
NL
DE
FR
IT
ES
PT
PL
STEP 13
STEP 14
Z1
Z2
Z2 Z1
+15°
-15°
1
2
3
Z2

23.7
-
 1
1
-
 2
2
-
 3
3
-
 4
4
-
 5
5
-
 6
6
-
 7
7
-
 8
8


Neomounts FPMA-MOBILE1700 Manual do usuário
- Tipo
- Manual do usuário
em outras línguas
Artigos relacionados
-
 Neomounts FPMA-D550D4BLACK Manual do usuário
-
 Neomounts FPMA-D550DVBLACK Manual do usuário
-
 Neomounts FPMA-D540BLACK Manual do usuário
-
 Neomounts FPMA-MOBILE1800 Manual do usuário
-
 Neomounts FPMA-D550SBLACK Manual do usuário
-
 Neomounts FPMA-D550DDBLACK Manual do usuário
-
 Neomounts FPMA-D890BLACK Manual do usuário
-
Neomounts FPMA-W75 Manual do usuário
-
 Neomounts NS-M1250BLACK Manual do usuário
-
 Neomounts NS-FS100BLACK Manual do usuário


