Candy CVMI 970 LX Cooker Hood Manual do usuário
- Categoria
- Exaustores
- Tipo
- Manual do usuário

1
ENGLISH
INSTALLATION AND USER’S MANUAL
FRENCH
NOTICE D’INSTALLATION ET D’UTILISATION
ITALIAN
MANUALE D’ISTRUZIONE
PORTOGUESE
MANUAL DE INSTALAÇÃO E UTILIZAÇÃO
Dutch
INSTALLATIE EN GEBRUIKSAANWIJZING

2
INSTALLATION AND USER’S MANUAL

3
CONTENT
INTRODUCTION
1
SAFETY
PRECAUTION
1
SPECIFICATION
6
INSTALLATION
7
DESCRIPTION
OF
COMPONENTS
9
OPERATION
9
MAINTENANCE
10
TROBULESHOOTING
11
CONFORMITY
WITH
DIRECTIVES
11
ENVIRONMENTAL
PROTECTION
11

4
INTRODUCTION
Thank you for choosing this cooker hood.
This instruction manual is designed to provide you with all required
instructions related to the installation, use and maintenance of the appliance.
In order to operate the unit correctly and safety, please read this instruction
manual carefully before installation and usage.
The cooker hood uses high quality materials, and is made with a streamlined
design. Equipped with large power electric motor and centrifugal fan, it also
provides strong suction power, low noise operation, non-stick grease filter and
easy assembly installation.
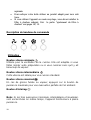
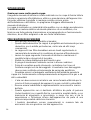
SAFETY PRECAUTION
Never let the children operate the machine.
The cooker hood is for home use only, not suitable for barbecue, roast
shop and other commercial purpose.
The cooker hood and its filter should be clean regularly in order to
keep in good working condition.
Clean the cooker hood according to the instruction manual and keep
the unit from danger of burning.
Forbid the direct baking from the gas cooker.
Please keep the kitchen room a good convection.
Before connecting this appliance check that the power supply cord is
not damaged. A damage supply cord must be replaced by qualified
service personnel only.
There shall be adequate ventilation of the room when the range hood
is used at the same time as appliances burning gas or other fuels;
Τhe air must not be discharged into a flue that is used for exhausting
fumes from appliances burning gas or other fuels;
Regulations concerning the discharge of air have to be fulfilled.
This appliance if not intended for use by persons(including children)
with reduced physical, sensory or mental capabilities, or lack of
experience and knowledge, unless they have been given supervision or
instruction concerning use of the appliance by a person slide for their
safety.
Children should be supervised to ensure that they do not play with the
appliance.
Do not flambé under the range hood.
The range hood is not intended to be installed over a hob having more
than four hob elements

5
Electrical Shock Hazard
Only plug this unit into a properly earthed outlet. If in doubt seek
advice from a suitably qualified engineer.
Failure to follow these instructions can result in death, fire, or
electrical shock.

6
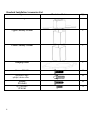
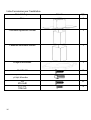
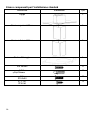
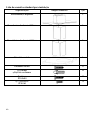
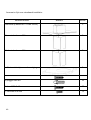
Standard Installation Accessories List
Spec.
Illustration Picture
Qty
Casing
1
Upper Chimney 500mm
1
Lower Chimney 500mm
1
Hanging Board
1
Screws M6×60
8
φ8 Rawl Plugs
φ8×φ6 white color
11
Screws
ST6.0×40
11
φ7.2 Screws
ST4.0×8
4

7
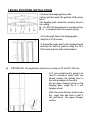
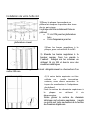
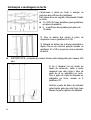
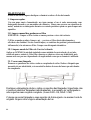
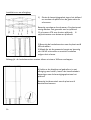
CEILING MOUNTING INSTALLATION
1)Position the hanging plate on the
ceiling and then mark the position of the screw
holes.
The hanging plate should be securely fixed to
the ceiling,
11 x ST6 (40 mm)screws for wooden ceiling
8 x expansion bolts for cement ceiling
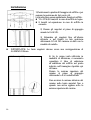
2) Fix the angle bars to the hanging plate,
using the 8 x M5 screws.
3) Extend the angle bars to the repuired height
and then fix them in position using the 16 x
M5 screws and nuts with metal washers.
IMPORTANT: The angle bars must have an overlap of AT LEAST 100 mm.
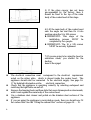
4) If your cooker hood is going to be
used in extraction mode, then you
should connect the ducting hose to
the ceiling adaptor at this point.
Fix the upper chimney section to the
hanging plate, using the 4 x self
tapping screws.
Slide the lower chimney section onto
the angle bars and raise it until it
sits just below the upper chimney
section.

8
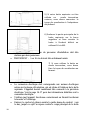
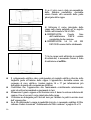
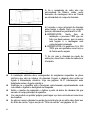
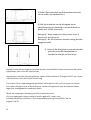
5) If the glass canopy has not been
pre-assembled by the factory, then it
should be fixed to the top of the main
body of the cooker hood at this stage.
6) Lift the main body of the cooker hood
onto the angle bar and then fix it into
position using the 16 x M5 screws.
IMPORTANT: This stage of the
installation process MUST be
completed by two people.
IMPORTANT: The 16 x M5 screws
MUST be securely tightened.
7) If you are going to be using the hood in
extraction mode, you should fix the
ducting
hose to the spigot.
The electrical connection must correspond to the electrical repuirement
noted on the rating plate, which is placed inside the cooker hood. The
appliance should now be connected to the electrical supply. See page 16-
17 for detailed information on the electrical connection.
Check that the appliance is operating correctly by selecting eachspeed and
switching the light bulbs on and off.
Remove the hanging hook and then slide the lower chimneysection downwards,
until it rests against the main body of the cooker hood.
Use a stainless steel cleaner and polish on the stainless steel sections of the
appliance.
If you are using the appliance in recirculation mode, then you should now fit
the carbon filter. See the “fitting the carbon filter" section on pages 14 一15.

9
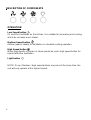
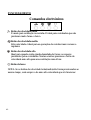
DESCRIPTION OF COMPONENTS
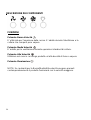
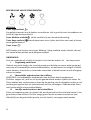
OPERATION
Low Speed button
It’s used for Ventilation on the kitchen. It is suitable for simmering and cooking
which do not make much steam.
Medium Speed button
Airflow speed is ideally for ventilation in standard cooking operation.
High Speed button
When high density of smoke or steam produced, press high-speed button for
highest effective ventilation.
Light button
NOTE: If Low / Medium / High speed buttons are press at the same time, the
unit will only operate at the highest speed.

10
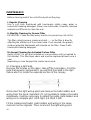
MAINTENANCE
Before cleaning switch the unit off and pull out the plug.
I. Regular Cleaning
Use a soft cloth moistened with hand-warm mildly soapy water or
household cleaning detergent. Never use metal pads, chemical, abrasive
material or stiff brush to clean the unit.
II. Monthly Cleaning for Grease Filter
ESSENTIAL: Clean the filter every month can prevent any risk of fire.
The filter collects grease, smoke and dust…... so the filter is directly
affecting the efficiency of the cooker hood. If not cleaned, the grease
residue (potential flammable) will saturate on the filter. Clean it with
household cleaning detergent.
III. Annual Cleaning for Activated Carbon Filter
Apply SOLELY to unit that installed as a recirculation unit (not vented to
the outside). This filter traps odors and must be replaced at least once a
year
depending on how frequent the cooker hood used.
IV. Changing a light bulb
Remove the screws on the glass, take off the hood glass. Find the
bulb that requires replacement, you will find it located in the light
fixture which is inside the exposed section of the canopy.
Disconnect the light wiring point and remove the bulb holders and
wiring from the hood. Important: It’s not possible to replace the bulbs
individually, it will be necessary to obtain the bulbs, bulb holders and
wiring as a complete part. (LED light: G4, MAX 1.5W)
Fit the replacement bulbs, bulb holders and wiring in the same
manners as the originals. Then reconnect the light wiring point.

11
Refit the hood glass and fasten the glass screws. Make sure the screws are
fully tightened.
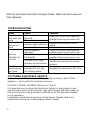
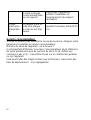
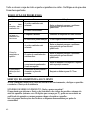
TROBULESHOOTING
Fault
Cause
Solution
Light on, but
fan does not
work
The fan blade is
jammed.
Switch off the unit and repair by
qualified service personnel only.
The motor is damaged.
Both light and
fan do not
work
Halogen light bulb burn. Replace the bulb with correct
rating.
Power cord looses.
Plug in to the power supply again.
Serious
Vibration of
the unit
The fan blade is
damaged.
Switch of the unit and repair by
qualified service personnel only.
The fan motor is not
fixed tightly.
Switch off the unit and repair by
qualified service personnel only.
The unit is not hung
properly on the bracket.
Take down the unit and check
whether the bracket is in proper
location.
Suction
performance
not good
Too long distance
between the unit and
the cooking plane
Readjust the distance to 65-75cm
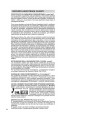
CUSTOMER ASSISTANCE SERVICE
If you cannot identify the cause of the operating anomaly, switch off the
appliance and contact the Assistance Service.
PRODUCT SERIAL NUMBER. Where can I find it?
It is important you to inform the Assistance Service of your product code
and its serial number (a 16 character code which begins with the number 3);
this can be found on the guarantee certificate or on the data plate located
on the appliance.
It will help to avoid wasted journeys to technicians, thereby (and most
significantly) saving the corresponding callout charges.

12
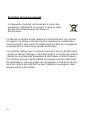
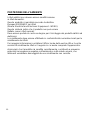
ENVIRONMENTAL PROTECTION
Waste electrical products should not be disposed of with
household waste. Please recycle where facilities exist.
Check with your Local Authority or retailer for recycling
advice.
This appliance is marked according to the European directive 2002/96/EC
on Waste Electrical and Electronic Equipment (WEEE).
By ensuring this product is disposed of correctly, you will help prevent
potential negative consequences for the environment and human health,
which could otherwise be caused by inappropriate waste handling of this
product.
The symbol on the product indicates that this product may not be treated as
household waste. Instead it shall be handed over to the applicable
collection point for the recycling of electrical and electronic equipment
Disposal must be carried out in accordance with local environmental
regulations for waste disposal.
For more detailed information about treatment, recovery and recycling of
this product, please contact your local city office, your household waste
disposal service or the shop where you purchased the product.

13
Notice d’installation et d’utilisation
Sommaire
INTRODUCTION
14
Conseils pour la sécurité
14
Description des composants
16
Installation
17
Fonctionnement
19
Entretien
19
Dépannage
21
Cahier des charges
21
Service après ventes
22
Protection de l’environnement
23

14
Introduction
Merci d‘avoir choisi cette hotte.
Ce manuel d'instructions est conçu pour vous fournir toutes les
instructions requises relatives à l'installation, l'utilisation et l'entretien
de l'appareil. Afin de faire fonctionner l'appareil correctement et en
toute sécurité, merci de lire attentivement ce manuel avant
l'installation et l'utilisation.
La hotte utilise des matériaux de haute qualité avec un design épuré.
Equipé d’un moteur électrique de grande puissance et d’un
ventilateur centrifuge, il fournit également une puissance d'aspiration
forte, un fonctionnement avec un bruit modéré, un filtre à graisse et
un montage facile.
Avertissement de sécurité
• Ne pas laisser d’enfants utiliser l’appareil
• Cette hotte est dédiée à un usage domestique uniquement.
Elle ne doit pas être utilisée pour les barbecues, les
rôtisseries ou toutes autres activités
• La hotte et ses filtres doivent être nettoyés régulièrement
pour en garantir un bon état de fonctionnement
• Respecter les consignes de ce manuel pour le nettoyage de
la hotte afin d’empêcher tout risque d’incendie
• Merci de garder une ventilation dans la cuisine
• Avant de connecter cet appareil, contrôlez que le cordon
d'alimentation n'est pas endommagé. Un cordon
d'alimentation endommagé doit être remplacé par une
personne qualifiée.
• Il doit y avoir une ventilation adéquate de la pièce quand la
hotte est utilisée en même temps que des appareils utilisant
du gaz ou d'autres combustibles
• l'air ne doit pas être évacué par un conduit qui est utilisé pour
évacuer les fumées des appareils utilisant le gaz ou d'autres
combustibles
• La réglementation concernant le rejet de l’air doit être
satisfaite
• Cet appareil n’est pas destiné à être utilisé par des personnes

15
(notamment les enfants) incapables, irresponsables ou sans
connaissance sur l’utilisation du produit, à moins qu’elle ne
soit surveillées ou instruites sur l’utilisation de l’appareil par
une personne responsable de leur sécurité
• Les enfants doivent être surveillés pour s'assurer qu'ils ne
jouent pas avec l'appareil.
• Ne pas faire flamber sous la hotte
• La hotte n'est pas destinée à être installé au-dessus d’une
plaque de cuisson ayant plus de quatre foyers de cuisson
Risque de choc électrique
• Cette hotte ne peut être branchée seulement sur une prise
reliée à la terre. En cas de doute, demandez conseil à un
ingénieur qualifié
• Le non-respect de ces instructions peut entraîner la mort, un
incendie ou un choc électrique.

16
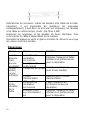
Liste d’accessoires pour l’installation
Caractéristiques
Visuels
Qty
Base
1
Cheminée supérieure 500mm
1
Cheminée inférieure 500mm
1
Plaque s'accrochant
1
Vis M6×60
8
φ8 Chevilles
φ8×φ6 blanches
11
Vis
ST6.0×40
11
φ7.2 Vis
ST4.0×8
4

17
Installation de votre hotte ilot.
1)Placer la plaque s'accrochant au
plafond et marquez la position des trous
de vis, puis vissez.
La plaque doit être solidement fixée au
plafond.
• 11 vis ST6 pour les plafonds en
bois
• 8 vis d'expansion pour les
plafonds en ciment
2)Fixer les barres angulaires à la
plaque, pour cela utiliser 8 vis M5
3) Etendre les barres angulaires à la
hauteur requise, fixez les ensuite à
l’endroit indiqué sur les schémas en
utilisant 16 vis M5 et des vis avec des
rondelles métalliques.
Important : les barres angulaires doivent obligatoirement se chevaucher d’au
moins 100 mm.
4) Si votre hotte aspirante va être
utilisée en mode évacuation
externe, vous devez connecter le
tuyau de canalisation à l'adaptateur
de plafond.
Fixez la section de cheminée supérieure à
la plaqu
e en utilisant 4 vis
découvrantes.
Faites glisser la section de cheminée
inférieure sur les barres angulaires jusqu'à
ce qu'elle soit juste au-dessous de la section
de cheminée supérieure.

18
5) Si votre hotte aspirante va être
utilisée en mode évacuation
externe, vous devez connecter le
tuyau de canalisation à l'adaptateur
de plafond.
6) Soulever la partie principale de la
hotte aspirante sur la barre
angulaire et fixez ensuite la
hotte à l’endroit définit en
utilisant 16 vis M5.
• IMPORTANT : Cette étape du processus d'installation doit être
réalisée par deux personnes.
• IMPORTANT : Les 16 vis doivent être solidement serrés.
7) Si vous utilisez la hotte en
mode évacuation, vous devez
fixer le tuyau de canalisation au
fausset.
• La connexion électrique doit correspondre aux normes électriques
notées sur la plaque d'évaluation, qui est située à l'intérieur de la hotte
aspirante. L'appareil devrait maintenant être connecté à la provision
électrique. Voir la page 16-17 pour des informations détaillées sur la
connexion électrique.
• Vérifiez que l'appareil fonctionne correctement en faisant fonctionné
le booster et l’éclairage.
• Enlevez le crochet et glissez ensuite la partie basse du conduit vers
le bas, jusqu'à ce qu'il se repose contre le corps principal de la hotte

19
aspirante.
• Pour nettoyer votre hotte utiliser un produit adapté pour inox anti
trace.
• Si vous utilisez l'appareil en mode recyclage, vous devez installer le
filtre à charbon adéquat. Voir la partie "ajustement du filtre à
charbon" aux pages 14 / 15.
Description du bandeau de commande
Utilisation
Bouton vitesse minimale
Utilisée pour la ventilation de la cuisine. Elle est adaptée si vous
faîtes mijoter votre préparation ou si vous cuisinez sans qu’il y ait
beaucoup de vapeur.
Bouton vitesse intermédiaire
Cette vitesse est idéale pour une cuisson standard.
Bouton vitesse maximale
En cas de grosse fumée ou vapeur, appuyez sur le bouton de
puissance maximale pour une évacuation parfaite de l’air ambiant.
Bouton d’éclairage
Note : Si les trois puissances (minimale, intermédiaire et maximale)
sont enclenchées en même temps, l’appareil fonctionnera à pleine
puissance.

20
Maintenance
Avant de nettoyer votre hotte, débranchez la prise de courant.
1.Nettoyage régulier
Utilisez un chiffon doux humide avec un produit nettoyant. N’utilisez
jamais d’éponge du côté grattant, de produit chimique ou n’importe
quel autre matériel abrasif pour nettoyer votre hotte.
2. Nettoyage mensuel pour le filtre à graisse
Important : nettoyer le filtre à graisse tous les mois évite des risques
d’incendie.
Le filtre à graisse absorbe les graisses, les fumées et la poussière…
ce qui affecte directement la puissance d’aspiration de la hotte. Non
nettoyé, les résidus de graisse (potentiellement inflammables)
peuvent saturer le filtre à graisse. Nettoyez-le avec un produit
ménager.
3. Nettoyage annuel pour les filtres à charbon actif
Ce nettoyage s’applique uniquement aux hottes qui fonctionnent en
recyclage (non en évacuation externe).
Ces filtres absorbent les odeurs et doivent être remplacés au
minimum une fois par an, selon la fréquence d’utilisation de la hotte.
4. Remplacer une ampoule
Retirez les vis sur la vitre, et enlevez-la. Trouvez l’ampoule qui doit
être remplacée, vous la trouverez placée à l’intérieur de la base de la
hotte.
A página está carregando...
A página está carregando...
A página está carregando...
A página está carregando...
A página está carregando...
A página está carregando...
A página está carregando...
A página está carregando...
A página está carregando...
A página está carregando...
A página está carregando...
A página está carregando...
A página está carregando...
A página está carregando...
A página está carregando...
A página está carregando...
A página está carregando...
A página está carregando...
A página está carregando...
A página está carregando...
A página está carregando...
A página está carregando...
A página está carregando...
A página está carregando...
A página está carregando...
A página está carregando...
A página está carregando...
A página está carregando...
A página está carregando...
A página está carregando...
A página está carregando...
A página está carregando...
A página está carregando...
-
 1
1
-
 2
2
-
 3
3
-
 4
4
-
 5
5
-
 6
6
-
 7
7
-
 8
8
-
 9
9
-
 10
10
-
 11
11
-
 12
12
-
 13
13
-
 14
14
-
 15
15
-
 16
16
-
 17
17
-
 18
18
-
 19
19
-
 20
20
-
 21
21
-
 22
22
-
 23
23
-
 24
24
-
 25
25
-
 26
26
-
 27
27
-
 28
28
-
 29
29
-
 30
30
-
 31
31
-
 32
32
-
 33
33
-
 34
34
-
 35
35
-
 36
36
-
 37
37
-
 38
38
-
 39
39
-
 40
40
-
 41
41
-
 42
42
-
 43
43
-
 44
44
-
 45
45
-
 46
46
-
 47
47
-
 48
48
-
 49
49
-
 50
50
-
 51
51
-
 52
52
-
 53
53


Candy CVMI 970 LX Cooker Hood Manual do usuário
- Categoria
- Exaustores
- Tipo
- Manual do usuário
em outras línguas
- français: Candy CVMI 970 LX Cooker Hood Manuel utilisateur
- italiano: Candy CVMI 970 LX Cooker Hood Manuale utente
- English: Candy CVMI 970 LX Cooker Hood User manual
- Nederlands: Candy CVMI 970 LX Cooker Hood Handleiding