Pioneer DM-40-W Manual do usuário
- Categoria
- Equipamento musical suplementar
- Tipo
- Manual do usuário

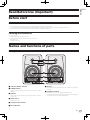
DM-40
Active Monitor Speaker
Haut-parleur de Moniteur Actif
Aktiver Monitorlautsprecher
Diffusore Monitor Attivo
Actieve Monitorluidspreker
Altavoz Monitor Activo
Coluna de Monitor Ativa
Активная Акустическая Система
ᆀ઼ԥྜඵᖑᏣ
Operating Instructions
Mode d’emploi
Bedienungsanleitung
Istruzioni per l’uso
Handleiding
Manual de instrucciones
Manual de instruções
Инструкции по эксплуатации
ᐈձКь
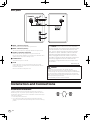
http://pioneerdj.com/support/
The Pioneer DJ support site shown above offers FAQs, information on software and various other types of
information and services to allow you to use your product in greater comfort.
Le site de support DJ de Pioneer indiqué ci-dessus propose une FAQ, des informations sur le logiciel et divers
types d’informations et de services qui permettent une utilisation plus confortable de ce produit.
Die oben gezeigte Pioneer DJ-Support-Website enthält häufig gestellte Fragen, Informationen über Software
und andere wichtige Informationen und Dienste, die Ihnen helfen, Ihr Produkt optimal zu verwenden.
Il sito di supporto DJ Pioneer indicato qui sopra offre una sezione FAQ, informazioni sul software ed
informazioni e servizi di vario tipo, per permettere un uso più confortevole dei nostri prodotti.
De bovengenoemde Pioneer DJ ondersteuningswebsite biedt een overzicht van de vaak gestelde vragen,
informatie over software en allerlei andere soorten informatie en diensten die u in staat stellen dit product met
meer gemak te gebruiken.
El sitio de asistencia Pioneer DJ mostrado arriba ofrece las preguntas frecuentes, información del software y
varios otros tipos de información y servicios que le permitirán usar su producto con mayor confort.
O site de suporte da Pioneer DJ mostrado acima oferece FAQs, informações sobre o software e outros tipos
de informações e serviços para permitir utilizar o produto com um maior conforto.
На указанном выше сайте поддержки Pioneer DJ содержатся раздел часто задаваемых вопросов,
информация по программному обеспечению, а также различные другие типы информации и услуг,
позволяющие использовать ваше изделие более лучшим образом.
αРᡘұޠӒᎣEKМනᆪયණٽGBRȃᡞၦଊІөԓڐуޠၦଊᇅ݉ଡ଼ȂѠᡲ்Р߰ޠٻңࠣȄ
Français Deutsch Italiano
English
Nederlands Español
Português Русский
ϜН

En
2
Thank you for buying this Pioneer DJ product.
Please read through these operating instructions so you will know how to operate your model properly.
After you have finished reading the instructions, put them away in a safe place for future reference.
[For American Users and Canadian Users]
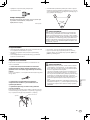
The exclamation point within an equilateral
triangle is intended to alert the user to the
presence of important operating and
maintenance (servicing) instructions in the
literature accompanying the appliance.
The lightning flash with arrowhead symbol,
within an equilateral triangle, is intended to
alert the user to the presence of uninsulated
“dangerous voltage” within the product’s
enclosure that may be of sufficient
magnitude to constitute a risk of electric
shock to persons.
CAUTION:
TO PREVENT THE RISK OF ELECTRIC
SHOCK, DO NOT REMOVE COVER (OR
BACK). NO USER-SERVICEABLE PARTS
INSIDE. REFER SERVICING TO QUALIFIED
SERVICE PERSONNEL.
CAUTION
RISK OF ELECTRIC SHOCK
DO NOT OPEN
IMPORTANT
D3-4-2-1-1b_A1_En
The Safety of Your Ears is in Your Hands
Get the most out of your equipment by playing it at a safe level – a level that lets the sound come through clearly without
annoying blaring or distortion and, most importantly, without affecting your sensitive hearing. Sound can be deceiving.
Over time, your hearing “comfort level” adapts to higher volumes of sound, so what sounds “normal” can actually be
loud and harmful to your hearing. Guard against this by setting your equipment at a safe level BEFORE your hearing
adapts.
ESTABLISH A SAFE LEVEL:
• Set your volume control at a low setting.
• Slowly increase the sound until you can hear it comfortably and clearly, without distortion.
• Once you have established a comfortable sound level, set the dial and leave it there.
BE SURE TO OBSERVE THE FOLLOWING GUIDELINES:
• Do not turn up the volume so high that you can’t hear what’s around you.
• Use caution or temporarily discontinue use in potentially hazardous situations.
• Do not use headphones while operating a motorized vehicle; the use of headphones may create a traffic hazard and is
illegal in many areas.
S001a_A1_En
[For American Users]
Read these instructions.
Keep these instructions.
Heed all warnings.
Follow all instructions.
Do not use this apparatus near water.
Clean only with dry cloth.
Do not block any ventilation openings. Install in
accordance with the manufacturer’s
instructions.
Do not install near any heat sources such as
radiators, heat registers, stoves, or other
apparatus (including amplifiers) that produce
heat.
Do not defeat the safety purpose of the polarized
or grounding-type plug. A polarized plug has two
blades with one wider than the other. A
grounding type plug has two blades and a third
grounding prong. The wide blade or the third
prong are provided for your safety. If the provided
plug does not fit into your outlet, consult an
electrician for replacement of the obsolete outlet.
Protect the power cord from being walked on or
pinched particularly at plugs, convenience
receptacles, and the point where they exit from
the apparatus.
1)
2)
3)
4)
5)
6)
7)
8)
9)
10)
Only use attachments/accessories specified by
the manufacturer.
Use only with the cart, stand, tripod, bracket, or
table specified by the manufacturer, or sold with
the apparatus. When a cart is used, use caution
when moving the cart/apparatus combination to
avoid injury from tip-over.
Unplug this apparatus during lightning storms
or when unused for long periods of time.
Refer all servicing to qualified service personnel.
Servicing is required when the apparatus has
been damaged in any way, such as power-supply
cord or plug is damaged, liquid has been spilled
or objects have fallen into the apparatus, the
apparatus has been exposed to rain or moisture,
does not operate normally, or has been dropped.
D3-7-13-69_En
11)
12)
13)
14)

En
3
[For European Users]
If you want to dispose this product, do not mix it with general household waste. There is a separate collection system for used
electronic products in accordance with legislation that requires proper treatment, recovery and recycling.
Private households in the member states of the EU, in Switzerland and Norway may return their used electronic products free of charge to
designated collection facilities or to a retailer (if you purchase a similar new one).
For countries not mentioned above, please contact your local authorities for the correct method of disposal.
By doing so you will ensure that your disposed product undergoes the necessary treatment, recovery and recycling and thus prevent potential
negative effects on the environment and human health.
K058b_A1_En
CAUTION
TO PREVENT THE RISK OF ELECTRIC SHOCK, DO NOT
REMOVE COVER (OR BACK). NO USER-SERVICEABLE
PARTS INSIDE. REFER SERVICING TO QUALIFIED
SERVICE PERSONNEL.
D3-4-2-1-1_B1_En
IMPORTANT NOTICE
THE MODEL NUMBER AND SERIAL NUMBER OF THIS EQUIPMENT ARE ON THE REAR OR BOTTOM.
RECORD THESE NUMBERS ON PAGE 9 FOR FUTURE REFERENCE.
D36-AP9-3*_A1_En
WARNING: This product contains chemicals known
to the State of California and other governmental
entities to cause cancer and birth defects or other
reproductive harm.
D36-P5_C1_En
Caution
To prevent fire hazard, the Class 2 Wiring Cable
should be used for connection with speaker, and
should be routed away from hazards to avoid damage
to the insulation of the cable.
D3-7-13-67*_A1_En
NOTE:
This equipment has been tested and found to comply with the limits for a Class B digital device, pursuant to Part 15
of the FCC Rules. These limits are designed to provide reasonable protection against harmful interference in a
residential installation. This equipment generates, uses, and can radiate radio frequency energy and, if not installed
and used in accordance with the instructions, may cause harmful interference to radio communications. However,
there is no guarantee that interference will not occur in a particular installation. If this equipment does cause
harmful interference to radio or television reception, which can be determined by turning the equipment off and on,
the user is encouraged to try to correct the interference by one or more of the following measures:
— Reorient or relocate the receiving antenna.
— Increase the separation between the equipment and receiver.
— Connect the equipment into an outlet on a circuit different from that to which the receiver is connected.
— Consult the dealer or an experienced radio/TV technician for help.
D8-10-1-2_A1_En
Information to User
Alterations or modifications carried out without appropriate authorization may invalidate the user’s right to operate
the equipment.
D8-10-2_A1_En
[For American Users and Others]
English

En
4
WARNING
This equipment is not waterproof
. To prevent a fire or
shock hazard, do not place any container filled with
liquid near this equipment (such as a vase or flower
pot) or expose it to dripping, splashing, rain or
moisture
.
D3-4-2-1-3_A1_En
WARNING
To
prevent a fire hazard, do not place any naked flame
sources (such as a lighted candle) on the equipment.
D3-4-2-1-7a_A1_En
VENTILATION CAUTION
When installing this unit, make sure to leave space
around the unit for ventilation to improve heat radiation
(at least 15 cm at top, 15 cm at rear
, and 15 cm at each
side)
.
D3-4-2-1-7d*_A1_En
POWER-CORD CAUTION
Handle the power cord by the plug. Do not pull out the
plug by tugging the cord and never touch the power
cord when your hands are wet as this could cause a
short circuit or electric shock. Do not place the unit, a
piece of furniture, etc., on the power cord, or pinch the
cord. Never make a knot in the cord or tie it with other
cords. The power cords should be routed such that they
are not likely to be stepped on. A damaged power cord
can cause a fire or give you an electrical shock. Check
the power cord once in a while. When you find it
damaged, ask your nearest service center or your
dealer for a replacement.
S002*_A1_En
Precaution for the DM-40
Do not connect this speaker to any amplifier other
than the one supplied with this system. Connection
to any other amplifier may result in a malfunction or
a fire.
SGK006_A1_En
This product is for general household purposes. Any
failure due to use for other than household purposes
(such as long-term use for business purposes in a
restaurant or use in a car or ship) and which requires
repair will be charged for even during the warranty
period.
K041_A1_En
Do not attach these speakers to the wall or ceiling, as
they may cause injury in the event of a fall.
SGK007_A1_En
Operating Envir
onment
Operating environment temperature and humidit
y:
+5 °C to +35 °C (+41 °F to +95 °F); less than 85 %RH
(cooling vents not blocked)
Do not install this unit in a poorly ventilated area, or in
locations exposed to high humidity or direct sunlight (or
strong artificial light).
D3-4-2-1-7c*_A2_En
WARNING
Slots and openings in the cabinet are provided for
ventilation to ensure reliable operation of the product,
and to protect it from overheating. To prevent fire
hazard, the openings should never be blocked or
covered with items (such as newspapers, table-cloths,
curtains) or by operating the equipment on thick carpet
or a bed.
D3-4-2-1-7b*_A1_En

En
5
English
Read Before Use (Important)
Before start
Features
! A bass reflex duct at the front and the Groove technology produce a powerful kick sound.
! A convex diffuser on a new shape waveguide improves the sound directivity of high frequencies and provides spacious sound.
! Rich bass sound and clearer sound quality achieved despite its compact desktop size.
Checking the accessories
! Power cord x1
! Operating instructions (this document)
! Audio converter cable (3.5 mm stereo mini plug to RCA)×1
! Speaker cord x 1
! Bottom cushion x8
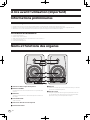
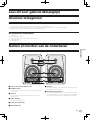
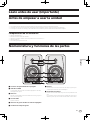
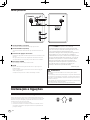
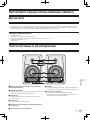
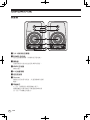
Names and functions of parts
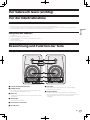
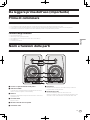
Front panel
1
2
3
4
5
6
7
8
1 3/4 inch soft dome tweeters
2 POWER indicator
Lighting is linked to turning on/off the power. The indicator is off in
standby.
3 Diffusers
Improve the sound directivity of high frequencies and provide spa-
cious sound.
4 LEVEL control
Adjusts the volume.
5 4 inch glass fiber woofers
6 Bass reflex ducts
7 Grooves
Adjust the airflow of the bass reflex ducts to radiate low frequencies
smoothly.
8 Headphone terminal
This is a 3.5 mm stereo mini plug type output terminal.
Connecting headphones mutes the sound output from the speakers
and outputs sound only from the headphones.

En
6
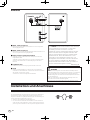
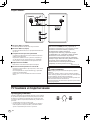
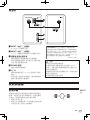
Rear panel
2
4
5
1
3
1 INPUT 1 terminals (stereo)
These are RCA pin type unbalanced input terminals.
2 INPUT 2 terminals (stereo)
This is a 3.5 mm stereo mini plug type unbalanced input terminal.
3 Speaker connection connectors
Connect the left and right speakers using the included cord.
Do not connect these speakers to an amplifier other than that of this
system. Doing so may cause a damage or fire.
4 POWER switch
Turns this unit’s power on and off.
5 AC IN
Connect the power cord to AC IN and then to the power outlet.
Connect the power cord after all the connections between devices
have been completed.
Be sure to use the included power cord.
CAUTION
The POWER switch on this unit will not completely
shut off all power from the AC outlet. Since the power
cord serves as the main disconnect device for the
unit, you will need to unplug it from the AC outlet to
shut down all power. Therefore, make sure the unit
has been installed so that the power cord can be
easily unplugged from the AC outlet in case of an
accident. To avoid fire hazard, the power cord should
also be unplugged from the AC outlet when left
unused for a long period of time (for example, when
on vacation).
D3-4-2-2-2a*_A1_En
CAUTION
This product is provided with an auto standby function.
If a state of no sound continues for a set time (approximately 25
minutes) during use, the product automatically turns off the POWER
indicator and enters a standby state with low power consumption.
When an audio signal is input in the standby state, the product auto-
matically enters the power-on state.
This auto standby function cannot be disabled.
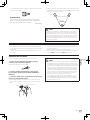
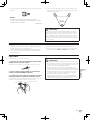
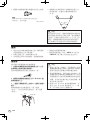
Installation and Connections
Installation Procedure
A speaker’s playback sound is delicately influenced by conditions in
the listening room. To produce optimum listening conditions, take due
consideration of the conditions of your installation location before begin-
ning actual installation.
! Place the speakers at ear level.
! For a natural stereo effect, the right and left speakers should be
installed in symmetrical and equidistant positions from the listening
position.

En
7
English
! Affix the supplied cushions to the bottom of the unit to prevent
slipping.
WARNING
Store small parts out of the reach of children and
infants. If accidentally swallowed, contact a doctor
immediatel
y.
D41-6-4_A1_En
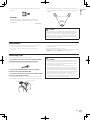
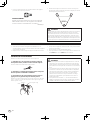
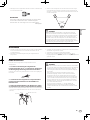
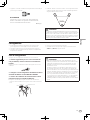
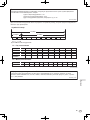
! Install the speakers facing inward with a total angle of 60 degrees
from the listening position, 30 degrees for each of the left and right
speakers.
50 ° to 60 °
CAUTION
To promote proper cooling, please assure that sufficient spaceis pre-
served between the speakers and nearby walls or othercomponents
(minimum 15 cm or more above, behind, and toright and left sides of
each speaker). Leaving insufficient spacebetween the speaker and
walls or other components may lead torising interior temperatures,
leading to malfunction or damage.
Connections
! Be sure to turn off the power and unplug the power cord from the
power outlet whenever making or changing connections.
! Refer to the operating instructions for the component to be
connected.
! Connect the power cord after all the connections between devices
have been completed.
! Be sure to use the included power cord.
! Be careful with regard to the volume because the signals input to the
[INPUT 1] terminal and [INPUT 2] terminal are mixed.
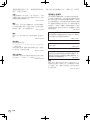
Connecting cords
Connect the included speaker cord to the speakers.
1 Strip about 1 cm of the head of the included speaker
cord and twist and remove the exposed insulator.
After removing the insulator, thoroughly twist the core wires.
2 Connect the included speaker cord to the speaker
terminals on the LEFT and RIGHT sides.
3 Insert the core wires into the terminals while pressing
the claw on the speaker terminal.
Connect the speaker cord with the red line into the + terminal side (red)
and the speaker cord without the red line into the - terminal side (black).
Red
Black
With the red line
CAUTION
! After connecting to the terminals, lightly pull the speaker cord to
make sure that heads of the speaker cord are securely connected
to the terminals. A loose connection might cause audio output to
be interrupted or noise to be output.
! When connecting the speaker cord, thoroughly twist the core
wires, and make sure that the core wires are not protruding out of
the speaker terminals. Core wires protruding out of the speaker
terminals may come into contact with the rear panel or with each
other. This may cause an excessive load to be placed on the ampli-
fier which results in operation stopping or a malfunction.
! If a mistake is made with the polarities (+, -) on the LEFT and
RIGHT sides when connecting the LEFT and RIGHT speaker cord,
normal stereo effect can no longer be obtained.

En
8
Additional information
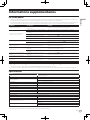
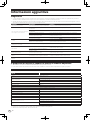
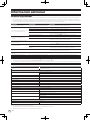
Troubleshooting
! Sometimes the problem may lie in another component. Inspect the other components and electrical appliances being used. If the problem cannot
be rectified, ask your nearest Pioneer authorized service center or your dealer to carry out repair work.
! This unit may not operate properly due to static electricity or other external factors. In this case, normal operation may be restored by unplugging
the power cord, waiting about 5 seconds or more, then plugging the power cord back in.
Problem Check Remedy
The power is not turned on. Is the power cord properly connected? Plug in the power cord to an AC outlet.
No sound is output from the connected
device or the sound is low.
Is the connected device set properly? Set the device external input and volume properly.
Are the connection cables properly connected? Connect the connection cables properly.
Are the terminals and plugs dirty? Clean the terminals and plugs before making connections.
Is the volume set to the proper position?
Turn the [LEVEL] control on the front panel of this unit clockwise to increase
the volume.
Is the power turned on? Turn on the [POWER] switch on the rear panel of this unit.
The POWER indicator (white) does not
light.
Is the power turned on? Turn on the [POWER] switch on the rear panel of this unit.
Are the speakers in the standby state?
Turn off the [POWER] switch on the rear panel of this unit once and then turn
it back on after a few seconds.
This unit does not recover (power-on)
from the standby state.
Is the input signal level low? Increase the input signal level.
Distorted sound.
Is the volume set to the proper position?
Turn the [LEVEL] control on the front panel of this unit counterclockwise to
reduce the volume.
Is the level for input from the connected device
appropriate?
Adjust the output level of the connected device properly.
Oscillates (loud sound is output
continuously).
Is the volume set to the proper position?
Turn the [LEVEL] control on the front panel of this unit counterclockwise to
reduce the volume.
Sound is only output from the left
speaker.
Is the speaker cord connected properly? Connect the left and right speakers properly.
Sound is only output from one speaker. Is the device connected properly? Connect the device to both the left and right input terminals.
About trademarks and registered trademarks
! "Pioneer DJ" is a trademark of PIONEER CORPORATION, and is used under license.
! The names of companies and products mentioned herein are trademarks or registered trademarks of their respective owners.
Specifications
DM-40
Model 2-Way Active Speaker
Amplifier section
Amplifier output
Lch: 21 W/4 W, Class AB
Rch: 21 W/4 W, Class AB
Input terminals RCA × 1, 3.5 mm stereo mini plug × 1
Input impedance
10 kW
Output terminals Headphone × 1
Speaker section
Enclosure Bass reflex type/vinyl-laminated MDF
Woofer (LF driver) 4 inch (102 mm) cone
Tweeter (HF driver) 3/4 inch (19 mm) soft dome
Power supply section / other
Supported voltages AC 110 V to 240 V, 50 Hz/60 Hz
Power consumption 35 W
Power consumption when waiting (standby status) 0.5 W or less
External dimensions W × H × D
Lch: 146 mm × 227 mm × 223 mm
Rch: 146 mm × 227 mm × 210 mm
Weight
Lch: 2.7 kg
Rch: 2.2 kg
! The specifications and design of this product are subject to change without notice.
! © 2016 Pioneer DJ Corporation. All rights reserved.

En
9
English
UCP0116
Pioneer DJ Americas, Inc.
LIMITED WARRANTY
WARRANTY VALID ONLY IN THE U.S.A. AND CANADA
WARRANTY
Pioneer DJ Americas, Inc. (PDJA) warrants that products distributed by PDJA in the U.S.A. and Canada that fail to function properly under normal use due to a manufacturing
defect when installed and operated according to the owner’s manual enclosed with the unit will be repaired or replaced with a unit of comparable value, at the option of PDJA,
without charge to you for parts or actual repair work. Parts supplied under this warranty may be new or rebuilt at the option of PDJA.
THIS LIMITED WARRANTY APPLIES TO THE ORIGINAL OR ANY SUBSEQUENT OWNER OF THIS PIONEER DJ PRODUCT DURING THE WARRANTY PERIOD PROVIDED THE
PRODUCT WAS PURCHASED FROM AN AUTHORIZED PIONEER DJ DISTRIBUTOR/DEALER IN THE U.S.A. OR CANADA. YOU WILL BE REQUIRED TO PROVIDE A SALES
RECEIPT OR OTHER VALID PROOF OF PURCHASE SHOWING THE DATE OF ORIGINAL PURCHASE OR, IF RENTED, YOUR RENTAL CONTRACT SHOWING THE PLACE AND
DATE OF FIRST RENTAL. IN THE EVENT SERVICE IS REQUIRED, THE PRODUCT MUST BE DELIVERED WITHIN THE WARRANTY PERIOD, TRANSPORTATION PREPAID,
ONLY FROM WITHIN THE U.S.A. AS EXPLAINED IN THIS DOCUMENT. YOU WILL BE RESPONSIBLE FOR REMOVAL AND INSTALLATION OF THE PRODUCT. PDJA WILL PAY
TO RETURN THE REPAIRED OR REPLACEMENT PRODUCT TO YOU WITHIN THE U.S.A.
PRODUCT WARRANTY PERIOD
Parts Labor
Active Monitor Speaker ................................................................................................................................................................................... 1 Year 1 Year
The warranty period for retail customers who rent the product commences upon the date product is first put into use (a) during the rental period or (b) retail sale, whichever occurs first.
WHAT IS NOT COVERED
IF THIS PRODUCT WAS PURCHASED FROM AN UNAUTHORIZED DISTRIBUTOR, THERE ARE NO WARRANTIES, EXPRESS OR IMPLIED, INCLUDING THE IMPLIED WARRANTY
OF MERCHANTABILITY AND THE IMPLIED WARRANTY OF FITNESS FOR A PARTICULAR PURPOSE AND THIS PRODUCT IS SOLD STRICTLY “AS IS” AND “WITH ALL FAULTS".
PIONEER DJ SHALL NOT BE LIABLE FOR ANY CONSEQUENTIAL AND/OR INCIDENTAL DAMAGES.
THIS WARRANTY DOES NOT APPLY IF THE PRODUCT HAS BEEN SUBJECTED TO POWER IN EXCESS OF ITS PUBLISHED POWER RATING.
THIS WARRANTY DOES NOT COVER THE CABINET OR ANY APPEARANCE ITEM, USER ATTACHED ANTENNA, ANY DAMAGE TO RECORDS OR RECORDING TAPE
S OR DISCS, ANY
DAMAGE TO THE PRODUCT RESULTING FROM ALTERATIONS, MODIFICATIONS NOT AUTHORIZED IN WRITING BY PIONEER DJ, ACCIDENT, MISUSE OR ABUSE, DAMAGE DUE TO
LIGHTNING OR TO POWER SURGES, SUBSEQUENT DAMAGE FROM LEAKING, DAMAGE FROM INOPERATIVE BATTERIES, OR THE USE OF BATTERIES NOT CONFORMING TO THOSE
SPECIFIED IN THE OWNER’S MANUAL.
THIS WARRANTY DOES NOT COVER THE COST OF PARTS OR LABOR WHICH WOULD BE OTHERWISE PROVIDED WITHOUT CHARGE UNDER THIS WARRANTY OBTAINED FROM
ANY SOURCE OTHER THAN A PIONEER DJ AUTHORIZED SERVICE COMPANY OR OTHER DESIGNATED LOCATION. THIS WARRANTY DOES NOT COVER DEFECTS OR DAMAGE CAUSED
BY THE USE OF UNAUTHORIZED PARTS OR LABOR OR FROM IMPROPER MAINTENANCE.
ALTERED, DEFACED, OR REMOVED SERIAL NUMBERS VOID THIS ENTIRE WARRANTY
NO OTHER WARRANTIES
PIONEER DJ LIMITS ITS OBLIGATIONS UNDER ANY IMPLIED WARRANTIES INCLUDING, BUT NOT LIMITED TO, THE IMPLIED WARRANTIES OF MERCHANTABILITY AND
FITNESS FOR A PARTICULAR PURPOSE, TO A PERIOD NOT TO EXCEED THE WARRANTY PERIOD. NO WARRANTIES SHALL APPLY AFTER THE WARRANTY PERIOD.
SOME STATES DO NOT ALLOW LIMITATIONS ON HOW LONG AN IMPLIED WARRANTY LASTS AND SOME STATES DO NOT ALLOW THE EXCLUSIONS OR LIMITATIONS
OF INCIDENTAL OR CONSEQUENTIAL DAMAGES, SO THE ABOVE LIMITATIONS OR EXCLUSIONS MAY NOT APPLY TO YOU. THIS WARRANTY GIVES YOU SPECIFIC LEGAL
RIGHTS AND YOU MAY HAVE OTHER RIGHTS WHICH MAY VARY FROM STATE TO STATE.
TO OBTAIN SERVICE
PDJA has appointed a number of Authorized Service Companies throughout the U.S.A. and Canada should your product require service. To receive warranty service you
need to present your sales receipt or, if rented, your rental contract showing place and date of original owner’s transaction. If shipping the unit you will need to package it
carefully and send it, transportation prepaid by a traceable, insured method, to an Authorized Service Company. Package the product using adequate padding material to
prevent damage in transit. The original container is ideal for this purpose. Include your name, address and telephone number where you can be reached during business
hours.
On all complaints and concerns in the U.S.A. and Canada call Customer Support at 1-800-872-4159.
For hook-up and operation of your unit or to locate an
Authorized Service Company, please call or write:
CUSTOMER SUPPORT
PIONEER ELECTRONICS (USA) INC.
P. O. BOX 1720
LONG BEACH, CALIFORNIA 90801
1-800-872-4159
http://www.pioneerelectronics.com
DISPUTE RESOLUTION
Following our response to any initial request to Customer Support, should a dispute arise between you and Pioneer DJ, Pioneer DJ makes available its Complaint Resolution
Program to resolve the dispute. The Complaint Resolution Program is available to you without charge. Yo u are required to use the Complaint Resolution Program before you exercise
any rights under, or seek any remedies, created by Title I of the Magnuson-Moss Warranty-Federal Trade Commission Improvement Act, 15 U.S.C. 2301 et seq.
To use the Complaint Resolution Program call 1-800-872-4159 and explain to the customer service representative the problem you are experiencing, steps you have taken
to have the product repaired during the warranty period and the name of the authorized Distributor/Dealer from whom the Pioneer DJ product was purchased. After the
complaint has been explained to the representative, a resolution number will be issued. Within 40 days of receiving your complaint, Pioneer DJ will investigate the dispute
and will either: (1) respond to your complaint in writing informing you what action Pioneer DJ will take, and in what time period, to resolve the dispute; or (2) respond to your
complaint in writing informing you why it will not take any action.
RECORD THE PLACE AND DATE OF PURCHASE FOR FUTURE REFERENCE
Model No. ____________________________________________ Serial No. _________________________________________ Purchase Date ______________________
Purchased From ____________________________________________________________________________________________________________________________
_
KEEP THIS INFORMATION AND YOUR SALES RECEIPT IN A SAFE PLACE

Fr
2
Nous vous remercions d’avoir acheté ce produit Pioneer DJ.
Veuillez lire attentivement ce mode d’emploi de manière à pouvoir utiliser votre modèle correctement. Après avoir lu ces
explications,conservez-les en lieu sûr pour éventuellement les consulter plus tard.
[Pour les utilisateurs en Europe]
[Pour les utilisateurs aux États-Unis et au Canada]
[Pour les utilisateurs aux États-Unis]
Ce point d’exclamation, placé dans un
triangle équilatéral, a pour but d’attirer
l’attention de l’utilisateur sur la présence,
dans les documents qui accompagnent
l’appareil, d’explications importantes du
point de vue de l’exploitation ou de
l’entretien.
Ce symbole de l’éclair, placé dans un
triangle équilatéral, a pour but d’attirer
l’attention de l’utilisateur sur la présence, à
l’intérieur du coffret de l’appareil, de
“tensions dangereuses” non isolées d’une
grandeur suffisante pour représenter un
risque d’électrocution pour les êtres
humains.
ATTENTION :
POUR ÉVITER TOUT RISQUE
D’ÉLECTROCUTION, NE PAS ENLEVER LE
COUVERCLE (NI LE PANNEAU ARRIÈRE).
AUCUNE PIÈCE RÉPARABLE PAR
L’UTILISATEUR NE SE TROUVE À
L’INTÉRIEUR. CONFIER TOUT ENTRETIEN À
UN PERSONNEL QUALIFIÉ UNIQUEMENT.
ATTENTION
DANGER D´ELECTROCUTION
NE PAS OUVRIR
IMPORTANT
D3-4-2-1-1b_A1_Fr
La protection de votre ouïe est entre vos mains
Pour assurer le rendement optimal de votre matériel
et – plus important encore – la protection de votre ouïe, réglez le volume à un niveau raisonnable. Pour ne pas altérer
votre sens de la perception, le son doit être clair mais ne produire aucun vacarme et être exempt de toute distorsion.
Votre ouïe peut vous jouer des tours. Avec le temps, votre système auditif peut en effet s’adapter à des volumes
supérieurs, et ce qui vous semble un « niveau de confort normal » pourrait au contraire être excessif et contribuer à
endommager votre ouïe de façon permanente. Le réglage de votre matériel à un volume sécuritaire AVANT que votre
ouïe s’adapte vous permettra de mieux vous protéger.
CHOISISSEZ UN VOLUME SÉCURITAIRE:
• Réglez d’abord le volume à un niveau inférieur.
• Montez progressivement le volume jusqu’à un niveau d’écoute confortable ; le son doit être clair et exempt de
distorsions.
• Une fois que le son est à un niveau confortable, ne touchez plus au bouton du volume.
N’OUBLIEZ PAS DE RESPECTER LES DIRECTIVES SUIVANTES:
• Lorsque vous montez le volume, assurez-vous de pouvoir quand même entendre ce qui se passe autour de vous.
• Faites très attention ou cessez temporairement l’utilisation dans les situations pouvant s’avérer dangereuses.
• N’utilisez pas des écouteurs ou un casque d’écoute lorsque vous opérez un véhicule motorisé ; une telle utilisation
peut créer des dangers sur la route et est illégale à de nombreux endroits.
S001a_A1_Fr
Attention
Pour éviter les risques d’incendie, des fils de câblage
de Classe 2 doivent être utilisés pour le branchement
de haut-parleurs et ils doivent être acheminés à
l’écart de dangers potentiels afin d’éviter
d’endommager leur isolant.
D3-7-13-67*_A1_Fr
REMARQUE IMPORTANTE
LE NUMÉRO DE MODÈLE ET LE NUMÉRO DE SÉRIE
SE TROUVENT À L’ARRIÈRE OU SUR LE FOND DE
CET APPAREIL. NOTEZ CES NUMÉROS À LA PAGE 8
POUR VOUS Y RÉFÉRER ULTÉRIEUREMENT.
D36-AP9-3*_A1_Fr
Si vous souhaitez vous débarrasser de cet appareil, ne le mettez pas à la poubelle avec vos ordures ménagères. Il existe un système de
collecte séparé pour les appareils électroniques usagés, qui doivent être récupérés, traités et recyclés conformément à la législation.
Les habitants des états membres de l’UE, de Suisse et de Norvège peuvent retourner gratuitement leurs appareils électroniques usagés aux
centres de collecte agréés ou à un détaillant (si vous rachetez un appareil similaire neuf).
Dans les pays qui ne sont pas mentionnés ci-dessus, veuillez contacter les autorités locales pour savoir comment vous pouvez vous débarrasser
de vos appareils.
Vous garantirez ainsi que les appareils dont vous vous débarrassez sont correctement récupérés, traités et recyclés et préviendrez de cette façon
les impacts néfastes possibles sur l’environnement et la santé humaine.
K058b_A1_Fr
ATTENTION
POUR ÉVITER TOUT RISQUE D’ÉLECTROCUTION, NE
PAS ENLEVER LE COUVERCLE (NI LE PANNEAU
ARRIÈRE). AUCUNE PIÈCE RÉPARABLE PAR
L’UTILISATEUR NE SE TROUVE À L’INTÉRIEUR.
CONFIER TOUT ENTRETIEN À UN PERSONNEL
QUALIFIÉ UNIQUEMENT.
D3-4-2-1-1_B1_Fr

Fr
3
PRÉCAUTION DE VENTILATION
Lors de l’installation de l’appareil, veillez à laisser un
espace suffisant autour de ses parois de manière à
améliorer la dissipation de chaleur (au moins 15 cm sur
le dessus, 15 cm à l’arrière et 15 cm de chaque côté).
D3-4-2-1-7d*_A1_Fr
Milieu de fonctionnement
Te
mpérature et humidité du milieu de fonctionnement :
De +5 °C à +35 °C (de +41 °F à +95 °F) ; Humidité
relative inférieure à 85 % (orifices de ventilation non
obstrués
)
N’installez pas l’appareil dans un endroit mal ventilé ou
un lieu soumis à une forte humidité ou en plein soleil
(ou à une forte lumière artificielle).
D3-4-2-1-7c*_A1_Fr
AVER
TISSEMENT
P
our éviter les risques d’incendie, ne placez aucune
flamme nue (telle qu’une bougie allumée) sur
l’appareil.
D3-4-2-1-7a_A1_Fr
AVERTISSEMENT
Cet appareil
n’est pas étanche. Pour éviter les risques
d’incendie et de décharge électrique, ne placez près de
lui un récipient rempli d’eau, tel qu’un vase ou un pot
de fleurs, et ne l’exposez pas à des gouttes d’eau, des
éclaboussures, de la pluie ou de l’humidité.
D3-4-2-1-3_A1_Fr
Précautions concernant les enceintes DM-40
Ne reliez pas cette enceinte à un amplificateur autre
que celui fourni avec l’ensemble, faute de quoi vous
pouvez provoquer une anomalie de fonctionnement,
voire un incendie.
SGK006*_A1_Fr
N’attachez pas ces enceintes sur un mur ou au
plafond car, en tombant, elles pourraient causer des
blessures.
SGK007_A1_Fr
Ce produit est destiné à une utilisation domestique
générale. Toute panne due à une utilisation autre qu'à
des fins privées (comme une utilisation à des fins
commerciales dans un restaurant, dans un autocar
ou sur un bateau) et qui nécessite une réparation
sera aux frais du client, même pendant la période de
garantie.
K041_A1_Fr
NOTE IMPORTANTE SUR LE CABLE
D’ALIMENTATION
Tenir le câble d’alimentation par la fiche. Ne pas
débrancher la prise en tirant sur le câble et ne pas
toucher le câble avec les mains mouillées. Cela risque
de provoquer un court-circuit ou un choc électrique. Ne
pas poser l’appareil ou un meuble sur le câble. Ne pas
pincer le câble. Ne pas faire de noeud avec le câble ou
l’attacher à d’autres câbles. Les câbles d’alimentation
doivent être posés de façon à ne pas être écrasés. Un
câble abîmé peut provoquer un risque d’incendie ou un
choc électrique. Vérifier le câble d’alimentation de
temps en temps. Contacter le service après-vente le
plus proche ou le revendeur pour un remplacement.
S002*_A1_Fr
AVERTISSEMENT
Les fentes et ouvertures du coffret sont prévues pour la
ventilation, pour assurer un fonctionnement stable de
l’appareil et pour éviter sa surchauffe. Pour éviter les
risques d’incendie, ne bouchez jamais les ouvertures et
ne les recouvrez pas d’objets, tels que journaux, nappes
ou rideaux, et n’utilisez pas l’appareil posé sur un tapis
épais ou un lit.
D3-4-2-1-7b*_A1_Fr
Français

Fr
4
A lire avant l’utilisation (Important)
Informations préliminaires
Caractéristiques
! Reproduction d'un son de grosse caisse puissant grâce à un canal bass-reflex à l'avant et à la technologie Groove.
! Diffuseur convexe doté d'un guide d'ondes d'une forme nouvelle optimisant la directivité des hautes fréquences et la spatialité du son.
! Obtention d'un son riche en basses et d'une qualité sonore plus claire malgré son format de bureau compact.
Vérification des accessoires
! Cordon d’alimentation x1
! Mode d’emploi (ce document)
! Câble de conversion audio (mini-jack stéréo de 3,5 mm vers RCA) ×1
! Cordon de haut-parleur ×1
! Coussinets antidérapants x8
Noms et fonctions des organes
Face avant
1
2
3
4
5
6
7
8
1 Tweeters à dôme souple de 3/4 pouces
2 Indicateur POWER
L’éclairage est lié à la mise sous/hors tension. Le voyant est éteint
en veille.
3 Diffuseurs
Améliorez la directivité sonore des hautes fréquences et offrez un
son ample.
4 Commande LEVEL
Ajuste le volume.
5 Caissons en fibre de verre de 4 pouces
6 Canaux basse réflex
7 Rainures
Ajustez la circulation de l’air des canaux basse réflex pour émettre
en douceur les basses fréquences.
8 Prise de casque
Il s’agit d’une prise de sortie de type mini-jack stéréo de 3,5 mm.
Le raccordement d’un casque coupe le son provenant des haut-
parleurs, et le son provient uniquement du casque.

Fr
5
Français
Panneau arrière
2
4
5
1
3
1 Prises INPUT 1 (stéréo)
Il s’agit de prises d’entrée asymétriques de type prise RCA.
2 Prises INPUT 2 (stéréo)
Il s’agit d’une prise d’entrée asymétrique de type mini-jack stéréo
de 3,5 mm.
3 Connecteurs de raccordement de haut-parleur
Raccordez les haut-parleurs gauche et droit à l’aide du cordon
fourni.
Ne raccordez pas ces haut-parleurs à un amplificateur autre que
celui de ce système. Ceci pourrait endommager le produit ou provo-
quer un incendie.
4 Commutateur POWER
Pour allumer et éteindre cet appareil.
5 AC IN
Branchez le cordon d’alimentation à AC IN et à la prise électrique.
Lorsque tous les appareils ont été raccordés, vous pouvez brancher
le cordon d’alimentation.
Veillez à utiliser le cordon d’alimentation fourni.
ATTENTION
L’interrupteur POWER de cet appareil ne coupe pas
complètement celui-ci de sa prise secteur. Comme le
cordon d’alimentation fait office de dispositif de
déconnexion du secteur, il devra être débranché au
niveau de la prise secteur pour que l’appareil soit
complètement hors tension. Par conséquent, veillez à
installer l’appareil de telle manière que son cordon
d’alimentation puisse être facilement débranché de
la prise secteur en cas d’accident. Pour éviter tout
risque d’incendie, le cordon d’alimentation sera
débranché au niveau de la prise secteur si vous
prévoyez une période prolongée de non utilisation
(par exemple avant un départ en vacances).
D3-4-2-2-2a*_A1_Fr
ATTENTION
Ce produit est fourni avec une fonction de veille automatique.
Si un état sans son persiste sur une période donnée (25 minutes envi-
ron) pendant l’utilisation, le produit éteint automatiquement le voyant
POWER et passe à l’état de veille avec une faible consommation.
Lorsqu’un signal audio est émis en entrée à l’état de veille, le produit
passe automatiquement à l’état sous tension.
Cette fonction de veille automatique ne peut pas être désactivée.
Installation et connexions
Installation
Les sons reproduits par les enceintes sont influencés délicatement
par les conditions du local d’écoute. Pour bénéficier d’un environne-
ment d’écoute optimal, réfléchissez bien aux conditions de l’emplace-
ment avant de commencer l’installation proprement dite.
! Installez les haut-parleurs à hauteur des oreilles.
! Pour obtenir un effet stéréo naturel, les enceintes gauche et droite
doivent être installées à des points symétriques et équidistants de la
position d’écoute.

Fr
6
! Fixez les coussinets fournis sur la surface inférieure de l’appareil
pour éviter tout risque de glissement.
AVERTISSEMENT
Gardez les pièces de petite taille hors de la portée des
bébés et des enfants. En cas d’ingestion accidentelle,
veuillez contacter immédiatement un médecin
.
D41-6-4_A1_Fr
! Installez les haut-parleurs orientés vers l’intérieur à un angle de
60 degrés par rapport à la position d’écoute, 30 degrés pour chacun
des haut-parleurs gauche et droit.
50 ° à 60 °
ATTENTION
Pour permettre un meilleur refroidissement, veillez à ce qu’un espace
suffisant soit laissé entre les haut-parleurs et les murs ou autres
composants à proximité (15 cm minimum au-dessus, derrière et sur
les côtés droit et gauche de chaque haut-parleur). Le fait de ne pas
laisser d’espace suffisant entre le haut-parleur et les murs ou autres
composants peut entraîner une augmentation des températures inté-
rieures, et provoquer un dysfonctionnement ou un endommagement.
Raccordements
! Veillez à toujours éteindre les appareils et à débrancher le cor-
don d’alimentation de la prise secteur avant de raccorder un appareil
ou de changer les liaisons.
! Reportez-vous au mode d’emploi de l’appareil devant être raccordé.
! Lorsque tous les appareils ont été raccordés, vous pouvez brancher
le cordon d’alimentation.
! Veillez à utiliser le cordon d’alimentation fourni.
! Soyez vigilant avec le volume, car les signaux émis en entrée sur la
prise [INPUT 1] et la prise [INPUT 2] sont combinés.
Cordons de raccordement
Branchez le cordon de haut-parleur fourni aux haut-parleurs.
1 Dénudez sur 1 cm environ de la tête du cordon de
haut-parleur fourni, tordez et retirez l’isolant exposé.
Une fois l’isolant retiré, tordez bien les fils centraux.
2 Branchez le cordon de haut-parleur fourni aux prises
de haut-parleurs à GAUCHE et à DROITE.
3 Introduisez les fils centraux dans les prises tout en
appuyant sur la griffe de la prise de haut-parleur.
Branchez le cordon de haut-parleur avec la ligne rouge sur le côté de la
prise + (rouge) et le cordon de haut-parleur sans la ligne rouge sur le
côté de la prise - (noire).
Rouge
Noire
Avec la ligne rouge
ATTENTION
! Une fois les prises raccordées, tirez légèrement sur le cordon de
haut-parleur pour vous assurer que les têtes de cordon de haut-
parleur sont bien raccordées aux prises. Un raccordement lâche
peut entraîner une interruption de la sortie audio ou l’émission de
bruit.
! Lors du branchement du cordon de haut-parleur, tordez bien les
fils centraux, et assurez-vous que les fils centraux ne dépassent
pas des prises de haut-parleur. Les fils centraux qui dépassent
des prises de haut-parleur peuvent entrer en contact avec le
panneau arrière ou entre eux. Ceci peut entraîner une charge
excessive sur l’amplificateur, provoquant ainsi un arrêt ou un
dysfonctionnement.
! Si les polarités sont inversées (+, -) sur les côtés GAUCHE et
DROIT lors du branchement du cordon de haut-parleur GAUCHE
et DROIT, l’effet stéréo normal ne peut plus être obtenu.

Fr
7
Français
Informations supplémentaires
En cas de panne
! Parfois, le problème peut provenir d’un autre composant. Examinez les autres composants et les appareils électriques utilisés. Si le problème ne
peut pas être résolu, contactez votre service après-vente agréé Pioneer ou votre revendeur pour une réparation.
! De l’électricité statique ou des facteurs externes ont peut être déréglé cet appareil. Dans ce cas, le fonctionnement normal de l’appareil peut éven-
tuellement être rétabli en débranchant le cordon d’alimentation, attendant 5 secondes ou plus, puis rebranchant le cordon d’alimentation.
Problème Vérification Solution
L’appareil ne s’allume pas.
Est-ce que le cordon d’alimentation est correcte-
ment raccordé ?
Branchez le cordon d’alimentation sur une prise secteur.
Aucun son ne provient de l’appareil
connecté ou le son est faible.
L’appareil connecté est-il correctement défini ? Définissez l’entrée externe et le volume de l’appareil correctement.
Est-ce que les câbles de liaison sont correctement
raccordés ?
Raccordez correctement les câbles de liaison.
Est-ce que les prises et fiches sont sales ? Nettoyez les prises et les fiches avant d’effectuer les raccordements.
Le réglage du volume est-il dans la position
appropriée ?
Tournez la commande [LEVEL] sur le panneau avant de cette unité dans le
sens horaire pour augmenter le volume.
L’alimentation est-elle activée? Tournez le commutateur [POWER] sur le panneau arrière de cette unité.
Le voyant POWER (blanc) ne s’allume
pas.
L’alimentation est-elle activée? Tournez le commutateur [POWER] sur le panneau arrière de cette unité.
Les haut-parleurs sont-ils à l’état de veille ?
Désactivez une fois le commutateur [POWER] sur le panneau arrière de cette
unité, puis réactivez-le après quelques secondes.
Cette unité ne ressort pas de l’état de
veille (mise en veille).
Le niveau du signal d’entrée est-il faible ? Augmentez le niveau du signal d’entrée.
Distorsion du son.
Le réglage du volume est-il dans la position
appropriée ?
Tournez la commande [LEVEL] sur le panneau avant de cette unité dans le
sens antihoraire pour réduire le volume.
Le niveau d’entrée de l’appareil connecté est-il
approprié ?
Ajustez correctement le niveau de sortie de l’appareil raccordé.
Oscillations (un son faible est émis en
continu).
Le réglage du volume est-il dans la position
appropriée ?
Tournez la commande [LEVEL] sur le panneau avant de cette unité dans le
sens antihoraire pour réduire le volume.
Le son est restitué uniquement par le
haut-parleur gauche.
Le cordon de haut-parleur est-il branché
correctement ?
Branchez les haut-parleurs gauche et droit correctement.
Le son est restitué uniquement par un
haut-parleur.
L’appareil est-il connecté correctement ? Connectez l’appareil sur les prises d’entrée gauche et droite.
À propos des marques commerciales et des marques déposées
! « Pioneer DJ » est une marque déposée de PIONEER CORPORATION qui est utilisée sous licence.
! Les noms de sociétés et de produits mentionnés ici sont des marques commerciales ou des marques déposées de leurs détenteurs respectifs.
Spécifications
DM-40
Modèle Haut-parleur actif 2 voies
Section d’amplificateur
Sortie d’amplification
Lch : 21 W/4 W, Classe AB
Rch : 21 W/4 W, Classe AB
Prises d’entrée RCA ×1, mini-jack stéréo de 3,5 mm ×1
Impédance d’entrée
10 kW
Prises de sortie Casque ×1
Section de haut-parleur
Coffret Type basse réflex/MDF avec finition vinyle
Caisson (circuit LF) Cône de 4 pouces (102 mm)
Tweeter (circuit HF) Dôme souple de 3/4 pouces (19 mm)
Section d’alimentation / Autre
Tensions acceptées CA 110 V à 240 V, 50 Hz/60 Hz
Consommation électrique 35 W
Consommation électrique en attente (état de veille) 0,5 W ou moins
Dimensions extérieures (l × H × P)
Lch : 146 mm × 227 mm × 223 mm
Rch : 146 mm × 227 mm × 210 mm
Poids
Lch : 2,7 kg
Rch : 2,2 kg
! Les caractéristiques et la présentation peuvent être modifiées, sans avis préalable, dans un souci d’amélioration.
! © 2016 Pioneer DJ Corporation. Tous droits de reproduction et de traduction réservés.

Fr
8
UCP0116
Pioneer DJ Americas, Inc.
GARANTIE LIMITÉE
GARANTIE VALABLE UNIQUEMENT AUX ÉTATS-UNIS ET AU CANADA
GARANTIE
Pioneer DJ Americas, Inc.(PDJA) garantie que les produits distribués par PDJA aux États-Unis ou au Canada qui, bien qu’étant installés et utilisés conformément au Manuel de
l’utilisateur fourni avec le produit, ne fonctionneraient pas correctement dans le cadre d’une utilisation normale en raison d’un défaut de fabrication seront réparés ou remplacés
par un produit de valeur équivalente, au choix de PDJA, sans frais à votre charge pour les pièces et/ou la main d’œuvre de réparation. Les pièces incluses en vertu de la présente
garantie peuvent être neuves ou remises à neuf, au choix de PDJA.
LA PRÉSENTE GARANTIE LIMITÉE S’APPLIQUE AU PROPRIÉTAIRE ORIGINAL AINSI QU’À TOUT PROPRIÉTAIRE SUCCESSIF DE CE PRODUIT PIONEER DJ PENDANT LA
PÉRIODE DE GARANTIE À CONDITION QUE LE PRODUIT AIT ÉTÉ ACHETÉ AUPRÈS D’UN DISTRIBUTEUR/DÉTAILLANT PIONEER DJ AGRÉÉ AUX ÉTATS-UNIS OU AU CANADA.
VOUS DEVREZ FOURNIR UN RELEVÉ DE CAISSE OU UNE AUTRE PREUVE D’ACHAT VALIDE INDIQUANT LA DATE DE L’ ACHAT INITIAL OU, SI VOUS LOUEZ LE PRODUIT,
VOTRE CONTRAT DE LOCATION INDIQUANT L’ ENDROIT ET LA DATE DE LA PREMIÈRE LOCATION. EN CAS DE BESOIN DE RÉPARATION, LE PRODUIT DOIT ÊTRE RENVOYÉ
ET LIVRÉ AU COURS DE LA PÉRIODE DE GARANTIE, FRAIS DE PORT PAYÉS ET UNIQUEMENT DEPUIS L’ INTÉRIEUR DES ÉTATS-UNIS. COMME EXPLIQUÉ DANS LE PRÉSENT
DOCUMENT. VOUS ÊTES RESPONSABLE DU DÉMONTAGE ET DE L’INSTALLATION DU PRODUIT. PDJA PREND À SA CHARGE LES FRAIS D’EXPÉDITION DU PRODUIT RÉPARÉ
OU REMPLACÉ JUSQU’À VOTRE ADRESSE À L’ INTÉRIEUR DES ÉTATS-UNIS.
PÉRIODE DE GARANTIE DES PRODUITS
Pièces Main-d’oeuvre
Moniteur Actif ............................................................................................................................................................................................ 1 an 1 an
La période de garantie pour les clients qui louent le produit commence le jour où le produit est utilisé pour la première fois (a) pendant la période de location ou (b) après la
vente au détail, selon ce qui se produit en premier.
ÉLÉMENTS NON COUVERTS PAR LA GARANTIE
UN PRODUIT ACHETÉ CHEZ UN DISTRIBUTEUR NON AUTORISÉ N’EST COUVERT PAR AUCUNE GARANTIE EXPRESSE OU IMPLICITE, Y COMPRIS QUELQUE GARANTIE
IMPLICITE DE QUALITÉ MARCHANDE OU D’ADAPTATION À UN USAGE PARTICULIER QUE CE SOIT. DE PLUS, CE PRODUIT EST STRICTEMENT VENDU « TEL QUEL » ET
« AVEC TOUS SES DÉFAUTS ÉVENTUELS ».
Pioneer DJ NE PEUT PAS ÊTRE TENU RESPONSABLE DES DOMMAGES INDIRECTS ET/OU ACCESSOIRES ÉVENTUELS.
LA PRÉSENTE GARANTIE NE S’APPLIQUE PAS SI LE PRODUIT A ÉTÉ SOUMIS À UNE PUISSANCE NOMINALE EXCÉDANT LA PUISSANCE INDIQUÉE DANS LES
SPÉCIFICATIONS FOURNIES.
LA PRÉSENTE GARANTIE NE COUVRE PAS LE BOÎTIER OU LES ÉLÉMENTS ESTHÉTIQUES, LES ANTENNES INSTALLÉES PAR L’ UTILISATEUR, LES DOMMAGES AUX DISQUES OU
AUX RUBANS OU DISQUES D’ENREGISTREMENT, LES DOMMAGES AU PRODUIT DÉCOULANT D’UNE RETOUCHE, D’UNE MODIFICATION NON AUTORISÉE PAR ÉCRIT PAR Pioneer
DJ, D’UN ACCIDENT, D’UN USAGE INAPPROPRIÉ OU D’UN USAGE ABUSIF, LES DOMMAGES PRODUITS PAR LA FOUDRE OU LA SURTENSION, LES DOMMAGES SUBSÉQUENTS
DÉCOULANT DE FUITES, LES DOMMAGES DÉCOULANT DE PILES DÉFECTUEUSES OU DE L’ UTILISATION DE PILES NON CONFORMES À CELLES QUI SONT SPÉCIFIÉES DANS LE
MANUEL DE L’UTILISATEUR.
LA PRÉSENTE GARANTIE NE COUVRE PAS LE COÛT DES PIÈCES OU DE LA MAIN-D’OEUVRE QUI SERAIENT AUTREMENT OFFERTES SANS FRAIS EN VERTU DE LA
PRÉSENTE GARANTIE, SI ELLES SONT OBTENUES AUPRÈS D’UNE SOURCE AUTRE QU’UNE SOCIÉTÉ DE SERVICE OU AUTRE AUTORISÉE OU DÉSIGNÉE PAR Pioneer DJ.
LA PRÉSENTE GARANTIE NE COUVRE PAS LES DÉFECTUOSITÉS OU LES DOMMAGES CAUSÉS PAR L’UTILISATION D’UNE MAIN-D’OEUVRE OU DE PIÈCES NON AUTORISÉES, ET/
OU D’UN ENTRETIEN INADÉQUAT.
LES NUMÉROS DE SÉRIE MODIFIÉS, OBLITÉRÉS OU ENLEVÉS ANNULENT LA PRÉSENTE GARANTIE DANS SA TOTALITÉ.
EXCLUSION DE TOUTE AUTRE GARANTIE
Pioneer DJ LIMITE SES OBLIGATIONS EN VERTU DE TOUTE GARANTIE IMPLICITE QUE CE SOIT, Y COMPRIS ENTRE AUTRES LES GARANTIES IMPLICITES DE QUALITÉ
MARCHANDE OU D’ADAPTATION À UN USAGE PARTICULIER, À UNE PÉRIODE N’EXCÉDANT PAS LA PÉRIODE DE GARANTIE. AUCUNE GARANTIE NE S’APPLIQUE APRÈS LA
PÉRIODE DE GARANTIE. CERTAINS ÉTATS NE PERMETTENT PAS LA LIMITATION DE LA DURÉE D’UNE GARANTIE IMPLICITE, ET CERTAINS NE PERMETTENT PAS L’EXCLUSION
OU LA LIMITATION DES DOMMAGES CONSÉCUTIFS OU INDIRECTS. LES LIMITATIONS ET EXCLUSIONS ÉTABLIES CI-DESSUS PEUVENT DONC NE PAS S’APPLIQUER À VOUS.
LA PRÉSENTE GARANTIE VOUS DONNE DES DROITS LÉGAUX SPÉCIFIQUES. VOUS POUVEZ JOUIR D’AUTRES DROITS, QUI PEUVENT VARIER D’UN ÉTAT À L’AUTRE.
SERVICE APRÈS-VENTE
PDJA a autorisé un certain nombre de sociétés de service après-vente agréées à travers les États-Unis et le Canada pour le cas où votre produit
aurait besoin d’être réparé. Pour profiter d’un tel service en vertu de la garantie, vous devez présenter votre ticket de caisse ou, si vous louez
le produit, votre contrat de location indiquant l’endroit et la date de la transaction par le premier propriétaire. Si vous expédiez le produit, vous
devez l’emballer soigneusement et l’envoyer à une société de service autorisée, en port prépayé et selon une méthode de transport incluant un
suivi et une assurance. Emballez le produit au moyen de matériaux de rembourrage appropriés pour éviter tout dommage pendant le transport.
L’emballage d’origine est idéal pour cela. Indiquez votre nom, votre adresse et un numéro de téléphone où nous pouvons vous joindre pendant les heures de bureau.
Pour toute réclamation et/ou question à l’intérieur des États-Unis ou du Canada, appelez le Service Consommateurs au 1-800-872-4159.
Pour toute question concernant la mise en service ou l’utilisation de votre produit,
ou pour trouver une société de service autorisée, appelez ou écrivez à :
CUSTOMER SUPPORT
PIONEER ELECTRONICS (USA) INC.
P.O. BOX 1720
LONG BEACH, CALIFORNIA 90801
1-800-872-4159
http://www.pioneerelectronics.com
RÉSOLUTION DES LITIGES
Si un litige se produit entre vous et Pioneer DJ après la réponse à une demande initiale faite au Service Consommateurs, vous pouvez avoir recours au Programme de résolution des
plaintes de Pioneer DJ pour résoudre le litige. Le Programme de résolution des plaintes vous est offert gratuitement. Vous devez avoir recours au Programme de résolution des plaintes
avant de vous prévaloir de vos droits ou de chercher réparation en vertu du Titre I de la loi Magnuson-Moss Warranty-Federal Trade Commission Improvement Act, 15 U.S.C. 2301 et seq.
Pour utiliser le Programme de résolution des plaintes, appelez le 1-800-872-4159 et expliquez au représentant du S ervice Consommateurs
le problème que vous rencontrez ainsi que les démarches que vous avez effectuées pour faire réparer le produit pendant la pério de
de garantie, puis communiquez-lui le nom du distributeur / détaillant autorisé auprès duquel vous a vez acheté le produit Pioneer DJ.
Une fois que votre plainte a été expliquée au représentant, un numéro de résolution vous sera communiqué. Pioneer DJ étudiera votre plainte et, dans un délai de quarante (40) jours
après la réception de votre plainte, (1) répondra à votre plainte par écrit pour vous aviser des démarches qui seront entreprises pour résoudre le conflit, et indiquera combien de temps
ces démarches prendront ; ou (2) répondra à votre plainte par écrit pour vous indiquer les raisons pour lesquelles aucune démarche ne sera entreprise.
NOTEZ ET CONSERVER LE LIEU ET LA DATE D’ACHAT POUR RÉFÉRENCE ULTÉRIEURE
N° de modèle : _______________________________________ N° de Série : ________________________________________________________________________
Date d’achat : ________________________________________ Nom du distributeur/détaillant ___________________________________________________________
PRENEZ SOIN DE CONSERVER CES INFORMATIONS ET VOTRE REÇU D’ACHAT EN LIEU SÛR POUR RÉFÉRENCE ULTÉRIEURE

9
Fr
Français

De
2
Vielen Dank, dass Sie sich für dieses Pioneer DJ-Produkt entschieden haben.
Bitte lesen Sie diese Bedienungsanleitung gründlich durch, um sich mit derBedienung des Geräts vertraut zu machen
.
Nachdem Sie die Bedienungsanleitung gelesen habe
n, legen Sie sie griffbereit zum Nachschlagen ab.
ACHTUNG
UM SICH NICHT DER GEF
AHR EINES ELEKTRISCHEN
SCHL
AGES AUSZUSETZEN, DÜRFEN SIE NICHT DEN
DECKEL (ODER DIE RÜCKSEITE) ENTFERNEN. IM
GERÄTEINNEREN BEFINDEN SICH KEINE VOM
BENUTZER REP
ARIERBAREN TEILE. ÜBERLASSEN
SIE REP
ARATUREN DEM QUALIFIZIERTEN
KU
NDENDIENST.
D3-4-2-1-1_B1_De
WARNUNG
Dieses Gerät ist nicht wasserdicht. Zur
Vermeidung der
Gefahr von Brand und Stromschlag keine Behälter mit
Flüssigkeiten (z.B. Blumenvasen und -töpfe) in die
Nähe des Gerätes bringen und dieses vor
Tropfwasser,
Spritzwasse
r, Regen und Nässe schützen.
D3-4-2-1-3_A1_De
WARNUNG
Keine Quellen offener Flammen (z.B. eine brennende
Ker
ze) auf dieses Gerät stellen.
D3-4-2-1-7a_A1_De
Betriebsumgebung
Betriebstemperatur und Betriebslu
ftfeuchtigkeit:
+5 °C bis +35 °C, 85 % rel.
Feuchte max.
(V
entilationsschlitze nicht blockiert)
Eine Aufstellung dieses Gerät an einem unzureichend
belü
fteten, sehr feuchten oder heißen Ort ist zu
vermeide
n, und das Gerät darf weder direkter
Sonneneinstrahlung noch starken K
unstlichtquellen
ausgesetzt werden
.
D3-4-2-1-7c*_A1_De
VORSICHTSHINWEIS ZUR BELÜFTUNG
Bei der Aufstellung dieses Gerätes muss für einen
ausreichenden
Freiraum gesorgt werden, um eine
einwandfreie Wärmeabfuhr zu gewährleisten
(mindestens 15 cm oberhalb des Gerätes, 15 cm hinter
dem Gerät und jeweils 15 cm an der Seite des Gerätes)
.
D3-4-2-1-7d*_A1_De
Dieses Gerät ist für den Heimgebrauch vorgesehen.
Falls bei Einsatz zu einem anderem Zweck (z.B.
Langzeitgebrauch zu gewerblichen Zwecken in einem
Restaurant oder Betrieb in einem Fahrzeug bzw.
Schiff) eine Funktionsstörung auftritt, die eine
Reparatur des Gerätes erforderlich macht, werden
die Reparaturkosten dem Kunden selbst dann in
Rechnung gestellt, wenn die Garantiefrist noch nicht
abgelaufen ist.
K041_A1_De
Mischen Sie dieses Produkt, wenn Sie es entsorgen wollen, nicht mit gewöhnlichen Haushaltsabfällen. Es gibt ein getrenntes
Sammelsystem für gebrauchte elektronische Produkte, über das die richtige Behandlung, Rückgewinnung und Wiederverwertung
gemäß der bestehenden Gesetzgebung gewährleistet wird.
Privathaushalte in den Mitgliedsstaaten der EU, in der Schweiz und in Norwegen können ihre gebrauchten elektronischen Produkte an
vorgesehenen Sammeleinrichtungen kostenfrei zurückgeben oder aber an einen Händler zurückgeben (wenn sie ein ähnliches neues Produkt
kaufen).
Bitte wenden Sie sich in den Ländern, die oben nicht aufgeführt sind, hinsichtlich der korrekten Verfahrensweise der Entsorgung an die örtliche
Kommunalverwaltung.
Auf diese Weise stellen Sie sicher, dass das zu entsorgende Produkt der notwendigen Behandlung, Rückgewinnung und Wiederverwertung
unterzogen wird, und so mögliche negative Einflüsse auf die Umwelt und die menschliche Gesundheit vermieden werden.
K058b_A1_De
VORSICHT MIT DEM NETZKABEL
Fassen Sie das Netzkabel immer am Stecker. Ziehen Sie
nicht am Kabel selbst, und fassen Sie das Netzkabel
niemals mit nassen Händen an, da dies einen
Kurzschluss oder elektrischen Schlag verursachen
kann. Stellen Sie nicht das Gerät, Möbelstücke o.ä. auf
das Netzkabel; sehen Sie auch zu, dass es nicht
eingeklemmt wird. Machen Sie niemals einen Knoten
in das Netzkabel, und binden Sie es nicht mit anderen
Kabeln. Das Netzkabel sollte so gelegt werden, dass
niemand darauf tritt. Ein beschädigtes Netzkabel kann
einen Brand oder elektrischen Schlag verursachen.
Prüfen Sie das Netzkabel von Zeit zu Zeit. Sollte es
beschädigt sein, wenden Sie sich an Ihre nächste
Kundendienststelle oder Ihren Händler, um es zu
ersetzen.
S002*_A1_De
Vorsichtshinweis für Modell DM-40
Diesen Lautsprecher ausschließlich an den
Verstärker im Lieferumfang dieser Anlage
anschließen. Der Anschluss an einen anderen
Verstärker kann Funktionsstörungen oder einen
Brand verursachen.
SGK006*_A1_De
Dieser Lautsprecher darf auf keinen Fall an einer
Wand oder der Decke montiert werden, da er
anderenfalls herunterfallen und Verletzungen
verursachen kann.
SGK007_A1_De
WARNUNG
Im Gerätegehäuse sind
Ventilationsschlitze und andere
Öffnungen vorgesehe
n, die dazu dienen, eine
Überhitzung des Gerätes zu verhindern und einen
zuverlässigen Betrieb zu gewährleisten
. Um
Brandgefahr auszuschließe
n, dürfen diese Öffnungen
auf keinen
Fall blockiert oder mit Gegenständen (z.B.
Zeitungen
, Tischdecken und Gardinen) abgedeckt
werde
n, und das Gerät darf beim Betrieb nicht auf
einem dicken
Teppich oder Bett aufgestellt sein.
D3-4-2-1-7b*_A1_De

De
3
Deutsch
Vor Gebrauch lesen (wichtig)
Vor der Inbetriebnahme
Merkmale
! Ein Bassreflexrohr an der Vorderseite und die Groove-Technologie erzeugen einen kraftvollen Basston.
! Ein konvexer Diffusor auf einem neu geformten Hornvorsatz verbessert die Richtcharakteristik von Hochfrequenztönen und die Klangdiffusion.
! Kraftvoller Basston und klarere Soundqualität trotz seiner platzsparenden, kompakten Größe.
Überprüfen des Zubehörs
! Netzkabel 1x
! Bedienungsanleitung (dieses Dokument)
! Audio-Wandlerkabel (3,5 mm-Stereo-Miniklinkenstecker zu RCA) x 1
! Lautsprecherkabel x 1
! Polster für die Unterseite 8x
Bezeichnung und Funktion der Teile
Frontplatte
1
2
3
4
5
6
7
8
1 3/4 Zoll-Weichkalottenhochtöner
2 POWER-Anzeige
Die Anzeigen leuchten entsprechend des Einschaltzustands. Die
Anzeige leuchtet im Standby-Betrieb nicht.
3 Diffusoren
Verbessern die Richtcharakteristik von Hochfrequenztönen und die
Klangdiffusion.
4 LEVEL-Regler
Zum Einstellen der Lautstärke.
5 4 Zoll-Glasfaser-Subwoofer
6 Bassreflexrohr
7 Öffnungen
Reguliert den Luftstrom im Bassreflexrohr zur gleichmäßigen
Abstrahlung tiefer Frequenzen.
8 Kopfhörerbuchse
Das ist die 3,5 mm-Stereo-Miniklinkenstecker-Ausgangsbuchse.
Durch den Anschluss von Kopfhörern wird die Ton der Lautsprecher
stumm geschaltet und der Ton wird nur über die Kopfhörer
ausgegeben.

De
4
Rückseite
2
4
5
1
3
1 INPUT 1-Buchsen (Stereo)
Bei diesen Chinchbuchsen (RCA) handelt es sich um unsymmetri-
sche Eingangsbuchsen.
2 INPUT 2-Buchsen (Stereo)
Bei dieser 3,5 mm-Stereo-Miniklinkenstecker-Buchse handelt es sich
um eine unsymmetrische Eingangsbuchse.
3 Buchse für den Lautsprecheranschluss
Verbinden Sie den rechten und linken Lautsprecher mit diesem
mitgelieferten Kabel.
Verbinden Sie diese Lautsprecher nur mit einem Verstärker dieses
Systems. Andernfalls kann es zu Beschädigungen oder Brand
kommen.
4 POWER-Schalter
Schalten Sie die Stromversorgung dieses Geräts ein und aus.
5 AC IN
Stecken Sie das Netzkabel in AC IN und dann in die Steckdose.
Schließen Sie das Netzkabel an, nachdem alle Anschlüsse zwischen
den Geräten vorgenommen wurden.
Verwenden Sie immer das mitgelieferte Netzkabel.
ACHTUNG
Der POWER-Schalter dieses Gerätes trennt das Gerät
nicht vollständig vom Stromnetz. Um das Gerät
vollständig vom Netz zu trennen, muss der
Netzstecker aus der Netzsteckdose gezogen werden.
Daher sollte das Gerät so aufgestellt werden, dass
stets ein unbehinderter Zugang zur Netzsteckdose
gewährleistet ist, damit der Netzstecker in einer
Notsituation sofort abgezogen werden kann. Um
Brandgefahr auszuschließen, sollte der Netzstecker
vor einem längeren Nichtgebrauch des Gerätes,
beispielsweise während des Urlaubs, grundsätzlich
von der Netzsteckdose getrennt werden.
D3-4-2-2-2a*_A1_De
ACHTUNG
Dieses Produkt verfügt über eine automatische Standby-Funktion.
Wenn beim Gebrauch für einen bestimmten Zeitraum (ca. 25 Minuten)
kein Ton ausgegeben wird, schaltet das Produkt automatisch die
POWER-Anzeige aus und wechselt in den Standby-Betrieb mit niedri-
gem Stromverbrauch.
Wenn ein Audiosignal im Standby-Betrieb empfangen wird, wird
automatisch der normale Betrieb fortgesetzt.
Die automatische Standby-Funktion kann nicht deaktiviert werden.
Installation und Anschlüsse
Installationsverfahren
Der Wiedergabeklang eines Lautsprechers wird durch die akustischen
Verhältnisse im Hörraum beeinflusst. Bitte berücksichtigen Sie vor
Beginn der Installation sorgfältig die Bedingungen am Aufstellungsort,
um eine optimale Hörumgebung zu kreieren.
! Stellen Sie die Lautsprecher auf Ohrenhöhe auf.
! Um einen natürlich wirkenden Stereoeffekt zu erzielen,sollten der
rechte und der linke Lautsprecher an einer symmetrischen Position
jeweils im gleichen Abstand von der Hörposition aufgestellt werden.
A página está carregando...
A página está carregando...
A página está carregando...
A página está carregando...
A página está carregando...
A página está carregando...
A página está carregando...
A página está carregando...
A página está carregando...
A página está carregando...
A página está carregando...
A página está carregando...
A página está carregando...
A página está carregando...
A página está carregando...
A página está carregando...
A página está carregando...
A página está carregando...
A página está carregando...
A página está carregando...
A página está carregando...
A página está carregando...
A página está carregando...
A página está carregando...
A página está carregando...
A página está carregando...
A página está carregando...
A página está carregando...
A página está carregando...
A página está carregando...
A página está carregando...
A página está carregando...
A página está carregando...
A página está carregando...
A página está carregando...
A página está carregando...
A página está carregando...
A página está carregando...
A página está carregando...
A página está carregando...
A página está carregando...
A página está carregando...
A página está carregando...
A página está carregando...
A página está carregando...
A página está carregando...
A página está carregando...
A página está carregando...
A página está carregando...
A página está carregando...
A página está carregando...
A página está carregando...
-
 1
1
-
 2
2
-
 3
3
-
 4
4
-
 5
5
-
 6
6
-
 7
7
-
 8
8
-
 9
9
-
 10
10
-
 11
11
-
 12
12
-
 13
13
-
 14
14
-
 15
15
-
 16
16
-
 17
17
-
 18
18
-
 19
19
-
 20
20
-
 21
21
-
 22
22
-
 23
23
-
 24
24
-
 25
25
-
 26
26
-
 27
27
-
 28
28
-
 29
29
-
 30
30
-
 31
31
-
 32
32
-
 33
33
-
 34
34
-
 35
35
-
 36
36
-
 37
37
-
 38
38
-
 39
39
-
 40
40
-
 41
41
-
 42
42
-
 43
43
-
 44
44
-
 45
45
-
 46
46
-
 47
47
-
 48
48
-
 49
49
-
 50
50
-
 51
51
-
 52
52
-
 53
53
-
 54
54
-
 55
55
-
 56
56
-
 57
57
-
 58
58
-
 59
59
-
 60
60
-
 61
61
-
 62
62
-
 63
63
-
 64
64
-
 65
65
-
 66
66
-
 67
67
-
 68
68
-
 69
69
-
 70
70
-
 71
71
-
 72
72


Pioneer DM-40-W Manual do usuário
- Categoria
- Equipamento musical suplementar
- Tipo
- Manual do usuário
em outras línguas
- español: Pioneer DM-40-W Manual de usuario
- français: Pioneer DM-40-W Manuel utilisateur
- italiano: Pioneer DM-40-W Manuale utente
- English: Pioneer DM-40-W User manual
- Nederlands: Pioneer DM-40-W Handleiding
- Deutsch: Pioneer DM-40-W Benutzerhandbuch
Artigos relacionados
-
Pioneer DJ dm-40bt-w Manual do usuário
-
Pioneer S-DJ50X Manual do usuário
-
Pioneer VM-80 Guia rápido
-
Pioneer VM-70 Guia rápido
-
-
Pioneer DJ RM-05 Manual do usuário
-
Pioneer DJ DDJ-400 Manual do proprietário
-
Pioneer DDJ-SB3 Manual do usuário
-
Pioneer DDJ-RZ Guia rápido
-
Pioneer s 71w Manual do usuário