
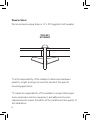
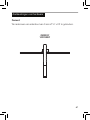
MOUNTING PLATE
PRO 4000 ATTACHMENT
INSTALL GUIDE

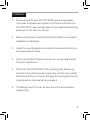
Please read all warnings, instructions and cautions carefully
before use to avoid personal injury, property damage or
damage to your Goal Zero product. Goal Zero reserves
the right to update this document without prior notice.
Please visit www.goalzero.com to find the latest product
information and the most recent version of the User Guide.
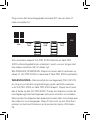
The mounting plate keeps your Yeti PRO and Tank PRO 4000
units secure and stationary whether you set them up at home
or take them on the road.
DISCLAIMER
For assistance with your device in the United States, visit our contact page
at www.goalzero.com/contact or call 1-888-794-6250. For assistance with
your device outside of the United States, contact the local distributor. If you
do not have contact information for the local distributor, contact us in the
United States and we will help connect you to the local representative.
Hardware Recommendations 3
Installation 5
Français 10
Deutsch 18
Español 26
Italiano 34
Portugués 42
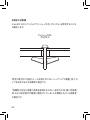
日本語 50
Suomalainen 58
Nederlands 66
Svenska 74

Hardware Recommendations 3
Installation 5
Français 10
Deutsch 18
Español 26
Italiano 34
Portugués 42
日本語 50
Suomalainen 58
Nederlands 66
Svenska 74
Table of Contents

2
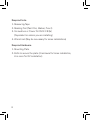
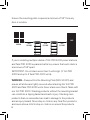
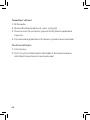
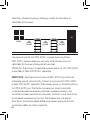
Required tools:
1: Measuring Tape
2: Marking Tool (Paint Pen, Marker, Pencil)
3: Screwdriver or Power Drill & Drill Bit(s)
(Dependent on where you are installing)
4: Wrench set (May be necessary for some installations)
Required Hardware:
1: Mounting Plate
2: Bolts to secure the plate (4 minimum for home installation,
8 or more for RV installation)

3
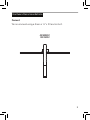
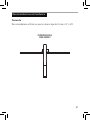
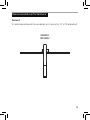
Hardware Recommendations
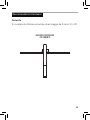
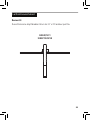
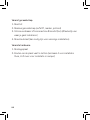
Cement
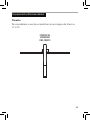
We recommend using a 6mm or ¼” x 20 anchor bolt.
ANCHOR BOLT
FOR CEMENT

4
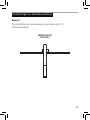
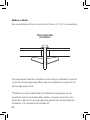
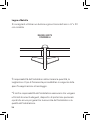
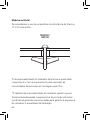
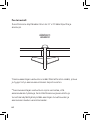
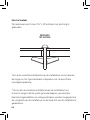
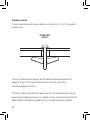
Wood or Metal
We recommend using a 6mm or ¼” x 20 toggle bolt with washer.
*It is the responsibility of the installer to determine hardware
quantity, length, and type to meet the needs of the specific
mounting application.
**It is also the responsibility of the installer to ensure that proper
tools, personal protective equipment, and safe practices are
implemented to ensure the safety of the installer and the quality of
the installation.
TOGGLE BOLT
WITH WASHER

5
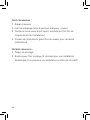
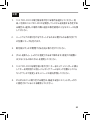
1. Choose a spot for your Yeti PRO 4000 and mounting plate.
If you plan to expand your system in the future with a second
Yeti PRO 4000, leave enough space for an additional mounting
plate next to the spot you choose.
2. Mark mounting hole locations that will be drilled out to support
installation of hardware.
3. Install the mounting plate in a direction that allows the latches
to be opened and closed.
4. Insert your bolts and tighten until secure. Use at least 4 bolts
for home installations.
5. Attach the Yeti PRO 4000 to the mounting plate and secure
with the locking latch by inserting the key into the lock cylinder
and turning the key clockwise, bringing the locking arm into the
locked position. See illustration on page 6.
6. If installing in an RV or van, be sure the unit is secure before
transporting.
Installation

6
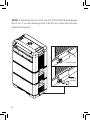
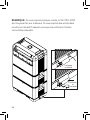
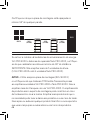
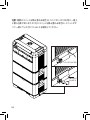
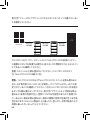
NOTE: If stacking multiple Units, the Yeti PRO 4000 should always
be on top. If you are stacking units in an RV, be certain the units are
all latched together.
1. Latch onto lip
2. Push in
and lock

7
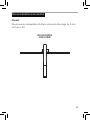
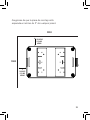
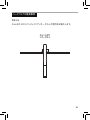
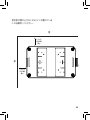
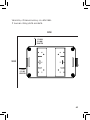
Ensure that the mounting plate is spaced
a minimum of 5” from any wall.
WALL
WALL
5 IN
123 MM
MINIMUM
5 IN
123 MM
MINIMUM

8
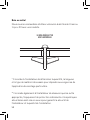
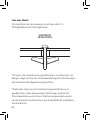
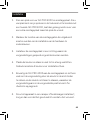
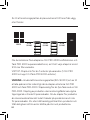
Ensure the mounting plate is spaced a minimum of 36” from any
door or window.
If you’re installing multiple stacks of Yeti PRO 4000 power stations
and Tank PRO 4000 expansion batteries, ensure that each stack is
a minimum of 36” apart.
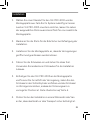
IMPORTANT: Do not stack more than 5 units high. (1 Yeti PRO
4000 and up to 4 Tank PRO 4000 units).
WARNING - Always utilize the Mounting Plate (SKU 96115) and
ensure all latches are tightly secured when stacking the Yeti PRO
4000 and Tank PRO 4000 units. Never stack more than 4 Tanks with
one Yeti PRO 4000. Stacking products without the mounting bracket
can constitute a tipping hazard and lead to injury. Stacking more
products than recommended can lead to damage to the products
and an injury hazard. Never step or climb on any Goal Zero products
and never allow a child to step or climb on or around the products.
36 IN
915 MM 36 IN
915 MM 36 IN
915 MM
WINDOW
DOOR

9
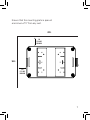
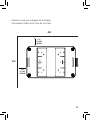
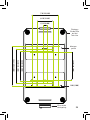
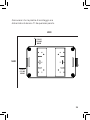
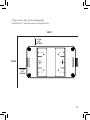
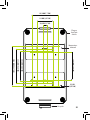
1.2 IN 30.4 MM
4.45 IN 113 MM
7.7 IN 195.6 MM
.26 IN 6.5 MM
10.45 IN 265.5 MM
9.26 IN 235.1 MM
8.06 IN 204.8 MM
7.49 IN 190.3 MM
Locking Latch
Mounting
Hardware
Place
Yeti/Tank
feet here

10
Outils nécessaires:
1: Ruban à mesurer
2: Outil de marquage (stylo à peinture, marqueur, crayon)
3: Tournevis ou perceuse électrique et mèche(s) (en fonction de
l’emplacement de l’installation)
4: Trousse de clés à douille (peut être nécessaire pour certaines
installations)
Matériel nécessaire:
1: Plaque de montage
2: Boulons pour fixer la plaque (4 minimum pour une installation
domestique, 8 ou plus pour une installation en véhicule récréatif)

11
Recommandations de matériel
Ciment
Nous vous recommandons d’utiliser un boulon d’ancrage de 6 mm
ou ¼ po x 20.
BOULON D’ANCRAGE
POUR LE CIMENT

12
Bois ou métal
Nous vous recommandons d’utiliser un boulon à ailettes de 6 mm ou
¼po x 20 avec une rondelle.
* Il incombe à l’installateur de déterminer la quantité, la longueur
et le type de matériel nécessaire pour répondre aux exigences de
l’application de montage particulière.
** Il incombe également à l’installateur de s’assurer que les outils
appropriés, l’équipement de protection individuelle et les pratiques
sécuritaires sont mis en œuvre pour garantir la sécurité de
l’installateur et la qualité de l’installation.
LE BOULON À AILETTES
AVEC LA RONDELLE

13
1. Choisissez un emplacement pour votre Yeti PRO4000 et la
plaque de montage. Si vous prévoyez d’étendre votre système
avec un deuxième Yeti PRO4000, laissez suffisamment
d’espace pour une plaque de montage supplémentaire à côté
de l’emplacement choisi.
2. Marquez les emplacements des trous de montage à percer
pour appuyer l’installation de la quincaillerie.
3. Installez la plaque de montage dans un sens permettant
d’ouvrir et de fermer les loquets.
4. Insérez vos boulons et serrez-les jusqu’à ce qu’ils soient bien
fixés. Utilisez au moins 4 boulons pour les installations à domicile.
5. Fixez la Yeti PRO4000 à la plaque de montage et sécurisez-la
avec le loquet de verrouillage en insérant la clé dans le cylindre
de verrouillage et en tournant la clé dans le sens des aiguilles
d’une montre, amenant le bras de verrouillage en position
verrouillée. Voir l’illustration à la page 6.
6. Si vous installez l’appareil dans un véhicule récréatif ou une
camionnette, assurez-vous qu’il est bien fixé avant de le
transporter.
Installation

14
REMARQUE: Si vous empilez plusieurs unités, la Yeti PRO4000
doit toujours être sur le dessus. Si vous empilez des unités dans
un véhicule récréatif, assurez-vous que les unités sont toutes
verrouillées ensemble.
1. le loquet
sur le bord
2. Enfoncer
et
verrouiller

15
Assurez-vous que la plaque de montage
est espacée d’au moins 5 po de tout mur.
MUR
MUR
5PO
123MM
MINIMUM
5PO
123MM
MINIMUM

16
Assurez-vous que la plaque de montage est espacée d’au moins 36"
de toute porte ou fenêtre.
Si vous installez plusieurs piles de puissance Yeti PRO4000 et des
piles d’extension Tank PRO4000, assurez-vous que chaque pile est
séparée d’au moins 36 po.
IMPORTANT: N’empilez pas plus de 5 unités. (1 Yeti PRO4000 et
jusqu’à 4 batteries Tank PRO4000).
AVERTISSEMENT - Utilisez toujours la plaque de montage
(UGS96115) et assurez-vous que tous les loquets sont bien fixés
lorsque vous empilez les unités Yeti PRO4000 et Tank PRO4000.
N’empilez jamais plus de 4 batteries Tank avec une Yeti PRO4000.
Empiler des produits sans le support de montage peut constituer
un risque de basculement et entraîner des blessures. Empiler
plus de produits que recommandé peut entraîner des blessures
ou endommager le produit. Ne marchez ou ne grimpez jamais sur
les produits Goal Zero et ne laissez jamais un enfant marcher ou
grimper sur ou autour des produits.
36PO
915 MM 36PO
915 MM 36PO
915 MM
MATÉRIEL
PORTE

17
1,2 PO 30,4 MM
4,45 PO 113 MM
7,7 PO 195.6 MM
0,26PO 6,5MM
10,45 PO 265,5 MM
9,26 PO 235,1 MM
8,06 PO 204,8 MM
7,49 PO 190,3 MM
Loquet de verrouillage
de montage
pour fenêtres
Placer les
pieds de la
Yeti/Tank
ici

18
Erforderliches Werkzeug:
1: Maßband
2: Markierwerkzeug (Lackstift, Marker, Bleistift)
3: Schraubendreher oder Bohrmaschine & Bohreinsätze
(je nach Installationsort)
4: Steckschlüssel-Satz (kann für einige Installationen erforderlich sein)
Erforderliche Geräteausstattung:
1: Montageplatte
2: Schrauben zur Befestigung der Platte (mindestens 4 für die
Installation zuhause, 8 oder mehr für die Installation im Wohnmobil)
A página está carregando...
A página está carregando...
A página está carregando...
A página está carregando...
A página está carregando...
A página está carregando...
A página está carregando...
A página está carregando...
A página está carregando...
A página está carregando...
A página está carregando...
A página está carregando...
A página está carregando...
A página está carregando...
A página está carregando...
A página está carregando...
A página está carregando...
A página está carregando...
A página está carregando...
A página está carregando...
A página está carregando...
A página está carregando...
A página está carregando...
A página está carregando...
A página está carregando...
A página está carregando...
A página está carregando...
A página está carregando...
A página está carregando...
A página está carregando...
A página está carregando...
A página está carregando...
A página está carregando...
A página está carregando...
A página está carregando...
A página está carregando...
A página está carregando...
A página está carregando...
A página está carregando...
A página está carregando...
A página está carregando...
A página está carregando...
A página está carregando...
A página está carregando...
A página está carregando...
A página está carregando...
A página está carregando...
A página está carregando...
A página está carregando...
A página está carregando...
A página está carregando...
A página está carregando...
A página está carregando...
A página está carregando...
A página está carregando...
A página está carregando...
A página está carregando...
A página está carregando...
A página está carregando...
A página está carregando...
A página está carregando...
A página está carregando...
A página está carregando...
A página está carregando...
-
 1
1
-
 2
2
-
 3
3
-
 4
4
-
 5
5
-
 6
6
-
 7
7
-
 8
8
-
 9
9
-
 10
10
-
 11
11
-
 12
12
-
 13
13
-
 14
14
-
 15
15
-
 16
16
-
 17
17
-
 18
18
-
 19
19
-
 20
20
-
 21
21
-
 22
22
-
 23
23
-
 24
24
-
 25
25
-
 26
26
-
 27
27
-
 28
28
-
 29
29
-
 30
30
-
 31
31
-
 32
32
-
 33
33
-
 34
34
-
 35
35
-
 36
36
-
 37
37
-
 38
38
-
 39
39
-
 40
40
-
 41
41
-
 42
42
-
 43
43
-
 44
44
-
 45
45
-
 46
46
-
 47
47
-
 48
48
-
 49
49
-
 50
50
-
 51
51
-
 52
52
-
 53
53
-
 54
54
-
 55
55
-
 56
56
-
 57
57
-
 58
58
-
 59
59
-
 60
60
-
 61
61
-
 62
62
-
 63
63
-
 64
64
-
 65
65
-
 66
66
-
 67
67
-
 68
68
-
 69
69
-
 70
70
-
 71
71
-
 72
72
-
 73
73
-
 74
74
-
 75
75
-
 76
76
-
 77
77
-
 78
78
-
 79
79
-
 80
80
-
 81
81
-
 82
82
-
 83
83
-
 84
84


em outras línguas
- español: Goal Zero Pro 4000 Guía de instalación
- français: Goal Zero Pro 4000 Guide d'installation
- italiano: Goal Zero Pro 4000 Guida d'installazione
- Nederlands: Goal Zero Pro 4000 Installatie gids
- eesti: Goal Zero Pro 4000 paigaldusjuhend
- svenska: Goal Zero Pro 4000 Installationsguide
- 日本語: Goal Zero Pro 4000 インストールガイド