Küppersbusch W6810.0W Manual do usuário
- Categoria
- Máquinas de lavar roupas
- Tipo
- Manual do usuário

W6810.0W

CONTENTS
1
SAFETY INSTRUCTIONS
Safety Instructions ..................................................
INSTALLATION
Product Description ................................................
Installation ...........................................................
OPERATION
Quick Start .............................................................
Before Each Washing ..............................................
Detergent Dispenser ...............................................
Control Panel .........................................................
Programmes............................................................
Option....................................................................
MAINTENANCE
Cleaning and Care .................................................
Trouble Shooting ....................................................
Technical Specifications .........................................
Product Fiche ........................................................
2
9
10
13
15
16
18
19
23
27
30
31
32

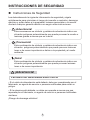
Please read the following safety information thoroughly and follow it
strictly to minimize the risk of fire or explosion, electric shock and to
prevent property damage, personal injury or loss of life. Failing to follow
these instructions shall void any warranty.
its service agent or similarly qualified persons in order to avoid a hazard.
•If the machine is damaged, it must not be operated unless repaired by
the manufacturer, its service agent or similarly qualified persons.
Risk of electric shock!
•If the supply cord is damaged, it must be replaced by the manufacturer,
ELECTRIC SHOCK HAZARD
SAFETY INSTRUCTIONS
Safety Instructions
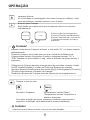
a potentially dangerous situation which may result in
death or serious injuries unless it’s avoided.
This combination of symbol and signal word indicates
Warning!
!
a potentially dangerous situation which may result in
slight or minor injuries.
This combination of symbol and signal word indicates
Note!
a potentially dangerous situation which may result in
slight or minor injuries or damage to property and the
environment.
This combination of symbol and signal word indicates
Caution!
Warning!
!
2

SAFETY INSTRUCTIONS
•The appliance can be used by children aged from 8 years and above
and persons with reduced physical, sensory or mental capabilities or
lack of experience and knowledge if they have been given
supervision or instruction concerning use of the appliance in a safe
way and understand the hazards involved. Children shall not play
with the appliance. Cleaning and user maintenance shall not be
made by children without supervision.
•Children should be supervised that they do not play with the
appliance.
•Children 3 years and under shall be kept away from the appliance
or continuously supervised.
•Animals and children may climb into the machine. Check the
machine before every operation.
•Do not climb or sit on the appliance.
INSTALLATION LOCATION AND SURROUNDING
•All washing and additional substances are to be kept in a safe place
out of the reach of children.
•Do not install the machine on a carpet floor. The obstruction of the
openings by a carpet can damage the machine.
•Keep the appliance clear from heating sources and direct sunlight
to avoid plastic and rubber parts to corrode.
•Do not use the appliance in humid environments or rooms
containing explosive or caustic gas. In case of water leakage or
water splashes let the appliance dry in the open air.
•The appliance must not be installed behind a lockable door, a
sliding door or a door with a hinge on the opposite side to that of the
washing machine.
3

SAFETY INSTRUCTIONS
•Do not operate the machine in rooms with a temperature of below
5°C. This can cause damages to parts of it. If it is unavoidable, make
sure to drain the water completely from the appliance after every
use (see „Maintenance - Cleaning of drain pump filter“) to avoid
damages caused by frost.
•Never use flammable sprays or substances in the immediate
proximity of the appliance.
INSTALLATION
•Remove all packaging material and transport bolts before using the
appliance. Otherwise, serious damage may result.
•This appliance is equipped with a single inlet valve and can be
connected to the cold water supply only.
•Mains plug must be accessible after installation.
•Before washing clothes for the first time, the product shall be
operated once throughout all the procedures without any clothes
inside.
•Before using the washing machine, the product shall be calibrated.
•Do not put any excessively heavy objects on the appliance, like
water containers or heating devices.
•The new hose-sets supplied with the appliance are to be used and
that old hose-sets should not be reused.
•Max. Inlet water pressure 1 MPa. Min. inlet water pressure 0.05
MPa.
ELECTRICAL CONNECTION
•Make sure the supply cable is not trapped by the machine, it can get
damaged.
•Connect the product to a grounded outlet protected by a fuse
complying with the values in the “ Technical specifications“ table.
The grounding installation has to be made by a qualified electrician.
Ensure that the machine is installed in accordance with the local
regulations.
4

SAFETY INSTRUCTIONS
•Water and electrical connections must be carried out by a qualified
technician in accordance with the manufacturer‘s instructions and
local safety regulations.
•Don´t use multiple plugs or extension cords.
•The appliance must not have an external switching device such as a timer or
connected to a circuit that is regularly switched on and off.
•Do not pull the plug out of the mains outlet if there is flammable gas around.
•Never pull out power plug with wet hands.
•Always pull at the plug, not at the cable.
•Always unplug the appliance if it is not being used.
Warning!
!
WATER CONNECTIONS
•Check the connections of the water inlet tubes, the water tap and
the outlet hose for possible problems due to changes of water
pressure. If the connections loosen or leak close the water tap and
get it repaired. Do not use the appliance before the pipes and hoses
are installed properly by qualified persons.
•Glass door may become very hot during the operation. Keep
children and pets far away from the machine while it is operating.
•The water inlet and outlet hoses have to be safely installed and
remain undamaged. Otherwise, water leakage can occur.
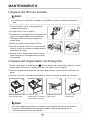
•Do not remove the drain pump filter while there is still water in the
appliance. Big quantities of water can leak out, and there is a risk of
scalding due to hot water.
5

SAFETY INSTRUCTIONS
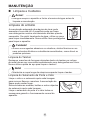
OPERATION AND MAINTENANCE
•Never use any flammable, explosive or toxic solvents. Do not use
gasoline and alcohol etc. as detergents. Only select detergents that
are suitable for machine washing.
•Make sure that all pockets are emptied. Sharp and rigid items such
as coins, brooches, nails, screws, stones etc. may cause serious
damages to this machine.
•Remove all objects from pockets such as lighters and matches
before use the appliance.
•Thoroughly rinse items that have been washed by hand.
•Items that have been soiled with substances such as cooking oil,
acetone, alcohol, petrol, kerosene, spot removers, turpentine, wax
and wax removers should be washed in hot with an extra amount of
detergent before being dried in the appliance.
•Items containing foam rubber (latex foam), shower caps, water
proof textiles, rubber backed articles and clothes or pillows fitted
with foam rubber pads should not be dried in the machine
•Fabric softeners or similar products should be used as
recommended in their instructions.
•Never try to open the door forcefully. The door will unlock shortly
after the end of a cycle.
•Please do not close the door with excessive force. If it is found
difficult to close the door, please check if the clothes are properly
inserted and distributed.
6

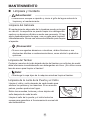
SAFETY INSTRUCTIONS
•Always unplug the appliance and close the water tap before
cleaning and maintenance and after each use.
•Never pour water over the appliance for cleaning purpose. Risk of
electric shock!
•Repairs shall only be carried out by the manufacturer, its service
agent or similarly qualified persons in order to avoid a hazard. The
producer will not be responsible for damages caused by the
intervention of not authorized persons.
TRANSPORT
•Before Transport:
-Bolts shall be reinstalled to the machine by a specialized person
-Accumulated water shall be drained out of the machine
•This appliance is heavy. Transport with care. Never hold any
protruding part of the machine when lifting. The machine door
cannot be used as a handle.
INTENDED USE
The product is intended only for home use and for textiles in
household amounts suitable for machine washing and drying. This
appliance is for indoor use only and not intended for built in use.
Only use according to these instructions. The appliance is not
intended for commercial use.
Any other use is considered as improper use. The producer is not
responsible for any damage or injuries that may result of it.
•This appliance is intended to be used in household and similar
applications such as:
-Staff kitchen areas in shops, offices and other working environments;
-Farm houses;
-By clients in hotels, motels and other residential type environments;
-Bed and breakfast type environments;
-Areas for communal use in blocks of flats or in launderettes.
7

SAFETY INSTRUCTIONS
This marking indicates that this product should not be
disposed with other household wastes throughout the
EU.To prevent possible harm to the environment or
human health from uncontrolled waste disposal,recycle
it responsibly to promote the sustainable reuse of
material resources.To return your used device, please use
the collection systems or contact the retailer where the
product was purchased. They return and can take this
product for environmental safe recycling.
Packaging/Old appliance
8

INSTALLATION
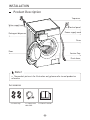
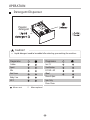
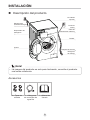
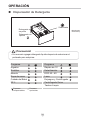
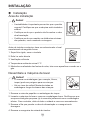
Accessories
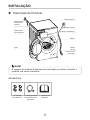
Product Description
4 x Cover caps 1 x Supply hose
cold water
• The product picture is for illustration only, please refer to real product as
reference.
Note!
Drum
Power supply cord
Control panel
Detergent dispenser
Service flap
Door
Water supply hose
Top cover
Drain hose
1 x Owner’s manual
9

INSTALLATION
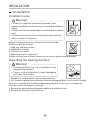
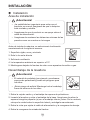
Installation
Before installing the machine, the location characterized
as follows shall be selected:
1.Rigid, dry, and level surface
2.Avoid direct sunlight
3.Sufficient ventilation
4.Room temperature is above 0°C
5.Keep far away from the heat sources such as coal or gas burning appliances.
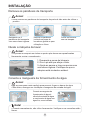
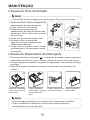
Unpacking the washing machine
1. Remove the cardboard box and styrofoam packing.
2. Lift the washing machine and remove the base packaging.Make sure the small triangle
foam (a) is removed with the bottom packaging together. If not, lay the unit down on
the side surface and remove it manually.
4. Remove the inlet hose from the drum.
3. Remove the tape securing the power supply cord and drain hose.
• Stability is important to prevent the product from
wandering! Make sure the machine is standing leveled and
stable.
• Make sure that the product does not stand onto the power
cord.
• Make sure to maintain the minimum distances from the
walls as shown in the picture
Warning!
!
• Packaging material (e.g. Films, Styrofoam) can be
dangerous for children.
• There is a risk of suffocation ! Keep all packaging
well away from children.
Warning!
!
w
w
W> 20mm
Installation area
a
10

INSTALLATION
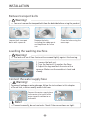
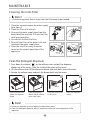
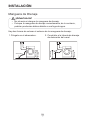
Remove transport bolts
• You must remove the transport bolts from the backside before using the product.
Warning!
!
Loosen the 4 transport
bolts with a spanner.
Remove the bolts
including the rubber parts
and keep them for future
use.
Close the holes using the
cover caps.
Levelling the washing machine
• The lock nuts on all four feet must be screwed tightly against the housing.
Warning!
!
1. Loosen the lock nut.
2. Turn the foot until it reaches the floor.
3. Adjust the legs and lock the nuts with a
spanner. Make sure the machine is level and
steady.
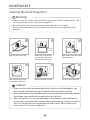
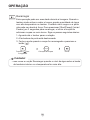
Connect the water supply hose
To prevent leakage or water damage, follow the instructions in this chapter
• Do not kink, crush or modify water inlet hose.
Warning!
!
Connect the water supply hose
to the water inlet valve and a
water tap with cold water as
indicated.
• Connect manually, do not use tools. Check if the connections are tight.
Note!
11

INSTALLATION
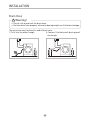
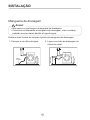
Drain Hose
There are two ways to place the end of drain hose:
1.Put it into the water trough. 2.Connect it to the branch drain pipe of
the trough.
•
• Position drain hose properly ,otherwise damage might result of water leakage.
Do not kink or protract the drain hose.
Warning!
!Warning!
!
12

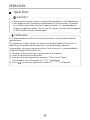
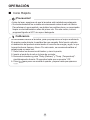
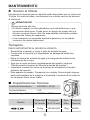
Quick Start
OPERATION
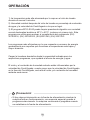
• Before washing, please make sure the washing machine is installed properly.
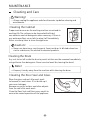
• Your appliance was thoroughly checked before it left the factory. To remove
any residual water and to neutralize potential odors, it’s recommended to
clean your appliance before first use. For this reason, start the Cotton program
at 90°C without laundry and detergent.
Caution!
It’s recommended to calibrate the washing machine, so that provide the best
performance.
The appliance is able to detect the amount of laundry loaded. This function is
optimizing the product performance by minimizing energy and water
consumption, saving you money and time. For this reason it’s recommended to
calibrate the appliance for best use.
1- Remove all accessories from the drum and close the door;
2- Insert the mains plug to the socket;
3- Switch on the washing machine and press “Delay” and “Temp.”
simultaneously for 10 seconds until “t19” is displayed;
4- Press [ ] to start the appliance and wait till “****” is displayed.
Calibration
13

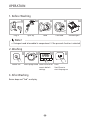
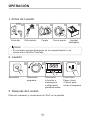
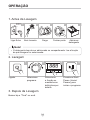
2. Washing
Select programme
Select function or
remain default
settings
Press
Start/Pause to
start the program
2 3 4
Buzzer beep and “End” on display.
3. After Washing
1. Before Washing
Open tap
Load
Close door
Plug in
Add detergent
• Detergent need to be added in compartment I if the pre-wash function is selected.
1 2 3 4 5
Note!
ear th
terminal
OPERATION
Power On
1
14

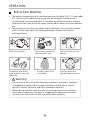
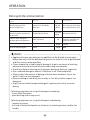
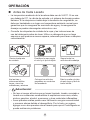
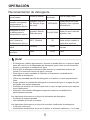
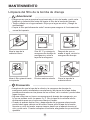
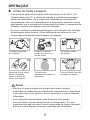
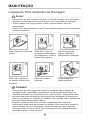
• Do not wash or dry articles that have been cleaned in, washed in, soaked in,
or dabbed with combustible or explosive substances like wax, oil, paint,
gasoline, alcohol, kerosene, and other flammable materials.
• Washing single clothes items may easily create big eccentricity and cause
alarm due to unbalance. Therefore it is suggested to add one or two more
laundry items to the wash so that spin can be done smoothly.
• The ambient temperature of the washing machine should be 5-40°C. If used under
0°C, the inlet valve and draining system may be damaged. If the machine is
installed under freezing conditions, it should be transferred to normal ambient
temperature to ensure the water supply hose and drain hose can unfreeze before
use.
• Please check your laundry care labels and the detergent use instructions before
wash. Use non-foaming or less-foaming detergent suitable for machine
washing properly.
Tie together long textile
strips and belts, close zips
and button
Take all items out of the
pockets
Put small items into a
laundry bag
Check the care label
Before Each Washing
Turn easy-pilling and
long-pile fabric inside out
Sort laundry according to
color and textile type
Warning!
!
OPERATION
1 2 3
4 5 6
15

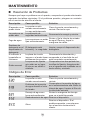
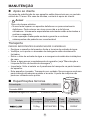
Detergent Dispenser
OPERATION
16
( )
Powder
detergent
Caution!
• Liquid detergent need to be added after selecting pre-washing for machines
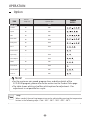
Programme
Cotton
Sport
Mix
Bed Linen
Baby Care
ECO 40 - 60
Means must ○ Means optional
Programme
Wool
Spin Only
20℃
Fast 15´
Sterilization
Rinse & Spin
Drum Clean

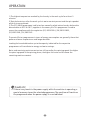
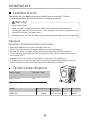
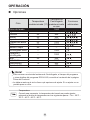
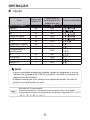
Detergent Recommendation
OPERATION
Agglomerating or ropy detergent or additive can be diluted in some water
before pouring it into the detergent dispenser, to avoid its inlet to get blocked
and thus cause a water overflow.
• Please choose the suitable type of detergent to get a maximum of washing
performance and a minimum of water and energy consumption
• To achieve the best cleaning result a proper detergent dosing is important.
• Use a reduced detergent amount if the drum is not filled completely.
• Always adjust the amount of detergent to the water hardness, if your tap
water is soft, use less detergent.
• Dose according to how dirty your laundry is, less dirty clothes require less
detergent.
• Highly concentrated (compact detergent) requires particularly accurate
dosing.
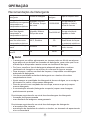
Following symptoms are a sign of detergent overdosing:
- heavy foam formation
- poor washing and rinsing result
Following symptoms are a sign of detergent underdosing:
- laundry turns grey
- built-up of limescale deposits on the drum, the heating element and/or the
laundry
•
Note!
Heavy-duty detergent with
bleaching agents and
optical brighteners
Colour detergent without
bleaching agent and optical
brighteners
Color or mild detergent
without optical brighteners
Mild washing detergent
Special wool detergent
Cotton,ECO 40-60,Mix,
BedLinen
Cotton,Mix,BedLinen
20℃,Synthetic
Sport
Wool
20/30
40/60
/
20 30/
20 30/
White laundry made from
boil-proof cotton or linen
Coloured laundry made
from cotton or linen
Coloured laundry made
from easy care fibres or
synthetic materials
Delicate textiles, silk,
viscose
Wool
Cold/20/
30/40
20
17
Recommended washing
detergent
Wash cycles
Washing
temp.
Type of laundry and textile

OPERATION
18
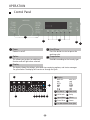
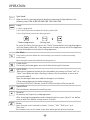
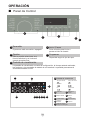
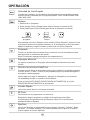
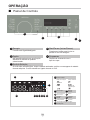
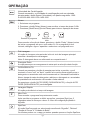
Control Panel
Power
Product is on/off.
Start/Pause
Press the button to start or pause the
washing cycle.
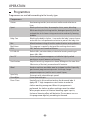
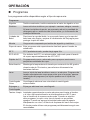
Programmes
Available according to the laundry type.
Option
This allows you to select an additional
function and will light when selected.
1
1
3
1
2
4
Display
The display shows the settings, estimated time remaining, options, and status messages
for your washer. The display will remain on through the cycle.
5
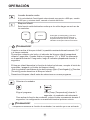
Pre Wash
B
Child Lock
D
Display
A
Wash Time Delay Time
Speed Error
End Temp.
A
JC
Door Lock
C
Delay
E
H
Speed Wash
F
Silence
G
Extra Rinse
H
Steam
I
Pre Wash-Wash-Rinse-Spin
J
BD E F G
I
3
2
1
1
4
5

OPERATIONS
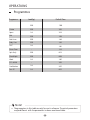
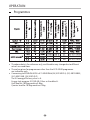
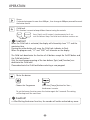
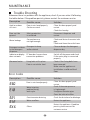
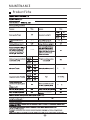
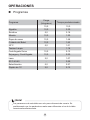
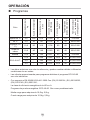
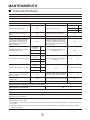
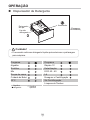
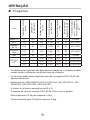
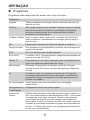
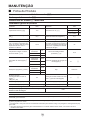
maybe different with the parameters in above mentioned table.
• The parameters in this table are only for user's reference. The actual parameters
Note!
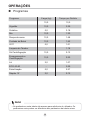
Programmes
Programme
Load(kg) Default Time
10.0
10.0
5.0
2.0
10.0
2.0
10.0
–
10.0
Cotton
Sport
Mix
Bed Linen
Baby Care
20℃
Drum Clean
Spin Only
Rinse&Spin
Wool
ECO 40-60
Sterilization
Fast 15´
10.0
10.0
3:39
3:18
1:20
1:48
1:42
1:01
1:18
0:12
0:20
1:07
3:59
2:27
0:15
10.0
19
5.0
5.0
–
A página está carregando...
A página está carregando...
A página está carregando...
A página está carregando...
A página está carregando...
A página está carregando...
A página está carregando...
A página está carregando...
A página está carregando...
A página está carregando...
A página está carregando...
A página está carregando...
A página está carregando...
A página está carregando...
A página está carregando...
A página está carregando...
A página está carregando...
A página está carregando...
A página está carregando...
A página está carregando...
A página está carregando...
A página está carregando...
A página está carregando...
A página está carregando...
A página está carregando...
A página está carregando...
A página está carregando...
A página está carregando...
A página está carregando...
A página está carregando...
A página está carregando...
A página está carregando...
A página está carregando...
A página está carregando...
A página está carregando...
A página está carregando...
A página está carregando...
A página está carregando...
A página está carregando...
A página está carregando...
A página está carregando...
A página está carregando...
A página está carregando...
A página está carregando...
A página está carregando...
A página está carregando...
A página está carregando...
A página está carregando...
A página está carregando...
A página está carregando...
A página está carregando...
A página está carregando...
A página está carregando...
A página está carregando...
A página está carregando...
A página está carregando...
A página está carregando...
A página está carregando...
A página está carregando...
A página está carregando...
A página está carregando...
A página está carregando...
A página está carregando...
A página está carregando...
A página está carregando...
A página está carregando...
A página está carregando...
A página está carregando...
A página está carregando...
A página está carregando...
A página está carregando...
A página está carregando...
A página está carregando...
A página está carregando...
A página está carregando...
A página está carregando...
A página está carregando...
A página está carregando...
A página está carregando...
A página está carregando...
A página está carregando...
-
 1
1
-
 2
2
-
 3
3
-
 4
4
-
 5
5
-
 6
6
-
 7
7
-
 8
8
-
 9
9
-
 10
10
-
 11
11
-
 12
12
-
 13
13
-
 14
14
-
 15
15
-
 16
16
-
 17
17
-
 18
18
-
 19
19
-
 20
20
-
 21
21
-
 22
22
-
 23
23
-
 24
24
-
 25
25
-
 26
26
-
 27
27
-
 28
28
-
 29
29
-
 30
30
-
 31
31
-
 32
32
-
 33
33
-
 34
34
-
 35
35
-
 36
36
-
 37
37
-
 38
38
-
 39
39
-
 40
40
-
 41
41
-
 42
42
-
 43
43
-
 44
44
-
 45
45
-
 46
46
-
 47
47
-
 48
48
-
 49
49
-
 50
50
-
 51
51
-
 52
52
-
 53
53
-
 54
54
-
 55
55
-
 56
56
-
 57
57
-
 58
58
-
 59
59
-
 60
60
-
 61
61
-
 62
62
-
 63
63
-
 64
64
-
 65
65
-
 66
66
-
 67
67
-
 68
68
-
 69
69
-
 70
70
-
 71
71
-
 72
72
-
 73
73
-
 74
74
-
 75
75
-
 76
76
-
 77
77
-
 78
78
-
 79
79
-
 80
80
-
 81
81
-
 82
82
-
 83
83
-
 84
84
-
 85
85
-
 86
86
-
 87
87
-
 88
88
-
 89
89
-
 90
90
-
 91
91
-
 92
92
-
 93
93
-
 94
94
-
 95
95
-
 96
96
-
 97
97
-
 98
98
-
 99
99
-
 100
100
-
 101
101


Küppersbusch W6810.0W Manual do usuário
- Categoria
- Máquinas de lavar roupas
- Tipo
- Manual do usuário
em outras línguas
- español: Küppersbusch W6810.0W Manual de usuario
- English: Küppersbusch W6810.0W User manual
Outros documentos
-
Infiniton WM-D89 Manual do proprietário
-
EAS ELECTRIC EMWI82401 Manual do usuário
-
-
Becken BWD4348 Maq de Lavar e Secar Roupa Manual do proprietário
-
-
-
-
-
LG FH4U1JBH6N Manual do usuário
-
LG FH695BDH2N Manual do usuário