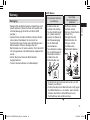
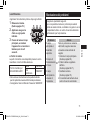
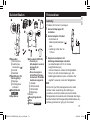
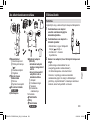
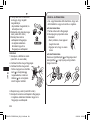
Panasonic ERGD51 Instruções de operação
- Categoria
- Barbeadores masculinos
- Tipo
- Instruções de operação
Este manual também é adequado para

Operating Instructions
(Household use)
AC/Rechargeable Beard Trimmer
Model No.
ER‑GD61/ER‑GD51
PB016970 - ER-GD6151�����_(00COVER)_12-04-18.indd 1 2018/12/4 13:27:14

2
English 3
Deutsch 19
Français 39
Italiano 57
Nederlands 75
Español 93
Dansk 111
Português 129
Norsk 147
Svenska 163
Suomi 181
Polski 197
Česky 215
Slovensky 233
Magyar 251
Română 269
Türkçe 287
PB016970 - ER-GD6151�����_(00COVER)_12-04-18.indd 2 2018/12/4 13:27:14

3
English
Operating Instructions
(Household use) AC/Rechargeable Beard Trimmer
Model No. ER‑GD61/ER‑GD51
Thank you for purchasing this Panasonic product.
Before operating this unit, please read these instructions completely and save them for future use.
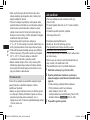
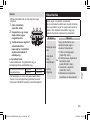
Safety precautions ............... 6
Important information .......................10
Parts identication ............................10
Preparation.........................................11
How to use .........................................12
Maintenance ....................................... 14
Troubleshooting ................................16
Blade life.............................................17
Battery life ..........................................17
Removing the built-in
rechargeable battery .........................17
Specications ....................................18
Contents
PB016970 - ER-GD6151�����_(01GB)_12-04-18.indd 3 2018/12/4 9:33:29

4
English
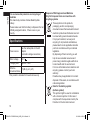
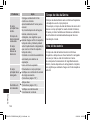
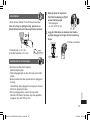
Warning
•This appliance can be used by children aged from 8
years and above and persons with reduced physical,
sensory or mental capabilities or lack of experience and
knowledge if they have been given supervision or
instruction concerning use of the appliance in a safe way
and understand the hazards involved. Children shall not
play with the appliance. Cleaning and user maintenance
shall not be made by children without supervision.
•The supply cord cannot be replaced. If the cord is
damaged, the AC adaptor should be scrapped.
PB016970 - ER-GD6151�����_(01GB)_12-04-18.indd 4 2018/12/4 9:33:29

5
English
•The following symbol means suitable for cleaning under
an open water tap.
•Do not clean with water when the AC adaptor is
attached.
•Do not use anything other than the supplied AC adaptor
for any purpose.
Also, do not use any other product with the supplied AC
adaptor. (See page 10.)
•Thefollowingsymbolindicatesthataspecicdetachable
power supply unit is required for connecting the electrical
appliance to the supply mains. The type reference of
power supply unit is marked near the symbol.
PB016970 - ER-GD6151�����_(01GB)_12-04-18.indd 5 2018/12/4 9:33:29

6
English
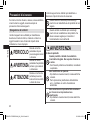
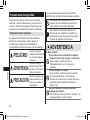
Safety precautions
Toreducetheriskofinjury,lossoflife,electricshock,re,
and damage to property, always observe the following
safety precautions.
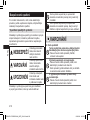
Explanation of symbols
The following symbols are used to classify and
describe the level of hazard, injury, and property
damage caused when the denotation is disregarded
and improper use is performed.
DANGER
Denotes a potential
hazard that will result in
serious injury or death.
WARNING
Denotes a potential
hazard that could
result in serious injury
or death.
CAUTION
Denotes a hazard that
could result in minor
injury or property
damage.
The following symbols are used to classify and
describe the type of instructions to be observed.
Thissymbolisusedtoalertuserstoaspecic
operating procedure that must not be performed.
Thissymbolisusedtoalertuserstoaspecic
operating procedure that must be followed in
order to operate the unit safely.
WARNING
►This product
This product has a built-in rechargeable
battery. Do not throw into ame or heat.
‑ Doingsomaycauseuidleak,overheating,or
explosion.
Do not modify or repair.
‑ Doingsomaycausere,electricshock,or
injury.
Contact an authorized service centre for repair
(battery change, etc.).
Never disassemble except when disposing of
the product.
‑
Doingsomaycausere,electricshock,orinjury.
►In case of an abnormality or malfunction
Immediately stop using and remove the adaptor
if there is an abnormality or malfunction.
‑ Failuretodosomaycausere,electricshock,
or injury.
<Abnormality or malfunction cases>
•The main body or AC adaptor is deformed or
abnormally hot.
•The main body or AC adaptor smells of
burning.
•There is abnormal sound during use or
charging of the main body or AC adaptor.
‑ Immediately request inspection or repair at an
authorized service centre.
PB016970 - ER-GD6151�����_(01GB)_12-04-18.indd 6 2018/12/4 9:33:29

7
English
WARNING
►Power supply
Do not connect or disconnect the adaptor to a
household outlet with a wet hand.
‑ Doing so may cause electric shock or injury.
Do not immerse the AC adaptor in water or
wash with water.
Do not place the AC adaptor over or near
water lled sink or bathtub.
Never use the appliance if the AC adaptor is
damaged or if the power plug ts loosely in a
household outlet.
Do not damage or modify, or forcefully bend,
pull, or twist the cord.
Also, do not place anything heavy on or pinch
the cord.
‑ Doingsomaycauseelectricshockorredueto
a short circuit.
Do not use in a way exceeding the rating of
the household outlet or the wiring.
‑ Exceeding the rating by connecting too many
plugstoonehouseholdoutletmaycausere
due to overheating.
Always ensure the appliance is operated on
an electric power source matched to the rated
voltage indicated on the AC adaptor.
Fully insert the adaptor.
‑ Failuretodosomaycausereorelectricshock.
Always unplug the adaptor from a household
outlet when cleaning.
‑ Failure to do so may cause electric shock or
injury.
Regularly clean the power plug and the
appliance plug to prevent dust from
accumulating.
‑ Failuretodosomaycausereduetoinsulation
failure caused by humidity.
→
Disconnect the adaptor and wipe with a dry cloth.
►Preventing accidents
Do not store within the reach of children or
infants. Do not let them use it.
‑ Putting parts or accessories in the mouth may
cause an accident or injury.
If the oil is consumed accidentally, do not
induce vomiting, drink a large amount of
water, and contact a physician.
If the oil comes into contact with eyes,
immediately wash thoroughly with running
water, and contact a physician.
‑ Failure to do so may result in physical problems.
PB016970 - ER-GD6151�����_(01GB)_12-04-18.indd 7 2018/12/4 9:33:30

8
English
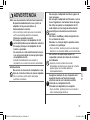
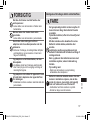
CAUTION
►Protecting the skin
Do not press the blade strongly on your lip or
skin.
Do not use this product for any purpose other
than trimming beard.
‑ Doing so may cause skin injury.
Do not directly apply the blades on ears or
rough skin (such as swellings, injuries or
blemishes).
‑ Doing so may cause injury to ears or uneven
skin.
Do not forcefully press the blade. Also, do not
touch blade with nails.
Do not bring the blade into contact with hard
objects.
‑ Doing so may cause the blade to become
damaged and injure the skin as the blade is very
thin. Be careful when using it.
Check that the blades are not damaged or
deformed before use.
‑ Failure to do so may cause skin injury.
►Note the following precautions
Do not allow metal objects or trash to adhere
to the power plug or the appliance plug.
‑ Doingsomaycauseelectricshockorredueto
a short circuit.
Do not share your appliance with your family
or other people.
‑ Doingsomayresultininfectionorinammation.
Do not drop or hit against other objects.
‑ Doing so may cause injury.
Do not wrap the cord around the adaptor and
main body when storing.
‑ Doing so may cause the wire in the cord to
breakwiththeload,andmaycauseredueto
short circuit.
Disconnect the adaptor from the household
outlet when not using.
‑ Failuretodosomaycauseelectricshockorre
due to electrical leakage resulting from
insulation deterioration.
Disconnect the adaptor or the appliance plug
by holding onto the adaptor or the appliance
plug instead of the cord.
‑
Failure to do so may cause electric shock or injury.
PB016970 - ER-GD6151�����_(01GB)_12-04-18.indd 8 2018/12/4 9:33:30

9
English
Handling of the removed battery when disposing
DANGER
The rechargeable battery is exclusively for
use with this appliance. Do not use the battery
with other products.
Do not charge the battery after it has been
removed from the product.
Do not throw into re or apply heat.
Do not solder, disassemble, or modify the
battery.
Do not let the positive and negative terminals
of the battery get in contact with each other
through metallic objects.
Do not carry or store the battery together with
metallic jewellery such as necklaces and
hairpins.
Never peel off the tube.
‑ Doingsomaycauseuidleak,overheating,or
explosion.
The battery contains alkaline uid. If it comes
in contact with the eyes, do not rub the eyes,
and thoroughly rinse with clean water, such
as tap water.
‑ Failure to do so may cause loss of vision.
→
Consult a physician immediately.
WARNING
After removing the rechargeable battery, do
not keep it within reach of children and
infants.
‑ The battery will harm the body if accidentally
swallowed.
→
If this happens, consult a physician immediately.
The battery contains alkaline uid. If it comes
in contact with the skin or clothes, rinse off
with clean water, such as tap water.
‑ Failure to do so may cause skin injury.
PB016970 - ER-GD6151�����_(01GB)_12-04-18.indd 9 2018/12/4 9:33:30

10
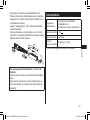
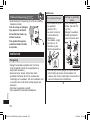
English
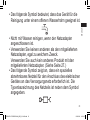
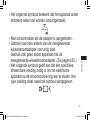
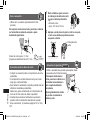
Important information
•Before using an attachment, check that it has been
installed correctly. Failure to do so may cause beard
to be cut too short.
•The appliance should not be used on animals.
•Apply the oil to the blade before and after each use.
(See page 16.)
Failure to apply the oil may cause the following
problems.
‑ The blade has become blunt.
‑ Shorter operating time.
‑ Louder sound.
•Store the main body in a place with low humidity after
use. Failure to do so may cause malfunction due to
condensation or rust.
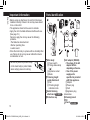
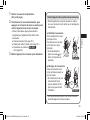
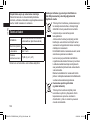
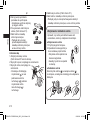
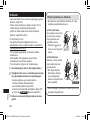
•Be sure to place the protective cap
on the main body to protect blade
when carrying around or storing.
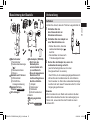
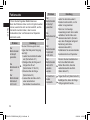
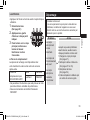
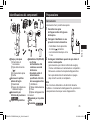
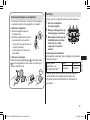
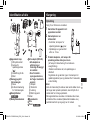
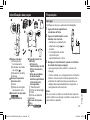
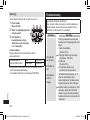
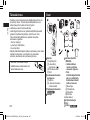
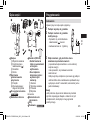
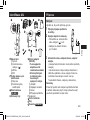
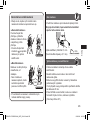
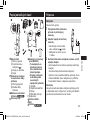
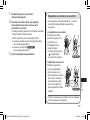
Parts identication
B
C
D
F
E
A
G
H
Main body
1 Power switch
2 Charge status lamp
(
)
3 Appliance socket
4 Blade
Trimming height
comb attachment
5 Dial
6 Trimming height
indication mark
Detail trimming
attachment
ER-GD61
Protective cap
AC adaptor (RE9‑86)
• The shape of the AC
adaptor differs
depending on the area.
• One of the power
supply units
specied is provided
with this appliance.
7 Adaptor
8 Power plug
9 Cord
0 Appliance plug
Accessories
Cleaning brush
Oil
Pouch
ER-GD61
PB016970 - ER-GD6151�����_(01GB)_12-04-18.indd 10 2018/12/4 9:33:31

11
English
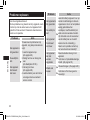
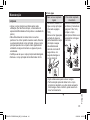
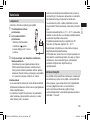
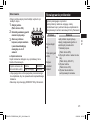
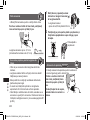
Preparation
Charging
•Make sure that the main body is turned off.
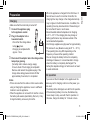
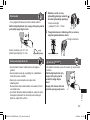
1
Connect the appliance plug
to the appliance socket.
2
Plug in the adaptor into a
household outlet.
• Check that the charge status
lamp (
) glows.
• Charging is completed after
approx. 1 hour.
1
2
3
Disconnect the adaptor when the charge status
lamp stops glowing.
(for safety and to reduce energy usage)
<How to check if the charging is completed>
Remove and reinsert the appliance plug. If the
charge status lamp glows and turns off after
approximately 5 seconds, it is completed.
Notes
•If there is noise from the radio or other sources while
using or charging the appliance, move to a different
location to use the appliance.
•When the appliance is not used for 6 months or more,
thebatterywillweaken(leakbatteryuid,etc.).Fully
charge the battery once every 6 months.
•Whentheapplianceischargedforthersttimeorit
has not been in use for more than 6 months, the
charging time may change or the charge status lamp
maynotglowintherstfewminutes.Inaddition,the
operating time may become shorter. Please charge it
for more than 8 hours in such cases.
•
Recommended ambient temperature for charging
is 0 °C – 35 °C. The charging time may change or
battery performance may decrease outside of the
recommended temperature.
•A full charge supplies enough power for approximately
50 minutes of use. (Based on using at 20
°C –
30
°C
.)
The operating time may differ depending on the
frequency of use and the operating method.
•You can charge the battery before it is completely
discharged. However, it is recommended to charge
when the battery is completely discharged. The
battery life depends strongly on factors such as how it
is used and stored.
AC operation
If you connect the AC adaptor to the appliance in the
same way as for charging, and turn on the power, you
can use it.
•
The battery will be discharged, even with the AC operation.
•If the remaining battery is too low, the blades may
move slowly or stop, even with the AC operation. In
this case, charge the battery for 1 minute or more.
PB016970 - ER-GD6151�����_(01GB)_12-04-18.indd 11 2018/12/4 9:33:32

12
English
How to use
•Apply the oil to the blade before and after each use.
(See page 16.)
•The appliance may not operate in an ambient
temperature lower than approximately 0 °C.
•Please clean the appliance after each use.
(See pages 14 and 15.)
<Note before trimming>
•Make sure that the main body is turned off.
•Check that the blades are not damaged or deformed
before use.
•Do not use with shaving foam applied or when the
beard is wet.
A wet beard may stick to the skin or bunch up, making
itdifculttotrim.
•Before trimming, comb your moustache with a comb.
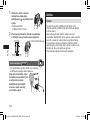
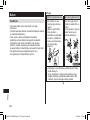
1
Remove the protective cap. (See this page.)
2
Select the desired attachments, then press the
power switch to turn on the power and trim.
•Use the appropriate attachment as needed.
It can also be used without the attachment.
●Withouttheattachment(Seepage13.)
●Trimmingheightcombattachment(Seepage13.)
●Detailtrimmingattachment
ER-GD61
(See page 14.)
3
Turn off the switch after use.
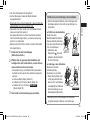
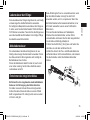
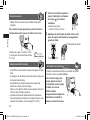
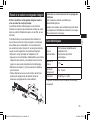
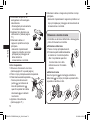
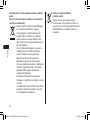
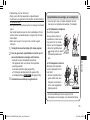
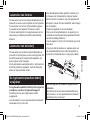
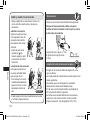
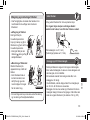
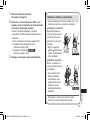
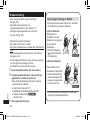
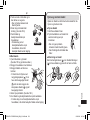
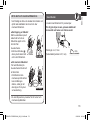
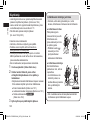
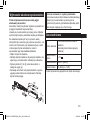
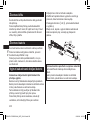
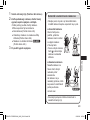
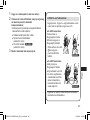
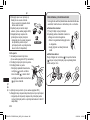
Removing and mounting the attachments
•Take care not to injure hands, etc., with the blade
when removing or mounting the attachment.
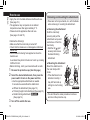
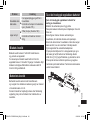
►Removing the attachment
Hold the main body
securely and pull the
attachment out upward
and remove it from the
main body.
•Hold the rib (
a
) part
securely and remove
the detail trimming
attachment.
a
ER-GD61
►Mounting the attachment
Mount the attachment to
the main body until it
clicks.
•If the attachment is not
attached correctly, it
may shift and end up
cutting too much during
use.
Click
ER-GD61
•You can follow the same procedure to remove
and mount the protective cap.
PB016970 - ER-GD6151�����_(01GB)_12-04-18.indd 12 2018/12/4 9:33:33

13
English
Without attachment
•Use without the attachment for design precise lines.
Place the blade horizontally against the skin and
towards the beard line trim slowly.
Trimming height: approx. 0.1 mm
(Fixed blade thickness is 0.1 mm)
Trimming height comb attachment
•The digit on the attachment indicates the target
trimming length.
•Actual beard length will be a little longer than the
height you set.
•The desired results may not be achieved if beard is
too long.
In this case, trim the beard to a length of about 20 mm
before using the appliance.
•Beard will be easy to accumulate in the attachment
when a lot of beard is cut. When this happens, clean
the attachment. (See pages 14 and 15.)
1
Turn the dial and adjust the
trimming height indication mark
(
b
) to the desired height.
•Trimming height:
approx. 0.5 mm to 10 mm
b
2
Apply the at part of the comb against your
skin and cut your beard by combing it left and
right.
Flat part of the comb
PB016970 - ER-GD6151�����_(01GB)_12-04-18.indd 13 2018/12/4 9:33:34

14
English
Detail trimming attachment
ER-GD61
•Use the attachment for trimming narrow areas and for
detailed trimming.
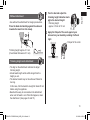
Place the blade horizontally
against the skin and
towards the beard line trim
slowly.
Trim gradually from the
ends by bringing the blade
in contact with the skin.
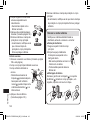
Maintenance
Cleaning
•Clean the main body and the blade after each use.
(If not cleaned, the motion will become poor and the
sharpness will worsen.)
•Do not use thinner, benzine, alcohol or other
chemicals. Doing so may cause failure, cracking or
discoloration of the main body. Wipe the main body
only with a soft cloth slightly dampened with tap water
or soapy tap water.
•Make sure that the main body is turned off.
•Remove the main body from the AC adaptor.
►With water
To remove light dirt To remove heavy dirt
1. Remove the
attachment and turn
the main body on.
(See page 12.)
2. Run water down the
water inlet at the back
of the main body, rinse
thoroughly for
approximately 20
seconds, and then turn
the main body off.
1. Remove the
attachment and blade.
(See pages 12 and 15.)
2. Clean the main body,
the blade and the
attachments with
running water.
ER-GD61
•Shake up and down several times to remove the
water.
•Be careful not to hit the main body on the sink or
any other object while draining the water. Failure
to do so may cause malfunction.
PB016970 - ER-GD6151�����_(01GB)_12-04-18.indd 14 2018/12/4 9:33:35

15
English
3. Wipe off the water with a towel
and let it dry naturally.
•It will dry faster with the blade
removed.
4. Apply the oil to the blade after
drying. (See page 16.)
5. Attach the blade and the
protective cap to the main body.
•Besuretoplacetheprotective
cap on the main body to
protect blade when storing.
ER-GD61
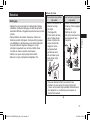
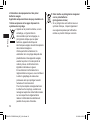
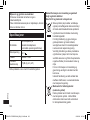
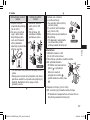
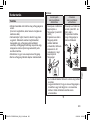
►With the brush
1. Remove the attachment and blade.
(See page 12 and this page.)
2. Clean the main body using the brush.
3. Clean the blade using the
brush.
•Keeppressingdownthe
cleaning lever (
c
) to raise
the moving blade (
d
) when
cleaning between the
stationary blade (
e
) and the
moving blade.
c
e
d
4. Apply the oil to the blade. (See page 16.)
5. Attach the blade and the protective cap to the main
body.
•Besuretoplacetheprotectivecaponthemain
body to protect blade when storing.
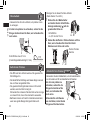
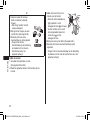
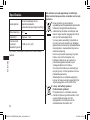
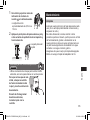
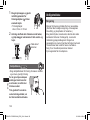
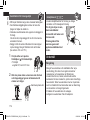
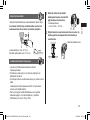
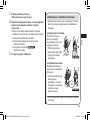
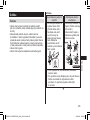
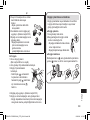
Removing and mounting the blade
•Please check if the blade is deformed or damaged
before removing and mounting it.
►Removing the blade
1. Hold the main body in front.
2. Push the metal part of the blade
to the left with the thumb’s belly.
•It is no problem when touch the
bladebyngers.
•Be careful not to let the blade fall.
►Mounting the blade
Fit the mounting hook (
B
) into the blade mounting
(
A
) on the main body and then push in until you
hear a click.
A
B
Click
PB016970 - ER-GD6151�����_(01GB)_12-04-18.indd 15 2018/12/4 9:33:36

16
English
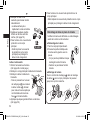
Lubrication
•Apply the oil to the blade before and after each use.
1
Remove the blade.
(See page 15.)
2
Apply a drop of the oil to
each indicated point.
3
Attach the blade to the
main body, turn on the
power and allow to run for
approximately 5 seconds.
►Replacement parts
Replacement part is available at your dealer or Service
Centre.
Replacement parts for
ER‑GD61/ER‑GD51
Blade WER9500
Lubrication oil WES003P
•Do not use any blade other than the one dedicated as
it may cause defect in performance.
•We recommend Panasonic lubrication oil WES003P.
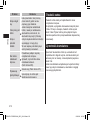
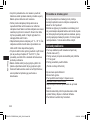
Troubleshooting
Perform the following actions.
If the problems still cannot be solved, contact the
store where you purchased the unit or a service
centre authorized by Panasonic for repair.
Problem Action
The main body
has become
blunt.
Operating time
is short.
Main body
stopped
functioning.
Until problems are solved, please
follow each procedure as follows:
1. Charge the main body.
(See page 11.)
2. Clean the blade and apply oil.
(See pages 14‑16.)
3. Replace the blade.
(See page 15.)
4. Have the battery replaced by an
authorized service centre.
Charge the battery for
approximately 8 hours
continuously to rejuvenate it.
If few uses remain even after
charging, the battery has reached
the end of its life. (Fluid may be
leaking due to degradation at the
end of battery life.)
Contact an authorized service
centre for repair.
PB016970 - ER-GD6151�����_(01GB)_12-04-18.indd 16 2018/12/4 9:33:36

17
English
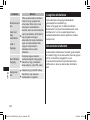
Problem Action
The main body
cannot be
charged.
Insert the appliance plug into the
mainbodyrmly.
Check the charge status lamp
glows. (See page 11.)
Makes a loud
sound.
Apply oil. (See page 16.)
Conrmthatthebladeisproperly
attached.
Blade life
Blade life varies according to the frequency and period
of use of the main body.
For example, the blade life is approximately 3 years
when using the main body for 5 minutes 10 times a
month.Replacethebladesifcuttingefciencyreduces
substantially despite proper maintenance.
Battery life
Battery life will vary according to the frequency and
length of use. If the battery is charged once a month,
the service life will be approximately 3 years.
Iftheoperatingtimeissignicantlyshorterevenaftera
full charge, the battery has reached the end of its life.
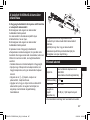
Removing the built-in rechargeable battery
Remove the built-in rechargeable battery before
disposing of the main body.
The battery is to be disposed of safely.
Please make sure that the battery is disposed of at an
ofciallydesignatedlocationifthereisone.
Thisguremustonlybeusedwhendisposingofthe
main body, and must not be used to repair it. If you
dismantle the main body yourself, it will no longer be
waterproof, which may cause it to malfunction.
•Remove the main body from the AC adaptor.
•Press the power switch to turn on the power and then
keep the power on until the battery is completely
discharged.
•Perform steps 1 to 8 and lift the battery, and then
remove it.
•Take care not to short circuit the positive and negative
terminals of the removed battery, and insulate the
terminals by applying tape to them.
PB016970 - ER-GD6151�����_(01GB)_12-04-18.indd 17 2018/12/4 9:33:36

18
English
For environmental protection and recycling of
materials
This main body contains a Nickel‑Metal Hydride
battery.
Please make sure that the battery is disposed of at an
ofciallyassignedlocation,ifthereisoneinyour
country.
Specications
Power source
See the name plate on the AC
adaptor.
(Automatic voltage conversion)
Motor voltage
1.2 V
Charging time Approx. 1 hour
Airborne
Acoustical Noise
67 (dB (A) re 1 pW)
This product is intended for household use only.
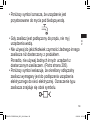
Disposal of Old Equipment and Batteries
Only for European Union and countries with
recycling systems
These symbols on the products,
packaging, and/or accompanying
documents mean that used electrical and
electronic products and batteries must not
be mixed with general household waste.
For proper treatment, recovery and
recycling of old products and batteries,
please take them to applicable collection
points in accordance with your national
legislation.
By disposing of them correctly, you will
help to save valuable resources and
prevent any potential negative effects on
human health and the environment.
For more information about collection and
recycling, please contact your local
authority.
Penalties may be applicable for incorrect
disposal of this waste, in accordance with
national legislation.
Note for the battery symbol
(bottom symbol)
This symbol might be used in combination
with a chemical symbol. In this case it
complies with the requirement set by the
Directive for the chemical involved.
PB016970 - ER-GD6151�����_(01GB)_12-04-18.indd 18 2018/12/4 9:33:36

19
Deutsch
Bedienungsanleitung
(Private Verwendung) Bart-Trimmer mit Netz-Akku-Betrieb
Modellnr. ER-GD61/ER-GD51
Vielen Dank, dass Sie sich für den Kauf dieses Panasonic-Produkts entschieden haben.
Bevor Sie dieses Gerät in Betrieb nehmen, lesen Sie sich bitte diese Anleitung vollständig durch und
bewahren Sie sie für ein späteres Nachschlagen auf.
Sicherheitsvorkehrungen ... 22
Wichtige Informationen .....................26
Bezeichnung der Bauteile.................27
Vorbereitung ......................................27
Verwendung des Geräts....................28
Wartung ..............................................31
Fehlersuche .......................................34
Lebensdauer der Klinge....................35
Akkulebensdauer...............................35
Entnehmen des integrierten
Akkus .................................................. 35
Technische Daten ..............................36
Inhalt
PB016970 - ER-GD6151�����_(02D)_12-04-18.indd 19 2018/12/4 11:22:15

20
Deutsch
Warnung
•Dieses Gerät kann von Kindern ab 8 Jahren und von
Personen mit eingeschränkten physischen, sensorischen
oder mentalen Fähigkeiten verwendet werden, oder von
Personen, denen entsprechende Kenntnisse und
Erfahrungen fehlen. Voraussetzung ist, dass sie dabei
beaufsichtigt werden oder ihnen eine Einweisung
gegeben wurde, wie sie das Gerät sicher verwenden
können, und sie die damit verbundenen Risiken
verstanden haben. Kinder dürfen nicht mit dem Gerät
spielen. Die Reinigung und Wartung sollte nicht von
Kindern ohne Aufsicht durchgeführt werden.
•Das Netzkabel kann nicht ausgetauscht werden. Wenn
das Kabel beschädigt ist, muss der Netzadapter
entsorgt werden.
PB016970 - ER-GD6151�����_(02D)_12-04-18.indd 20 2018/12/4 11:22:15
A página está carregando ...
A página está carregando ...
A página está carregando ...
A página está carregando ...
A página está carregando ...
A página está carregando ...
A página está carregando ...
A página está carregando ...
A página está carregando ...
A página está carregando ...
A página está carregando ...
A página está carregando ...
A página está carregando ...
A página está carregando ...
A página está carregando ...
A página está carregando ...
A página está carregando ...
A página está carregando ...
A página está carregando ...
A página está carregando ...
A página está carregando ...
A página está carregando ...
A página está carregando ...
A página está carregando ...
A página está carregando ...
A página está carregando ...
A página está carregando ...
A página está carregando ...
A página está carregando ...
A página está carregando ...
A página está carregando ...
A página está carregando ...
A página está carregando ...
A página está carregando ...
A página está carregando ...
A página está carregando ...
A página está carregando ...
A página está carregando ...
A página está carregando ...
A página está carregando ...
A página está carregando ...
A página está carregando ...
A página está carregando ...
A página está carregando ...
A página está carregando ...
A página está carregando ...
A página está carregando ...
A página está carregando ...
A página está carregando ...
A página está carregando ...
A página está carregando ...
A página está carregando ...
A página está carregando ...
A página está carregando ...
A página está carregando ...
A página está carregando ...
A página está carregando ...
A página está carregando ...
A página está carregando ...
A página está carregando ...
A página está carregando ...
A página está carregando ...
A página está carregando ...
A página está carregando ...
A página está carregando ...
A página está carregando ...
A página está carregando ...
A página está carregando ...
A página está carregando ...
A página está carregando ...
A página está carregando ...
A página está carregando ...
A página está carregando ...
A página está carregando ...
A página está carregando ...
A página está carregando ...
A página está carregando ...
A página está carregando ...
A página está carregando ...
A página está carregando ...
A página está carregando ...
A página está carregando ...
A página está carregando ...
A página está carregando ...
A página está carregando ...
A página está carregando ...
A página está carregando ...
A página está carregando ...
A página está carregando ...
A página está carregando ...
A página está carregando ...
A página está carregando ...
A página está carregando ...
A página está carregando ...
A página está carregando ...
A página está carregando ...
A página está carregando ...
A página está carregando ...
A página está carregando ...
A página está carregando ...
A página está carregando ...
A página está carregando ...
A página está carregando ...
A página está carregando ...
A página está carregando ...
A página está carregando ...
A página está carregando ...
A página está carregando ...
A página está carregando ...
A página está carregando ...
A página está carregando ...
A página está carregando ...
A página está carregando ...
A página está carregando ...
A página está carregando ...
A página está carregando ...
A página está carregando ...
A página está carregando ...
A página está carregando ...
A página está carregando ...
A página está carregando ...
A página está carregando ...
A página está carregando ...
A página está carregando ...
A página está carregando ...
A página está carregando ...
A página está carregando ...
A página está carregando ...
A página está carregando ...
A página está carregando ...
A página está carregando ...
A página está carregando ...
A página está carregando ...
A página está carregando ...
A página está carregando ...
A página está carregando ...
A página está carregando ...
A página está carregando ...
A página está carregando ...
A página está carregando ...
A página está carregando ...
A página está carregando ...
A página está carregando ...
A página está carregando ...
A página está carregando ...
A página está carregando ...
A página está carregando ...
A página está carregando ...
A página está carregando ...
A página está carregando ...
A página está carregando ...
A página está carregando ...
A página está carregando ...
A página está carregando ...
A página está carregando ...
A página está carregando ...
A página está carregando ...
A página está carregando ...
A página está carregando ...
A página está carregando ...
A página está carregando ...
A página está carregando ...
A página está carregando ...
A página está carregando ...
A página está carregando ...
A página está carregando ...
A página está carregando ...
A página está carregando ...
A página está carregando ...
A página está carregando ...
A página está carregando ...
A página está carregando ...
A página está carregando ...
A página está carregando ...
A página está carregando ...
A página está carregando ...
A página está carregando ...
A página está carregando ...
A página está carregando ...
A página está carregando ...
A página está carregando ...
A página está carregando ...
A página está carregando ...
A página está carregando ...
A página está carregando ...
A página está carregando ...
A página está carregando ...
A página está carregando ...
A página está carregando ...
A página está carregando ...
A página está carregando ...
A página está carregando ...
A página está carregando ...
A página está carregando ...
A página está carregando ...
A página está carregando ...
A página está carregando ...
A página está carregando ...
A página está carregando ...
A página está carregando ...
A página está carregando ...
A página está carregando ...
A página está carregando ...
A página está carregando ...
A página está carregando ...
A página está carregando ...
A página está carregando ...
A página está carregando ...
A página está carregando ...
A página está carregando ...
A página está carregando ...
A página está carregando ...
A página está carregando ...
A página está carregando ...
A página está carregando ...
A página está carregando ...
A página está carregando ...
A página está carregando ...
A página está carregando ...
A página está carregando ...
A página está carregando ...
A página está carregando ...
A página está carregando ...
A página está carregando ...
A página está carregando ...
A página está carregando ...
A página está carregando ...
A página está carregando ...
A página está carregando ...
A página está carregando ...
A página está carregando ...
A página está carregando ...
A página está carregando ...
A página está carregando ...
A página está carregando ...
A página está carregando ...
A página está carregando ...
A página está carregando ...
A página está carregando ...
A página está carregando ...
A página está carregando ...
A página está carregando ...
A página está carregando ...
A página está carregando ...
A página está carregando ...
A página está carregando ...
A página está carregando ...
A página está carregando ...
A página está carregando ...
A página está carregando ...
A página está carregando ...
A página está carregando ...
A página está carregando ...
A página está carregando ...
A página está carregando ...
A página está carregando ...
A página está carregando ...
A página está carregando ...
A página está carregando ...
A página está carregando ...
A página está carregando ...
A página está carregando ...
A página está carregando ...
A página está carregando ...
A página está carregando ...
A página está carregando ...
A página está carregando ...
A página está carregando ...
A página está carregando ...
A página está carregando ...
A página está carregando ...
A página está carregando ...
A página está carregando ...
A página está carregando ...
A página está carregando ...
A página está carregando ...
A página está carregando ...
A página está carregando ...
A página está carregando ...
A página está carregando ...
A página está carregando ...
A página está carregando ...
A página está carregando ...
A página está carregando ...
-
 1
1
-
 2
2
-
 3
3
-
 4
4
-
 5
5
-
 6
6
-
 7
7
-
 8
8
-
 9
9
-
 10
10
-
 11
11
-
 12
12
-
 13
13
-
 14
14
-
 15
15
-
 16
16
-
 17
17
-
 18
18
-
 19
19
-
 20
20
-
 21
21
-
 22
22
-
 23
23
-
 24
24
-
 25
25
-
 26
26
-
 27
27
-
 28
28
-
 29
29
-
 30
30
-
 31
31
-
 32
32
-
 33
33
-
 34
34
-
 35
35
-
 36
36
-
 37
37
-
 38
38
-
 39
39
-
 40
40
-
 41
41
-
 42
42
-
 43
43
-
 44
44
-
 45
45
-
 46
46
-
 47
47
-
 48
48
-
 49
49
-
 50
50
-
 51
51
-
 52
52
-
 53
53
-
 54
54
-
 55
55
-
 56
56
-
 57
57
-
 58
58
-
 59
59
-
 60
60
-
 61
61
-
 62
62
-
 63
63
-
 64
64
-
 65
65
-
 66
66
-
 67
67
-
 68
68
-
 69
69
-
 70
70
-
 71
71
-
 72
72
-
 73
73
-
 74
74
-
 75
75
-
 76
76
-
 77
77
-
 78
78
-
 79
79
-
 80
80
-
 81
81
-
 82
82
-
 83
83
-
 84
84
-
 85
85
-
 86
86
-
 87
87
-
 88
88
-
 89
89
-
 90
90
-
 91
91
-
 92
92
-
 93
93
-
 94
94
-
 95
95
-
 96
96
-
 97
97
-
 98
98
-
 99
99
-
 100
100
-
 101
101
-
 102
102
-
 103
103
-
 104
104
-
 105
105
-
 106
106
-
 107
107
-
 108
108
-
 109
109
-
 110
110
-
 111
111
-
 112
112
-
 113
113
-
 114
114
-
 115
115
-
 116
116
-
 117
117
-
 118
118
-
 119
119
-
 120
120
-
 121
121
-
 122
122
-
 123
123
-
 124
124
-
 125
125
-
 126
126
-
 127
127
-
 128
128
-
 129
129
-
 130
130
-
 131
131
-
 132
132
-
 133
133
-
 134
134
-
 135
135
-
 136
136
-
 137
137
-
 138
138
-
 139
139
-
 140
140
-
 141
141
-
 142
142
-
 143
143
-
 144
144
-
 145
145
-
 146
146
-
 147
147
-
 148
148
-
 149
149
-
 150
150
-
 151
151
-
 152
152
-
 153
153
-
 154
154
-
 155
155
-
 156
156
-
 157
157
-
 158
158
-
 159
159
-
 160
160
-
 161
161
-
 162
162
-
 163
163
-
 164
164
-
 165
165
-
 166
166
-
 167
167
-
 168
168
-
 169
169
-
 170
170
-
 171
171
-
 172
172
-
 173
173
-
 174
174
-
 175
175
-
 176
176
-
 177
177
-
 178
178
-
 179
179
-
 180
180
-
 181
181
-
 182
182
-
 183
183
-
 184
184
-
 185
185
-
 186
186
-
 187
187
-
 188
188
-
 189
189
-
 190
190
-
 191
191
-
 192
192
-
 193
193
-
 194
194
-
 195
195
-
 196
196
-
 197
197
-
 198
198
-
 199
199
-
 200
200
-
 201
201
-
 202
202
-
 203
203
-
 204
204
-
 205
205
-
 206
206
-
 207
207
-
 208
208
-
 209
209
-
 210
210
-
 211
211
-
 212
212
-
 213
213
-
 214
214
-
 215
215
-
 216
216
-
 217
217
-
 218
218
-
 219
219
-
 220
220
-
 221
221
-
 222
222
-
 223
223
-
 224
224
-
 225
225
-
 226
226
-
 227
227
-
 228
228
-
 229
229
-
 230
230
-
 231
231
-
 232
232
-
 233
233
-
 234
234
-
 235
235
-
 236
236
-
 237
237
-
 238
238
-
 239
239
-
 240
240
-
 241
241
-
 242
242
-
 243
243
-
 244
244
-
 245
245
-
 246
246
-
 247
247
-
 248
248
-
 249
249
-
 250
250
-
 251
251
-
 252
252
-
 253
253
-
 254
254
-
 255
255
-
 256
256
-
 257
257
-
 258
258
-
 259
259
-
 260
260
-
 261
261
-
 262
262
-
 263
263
-
 264
264
-
 265
265
-
 266
266
-
 267
267
-
 268
268
-
 269
269
-
 270
270
-
 271
271
-
 272
272
-
 273
273
-
 274
274
-
 275
275
-
 276
276
-
 277
277
-
 278
278
-
 279
279
-
 280
280
-
 281
281
-
 282
282
-
 283
283
-
 284
284
-
 285
285
-
 286
286
-
 287
287
-
 288
288
-
 289
289
-
 290
290
-
 291
291
-
 292
292
-
 293
293
-
 294
294
-
 295
295
-
 296
296
-
 297
297
-
 298
298
-
 299
299
-
 300
300
-
 301
301
-
 302
302
-
 303
303
-
 304
304


Panasonic ERGD51 Instruções de operação
- Categoria
- Barbeadores masculinos
- Tipo
- Instruções de operação
- Este manual também é adequado para
em outros idiomas
- español: Panasonic ERGD51 Instrucciones de operación
- français: Panasonic ERGD51 Mode d'emploi
- italiano: Panasonic ERGD51 Istruzioni per l'uso
- English: Panasonic ERGD51 Operating instructions
- Nederlands: Panasonic ERGD51 Handleiding
- slovenčina: Panasonic ERGD51 Návod na používanie
- Deutsch: Panasonic ERGD51 Bedienungsanleitung
- dansk: Panasonic ERGD51 Betjeningsvejledning
- čeština: Panasonic ERGD51 Operativní instrukce
- svenska: Panasonic ERGD51 Bruksanvisningar
- polski: Panasonic ERGD51 Instrukcja obsługi
- Türkçe: Panasonic ERGD51 Kullanma talimatları
- suomi: Panasonic ERGD51 Käyttö ohjeet
- română: Panasonic ERGD51 Instrucțiuni de utilizare
Artigos relacionados
-
Panasonic ERGK80 Instruções de operação
-
-
-
-
-
-
-
Panasonic ESWS14 Instruções de operação
-
-