Denver DAB-47 Manual do usuário
- Categoria
- Despertadores
- Tipo
- Manual do usuário
Este manual também é adequado para

DAB-47


7
2
12
17
22
27
32
37
42
47
52
57
1

Instructions
Manual
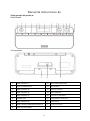
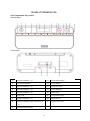
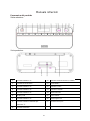
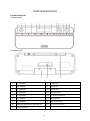
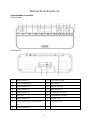
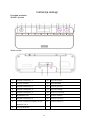
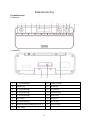
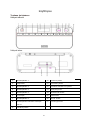
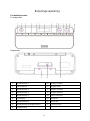
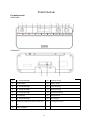
Product Overview
Front
view
Back view
1
“1” numeric button
10
TUNING button
2
Power button
11
MENU button
3
“2” numeric button
12
VOLUME button
4
“3” numeric button
13
DAB/FM button
5
“4” numeric button
14
Earphones jack
6
LCD display
15
Battery compartment
7
“5” numeric button
16
DC IN jack
8
Numeric button used for more than “5”
17
Telescopic antenna
9
SELECT button
2

Use instructions
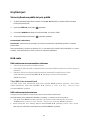
Power On/off
1. Connect the power adaptor to the DC IN jack at the back of the unit, and connect the other end of
the power adaptor to a mains outlet.
2. Press the button to turn ON the unit.
3. Press the DAB/FM button to toggle between DAB and FM modes.
4. To switch to standby mode, press the button again.
Battery power (optional).
Note: Before installing the batteries (not included), ensure that the unit is unplugged from the mains
outlet.
Open the battery compartment, and insert 4 AA batteries (1.5 V, also known as LR-6) with correct
polarities (+/-) as indicated, then replace the battery compartment until it clicks into place.
DAB radio
Store DAB radio stations automatically
1. Press the DAB/FM button to select DAB mode.
2. When switching to DAB mode for the first time, the unit performs a full scan and store all the available
DAB radio stations.
3. Once the scanning finishes, the unit broadcasts the first alphanumerically found station. Press the TUNING
▲/▼ button to select a DAB radio station, and press the SELECT button to confirm your selection.
Perform full DAB scan manually
To perform a full scan manually, in DAB mode, press and hold the MENU button to access the menu options,
then press the TUNING ▲/▼ button to select “Full Scan”, and then press the SELECT button to start a full
scan.
Prune DAB radio stations
You can remove the DAB stations from the station list that cannot be received in your area.
A DAB radio station which cannot be received in your area is listed with a ‘?’ mark before a station name.
1. In DAB mode, press and hold the MENU button to access the menu options, then press the TUNING
▲/▼ button to select “PRUNE”, and then press the SELECT button to confirm.
2. Then “Prune? Yes <No>” is displayed. Press the TUNING ▲/▼ button to select “<Yes>”, then press the
SELECT button to remove the current radio station from the station list.
3

Store DAB radio stations manually
You can store up to 10 DAB radio stations as favorite stations for instant access.
1. Select a DAB radio station that you wish to preset.
2. Press and hold the MENU button to access the menu options, then press the TUNING ▲/▼ button to
select “Preset store”, and then press the SELECT button to confirm.
3. Press the TUNING ▲/▼ button to allocate a number from 1 to 10, then press the SELECT button to
confirm. “Preset X saved” is displayed. “X” is a number allocated to the current radio station.
Select a preset DAB radio station
In DAB mode, press a numeric button to select a preset DAB radio station.
Note: To select a preset number 6-10, first press a numeric button from “1” to “5”, then press the “5+”
numeric button.
FM radio
1. Press the DAB/FM button to select FM mode.
2. When switching on FM radio for the first time, the unit starts at the beginning of the FM frequency range
(87.50MHz). Otherwise, the last selected FM radio is broadcast.
3. Press and hold the TUNING ▲/▼ button to tune to a FM radio station. To fine tune a frequency, press
repeatedly the TUNING ▲/▼ button.
Set alarm
1. Press and hold the MENU button to enter the “System” menu, then press the TUNING ▲/▼ button to
scroll to “Alarm Setting”, and then press the SELECT button to select “Alarm 1 Setting” or “Alarm 2
Setting”.
2. The hour digits flash. Press the TUNING ▲/▼ button to set the hour for you alarm, then press the
SELECT button to confirm.
3. The minute digits flash. Press the TUNING ▲/▼ button to set the minute for you alarm, then press the
SELECT button to confirm.
4. The time digits for alarm duration flash. Press the TUNING ▲/▼ button to select an alarm duration from
15, 30, 45, 60 or 90 minutes, then press the SELECT button to confirm.
5. The alarm sound source flashes. Press the TUNING ▲/▼ button to select a sound source from Buzzer,
DAB or FM radio, then press the SELECT button to confirm.
6. “Daily” flashes in the display, press the TUNING ▲/▼ button to select a frequency from daily, Weekends,
Weekdays or Once, then press the SELECT button to confirm.
Note: If you select “Once”, you are prompted to set the date for your alarm.
7. Alarm Volume scrolls in the display. Press the TUNING ▲/▼ button to set the volume for your alarm,
then press the SELECT button to confirm.
8. “On” or “Off” flashes in the display. Press the TUNING ▲/▼ button to select “On”, then press the
SELECT button to confirm.
Note: To deactivate the alarm, select “Off”.
9. “Saved” is display. When an alarm is activated, in standby, a bell icon is displayed, together with “1” or “2”
(based on Alarm 1 or Alarm 2 is set).
4

Switch off the alarm
You may switch off the alarm using one of the following ways.
When the alarm sounds, press the button to turn off the alarm. The alarm repeats for the next
day.
When the alarm sounds, press the SELECT button to repeat alarm at 9-minute interval.
Follow the steps described in the “Alarm setting” section, and select “Off” in step 8 to deactivate the
alarm.
5

Please notice - All products are subject to change without any notice. We take reservations for
errors and omissions in the manual.
ALL RIGHTS RESERVED, COPYRIGHT DENVER ELECTRONICS A/S
Electric and electronic equipment and included batteries contains materials, components and
substances that can be hazardous to your health and the environment, if the waste material
(discarded electric and electronic equipment and batteries) is not handled correctly.
Electric and electronic equipment and batteries is marked with the crossed out trash can
symbol, seen above. This symbol signifies that electric and electronic equipment and
batteries should not be disposed of with other household waste, but should be disposed of
separately.
As the end user it is important that you submit your used batteries to the appropriate and
designated facility. In this manner you make sure that the batteries are recycled in accordance
with legislature and will not harm the environment.
All cities have established collection points, where electric and electronic equipment and
batteries can either be submitted free of charge at recycling stations and other collection sites,
or be collected from the households. Additional information is available at the technical
department of your city.
Hereby, Inter Sales A/S declares that the radio equipment type DAB-47 is in compliance with
Directive 2014/53/EU. The full text of the EU declaration of conformity is available at the
following internet address: www.denver-electronics.com and then click the search ICON on
topline of website. Write modelnumber: DAB-47.Now enter product page, and red directive is found
under downloads/other downloads
Operating Frequency Range: DAB:174 MHz to 240 MHz / FM: 88 MHz to 108 MHz
Max Output Power: DC 6V 1200mA
DENVER ELECTRONICS A/S
Omega 5A, Soeften
DK-8382 Hinnerup
Denmark
www.facebook.com/denverelectronics
6

Bedienungsanleitung
Produktübersicht
Ansicht von vorn
Ansicht von hinten
1
Zifferntaste „1“
10
Abstimmtaste
2
Ein/Aus-Taste
11
MENÜ-Taste
3
Zifferntaste „2“
12
Lautstärkeregler
4
Zifferntaste „3“
13
DAB/UKW-Taste
5
Zifferntaste „4“
14
Ohrhörerbuchse
6
LCD-Display
15
Batteriefach
7
Zifferntaste „5“
16
DC-Eingangsbuchse
8
Zifferntaste für die Verwendung bei
Zahlen größer „5“
17
Teleskopantenne
9
Auswahltaste
7

Bedienungsanweisun
gen
Ein-/Ausschalten
1. Schließen Sie den Netzadapter an der Buchse DC IN auf der Rückseite des Geräts an und
stecken Sie dann den Netzstecker des Netzadapters in eine Netzsteckdose.
2. Drücken Sie die Taste , um das Gerät einzuschalten.
3. Drücken Sie die Taste DAB/FM, um zwischen DAB- und UKW-Modus zu wechseln.
4. Drücken Sie die Taste erneut, um in den Standby-Modus zu wechseln.
Batteriebetrieb (optional).
Hinweis: Versichern Sie sich vor dem Einlegen der Batterien (nicht im Lieferumfang enthalten), dass
der Netzstecker des Geräts aus der Netzsteckdose gezogen ist.
Öffnen Sie das Batteriefach und legen Sie dann 4 Batterien vom Typ AA (1,5 V; auch als LR-6
bezeichnet) polrichtig (+/-) wie angezeigt ein. Schließen Sie anschließend das Batteriefach wieder,
wobei die Abdeckung mit einem Klick einrasten muss.
DAB-Radio
DAB-Radiosender automatisch speichern
1. Drücken Sie die Taste DAB/FM, um den DAB-Modus auszuwählen.
2. Wenn Sie den DAB-Modus das erste Mal auswählen, führt das Gerät einen vollständigen Radiosenderscan
durch und speichert alle verfügbaren DAB-Radiosender.
3. Nach Beenden des Scannens gibt das Radio den ersten Radiosender in der alphanumerischen Liste wieder.
Drücken Sie die TasteTUNING ▲/▼, um einen gespeicherten DAB-Radiosender auszuwählen. Bestätigen
Sie Ihre Auswahl durch Drücken der Taste SELECT.
Einen vollständigen DAB-Radiosenderscan manuell durchführen
Wenn Sie den vollständigen Radiosenderscan manuell durchführen möchten, dann halten Sie im DAB-Modus
die Taste MENU gedrückt, um zu den Menüoptionen zu wechseln. Drücken Sie anschließend die Taste
TUNING ▲/▼, um „Full Scan“ auszuwählen. Drücken Sie dann die Taste SELECT, um den vollständigen
Scan zu starten.
DAB-Radiosender bereinigen
Sie können die DAB-Radiosender aus der Senderliste entfernen, die in Ihrer Region nicht empfangen werden
können.
Ein DAB-Radiosender, der in Ihrer Region nicht empfangen werden kann, wird in der Senderliste durch ein „?“ vor
8

dem Namen gekennzeichnet.
1. Halten Sie im DAB-Modus die Taste MENU gedrückt, um zu den Menüoptionen zu wechseln. Drücken Sie
anschließend die Taste TUNING ▲/▼, um „PRUNE“ auszuwählen. Drücken Sie dann die Taste SELECT,
um Ihre Auswahl zu bestätigen.
2. Daraufhin wird „Prune? Yes <No>“ angezeigt. Drücken Sie die Taste TUNING ▲/▼, um
„<Yes>“ auszuwählen und anschließend die Taste SELECT, um den aktuellen Radiosender aus der
Senderliste zu entfernen.
DAB-Radiosender manuell speichern
Sie können für den Schnellzugriff bis zu 10 DAB-Radiosender als bevorzugte Radiosender speichern.
1. Wählen Sie den DAB-Radiosender aus, den Sie speichern möchten.
2. Halten Sie die Taste MENU gedrückt, um zu den Menüoptionen zu wechseln. Drücken Sie anschließend
die Taste TUNING ▲/▼, um „Preset store“ auszuwählen. Drücken Sie dann die Taste SELECT, um Ihre
Auswahl zu bestätigen.
3. Drücken Sie die Taste TUNING ▲/▼, um eine Ziffer zwischen 1 und 10 auszuwählen. Drücken Sie dann
die Taste SELECT, um Ihre Auswahl zu bestätigen. Es wird „Preset X saved“ angezeigt. „X“ repräsentiert
dabei die Speicherplatznummer, auf der Sie den aktuellen Radiosender gespeichert haben.
Einen abgespeicherten DAB-Radiosender auswählen
Drücken Sie im DAB-Modus eine Zifferntaste, um einen gespeicherten DAB-Radiosender aufzurufen.
Hinweis: Wenn Sie die Speicherplatznummer 6 – 10 aufrufen möchten, dann drücken Sie zuerst
eine der Zifferntasten „1“ bis „5“ und anschließend die Zifferntaste „5+“.
UKW-Radio
1. Drücken Sie die Taste DAB/FM, um den FM-Modus auszuwählen.
2. Wenn Sie den FM-Modus das erste Mal auswählen, dann stellt das Gerät die untere Grenze des
UKW-Frequenzbereichs (87,50 MHz) ein. Ansonsten stellt das Gerät den zuletzt wiedergegebenen
UKW-Radiosender ein.
3. Halten Sie die Taste TUNING ▲/▼ gedrückt, um einen UKW-Radiosender einzustellen. Drücken Sie
mehrmals die Taste TUNING ▲/▼, um die Senderfrequenz feinabzustimmen.
Weckruf einstellen
1. Halten Sie die Taste MENU gedrückt, um zum Menü „System“ zu wechseln. Drücken Sie anschließend die
Taste TUNING ▲/▼ und scrollen Sie dann bis zu „Alarm Setting“. Drücken Sie dann die Taste SELECT,
um „Alarm 1 Setting“ oder „Alarm 2 Setting“ auszuwählen.
2. Jetzt blinkt die Stundenstelle. Drücken Sie die Taste TUNING ▲/▼, um die Stunden für Ihren Weckruf
einzustellen. Drücken Sie dann die Taste SELECT, um Ihre Auswahl zu bestätigen.
3. Jetzt blinkt die Minutenstelle. Drücken Sie die Taste TUNING ▲/▼, um die Minuten für Ihren Weckruf
einzustellen. Drücken Sie dann die Taste SELECT, um Ihre Auswahl zu bestätigen.
4. Jetzt blinkt die Zeitstelle für die Weckrufdauer. Drücken Sie die Taste TUNING ▲/▼, um eine
Weckrufdauer aus 15, 30, 45, 60 oder 90 Minuten auszuwählen. Drücken Sie dann die Taste SELECT, um
Ihre Auswahl zu bestätigen.
9

5. Jetzt blinkt die Weckruf-Klangquelle. Drücken Sie die Taste TUNING ▲/▼, um eine Klangquelle aus
Summer, DAB-Radio und UKW-Radio auszuwählen. Drücken Sie dann die Taste SELECT, um Ihre
Auswahl zu bestätigen.
6. Im Display blinkt jetzt „Daily“. Drücken Sie die Taste TUNING ▲/▼, um die Weckrufhäufigkeit aus daily,
Weekends, Weekdays oder Once auszuwählen. Drücken Sie anschließend die Taste SELECT, um Ihre
Auswahl zu bestätigen.
Hinweis: Wenn Sie „Once“ auswählen, dann werden Sie aufgefordert, das Datum für Ihren Weckruf
einzugeben.
7. Der Weckruf-Lautstärkebalken erscheint im Display. Drücken Sie die Taste TUNING ▲/▼, um die
Lautstärke für Ihren Weckruf einzustellen. Drücken Sie dann die Taste SELECT, um Ihre Auswahl zu
bestätigen.
8. Jetzt blinkt im Display „On“ oder „Off“. Drücken Sie die Taste TUNING ▲/▼, um „On“ auszuwählen.
Drücken Sie dann die Taste SELECT, um Ihre Auswahl zu bestätigen.
Hinweis: Wenn Sie den Weckruf deaktivieren möchten, dann wählen Sie „Off“ aus.
9. Im Display erscheint jetzt „Saved“. Wenn der Weckruf aktiviert ist, dann wird im Standby-Modus im
Display ein Glockensymbol zusammen mit „1“ oder „2“ (je nachdem, ob Weckruf 1 oder Weckruf 2 aktiv
ist) angezeigt.
Den Weckruf ausschalten
Sie können eine der nachstehenden Methoden benutzen, um den Weckruf auszuschalten.
Wenn der Weckruf ertönt, dann drücken Sie die Taste , um den Weckruf auszuschalten. Der
Weckruf wird dann am nächsten Tag wiederholt.
Wenn der Weckruf ertönt, dann können Sie die Taste SELECT drücken, um den Weckruf nach 9
Minuten erneut ertönen zu lassen.
Folgen Sie den unter Kapitel „Weckruf einstellen” beschriebenen Schritten und wählen Sie in
Schritt 8 „Off“ aus, um den Weckruf zu deaktivieren.
10

Bitte beachten Sie – Alle Produkte können stillschweigend geändert werden. Irrtümer und
Auslassungen in der Bedienungsanleitung vorbehalten.
ALLE RECHTE VORBEHALTEN, URHEBERRECHTE DENVER ELECTRONICS A/S
Elektrische und elektronische Geräte sowie Batterien enthalten Materialien, Komponenten
und Substanzen, welche für Sie und Ihre Umwelt schädlich sein können, sofern die
Abfallmaterialien (entsorgte elektrische und elektronische Altgeräte sowie Batterien) nicht
korrekt gehandhabt werden.
Elektrische und elektronische Geräte und Batterien sind mit dem durchgestrichenen
Mülltonnensymbol gekennzeichnet, wie oben dargestellt. Dieses Symbol bedeutet, dass
elektrische und elektronische Altgeräte sowie Batterien nicht mit dem Hausmüll entsorgt
werden dürfen, sondern sie separat zu entsorgen sind.
Als Endverbraucher ist es notwendig, dass Sie Ihre erschöpften Batterien bei den
entsprechenden Sammelstellen abgeben. Auf diese Weise stellen Sie sicher, dass die
Batterien entsprechend der Gesetzgebung recycelt werden und keine Umweltschäden
verursachen.
Alle Städte und Gemeinden haben Sammelstellen eingerichtet, an denen elektrische und
elektronische Altgeräte sowie Batterien kostenfrei zum Recycling abgegeben werden können
oder die sie von den Haushalten einsammeln. Weitere Informationen erhalten Sie bei der
Umweltbehörde Ihrer Gemeinde.
Hiermit erklärt Inter Sales A/S, dass der Funkanlagentyp DAB-47 der Richtlinie 2014/53/EU
entspricht. Der vollständige Text der EU-Konformitätserklärung ist unter der folgenden
Internetadresse verfügbar: Bitte geben Sie „www.denver-electronics.com“ ein. Klicken Sie dann auf
das Suchen-SYMBOL in der oberen Leiste der Webseite und geben Sie hier die
Modellnummer ”DAB-47“ ein.
Sie gelangen nun zur Produktseite. Die Funkanlagenrichtlinie (Richtlinie 2014/53/EU) finden Sie unter
„downloads/other downloads“.
Betriebsfrequenzbereich: DAB:174 MHz to 240 MHz / FM: 88 MHz to 108 MHz
Max. Ausgangsleistung: 1W
DENVER ELECTRONICS A/S
Omega 5A, Soeften
DK-8382 Hinnerup
Dänemark
www.facebook.com/denverelectronics
11

Manual de instrucciones de
Vista general del producto
Vista frontal
Vista posterior
1
Botón numérico “1”
10
Botón SINTONIZACIÓN
2
Botón de alimentación
11
Botón MENÚ
3
Botón numérico “2”
12
Botón de volumen
4
Botón numérico “3”
13
Botón DAB/FM
5
Botón numérico “4”
14
Toma de los auriculares
6
Pantalla LCD
15
Compartimento de las pilas
7
Botón numérico “5”
16
Toma CC IN
8
Botón numérico usado para más de “5”
17
Antena telescópica
9
Botón SELECCIONAR
12

Instrucciones de uso
Encendido/Apagado
1. Conecte el adaptador de alimentación a la toma DC IN situada en la parte posterior de la unidad y
conecte el otro extremo del adaptador de alimentación a la toma de corriente.
2. Pulse el botón para ENCENDER la unidad.
3. Pulse el botón DAB/FM para cambiar entre los modos DAB y FM.
4. Para cambiar el modo en espera, vuelva a pulsar el botón .
Alimentación con pilas (opcional).
Nota: Antes de instalar las pilas (no incluidas) asegúrese de que la unidad está desenchufada de la
toma de corriente.
Abra el compartimento de las pilas e inserte 4 pilas AA (1.5 V, también conocidas como LR-6) con las
polaridades correctas (+/-) tal y como se indica y posteriormente vuelva a colocar el compartimento de
las pilas hasta que se ajuste en su lugar.
Radio DAB
Guardar emisoras de radio DAB automáticamente
1. Pulse el botón DAB/FM para seleccionar el modo DAB.
2. Cuando se conecta el modo DAB por primera vez, la unidad realiza una búsqueda completa y guarda todas
las emisoras de radio DAB disponibles.
3. Una vez que finaliza la búsqueda, la unidad emite la primera emisora alfanumérica encontrada. Pulse el
botón TUNING ▲/▼ para seleccionar una emisora de radio DAB y pulse el botón SELECT para
confirmar su selección.
Realizar una búsqueda DAB completa manualmente
Para realizar una búsqueda completa manual, en modo DAB, mantenga pulsado el botón MENU para acceder a
las opciones del menú y posteriormente pulse el botón TUNING ▲/▼ para seleccionar “Full Scan” y
posteriormente pulse el botón SELECT para iniciar una búsqueda completa.
Recortar emisoras de radio DAB
Puede eliminar emisoras DAB de la lista de emisoras que no pueden recibirse en su zona.
Una emisora de radio DAB que no puede recibirse en su zona se enumera con un símbolo “?” antes del nombre
de la emisora.
1. En modo DAB, mantenga pulsado el botón MENU para acceder a las opciones del menú y posteriormente
pulse el botón TUNING ▲/▼ para seleccionar “PRUNE” y posteriormente pulse el botón SELECT para
confirmarlo.
13

2. Después “Prune? Yes <No>”. Pulse el botón TUNING ▲/▼ para seleccionar “<Yes>”, y posteriormente
pulse el botón SELECT para eliminar la emisora de radio actual de la lista de emisoras.
Guardar emisoras de radio DAB manualmente
Puede guardar hasta 10 emisoras de radio DAB como emisoras favoritas para un acceso instantáneo.
1. Seleccione una emisora de radio DAB que desee presintonizar.
2. Mantenga pulsado el botón MENU para acceder a las opciones del menú; posteriormente pulse el botón
TUNING ▲/▼ para seleccionar “Preset store” y posteriormente pulse el botón SELECT para
confirmarlo.
3. Pulse el botón TUNING ▲/▼ para asignar un número del 1 al 10, y posteriormente, pulse el botón
SELECT para confirmarlo. Se muestra “Preset X saved”. “X” es un número asignado a una emisora de
radio actual.
Seleccionar una emisora de radio DAB presintonizada
En modo DAB, pulse un botón numérico para seleccionar una emisora de radio DAB presintonizada.
Nota: Para seleccionar un número presintonizado 6-10, primero pulse un botón numérico del “1” al
“5”, y posteriormente pulse el “botón numérico” 5+.
Radio FM
1. Pulse el botón DAB/FM para seleccionar el modo FM.
2. Cuando encienda la radio FM radio por primera vez, la unidad empieza al principio de la gama de
frecuencia FM (87,50MHz). En caso contrario, se emite la última emisora de radio FM.
3. Mantenga pulsado el botón TUNING ▲/▼ para sintonizar una emisora de radio FM. Para sintonizar una
frecuencia, pulse de forma reiterada el botón TUNING ▲/▼ .
Configurar la alarma
1. Mantenga pulsado el botón MENU para entrar en el menú del “System” y posteriormente pulse el botón
TUNING ▲/▼ para desplazarse a “Alarm Setting” y después pulse el botón SELECT para seleccionar
“Alarm 1 Setting” o “Alarm 2 Setting”.
2. Parpadean los dígitos de la hora. Pulse el botón TUNING ▲/▼ para fijar la hora de la alarma y
posteriormente pulse el botón SELECT para confirmarlo.
3. Parpadean los dígitos de los minutos. Pulse el botón TUNING ▲/▼ para fijar los minutos de la alarma y
posteriormente pulse el botón SELECT para confirmarlo.
4. Parpadean los dígitos de la hora para la duración de la alarma. Pulse el botón TUNING ▲/▼ para
seleccionar la duración de la alarma entre 15, 30, 45, 60 o 90 minutos, y posteriormente pulse el botón
SELECT para confirmarlo.
5. Parpadea la Fuente del sonido de la alarma. Pulse el botón TUNING ▲/▼ para seleccionar una Fuente
de sonido entre pitido, DAB o radio FM, y posteriormente pulse el botón SELECT para confirmarlo.
6. “Daily” parpadea en la pantalla; pulse el botón TUNING ▲/▼ para seleccionar una frecuencia entre diaria,
fines de semana. Días laborables o una vez, y posteriormente pulse el botón SELECT para confirmarlo.
Nota: Si selecciona “Once” se la indica que fije la fecha de la alarma.
7. El volumen de la alarma se desplaza en la pantalla. Pulse el botón TUNING ▲/▼ para fijar el volumen de
14

la alarma; posteriormente pulse el botón SELECT para confirmarlo.
8. “On” u “Off” parpadean en la pantalla. Pulse el botón TUNING ▲/▼ para seleccionar “On”, y
posteriormente pulse el botón SELECT para confirmarlo.
Nota: Para desactivar la alarma, seleccione “Off”.
9. Se muestra “Saved”. Cuando se active una alarma, en modo en espera, se muestra un icono en forma de
campana conjuntamente con “1” o “2” (basándose en si está fijada la Alarma 1 o la Alarma 2).
Apagar la alarma
Puede apagar la alarma usando una de las maneras siguientes.
Cuando suene la alarma, pulse el botón para apagarla. La alarma se repite al día siguiente.
Cuando suene la alarma, pulse el botón SELECT para repetir la alarma a intervalos de 9 minutos.
Siga los pasos que se describen en la sección “Configuración de la alarma” y seleccione “Off” en el
paso 8 para desactivar la alarma
15

Aviso: - Todos los productos pueden estar sujetos a cambios técnicos sin previo aviso.
Además, nos reservamos el derecho de corregir errores y omisiones en el manual.
TODOS LOS DERECHOS RESERVADOS, COPYRIGHT DENVER ELECTRONICS A/S
Los equipos eléctricos y electrónicos, y las pilas o baterías incluidas, contienen materiales,
componentes y sustancias que pueden ser perjudiciales para su salud y para el medio
ambiente si el material de desecho (equipos eléctricos y electrónicos y baterías) no se
manipula correctamente.
El equipo eléctrico y electrónico y las pilas aparecen marcadas con un símbolo de un cubo de
basura tachado, véase arriba. Este símbolo indica que los equipos eléctricos y electrónicos y
sus pilas o baterías no deben ser eliminados con el resto de residuos domésticos, sino que
deben eliminarse por separado.
Como usuario final, es importante que usted remita las pilas o baterías usadas al centro
adecuado de recogida. De esta manera se asegurará de que las pilas y baterías se reciclan
según la legislación y no dañarán el medio ambiente.
Todas las ciudades tienen establecidos puntos de recogida en los que puede depositar los
equipos eléctricos y electrónicos y sus pilas o baterías gratuitamente, o solicitar que los
recojan en su hogar. Puede obtener información adicional en el departamento técnico de su
ciudad.
Por la presente, Inter Sales A/S declara que el tipo de equipo radioeléctrico DAB-47 es
conforme con la Directiva 2014/53/EU. El texto completo de la declaración de conformidad de
la UE está disponible en la siguiente dirección de Internet: Entre en:
www.denver-electronics.com y después haga clic en el ICONO búsqueda situado en la línea
superior de la página web. Escriba el número de modelo: DAB-47 Ahora entre en la página del
producto y la directiva roja se encuentra bajo descargas / otras descargas
Rango de funcionamiento del alcance de frecuencia:
DAB:174 MHz to 240 MHz / FM: 88 MHz to 108 MHz
Potencia de salida máxima:1W
DENVER ELECTRONICS A/S
Omega 5A, Soeften
DK-8382 Hinnerup
Dinamarca
www.facebook.com/denverelectronics
16

Guide d’utilisation de
Vue d’ensemble du produit
Vue de face
Vue arrière
1
Touche numérique « 1 »
10
Touche Syntonisation
2
Touche Alimentation
11
Touche MENU
3
Touche numérique « 2 »
12
Touche de volume
4
Touche numérique « 3 »
13
Touche DAB/FM
5
Touche numérique « 4 »
14
Sortie casque
6
Écran LCD
15
Compartiment à piles
7
Touche numérique « 5 »
16
Prise Entrée CC
8
Touche numérique utilisée pour plus de
« 5 »
17
Antenne télescopique
9
Touche de SÉLECTION
17

Mode d’emploi
Allumer/Éteindre
1. Branchez une extrémité de l'adaptateur secteur fourni dans la prise DC IN située à l'arrière de
l'unité et l'autre extrémité dans une prise secteur.
2. Appuyez sur la touche pour allumer l'unité.
3. Appuyez sur la touche DAB/FM pour basculer entre les modes DAB et FM.
4. Appuyez sur la touche pour passer en mode veille.
Alimentation sur piles (facultatif).
Remarque : Avant d'installer les piles (non incluses), assurez-vous que la radio est débranchée.
Ouvrez le compartiment à piles et insérez 4 piles AA (1,5 V, également appelées LR-6) en respectant
les polarités (+/-) indiquées, puis refermez le compartiment à piles confirmé par clic.
Radio DAB
Mémoriser automatiquement les stations radio DAB
1. Appuyez sur la touche DAB/FM pour sélectionner le mode DAB.
2. Lors du passage au mode DAB pour la première fois, l’unité effectue une recherche complète et mémorise
toutes les stations radio DAB disponibles.
3. Une fois la recherche terminée, la radio syntonise la première station dans l'ordre alphanumérique. Utilisez
les touches TUNING ▲/▼ pour sélectionner une station radio DAB, puis appuyez sur la touche SELECT
pour confirmer la sélection.
Effectuer une recherche DAB complète manuellement
Pour effectuer une recherche complète manuellement, en mode DAB, maintenez appuyée la touche MENU pour
accéder aux options du menu, puis utilisez les touches TUNING ▲/▼ pour sélectionner « Full Scan », puis
appuyez sur la touche SELECT pour lancer une recherche complète.
Purger les stations radio DAB
Vous pouvez supprimer de la liste des stations, les stations DAB qui ne peuvent pas être reçues dans votre région.
Une station radio DAB qui ne peut pas être reçue dans votre région est identifiée par le symbole « ? » placé avant
le nom de la station.
1. Maintenez appuyée la touche MENU pour accéder aux options du menu, puis utilisez les touches TUNING
▲/▼ pour sélectionner « PRUNE », puis appuyez sur la touche SELECT pour confirmer.
2. « Prune? Yes <No> » sera affiché. Utilisez les touches TUNING ▲/▼ pour sélectionner « <Yes> », puis
appuyez sur la touche SELECT pour supprimer la station radio en cours de la liste des stations.
18
A página está carregando ...
A página está carregando ...
A página está carregando ...
A página está carregando ...
A página está carregando ...
A página está carregando ...
A página está carregando ...
A página está carregando ...
A página está carregando ...
A página está carregando ...
A página está carregando ...
A página está carregando ...
A página está carregando ...
A página está carregando ...
A página está carregando ...
A página está carregando ...
A página está carregando ...
A página está carregando ...
A página está carregando ...
A página está carregando ...
A página está carregando ...
A página está carregando ...
A página está carregando ...
A página está carregando ...
A página está carregando ...
A página está carregando ...
A página está carregando ...
A página está carregando ...
A página está carregando ...
A página está carregando ...
A página está carregando ...
A página está carregando ...
A página está carregando ...
A página está carregando ...
A página está carregando ...
A página está carregando ...
A página está carregando ...
A página está carregando ...
A página está carregando ...
A página está carregando ...
A página está carregando ...
A página está carregando ...
A página está carregando ...
A página está carregando ...
-
 1
1
-
 2
2
-
 3
3
-
 4
4
-
 5
5
-
 6
6
-
 7
7
-
 8
8
-
 9
9
-
 10
10
-
 11
11
-
 12
12
-
 13
13
-
 14
14
-
 15
15
-
 16
16
-
 17
17
-
 18
18
-
 19
19
-
 20
20
-
 21
21
-
 22
22
-
 23
23
-
 24
24
-
 25
25
-
 26
26
-
 27
27
-
 28
28
-
 29
29
-
 30
30
-
 31
31
-
 32
32
-
 33
33
-
 34
34
-
 35
35
-
 36
36
-
 37
37
-
 38
38
-
 39
39
-
 40
40
-
 41
41
-
 42
42
-
 43
43
-
 44
44
-
 45
45
-
 46
46
-
 47
47
-
 48
48
-
 49
49
-
 50
50
-
 51
51
-
 52
52
-
 53
53
-
 54
54
-
 55
55
-
 56
56
-
 57
57
-
 58
58
-
 59
59
-
 60
60
-
 61
61
-
 62
62
-
 63
63
-
 64
64


Denver DAB-47 Manual do usuário
- Categoria
- Despertadores
- Tipo
- Manual do usuário
- Este manual também é adequado para
em outros idiomas
- español: Denver DAB-47 Manual de usuario
- français: Denver DAB-47 Manuel utilisateur
- italiano: Denver DAB-47 Manuale utente
- Nederlands: Denver DAB-47 Handleiding
- Deutsch: Denver DAB-47 Benutzerhandbuch
- dansk: Denver DAB-47 Brugermanual
- svenska: Denver DAB-47 Användarmanual
- polski: Denver DAB-47 Instrukcja obsługi