Dell Precision M6600 Manual do proprietário
- Tipo
- Manual do proprietário

Manual do Proprietário do Dell Precision
M6600
Modelo regulamentar P10E
Tipo regulamentar P10E001

Notas, avisos e advertências
NOTA: Uma NOTA indica informações importantes para melhor utilizar o computador.
AVISO: Um AVISO alerta para a possibilidade de danos no hardware ou de perda de
dados, caso as instruções não sejam seguidas.
ADVERTÊNCIA: Uma ADVERTÊNCIA indica potenciais danos no equipamento, lesões
corporais ou mesmo morte.
As informações deste documento estão sujeitas a alteração sem aviso prévio.
© 2011 Dell Inc. Todos os direitos reservados.
É estritamente proibida qualquer forma de reprodução destes materiais sem autorização por escrito da Dell
Inc.
Marcas comerciais utilizadas neste texto:
Dell
™
, o logótipo DELL,
Dell Precision
™
,
Precision ON
™
,
ExpressCharge
™
,
Latitude
™
,
Latitude ON
™
,
OptiPlex
™
,
Vostro
™
e
Wi-Fi Catcher
™
são marcas comerciais
da Dell Inc.
Intel
®
,
Pentium
®
,
Xeon
®
,
Core
™
,
Atom
™
,
Centrino
®
e
Celeron
®
são marcas comerciais
registadas ou marcas comerciais da Intel Corporation nos Estados Unidos e em outros países.
AMD
®
é
marca comercial registada e
AMD Opteron
™
,
AMD Phenom
™
,
AMD Sempron
™
,
AMD Athlon
™
,
ATI Radeon
™
e
ATI FirePro
™
são marcas comerciais da Advanced Micro Devices, Inc.
Microsoft
®
,
Windows
®
,
MS-DOS
®
,
Windows Vista
®
, o botão de iniciar do Windows Vista e
Office Outlook
®
são marcas
comerciais ou marcas comerciais registadas da Microsoft Corporation nos Estados Unidos e/ou em outros
países.
Blu-ray Disc
™
é marca comercial de propriedade da Blu-ray Disc Association (BDA) e licenciada
para utilização em discos e tocadores. A marca com a palavra
Bluetooth
®
é marca comercial registada e
de propriedade da
Bluetooth
®
SIG, Inc. e qualquer utilização de tal marca por parte da Dell é feita sob
licença.
Wi-Fi
®
é uma marca comercial registada da Wireless Ethernet Compatibility Alliance, Inc.
Outros nomes e marcas comerciais podem ser utilizados nesta publicação como referência às entidades
que invocam essas marcas e nomes ou aos seus produtos. A Dell declara que não tem interesse de
propriedade sobre marcas comerciais e nomes de terceiros.
2011 — 06
Rev. A00

Índice
Notas, avisos e advertências......................................................................2
Capítulo 1: Trabalhar no computador........................................................9
Before Working Inside Your Computer.............................................................................9
Recommended Tools.......................................................................................................10
Turning Off Your Computer..............................................................................................11
After Working Inside Your Computer..............................................................................11
Capítulo 2: Cartão SD (Secure Digital).....................................................13
Retirar o cartão SD (Secure Digital)................................................................................13
Instalar o cartão SD (Secure Digital)..............................................................................13
Capítulo 3: ExpressCard.............................................................................15
Retirar a ExpressCard.....................................................................................................15
Instalar a ExpressCard....................................................................................................15
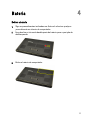
Capítulo 4: Bateria.......................................................................................17
Retirar a bateria..............................................................................................................17
Instalar a bateria.............................................................................................................18
Capítulo 5: Cartão SIM (Subscriber Identity Module)...........................19
Retirar o cartão SIM (Subscriber Identity Module)........................................................19
Instalar o cartão SIM (Subscriber Identity Module).......................................................20
Capítulo 6: Placa Bluetooth.......................................................................21
Retirar a placa Bluetooth................................................................................................21
Instalar a placa Bluetooth...............................................................................................22
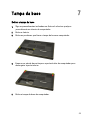
Capítulo 7: Tampa da base.........................................................................23
Retirar a tampa da base..................................................................................................23

Instalar a tampa da base.................................................................................................24
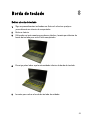
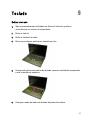
Capítulo 8: Borda do teclado.....................................................................25
Retirar a borda do teclado..............................................................................................25
Instalar a borda do teclado.............................................................................................26
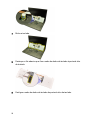
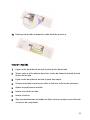
Capítulo 9: Teclado......................................................................................27
Retirar o teclado..............................................................................................................27
Instalar o teclado............................................................................................................29
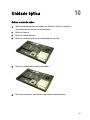
Capítulo 10: Unidade óptica.......................................................................31
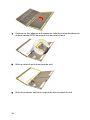
Retirar a unidade óptica..................................................................................................31
Instalar a unidade óptica................................................................................................32
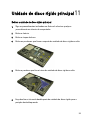
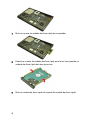
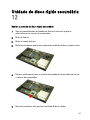
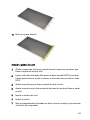
Capítulo 11: Unidade de disco rígido principal.......................................33
Retirar a unidade de disco rígido principal.....................................................................33
Instalar a unidade de disco rígido principal....................................................................35
Capítulo 12: Unidade de disco rígido secundária..................................37
Retirar a unidade de disco rígido secundária.................................................................37
Instalar a unidade de disco rígido secundária................................................................38
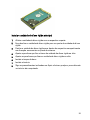
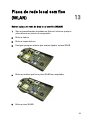
Capítulo 13: Placa de rede local sem fios (WLAN)................................39
Retirar a placa de rede de área local sem fios (WLAN).................................................39
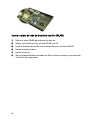
Instalar a placa de rede de área local sem fios (WLAN)................................................40
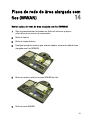
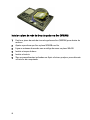
Capítulo 14: Placa de rede de área alargada sem fios (WWAN)........41
Retirar a placa de rede de área alargada sem fios (WWAN).........................................41
Instalar a placa de rede de área alargada sem fios (WWAN)........................................42
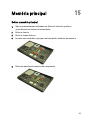
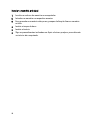
Capítulo 15: Memória principal.................................................................43
Retirar a memória principal.............................................................................................43
Instalar a memória principal...........................................................................................44

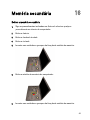
Capítulo 16: Memória secundária.............................................................45
Retirar a memória secundária.........................................................................................45
Instalar a memória secundária.......................................................................................46
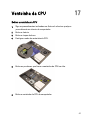
Capítulo 17: Ventoinha da CPU..................................................................47
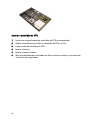
Retirar a ventoinha da CPU.............................................................................................47
Instalar a ventoinha da CPU............................................................................................48
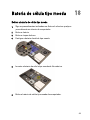
Capítulo 18: Bateria de célula tipo moeda..............................................49
Retirar a bateria de célula tipo moeda............................................................................49
Instalar a bateria de célula tipo moeda..........................................................................50
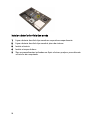
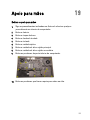
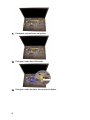
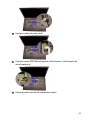
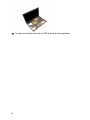
Capítulo 19: Apoio para mãos....................................................................51
Retirar o apoio para mãos...............................................................................................51
Instalar o apoio para mãos..............................................................................................56
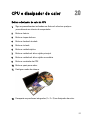
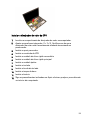
Capítulo 20: CPU e dissipador de calor....................................................57
Retirar o dissipador de calor da CPU..............................................................................57
Instalar o dissipador de calor da CPU.............................................................................59
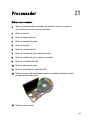
Capítulo 21: Processador...........................................................................61
Retirar o processador.....................................................................................................61
Instalar o processador....................................................................................................62
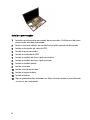
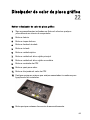
Capítulo 22: Dissipador de calor da placa gráfica.................................63
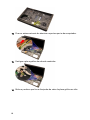
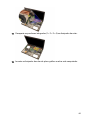
Retirar o dissipador de calor da placa gráfica................................................................63
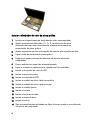
Instalar o dissipador de calor da placa gráfica..............................................................66
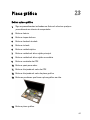
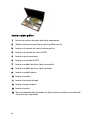
Capítulo 23: Placa gráfica..........................................................................67
Retirar a placa gráfica.....................................................................................................67
Instalar a placa gráfica...................................................................................................68
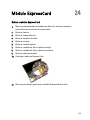
Capítulo 24: Módulo ExpressCard.............................................................69
Retirar o módulo ExpressCard.........................................................................................69

Instalar o módulo ExpressCard.......................................................................................70
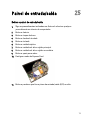
Capítulo 25: Painel de entrada/saída.......................................................71
Retirar o painel de entrada/saída....................................................................................71
Instalar o painel de entrada/saída..................................................................................73
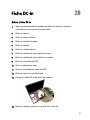
Capítulo 26: Ficha DC-in.............................................................................75
Retirar a ficha DC-in........................................................................................................75
Instalar a ficha DC-in.......................................................................................................77
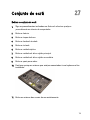
Capítulo 27: Conjunto do ecrã...................................................................79
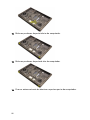
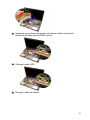
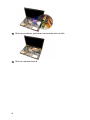
Retirar o conjunto do ecrã..............................................................................................79
Instalar o conjunto do ecrã.............................................................................................83
Capítulo 28: Placa de sistema...................................................................85
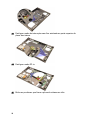
Retirar a placa de sistema..............................................................................................85
Instalar a placa de sistema.............................................................................................88
Capítulo 29: Moldura do ecrã táctil..........................................................91
Retirar a moldura do ecrã táctil......................................................................................91
Instalar a moldura do ecrã táctil.....................................................................................93
Capítulo 30: Painel do ecrã táctil..............................................................95
Retirar o painel do ecrã táctil..........................................................................................95
Instalar o painel do ecrã táctil........................................................................................98
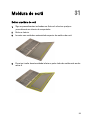
Capítulo 31: Moldura do ecrã....................................................................99
Retirar a moldura do ecrã...............................................................................................99
Instalar a moldura do ecrã............................................................................................100
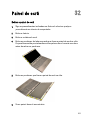
Capítulo 32: Painel do ecrã......................................................................101
Retirar o painel do ecrã.................................................................................................101
Instalar o painel do ecrã...............................................................................................103

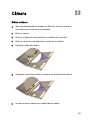
Capítulo 33: Câmara..................................................................................105
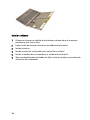
Retirar a câmara............................................................................................................105
Instalar a câmara..........................................................................................................106
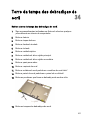
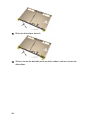
Capítulo 34: Torre da tampa das dobradiças do ecrã.........................107
Retirar a torre da tampa das dobradiças do ecrã.........................................................107
Instalar a torre da tampa das dobradiças do ecrã........................................................109
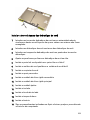
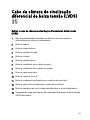
Capítulo 35: Cabo da câmara de sinalização diferencial de baixa
tensão (LVDS)............................................................................................111
Retirar o cabo da câmara de sinalização diferencial de baixa tensão (LVDS).............111
Instalar o cabo da câmara de sinalização diferencial de baixa tensão (LVDS)...........113
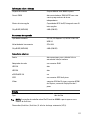
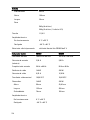
Capítulo 36: Especificações.....................................................................115
Especificações técnicas...............................................................................................115
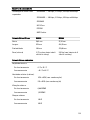
Capítulo 37: Configuração do sistema...................................................121
Descrição geral da Configuração do Sistema..............................................................121
Entrar na configuração do sistema...............................................................................121
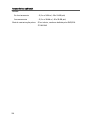
Opções de menu da Configuração do Sistema.............................................................121
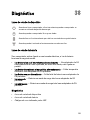
Capítulo 38: Diagnóstico...........................................................................135
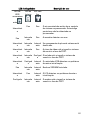
Luzes de estado do dispositivo.....................................................................................135
Luzes de estado da bateria...........................................................................................135
Diagnóstico...................................................................................................................135
Capítulo 39: Contactar a Dell...................................................................139
Contactar a Dell ............................................................................................................139

8

Trabalhar no computador 1
Before Working Inside Your Computer
Use the following safety guidelines to help protect your computer from potential
damage and to help to ensure your personal safety. Unless otherwise noted,
each procedure included in this document assumes that the following
conditions exist:
• You have performed the steps in Working on Your Computer.
• You have read the safety information that shipped with your computer.
• A component can be replaced or--if purchased separately--installed by
performing the removal procedure in reverse order.
ADVERTÊNCIA: Before working inside your computer, read the safety information
that shipped with your computer. For additional safety best practices information,
see the Regulatory Compliance Homepage at www.dell.com/
regulatory_compliance.
AVISO: Many repairs may only be done by a certified service technician. You
should only perform troubleshooting and simple repairs as authorized in your
product documentation, or as directed by the online or telephone service and
support team. Damage due to servicing that is not authorized by Dell is not covered
by your warranty. Read and follow the safety instructions that came with the
product.
AVISO: To avoid electrostatic discharge, ground yourself by using a wrist grounding
strap or by periodically touching an unpainted metal surface, such as a connector
on the back of the computer.
AVISO: Handle components and cards with care. Do not touch the components or
contacts on a card. Hold a card by its edges or by its metal mounting bracket. Hold
a component such as a processor by its edges, not by its pins.
AVISO: When you disconnect a cable, pull on its connector or on its pull-tab, not on
the cable itself. Some cables have connectors with locking tabs; if you are
disconnecting this type of cable, press in on the locking tabs before you disconnect
the cable. As you pull connectors apart, keep them evenly aligned to avoid bending
any connector pins. Also, before you connect a cable, ensure that both connectors
are correctly oriented and aligned.
9

NOTA: The color of your computer and certain components may appear differently
than shown in this document.
To avoid damaging your computer, perform the following steps before you begin
working inside the computer.
1. Ensure that your work surface is flat and clean to prevent the computer
cover from being scratched.
2. Turn off your computer (see
Turning Off Your Computer
).
3. If the computer is connected to a docking device (docked) such as the
optional Media Base or Battery Slice, undock it.
AVISO: To disconnect a network cable, first unplug the cable from your computer
and then unplug the cable from the network device.
4. Disconnect all network cables from the computer.
5. Disconnect your computer and all attached devices from their electrical
outlets.
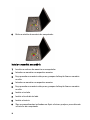
6. Close the display and turn the computer upside-down on a flat work
surface.
NOTA: To avoid damaging the system board, you must remove the main battery
before you service the computer.
7. Remove the main battery (see
Battery
).
8. Turn the computer top-side up.
9. Open the display.
10. Press the power button to ground the system board.
AVISO: To guard against electrical shock, always unplug your computer from the
electrical outlet before opening the display.
AVISO: Before touching anything inside your computer, ground yourself by touching
an unpainted metal surface, such as the metal at the back of the computer. While
you work, periodically touch an unpainted metal surface to dissipate static
electricity, which could harm internal components.
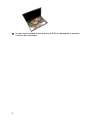
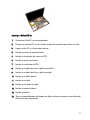
11. Remove any installed ExpressCards or Smart Cards from the appropriate
slots.
Recommended Tools
The procedures in this document may require the following tools:
• Small flat-blade screwdriver
10

• #0 Phillips screwdriver
• #1 Phillips screwdriver
• Small plastic scribe
• Flash BIOS update program CD
Turning Off Your Computer
AVISO: To avoid losing data, save and close all open files and exit all open
programs before you turn off your computer.
1. Shut down the operating system:
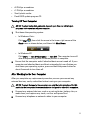
• In Windows Vista :
Click Start
, then click the arrow in the lower-right corner of the
Start menu as shown below, and then click Shut Down.
• In Windows XP:
Click Start → Turn Off Computer → Turn Off . The computer turns off
after the operating system shutdown process is complete.
2. Ensure that the computer and all attached devices are turned off. If your
computer and attached devices did not automatically turn off when you
shut down your operating system, press and hold the power button for
about 4 seconds to turn them off.
After Working Inside Your Computer
After you complete any replacement procedure, ensure you connect any
external devices, cards, and cables before turning on your computer.
AVISO: To avoid damage to the computer, use only the battery designed for this
particular Dell computer. Do not use batteries designed for other Dell computers.
1. Connect any external devices, such as a port replicator, battery slice, or
media base, and replace any cards, such as an ExpressCard.
2. Connect any telephone or network cables to your computer.
11

AVISO: To connect a network cable, first plug the cable into the network device and
then plug it into the computer.
3. Replace the battery.
4. Connect your computer and all attached devices to their electrical outlets.
5. Turn on your computer.
12

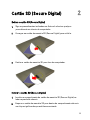
Cartão SD (Secure Digital) 2
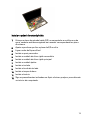
Retirar o cartão SD (Secure Digital)
1. Siga os procedimentos indicados em
Antes de efectuar qualquer
procedimento no interior do computador
.
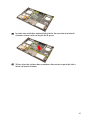
2. Carregue no cartão de memória SD (Secure Digital) para soltá-lo.
3. Deslize o cartão de memória SD para fora do computador.
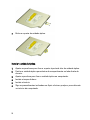
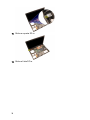
Instalar o cartão SD (Secure Digital)
1. Localize o compartimento do cartão de memória SD (Secure Digital) no
lado esquerdo do chassis.
2. Empurre o cartão de memória SD para dentro do compartimento até ouvir
um clique significando que está bem encaixado.
13

14

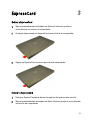
ExpressCard 3
Retirar a ExpressCard
1. Siga os procedimentos indicados em
Antes de efectuar qualquer
procedimento no interior do computador
.
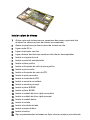
2. Carregue ligeiramente na ExpressCard para soltá-la do computador.
3. Agarre na ExpressCard e puxe-a para fora do computador.
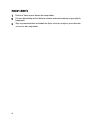
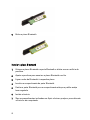
Instalar a ExpressCard
1. Deslize a ExpressCard para dentro da ranhura até que encaixe no sítio.
2. Siga os procedimentos indicados em
Após efectuar qualquer procedimento
no interior do computador
.
15

16


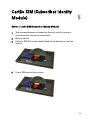
Cartão SIM (Subscriber Identity
Module) 5
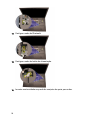
Retirar o cartão SIM (Subscriber Identity Module)
1. Siga os procedimentos indicados em
Antes de efectuar qualquer
procedimento no interior do computador
.
2. Retire a
bateria
.
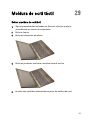
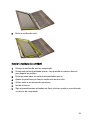
3. Deslize o SIM (Subscriber Identity Module) em direcção à saída da
ranhura.
4. Puxe o SIM para fora da ranhura.
19

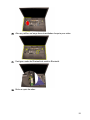
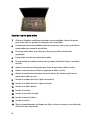
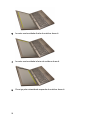
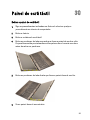
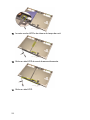
Instalar o cartão SIM (Subscriber Identity Module)
1. Localize a ranhura do cartão SIM (Subscriber Identity Module) no
compartimento da bateria.
2. Empurre o cartão SIM para dentro da ranhura até que fique bem
encaixado.
3. Volte a colocar a
bateria
.
4. Siga os procedimentos indicados em
Após efectuar qualquer procedimento
no interior do computador
.
20
A página está carregando...
A página está carregando...
A página está carregando...
A página está carregando...
A página está carregando...
A página está carregando...
A página está carregando...
A página está carregando...
A página está carregando...
A página está carregando...
A página está carregando...
A página está carregando...
A página está carregando...
A página está carregando...
A página está carregando...
A página está carregando...
A página está carregando...
A página está carregando...
A página está carregando...
A página está carregando...
A página está carregando...
A página está carregando...
A página está carregando...
A página está carregando...
A página está carregando...
A página está carregando...
A página está carregando...
A página está carregando...
A página está carregando...
A página está carregando...
A página está carregando...
A página está carregando...
A página está carregando...
A página está carregando...
A página está carregando...
A página está carregando...
A página está carregando...
A página está carregando...
A página está carregando...
A página está carregando...
A página está carregando...
A página está carregando...
A página está carregando...
A página está carregando...
A página está carregando...
A página está carregando...
A página está carregando...
A página está carregando...
A página está carregando...
A página está carregando...
A página está carregando...
A página está carregando...
A página está carregando...
A página está carregando...
A página está carregando...
A página está carregando...
A página está carregando...
A página está carregando...
A página está carregando...
A página está carregando...
A página está carregando...
A página está carregando...
A página está carregando...
A página está carregando...
A página está carregando...
A página está carregando...
A página está carregando...
A página está carregando...
A página está carregando...
A página está carregando...
A página está carregando...
A página está carregando...
A página está carregando...
A página está carregando...
A página está carregando...
A página está carregando...
A página está carregando...
A página está carregando...
A página está carregando...
A página está carregando...
A página está carregando...
A página está carregando...
A página está carregando...
A página está carregando...
A página está carregando...
A página está carregando...
A página está carregando...
A página está carregando...
A página está carregando...
A página está carregando...
A página está carregando...
A página está carregando...
A página está carregando...
A página está carregando...
A página está carregando...
A página está carregando...
A página está carregando...
A página está carregando...
A página está carregando...
A página está carregando...
A página está carregando...
A página está carregando...
A página está carregando...
A página está carregando...
A página está carregando...
A página está carregando...
A página está carregando...
A página está carregando...
A página está carregando...
A página está carregando...
A página está carregando...
A página está carregando...
A página está carregando...
A página está carregando...
A página está carregando...
A página está carregando...
A página está carregando...
A página está carregando...
A página está carregando...
A página está carregando...
-
 1
1
-
 2
2
-
 3
3
-
 4
4
-
 5
5
-
 6
6
-
 7
7
-
 8
8
-
 9
9
-
 10
10
-
 11
11
-
 12
12
-
 13
13
-
 14
14
-
 15
15
-
 16
16
-
 17
17
-
 18
18
-
 19
19
-
 20
20
-
 21
21
-
 22
22
-
 23
23
-
 24
24
-
 25
25
-
 26
26
-
 27
27
-
 28
28
-
 29
29
-
 30
30
-
 31
31
-
 32
32
-
 33
33
-
 34
34
-
 35
35
-
 36
36
-
 37
37
-
 38
38
-
 39
39
-
 40
40
-
 41
41
-
 42
42
-
 43
43
-
 44
44
-
 45
45
-
 46
46
-
 47
47
-
 48
48
-
 49
49
-
 50
50
-
 51
51
-
 52
52
-
 53
53
-
 54
54
-
 55
55
-
 56
56
-
 57
57
-
 58
58
-
 59
59
-
 60
60
-
 61
61
-
 62
62
-
 63
63
-
 64
64
-
 65
65
-
 66
66
-
 67
67
-
 68
68
-
 69
69
-
 70
70
-
 71
71
-
 72
72
-
 73
73
-
 74
74
-
 75
75
-
 76
76
-
 77
77
-
 78
78
-
 79
79
-
 80
80
-
 81
81
-
 82
82
-
 83
83
-
 84
84
-
 85
85
-
 86
86
-
 87
87
-
 88
88
-
 89
89
-
 90
90
-
 91
91
-
 92
92
-
 93
93
-
 94
94
-
 95
95
-
 96
96
-
 97
97
-
 98
98
-
 99
99
-
 100
100
-
 101
101
-
 102
102
-
 103
103
-
 104
104
-
 105
105
-
 106
106
-
 107
107
-
 108
108
-
 109
109
-
 110
110
-
 111
111
-
 112
112
-
 113
113
-
 114
114
-
 115
115
-
 116
116
-
 117
117
-
 118
118
-
 119
119
-
 120
120
-
 121
121
-
 122
122
-
 123
123
-
 124
124
-
 125
125
-
 126
126
-
 127
127
-
 128
128
-
 129
129
-
 130
130
-
 131
131
-
 132
132
-
 133
133
-
 134
134
-
 135
135
-
 136
136
-
 137
137
-
 138
138
-
 139
139
-
 140
140


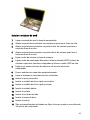
Dell Precision M6600 Manual do proprietário
- Tipo
- Manual do proprietário
Artigos relacionados
-
Dell Precision M6800 Manual do proprietário
-
Dell Vostro 1440 Manual do proprietário
-
Dell Vostro 1450 Manual do proprietário
-
Dell Precision M6700 Manual do proprietário
-
Dell Vostro V131 Manual do proprietário
-
Dell Vostro 3750 Manual do proprietário
-
Dell Vostro 2420 Manual do proprietário
-
Dell Vostro 2520 Manual do proprietário
-
Dell Latitude 3540 Manual do proprietário
-
Dell Latitude E6330 Manual do proprietário