Yamaha YSV104 Manual do proprietário
- Categoria
- Equipamento musical suplementar
- Tipo
- Manual do proprietário

EN 1
Contents
PRECAUTIONS............................................. 3
Main Unit / Accessories.................................. 5
Parts Diagram: Main Unit................................ 6
Parts Diagram: Control Box ............................. 8
Installing/Replacing batteries....................................... 10
About the Auto power off function ............................... 10
Tuning and Changing the Strings..................... 11
The Shoulder Rest ...................................... 13
Specifications ........................................... 14
Thank you for purchasing a Yamaha SILENT Violin™.
The YSV104 is a new version of the SILENT Violin that incorporates Yamaha’s
exclusive SRT Powered system.
SRT Powered system simulates the natural sound and resonance of an acoustic
violin by using samples that were recorded using high-quality microphones that
were placed in the position of the player’s ears. This gives players a natural
playing experience through headphones, while its solid body design has
reduced the actual sound output.
In order to obtain maximum performance and enjoyment from this instrument,
we urge you to read this Owner’s Manual thoroughly before using the instru-
ment. We recommend that you keep it in a convenient place for future reference.
* “SILENT Violin™” and the logo are trademarks of the Yamaha Cor-
poration.
* SRT: Studio Response Technology
YSV104
Owner’s Manual
English

2 EN
(weee_battery_eu_en_02)
CAN ICES-3 (B)/NMB-3(B)
• This applies only to products distributed by Yamaha Canada Music Ltd.
• Ceci ne s’applique qu’aux produits distribués par Yamaha Canada Musique Ltée. (can_b_01)
Information for users on collection and disposal of old equipment and used batteries:
These symbols on the products, packaging, and/or accompanying documents mean that used electrical and electronic products
and batteries should not be mixed with general household waste.
For proper treatment, recovery and recycling of old products and used batteries, please take them to applicable collection points,
in accordance with your national legislation.
By disposing of these products and batteries correctly, you will help to save valuable resources and prevent any potential nega-
tive effects on human health and the environment which could otherwise arise from inappropriate waste handling.
For more information about collection and recycling of old products and batteries, please contact your local municipality, your
waste disposal service or the point of sale where you purchased the items.
For business users in the European Union:
If you wish to discard electrical and electronic equipment, please contact your dealer or supplier for further information.
Information on Disposal in other Countries outside the European Union:
These symbols are only valid in the European Union. If you wish to discard these items, please contact your local authorities or
dealer and ask for the correct method of disposal.
Note for the battery symbol (bottom two symbol examples):
This symbol might be used in combination with a chemical symbol. In this case it complies with the requirement set by the EU
Battery Directive for the chemical involved.
SPECIAL MESSAGE SECTION
This product should be used only with the components supplied or; a cart,
rack, or stand that is recommended by Yamaha. If a cart, etc., is used, please
observe all safety markings and instructions that accompany the accessory
product.
SPECIFICATIONS SUBJECT TO CHANGE: The information con-
tained in this manual is believed to be correct at the time of printing. How-
ever, Yamaha reserves the right to change or modify any of the
specifications without notice or obligation to update existing units.
This product, either alone or in combination with an amplifier and head-
phones or speaker/s, may be capable of producing sound levels that could
cause permanent hearing loss. DO NOT operate for long periods of time at a
high volume level or at a level that is uncomfortable. If you experience any
hearing loss or ringing in the ears, you should consult an audiologist.
IMPORTANT: The louder the sound, the shorter the time period before
damage occurs.
NOTICE: Service charges incurred due to a lack of knowledge relating to
how a function or effect works (when the unit is operating as designed) are
not covered by the manufacturer’s warranty, and are therefore the owners
responsibility. Please study this manual carefully and consult your dealer
before requesting service.
ENVIRONMENTAL ISSUES: Yamaha strives to produce products that
are both user safe and environmentally friendly. We sincerely believe that
our products and the production methods used to produce them, meet these
goals. In keeping with both the letter and the spirit of the law, we want you
to be aware of the following:
Disposal Notice: Should this product become damaged beyond repair,
or for some reason its useful life is considered to be at an end, please
observe all local, state, and federal regulations that relate to the disposal of
products that contain lead, batteries, plastics, etc. If your dealer is unable to
assist you, please contact Yamaha directly.
NAME PLATE LOCATION: The name plate is located on the bottom of
the product. The model number, serial number, power requirements, etc., are
located on this plate. You should record the model number, serial number,
and the date of purchase in the spaces provided below and retain this manual
as a permanent record of your purchase.
Model Serial No.
Purchase Date
PLEASE KEEP THIS MANUAL
92-BP (bottom)
FCC INFORMATION (U.S.A.)
1. IMPORTANT NOTICE: DO NOT MODIFY THIS UNIT!
This product, when installed as indicated in the instructions contained in this
manual, meets FCC requirements. Modifications not expressly approved by
Yamaha may void your authority, granted by the FCC, to use the product.
2. IMPORTANT: When connecting this product to accessories and/or
another product use only high quality shielded cables. Cable/s supplied
with this product MUST be used. Follow all installation instructions. Fail-
ure to follow instructions could void your FCC authorization to use this
product in the USA.
3. NOTE: This product has been tested and found to comply with the
requirements listed in FCC Regulations, Part 15 for Class “B” digital
devices. Compliance with these requirements provides a reasonable level
of assurance that your use of this product in a residential environment will
not result in harmful interference with other electronic devices. This equip-
ment generates/uses radio frequencies and, if not installed and used
according to the instructions found in the users manual, may cause interfer-
ence harmful to the operation of other electronic devices. Compliance with
FCC regulations does not guarantee that interference will not occur in all
installations. If this product is found to be the source of interference, which
can be determined by turning the unit “OFF” and “ON”, please try to elim-
inate the problem by using one of the following measures:
Relocate either this product or the device that is being affected by the inter-
ference.
Utilize power outlets that are on different branch (circuit breaker or fuse)
circuits or install AC line filter/s.
In the case of radio or TV interference, relocate/reorient the antenna. If the
antenna lead-in is 300 ohm ribbon lead, change the lead-in to co-axial type
cable.
If these corrective measures do not produce satisfactory results, please con-
tact the local retailer authorized to distribute this type of product. If you
can not locate the appropriate retailer, please contact Yamaha Corporation
of America, Electronic Service Division, 6600 Orangethorpe Ave, Buena
Park, CA90620
The above statements apply ONLY to those products distributed by
Yamaha Corporation of America or its subsidiaries.
(class B)

EN 3
PRECAUTIONS
PLEASE READ CAREFULLY BEFORE PROCEEDING
Please keep this manual in a safe and handy place for future reference.
WARNING
Always follow the basic precautions listed below to avoid the possibility of serious injury
or even death from electrical shock, short-circuiting, damages, fire or other hazards.
These precautions include, but are not limited to, the following:
• This instrument contains no user-serviceable
parts. Do not open the instrument or attempt to
disassemble or modify the internal components in
any way.
• Take care not to pierce your finger with the end of
the string. String ends are sharp and may cause
injury.
• Never hold the instrument close to your face when
adjusting or replacing strings. A string may unex-
pectedly break damaging your eyes.
• Do not expose the instrument to rain, use it near
water or in damp or wet conditions.
• Follow the precautions below. Failure to do so
might result in explosion, fire, overheating or bat-
tery fluid leakage.
- Do not tamper with or disassemble batteries.
- Do not dispose of batteries in fire.
- Do not attempt to recharge batteries that are not
designed to be charged.
- Use the specified battery type (page 14) only.
- Keep the batteries separate from metallic objects
such as necklaces, hairpins, coins, and keys.
- Always make sure all batteries are inserted in
conformity with the +/– polarity markings.
- When the batteries run out, or if the instrument is
not to be used for a long time, remove the batter-
ies from the instrument.
- Use new batteries, all of which are the same type,
same model, and made by the same manufac-
turer.
- When using Ni-MH batteries, follow the instruc-
tions that came with the batteries. Use only the
specified charger device when charging.
• Keep batteries away from small children who might
accidentally swallow them.
• If the batteries do leak, avoid contact with the
leaked fluid. If the battery fluid should come in con-
tact with your eyes, mouth, or skin, wash immedi-
ately with water and consult a doctor. Battery fluid
is corrosive and may possibly cause loss of sight
or chemical burns.
• When one of the following problems occur, imme-
diately turn off the power switch and remove all
batteries from the instrument. Then have the
device inspected by Yamaha service personnel.
- It emits unusual smells or smoke.
- Some object has been dropped into the instru-
ment.
- There is a sudden loss of sound during use of the
instrument.
Do not open
Handling caution
Water warning
Battery
If you notice any abnormality

4 EN
CAUTION
Always follow the basic precautions listed below to avoid the possibility of physical injury
to you or others, or damage to the instrument or other property. These precautions
include, but are not limited to, the following:
• Before connecting the instrument to other elec-
tronic components, turn off the power for all com-
ponents. Before turning the power on or off for all
components, set all volume levels to minimum.
• Do not expose to direct sunlight (in a car during the
day), high temperatures such as near a stove, or
extremely low temperatures, and do not expose to
vibrations or dust to prevent damage to the internal
components or disfiguration.
• Do not place the instrument in an unstable position
where it might accidentally fall over.
• Before moving the instrument, remove all con-
nected cables, to prevent damage to the cables or
injury to anyone who might trip over them.
• To prevent injury to others or property damage, do
not swing or wave the bow when not playing, and
never throw the bow.
• Do not use the instrument for a long period of time
at a high or uncomfortable volume level, since this
can cause permanent hearing loss. If you experi-
ence any hearing loss or ringing in the ears, con-
sult a physician.
• If cleaning is required, wipe with a soft cloth. Do
not use thinners, solvents, cleaning fluids, or wipes
soaked with chemicals. Also, do not place vinyl or
plastic products on the instrument. Doing so can
cause discoloration/deterioration.
• Do not rest your weight on, or place heavy objects
on the instrument, and do not use excessive force
on the buttons, switches or connectors.
• To prevent injury to others or property damage,
always maintain sufficient distance around you to
prevent the bow from coming in contact with others
and/or objects while playing the instrument.
• Make sure to discard used batteries according to
local regulations.
Connections
Location
Handling caution
Yamaha cannot be held responsible for damage caused by improper use or modifications to the instrument.

EN 5
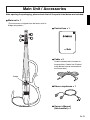
After opening the packaging, please check that all the parts listed below are included.
Main Unit / Accessories
Main unit × 1
(The instrument is shipped from the factory with its
bridge laying down.)
Control box × 1
Cable × 2
(Used to connect the instrument to
the proprietary Control box. External
audio devices can be connected via
the Control box.)
Stereo earphones × 1
Owner’s Manual
(this booklet) × 1
Bridge

6 EN
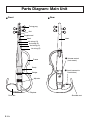
Parts Diagram: Main Unit
Front Rear
Tuning peg
Nut
Fingerboard
4th string (G)
3rd string (D)
2nd string (A)
1st string (E)
Bridge
Body
Adjuster
Tailpiece
Chin rest
Neck
w Jack (connect to
Control box)
q Volume control
(instrument)
Frame
Neck
Shoulder rest

EN 7
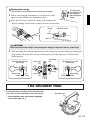
q Volume control (instrument)
Adjusts the instrument’s output level volume to the proprietary Control box.
w Jack (connect to Control box)
This jack is used to receive power from the Control box and transmit the audio signal from
the instrument to the Control box. Use the supplied cable to connect the instrument to the
“Instrument jack” ( ) on the Control box.
* A commercially available audio cable with stereo mini plugs on both ends can also be used.
(Cables with resistors are not compatible.)
* The system will not operate properly if a monaural cable is used.
* The system will not operate properly if the cable is attached to anything other than the Control box.
Connection example
NOTE
• If the sound is distorted, rotate the Volume control dial to the left.
CAUTION
• Connect or disconnect the cable between the Silent Violin and the Control box only after the
Control box power is switched OFF.
• When connecting the Silent Violin’s Control box to an external device, make sure that the power
is switched OFF on all devices, or that the volume on all devices is set to the minimum level.
Loud volume levels can damage your hearing, and damage the equipment.
• When making connections to external devices, make sure that the proper plugs are used and
securely connected.
Stereo earphones
Audio player, etc.
Main unit
Control box
To external audio device
(mixer, amplifier, etc.)

8 EN
* For use with the YSV104. Not compatible with other instruments.
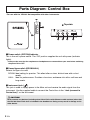
q Power switch (OFF/ON)/indicator
This is the unit’s power switch. The “ON” position supplies the unit with power (indicator
lights).
* Always make sure that the earphones or headphones are removed from your ears before switching
the power ON or OFF.
w Sound type switch (ROOM/HALL)
Selects the type of sound.
ROOM: Ideal setting for practice. This effect offers a clear, distinct tone with a short
reverb.
HALL: Ideal for performance. Provides a luxurious, ambience-rich with a soft tone and
long reverb.
e Instrument jack ( )
This jack is used to supply power to the Main unit and receive the audio signal from the
instrument. Use the supplied cable to connect the Control box to the “Jack (connect to
Control box)” on the instrument.
CAUTION
Never connect any devices (including other Silent Violins with different model numbers) other than
the YSV104 Silent Violin that is included in the bundled set. Doing so may result in damage to the
other device.
Parts Diagram: Control Box
q
w
u
ert y
Top side

EN 9
r AUX IN jack (stereo mini phone jack)
Use the supplied cable (or a commercially available audio cable) to connect an external
audio player or other such device to the AUX IN jack for playing along with audio from the
external device.
* Use the volume control on the external audio device to control its volume.
t PHONES jack ( stereo mini phone jack)
For connecting a pair of stereo earphones or headphones to the unit. In order to take advan-
tage of the SRT powered system, make sure the left and right sides of the inner earphones
or headphones are properly positioned. Use the supplied cable (or a commercially available
audio cable) to connect the unit to an external device for recording.
* Audio output is optimized for use with stereo earphones. When connecting other external devices
we recommend using the left-channel signal from the stereo output, especially when recording.
(When connecting the instrument’s stereo output to the mono input on an external audio device,
only the L channel signal is sent.)
* Do not connect the PHONES jack to a microphone jack (or mic/line jack) on a computer audio inter-
face, mixer, etc., that supplies power to the connected device (plug-in-power, phantom power, etc.).
Doing so may result in malfunction.
y Volume control (VOL)
Controls the volume level of the “PHONES jack” ( ).
u Clip
The clip is used to conveniently attach the Control box to your belt or pocket.
CAUTION
• Do not listen for extended periods of time at loud volume levels using the earphones or head-
phones. Doing so can result in damage to your hearing.
• If the sound is distorted, use the volume control on the Main unit or on the Control box and lower
the volume until the sound is no longer distorted.
• Accidentally disconnecting the cable while the power is ON, or the unit experiencing a strong
shock may cause a loud noise that can damage your hearing and the unit. Please use caution.

10 EN
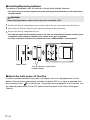
Installing/Replacing batteries
The device is powered by two AA alkaline or nickel-metal hydride* batteries.
* The device may not function properly due to the discharging characteristics of some nickel-metal
hydride batteries.
1
Remove the battery compartment cover on the back of the unit, and remove the old batteries.
2
Install the new batteries following the polarity markings in the illustration.
3
Replace the battery compartment cover.
* The indicator lights red when battery power is low. The unit automatically switches off when power
is depleted. Please replace the batteries with a fresh set as soon as possible.
* For more information on battery use, please refer to the “PRECAUTIONS” section (page 3).
About the Auto power off function
In order to prevent unnecessary power consumption, the unit is equipped with an Auto
power off function that automatically switches the power OFF if no signal is detected from
the Instrument jack ( ) for 30 minutes. If the power turns off because of this function, sim-
ply slide the power switch to the OFF position and then back to the ON position again
(reboot).
CAUTION
Before replacing batteries, make sure that the power is switched “OFF”.
Battery cover
Two AA alkaline or nickel-metal
hydride batteries

EN 11
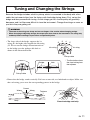
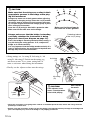
Because the bridge includes a built-in pickup, which is connected to the body with a thin
cable, the instrument ships from the factory with the bridge laying down. First, set up the
bridge and then proceed with tuning. As the strings get old, sound quality will gradually
decrease, and it will become difficult to tune the instrument. Change the strings as soon as
you think they are getting old.
• The lower side of the bridge supports the 1st
string (E), the higher side supports the 4th string
(G). Please note the bridge orientation and cen-
ter the bridge over the pickup cable hole as
shown in the illustration below.
• Ensure that the bridge stands vertically. If it leans to one side, use both hands to adjust. Make sure
that each string passes over the corresponding grooves in the bridge.
WARNING
• The ends of the strings are sharp and can cut fingers. Use caution when changing strings.
• When changing or adjusting strings, do not put your face close to the instrument. The string may
suddenly break resulting in eye or other unexpected injuries.
Tuning and Changing the Strings
1st string
G
D
A
E
4th string
Pickup cable
Groove
Pickup cable
Bridge Hole
* The illustrations show
the view looking from
the tailpiece.
Place the bridge vertically.
Correct
Wrong Wrong
Tailpiece
Ver tical
Body

12 EN
• String tunings are, 1st string E, 2nd string A, 3rd
string D, 4th string G. Push in on the tuning peg
and rotate to tune. Use a piano, tuning fork, or
tuner as reference when tuning the instrument.
• Finally, use the adjuster to fine tune the strings.
• When the instrument is not going to be used for an extended period of time, loosen the strings until the
pitch drops a whole tone.
• Before using the instrument, make sure that the bridge is positioned vertically. Damage to the bridge and
poor sound quality may result if the bridge is not properly positioned.
CAUTION
Make sure that the strings are resting in their
appropriate grooves in the bridge when play-
ing the instrument.
Strings may come out of their grooves when adjusting
the bridge or changing strings. Since the 1st (E) and 4th
(G) strings tend to come out of their grooves more eas-
ily, use your fingers to hold those strings gently in place
when tuning the instrument.
Also, the 1st (E) string is fitted with a protective tube.
Make sure that the tube rests on the bridge.
Always make sure that the bridge is standing
vertically, whether the instrument is being
played or stored (see diagram on page 11).
Even if the bridge is standing vertically before tuning, it
may tilt during the tuning process. If so, readjust the
bridge so it stands vertically.
It is very important that the bridge stands vertically. If it
leans in either direction, the sound may be impaired and
damage may occur to the instrument.
D
A
E
Make sure that the strings do
not come out of their grooves.
Protective tube on
the 1st (E) string
G
3rd string
(D)
4th string
(G)
2nd string
(A)
1st string
(E)
CAUTION
If the adjuster is too
loose, it could produce
noise while playing.
Don’t loosen
too much.
Adjuster
Raise
pitch
Lower
pitch

EN 13
A commercially available violin shoulder rest
(4/4 size) can be attached to the instrument.
* Some shoulder rests may not be compatible
(air cushion type, etc.).
Winding the strings
(Please refer to this section when changing the strings)
1
Before you string the instrument, set all adjusters so that
they are in the middle of its adjustment range.
2
Place the ball (on the end of the string) in the notch on the
adjuster, making sure the ball is properly inserted in the notch.
3
After threading the string through the hole in the tuning peg, turn the tuning peg making one
wrap on one side of the hole and the remaining wraps on the other side as shown in the
diagram below.
CAUTION
Do not use loop end E strings. It may damage the strings or fine tuner, and can cause injury.
The adjusters
should be set to
the middle of
the adjustment
range.
Adjuster notchString
Ball
2nd string
(A)
3rd string
(D)
4th string
(G)
1st string
(E)
Winding the 3rd and
4th strings
Winding the 1st and
2nd strings
1st
wind
Remaining
winds
Remaining
winds
1st
wind
The Shoulder Rest
Shoulder rest

14 EN
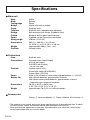
Main unit
Neck Maple
Body Spruce
Tuning pegs Ebony
Bridge Maple (with built-in pickup)
Frame Synthetic resin
Tailpiece Synthetic resin (equipped with adjusters)
Strings Ball-end type violin strings (D’Addario Zyex)
Pickup Bridge w/ built-in piezo-electric pickup
Power Supplied via the Control box connection
String length 328 mm (12-15/16")
Dimensions 583 (L) × 206 (W) × 111 (H) mm
22-15/16" (L) × 8-1/8" (W) × 4-3/8" (H)
Weight Approximately 490 g (1 lbs. 1 oz.)
Controls Volume control
Control box
Case Synthetic resin
Connections Instrument jack (Input/Output)
AUX IN jack (Input)
PHONES jack (Output)
* All mini jack type
Controls Volume control (VOL)
Sound type switch (ROOM/HALL)
Power switch (OFF/ON)
Power SUM-3 (AA) alkaline or nickel-metal hydride batteries × 2 (3V DC)
Battery life With Alkaline batteries: approximately 29 hours
With Nickel-metal hydride batteries: approximately 24 hours
* Depending upon usage and conditions
Dimensions 70 (W) × 20 (D) × 98 (H) mm
2-3/4" (W) × 3/16" (D) × 3-7/8" (H)
Weight Approximately 70 g (2.5 oz.) without batteries
Accessories
Cable × 2, stereo earphones × 1, Owner’s Manual (this booklet) × 1
* The contents of this manual apply to the latest specifications as of the publishing date. To obtain
the latest manual, access the Yamaha website then download the manual file.
Since specifications, equipment or separately sold accessories may not be the same in every
locale, please check with your Yamaha dealer.
Specifications

版次R2
C0
-
 1
1
-
 2
2
-
 3
3
-
 4
4
-
 5
5
-
 6
6
-
 7
7
-
 8
8
-
 9
9
-
 10
10
-
 11
11
-
 12
12
-
 13
13
-
 14
14
-
 15
15


Yamaha YSV104 Manual do proprietário
- Categoria
- Equipamento musical suplementar
- Tipo
- Manual do proprietário
em outras línguas
- español: Yamaha YSV104 El manual del propietario
- français: Yamaha YSV104 Le manuel du propriétaire
- italiano: Yamaha YSV104 Manuale del proprietario
- English: Yamaha YSV104 Owner's manual
- русский: Yamaha YSV104 Инструкция по применению
- Nederlands: Yamaha YSV104 de handleiding
- Deutsch: Yamaha YSV104 Bedienungsanleitung
- dansk: Yamaha YSV104 Brugervejledning
- čeština: Yamaha YSV104 Návod k obsluze
- svenska: Yamaha YSV104 Bruksanvisning
- polski: Yamaha YSV104 Instrukcja obsługi
- Türkçe: Yamaha YSV104 El kitabı
- suomi: Yamaha YSV104 Omistajan opas
- română: Yamaha YSV104 Manualul proprietarului
Artigos relacionados
-
Yamaha YEV-104 Manual do proprietário
-
-
-
-
-
-
-
-
-