A página está carregando...

ES
PT
DESCRIPCIÓN GENERAL/DESCRIÇÃO GERAL
Pantalla (preparaciones)/
Ecrã (preparação)
13
Lungo/Lungo
14
Espresso/Espresso
15
Ristretto/Ristretto
16
Agua caliente/Água quente
17
Leche templada/Leite quente
18
Cappuccino/Cappuccino
19
Latte Macchiato/Latte Macchiato
Pantalla (navegación)/
Ecrã (navegação)
20
Menú/Menu
21
Desplácese hacia arriba cuando el menú esté
activado/Ir para o topo quando o Menu está
ativo
22
Elija una opción cuando el menú esté activado/
Selecionar opção quando o Menu está ativo
23
Desplácese hacia abajo cuando el menú esté
activado/
Ir para o m quando o Menu está ativo
24
Pantalla de texto/Exibição de mensagem
Rapid Cappuccino System (R.C.S.)/
Rapid Cappuccino System (R.C.S.)
25
Regulador de espuma de leche/
Manípulo de regulação da Espuma de Leite
26
Introduzca la posición del regulador de espuma de leche/
Escolha a posição do manípulo de regulação da Espuma de leite
27
Nivel mínimo de espuma/Mín. de espuma
28
Nivel máximo de espuma/Máx. de espuma
29
«
LIMPIAR»: función de aclarado automático/
«LIMPEZA»: função de Enxaguamento Automático
30
Tapa del depósito de leche/Tampa do Reservatório de Leite
31
Tubo de salida de leche/Saída do leite
32
Depósito de leche/Depósito de Leite
33
Tubo de aspiración de leche/Tubo de aspiração do leite
34
Conector del R.C.S./Conector de R.C.S.
Descripción general de la máquina/
Descrição geral da máquina
A
Máquina solo con conguración de café/
Máquina congurada apenas para café
B
Máquina con Rapid Cappuccino System (para Cappuccino)/
Máquina com Rapid Cappuccino System (para Cappuccino)
C
Máquina con tubo de salida de agua caliente/
Máquina com saída de água quente
1
Palanca/Alavanca
2
Botón de encendido/apagado/Botão ON/OFF [Ligar/Desligar]
3
Depósito de agua/
Reservatório de água
4
Salida del café/Saída de café
5
Rejilla antigoteo/Grelha de gotejamento
6
Bandeja antigoteo/Tabuleiro de gotejamento
7
Soporte para tazas giratorio (no extraíble)/
Suporte de chávena giratório (não amovível)
8
Contenedor de cápsulas usadas/Recipiente de cápsulas usadas
9
Puerta del conector de vapor/Porta do conector de vapor
10
Tubo telescópico de salida de agua caliente
/
Saída telescópica de água quente
11
Zona de almacenamiento del tubo de salida de agua caliente
/
Armazenamento da saída de água quente
12
Conector de vapor/Conector de vapor
40
6926_UM_LATTISSIMA_PREMIUM_Z2A.indb 40 17.10.13 19:57

41
ES
PT
ÍNDICE/ÍNDICE
Nespresso, un sistema exclusivo para preparar siempre el espresso perfecto. Todas las máquinas Nespresso están equipadas con un sistema de extracción único que garantiza una presión de hasta 19 bares. Todos los parámetros
han sido calculados con la mayor precisión para asegurar la extracción de todos los aromas presentes en cada Grand Cru, dar cuerpo al café y crear una crema extraordinariamente densa y suave.
Nespresso, um sistema exclusivo que prepara o espresso, chávena após chávena. Todas as máquinas Nespresso estão equipadas com um sistema de extração único que assegura uma pressão até 19 bar. Cada parâmetro foi
calculado com grande precisão para garantir que todos os aromas de cada Grand Cru são extraídos, para dar corpo ao café e criar um creme excecionalmente suave e encorpado.
VOLÚMENES DE LA CONFIGURACIÓN DE FÁBRICA/
CONFIGURAÇÕES DE ORIGEM DO VOLUME
......................................................
DESCALCIFICACIÓN/DESCALCIFICAÇÃO ..........................................................
CONFIGURACIÓN DE LA DUREZA DEL AGUA/
CONFIGURAÇÃO DA DUREZA DA ÁGUA
............................................................
RESOLUCIÓN DE PROBLEMAS/RESOLUÇÃO DE PROBLEMAS .............................
ESPECIFICACIONES/ESPECIFICAÇÕES .............................................................
ELIMINACIÓN DE RESIDUOS Y CUESTIONES MEDIOAMBIENTALES/
ELIMINAÇÃO E PREOCUPAÇÕES ECOLÓGICAS
..................................................
CONTACTE CON EL CLUB NESPRESSO/
ENTRAR EM CONTACTO COM O CLUBE NESPRESSO
...........................................
GARANTÍA/GARANTIA ...................................................................................
DESCRIPCIÓN GENERAL/DESCRIÇÃO GERAL .......................................................
CONTENIDO DEL EMBALAJE/CONTEÚDO DA EMBALAGEM ....................................
NAVEGACIÓN POR EL MENÚ/MENU DE NAVEGAÇÃO .............................................
LISTA DEL MENÚ/LISTA DO MENU ......................................................................
PRIMER USO O DESPUÉS DE UN PERIODO PROLONGADO DE INACTIVIDAD/
PRIMEIRA UTILIZAÇÃO OU UTILIZAÇÃO APÓS UM LONGO PERÍODO DE NÃO
UTILIZAÇÃO
......................................................................................................
PREPARACIÓN DEL CAFÉ/PREPARAÇÃO DE CAFÉ .................................................
MONTAJE/DESMONTAJE DEL RAPID CAPPUCCINO SYSTEM R.C.S./
MONTAGEM/DESMONTAGEM DO RAPID CAPPUCCINO SYSTEM R.C.S.
.................
PREPARACIÓN DE CAPPUCCINO Y LATTE MACCHIATO/
PREPARAÇÃO DE CAPPUCCINO E LATTE MACCHIATO
............................................
CUIDADO DIARIO/CUIDADOS DIÁRIOS ................................................................
LIMPIEZA A MANO DEL RAPID CAPPUCCINO SYSTEM R.C.S./
LAVAGEM À MÃO DO RAPID CAPPUCCINO SYSTEM R.C.S.
..................................
51
52
53
54
55
56
56
56
ATENCIÓN: cuando vea este símbolo, consulte las instrucciones de seguridad para evitar posibles daños y lesiones.
NOTA: cuando vea este símbolo, siga los consejos para una utilización correcta y segura de su máquina de café.
ATENÇÃO: quando vir este símbolo, pedimos-lhe que consulte as instruções de segurança para evitar possíveis danos e lesões.
INFORMAÇÕES: quando vir este símbolo, pedimos-lhe que tenha em consideração os conselhos para a utilização correta e segura da
sua máquina de café.
40
42
42
43
44
46
46
47
50
50
6926_UM_LATTISSIMA_PREMIUM_Z2A.indb 41 17.10.13 19:57

EN SA FETY PRECAUTI ONS ............................................................................. 2
FR CONSIGNES DE SECURITE ......................................................................... 4
DE SICHERHEITSHINWEISE ........................................................................... 7
IT PRECAUZIONI DI SICUREZ ZA .................................................................... 10
ES PRECAUCIONES DE SEGURIDAD ................................................................ 12
PT MEDIDAS DE SEGURANÇA......................................................................... 15
NL V EILIGHEIDSMAATREGELEN ..................................................................... 18
GR ΜΈΤ ΡΑ ΑΣΦΑΛΈΙΑ Σ .................................................................................. 20
HU BIZTONSÁGI ELŐÍRÁSOK .......................................................................... 22
CZ BEZPEČNOSTNÍ POKYNY .......................................................................... 25
PL ZASADY BEZPIECZEŃSTWA ....................................................................... 28
RU МЕРЫ ПРЕДОСТОР ОЖНОСТИ ................................................................. 31
ES
PT
NAVEGACIÓN POR EL MENÚ/MENU DE NAVEGAÇÃO
CONTENIDO DEL EMBALAJE/CONTEÚDO DA EMBALAGEM
Máquina de café
Máquina de café
Carpeta de bienvenida a Nespresso
Dossier «Bem-vindo ao Clube Nespresso»
Manual de instrucciones
Manual do utilizador
Instrucciones de seguridad
Instruções de segurança
Juego de cápsulas
Conjunto de cápsulas
Para entrar en la lista del menú/Aceder à lista do Menu
Pulse el símbolo /Pressione brevemente o símbolo .
Para buscar opciones/Opções de navegação
Pulse el símbolo /Pressione símbolo .
Para seleccionar una opción/Selecione a opção
Pulse el símbolo /Pressione símbolo .
Para salir de la lista del menú/Sair da lista do Menu
Desplácese hasta la opción [EXIT] y selecciónela o pulse
rápidamente el símbolo .
Desloque até à opção [SAIR e selecione. Ou pressione
brevemente o símbolo .
Para abandonar una opción y volver a la lista del
menú/Sair da opção e voltar à lista do menu
Desplácese hasta la opción [SALIR] y selecciónela o pulse
rápidamente el símbolo .
Desloque até à opção [SAÍDA] e selecione. Ou pressione
brevemente o símbolo .
42
6926_UM_LATTISSIMA_PREMIUM_Z2A.indb 42 17.10.13 19:57

max
SET LANGUAGE
to continue
LANGUAGE
Actual value : EN
New value : [ ]
to select
05
max
SET LANGUAGE
to continue
LANGUAGE
Actual value : EN
New value : [ ]
to select
05
max
SET LANGUAGE
to continue
LANGUAGE
Actual value : EN
New value : [ ]
to select
05
max
SET LANGUAGE
to continue
LANGUAGE
Actual value : EN
New value : [ ]
to select
05
max
SET LANGUAGE
to continue
LANGUAGE
Actual value : EN
New value : [ ]
to select
05
max
SET LANGUAGE
to continue
LANGUAGE
Actual value : EN
New value : [ ]
to select
05
ES
PT
PRIMER USO O DESPUÉS DE UN PERIODO PROLONGADO DE INACTIVIDAD/
PRIMEIRA UTILIZAÇÃO OU UTILIZAÇÃO APÓS UM LONGO PERÍODO DE NÃO UTILIZAÇÃO
ATENCIÓN: en primer lugar, lea
las instrucciones de seguridad para
evitar riesgos de descarga eléctrica
mortal e incendio.
ATENÇÃO: em primeiro lugar,
leia as instruções de segurança para
evitar riscos fatais de choque elétrico
e de fogo.
1. Retire el depósito de agua, la bandeja antigoteo y el
contenedor de cápsulas usadas. Ajuste la longitud del cable
y almacene el exceso del mismo en la guía situada debajo de
la máquina.
1. Remova o reservatório de água, o tabuleiro de gotejamento
e o recipiente de cápsulas. Ajuste o comprimento do cabo e
arrume o excesso na guia do cabo, sob a máquina.
5. Inserte el tubo de salida de agua
caliente. Encienda la máquina.
5. Insira a saída de água quente. Ligue
a máquina.
2. Coloque la máquina en posición
vertical y conéctela a la red eléctrica.
2. Coloque a máquina na posição
vertical e ligue-a à corrente elétrica.
6. SET LANGUAGE: establezca el idioma que
preera. Pulse
para continuar.
6. SET LANGUAGE: dena o idioma
pretendido. Pressione
para continuar.
3. El depósito de agua se puede coger por
la tapa.
3. O reservatório de água pode ser
transportado pela tampa.
4. Aclare el depósito de agua y, a continuación, llénelo con
agua potable.
4. Enxague o reservatório de água antes de o encher com água
potável até ao nível máximo.
44
6926_UM_LATTISSIMA_PREMIUM_Z2A.indb 44 17.10.13 19:57

45
max
SET LANGUAGE
to continue
LANGUAGE
Actual value : EN
New value : [ ]
to select
05
max
First read the safety precautions to avoid risks of fatal electrical shock and fire
Remove the plastic films from grid,
lever and machine panels.
Remove the water tank, drip tray, and capsule
container. Adjust the cable length and store the
excess in the cable guide under the machine.
Put the machine in upright position,
plug machine into mains.
The water tank can be carried by
its cover.
Rinse the water tank before filling with
potable water up to maximum level.
Insert the hot water spout.
Switch machine ON
Set your preferred language.
Press to continue.
SET LANGUAGE
to continue
Select your language by scrolling the
options using up/down arrow. Press to
confirm.
LANGUAGE
Actual value : EN
New value : [ ]
to select
Coffee preparation
x3
x3
110 ml
40 ml
25 ml
05 06
ES
PT
7. LANGUAGE: seleccione el idioma desplazándose por las opciones
mediante las echas
. Pulse para continuar.
7. LANGUAGE: selecione o seu idioma usando a seta para
para
percorrer as opções. Pressione para conrmar.
PRIMER USO O DESPUÉS DE UN PERIODO PROLONGADO DE INACTIVIDAD/
PRIMEIRA UTILIZAÇÃO OU UTILIZAÇÃO APÓS UM LONGO PERÍODO DE NÃO UTILIZAÇÃO
11. Desmonte el Rapid Cappuccino System (R.C.S.) y lave todos los componentes en la parte superior
del lavavajillas. En caso de no disponer de lavavajillas, consulte el apartado «Limpieza a mano del Rapid
Cappuccino System (R.C.S.)».
11. Desmonte o Rapid Cappuccino System (R.C.S.) e lave todas as peças no cesto superior da máquina de
lavar louça. No caso de não ter uma máquina de lavar louça disponível, consulte a secção Lavagem à Mão
do Rapid Cappuccino System (R.C.S.).
NOTA: consulte el apartado «Montaje/Desmontaje del Rapid Cappuccino System».
INFORMAÇÃO: consulte a secção Montagem/Desmontagem do Rapid Cappuccino
System (R.C.S.).
10. Aclarado: repita tres veces con el tubo de salida de agua caliente. Cuando haya terminado, retírelo y
vuelva a guardarlo en la zona de almacenamiento situada en el lado derecho de la máquina. Cierre la puerta
del conector de vapor.
10. Enxaguamento: repita três vezes através da saída de água quente. Após terminar, remova-a e insira-a
na zona de armazenagem situada no lado direito da máquina. Feche a porta do conector de vapor.
NOTA: después de su fabricación se comprueba el funcionamiento de las máquinas, por lo que
es posible que aparezcan restos de café molido en el agua del aclarado.
INFORMAÇÃO: as máquinas são totalmente testadas após a sua produção. Poderão ser
encontrados vestígios de café na água de enxaguamento.
9. Aclarado: coloque un recipiente debajo de la salida del café y
pulse el botón Lungo. Repita esta acción tres veces.
9. Enxaguamento: coloque um recipiente sob a saída de café e
pressione o botão Lungo. Repita três vezes.
8. Cuando pulse , la máquina se calentará.
8. Assim que o
é pressionado, a máquina começa a aquecer.
4°
15”
Assembling / disassembling of Rapid Cappuccino system (R.C.S)
07
6926_UM_LATTISSIMA_PREMIUM_Z2A.indb 45 17.10.13 19:57

max
First read the safety precautions to avoid risks of fatal electrical shock and fire
Remove the plastic films from grid,
lever and machine panels.
Remove the water tank, drip tray, and capsule
container. Adjust the cable length and store the
excess in the cable guide under the machine.
Put the machine in upright position,
plug machine into mains.
The water tank can be carried by
its cover.
Rinse the water tank before filling with
potable water up to maximum level.
Insert the hot water spout.
Switch machine ON
Set your preferred language.
Press to continue.
SET LANGUAGE
to continue
Select your language by scrolling the
options using up/down arrow. Press to
confirm.
LANGUAGE
Actual value : EN
New value : [ ]
to select
Coffee preparation
x3
x3
110 ml
40 ml
25 ml
05 06
1
2
max
First read the safety precautions to avoid risks of fatal electrical shock and fire
Remove the plastic films from grid,
lever and machine panels.
Remove the water tank, drip tray, and capsule
container. Adjust the cable length and store the
excess in the cable guide under the machine.
Put the machine in upright position,
plug machine into mains.
The water tank can be carried by
its cover.
Rinse the water tank before filling with
potable water up to maximum level.
Insert the hot water spout.
Switch machine ON
Set your preferred language.
Press to continue.
SET LANGUAGE
to continue
Select your language by scrolling the
options using up/down arrow. Press to
confirm.
LANGUAGE
Actual value : EN
New value : [ ]
to select
Coffee preparation
x3
x3
110 ml
40 ml
25 ml
05 06
4°
15”
Assembling / disassembling of Rapid Cappuccino system (R.C.S)
07
ES
PT
PREPARACIÓN DEL CAFÉ/
PREPARAÇÃO DE CAFÉ
MONTAJE/DESMONTAJE DEL RAPID CAPPUCCINO SYSTEM R.C.S./
MONTAGEM/DESMONTAGEM DO RAPID CAPPUCCINO SYSTEM R.C.S.
1. Levante totalmente la palanca e introduzca
una cápsula Nespresso.
1. Levante completamente a alavanca e insira
uma cápsula Nespresso.
2. Baje la palanca y coloque una taza debajo
de la salida del café.
2. Baixe a alavanca e coloque uma chávena
por baixo da saída de café.
3. Pulse el botón Ristretto (25 ml), Espresso (40 ml) o Lungo (110 ml).
La preparación se detendrá automáticamente. Para detener el ujo de
café o llenar su café, pulse el botón de nuevo.
3. Pressione o botão Ristretto (25 ml), Espresso (40 ml) ou Lungo
(110 ml). A preparação irá parar automaticamente. Para parar o uxo de
café ou encher a sua chávena, pressione novamente o botão.
4. Coja la taza. Levante y baje la palanca
para expulsar la cápsula en el contenedor de
cápsulas usadas.
4. Retire a chávena. Levante e baixe a
alavanca para ejetar a cápsula para o
recipiente de cápsulas usadas.
1. Retire la tapa del depósito de leche y
desconecte el tubo de aspiración de leche.
1. Remova a tampa do recipiente do leite e
retire o tubo de aspiração de leite.
2. Retire el regulador de espuma de leche
girándolo hasta el símbolo
y tirando
hacia fuera.
2. Remova o manípulo de regulação
da espuma de leite girando-o até
e
empurrando para cima.
3. Retire el conector del Rapid Cappuccino
System. Desbloquee desde la posición
a
y quítelo.
3. Remova o conector do Rapid Cappuccino
System (R.C.S.) desbloqueando-o do
para
e empurrando para fora.
4. Retire el tubo de salida de leche.
4. Remova o bico de leite, empurrando-o
para fora.
NOTA: puede pulsar cualquier botón durante la fase de calentamiento. El café saldrá automáticamente
cuando la máquina esté lista.
INFORMAÇÃO: pode pressionar qualquer botão de café durante o período de aquecimento. O café irá uir
automaticamente assim que a máquina estiver pronta.
46
6926_UM_LATTISSIMA_PREMIUM_Z2A.indb 46 17.10.13 19:57
47
4°
15”
Assembling / disassembling of Rapid Cappuccino system (R.C.S)
07
4°
15”
Assembling / disassembling of Rapid Cappuccino system (R.C.S)
07
4°
15”
Assembling / disassembling of Rapid Cappuccino system (R.C.S)
07
4°
15”
Assembling / disassembling of Rapid Cappuccino system (R.C.S)
07
ES
PT
PREPARACIÓN DE CAPPUCCINO Y LATTE MACCHIATO/
PREPARAÇÃO DE CAPPUCCINO E LATTE MACCHIATO
1. Llene el depósito de leche con la cantidad
de leche que desee.
1. Encha o reservatório de leite com a
quantidade de leite desejada.
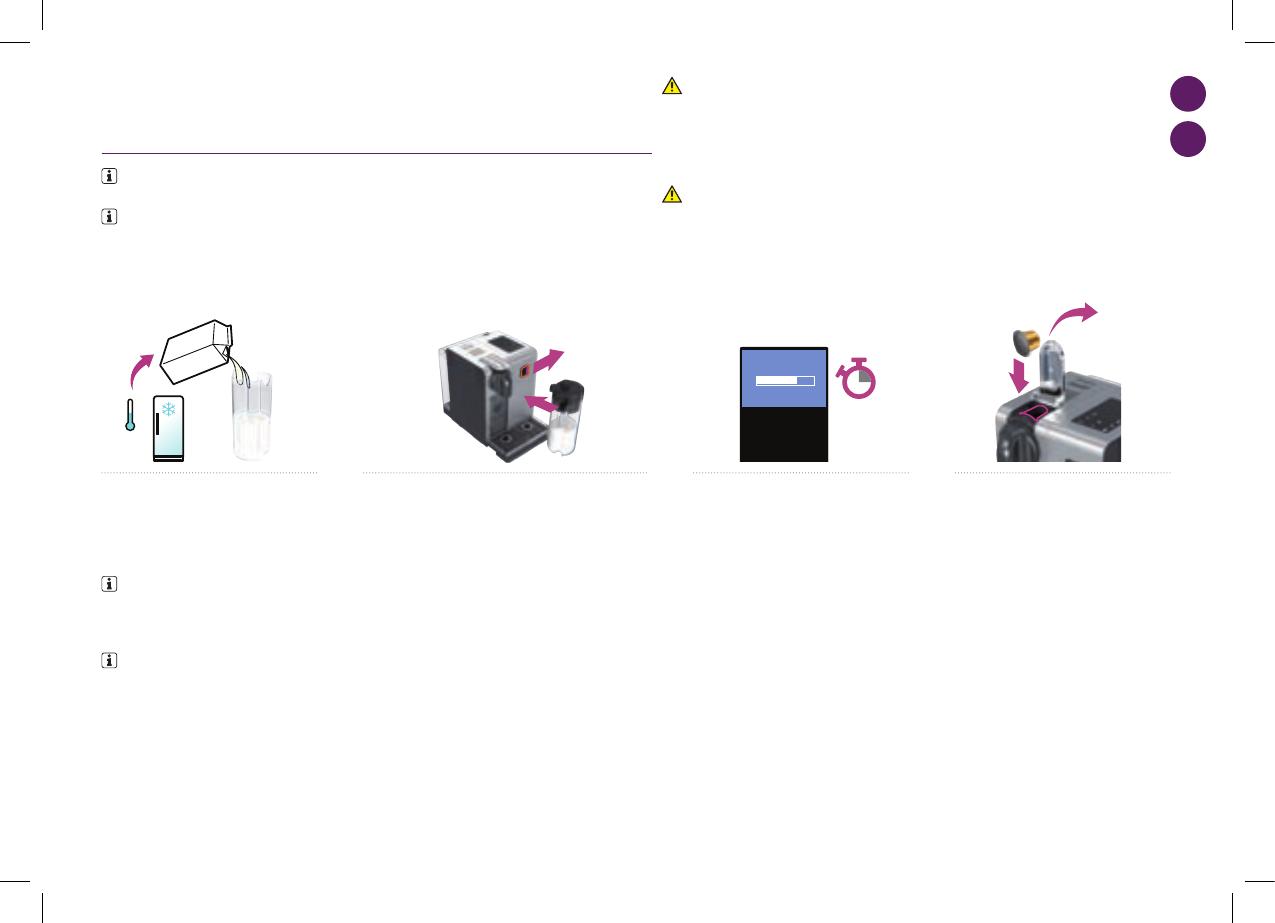
2. Cierre el depósito de leche. Abra la puerta del conector
de vapor deslizándola hacia la derecha. Conecte el Rapid
Cappuccino System a la máquina.
2. Feche o reservatório de leite. Abra a porta do conector
de vapor deslizando-a para a direita. Conecte o Rapid
Cappuccino System (R.C.S.) à máquina.
3. La máquina se calienta en
aproximadamente 15 segundos.
3. A máquina demora aproximadamente
15 seg. a aquecer.
4. Levante totalmente la palanca e introduzca
una cápsula Nespresso.
4. Levante completamente a alavanca e insira
uma cápsula Nespresso.
ATENCIÓN: no utilice el depósito de leche para almacenar otro
líquido que no sea leche o agua potable. No utilice leche cruda
sin pasteurizar y asegúrese de que la leche que utilice no haya
superado la fecha de caducidad que se indica en el envase.
ATENÇÃO: não utilize o reservatório de leite para qualquer
outro líquido que não seja leite ou água potável. Não utilize leite
não pasteurizado e certique-se de que não utiliza leite fora do
prazo de validade indicado na respetiva embalagem.
NOTA: para obtener una espuma de leche perfecta, utilice leche desnatada o semidesnatada a
temperatura del frigoríco (4° C aproximadamente).
INFORMAÇÃO: para obter uma espuma de leite perfeita, utilize leite magro ou meio-gordo à
temperatura do frigoríco (cerca de 4° C).
NOTA: cuando el depósito de leche
esté vacío, aclárelo bien con agua potable
antes de rellenarlo. Haga lo mismo con el
tubo de aspiración de leche.
INFORMAÇÃO: quando o recipiente
de leite car vazio, enxague-o bem com
água antes de o encher novamente.
Faça o mesmo com o tubo de aspiração
do leite.
6926_UM_LATTISSIMA_PREMIUM_Z2A.indb 47 17.10.13 19:57

Preparing Cappuccino and Latte Macchiato
4°
i
When the milk container is empty, before refilling,
thoroughly rinse it and the milk aspiration tube
with potable water.
Close the milk container. Open the steam
connector door by sliding it to the right. Connect
the Rapid Cappuccino System to the machine.
15”
+
LATTE MACCHIATO
Clean
15”
i
Remove Rapid Cappuccino System
connector by unlocking it from (sign ) to
(sign) and pulling it off
Remove the milk container lid and
unplug milk aspiration tube.
Remove the milk froth regulator knob by
turning it until and pulling it up.
Remove the milk spout by pulling it off.
1 2 3 4
Assembling / disassembling of Rapid Cappuccino system (R.C.S)
RINSE MILK SYSTEM
07 08
ES
PT
PREPARACIÓN DE CAPPUCCINO Y LATTE MACCHIATO/
PREPARAÇÃO DE CAPPUCCINO E LATTE MACCHIATO
NOTA: aclare el sistema de leche
después de cada uso.
INFORMAÇÃO enxague o sistema de
leite após cada utilização.
9. Coloque un recipiente debajo del tubo de
salida de leche.
9. Coloque um recipiente sob a saída do leite.
10. Gire el regulador de leche hasta la posición «LIMPIEZA».
A continuación se inicia el proceso de aclarado del sistema
de leche y el agua caliente combinada con vapor uye a
través del tubo de salida de agua.
10. Gire o manípulo de regulação do leite para a posição
«LIMPEZA». O processo de enxaguamento do sistema de
leite é iniciado saíndo água quente e vapor através da saída
de leite.
11. El proceso de aclarado durará
aproximadamente 15 segundos y se detendrá
automáticamente.
11. O processo de enxaguamento
demora cerca de 15 segundos e pára
automaticamente.
5. Baje la palanca, coloque una taza
Cappuccino o un vaso Macchiato debajo de la
salida del café y ajuste la posición del tubo de
salida de leche.
5. Baixe a alavanca, coloque uma chávena de
Cappuccino ou um copo de Latte Macchiato
sob a saída de café e ajuste a posição da saída
de leite.
6. Ajuste el regulador de espuma de leche
según el volumen que desee.
6. Ajuste o manípulo de regulação da
espuma de leite de acordo com o volume de
espuma que deseja.
7. Pulse el botón Cappuccino o Macchiato. La preparación
comenzará después de unos segundos (primero la leche y
después el café) y se detendrá automáticamente.
7. Pressione o botão de Cappuccino ou Macchiato.
A preparação começa após alguns segundos (primeiro o
leite e em seguida o café) e irá parar automaticamente.
8. Cuando termine la preparación, levante y
baje la palanca para expulsar la cápsula en el
contenedor de cápsulas usadas.
8. No nal da preparação, levante e baixe
a alavanca para ejetar a cápsula para o
recipiente de cápsulas usadas.
48
6926_UM_LATTISSIMA_PREMIUM_Z2A.indb 48 17.10.13 19:57

49
PRESS to confirm.
The discaling agent flows alternately
trough the coffee outlet, hot water nozzle
and drip tray.
Descaling
Descaling process: Empty the drip tray and
the used capsules container.
Rinsing process: Empty the drip
tray and the used capsules
container.
Refer to safety precautions
+
100 ml
500 ml
1 2 3
5
7 8
4
6
Lift and close the lever to eject any capsule
in the used capsule container.
Descaling process: Fill water tank with 100
ml of Nespresso descaling agent and 500ml
water.
Descaling process: Insert the hot
water spout.
Enter the Menu, browse the options and
select DESCALING. You will be guided
throughout the whole process. Follow
machine display instructions.
Descaling process: Place one container
of minimum 1 litre under both the coffee
outlet and the hot water spout.
4°
Volume factory settings
LANGUAGE
DESCALING
WATER HARDNESS
09 10
ES
PT
PREPARACIÓN DE CAPPUCCINO Y LATTE MACCHIATO/
PREPARAÇÃO DE CAPPUCCINO E LATTE MACCHIATO
12. Cuando el aclarado haya nalizado,
vuelva a situar el regulador de espuma de
leche en la posición de leche.
12. Quando o enxaguamento terminar,
coloque novamente o manípulo de regulação
da espuma de leite na posição de leite.
13. Desconecte el R.C.S. de la máquina y guárdelo
inmediatamente en el frigoríco. Cierre la puerta del
conector de vapor de la máquina.
13. Desligue o R.C.S. da máquina e coloque-o logo no
frigoríco. Feche a porta do conector de vapor.
15. Y lave todos los componentes en la
parte superior del lavavajillas. En caso de no
disponer de lavavajillas, consulte el apartado
«Limpieza a mano del Rapid Cappuccino
System ( R.C.S.)».
15. E lave todas as peças no cesto superior
da máquina de lavar louça. No caso de não
ter uma máquina de lavar louça disponível,
consulte a secção Lavagem à Mão do Rapid
Cappuccino System (R.C.S.).
NOTA: consulte el apartado «Montaje/Desmontaje
del Rapid Cappuccino System (R.C.S.)».
INFORMAÇÃO: consulte a secção «Montagem/
Desmontagem do Rapid Cappuccino System (R.C.S.)».
ATENCIÓN: esta leche no deberá conservarse más de dos días en el frigoríco.
Si mantiene el depósito de leche fuera del frigoríco durante más de 2 horas, desmonte el R.C.S. y limpie todos
los componentes (consulte las recomendaciones sobre lavado en lavavajillas o limpieza a mano).
AVISO: este leite não deve ser guardado no frigoríco por mais de 2 dias.
Caso o reservatório do leite permaneça mais de 2 horas fora do frigoríco, desmonte o R.C.S. e lave todas as
peças (consulte as recomendações de lavagem à mão ou na máquina de lavar louça).
14. Desmonte el Rapid Cappuccino System cada dos días.
14. De dois em dois dias, desmonte o Rapid Cappuccino
System.
6926_UM_LATTISSIMA_PREMIUM_Z2A.indb 49 17.10.13 19:57

PRESS to confirm.
The discaling agent flows alternately
trough the coffee outlet, hot water nozzle
and drip tray.
Descaling
Descaling process: Empty the drip tray and
the used capsules container.
Rinsing process: Empty the drip
tray and the used capsules
container.
Refer to safety precautions
+
100 ml
500 ml
1 2 3
5
7 8
4
6
Lift and close the lever to eject any capsule
in the used capsule container.
Descaling process: Fill water tank with 100
ml of Nespresso descaling agent and 500ml
water.
Descaling process: Insert the hot
water spout.
Enter the Menu, browse the options and
select DESCALING. You will be guided
throughout the whole process. Follow
machine display instructions.
Descaling process: Place one container
of minimum 1 litre under both the coffee
outlet and the hot water spout.
4°
Volume factory settings
LANGUAGE
DESCALING
WATER HARDNESS
09 10
ES
PT
2. Levante y baje la palanca para expulsar las cápsulas en el contenedor de cápsulas
usadas. Coloque un recipiente debajo de la salida del café y pulse el botón Lungo
para realizar el aclarado. Limpie la salida del café con un paño húmedo.
2. Levante e baixe a alavanca para ejetar a cápsula para o recipiente de cápsulas
usadas. Coloque um recipiente sob a saída de café e pressione o botão Lungo. Limpe
a saída de café com um pano limpo e húmido.
3. Limpie con cuidado con agua potable cualquier resto de
suciedad en el tubo de salida de agua caliente. Límpielo con
un paño húmedo.
3. Enxague cuidadosamente debaixo de água corrente
qualquer resíduo de sujidade na saída de água quente.
Limpe com um pano limpo e húmido.
1. Desmonte el Rapid Cappuccino System. Consulte el
apartado «Montaje/Desmontaje del Rapid Cappuccino
System (R.C.S.)».
1. Desmonte o Rapid Cappuccino System (R.C.S.). Consulte
a secção «Montagem/Desmontagem do Rapid Cappuccino
System (R.C.S.)».
2. Limpie con cuidado con agua potable
cualquier resto de leche.
2. Enxague cuidadosamente quaisquer
resíduos de leite com água limpa.
3. Sumerja todos los componentes en agua templada
(aproximadamente a 40° C) con jabón o detergente durante
al menos 30 minutos.
3. Mergulhe todas as peças em água quente (a
aproximadamente 40º C) com detergente durante pelo
menos 30 minutos.
4. Aclárelos con agua potable y séquelos con
un paño húmedo.
4. Enxague com água limpa e seque com um
pano limpo e húmido.
CUIDADO DIARIO/CUIDADOS DIÁRIOS
NOTA: no utilice ningún producto de limpieza agresivo ni disolventes. Utilice un paño húmedo y un producto de limpieza suave para limpiar la supercie de
la máquina. No introduzca ningún componente de la máquina en el lavavajillas, excepto los que pertenezcan al Rapid Cappuccino System.
INFORMAÇÃO: não utilize nenhum produto de limpeza abrasivo ou solvente. Utilize um pano húmido e detergente suave para limpar a superfície da máquina.
Não coloque quaisquer peças da máquina na máquina de lavar louça, excepto as peças do Rapid Cappuccino System (R.C.S.).
LIMPIEZA A MANO DEL RAPID CAPPUCCINO SYSTEM R.C.S./
LAVAGEM À MÃO DO RAPID CAPPUCCINO SYSTEM R.C.S.
NOTA: si no dispone de lavavajillas, los componentes del R.C.S. se pueden limpiar manualmente. En este caso, para conseguir la máxima eciencia, la limpieza debe realizarse a diario.
INFORMAÇÃO: quando não tiver uma máquina de lavar louça disponível, as peças do R.C.S. podem ser lavadas à mão. Nesse caso, o procedimento deve ser realizado diariamente para uma completa
ecácia
1. Retire la bandeja antigoteo y el contenedor de cápsulas
usadas. Vacíelos y aclárelos. Retire el depósito de agua.
Vacíelo, aclárelo y, a continuación, llénelo con agua potable.
1. Remova o tabuleiro de gotejamento e o recipiente de
cápsulas usadas. Esvazie e enxague. Remova o reservatório
de água. Esvazie e enxague antes de o encher com água
potável limpa.
50
6926_UM_LATTISSIMA_PREMIUM_Z2A.indb 50 17.10.13 19:57

51
PRESS to confirm.
The discaling agent flows alternately
trough the coffee outlet, hot water nozzle
and drip tray.
Descaling
Descaling process: Empty the drip tray and
the used capsules container.
Rinsing process: Empty the drip
tray and the used capsules
container.
Refer to safety precautions
+
100 ml
500 ml
1 2 3
5
7 8
4
6
Lift and close the lever to eject any capsule
in the used capsule container.
Descaling process: Fill water tank with 100
ml of Nespresso descaling agent and 500ml
water.
Descaling process: Insert the hot
water spout.
Enter the Menu, browse the options and
select DESCALING. You will be guided
throughout the whole process. Follow
machine display instructions.
Descaling process: Place one container
of minimum 1 litre under both the coffee
outlet and the hot water spout.
4°
Volume factory settings
LANGUAGE
DESCALING
WATER HARDNESS
09 10
ES
PT
NOTA: *el volumen de la espuma de leche depende del tipo de leche que se utilice, de la
temperatura de esta y de la posición del regulador de leche.
NOTA: *o volume da espuma de leite depende do tipo de leite utilizado, da temperatura e da posição
do manípulo de regulação da espuma de leite.
NOTA: le recomendamos que mantenga la conguración de fábrica de los volúmenes de Ristretto,
Espresso y Lungo para garantizar el mejor resultado en la taza para todas nuestras variedades de café.
NOTA: recomendamos que mantenha as congurações de origem para as variedades Ristretto,
Espresso e Lungo para garantir os melhores resultados em chávena para cada uma das nossas variedades
de café.
El volumen de agua se puede programar entre 50 y 400 ml.
El volumen de leche se puede programar entre 30 y 200 ml.
El volumen de café se puede programar entre 25 y 200 ml.
O volume de água pode ser programado entre 50 a 400 ml.
O volume de leite pode ser programado entre 30 a 200 ml.
O volume do café pode ser programadas entre 25 a 200 ml.
VOLÚMENES DE LA CONFIGURACIÓN DE FÁBRICA/
CONFIGURAÇÕES DE ORIGEM DO VOLUME
Ristretto 25 ml
Ristretto 25 ml
Cappuccino Leche*: 50 ml/Café: 40 ml
Cappuccino Leche*: 50 ml/Café: 40 ml
Lungo 110 ml
Lungo 110 ml
Latte Macchiato Leche*: 150 ml/Café: 40 ml
Latte Macchiato Leite*: 150 ml/Café: 40 ml
Espresso 40 ml
Espresso 40 ml
Agua caliente 125 ml
Água quente 125 ml
Leche templada* 120 ml
Leite quente* 120 ml
ATENCIÓN: si el volumen de café supera al menos en
150 ml el volumen programado, deje que la máquina se enfríe
durante 5 minutos antes de preparar otro café. Existe riesgo de
sobrecalentamiento.
AVISO: caso o volume de café programado seja superior a
150 ml.: deixe a máquina arrefecer durante 5 minutos antes da
extração do café seguinte. Risco de sobre aquecimento!
6926_UM_LATTISSIMA_PREMIUM_Z2A.indb 51 17.10.13 19:57

ES
PT
Si desea obtener más información, resolver cualquier problema o conseguir asesoramiento, llame al Club Nespresso.
Podrá encontrar la información de contacto del Club Nespresso en la carpeta de bienvenida a Nespresso de su máquina o en nespresso.com
Para obter qualquer informação adicional, em caso de problemas ou simplesmente para aconselhamento, ligue para o Clube Nespresso.
As informações de contacto do Clube Nespresso podem ser encontradas na pasta «Bem-vindo à Nespresso», na caixa da sua máquina ou em www.nespresso.com
CONTACTE CON EL CLUB NESPRESSO/CONTACTAR O CLUBE NESPRESSSO
GARANTÍA/GARANTIA
ELIMINACIÓN DE RESIDUOS Y CUESTIONES MEDIOAMBIENTALES/
ELIMINAÇÃO E PREOCUPAÇÕES ECOLÓGICAS
Eliminación de residuos y protección medioambiental
Su máquina contiene materiales valiosos que se pueden recuperar o reciclar. La separación de los residuos en diferentes tipos facilita el reciclaje de materias primas valiosas.
Deje la máquina en un punto de reciclaje. Puede solicitar información sobre la eliminación de los residuos a las autoridades locales.
Eliminação e Proteção Ambiental
O seu equipamento contêm materiais valiosos que podem ser recuperados ou reciclados. A separação dos restantes materiais residuais por tipo facilita a reciclagem de matérias-primas valiosas.
Deixe o aparelho num ponto de recolha. Pode obter informações sobre a eliminação junto das autoridades locais.
De’Longhi garantiza este producto contra todos los defectos de materiales y de fabricación por un periodo de dos años a partir de la fecha de compra. Durante este periodo, De’Longhi reparará o sustituirá, según su criterio, todo
producto defectuoso sin cargo alguno para el propietario. Los productos de sustitución o las piezas reparadas tendrán una garantía que cubrirá el plazo restante de la garantía inicial o bien de seis meses, el periodo que sea más
largo de los dos. Esta garantía limitada no se aplicará a los defectos resultantes de un accidente, un uso incorrecto, un mantenimiento defectuoso o el desgaste normal. Salvo en la medida en que esté previsto por la legislación
en vigor, los términos de esta garantía limitada no excluyen, restringen ni modican los derechos legales obligatorios relativos a la compra del producto, y les son complementarios. Si cree que su producto es defectuoso,
póngase en contacto con De’Longhi para obtener la dirección a la que hay que enviar o llevar la máquina para su reparación. Cualquier defecto resultante del uso de cápsulas no originales de Nespresso no será cubierto por esta
garantía.
A De’Longhi assegura garantia a este produto contra defeitos em materiais e de fabrico por um período de dois anos, a partir da data de compra. Durante este período, a De’Longhi repara ou substitui, ao seu critério, qualquer
produto defeituoso, sem custos para o proprietário. Os produtos de substituição ou peças reparadas, estão em garantia até ao nal da garantia original ou por 6 meses, prevalecendo o maior período. Esta garantia limitada
não se aplica a defeitos resultantes de acidentes, uso incorreto, manutenção indevida, ou desgaste normal. Excetuando alguma medida prevista na lei em vigor, os termos desta garantia limitada não excluem, restrigem, ou
modicam, e são complementares aos direitos legais obrigatórios aplicáveis à venda de produtos. Se acredita que este produto é defeituoso, contacte a De’Longhi para instruções sobre como colocá-lo em reparação. Qualquer
defeito ou anomalia resultante da utilização de cápsulas Nespresso não genuínas não será abrangido por esta garantia.
56
6926_UM_LATTISSIMA_PREMIUM_Z2A.indb 56 17.10.13 19:57
1/112

