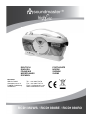
Soundmaster RCD1350WS Manual do usuário
- Categoria
- Tocadores de CD
- Tipo
- Manual do usuário

RCD1350WS / RCD1350BE / RCD1350RO
DEUTSCH PORTUGUÊS
ENGLISH NORSK
FRANÇAIS SVENSK
NEDERLANDS SUOMI
ESPAÑOL
Hersteller
Wörlein GmbH Tel.: +49 9103/71670
Gewerbestrasse 12 Fax.: +49 9103/716712
D 90556 Cadolzburg Email. info@woerlein.com
GERMANY Web: www.woerlein.com

Dieses Symbol zeigt an, dass im Inneren des Gerätes
gefährliche Spannungen vorhanden sind, und einen
Stromschlag verursachen können.
Dieses Symbol weist auf wichtige Bedienungs- und
Wartungsanweisungen bezüglich des Geräts hin.
Sicherheits- / Umwelt- / Aufstellhinweise
• Das Gerät ausnahmslos nur in trockenen Innenräumen betreiben.
• Niemals mit Feuchtigkeit in Verbindung bringen.
• Schützen Sie das Gerät vor tropfenden oder spritzenden Flüssigkeiten, und stellen Sie keine mit Flüssigkeit gefüllten Gefäße (z. B. Vasen) auf das
Gerät.
• Niemals das Gerät öffnen. STROMSCHLAGGEFAHR ! Dies ist nur Fachpersonal gestattet.
• Schließen Sie das Gerät nur an eine vorschriftsmäßig installierte und geerdete Netzsteckdose an. Die Netzspannung muss mit den Angaben auf
dem Typenschild des Gerätes übereinstimmen.
• Achten Sie darauf, dass im Betrieb das Netzkabel niemals nass oder feucht wird. Das Netzkabel darf nicht eingeklemmt oder anderweitig
beschädigt werden.
• Der Netzstecker muss immer leicht erreichbar sein, um das Gerät vom Stromnetz zu nehmen.
• Der Netzstecker dient als Trennvorrichtung und muss ohne Schwierigkeiten benutzbar sein.
• Achten Sie beim Verlegen des Netzkabels darauf, dass es beim Betrieb des Gerätes nicht zu einer Stolperfalle werden kann.
• Lassen Sie beschädigte Netzstecker oder Netzkabel sofort von dem Kundenservice austauschen.
• Ziehen Sie bei Gewitter oder einer längerer Abwesenheit (z.B. Urlaub) den Netzstecker und entnehmen Sie ggf. die Batterien.
• Kinder sollten das Gerät nur unter Aufsicht Erwachsener betreiben.
• Das Gerät ausnahmslos nur mit einem trockenen Abstaubtuch reinigen.
KEINE REINIGUNGSMITTEL oder TÜCHER mit GROBEN Material verwenden!!!
• Das Gerät keiner Sonnenbestrahlung oder anderen Hitzequellen aussetzen.
• Stellen Sie das Gerät so auf, dass kein Hitzestau entstehen kann, also frei und gut belüftet.
• Achten Sie darauf, dass an den Seiten ein Mindestabstand von 10 cm besteht, um eine ausreichende Luftzirkulation zu gewährleisten.
• Decken Sie niemals die Belüftungsöffnungen zu!!!
• Lassen Sie das Gerät während des Gebrauchs nicht unbeaufsichtigt.
• Offene Brandquellen, wie z.B. brennende Kerzen, dürfen nicht auf das Gerät gestellt werden.
• Es dürfen keine mit Flüssigkeit befüllten Behälter (z.B. Vasen) auf oder in die Nähe des Gerätes gestellt werden.
• Das Gerät an einem sicheren, erschütterungsfreien Platz aufstellen.
• Gerät möglichst weit entfernt von Computern und Mikrowellengeräten platzieren, da es sonst evtl. zu Empfangsstörungen im Radiobetrieb
kommen kann.
• Benutzen Sie das Gerät nicht, wenn es Beschädigungen aufweist, wenn es heruntergefallen ist oder nicht einwandfrei funktioniert.
• Prüfen Sie das Gerät, das Netzkabel sowie den Netzstecker regelmäßig auf sichtbare Beschädigungen. Verwenden Sie das Gerät auf keinen Fall,
wenn Sie Beschädigungen festgestellt haben.
• Sie dürfen das Gehäuse nicht öffnen oder reparieren. In diesem Falle ist die Sicherheit nicht gegeben und die Garantie erlischt. Reparaturen sind
ausschließlich durch einen Service-Center/Kundencenter auszuführen.
• Das Gerät verfügt über einen „Klasse 1 Laser“. Setzen Sie sich nicht dem Laserstrahl aus, dies kann zu Augenverletzungen führen.
• Verwenden Sie nur Batterien, die frei von Quecksilber & Cadmium sind.
• Verbrauchte Batterien sind Sonderabfall und gehören NICHT in den Hausmüll!!! Geben Sie diese Ihrem Händler zurück oder entsorgen Sie diese
an geeigneten Sammelstellen Ihrer Stadt oder Gemeinde.
• Batterien dürfen nicht in die Hände von Kindern gelangen. Kinder können Batterien verschlucken. Wurde eine Batterie verschluckt, muss sofort
medizinische Hilfe in Anspruch genommen werden.
• Überprüfen Sie regelmäßig die Batterien um ein Auslaufen der Batterie zu vermeiden.
• Batterien dürfen keiner Hitze (z. B. Sonnenbestrahlung), Feuer ausgesetzt werden.
• ACHTUNG: Explosionsgefahr bei falscher Batteriehandhabung. Nur durch den selben oder baugleichen Batterietyp ersetzen.
VORSICHT
–
UNSICHTBARE LASERSTR
AHLUNG TRITT AUS, WE
NN DER
DECKEL GEÖFFNET, UND DIE SICHERHEITSVERRIEGELUNG
NIEDERGEDRÜCKT WIRD. SETZEN SIE SICH NICHT DEM STRAHL AUS.

DEUTSCH
DE 1
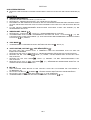
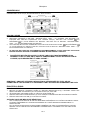
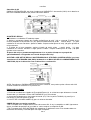
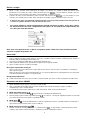
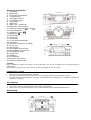
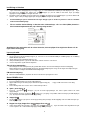
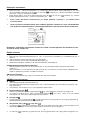
BEDIENELEMENTE
1) LEDERGRIFF
2) SPEICHERTASTE
3) REPEAT/RANDOM TASTE
4) FUNKTION TASTE
5) LAUTSTÄRKEREGELUNG
6) GERÄT EIN/AUS
7) STUMMSCHALTUNG MUTE
8) SOURCE TASTE
9) ALBUM - / ALARM TASTE
10) ALBUM + / UHRZEITEINSTELLUNG
11) TITELSPRUNG/SUCHE VORWÄRTS
/
RÜCKWÄRTS TASTE
12) SENDERFREQUENZEINSTELLUNG
13) WIEDERGABE/PAUSE TASTE
14) STOP TASTE
15) SNOOZE-SCHLUMMER TASTE
16) LCD DISPLAY/ANZEIGE
17) USB ANSCHLUSS
18) 3.5MM KOPFHÖRERANSCHLUSS
19) SD KARTEN ANSCHLUSS
20) CD FACH AUF/ZU
21) FERNBEDIENUNG IR SENSOR
22) SKALA PUNKT
23) UKW-STEREO LED INDIKATOR
24) RADIO LED INDIKATOR
25) ALARM WECKMODUS
26) TELESKOPANTENNE
27) BANDSCHALTER
28) AC NETZANSCHLUSS
29) BATTERIEFACH
30) UHR-GANGRESERVE BATTERIEFACH
VORKEHRUNGEN FÜR DIE BENUTZUNG DES GERÄTES
INSTALLATION
• PACKEN SIE ALLE MITGELIEFERTEN TEILE AUS UND ENTFERNEN DIE SCHUTZFOLIE.
• ÜBERPRÜFEN SIE DAS NETZKABEL UND IHR HAUSSTROMNETZ BEVOR SIE DAS GERÄT ANSCHLIEßEN.
• STELLEN SIE DAS GERÄT AN EINEN ERSCHÜTTERUNGSFREIEN PLATZ AUF UND BEACHTEN SIE, DASS
DIE BELÜFTUNGSSCHÄCHTE NICHT ABGEDECKT SIND.
AC NETZBETRIEB
1. STELLEN SIE SICHER, DASS IHR HAUSSTROMNETZ 230V, 50Hz HAT UND SCHLIEßEN DEN STECKER
AN DIE BUCHSE (28) UND DAS NETZKABEL AN IHRE STECKDOSE AN.
2. WENN DAS RADIO ERSTMALS AM STROM ANGESCHLOSSEN WIRD, SCHALTET ES SICH IN DEN
STANDBY MODUS.
3. SCHALTEN SIE DAS GERÄT EIN, INDEM SIE DIE ON/STANDBY TASTE (6) DRÜCKEN. DER TUNER LED
INDIKATOR (24) LEUCHTET AUF.

DEUTSCH
DE 2
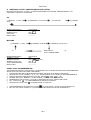
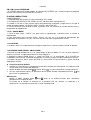
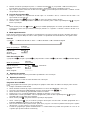
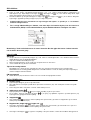
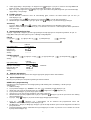
DC BATTERIEBETRIEB
FÜR BATTERIEBETRIEB LEGEN SIE 6 STÜCK UM-2 / C 1.5V BATTERIEN IN DAS BATTERIEFACH (27) EIN. BITTE
BEACHTEN SIE DIE POLARITÄT
UHRZEIT EINSTELLEN
1. GERÄT IM STANDBY MODUS (LED INDIKATOR 24 LEUCHTET AUF)
2. DRÜCKEN UND HALTEN SIE DIE TASTE “FOLDER UP/CLK-ADJ ” (10) UM IN DEN UHR EINSTELL MODUS ZU
GELANGEN. IN DER LCD ANZEIGE (16) BLINKEN NUN DIE MINUTEN. DRÜCKEN SIE EINE DER TASTEN
ODER
UM DIE MINUTEN EINZUSTELLEN. BESTÄTIGEN SIE DIE EINGABE MIT “FOLDER UP/CLK-ADJ ”
(10)
3. „00“ (STUNDEN) BLINKEN IN DER LCD ANZEIGE. MIT TASTEN
ODER
STUNDEN ANWÄHLEN.
TASTE “ “FOLDER UP/CLK-ADJ ” (10) DRÜCKEN UM EINGABE ZU SPEICHERN.
4. WENN KEINE EINGABE INNERHALB 10 SEKUNDEN ERFOLGT, SPEICHERT DAS GERÄT AUTOMATISCH DIE
ZULETZT EINGESTELLTE ZEIT.
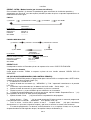
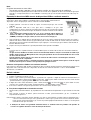
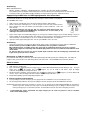
GANGRESERVE
MIT DIESER FUNKTION LÄUFT DIE UHR INTERN (ANZEIGE LEUCHTET NICHT) WEITER BZW. BLEIBT IHRE
EINGESTELLTE ALARMZEIT BEI STROMAUSFALL ERHALTEN. ANZEIGE LEUCHTET ERST WIEDER AUF, WENN
DAS STROMNETZ ODER BATTERIEBETRIEB WIEDER VERFÜGBAR IST. LEGEN SIE 2x UM-4/AAA 1.5V
BATTERIEN POLRICHTIG IN DAS BATTERIEFACH WIE UNTEN ABGEBILDET EIN.
RADIO BETRIEB
1. GERÄT EINSCHALTEN DURCH DRÜCKEN DER TASTE (6). DAS GERÄT STARTET IMMER IM RADIOMODUS.
2. GEWÜNSCHTES BAND ANWÄHLEN MIT SCHALTER (27).
3. MIT TUNING REGLER (12) GEWÜNSCHTE SENDERFREQUENZ EINSTELLEN
4. MIT VOLUME REGLER (5) GEWÜNSCHTE LAUTSTÄRKE EINSTELLEN.
- MW: FÜR DEN MITTELWELLEN-EMPFANG IST EINE ENTSPRECHENDE FERRITANTENNTE EINGEBAUT.
DURCH DREHEN DES GERÄTES KÖNNEN SIE DEN EMPFANG OPTIMIEREN.
- UKW: UM EINEN OPTIMALEN EMPFANG VON UKW SENDERN ZU ERREICHEN, RICHTEN SIE DIE UKW
TELEKOPANTENNE (26) ENTSPRECHEND AUS.
LAUTSTÄRKE REGULIEREN (ELEKTRONISCHER LAUTSTÄRKEREGLER)
LAUTSTÄRKE - LEISER: DREHEN UND HALTEN SIE DEN VOLUME REGLER (12) NACH LINKS. „KLICK“ IST
ZU HÖREN - LAUTSTÄRKE WIRD VERRINGERT UND IN DER LCD ANZEIGE
ANGEZEIGT.
LAUTSTÄRKE - LAUTER: DREHEN UND HALTEN SIE DEN VOLUME REGLER (12) NACH RECHTS
„KLICK“ IST ZU HÖREN - LAUTSTÄRKE WIRD ERHÖHT & IN DER LCD ANZEIGE
ANGEZEIGT.

DEUTSCH
DE 3
UKW-STEREO EMPFANG
WIRD EINE UKW-SENDUNG IN STEREO AUSGESTRAHLT, DANN LEUCHTET DIE UKW-STEREO-ANZEIGE (23)
AUF.
CD BETRIEB
WIEDERGABE EINER CD
1. DRÜCKEN SIE DIE FUNCTION TASTE (11) AUF POS. CD
2. DRÜCKEN SIE “ CD DOOR OPEN/CLOSE ” (20) UM CD FACH ZU ÖFFNEN.
3. ENTFERNEN SIE DIE EINGELEGTE CD-KARTE, DIE ALS TRANSPORTSICHERUNG DIENT, DANACH LEGEN
SIE EINE CD MIT DER BESCHRIFTUNG ZU IHNEN ZEIGEND IN DAS FACH EIN UND SCHLIEßEN DAS CD
FACH
4. IST DAS CD-FACH ORDNUNGSGEMÄß GESCHLOSSEN, ERSCHEINT IN DER LCD ANZEIGE (16) DIE
GESAMTANZAHL DER TITEL.
WIEDERGABE / PAUSE
1. DRÜCKEN SIE “ PLAY/PAUSE
” TASTE (13), UM DIE WIEDERGABE ZU STARTEN.
2. UM WIEDERGABE NUR KURZ ZU UNTERBRECHEN, DRÜCKEN SIE TASTE “ PLAY/PAUSE
” (13). DIE
TITELZEIT BLINKT IN DER LCD ANZEIGE (16). ZUM FORTSETZEN DER WIEDERGABE, DRÜCKEN SIE DEN
PLAY/PAUSE
(13)
ERNEUT.
STOP MODE
1. UM WIEDERGABE ZU BEENDEN/STOPPEN, DRÜCKEN SIE DIE STOP
TASTE (14).
SKIP FUNKTION (SKIP VOR
/ SKIP RÜCKWÄRTS )
MIT HILFE DER SKIP TASTEN RÜCK- & VORWÄRTS KANN EIN BELIEBIGER TITEL AUF DER CD
ANGESTEUERT WERDEN.
1. DRÜCKEN SIE DIE “SKIP UP ” TASTE (11), UM DEN BEGINN DES NÄCHSTEN TITELS ANZUSTEUERN.
2. DRÜCKEN SIE DIE “SKIP DOWN ” TASTE (11) EINMAL, UM DEN BEGINN DES AKTUELLEN TITELS
ANZUSTEUERN.
3. DRÜCKEN SIE DIE “SKIP DOWN ” TASTE (11) ZWEIMAL, UM DEN VORHERGEHENDEN TITEL
ANZUSTEUERN.
4. WIRD DIE TASTE “SKIP UP ” / SKIP DOWN ” (11) / WÄHREND DER WIEDERGABE GEDRÜCKT, SO
STARTEN SIE DEN SCHNELLSUCHLAUF.
MP3 CD`s
1. NACH EINLEGEN EINER MP3-CD IN DAS CD-FACH, ZEIGT DIE LCD ANZEIGE DIE TITELANZAHL &
ALUMBANZAHL AN.
2. MIT TASTEN“ FOLDER UP OR DOWN “ KÖNNEN SIE DAS GEWÜNSCHTES ALBUM ANWÄHLEN.
3. MIT TASTEN “ SKIP UP “ ODER SKIP DOWN (11) TITEL ANWÄHLEN.
4. UM WIEDERGABE ZU STARTEN, DRÜCKEN SIE DIE TASTE „PLAY/PAUSE
” (13).

DEUTSCH
DE 4
WIEDERHOL-/ZUFALLSWIEDERGABE/ANSPIEL (INTRO)
DRÜCKEN SIE DIE TASTE “Rep/Ran” (3) WÄHREND DEM ABSPIELEN (EINMAL ODER MEHRMALS), UM
JEWEILIGE FUNKTION ZU AKTIVIEREN:
CD
(1) WIERHOL. (1 TITEL) (2) WIEDERHOL. ALLE TITEL (3) ZUFALLSW. (4) NORMAL
(AUS)
WIEDERGABE MODUS LCD ANZEIGE
WIEDERH. 1 TITEL REP
WIEDERH. ALLE REP
ZUFALLSW. RANDOM
DEAKTIVIERT --------------
MP3/WMA
(1) WIEDERH. (1 TITEL) (2) WIEDERH. (ALBUM) (3) WIEDERH. (ALLE TITEL)
(5) DEAKTIVIERT (4)
ZUFALLSWIEDERGABE
WIEDERGABE MODUS LCD DISPLAY
WIEDERH. 1 TITEL REP
WIEDERH. ALBUM REP & blinkt
WIEDERH. ALLE TITEL REP
ZUFALLSWIEDERGABE RAN
DEAKTIVIERT -----------------
CD/MP3 TITEL PROGRAMMIERUNG
SIE KÖNNEN MIT DIESER FUNKTION BIS ZU 20 BELIEBIGE TITEL IN EINER REIHENFOLGE PROGRAMMIEREN.
GERÄT MUSS SICH IM STOPP MODUS BEFINDEN!!!
1. CD EINLEGEN WIE BEI CD BETRIEB BESCHRIEBEN UND IN CD STOP MODUS VERSETZEN.
2. DRÜCKEN SIE TASTE “ MEMORY ” (2) “ P01 “ BLINKT IM DISPLAY, SIE SIND NUN IM PROGRMMMODUS.
3. WÄHLEN SIE IHREN GEWÜNSCHTEN TITEL MIT TASTEN
ODER (11) AN.
4. EINGABE MIT TASTE “ MEMORY ” (2) BESTÄTIGEN TITEL WURDE GESPEICHERT
5. WIEDERHOLEN SIE SCHRITTE 3-4, BIS ALLE GEWÜNSCHTEN TITEL GESPEICHERT SIND.
6. MIT “ PLAY/PAUSE
” (13) PROGRAMMIERTES ABSPIELEN STARTEN.
7. DRÜCKEN SIE TASTE STOP (14) WIEDERGABE ZU STOPPEN
PROGRAMMIERUNG LÖSCHEN: TASTE STOP (14) 2x DRÜCKEN. („PROG“ ERLISCHT IM DISPLAY)
MP3 CD’s. MIT TASTE FOLDER UP (10) KÖNNEN SIE DAS GEWÜNSCHTE ALBUM ANWÄHLEN

DEUTSCH
DE 5
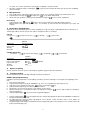
USB ODER SD-MMC ABSPIELEN
1. VERGEWISSERN SIE SICH, DASS SICH DAS GERÄT IM STANDBY
(BEREITSCHAFTSMODUS) ODER IN EINER FUNKTION AUßER USB ODER
SD/MMC BEFINDET.
2. SPEICHERMEDIUM KORREKT ANSCHLIEßEN (USB) bzw. EINSCHIEBEN
(SD/MMC).
ACHTUNG: FALSCHES ANSCHLIEßEN ODER EINSCHIEBEN KANN DAS
SPEICHERMEDIUM UND/ODER DIE ANSCHLÜSSE AM GERÄT
BESCHÄDIGEN, DAHER STELLEN SIE SICHER, DASS DIESE KORREKT
ANGESCHLOSSEN/EINGESCHOBEN WERDEN!!!
3. TASTE FUNCTION (4) DRÜCKEN BIS SIE IM CD MODUS SIND. NUN
DRÜCKEN SIE DIE TASTE SOURCE (8) UM USB ODER SD MODE
ANZUWÄHLEN:
4. DAS GERÄT LIESST DIE DATEN EIN UND ZEIGT DIE TITEL & ALBEN IM LCD DISPLAY AN.
5. WEITERE FUNKTIONEN WIE WIEDERGABE, STOP etc., SIND DIE GLEICHEN WIE IM CD bzw. CD/MP3
BETRIEB.
ENTFERNEN VON SPEICHERMEDIEN AUS DEM GERÄT
1. HAUPTGERÄT IMMER VORHER IN DEN STANDBY (BEREITSCHAFTSMODUS) VERSETZEN.
2. USB STICK GERADE AUS DEM GERÄT ZIEHEN
3. SD/MMC KARTE: AUF DIE KARTE LEICHT DRÜCKEN, DANN SCHNAPPT DIESE HERAUS UND KANN AUS
DEM GERÄT GEZOGEN WERDEN.
DAS PRODUKT UNTERSTÜTZT USB 2.0 MIT EINEM MAX. SPEICHER VON 16GB.
ALARM (WECKEN) EINSTELLEN
ALARMZEIT EINSTELLEN
MIT DIESER FUNKTION KÖNNEN SIE SICH MIT SIGNALTON (BUZZER), MEERESRAUSCHEN (OCEAN WAVE)
ODER VOGELGEZWITSCHER (BIRD SONG) WECKEN LASSEN.
GERÄT MUSS IM BEREITSCHAFTSMODUS (STANDBY) SEIN
DIE TASTE „FOLDER DOWN/ALARM“ (9) DRÜCKEN & HALTEN UM IN DEN PROGRAMMMODUS ZU GELANGEN.
IM LCD-DISPLAY BLINKT DIE MINUTENANZEIGE
1) WECKZEIT MIT TASTEN / (11) DIE MINUTEN EINSTELLEN & EINGABE MIT „FOLDER
DOWN/ALARM“ (9) TASTE BESTÄTIGEN. ANSCHLIEßEND DIE STUNDEN MIT TASTEN /
(11) EINSTELLEN & EINGABE MIT „FOLDER DOWN/ALARM“ (9) ERNEUT BESTÄTIGEN
2) AUSWAHL WÄHLEN SIE DAS GEWÜNSCHTE WECKMEDIUM (BUZZER / OCEAN / BIRD) MIT DEM
SCHALTER „ALARM SOUND MODE“ (25) AUS.
MEDIUM:
WECKEN-ALARM AKTIVIERUNG / DEAKTIVIERUNG
1. “ ” LEUCHTET IN DER LCD ANZEIGE AUF, WENN DIE WECKFUNKTION AKTIVIERT IST
2. WECKEN AKTIVIEREN: DIE TASTE „FOLDER DOWN/ALARM“ (9) KURZ DRÜCKEN, UM DIE EINGESTELLTE
ALARMZEIT ANZEIGEN ZU LASSEN. GLEICH IM ANSCHLUSS DIE TASTE „FOLDER DOWN/ALARM“ (9)
ERNEUT DRÜCKEN, UM DAS WECKEN ZU AKTIVIEREN. IN DER ANZEIGE ERSCHEINT “ ”.
3. WECKEN DEAKTIVIEREN: DIE TASTE „FOLDER DOWN/ALARM“ (9) KURZ DRÜCKEN, UM DIE EINGESTELLTE
ALARMZEIT ANZEIGEN ZU LASSEN. GLEICH IM ANSCHLUSS DIE TASTE „FOLDER DOWN/ALARM“ (9)
ERNEUT DRÜCKEN, UM DAS WECKEN ZU DEAKTIVIEREN. IN DER ANZEIGE ERLISCHT DAS SYMBOL
“ ”.
WENN KEINE EINGABE INNERHALB 10 SEKUNDEN ERFOLGT, SPEICHERT DAS GERÄT AUTOMATISCH DIE
ZULETZT EINGESTELLTE ZEIT.
SNOOZE (SCHLUMMER FUNKTION)
BEI ALARM TASTE SNOOZE (15) DRÜCKEN, UM ALARM KURZ ZU DEAKTIVIEREN. ALARM SCHALTET SICH
NACH CA. 9 MINUTEN AUTOMATISCH WIEDER EIN. VORGANG KANN MEHRMALS WIEDERHOLT WERDEN.
WÄHREND DES ALARMS, DIE TASTE „FOLDER DOWN/ALARM“ (9) DRÜCKEN UM DAS WECKEN ABZUSCHALTEN
UND AM NÄCHSTEN TAG WIEDER WECKEN ZU LASSEN.

DEUTSCH
DE 6
WICHTIGER HINWEIS
Automatische Standby-Schaltung
Um die ErP2 Richtlinie (Ökodesignrichtlinie) zu erfüllen und Energie zu sparen, schaltet
das Gerät nach ca. 15 Minuten automatisch in den Standby-Modus, ohne vorherige
Ankündigung. Um das Gerät wieder einzuschalten, schalten Sie es wie in der
Bedienungsanleitung beschrieben wieder ein.
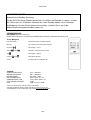
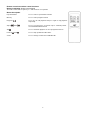
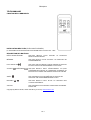
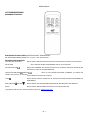
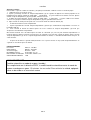
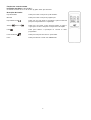
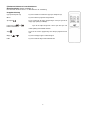
FERNBEDIENUNG
BATTERIEN (Batterien nicht inkl.)
LEGEN SIE 2x UM-4/AAA 1.5V BATTERIEN GEMÄß DER POLARITÄT IN DAS BATTERIEFACH EIN.
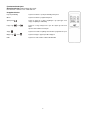
Tasten Belegung
Repeat/Random Titelwiederholung / Zufallwiedergabe
Memory Speichertaste bei Titelprogrammierung
Play/pause Wiedergabe / Pause
Skip up /down Titelwahl / Schnellvorlauf/-rücklauf
Stop Wiedergabe stoppen
Folder up /down MP3 Album Anwahl
Source Auswahl zwischen CD/SD/USB
TECHNIK
UKW/FM FREQUENZ 87,5 – 108 MHz
MW/AM FREQUENZ 540 – 1600 KHz
NETZBETRIEB AC 230V ~ 50Hz
BATTERIEBETRIEB 9V 6x UM-2 / C 1.5V
GANGRESERVE UHR 3V 2x UM-4 / AAA 1.5V
LEISTUNGSAUFNAHME 19 W
USB: USB 2.0 / max. 16GB
Technische Änderungen und Druckfehler vorbehalten
Copyright by Wörlein GmbH, 90556 Cadolzburg, www.woerlein.com
Vervielfältigung nur mit ausdrücklicher Genehmigung der Wörlein GmbH

This symbol indicates the presence of dangerous
voltage inside the enclosure, sufficient enough to
cause electric shock.
This symbol indicates the presence of important
operating and maintenance instructions for the
device.
Safety, Environmental and Setup Instructions
• Use the device in dry indoor environments only.
• Protect the device from humidity.
• Do not open the device. RISK OF ELECTRIC SHOCK! Refer opening and servicing to qualified personnel.
• Connect this device to a properly installed and earthed wall outlet only. Make sure the mains voltage corresponds with the
specifications on the rating plate.
• Make sure the mains cable stays dry during operation. Do not pinch or damage the mains cable in any way.
• Disconnect device warning: Main plug is used as the connection, so it should always remain ready operate.
• The mains plug is used as the disconnect device, the disconnect device shall remain readily operable.
• A damaged mains cable or plug must immediately be replaced by an authorized service center.
• In case of lightning, immediately disconnect the device from the mains supply.
• Children should be supervised by parents when using the device.
• Clean the device with a dry cloth only.
Do NOT use CLEANING AGENTS or ABRASIVE CLOTHS!
• Do not expose the device to direct sunlight or other heat sources.
• Install the device at a location with sufficient ventilation in order to prevent heat accumulation.
• Do not cover the ventilation openings!
• The ventilation should not be impeded by covering the ventilation openings with items, such as newspaper, table-cloths, curtains, etc.
• It shall be not be exposed to dripping or splashing and that no objects filled with liquids, such as vases, shall be placed on the
apparatus.
• The unit should not be exposed to direct sunlight, very high or low temperature, moisture, vibrations or placed in dusty environment.
• Never attempt to insert wires, pins or other such objects into the vents or opening of the unit.
• Install the device at a safe and vibration-free location.
• No naked flame sources, such as lighted candles, should be placed on the apparatus.
• Install the device as far away as possible from computers and microwave units; otherwise radio reception may be disturbed.
• Do not open or repair the enclosure. It is not safe to do so and will void your warranty. Repairs only by authorized service/ customer
center.
• The device is equipped with a “Class 1 Laser”. Avoid exposure to the laser beam as this could cause eye injuries.
• Only use mercury and cadmium-free batteries.
• Batteries shall not be exposed to excessive heat such as sunshine, fire or the like.
• Used batteries are hazardous waste and NOT to be disposed of with the household waste!!! Return the batteries to your dealer or to
collection points in your community.
• Keep batteries away from children. Children might swallow batteries. Contact a physician immediately if a battery was swallowed.
• Check your batteries regularly to avoid battery leakage.
CAUTION
-
INVISIBLE LASER RADIATION
WHEN OPENING
THE COVER
OR
PRESSING THE SAFETY INTERLOCK. AVOID EXPOSURE TO THE LASER BEAM.
ENVIRONMENTAL PROTEC
TION
Do not dispose of this product with the normal household waste at the end
of its life cycle. Return it to a collection point for the recycling of electrical
and electronic devices. This is indicated by the symbol on the product,
user manual or packaging.
The materials are reusable according to their markings. By reusing, recycling or
other forms of utilization of old devices you make an important contribution to
the protection of our environment.
Please contact your local authorities for details about collection points.
WARNING
Risk of electric shock
Do not open
!
Caution: To reduce the risk of electric shock, do not remove the cover (or back). There
are no user serviceable parts inside. Refer servicing to qualified service personnel.
Used batteries are hazardous waste and NOT to be disposed
of with the household waste! As a consumer you are legally
obligated to return all batteries for environmentally responsible
recycling – no matter whether or not the batteries contain harmful
substances*).
Return batteries
free of charge
to public collection points in your
community or to shops selling batteries of the respective kind.
Only return fully discharged batteries.
*) marked Cd = cadmium, Hg = mercury, Pb = lead

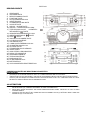
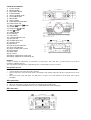
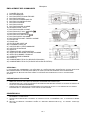
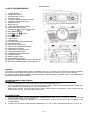
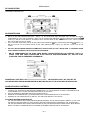
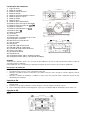
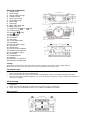
Location of controls
1) Leather handle
2) Memory button
3) Repeat/Ran button
4) Function button
5) Volume up/down knob
6) On/standby button
7) Mute button
8) Source button
9) Folder down/Alarm button
10) Folder up/Clk adj
11) Skip up
/
down button
12) Tuning knob
13) Play/pause button
14) Stop button
15) Snooze button
16) LCD display
17) USB socket
18) 3.5mm headphone jack
19) SD card slot
20) CD door open/close
21) Remote sensor
22) Dial pointer
23) FM-stereo LED indicator
24) Tuner LED indicator
25) Alarm sound mode selector
26) Rod antenna
27) Band switch
28) AC socket
29) Battery compartment (main unit)
30) Battery compartment (clock back up)
Caution:
Usage of controls or adjustments or performance of procedures other than those specified herein may result in
hazardous radiation exposure.
This unit should not be adjusted or repaired by anyone except qualified service personnel.
Precautions for use
Installation
• Unpack all parts and remove protective material.
• Do not connect the unit to the mains before checking the main voltage and before all other connections have been
made.
• Do not cover any vents and make sure that there is a space of several centimeters at the back of the unit for
ventilation.
AC connection
1. Connect the one end of the detachable power cord to the AC socket (28) and the other end to the ac outlet.
2. When you first plug the unit into the mains, the unit will go into standby mode.
3. Turn on the unit by On/Standby button (6), the TUNER LED indicator (24) will light up.
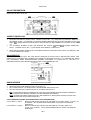
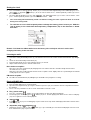
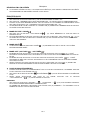
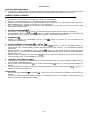
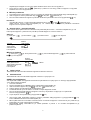
DC
connection
For DC operation, please insert 6 pcs size C (UM-2) battery at batter compartment (29) as below direction:-
1

Setting the clock
1. Set unit in standby mode.
2. Press and hold the “Folder up/Clk-adj ” button (10)
a second, The minute digit flashing on the LCD display(16). Press
skip up
or
skip down
button (11) to set the correct minute. Press “ Folder up/Clk-adj ” button (10) to store
the correct minute.
3. The hour digit will flashing, press the skip up
or
skip down
button (11) to set the correct minutes. Then
press “ Folder up/Clk-adj ” button (10) to store the correct hour.
The clock setting will automatically stored if no button is being pressed in a period of about 10 seconds
during clock setting mode.
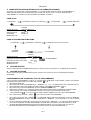
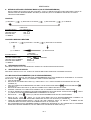
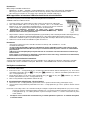
To avoid the re-set of clock frequently when exchange the battery, please insert 2 pcs AAA size
(um-4) battery at the clock/alarm back-up battery compartment (30) in the direction as below
direction:-
Remark : Pull down the ribbon while insert the battery, this can help to release it easier when
changing the battery in the next time.
Listening to radio
Operation
1. Turn on the unit by On/Standby button (6), unit defaulted on Tuner mode and the TUNER LED indicator (24) will light
up.
2. Select the descried band by band switch (27)
3. Turn the tuning knob (12) to set the station frequency as desired.
4. adjust volume know (5) to the desired volume level.
Hints for best reception:-
- FM : the receiver has rod antenna (26) hanging at the rear cabinet. this wire should be totally unraveled and
extended for best reception.
- AM : the receiver has a built-in am bar antenna. If am reception is weak, slightly rotate or re-positioning of the unit will
usually improve the am reception.
FM-stereo reception
The FM-stereo LED indicator (23) will light up to show FM stereo program is receiving.
Playing CD/MP3 disc
Getting start
1. Press Function button (4) to select CD mode.
2. Open the CD compartment by pressing the CD door open/close (20). Put a CD disc into the compartment and close
the CD door.
3. Focus search is performance if disc is inside. Total number of tracks is read.
Play / pause mode
1. Press the “ play/pause
” button (13) to start playback, the first track will start playback.
2. To interrupt, press the “ play/pause
” button (13) once, and the playing time will be freeze on the lcd display
(16). Press again to resume normal playback.
Stop mode
1. If Stop button (14) is pressed during play or pause mode. Go to stop mode and display total number of track on the
LCD display (16).
Skip mode (skip up /skip down )
1. During play or pause mode, if skip up button (11) is pressed it will go to next track and display the track no. and
then continuous the play or pause mode.
2

2. During play or pause mode, if Skip down button (11) is pressed, it will go back to the beginning of the track,
same track no. is display and continuous the play or pause mode.
3. After step 2, press skip down button (11) again, it will go to the previous track and continuous the play or pause
mode.
For MP3 disc/file
1. Place the MP3-CD to CD compartment. After focus search is performing, the total number of track will be shown on
the LCD display (16).
2. Press Skip up or Skip down (11) button to select the track number.
3. When the desired track and album is being selected, press the “ Play/Pause
” button (13) to start playback.
Remark
- Press “ Folder up or down “ button (9/10) on main unit can select the MP3 folder directly.
- The number of folder will display on LCD (16) for 1-2 seconds selected and then it will resume to the number of the
track being playback
Repeat/Random mode
Press the “ Rep/Ran “ button (3) during playback to select repeat and random function, a single track, single folder (MP3
only) or all the tracks can be played in difference mode as follow:-
For CD
(1) Repeat 1 (2) Repeat all track (3) Random (4) Off mode
Indicator
Play mode on LCD display
Repeat track REP
Repeat all REP
Random RANDOM
Off mode --------------
For MP3 disc/file
(1) Repeat 1 (2) Repeat 1 folder (3) Repeat all tracks (4) Random (5) Off mode
Indicator
Play mode on LCD display
Repeat single track REP
Repeat single folder REP & flashing
Repeat all tracks REP
Random RAN
Off mode -----------------
Repeat play
You can listen the desired tracks or folder repeatedly by this function.
Random play
You can listen all the tracks in a random order by this function
CD / MP3 disc programming
Up to 20 tacks can be programmed for disc play in any order. Before use, be sure to press the stop button.
1. Set in CD mode.
2. Press the Memory button (2), “ MEMORY “ & “ P01 ” will appear and flashing on LCD display (16).
3. Select a desired track by using the Skip up /Skip down buttons (11).
4. Press the Memory button (2) to enter the track into the memory.
5. Repeat steps 3 and 4 to enter additional tracks into the memory if necessary.
6. When all the desired tracks have been programmed, press “ Play/Pause “ button (13) to play the disc in the
order you have programmed.
7. Press “ Stop
”
button (14) to terminate program play.
Press “ Stop
”
button (13) at CD stop mode to cancel all programmed memory until the “ MEMORY “ indicator
disappear on LCD display (16).
For MP3 disc / file, press the “ Folder up “ button (10) to select the 1
st
track of next folder directly and hence to speed
up the song selection.
The programming mode will automatically stop if no button is being pressed in a period of about 30 seconds after
pressing the Memory button (2).
3

Remark:-
MP3 track format requirement:-
-
Bit rate : 32 kbps~320kbps, sampling rate : 32kHz, 44.1kHz and 48 kHz decodable
- The performance of playing MP3 disc is various from the quality of recording disc and the method of recording.
Furthermore, the searching lead-time for MP3-CD is longer than normal CD due to difference format.
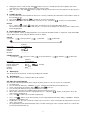
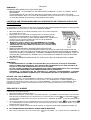
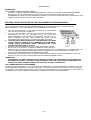
Playback of MP3 song via USB storage media or memory card
Connecting
The system is able to decode and playback all MP3 file which stored in the memory media
with USB connecting port or SD/MMC memory card.
1. Set the system at standby mode first or other function except USB/SD mode.
2. Plug-in the USB pen-drive with the face up & make sure it going into completely or insert
the memory card in the direction of the arrow as shown in the label on the underside of
the memory card slot cover. Insert straight without bending..
Connecting the USB upside down or backwards could damage the audio system
or the storage media (USB thumb driver/SD/MMC card). Check to be sure the
direction is correct before connection.
3. Turn on the unit again by On/Standby button (6) and set press Function button (4) to select CD mode. Press Source
button (8) to change to USB or SD mode. The system will start reading the storage media automatically after
connecting, and LCD display (16) will show the total number of MP3 files being detected.
4. Repeat the same playback procedure as playing CD/MP3 disc as above.
Remark
- The system can detect and read the file under MP3 format only at USB or SD mode but not other music file format.
- If connect the system to MP3 player via the USB socket, due to variances in MP3 encoding format, some
MP3 player may not be able to play via the USB socket. This is not a malfunction of the system.
- USB port does not support connection with USB extension cable and is not designed for communication
with computer directly
- Due to ErP stage two requirement and protect the environment. The unit will switch to standby mode
automatically once no any music playing over 15 minutes.
Removing of USB or memory card
To remove the USB turn off the power or switch the function mode to either cd or tuner mode first. For USB port – un-plug
it by pulling out the USB socket directly. For memory card – pull out the SD/MMC card straightly without bending.
Setting the alarm
This unit able to set the alarm and wake up by buzzer, Ocean or bird sound
1 Set unit in standby mode.
2. Press and hold the “Folder down/Alarm” button (9)
a second, the minute digit flashing on the LCD display (16). Press
skip up
or
skip down
button (11) to set the correct minute. Press “Folder down/Alarm” button (9) to store
the correct minute.
3. The hour digit will flashing, press the skip up
or
skip down
button (11) to set the correct minutes. Then
press “Folder down/Alarm ” button (9) to store the correct hour.
4. Choose the wake up sound mode by Alarm sound mode selector (25).
Active/de-active timer function
1. Press the “Folder down/Alarm” button (9) repeatedly until the timer indicator is shown on LCD display (16).
2. To cancel alarm function by press again “Folder down/Alarm” button (9) until the timer indicator disappear.
Remark : When alarm sound press “ snooze ” button (15) once to terminate the alarm mode temporarily and it will alarm
again after 9 minutes on each press. To cancel the alarm mode, press the “Folder down/Alarm” button (9). If no
any button press during alarm, it will automatically stop after running one hour.
The alarm setting will be automatically stored if no button is being pressed in a period of about 10 seconds
during alarm setting mode.
4

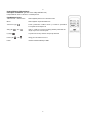
Remote control transmitter control functions
Battery installation (battery not provided)
The infra-red transmitter require 2 pcs “ AAA “ batteries for operation
Button description
Repeat/Random Press to active repeat/random function
Memory Press to active program function
Play/pause Press once to start playback and press again to stop playback
temporarily
Skip up /down Press to select previous / next track or press & hold to perform
fast forward/backward function
Stop Press to terminate playback or cancel programmed tracks
Folder up /down Press to skip up/down the MP3 folder
Source Press to change mode between CD/SD/USB
5

Ce symbole indique la présence d’une tension
dangereuse à l’intérieur de l'appareil, qui est
suffisante pour provoquer un choc électrique.
Ce symbole indique la présence de consignes
importantes de fonctionnement et d’entretien de
pour l’appareil.
Consignes de sécurité, d’environnement et d’installation
• N'utilisez l'appareil qu’à l’intérieur dans un lieu sec
• Protégez l’appareil contre l’humidité
• N’ouvrez pas l’appareil RISQUE D’ELECTROCUTION ! Faites effectuer l’ouverture et l’entretien par un personnel
qualifié
• Ne connectez cet appareil qu'à une prise murale correctement installée et reliée à la terre Assurez-vous que la tension
principale corresponde aux recommandations de la plaque d’indice
• Assurez-vous que le câble d’alimentation reste au sec pendant le fonctionnement. Ne pincez pas le câble et ne
l’endommagez d’aucune façon
• Un câble de réseau ou une prise abimés doivent être immédiatement remplacés par un centre agréé.
• En cas de tonnerre, débranchez immédiatement l’appareil de l’alimentation.
• Les enfants doivent être surveillés par leurs parents lorsqu’ils utilisent l’appareil.
• Ne nettoyez l’appareil qu’avec un tissu sec.
N’utilisez PAS de PRODUITS DETERGENTS ou de CHIFFONS ABRASIFS !
• N’exposez pas l’appareil à la lumière directe du soleil ou toute autre source de chaleur
• Installez l’appareil dans un emplacement suffisamment ventilé pour éviter une accumulation de chaleur.
• Ne recouvrez pas les grilles d’aération !
• Installez l’appareil dans un emplacement sécurisé et sans vibrations.
• Ne pas installer l’appareil à proximité d’ordinateurs et fours à micro-ondes; sinon la réception de radio pourrait être
perturbée.
• Ne pas ouvrir ou réparer l’appareil. Cela est dangereux et annulerait la garantie. La réparation doit être uniquement
effectuée que par un centre de réparations / service agréé.
• L’appareil est équipé d’un « Laser Classe 1 ». Evitez toute exposition au rayon laser car cela pourrait blesser les yeux.
• N’utilisez que des piles au mercure et sans cadmium.
• Les piles usagées sont des déchets dangereux et ne doivent PAS être jetées avec les ordures ménagères !!! Ramenez
les piles à votre point de vente ou aux points de collecte de votre ville.
• Eloignez les piles des enfants. Les enfants pourraient avaler les piles. En cas d’ingestion d’une pile, contactez
immédiatement un médecin.
• Vérifiez régulièrement vos piles pour éviter les fuites.
CLASS 1 LASER PRODUCT
KLASSE 1 LASER PRODUKT
LUOKAN 1 LASER LAITE
KLASS 1 LASER APPARAT
PRODUCTO LASER CLASE 1
ATTENTION – RADIATION LASER INVISIBLE LORSQUE VOUS
OUVREZ LE COUVERCLE OU APPUYEZ SUR
L’ENCLENCHEMENT DE SECURITE. EVITEZ TOUTE
EXPOSITION AU RAYON LASER
PROTECTION DE L’ENVIRONNEMENT
Ne jetez pas ce produit avec les ordures ménagères lorsqu’il est usagé.
Retournez-le à un point de collecte pour le recyclage des appareils
électriques et électroniques. Cette recommandation est indiquée par le
symbole sur le produit, le mode d’emploi ou l’emballage.
Les composants sont réutilisables en fonction de leur marquage. En réutilisant,
recyclant ou employant autrement les vieux appareils, vous contribuerez de
façon signifiante à la protection de notre environnement.
Veuillez contacter vos collectivités locales pour vous renseigner sur les points
de collecte.
ATTENTION
Risque d’électrocution
Ne
p
as ouvrir!
A
ttention!: Pour réduire le risque d’électrocution, ne retirez pas le couvercle (ou
l’arrière). L’usager ne peut entretenir aucune pièce à l’intérieur. Confiez l’entretien à un
personnel qualifié.
Les piles usages sont des déchets dangereux et ne doivent
PAS être jetées avec les ordures ménagères ! La loi impose
aux consommateurs de disposer de toutes les piles pour un
recyclage écologique – et ce que les piles soient de contenance
dangereuse ou pas*).
Disposer gratuitement des piles dans les points de collecte de votre
communauté ou auprès des magasins détaillant les piles de même
catégories.
Ne disposez que de piles entièrement vides.
*) marquée Cd = cadmium, Hg = mercure, Pb = plomb

FRANÇAIS
FR 1
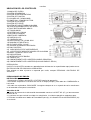
EMPLACEMENT DES COMMANDES
1) POIGNÉE EN CUIR
2) BOUTON MÉMOIRE
3) BOUTON RÉPÉTITION/ALÉATOIRE
4) BOUTON FONCTION
5) BOUTON DE PRÉRÉGLAGE EQ
6) BOUTON VOLUME HAUT/BAS
7) BOUTON SOURDINE
8) BOUTON SOURCE
9) BOUTON DOSSIER-/ALARME
10) DOSSIER+/RÉGL. HORL.
11) BOUTON DOSSIER SUIVANT
12) BOUTONS SAUT SUIV.
/
PRÉC.
13) BOUTON SYNTONISATION
14) BOUTON LECTURE/PAUSE
15) BOUTON RAPPEL D'ALARME
16) BOUTON AFFICHAGE / RAPPEL ALARME
17) ÉCRAN LCD
18) PRISE USB
19) LECTEUR DE CARTE SD
20) LOGEMENT CARTE SD
21) CAPTEUR DE LA TÉLÉCOMMANDE
22) CAPTEUR À DISTANCE
23) AIGUILLE
24) TÉMOIN LED DE SYNTONISATION
25) SÉLECTEUR DU MODE SONORE D'ALARME
26) SÉLÉCTEUR BANDE / FM-MO/ST
27) COMMUTATEUR DE BANDE
28) PRISE CA
29) COMPARTIMENT À PILES (APPAREIL PRINCIPAL)
30) COMPARTIMENT À PILES (PILES DE SECOURS DU RÉVEIL)
ATTENTION :
L’UTILISATION DES COMMANDES, LES RÉGLAGES OU L’EXÉCUTION DES PROCÉDURES AUTRES QUE CEUX
MENTIONNÉS DANS LE PRÉSENT DOCUMENT PEUVENT CAUSER DE DANGEREUSES IRRADIATIONS.
CET APPAREIL NE DEVRAIT PAS ÊTRE RÉGLÉ OU RÉPARÉ PAR N’IMPORTE QUI SAUF UN PERSONNEL
QUALIFIÉ.
PRÉCAUTIONS D’UTILISATION
INSTALLATION
• DÉBALLEZ TOUTES LES PIÈCES ET RETIREZ LE MATÉRIEL DE PROTECTION.
• NE BRANCHEZ PAS L’UNITÉ AU RÉSEAU ÉLECTRIQUE AVANT D’AVOIR VÉRIFIÉ LA TENSION ET EFFECTUÉ
TOUS LES AUTRES BRANCHEMENTS.
• N’OBSTRUEZ AUCUNE BOUCHE D’AÉRATION ET ASSUREZ-VOUS QU’IL Y A UN ESPACE DE PLUSIEURS
CENTIMÈTRES À L’ARRIÈRE DE L’UNITÉ POUR LA VENTILATION.
CONNEXION CA
1. CONNECTEZ UNE EXTRÈMITÈ DU CORDON D’ALIMENTATION AMOVIBLE À LA PRISE CA (27) ET L’AUTRE
EXTRÈMITÈ À LA SORTIE CA.
2. QUAND VOUS BRANCHEZ L'APPAREIL AU SECTEUR POUR LA PREMIÈRE FOIS, IL PASSERA EN MODE
VEILLE.
3.
METTEZ EN MARCHE L'APPAREIL GRÂCE AU BOUTON MARCHE/VEILLE (6), LE VOYANT TUNER (24)
S'ALLUME.

FRANÇAIS
FR 2
CONNEXION CC
POUR UN FONCTIONNEMENT EN CC, VEUILLEZ INSÉRER 6 PILES PCS DE TAILLE C (UM-2) DANS LE
COMPARTIMENT
À PILES
(28) EN RESPECTANT LE SENS SUIVANT:
RÉGLER L’HEURE
1. METTEZ L’UNITÉ EN MODE VEILLE.
2. MAINTENEZ ENFONCÉ LE BOUTON « DOSSIER+/RÉGL. HORL. » (10) PENDANT UNE SECONDE, LES
CHIFFRES DES MINUTES CLIGNOTENT SUR L'ÉCRAN LCD (16). APPUYEZ SUR SUIVANT OU
PRÉCÉDENT (11) POUR RÉGLER LES MINUTES. APPUYEZ SUR LE BOUTON « DOSSIER+/RÉGL.
HORL. » (10) POUR ENREGISTRER LES MINUTES.
3. LES CHIFFRES DES HEURES CLIGNOTENT, APPUYEZ SUR LE BOUTON SUIVANT OU PRÉCÉDENT
(11) POUR RÉGLER LES HEURES. ENSUITE, APPUYEZ SUR LE BOUTON « DOSSIER+/RÉGL. HORL. » (10)
POUR ENREGISTRER LES HEURES.
LE REGLAGE DE L'HORLOGE SERA MEMORISE AUTOMATIQUEMENT SI VOUS N'APPUYEZ SUR AUCUN
BOUTON PENDANT ENVIRON 10 SECONDES EN MODE DE REGLAGE DE L'HORLOGE.
POUR ÉVITER DE RÉGLER SOUVENT L’HEURE LORS D’UN FONCTIONNEMENT EN CC,
INSÉREZ 2 PILES PCS AAA (UM-4) DANS LE COMPARTIMENT À PILES DE SECOURS POUR
L’HEURE (29) EN RESPECTANT LE SENS SUIVANT :-
REMARQUE : ABAISSEZ LE RUBAN LORSQUE VOUS INTRODUISEZ LES PILES, CE QUI
PERMETTRA DE LES RETIRER PLUS FACILEMENT LORS DU PROCHAIN CHANGEMENT DE PILES
ÉCOUTER
LA RADIO
FONCTIONNEMENT
1. METTEZ EN MARCHE L'APPAREIL GRÂCE AU BOUTON MARCHE/VEILLE (6), L'APPAREIL PASSE PAR
DÉFAUT EN MODE SYNTONISEUR ET LE VOYANT TUNER (24) S'ALLUME.
2. SÉLECTIONNEZ UNE BANDE GRÂCE AU SÉLECTEUR DE BANDE (27).
3. RÉGLEZ LE BOUTON SYNTONISATION (12) POUR CHOISIR LA FRÉQUENCE DE LA STATION SOUHAITÉE.
4. RÉGLEZ LE BOUTON VOLUME (5) AU NIVEAU SOUHAITÉ.
ASTUCES POUR UNE MEILLEURE RÉCEPTION :-
- AM : LE RÉCEPTEUR DISPOSE D’UNE TIGE D'ANTENNE INTÉGRÉE AM. SI LA RÉCEPTION AM EST FAIBLE,
TOURNEZ LÉGÈREMENT ET LE REPOSITIONNEMENT DE L’UNITÉ AMLIORERA NORMALEMENT LA
RÉCEPTION AM.
- FM : LE RÉCEPTEUR DISPOSE D’UNE ANTENNE FORMÉE D’UNE TIGE (26) ACCROCHÉE AU COFFRET
ARRIÈRE. CETTE TIGE DEVRAIT ENTIÈREMENT SE DÉNOUER ET S’ÉTENDRE POUR UNE MEILLEURE
RÉCEPTION.

FRANÇAIS
FR 3
RÉCEPTION FM & FM-STÉRÉO
SI LE SIGNAL STÉRÉO EST REÇU, LE VOYANT LED STÉRÉO (23) S’ALLUMERA ET INDIQUERA FM STÉRÉO.
LE PROGRAMME EST MAINTENANT CAPTÉE & VICE VERSA
ÉCOUTER UN CD
DÉMARRER
1. APPUYEZ SUR LE BOUTON FONCTION (7) POUR SÉLECTIONNER LE MODE “ CD ”,
2. APPUYEZ SUR “ LOGEMENT CD OUVERTURE/FERMETURE ” (20) POUR OUVRIR LE COMPARTIMENT CD.
3. PLACEZ UN CD, FACE IMPRIMÉE DEVANT, SUR LE PLATEAU & PUIS FERMEZ LE COMPARTIMENT CD EN
APPUYANT À NOUVEAU SUR “ LOGEMENT CD OUVERTURE/FERMETURE ” (20).
4. LA RECHERCHE DE LA CIBLE S’EFFECTUE, L’ÉCRAN LCD (16) INDIQUERA LE NOMBRE TOTAL DE PISTES &
LA DURÉE TOTALE DE LECTURE.
MODE LECTURE / PAUSE
1. APPUYEZ SUR LE BOUTON “ LECTURE/PAUSE
” (13) POUR DÉMARRER LA LECTURE AVEC LA
PREMIÈRE PISTE.
2. POUR INTERROMPRE LA LECTURE, APPUYEZ UNE FOIS SUR LE BOUTON “ LECTURE/PAUSE
” (13), ET
LE TEMPS DE LECTURE SE FIXERA SUR L’ÉCRAN LCD (16). APPUYEZ DE NOUVEAU POUR REPRENDRE
UNE LECTURE NORMALE.
MODE ARRÊT
1. SI VOUS APPUYEZ SUR LE BOUTON “ ARRÊT
” (14) EN MODE LECTURE OU PAUSE, LE SYSTÈME
PASSERA EN MODE ARRÊT.
MODE SAUT (SAUT SUIV.
/ SAUT PRÉC. )
1. EN MODE LECTURE OU PAUSE, SI VOUS APPUYEZ SUR LE BOUTON “SAUT SUIV. ” (11), L’UNITÉ
PASSERA À LA PROCHAINE PISTE, AFFICHERA LE N° DE LA PISTE PUIS RESTERA EN MODE LECTURE OU
PAUSE.
2. EN MODE LECTURE OU PAUSE, SI VOUS APPUYEZ SUR LE BOUTON “SAUT PRÉC.
” (11), L’UNITÉ
REVIENDRA AU DÉBUT DE LA PISTE, AFFICHERA LE N° DE LA PREMIÈRE PISTE ET RESTERA EN MODE
LECTURE OU PAUSE.
3. APRES L’ÉTAPE 2, APPUYER UNE NOUVELLE FOIS SUR LE BOUTON “SAUT SUIV. ” (11) PERMET DE
REVENIR À LA PISTE PRÉCÉDENTE ET DE RESTER EN MODE LECTURE OU PAUSE.
POUR UN DISQUE/FICHIER MP3
1. PLACEZ LE CD MP3 DANS LE COMPARTIMENT À CD. A LA FIN DE LA RECHERCHE, LE NOMBRE TOTAL DE
PISTES S'AFFICHE SUR L'ÉCRAN LCD (16).
2. APPUYEZ SUR LE BOUTON SUIVANT OU PRÉCÉDENT (11) POUR SÉLECTIONNER LE NUMÉRO DE
PISTE.
3. APRÈS AVOIR SÉLECTIONNÉ UNE PISTE ET UN ALBUM, APPUYEZ SUR LE BOUTON
« LECTURE/PAUSE »« » (13) POUR LANCER LA LECTURE.
REMARQUE
- APPUYEZ SUR LE BOUTON « DOSSIER+ »« »« OU DOSSIER- »« » (9/10) SUR L'APPAREIL PRINCIPAL
POUR SÉLECTIONNER DIRECTEMENT UN DOSSIER MP3.
-
LE NOMBRE DE DOSSIERS S'AFFICHERA SUR L'ÉCRAN LCD (16) PENDANT 1 À 2 SECONDES PUIS LE
NOMBRE DE PISTES LUES SE RÉAFFICHERA.

FRANÇAIS
FR 4
MODE RÉPÉTER/INTRO/ALÉATOIRE (PAR LE COMBINÉ À DISTANCE)
APPUYEZ SUR LE BOUTON « RÉP./ALÉATOIRE » (3) EN COURS DE LECTURE POUR SÉLECTIONNER LA
FONCTION DE RÉPÉTITION ET ALÉATOIRE POUR LIRE UNE SEULE PISTE, UN SEUL DOSSIER (MP3
UNIQUEMENT) OU TOUTES LES PISTES DANS LES MODES SUIVANTS :
POUR UN CD
(1) RÉPÉTER 1 (2) RÉPÉTER TOUTES LES PISTES (3) ALÉATOIRE (4) MODE INACTIVÉ
VOYANT
MODE LECTURE SUR L’ÉCRAN LCD
RÉPÉTER LA PISTE RÉP
RÉPÉTER TOUT RÉP
ALÉATOIRE RAN
MODE INACTIVÉ --------------
POUR UN FICHIER/DISQUE MP3/WMA
(1) RÉPÉTER 1 (2) RÉPÉTER 1 DOSSIER (3) RÉPÉTER TOUTES LES PISTES
(5) MODE
INACTIVÉ (4) ALÉATOIRE
VOYANT
MODE LECTURE SUR L’ÉCRAN LCD
REPETER UNE SEULE PISTE RÉP
REPETER UN SEUL DOSSIER RÉP ET CLIGNOTEMENT
REPETER TOUTES LES PISTES RÉP
MODE ALÉATOIRE RAN
MODE INACTIVÉ -----------------
LECTURE RÉPÉTÉE
CETTE FONCTION VOUS PERMET D’ÉCOUTER PLUSIEURS FOIS LES PISTES OU LE DOSSIER SOUHAITÉS.
LECTURE ALÉATOIRE
CETTE FONCTION VOUS PERMET D’ÉCOUTER TOUTES LES PISTES OU TOUT LE DOSSIER DE FAÇON
ALÉATOIRE.
PROGRAMMATION CD / DISQUE MP3 (PAR LA TÉLÉCOMMANDE)
VOUS POUVEZ PROGRAMMER JUSQU’À 20 PISTES DANS N’IMPORTE QUEL ORDRE. AVANT UTILISATION,
N’OUBLIEZ PAS D’APPUYER SUR LE BOUTON “ ARRÊT
” (14).
1. PASSEZ EN MODE CD.
2. APPUYEZ SUR LE BOUTON MÉMOIRE (2), « MEMORY » ET « P01 » CLIGNOTERONT SUR L'ÉCRAN LCD (16).
3. SÉLECTIONNEZ UNE PISTE GRÂCE AUX BOUTONS SUIVANT /PRÉCÉDENT (11).
4. APPUYEZ SUR LE BOUTON MÉMOIRE (2) POUR MÉMORISER LA PISTE.
5. RÉPÉTEZ LES ÉTAPES 3 ET 4 POUR AJOUTER D'AUTRES PISTES DANS LA MÉMOIRE SI NÉCESSAIRE.
6. UNE FOIS QUE VOUS AVEZ PROGRAMMÉ TOUTES LES PISTES, APPUYEZ SUR LE BOUTON
« LECTURE/PAUSE » (13) POUR LIRE LE DISQUE DANS L'ORDRE QUE VOUS AVEZ PROGRAMMÉ.
7. APPUYEZ SUR LE BOUTON « ARRÊT » (14) POUR QUITTER LE PROGRAMME.
APPUYEZ SUR LE BOUTON « ARRÊT » (13) EN MODE ARRÊT CD POUR EFFACER TOUTE LA MÉMOIRE
DE PROGRAMMATION JUSQU'À CE QUE L'INDICATEUR « MEMORY » NE S'AFFICHE PLUS SUR L'ÉCRAN
LCD (16).
POUR UN DISQUE/FICHIER MP3, APPUYEZ SUR LE BOUTON « DOSSIER+ » (10) POUR SÉLECTIONNER LA
1E PISTE DU DOSSIER SUIVANT DIRECTEMENT ET AINSI SÉLECTIONNER LES CHANSONS PLUS VITE.
LE MODE DE PROGRAMMATION CESSERA AUTOMATIQUEMENT SI VOUS N'APPUYEZ SUR AUCUN
BOUTON PENDANT LES 30 SECONDES QUI SUIVANT L'APPUI DU BOUTON MÉMOIRE (2).
3

FRANÇAIS
FR 5
REMARQUE :
EXIGENCES DE FORMAT POUR LES PISTES MP3 :
-
DÉBIT BINAIRE : 32 À 320 KBITS/S, TAUX D'ÉCHANTILLONNAGE : 32 KHZ, 44,1 KHZ ET 48 KHZ
DÉCODABLE
- LA PERFORMANCE DE LECTURE D'UN DISQUE MP3 DÉPEND DE LA QUALITÉ ET DE LA MÉTHODE
D'ENREGISTREMENT. DE PLUS, LE DÉLAI DE RECHERCHE POUR LES CD MP3 EST PLUS LONG QUE POUR
UN CD AUDIO NORMAL EN RAISON DE LA DIFFÉRENCE DE FORMAT.
LECTURE D’UNE CHANSON MP3/WMA VIA UN DISPOSITIF DE STOCKAGE USB OU UNE
CARTE MÉMOIRE
BRANCHEMENT
LE SYSTÈME PEUT DÉCODER ET LIRE TOUS LES FICHIERS MP3 /WMA ENREGISTRÉS DANS LE DISPOSITIF DE
MÉMOIRE AVEC UN PORT USB OU UNE CARTE MÉMOIRE SD/MMC.
1. METTEZ D’ABORD LE SYSTÈME EN MODE VEILLE OU AUTRE FONCTION
SAUF MODE SD OU USB.
2. BRANCHEZ LA CLÉ USB AVEC LA FACE DEVANT & N’OUBLIEZ PAS DE
L’INTRODUIRE ENTIÈREMENT OU INSÉREZ LA CARTE MÉMOIRE EN
REPECTANT LE SENS DE LA FLÈCHE COMME INDIQUÉ SUR L’ÉTIQUETTE
AU DESSOUS DU CACHE CONNECTEUR DE LA CARTE MÉMOIRE.
INSÉREZ DIRECTEMENT SANS PLIER.
BRANCHER L’USB À L’ENVERS PEUT ENDOMMAGER LE SYSTEME
AUDIO OU LE DISPOSITIF DE STOCKAGE (CLÉ USB / CARTE SD/MMC).
VERIFIEZ QUE VOUS AVEZ BIEN SUIVI LE SENS DE LA FLÈCHE AVANT
LE BRANCHEMENT.
3. REMETTEZ EN MARCHE L'APPAREIL GRÂCE AU BOUTON
MARCHE/VEILLE (6) ET SÉLECTIONNEZ LE MODE CD GRÂCE AU BOUTON DE RÉGLAGE DE
FONCTION (4). APPUYEZ SUR LE BOUTON SOURCE (8) POUR BASCULER ENTRE LES MODES
USB ET SD. APRÈS LA CONNEXION, L'APPAREIL COMMENCERA AUTOMATIQUEMENT À LIRE LE
SUPPORT DE STOCKAGE ET L'ÉCRAN LCD (16) AFFICHERA LE NOMBRE TOTAL DE FICHIERS
MP3 DÉTECTÉS.
4. RÉPÉTER LA MÊME PROCÉDURE DE LECTURE POUR LIRE UN CD/DISQUE MP3 COMME
CI-DESSUS.
REMARQUE
- SI VOUS BRANCHEZ LE SYSTÈME À UN LECTEUR MP3 VIA LA PRISE USB, À CAUSE DE VARIATIONS
DANS LE FORMAT D’ENCODAGE MP3, DES LECTEURS MP3 POURRAIENT NE PAS ÊTRE CAPABLES DE
LIRE VIA LA PRISE USB. CE DÉFAUT N’EST PAS LIÉ AU SYSTÈME.
- LE PORT USB NE SUPPORTE PAS LA CONNEXION À UN CÂBLE D’EXTENSION USB ET N’EST PAS CONÇU
POUR ASSURER DIRECTEMENT UNE COMMUNICATION AVEC UN ORDINATEUR.
- CONFORME À LA DIRECTIVE ERP DE CATÉGORIE 2 ET PRÉSERVE L'ENVIRONNEMENT. L'APPAREIL
PASSE AUTOMATIQUEMENT EN MODE VEILLE SI AUCUNE MUSIQUE N'EST LUE PENDANT 15 MINUTES.
RETRAIT USB / CARTE MÉMOIRE
POUR RETIRER L’USB / LA CARTE MÉMOIRE, ÉTEIGNEZ L’APPAREIL OU PASSEZ D’ABORD DE MODE
FONCTION À MODE CD OU SYNTONISEUR. POUR LE PORT USB – DÉBRANCHEZ-LE DIRECTEMENT EN LE
RETIRANT À PARTIR DE LA PRISE USB, POUR LA CARTE MÉMOIRE – POUSSEZ LA CARTE MÉMOIRE VERS
L’INTÉRIEUR & PUIS RELÂCHEZ, MAINTENANT LA CARTE EST À MOITIÉ ÉJECTÉE ET VOUS POUVEZ LA
RETIRER À LA MAIN.
REGLAGE DE L'ALARME
CET APPAREIL PERMET DE REGLER L'ALARME ET DE SE REVEILLER AVEC UNE SONNERIE, LE SON DE
L'OCEAN OU UN CHANT D'OISEAU.
1. METTEZ L'APPAREIL EN MODE VEILLE.
2. MAINTENEZ ENFONCÉ LE BOUTON « DOSSIER-/ALARME » (9) PENDANT UNE SECONDE, LES CHIFFRES
DES MINUTES CLIGNOTENT SUR L'ÉCRAN LCD (16). APPUYEZ SUR SUIVANT OU PRÉCÉDENT (11)
POUR RÉGLER LES MINUTES. APPUYEZ SUR LE BOUTON « DOSSIER-/ALARME » (9) POUR ENREGISTRER
LES MINUTES.
3. LES CHIFFRES DES HEURES CLIGNOTENT, APPUYEZ SUR LE BOUTON SUIVANT OU PRÉCÉDENT
(11) POUR RÉGLER LES MINUTES. ENSUITE, APPUYEZ SUR LE BOUTON « DOSSIER-/ALARME » (9) POUR
ENREGISTRER LES HEURES.
4. CHOISISSEZ LE MODE SONORE DE RÉVEIL GRÂCE AU SÉLECTEUR DE MODE SONORE D'ALARME (25).
ACTIVATION/DÉSACTIVATION DE LA FONCTION DE MINUTEUR
1. APPUYEZ PLUSIEURS FOIS SUR LE BOUTON « DOSSIER-/ALARME » (9) JUSQU'À CE QUE L'INDICATEUR
A página está carregando ...
A página está carregando ...
A página está carregando ...
A página está carregando ...
A página está carregando ...
A página está carregando ...
A página está carregando ...
A página está carregando ...
A página está carregando ...
A página está carregando ...
A página está carregando ...
A página está carregando ...
A página está carregando ...
A página está carregando ...
A página está carregando ...
A página está carregando ...
A página está carregando ...
A página está carregando ...
A página está carregando ...
A página está carregando ...
A página está carregando ...
A página está carregando ...
A página está carregando ...
A página está carregando ...
A página está carregando ...
A página está carregando ...
A página está carregando ...
A página está carregando ...
A página está carregando ...
A página está carregando ...
A página está carregando ...
A página está carregando ...
A página está carregando ...
A página está carregando ...
A página está carregando ...
A página está carregando ...
A página está carregando ...
A página está carregando ...
A página está carregando ...
A página está carregando ...
A página está carregando ...
A página está carregando ...
A página está carregando ...
-
 1
1
-
 2
2
-
 3
3
-
 4
4
-
 5
5
-
 6
6
-
 7
7
-
 8
8
-
 9
9
-
 10
10
-
 11
11
-
 12
12
-
 13
13
-
 14
14
-
 15
15
-
 16
16
-
 17
17
-
 18
18
-
 19
19
-
 20
20
-
 21
21
-
 22
22
-
 23
23
-
 24
24
-
 25
25
-
 26
26
-
 27
27
-
 28
28
-
 29
29
-
 30
30
-
 31
31
-
 32
32
-
 33
33
-
 34
34
-
 35
35
-
 36
36
-
 37
37
-
 38
38
-
 39
39
-
 40
40
-
 41
41
-
 42
42
-
 43
43
-
 44
44
-
 45
45
-
 46
46
-
 47
47
-
 48
48
-
 49
49
-
 50
50
-
 51
51
-
 52
52
-
 53
53
-
 54
54
-
 55
55
-
 56
56
-
 57
57
-
 58
58
-
 59
59
-
 60
60
-
 61
61
-
 62
62
-
 63
63


Soundmaster RCD1350WS Manual do usuário
- Categoria
- Tocadores de CD
- Tipo
- Manual do usuário
em outros idiomas
- español: Soundmaster RCD1350WS Manual de usuario
- français: Soundmaster RCD1350WS Manuel utilisateur
- italiano: Soundmaster RCD1350WS Manuale utente
- Nederlands: Soundmaster RCD1350WS Handleiding
- Deutsch: Soundmaster RCD1350WS Benutzerhandbuch
- dansk: Soundmaster RCD1350WS Brugermanual
- svenska: Soundmaster RCD1350WS Användarmanual